Eloquent Images by Gary Hart
Insight, information, and inspiration for the inquisitive nature photographer
Channeling Your Camera’s Vision
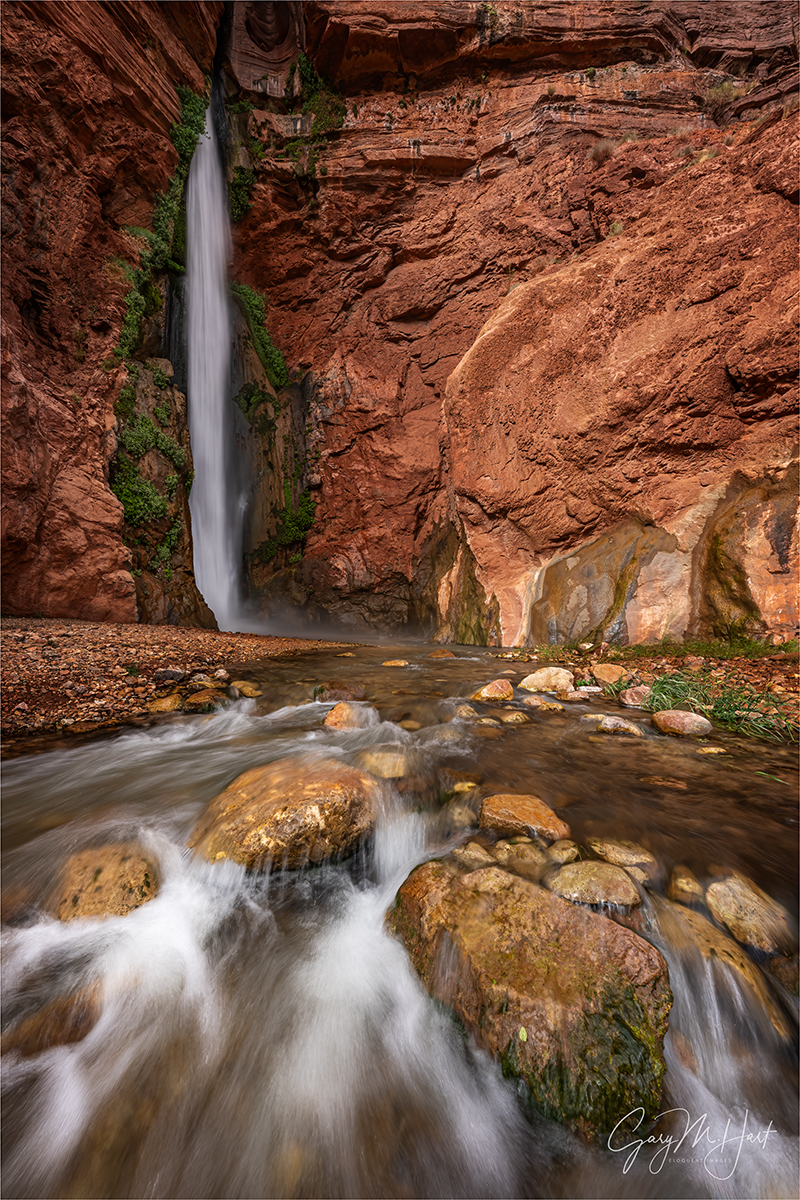
Whitewater, Deer Creek Fall, Grand Canyon
Sony α1
Sony 12-24 GM
1/5 second
F/16
ISO 50
About a month ago I wrapped up my ninth Grand Canyon raft trip. As my guides and I get better at identifying the best spots and when to be there, there’s an aspect of similarity from trip to trip, but thanks to group dynamics, weather conditions, and the secondary stops we chose to make on any given year, each trip always feels unique.
As with most spectacular locations, Grand Canyon has more worthy subjects than we have time to visit, but there are five primary spots we never miss: Nankoweap granaries, Little Colorado River, Elves’ Chasm, Deer Creek Fall, and Havasu Creek. Additionally, we have a couple of south-facing campsites we target for the best possible Milky Way photography. But making all this happen in the best conditions for photography sometimes feels like three-dimensional chess. Starting with our first evening, our campsite choice (the number of river miles we cover) creates a cascading effect on the timing of our photo stops and campsites for each subsequent day of the trip—not enough, or too many, miles on any given day and we’re completely out of synch.
But my guides and I have gotten really good at it, and I’ve really grown to appreciate the rhythm of this trip. The moderate pace and not too crazy rapids of our first two days allows everyone to get comfortable with the whole rafting experience—both on the river and in camp. That’s a good thing, because Day 3 is Rapid Day! To set us up for downstream stops, on that third day we cover nearly 60 miles and navigate dozens of large to massive rapids (the vast majority of the canyon’s largest rapids). Finishing with a celebratory party in camp that evening, the entire day is a blast, and the bonding is complete.
Given the frenetic pace of Day 3, everyone is ready for our (relatively) relaxing Day 4. Without too many miles to cover, we make it to Deer Creek Fall early enough (fingers crossed) to snag the campsite directly across from the fall—this year we made it by lunchtime—where we can hang out (kick back) in camp, waiting for the crowds to clear out so we have the fall to ourselves for the rest of the day.
Of course rafting Grand Canyon isn’t all river and campsites. The photography down here is downright spectacular, and we get to do quite a bit of it. As with every workshop I lead, I try to get an idea of what everyone hopes to accomplish and do all I can to accommodate them. But since safety and schedule have to take priority on the river, and the conditions are beyond my control, I can’t always grant everyone’s wish—but I can’t imagine anyone ever being disappointed.
Having done this trip as many times as I have, I’ve become a little more selective about my own photo choices, with many of those decisions depending on the conditions. But one subject I never miss, regardless of conditions, is Deer Creek fall. Gushing from a red rock slot canyon, Deer Creek Fall is truly one of the most beautiful waterfalls I’ve ever seen. But, as with most natural beauty, the real challenge here is doing it justice.
Every nature scene worthy of a photograph possesses inherent beauty—the nature photographer’s job is to identify that beauty and figure out the best way to convey it with a camera. Anyone who has been disappointed by their images from a beautiful moment in nature (that would be pretty much everyone) knows that a good picture isn’t a simple matter of pointing a camera and clicking the shutter. There are just too many differences between the human and camera views of the world to expect a point and click approach to succeed reliably.
Subjects like Deer Creek Fall, especially at first sight, are surprisingly difficult to photograph well because of the instinctive tendency to just frame up the first beautiful thing we see and start clicking, wrongly assuming that our pictures will look just like what our eyes see. But that’s literally impossible.
The better approach starts with understanding the camera’s unique vision and accepting that it is no less valid than the human perspective. Once we start channeling our camera’s vision (rather than trying to force our camera to submit to our vision), we can leverage the exposure variables (that control depth, motion, and light), subject relationships, and creative framing, to provide a fresh view of familiar subjects.
Since this Deer Creek Fall image from the most recent raft trip illustrates many of the differences between human and camera vision, I thought sharing my approach to its capture would be a good opportunity to (once again) distinguish the camera’s vision from human vision. But first, let me cite the significant human/camera vision differences I had to deal with this afternoon:
- Boundaries: While my own world was unbounded, the world in my viewfinder was surrounded by a rectangular box. To a certain extent I can control the size of that box with focal length choice, and where I point it in the scene, but every image has a boundary.
- Depth: Photography is an attempt to render a 3-dimensional world in a 2-dimensional medium. Of course that’s impossible, but there are things we can do to create the illusion of depth.
- Dynamic range: The human eye can see a much wider range of tones, from the darkest shadows to the brightest highlights, than the camera can. The many ways to handle this difference are a creative choice.
- Motion: A still image can’t display actual motion, but it can create an illusion of motion that stimulates the viewer’s brain into imagining the scene’s motion. While nothing like our experience of the world, a camera can freeze the extreme chaos of a single instant, or combine a series of instants into a blur that conveys patterns in the motion indistinguishable to the eye.
Though this image isn’t high dynamic range, that doesn’t mean I didn’t have to factor dynamic range into my calculus this afternoon. Despite a fair amount of cloud cover, some of it rather threatening, Deer Creek Fall spent most of the afternoon in full sunlight. And while my camera can handle this extreme dynamic range, I try to avoid mixing brilliant highlights and deep shadows whenever possible. Studying the clouds, I decided there was a decent chance that they’d eventually provide the shade on the fall necessary to shrink the dynamic range, then went to work searching for my composition while I waited.
I wanted to feature the waterfall, but I also wanted to take full advantage of the abundant foreground subjects that would significantly enhance the illusion of depth. I explored many options, from looking up at the base of the fall, as close as I could get without soaking myself and my camera, to scaling a nearby slippery rock ledge for a different perspective. I finally decided the perspective that worked best was actually in the creek. Once I made that decision, I spent nearly 10 minutes micro-positioning myself relative to the nearby rocks until I was satisfied with the way the rocks and rapids moved the viewer’s eyes through the frame. Finally, to emphasize the rocks and shrink the (less interesting) open rocky beach, I dropped as low as I could go—less than a foot above the water—without merging the large nearby boulders with the smaller ones behind them.
With my perspective established, it was time to frame up the scene. There were other photographers in my group just out of the scene on the left; on the right was a large boulder and unattractive shrubs, and above the fall was bright sky that really didn’t add anything. Adjusting my focal length, I was able to use my frame’s boundaries to completely eliminate these distractions and distill the image to the most important visual elements: Deer Creek Fall, the whitewater of Deer Creek itself, and the array of boulders protruding from the creek.
My final decision was how to handle the extreme water motion. With the fall in full sun, I played with some images that froze the water in place, but those turned out to be practice shots that just helped me refine my composition. Since most of the creek was already in shade, and the fall would soon be as well (even if the clouds didn’t come through for me, I was willing to wait for the sun to drop behind the rocks), I knew my real decision wasn’t whether or not to blur the water, it was how much to blur it. When the clouds finally delivered, my composition was ready, and all I had to do was click. But I didn’t just click once—I ran through a range of shutter speeds so I’d have a variety of motion effects to choose from later—when I wasn’t standing on slippery rocks in chilly whitewater.
Grand Canyon: The View From the River


As usual your pictures are superb, and I enjoy reading your blog. I haven’t commented for a long time but am still following – keep up the great work, I love it!
Such a beautiful place that you have preserved for your memories! I love the little bit of texture that you left in the water, and the composition so perfectly draws your eye through the photo. This is one of my favorites in your Grand Canyon collection!