Beyond the Wall
Posted on July 23, 2026
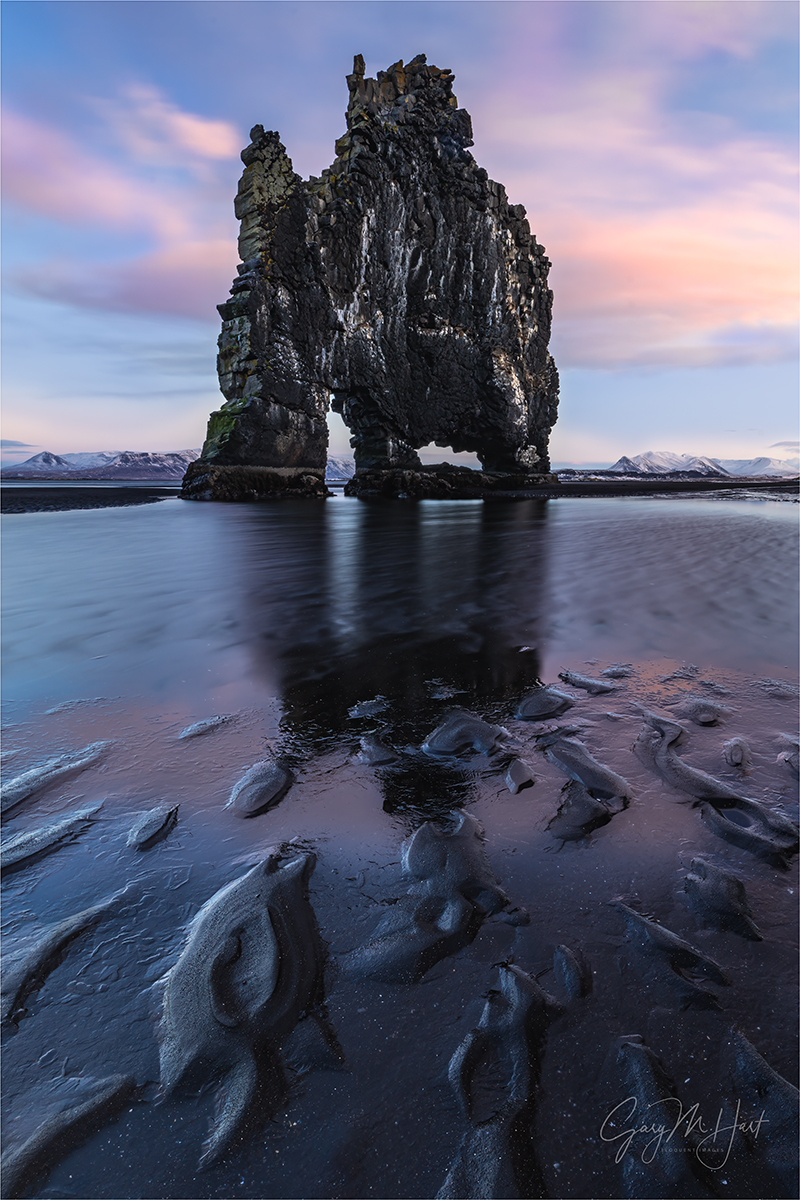
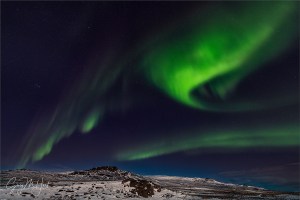
Hvítserkur Low Tide Reflection, Vatnsnes Peninsula, Iceland
Sony α1
Sony 16-35 GM II
30 seconds
F/20
ISO 50
I can think of no better way to see the world than to follow your camera to new, far-flung destinations. But since much of my photography travel is tied to my photo workshops, I don’t get to visit truly new places as much as I’d like. I’m not complaining—I love the intimate connection to locations that can only be developed by frequent, regular visits. But I also appreciate an opportunity to see something new.
Iceland, for example, where Don Smith and I have visited every (non-pandemic) winter since 2019. On each of those visits we’ve followed the same itinerary, first taking our workshop students north of Reykjavik to the Snaefellsnes Peninsula for a couple of days, then traveling down along the South Coast as far east as Vestrahorn. It’s a truly magical trip that hits many of Iceland’s most beautiful spots. (Not mention the potential for northern lights every night.)
But many is not all, and despite returning year after year, I’ve long known there are many beautiful Iceland locations I’d never laid eyes on. So this year Don and I switched things up, replacing the South Coast portion of our trip with the northern part of the island. (Since we’re in the care of a native Iceland photography guide, we feel comfortable taking our groups to new locations.)
As with prior workshops, this year’s trip started with Snaefellsnes favorites like Kirkjufell, Budir (the Black Church), Londrangar, and Arnarstapi. But then, instead of heading south after leaving Snaefellsnes, we pointed north and east toward parts unknown. Almost immediately, despite the fact that everything was new, the north part of Iceland gave me an eerie feeling of familiarity.
It’s no secret that a lot of Game of Thrones was filmed in Iceland, but until this year, I never felt the GoT vibes in Iceland as strongly as I feel the Lord of the Rings vibes when I’m in New Zealand. Heading north from Snaefellsnes this year, I finally got it—with every new view I couldn’t shake the feeling that I was somewhere north of the Wall. It wasn’t so much that I recognized specific settings from the show—in fact, we only saw a handful of actual GoT locations—it was more the striking features and exquisite starkness of the terrain at every turn.
Both New Zealand and Iceland are among the most beautiful locations I’ve ever visited, but they’re quite different. While New Zealand’s beauty is lush and opulent, Iceland in winter is stark and raw. The familiarity wasn’t limited to specific Game of Thrones locations—even locations that weren’t in the show conveyed that GoT feel. For me, Hvítserkur topped that list.
The Game of Thrones vibe at Hvítserkur was so strong, at first I first I thought that at the very least it had to have been in the background of some GoT scene. But researching GoT locations, I learned that, unlike a Milky Way location we used later in the workshop, Hvítserkur never appeared in the series. Even its nickname—”Drinking Dragon”—conjures thoughts of Game of Thrones.
Hvítserkur is a volcanic plug, the vestiges of an eruption more than 12 million years ago. When the erupting volcano finished delivering its payload, the lava remaining in its vent hardened in place. Over countess subsequent millennia, the softer surrounding material eroded, leaving only the hard basalt core standing 50 feet above what is now Húnaflói Bay.
Most of the Hvítserkur images I’ve seen show it reflecting in water completely surrounding its perimeter, but the tide was low when we arrived, leaving the rock protruding from a patchwork of small pools and mudflats. At first I was disappointed to be denied the reflection opportunity, but (as often happens) the longer I spent with the scene, the more excited I became about the possibilities to capture something a little less common at this heavily photographed location.
I started by identifying the outstanding qualities at that moment. Besides Hvítserkur itself, the most obvious feature was the braided patterns in the mud at my feet. I also saw great potential for sunset color in the mix of clouds, sky, and sunlight above distant snow-covered mountains. With the sun fast approaching the horizon, I moved around to find the best alignment of foreground patterns and background sky and mountains, all anchored by Hvítserkur.
To emphasize the mud patterns, I dropped my tripod to about a foot above the ground and dialed my 16-35 lens to 16mm. Though the large nearby pool would have created a perfect mirror on a still day, a fairly stiff breeze had whipped its surface and all but erased the reflection. So I added a Breakthrough 6-stop Dark Polarizer (basically, a 6-stop polarizing ND that doesn’t vignette) to enable a long shutter speed that would smooth the water enough to capture a reflection of the color in the sky, and a vague outline of the rock.
The result was this image that I think (hope?) balances with the bold majesty of Hvítserkur with the sublime beauty north of the Wall.
The Land of Ice and Snow
Click any image to scroll through the gallery LARGE (it’s better on a computer)


Next Year Finally Came
Posted on June 30, 2026
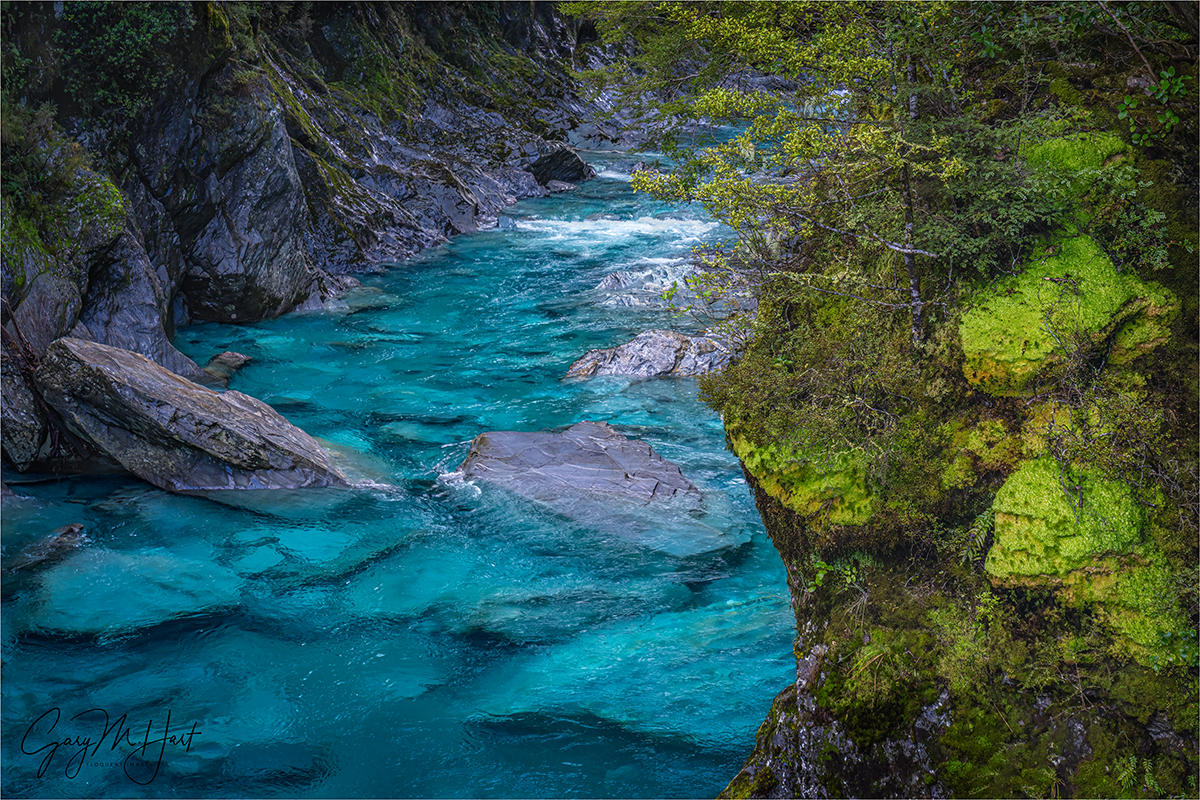
Blue Pools, Blue River and Makarora River Confluence, New Zealand
Sony a7R V
Sony 24-105 G
1/25 seconds
F/10
ISO 800
The rallying cry of the early ’50s Brooklyn Dodgers, “Wait ’til next year!”, was spawned by years of disappointment served up by crosstown rivals: mostly the New York Yankees, plus a lethal dose of 1951 New York Giants. Entering this year, the “wait ’til next year” nemesis for Don Smith, me, and our New Zealand workshops had become the Blue Pools of Haast Pass.
The Blue Pools are the visual reward for making a short but sweet rainforest hike that ends on a footbridge overlooking a narrow, blue or (sometimes) greenish-blue (or brown if you’re unlucky) river. It’s is a true highlight location, a spot Don and I love returning to and sharing with our groups each year. But recently, we were starting to feel like we’d never make it back there.
The first few years we did this workshop, the Blue Pools delivered so reliably that it’s difficult to distinguish in my memory one visit from another. Then the COVID pandemic intervened, and when we returned to New Zealand in 2022 following a two-year hiatus, we discovered that the trail to the Blue Pools had been rerouted and lengthened. The formerly half-mile downhill trek that had originated at a small roadside turnout, had been replaced by a one-mile gently undulating route that started at a new parking lot that was better able to handle the growing crowds.
I was a little concerned about taking a group on a trail I’d never been on, but despite doubling the distance, Don and I quickly deemed this change a net improvement to the overall Blue Pools experience: more parking, a toilet at the trailhead, plus a broader and less steep trail. And the payoff remained unchanged: a soothing walk through a lush rainforest to view a narrow canyon carved by a spectacularly clear and ridiculously blue river.
So imagine our disappointment in 2023, to learn that this new trail had been closed to overhaul its (essential) swinging suspension bridges. Oh well, we rationalized, closures can happen anywhere and anytime (as any photo workshop leader can confirm), and we were confident that we’d return the next year. But shortly before the 2024 workshop, our driver told us that the bridge repairs still weren’t complete and the trail remained closed. Bummer—but surely next year….
When the 2025 New Zealand trip came around, Don and I were quite pleased to learn a few weeks before starting that the Blue Pools bridge repairs had finally wrapped up and the trail was open for business. Yay, finally—nothing can stop us now….
On the morning we were scheduled to navigate Haast Pass and visit the Blue Pools on our drive to Fox Glacier, we were notified that an overnight rockslide had closed Haast Pass “indefinitely.” Suddenly the Blue Pools was the least of our concerns—with two workshop nights in Fox Glacier to replace, we scrambled to rearrange our itinerary, completely removing Haast Pass and Fox Glacier from that year’s trip.
Last year’s adjusted on-the-fly itinerary added two more nights in Te Anau, allowing us spend more time at Milford Sound and on the Milford road. We liked this change so much that we decided to permanently drop our two Fox Glacier nights and add one more night in Te Anau. And because we didn’t want to miss Haast Pass and the Blue Pools, the new (and improved!) itinerary replaced the other Fox Glacier night with a second night in Wanaka, allowing us to dedicate a full day to the Blue Pools and waterfalls of Haast Pass.
As you can see from this image, “next year” finally arrived!
Every time I guide a group here, I make a point of being among the first to arrive at the bridge so I can enjoy everyone’s reaction to their first view of this vivid blue water. Not only does this give me great pleasure, it always gives me flashbacks to the first time I laid eyes on the Little Colorado River.
The color here is a product of the Blue River’s glacial origin. As a glacier advances and retreats, it grinds the underlying rock to an extremely fine powder, called glacial flour—nearly microscopic particles so fine, they remain suspended in the moving water rather than drifting to the bottom. These suspended particles absorb the shortest—indigo and violet—wavelengths of the visible spectrum, while the water itself absorbs the longer—yellow, orange, and red—wavelengths. All that remains to get bounced back to our eyes is a very narrow band of wavelengths in the blue and green range. The variation in color from visit to visit is a function of the temperature of the sunlight illuminating the water, and the amount and size of the suspended particles on that day. And if runoff from recent rainfall has sent mud and organic debris into the water, you might see nothing but brown (fortunately, this has never happened to us).
Honestly, standing there and taking in the view up the canyon this afternoon, I realized that despite the vibrant blue that grabs you instantly, after spending a few minutes appreciating the jumbled assortment of submerged car-size boulders, you begin to realize how deep the water is, and suddenly it’s difficult to decide what’s more impressive about the Blue Pools, its color or its clarity.
A polarizer essential to remove the glossy sheen from the surface of the water, rocks, and foliage (the improvement is not subtle). But since we always try to get here in overcast or late afternoon shade, and a polarizer subtracts a couple of stops, light limited. Since the best vantage point is a suspension bridge that sways with each footstep, photographing here when others are around can be a challenge.
When it’s just other photographers, it’s not hard to negotiate and agree on the times to move and the times to expose. But when sharing the bridge with tourists (almost always), it’s mostly just a matter of trying to time the clicks and crossing your fingers. For this shoot, I bumped my ISO to 800, and even though I was on a tripod, put my camera in Continuous mode and for each shutter press held my finger down for three or four frames.
It’s pretty hard to take a bad picture here, but I was still pretty deliberate about my framing. For this one I positioned myself a little to the right of the bridge’s center so the river moved diagonally across my frame. I was careful to avoid cutting off the most prominent submerged boulders, and used the bright green moss patches on the steep, rocky slope on the right to balance the blue river.
I already can’t wait for next year…
Join Don and me in New Zealand
Glacial Influence
Click any image to scroll through the gallery LARGE


Send in the Clouds
Posted on June 15, 2026
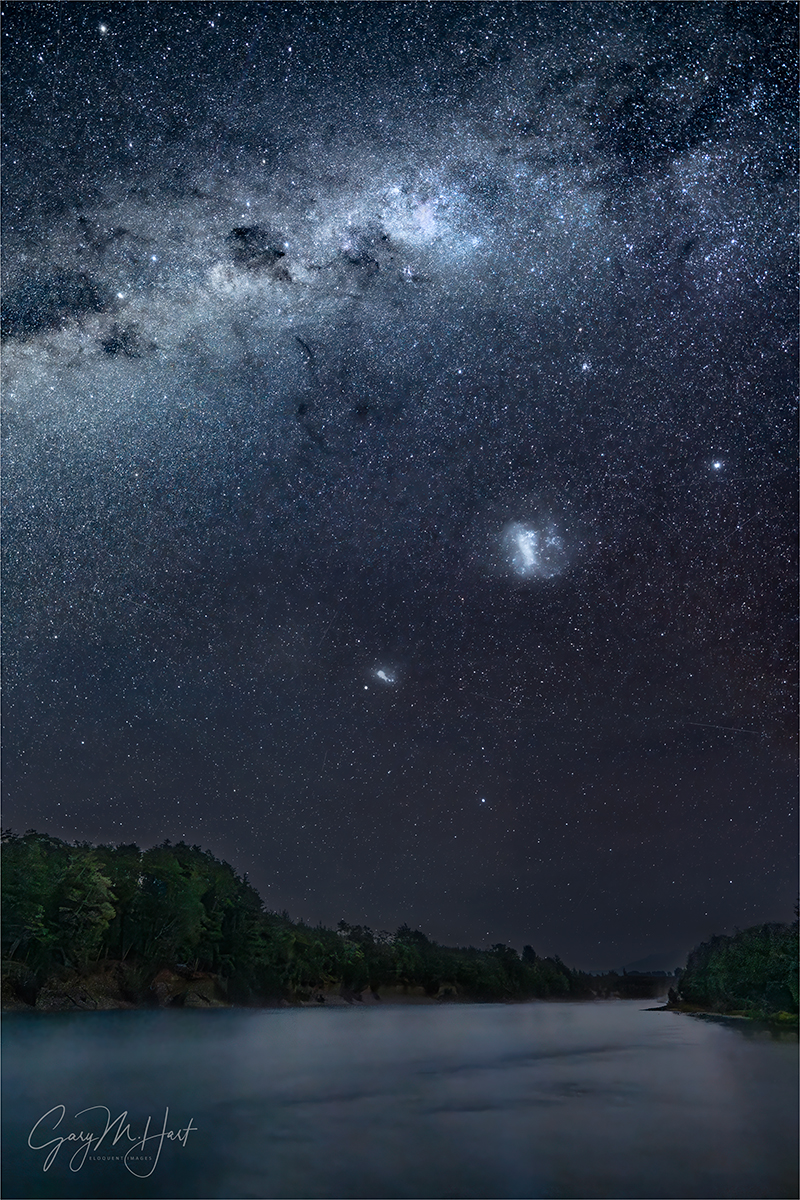
Milky Way and Magellanic Clouds, Waiau River, New Zealand
Sony α1
Sony 14mm f/1.8 GM
ISO 5000
f/1.8
20 seconds
Greetings from New Zealand.
It doesn’t take a genius to figure out that New Zealand is my favorite place to photograph the Milky Way. So, because I only get down here once a year, I always choose June, when the Milky Way is up all night and New Zealand nights are longest.
The New Zealand workshop Don Smith and I do follows pretty much the same itinerary each year, laid out in large part to match the spectacular scenery with the Milky Way. Since our first New Zealand visit in 2017, I’ve identified many great spots to photograph the Milky Way—at least one at most of our workshop’s overnight destinations. Lake Wakatipu: check. Wanaka: check. Aoraki / Mt. Cook: check. But Te Anau—where we spend three nights and visit both Doubtful and Milford Sounds—has always frustrated me.
The problem in Te Anau is two-fold. First, the town’s position on the shore of Lake Te Anau doesn’t offer any correctly oriented, easily accessible lake views in the hours immediately following sunset (we rely on a driver who must follow strict government safety rules that don’t permit him to drive all day, then go out again in the wee hours of the morning). And second, in winter, lake-hugging fog usually obscures the Te Anau night sky.
But this year was different. After losing (our usually reliable) first night Lake Wakatipu Milky Way shoot to clouds, when we saw clear sky in the forecast for the following night in Te Anau, Don and I reached out to friend and Te Anau-based photographer Douglas Thorne, who generously suggested his favorite nearby Milky Way location. Turns out, this spot isn’t actually on the lake, it’s on the Waiau River that connects Lake Te Anau and nearby Lake Manapouri.
Normally Don and I try to get our eyes on a new location before guiding a group there, but we arrived in Te Anau too late that evening to do any scouting. Having lost one Milky Way shoot already, and with clouds forecast for the next two nights (and maybe beyond), we decided go all-in on Douglas’s site.
Foremost on my mind as we arrived was whether it would check all of our Milky Way boxes—boxes that are different for a workshop group than they are for a solo photographer or small group of comparably adventuresome shooters (because a group can only do what it’s most limited participant can to do). To work for a workshop group, we require: 1) a photogenic foreground beneath a clear view of the Milky Way; 2) easy and safe access (a relatively short walk that’s easily headlamp navigable by all in moonless darkness); 3) (because we usually have several Milky Way first-timers) plenty of room for the entire group to photograph in close proximity, enabling Don and me to get everyone set-up, and to be easily available when someone needs help.
Hopping out of the van in the evening’s rapidly darkening twilight, the first thing I did was orient myself and scan the landscape in the direction the Milky Way would soon materialize. Seeing nothing but a lovely tree-lined river beneath wide open skies, I breathed a small sigh of relief and mentally checked Milky Way Box 1. Our driver Steve and I donned headlamps and followed a wide dirt track up a little rise for no more than 200 feet, before descending to a broad, open stretch of riverbank with more than enough room for our entire group: Boxes 2 and 3 checked.
It only took about 10 minutes to get the group over there and set up. At first the Milky Way was only visible to our cameras, so I had to point out where to aim until the sky darkened enough (love those dark New Zealand skies!) to be easily seen by all. I started as I usually do when photographing the Milky Way: wide and vertical. Since the Milky Way is higher in New Zealand than most of the northern hemisphere locations where I usually photograph it, I used nothing but my 14mm f/1.8 prime lens, which gives me the best combination of wide field of view and light gathering capability.
With darkness complete, I pointed out the Large and Small Magellanic Clouds to the group, explaining to anyone listening that they are satellite galaxies gravitationally bound to the Milky Way and visible only in the Southern Hemisphere. Because the only time I get to see and photograph the Magellanic Clouds is on my New Zealand trip, I always look for ways to include them in my images. Unfortunately, the two Magellanic Clouds are separated from the Milky Way just enough to make it difficult to include all three in the same frame—it can be done in a wide horizontal composition, but the MCs and the Milky Way usually end up being too close to their respective sides of the frame to be compositionally palatable to me.
The other problem I’ve encountered when trying to include all three in one frame is that composing that wide at any of other my New Zealand Milky Way locations ends up requiring me to include less photogenic parts of the landscape. But from here, I was pretty thrilled to see that a 14mm horizontal frame that included all three worked really well.
Instead of being satisfied with the horizontal solution, I got the (uncharacteristically) brilliant idea to try a vertical frame aimed straight upstream, directly at the two Magellanic Clouds (which were conveniently situated over the river). Low and behold, not only was a 14mm vertical able to capture both Magellanic Clouds and the river, it was wide enough to include a segment of the Milky Way was close enough to the galactic core to rival its brightness.
This turned out to be a successful night in many ways. In addition to my Magellanic Clouds / Milky Way triumph, everyone in our group got Milky Way images that made them happy (a point of emphasis—and stress—for Don and me until it happens), and we found a new Milky Way spot to share with future groups.
Join Don and me as we run it back in New Zealand again next year
Workshop Schedule || Purchase Prints || Instagram
New Zealand Milky Way
Click any image to scroll through the gallery LARGE


Taking One for the Team…
Posted on May 29, 2026
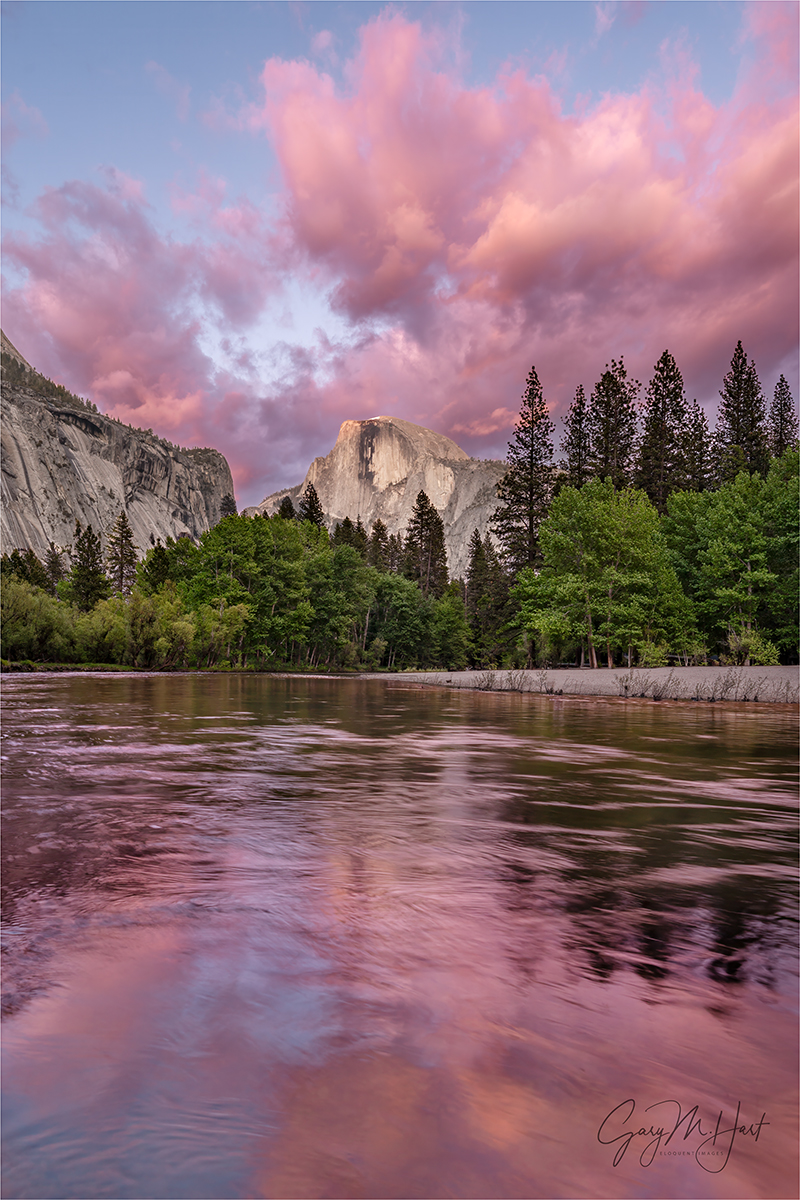
Color and Clouds, Half Dome and Merced River, Yosemite
Sony a7R V
Sony 12-24 GM
1/5 second
F/11
ISO 100
If there’s one thing every nature photographer agrees on, it’s this: Before the really good stuff can happen, someone needs to take one for the team. In other words, the truly spectacular (sunset, aurora, rainbow, lightning, and so on.) display everyone hopes for will not happen unless, 1) someone who could have been there opts out, or 2) at least one person gives up and leaves.
Over the years this truth has been proven time and again: Kilauea eruptions, Horsetail Fall color, and Grand Canyon lightning shows, to name three, but today I’m thinking about my most recent experience.
By the time our final sunset rolled around, my April Yosemite spring workshop had already been memorable for several reasons, from the road conditions uncertainty that threatened the start of the workshop, to an assortment of waterfall rainbows, to the welcome return of the Yosemite Falls moonbow. In fact, coming into the workshop’s final shoot, this group had already enjoyed so much beautiful Yosemite springtime photography, I figured whatever happened for that evening would just be the cherry on top. And when I saw that the weather forecast called for blank skies, I lowered my expectations further. Until…
For absolutely valid reasons, earlier that final day three people had decided to cut and run before the workshop ended. Two participants wanted to get a head start on their long journeys home (one had driven out from Tennessee), while my brother Jay, who was assisting the workshop and sharing my hotel room, decided to call in sick. That’s when I started having flashbacks to the last day of my spring workshop two years ago, when Jay thought he was having a heart attack and ended up getting an ambulance ride to the hospital in Mariposa—followed by four months (that’s not a typo) in UC Med Center in San Francisco with what turned out to be acute necrotising pancreatitis. (Talk about taking one for the team.) This time it was either food poisoning or norovirus, a distinction that made little difference to the sufferer, but a great difference to his roommate. So Jay got no argument from me when he opted out of that final day and went home.
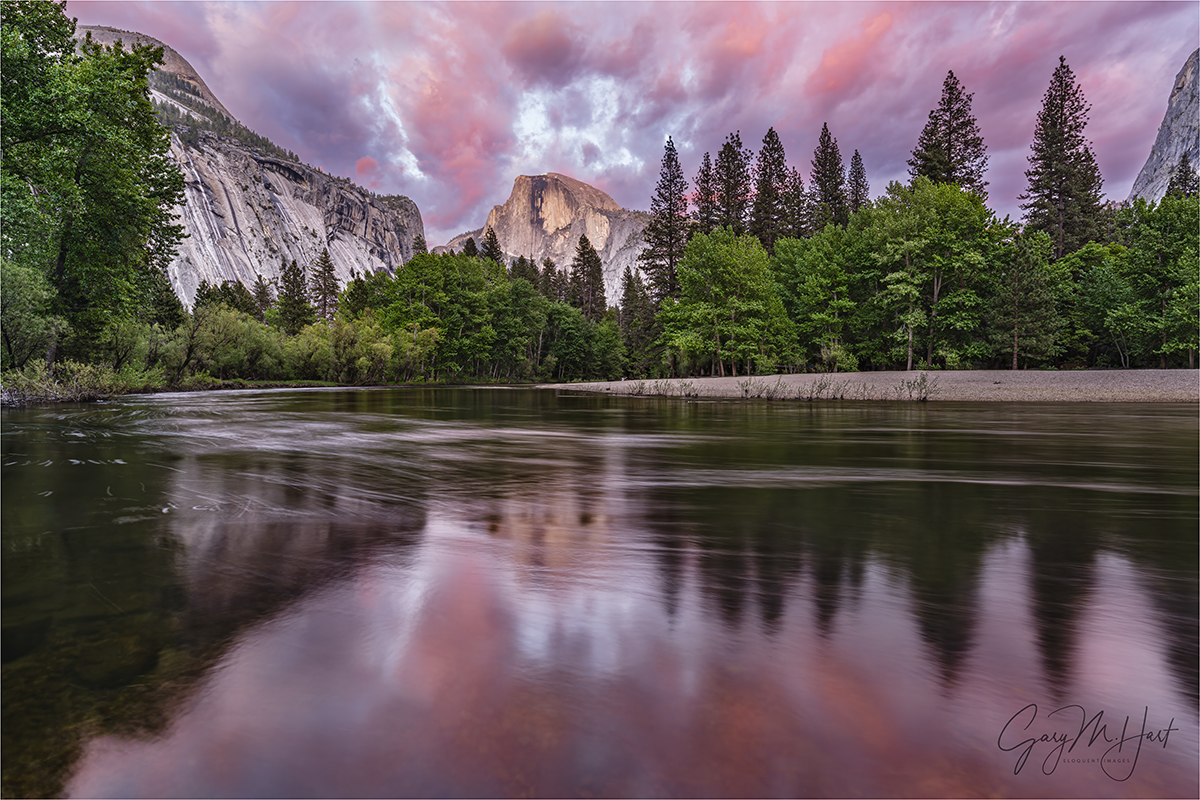
Majesty, Half Dome Sunset Reflection, Yosemite
The rest of the group enjoyed a pleasant afternoon that included an image review and moonbow processing talk, more nice photography, and a visit to the Ansel Adams gallery. We wrapped up about an hour before sunset, taking thea short walk to a favorite riverside view of Half Dome and its reflection, that I often save for the workshop’s final shoot.
Because I’ve photographed this spot so many times, when the conditions don’t look especially promising I’ve been known to taunt the photography gods by leaving my camera gear in the car. But this time I inexplicably decided to don my backpack before leading everyone into the woods. Never have I been happier with a decision that was in all honesty pretty-much a coin-flip. Whether or not it would have happened if the group had been at full strength, but it’s fun to imagine.
I already wrote about this sunset a couple of weeks ago, but let me emphasize the importance of composing your images to fit the conditions, rather than forcing them into a preconceived bias of how the scene should look. This bias can be the product of prior visits, viewing the images of others, or just noticing what others around you are doing—whatever the reason, don’t let your bias blind you to what’s happening right now, because you might be pretty amazed to discover the variety of ways a single scene can be photographed.
I frequently time my visits here to coincide with a moonrise I can use to accent a wide shot, or as a scene partner to pair with Half Dome in a tight frame. In low-flow months, the main event at this spot is the Merced River’s mirror-like reflection, while in spring, the Merced’s volume and speed turns the surface into a swirling abstract that looks very cool in a multi-second exposure. Either way, I often compose wide enough to include the reflection with whatever is happening on and behind Half Dome. And when there are no clouds, assuming I take any pictures at all, they tend to be tighter portraits of Half Dome, or of nothing but Half Dome’s reflection.
This evening, with the clouds catching late sunlight and clearly hanging around longer than usual, I soon switched to my 12-24 lens—something I rarely do here. But since the warming clouds were so exquisite, and the reflection doubled the size of the scene, I wanted the option to include as much of this beauty as possible, even if that meant shrinking Half Dome. When the sky and reflection turned about as red as a sunset can get in Yosemite, I was ready to catch the whole thing. I also made a point of composing both horizontal and vertical versions of the scene.
Even though I was using focal lengths in the 12mm – 16mm range, note how straight the trees are. Though many photographers blame flaws in their ultra-wide lenses for the perspective distortion that skews trees and other vertical lines, it’s simply what every lens does when angled up or down—the wider the focal length, the greater the effect. Point the lens straight ahead and everything magically straightens.
So what about the people who took it for the team so the rest of the group could enjoy this beautiful sunset? Everyone made it home safely and (eventually) healthy, and focused more on what they saw than what they missed. As it should be.
Yosemite Photo Workshops
Variations on a Scene (same place, different conditions)
Click any image to scroll through the gallery LARGE


An Old Friend Returns
Posted on May 22, 2026
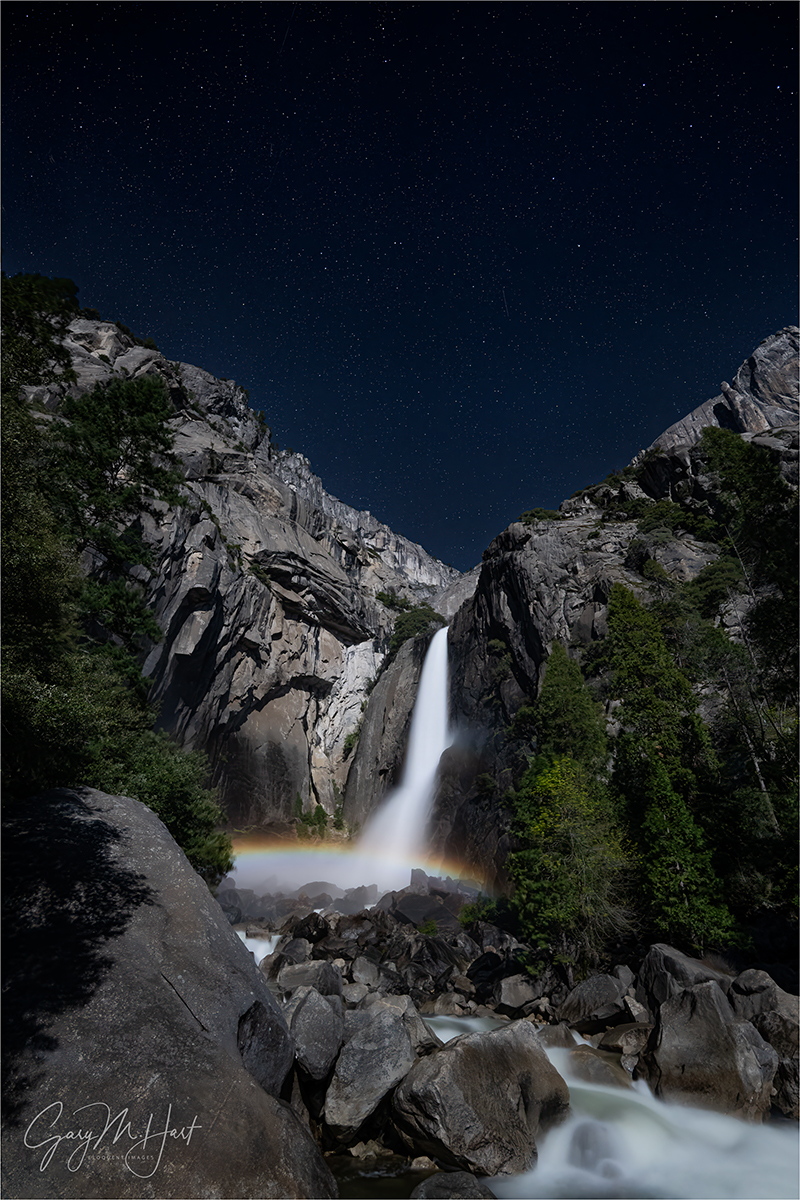
Moonlight Prism, Lower Yosemite Fall Moonbow, Yosemite
Sony α1
Sony 14mm f/1.8 GM
ISO 1600
f/1.8
4 seconds
Has anyone noticed that Yosemite becomes a completely different park with each season? I feel quite fortunate to live close enough that I’m able to enjoy each Yosemite season, and to offer Yosemite workshops in three of four seasons. (Actually, you can probably infer that I live close enough to offer workshops in all four seasons, but I leave summer to the tourists.)
Each Yosemite season offers its own distinguishing qualities. In autumn, though the falls are nearly dry (Bridalveil still trickles), red and gold leaves fill the trees, carpet the ground, and reflect gloriously in the low and slow Merced River. Winter is when the waterfalls return to life, and also the best time to find Yosemite draped in powdery white—but since snow is never guaranteed, I always schedule a workshop around the natural firefall light on Horsetail Fall (while still crossing my fingers for snow). Spring is the Yosemite of postcards and calendars, when waterfalls peak, dogwood blooms abound, low-lying meadows host (reflective) vernal pools, and rainbows color the waterfalls.
Each of these Yosemite workshops has a potential bonus lunar event that I try to include when it corresponds with the season’s primary distinguishing quality. Many autumns and winters I can align a rising full moon with Half Dome at sunset, and spring is when the light of a full moon paints a rainbow at the base of Lower Yosemite Fall.
For years I scheduled two workshops around this moonbow, but finally decided that the window for the absolute best moonbow experience is open only during a four week span from early April into early May. Though a moonbow also happens with the full moon from late March and into June, in late March and early April the moonbow appears in the mist billowing too far left of the fall; later in May and into June, the crowds swarming Yosemite Valley make an unpleasant experience for everyone.
Despite the remarkably predictable moon/landscape geometry that creates a moonbow, its appearance is never certain. Clouds are the biggest nemesis, but low water can also diminish the experience. Coming into this year, limiting my moonbow workshops to a single full moon in that four-week window, combined with factors beyond my control (in addition to clouds, you can add a sudden park closure and global pandemic), has meant that my previous successful moonbow sighting was in 2019. And for a while, it appeared 2026 would continue that streak of futility.
There was a time when I didn’t believe it possible for Yosemite’s spring runoff to be so low that the moonbow would essentially be erased. But as California’s wet season progressed and the Sierra Nevada range found itself on the way to an historically poor snowpack year, I couldn’t help flashing back to 2015. That’s the year PBS Newshour arranged for a film crew to follow me and my Yosemite spring workshop group as we photographed Yosemite’s spring splendor, with a particular emphasis on the moonbow. But 2015 also happened to be the year an unprecedented drought shrunk Yosemite’s normally booming spring waterfalls to mere trickles. Rather than cancel the Newshour segment and keep the film crew home, they adroitly pivoted to a piece on California’s drought and its impact on Yosemite. Check it out. (FYI, I haven’t aged a bit since then.)
Would history repeat this year? As April approached, the answer appeared to be yes. Then a series of unseasonably cold storms arrived, filling our rivers and bolstering the Sierra snowpack just in the nick of time. A couple of days before the workshop (scheduled for the last four days of April), another storm landed, further recharging the falls and even lingering through the workshop’s first couple of days—just enough rain and clouds to provide excellent photography, but not enough to wash us out. Suddenly, my concern wasn’t that there would be enough water, it was whether the clouds would depart in time for my planned Wednesday night moonbow shoot.
Even with all this last-minute moisture, spring 2026 was not especially wet in Yosemite. Though still flowing beautifully, all the falls were noticeably on the low side of average for this time of year (peak runoff is usually around May 1). Nevertheless, there was more than enough water exploding on the rocks beneath the falls to form the billowing mist Yosemite’s signature waterfall rainbows require.
Throughout the workshop my group enjoyed an assortment of daylight rainbows, from various vantage points (I have the timing down to the minute for each location, creating the illusion that I’m much smart than I am), but it was the moonbow everyone was crossing their fingers for. I had one person in the group who had already taken this workshop twice, each time with the expressed desire to photograph the moonbow. With Kent was returning for a third attempt, the pressure was on and I was pretty committed to making it happen for him if at all possible.
Since the moonlight timing and angle would be best on Wednesday, the workshop’s penultimate night, I tried to get everyone up to speed on moonlight and moonbow photography during that afternoon’s training session. The evening’s sunset shoot featured the full moon rising over Bridalveil Fall, photographed from an elevated turnout on Big Oak Flat Road. As soon as we finished there, I zipped the group back down to the Yosemite Valley Lodge parking lot, where we grabbed our gear and made the short walk, in the gathering dark, up to the bridge at the base of Lower Yosemite Fall.
The below average flow in the fall meant that this year’s moonbow wouldn’t be as big, or last as long, as it does in the wettest years. That’s because less water means a smaller cloud of mist for the bow to form in, not only shrinking the moonbow’s breadth, but also terminating the show sooner, as the rising moon shifts the necessary 42 degree rainbow angle downward and eventually out of the mist. (Rainbows drop as the sun or moon rises—read more about the geometry of rainbows on my blog) But this year’s moonbow was plenty big enough to thrill everyone, providing about 40 minutes of quality photography between the time the sky was dark enough for the moonbow to appear, and when it dropped out of the mist.
Even with less water than usual, the moonbow was obvious to the unaided eye as a shimmering silver band. And the rainbow colors were clearly visible in our mirrorless viewfinders or live-view LCD screens, even before a picture was captured.
The diminished flow in Yosemite Fall had one major advantage: at no point did we feel like we were photographing in a rainstorm. Every once in a while we’d get sprinkled with a small amount of mist, but I’ve photographed the moonbow from here when everyone had to don rain gear, and even a single 5-second exposure—that started with a dry lens—would finish with the front lens element completely misted over. When it gets like this, the only way to do it is with an umbrella in one hand and a towel in the other.
There were quite a few people the bridge this evening, but I’ve seen far more here. We’d become a little scattered on the walk up to the fall, so it took me a little while in the darkness to ensure everyone in my group had found a suitable spot to set up. Once I was confident my group was positioned satisfactorily, I tried to get around to everyone to make sure they were doing okay.
Exposure for the moonbow is pretty easy, and I’d given them settings to use before we started. Composition is a little tougher given the limited light, but I’d very strongly encouraged everyone to put their lens at its widest focal length and leave it there—this simplifies things, and today’s digital cameras have more than enough resolution to allow ample cropping later.
Not only does shooting wide streamline composition in the dark, it simplifies the most challenging aspect of night photography: focus. Since changing focal length requires refocusing, and finding focus in the dark is not easy, once you’ve achieved sharpness you don’t want to do it again. Most of my time this evening was spent moving around between the members of my group, helping them get focused, or checking their focus to make sure it was good. I started with Kent, but eventually made it around to nearly everyone (and even helped one or two people who weren’t in my group).
Eventually I found a few minutes for some frames of my own, squeezing in between a member of my group and another person who was okay with me and my tripod up in his space (I checked). I take both horizontal and vertical versions of virtually every scene I photograph, but I always photograph the moonbow vertically because I just haven’t found a horizontal composition that pleases me. For starters, I want to include as much sky as possible, and I think Yosemite Creek churning through granite boulders is a far more interesting than the trees on the left and right. This evening, I used my 14mm prime lens, enabling me to include a lot of starry sky above the fall (including 5/7 of the Big Dipper), while still getting plenty of moonlit creek and granite beneath it.
You can tell that I captured this toward the of the moonbow window by how low the moonbow is. When we arrived, it hovered above the visible mist, just below the top of the lower section (where the fall starts to spread). So even though my moonbow is not quite as broad as the earlier ones, it is brighter, thanks to all that water.
I should probably add a few words about my exposure. I started doing moonlight photography about 20 years ago, and established my full moonlight exposure values very early on. Back then, then ISO 400 was about as high as I could go without noticeable noise; since my fastest lens at the beginning of my digital years was f/4, so my exposure settings were usually in the ballpark of ISO 400, f/4, 30 seconds.
The problem with 30 seconds is you get a little star movement—not a deal-breaker, but enough to be visible if you look closely. So as sensor technology improved, and I acquired faster lenses, my ISOs went up and my shutter speeds dropped, while my exposure values (amount of light captured) remained constant. For this one, I used f/1.8, ISO 1600, and 5 seconds.
With limited time, and even more limited ability to move around, I still managed to get a handful of frames this night. But that was fine because my photography is never the priority in a workshop (and I certainly don’t lack for moonbow images from past years). Even though this year’s version may not be my best moonbow shot ever, I’m still pretty pleased with my results.
In the image review the next day, I invited everyone to share a moonbow image in addition to their review image—it was wonderful to see that everyone had a success! That includes Kent, who had to leave the workshop early, but who reported to me that his moonbow image is beautiful and he’ll no longer need to repeat the course.
Workshop Schedule || Purchase Prints || Instagram
Yosemite Falls, Day and Night


A Different Kind of Cat Herding
Posted on May 16, 2026
Majesty, Half Dome Sunset Reflection, Yosemite
Sony a7R V
Sony 12-24 GM
2 seconds
F/16
ISO 50
With my April Yosemite workshop starting in less than three hours, I was experiencing more than my normal (mild) pre-workshop anxiety. But after 20 years of photo workshops, I’ve accepted that I will always be a little stressed about the unknown until we start: how will this group of strangers connect, and what kind of photography conditions will we have?
Guiding a diverse group of photographers, each with their own priorities and pace, always has a cat-herding component, but this was the first time I’ve felt like I was herding cats before the workshop even started. In this case, rather than anxiety over connections and conditions, I was stressing about whether everyone (or anyone) would even make it to the workshop at all.
My concern was the snow forecast threatening to close two of the three routes to Yosemite Valley, combined the weeks-long now-it’s-open/now-it’s-closed status of the third route, thanks to a new rockslide. It didn’t help that, as the workshop approached, I’d already heard from several participants who were experiencing a variety transportation troubles that ranged from a cancelled bus ticket to concern about potential chain requirements. Reminding myself that these kind of inconveniences usually temporary, and almost always end up making great stories that help bond the group later, was little comfort in that moment.
Most years, the go-to stress for my Yosemite spring workshop is whether there would be enough water in Yosemite Falls for us to get a nice moonbow. But that concern had been resolved when a series of unusually robust April storms had turned the historically low Sierra snowpack into something that at least approached average.
Ironically, my current concerns—the snow forecast and persistent rockslide—were a direct result of those ongoing storms that had solved the not-enough-water-in-the-fall problem.
Highway 140 is my preferred, and strongly recommended, route to Yosemite for several reasons: it’s an easier drive, the scenery is better, and (especially) it gets much less snow and ice. Slides on 140 happen several times a year, but the closures are usually measured in hours. Not only did this slide lead to multiple closures, the duration each was measured in days. And each reopening was only one lane, a sign that they were still working on it.
Sure enough, the Caltrans engineers who make these closure decisions determined that 140 still wasn’t quite ready for prime time. When, less than a week before the workshop, 140 closed again so they could address the troubling areas, I started sending my April group updates offering alternate routes: from the north, Highway 120 through the Big Oak Flat entrance; from the south, Highway 41 through the Wawona entrance. These alternatives, adding more curves and mountainous terrain to the drive, are still good roads that don’t increase the drive time. But because they climb 3000 feet higher than Highway 140, Highways 120 and 41 are particularly problematic in stormy weather: when it’s raining on 140 and Yosemite Valley, 41 and 120 are usually experiencing snow and ice (and chain requirements).
With the next in a series of late-season storm forecast to arrive the day before the workshop, the (literally) chilling prospect of sending Yosemite virgins—some from regions of the country that never see snow, have no mountainous terrain, or both—into a Sierra storm that may bring snow, ice, limited visibility, and chain requirements, seemed very possible. If 140 stayed open, everyone’s drive to Yosemite should be a piece of cake; but if it closes…
So imagine my relief Friday night, less than three days before our Monday afternoon start, when I learned that 140 reopened. I updated my group with the good news, but also shared a link to the Caltrans website where they could find reliable and up-to-date road conditions (closures, roadwork, chain requirements, etc.). Because another closure was not impossible, I encouraged everyone to monitor their chosen route’s status before starting their drive into the park—given the forecast, I encouraged them to default to 140 if at all possible to avoid the inevitable snow and ice on the higher roads.
With 140 now open, I started to feel more confident that most or all of my group would make it to our workshop hotel without trouble. The biggest unknown at that point was Jim, a photographer from California’s Central Coast, who couldn’t drive and was at the mercy of a combination of trains and buses. About a week before the workshop, Jim had been notified by Amtrak, which contracts with YARTS (the Yosemite bus service) for the non-rail portion of its Yosemite route, that due to the 140 closure, his trip had been cancelled. With no reasonable alternative, he told me he had to cancel. But a few days later, Jim e-mailed that he was still going to try to make the workshop, though he might be a day or two late (depending on when 140 opened and the buses resumed). Then he went dark.
On Sunday evening (the day before the workshop), I’d heard from one of the workshop’s snow- and mountain-driving rookies (from the Gulf Coast), Barbara, that she had attempted 120 earlier that evening, but returned to Groveland for the night after encountering snow, poor visibility, lost cellular (and the GPS map service that requires it), and highway signs threatening chain requirements. I told her that since my Outback and I were planning to enter on 120 (so I could check out the higher elevation dogwood bloom), if the 120 conditions hadn’t improved by morning, I would meet her in Groveland and she could follow me all the way down to Yosemite Valley.
Waking at home early Monday morning, I immediately checked the road conditions and saw that 120 was only R1 (chains not required as long as you have snow tires), and 140 was still open. Yay. While on the road a couple of hours later, I received a text from Barbara saying that rather than attempt 120, she’d backtracked to 140 and no longer needed my assistance. It seemed things were starting to fit into place.
But one immutable photography truth, pounded into a nature photographer’s brain at every opportunity, is to take nothing for granted. Which is why I shouldn’t have been surprised when word soon reached me that 140 had just closed again. Sigh. I quickly called and texted Barbara, but she was out of cell range; soon I was off the grid too, so I just had to hope that she’d get my messages in time turn around before driving all the way to the closure.
I stopped in Groveland, a small cell signal island in a gridless sea, to catch up on the latest conditions and wait for Barbara as long as possible, in case she needed my help navigating 120. While waiting there, though I didn’t hear from Barbara, I did learn that the snow had stopped and all chain requirements on 120 had been lifted. A few minutes later, just as I started to get back on the road, my phone rang: not Barbara—this was Jim.
With everything else going on, I hadn’t really thought about Jim since he’d told me he’d be late, if he made it at all. He told me that shortly after 140 had opened Friday night, Amtrak had notified him that his bus trip had been reinstated. So, leaving his home on California’s Central Coast early Sunday, he’d actually made it all the way to Yosemite Valley by Sunday evening. Once in the valley he’d booked a room; his plan had been to take that night to recover from his travels, then catch a bus down to the workshop hotel Monday morning. Easy-peasy.
Not so fast. While walking back to his room after dinner Sunday night, he’d tripped on a rock in the dark, landing hard enough to eject a hearing aid and bang himself up so much that the hotel staff called an ambulance to rush him to the closest hospital, more than an hour away in Mariposa (which he’d already been through once that day).
The good news was, the hospital found no serious injuries. The not-so-good news was, after patching him up and releasing him in the wee hours of Monday morning, he had no way to get back to his hotel room (which contained his suitcase and camera gear) in Yosemite Valley. Eventually he found a generous soul to give him a ride to a nearby hotel. He’d checked in (his second hotel room that night) and managed to get few hours of sleep, then waited for the day’s first bus that would return him to Yosemite and all his stuff. Not ideal, but no damage beyond a few cuts and bruises, and the lost hearing aid—and at least he’d make it the workshop in time for our 1:30 p.m. Monday start.
A truly great plan—until 140 re-closed Monday morning, just a couple of hours before he was to catch his bus. Suddenly, Jim found himself stranded in Mariposa with no car, no public transportation, no local taxi service, and a rock slide between him and all of his stuff in Yosemite.
Which is how I found myself sitting in my car, less than three hours until my workshop, stressing about whether or not I’d even have a group to lead: I had Barbara and ten other workshop participants careening about the Sierra foothills in stormy weather, quite possibly following my directions into a dead-end or a snowstorm (take your pick), plus one person completely marooned in Mariposa. What could be worse?
Right about then my phone rang again—a new number—and I feared I was about to find out. But (spoiler alert) this is where my story takes an about-face. I inhaled and answered, bracing for the next crisis. But this was just Stan and Bonnie from Wisconsin, two of the missing ten (at least they know how to drive in snow), making sure I was aware of the latest 140 closure, and letting me know it had forced them to detour and that they’d probably be late for the orientation.
As I told them that wouldn’t be a problem, I was struck by an uncharacteristic flash of brilliance and asked how far they are from Mariposa. Ten minutes? I quickly summarized Jim’s plight and asked if they’d mind returning to Mariposa to pick him up. When they graciously agreed, I had them sit tight while I called Jim to see if he could be ready in 10 minutes. Jim was thrilled, so I quickly called Stan and Bonnie back, gave them Jim’s number, and told them to negotiate the rendezvous directly with him. A few minutes later I motored out of cellular range and could only hope that all the pieces would fall into place.
I’m happy to report that everyone made it to the workshop—most (including Barbara) before orientation, with Stan, Bonnie, and Jim rolling in shortly before I wrapped up. Many in the group had stories of their own adventures getting to the workshop, and it was clear that having shared travel experiences enabled the group to connect even faster than most groups connect.
It didn’t hurt that the unsettled weather that caused me so much stress hung around for the workshop’s first couple of days, treating the group to beautiful clouds and turbo-charging the falls. The clouds departed just in time for our moonbow shoot on the workshop’s penultimate night, then returned the next afternoon to color the sky for our final sunset.
Oh yeah—it seems that someone found Jim’s lost hearing aid and returned it to the hotel’s lost-and-found. And when we picked it up, the hotel staff was genuinely concerned about his wellbeing, and let him know that they’re reversed the charges for his room on the night he spent in Mariposa.
About this image
Yosemite isn’t known for its colorful sunsets, but they do happen. Nevertheless, and despite beautiful cumulous clouds assembled behind Half Dome all afternoon, I couldn’t help being a bit pessimistic about them hanging around until the workshop’s final sunset. Usually clouds like this dissipate as the sun drops toward the horizon, which switches off the convection mechanism that drives them upward. But watching from the bank of the Merced River that afternoon, it soon became clear that these clouds weren’t going away.
Since there were so many clouds, each catching the rapidly warming light of the setting sun, I told my group if the light stays on the clouds all the way until sunset, we’d be in store for a real treat. For the next 30 minutes I held my breath as we watched the clouds slowly shift from amber to peach to a rich magenta. But what made the scene special for me, and the thing I usually love most about this location, was the reflection.
In any landscape scene the photographer needs to decide how much sky the image merits. That decision becomes especially important when there’s a reflection. I tell all my workshop students (and anyone else who will listen) to base this sky versus landscape decision on the relative beauty of the two. In this case, both the vivid sky and its reflection in the Merced River merit maximum attention, I quickly switched to my 12-24 lens and gave them both equal billing.
This turned out to be one of the most memorable sunsets I’ve ever experienced in Yosemite, and truly fitting conclusion to (what turned out to be) a fantastic workshop. To quote Tom Petty: Most things I worry about, never happen anyway. Truth.
Workshop Schedule || Purchase Prints || Instagram
Yosemite Sunsets
Click any image to scroll through the gallery LARGE


, Yosemite")


, Yosemite")


More Than a Pretty Picture
Posted on April 26, 2026
Morning Light, Half Dome and Merced River, Yosemite
Sony a7R V
Sony 24-105 G
1/25 seconds
F/11
ISO 100
Before exploring for the scene that ultimately delivered the image in my prior blog post, I got my February group set up at what I’ve always felt was the primary view at this location. With Half Dome framed on the left by towering evergreens, on the right by a long diagonal ridge, and the tree-lined Merced River in the foreground, this spot has all the landscape ingredients a beautiful image needs. Stir in fresh snow, translucent clouds, and warm sunlight, and the beauty is ratcheted off the charts.
I interrupt this photo blog to share a little about what’s been disrupting my life this week: a “minor” home remodel. In the grand scheme of things you can do to improve a house, upgrading kitchen cabinets (completely new exteriors, all new drawers, pull-out shelves) is no big deal. But anything that requires my wife and me to completely pack up the kitchen and basically camp out in our living room at least feels quite major.
Before the installers even started, our preparation included emptying the original cabinets into boxes, relocating our refrigerator to the dining room, removing the above-range microwave, and expanding the dining room table enough to host our kitchen essentials—convection oven, microwave, espresso machine, and Vitamix—while somehow leaving just enough remaining space for meal prep and dining for two.
Suddenly, our entire downstairs was a an obstacle course of boxes and countertop items (who knew a relatively small kitchen could hold so much?). My wife and I both work from home, but while I could retreat to my upstairs office, her workspace was downstairs amidst the mayhem. To get any work done amidst the din of power saws and sanders, each of us had to resort to noise-cancelling headphones at multiple points.
I’m happy to report that the just-completed cabinets exceed our lofty expectations, and the cars are back in the garage where they belong. On the other hand, at least half of our stuff is still in boxes as we meticulously unpack and reorganize our “new” kitchen.
Since every hardship is a learning opportunity, here are the things this experience taught us to never take for granted again: a kitchen sink, a dishwasher, parking inside, on-demand filtered water straight from the fridge, and not having to rummage through boxes to find that thing we never imagined we should leave out (cheese grater, coffee filters, 1/4 measuring cup, and on, and on…).
Next up? Hmmm, this 20-year old interior paint is starting to look a little dated…
So, anyway…
Finding the confluence of all these landscape and atmospheric elements is the stuff landscape photographers dream of. But I think far too many, when gifted this opportunity, simply settle for capturing the beautiful scene. (Not that there’s anything wrong with that.) In so doing, they miss an opportunity to elevate their images something extraordinary.
I see examples of this kind of settling everywhere. Whether it’s social media, hotel room “art,” screensavers, calendars, postcards, or any other medium that displays beautiful landscape photography, I can’t help shaking my head at clearly beautiful scenes that could have made much better images had the photographer taken a few simple steps.
It seems almost as if they said, “Wow, this is so beautiful, all I have to do is click my shutter before it goes away.” And if your only goal is to save the moment, read no further. But to my mind, the more beautiful a scene, the more important it is to squeeze every ounce of beauty from it. I could probably go on for hours on this topic, but I’ll try to distill my thoughts down to a few basic points.
Foremost is the need to be aware of the way the viewer’s eye moves through the frame. When I decide a scene is worth photographing, I start by identifying what I want the image to be about—a spectacular view, a specific subject, a collection of subjects, beautiful light, and so on (or some combination of these)—then identify the best way to guide my viewers’ eyes there.
With the “about” decided, I survey the scene to identify elements that possess “visual weight”—objects or features that pull the eye like gravity pulls celestial objects. Qualities that give an object visual weight include size, brightness, contrast, color, position in the scene, or any other characteristic that makes something stand out from its surroundings.
The value (in an image) of an object possessing visual weight isn’t necessarily a function of the object’s aesthetic appeal. A very ordinary feature in the right position qualifies as a desirable VW feature when it serves a scene’s most striking element, either by creating a balance point, by completing a virtual line that connects to the primary subject or other VW object, or through some combination of these. On the other hand, a beautiful but poorly positioned feature could actually work against the scene’s primary subject.
Undesirable objects with visual weight draw the eye away from the focal point of the image. I try to compose these out of the scene, or deemphasize them in the composition—for example, putting them in a less prominent location, burying them in the foreground of a silhouette, or deemphasizing them with soft focus. When none of those options are available, burning (darkening) the offending object in processing often works wonders.
Viewers subconsciously draw virtual lines connecting objects with visual weight. Desirable objects with visual weight can be “connected” virtually by creating appealing positional relationships. I’m especially drawn to diagonal connections between these objects, and look to create them whenever possible.
Another frequently overlooked aspect of “pretty scene” pictures that fall short of their potential is distracting elements that pull the eye from whatever the scene is supposed to be about. In addition to, and often even worse than, misplaced visual weight objects in the main part of the scene, is messy borders. Since the visual weight of objects seems to increase on the border of the frame (this is just a personal observation that feel pretty strongly about), I always strive for clean borders by avoiding cutting things off (most of it in the frame, but just a little piece missing), or having them jut in (most of an object outside the frame, with just a small piece visible).
But since we’re photographing the natural world, scenes usually don’t cooperate, often making it impossible to avoid objects cut off or jutting in at the edges of the frame. In that case, it’s most important to make cutting your border objects a conscious choice, rather than not checking at all and placing the border wherever it happens to fall while you concentrate on the main part of the scene. This border awareness includes clouds at the top of the frame, which I find to be an especially overlooked flaw that’s usually a pretty easy to fix—if you make the effort to look.
In the Half Dome image above, in a very general sense this was the first composition I saw when I arrived here. But not wanting to settle for the (undeniably) pretty scene, I went to work finding my about and visual weight objects and overall framing. Half Dome was the obvious “about” choice, but I also wanted to feature the snow and morning light in the clouds.
The first thing I noticed when I framed up something that featured these elements while composing wide enough to include the river too, was the log jutting in on the lower left. Eliminating it completely also eliminated the best part of the river, so I went with Plan B: composing wide enough to make the log one of my VW objects, taking it off the border and far enough into the scene to create a nice diagonal connection with Half Dome.
Including all of the rock (from which the log emerges) meant going much wider than I wanted to, and introduced other undesirable elements, like other workshop students (I know what you’re thinking: no, the students were not undesirable, I just didn’t want them in my frame). But I got enough of the rock so it didn’t appear to be an afterthought, making sure not cut off that small, horizontal patch of snow beneath the (unavoidable) snowy cap.
The right side of my frame was determined by a protruding branch that I didn’t want to include. With the left and right setting my focal length, I just had to aim my camera up and down until I found the right combination of foreground snow below, and translucent clouds above.
Assembly Required
Click any image to scroll through the gallery LARGE

")

, Yosemite")


")


Who’s Counting?
Posted on April 18, 2026
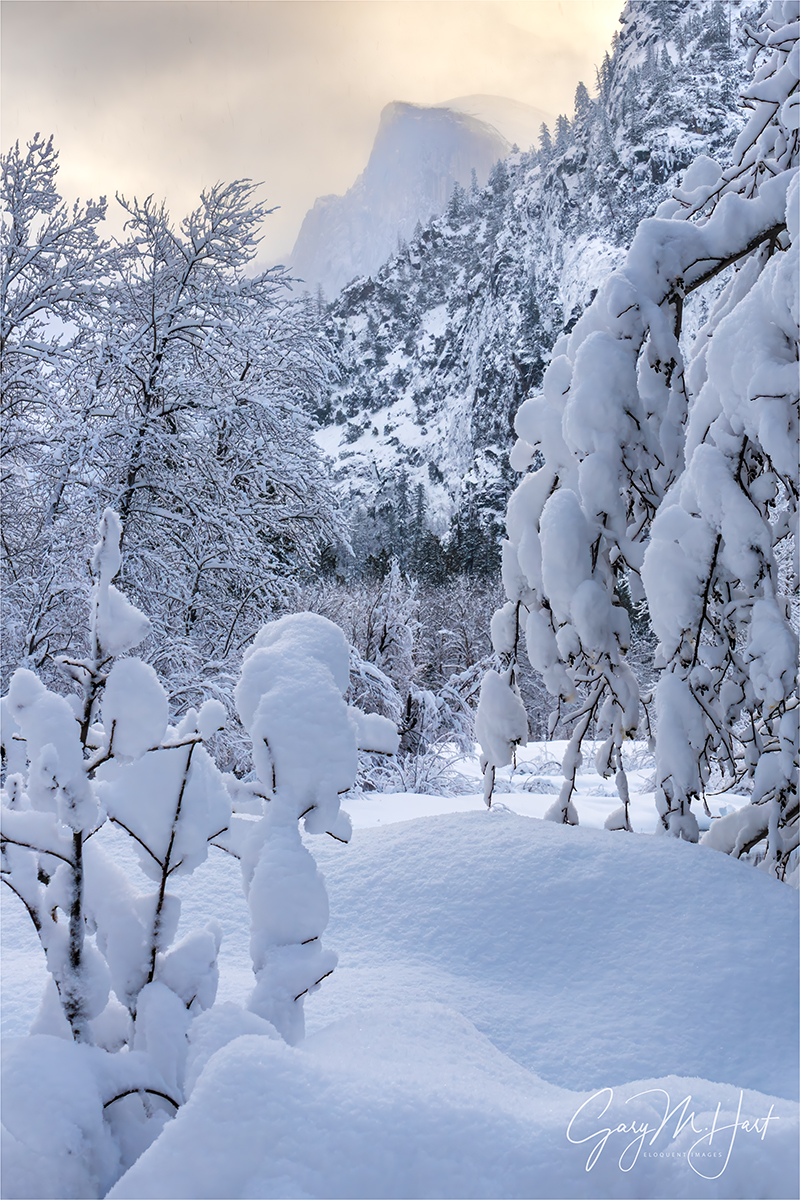
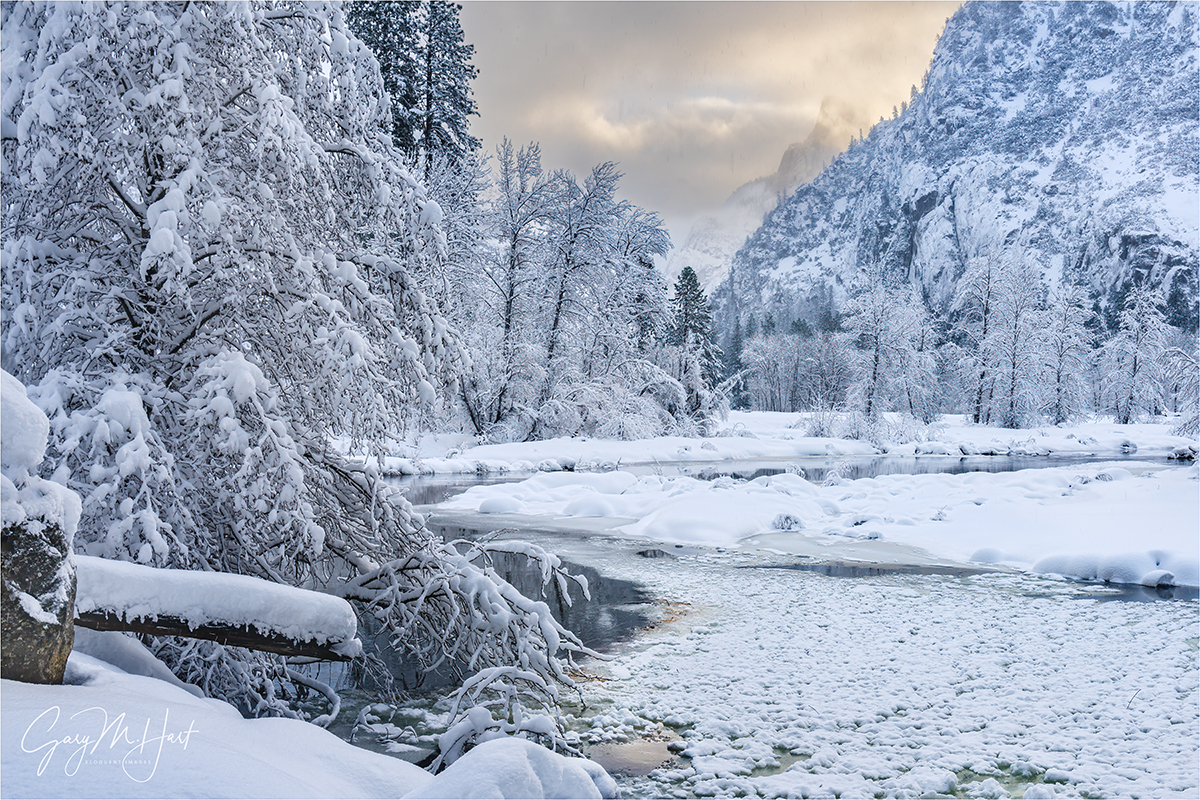
Winter Morning, Half Dome and Clouds, Yosemite
Sony a7R V
Sony 24-105 G
1/25 seconds
F/11
ISO 100
I get a lot of questions during a photo workshop, but about 80% of them are some version of, “Should I do it this way or that way?”:
- “Should I shoot this with a wide or telephoto lens?”
- “Should I shoot this horizontal or vertical?”
- “Should I include that rock or leave it out?”
- “Should I polarize this or not?”
- “Should I freeze or blur the waterfall?”
- “Should I…?”
Some photographers are so paralyzed by these choices, they choose to do nothing rather than make a “mistake.” They forget that, as with every other artistic endeavor, in photography there’s no universal right or wrong, no consensus on the best way to render a scene.
Other photographers are inhibited by the subconscious need to conserve resources at all costs. That need to conservative probably started way back in our childhood, when we were constantly warned not to waste: clean your plate, turn off the light when you leave the room, don’t leave the water running, and a host of other waste-related proclamations are a right of passage for American (and likely everywhere else) youth.
Adding to our formative-years’ “don’t waste” anxiety, when film shooters graduated to our first “grown-up” camera (one that didn’t involve a film cartridge and pop-on flash cube—I’m looking at you, Kodak 104), after being rendered destitute by our complex new equipment, we were suddenly punched in the wallet again (and again, and again…) by the perpetual expense of film and processing. It’s no wonder we grew accustomed to sparing every frame, an inclination that for most became ingrained.
Conserving resources is certainly important, but that parsimony shouldn’t come at the expense of your photographic success. In the immortal words of Michael Scott:
Still not convinced? Here’s a paradigm bending insight that might help: While every click with a film camera costs money (film and processing), every click with a digital camera increases the return on your investment. That’s right: each time you take a picture with your digital camera, your cost per click drops. So click freely and stop counting—there’s no limit to the number of pictures it takes to get to the one you’re hoping for.
I’m not suggesting that you put your camera in continuous shooting mode and fire away*. But I am encouraging you to shoot liberally, the more the better—albeit with a purpose. And there’s no law saying that purpose must be a successful image.
A shutter click can just be a way to get in the mood, or to determine whether there really is a shot there (I don’t always know whether a scene is worth shooting until I’ve clicked a couple of frames), or simply an experiment.
Following that mindset, I frequently play “what-if?” games with my camera: “What if I do this?” I’d be mortified if people saw some of these what-if? images, but I do usually learn something from even the worst of them. Often that learning is simply what not to do, because a failure is at least a way to understand why something didn’t work, and often leads to ideas for how it might work the next time.
Even when a scene is so beautiful that a successful picture feels inevitable, I always consider my first click a draft: rather than a completed masterpiece, my goal for the first few clicks of a scene is to establish a foundation that I can incrementally improve until I’m satisfied the finished product is as “perfect” as it can be.
When I’m not sure of the best way to handle a scene, I shoot it multiple ways, deferring the decision until I view the images on a large monitor. Not only using a variety of compositions, but a variety of depth, exposure, and motion effects as well.
And never settle for just one excellent image. When photographing a scene that truly thrills you, slow down and shoot it with as much variety as possible: horizontal/vertical, wide/tight, as well as multiple foregrounds, backgrounds, and framing—as many variations as you can come up with. I mean, you never know when a magazine might want to put a vertical version of that horizontal Half Dome in the snow image on their cover—even if it’s not obvious at first, most great horizontal scenes have great vertical scenes as well (and vice-versa).
Which brings me to today’s image of, not coincidentally, Half Dome in the snow.
This was the first morning of the workshop formerly known as “Yosemite Horsetail Fall.” Click the images below to read more (I’ll still be here when you get back):

Circling Yosemite Valley, we feasted our eyes on the new snow covering every exposed surface. My job was to find the best views to put with all that still pristine snow. Beauty surrounded us, but with filling the bowl of Yosemite Valley, views beyond 100 yards had disappeared.
Approaching Sentinel Bridge, I glimpsed Half Dome peeking through the clouds; my instant inclination was to pull into the Sentinel Bridge parking lot, but we found the lot covered with a foot of overnight snow still waiting for the day’s first snowplow. I was pretty sure my Outback could handle it, but I was less confident about the other two cars in our caravan. So I crossed my fingers that Half Dome would hang in a little longer and continued toward another favorite, and less known, view of Half Dome.
We found the parking at this next spot, about a mile beyond Yosemite Lodge, a little less problematic. The downside here was that getting to the view requires a (roughly) quarter mile “hike” on a flat and normally well-worn riverside trail. But of course that trail was now obscured by at least a foot of fresh powder. Since I was the only one who knew where we were going, it fell to me to blaze a new trail. Concerned about missing the window to photograph Half Dome before it disappeared again, I quickly grabbed my camera bag and headed through the forest as fast as the snow allowed, my group in tow.
At first the going was pretty manageable, but whenever we exited the evergreen canopy into a more open stretch, the powder doubled and I sunk in above my knees with each step. Normally when leading a group to a new spot, I need to take care not to walk too fast, lest those not familiar with the route lose track of me. But battling through the snow slowed me enough to allow everyone drafting behind me to keep up—and even if someone did fall a little behind, they’d have no problem following the path cut by the rest of us.
Needless to say, bundled for winter and hurrying as quickly as I could, I worked up a real sweat in that quarter mile. The rest of the group wasn’t far behind, and we shared the thrill of the workshop’s first peek at Half Dome, never a certainty in stormy weather. We photographed here for nearly an hour, watching Half Dome disappear and emerge from the clouds many times, creating new opportunities every minute, and also a constant reminder Half Dome could disappear for good any second.
To my eye, the obvious composition was horizontal, with a foreground that included the river (with a partial reflection) and lots of snow-draped trees and rocks. But after working on many versions of that scene, including some vertical versions, I went exploring to see what else I could find.
Less than 20 feet from my original spot, I found this view of Half Dome framed by snowy trees and the graceful curves of drifting snow. I tried many versions of this scene as well, both horizontal and vertical, before landing on this one that was a little tighter than most of the other frames I’d come up with.
In the dozens of photos I came away with are probably more clunkers than classics, but I don’t care. And honestly, this was one of those extra frames that I forced myself to shoot because the scene was too nice to quit, not because I saw something special—it wasn’t until I reviewed my images on my big monitor at home that I realized it was an image worth processing and sharing. (And I know there are probably more keepers in this morning’s folder, just waiting for me to uncover.)
Photography often requires instantaneous choices, and Nature doesn’t usually wait until you’re ready. Just because you’re not sure what you’ll end up with, or don’t have a pro photographer whispering guidance and reassurance in your ear, doesn’t mean you should stop shooting. Even if you don’t see any winners at the time, at the very least you’ll learn something—and who knows, you might just surprise yourself later.
* True story: I once had a woman in a workshop put her Nikon D4 in continuous shooting mode, hold the camera in front of her, depress the shutter button, and spin. When I asked her what in the world she was doing, she replied, “It’s Yosemite—there’s bound to be something good in there.”
Workshop Schedule || Purchase Prints || Instagram
Half Dome Views
Click any image to scroll through the gallery LARGE


, Yosemite")


Yosemite at its Best
Posted on April 5, 2026
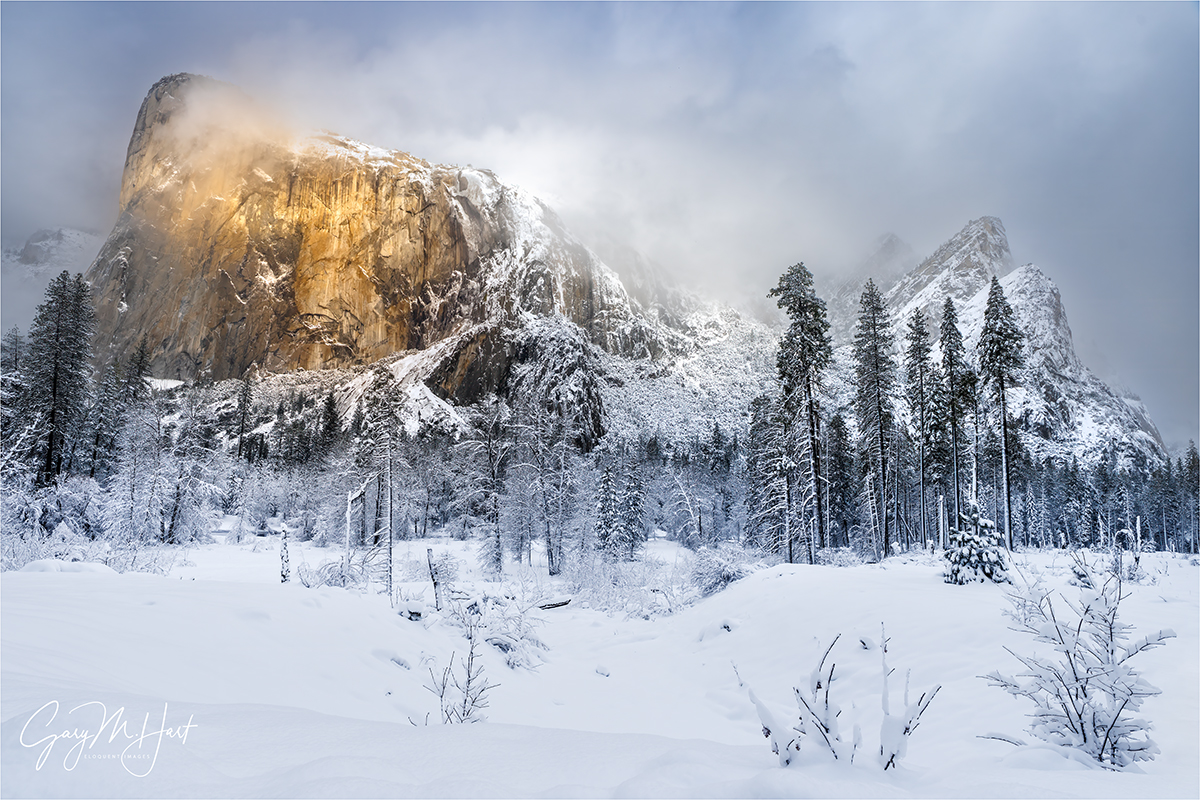
White Gold, El Capitan and the Three Brothers, Yosemite
Sony α1
Sony 16-35 GM II
1/100 second
F/10
ISO 100
If anyone had told me that my annual Yosemite Horsetail Fall photo workshop would get no opportunity to photograph the molten sunset light on El Capitan; that many of my go-to locations, including Tunnel View, would be inaccessible for the entire workshop; that Half Dome would be shrouded in clouds for all but a few hours; that the park would actually shut down the afternoon before our final day, I’d have started preparing to placate a lot of disappointed photographers. Instead, though all of that did in fact come true, this group got to see Yosemite at its absolute best.
Rather than the clear skies and sunset fire every Horsetail chaser prays for, the day before the workshop a series of cold winter storms descended on Yosemite, obscuring the sun and delivering more snow than I’ve ever had to deal with in 20 years of Yosemite photo workshops. In fact, I can’t think of any workshop at any location, including Iceland and New Zealand in winter, that had this much snow.
With all this white stuff came all the inconveniences you might imagine (and some you might not): challenging driving, difficult (to impossible) access to many photo sites, chilly photography conditions, wet clothes and gear, and vanishing Yosemite icons. Not only were some of my favorite views inaccessible, the views that were accessible aren’t much use when the featured monolith or waterfall isn’t visible.
Some of my workshops locations are so spread out, I don’t have a lot of location timing flexibility. But Yosemite Valley’s compactness enables me to change plans on the fly. I start each workshop with a mental list of must-see locations, plus a list of secondary and tertiary locations to augment the prime spots as schedule permits—exactly when we get to these locations depends on the conditions. But all this workshop’s snow really forced me to dig deep into my (lifetime’s worth) bag of location tricks.
One of my favorite locations to take my groups is a riverside view of El Capitan that has been unofficially, and affectionately, dubbed “Tahiti Beach.” Though no secret to photographers, being a little bit off the road with no obvious trail to the river makes Tahiti Beach relatively free of tourists. But if you’ve been in one of my Yosemite workshops, you’ve been here. Not just a great El Capitan view, it’s hands-down the best Yosemite Valley view of the Three Brothers. And if that’s not enough, Tahiti Beach’s proximity to an especially flat stretch of the Merced River means great reflections. (Continued below)
“Tahiti Beach”


Throughout Yosemite, the best Merced River reflections are possible when the spring snowmelt has subsided and the rushing Merced has slowed to a more leisurely pace—that’s usually from mid-summer through early the following spring. That’s the case at Tahiti Beach too, but if you’re especially lucky, you’ll find yourself here at peak spring runoff following a wet winter, usually sometime in May, when the river rises enough to leave its banks and flood the meadow and form a shallow, perfectly still reflective pool.
Tahiti Beach can be very nice in late afternoon light, but I’m especially fond of the morning’s first sun on El Capitan, and the opportunity to add a reflection makes this one of my favorite spots for that. In a normal Yosemite workshop, conditions are predictable enough that I can get my group to each of my prime locations in the best conditions, and Tahiti beach is often on the menu for our second morning.
This year, a look at the forecast was enough to know that the conventional location rules would be completely different for this workshop, and I emphasized in the orientation that we’d need to be quick on our feet to adjust to rapidly changing conditions. That reality became immediately clear from the instant we set out for our first shoot, and was further reinforced the following morning, when my plans were immediately thwarted by closed roads and low clouds at several of my first-choice locations.
Refusing to be defeated, we slowly circled the valley, waiting for the inevitable clearing. I eventually took everyone on a short but sweet hike to an off-the-beaten-path spot where we enjoyed a brief but beautiful view of Half Dome before the clouds lowered again. Leaving there in very limited visibility, my plan was to circle back to the Lower Yosemite Fall trail, hoping that we might be able to get close enough to the fall to photograph it through the low clouds. I was afraid that this driving and waiting for openings was frustrating my group, but took heart in their unbridled awe for the beauty surrounding us.
Most of Yosemite Valley is navigated via a pair one-way roads: eastbound Southside Drive for those entering the park; westbound Northside Drive for those exiting; and a mid-point crossover to shortcut the loop. As we navigated the crossover and headed back east on Southside Drive, I saw hints that El Capitan might soon emerge and made a quick decision to pull over at the parking area for Tahiti Beach. Tahiti Beach wasn’t part of my plan for this morning, but I knew there were no more good views of El Capitan beyond here.
I parked and exited my car, and told everyone to stay put while I surveyed the scene. Though access to Tahiti Beach isn’t treacherous, even in good conditions it can be a little problematic for people with mobility problems—fortunately, multiple routes down to the river that range from short-but-steep to long-but-gradual allow me to offer my group multiple choice. But this morning I also had to factor in all this fresh snow that meant whichever route we chose, we’d be blazing a new trail.
About the time I decided I probably could get everyone down to the river, El Capitan and the Three Brothers popped out of the clouds. Though this roadside parking area provides nice views of El Capitan and the Three Brothers, its foreground—a scrubby meadow filled with similarly scrubby shrubs and small trees—can’t compete with the reflections possible at the river. But the snow had erased all of the negatives, replacing it with an undulating carpet of pristine white. Since there was no telling how long the increasingly spectacular El Capitan and Three Brothers view would last, I made a snap decision to not attempt to get to the river and just shoot from here.
Within minutes a shaft of warm sunlight split the swirling clouds to spotlight El Capitan, and I knew I’d made the right call. That was further validated when the direct light disappeared for good within a few minutes. Fortunately, the clouds stayed open long enough for everyone to get a wonderful assortment of beautiful and truly unique images of two Yosemite icons.
This workshop was filled with stories like this: frustrating disappearances, surprise appearances, sudden adjustments to plans, and ubiquitous beauty. Through it all, my group responded with euphoric enthusiasm, ignoring minor discomfort and inconvenience. Despite ending a day early, we all came away with memory cards filled with one-of-a-kind Yosemite images—no small feat in one of the most photographed places on Earth.
Workshop Schedule || Purchase Prints || Instagram
The Many Faces of El Capitan
Click any image to scroll through the gallery LARGE


, Yosemite")


Still Learning
Posted on March 31, 2026
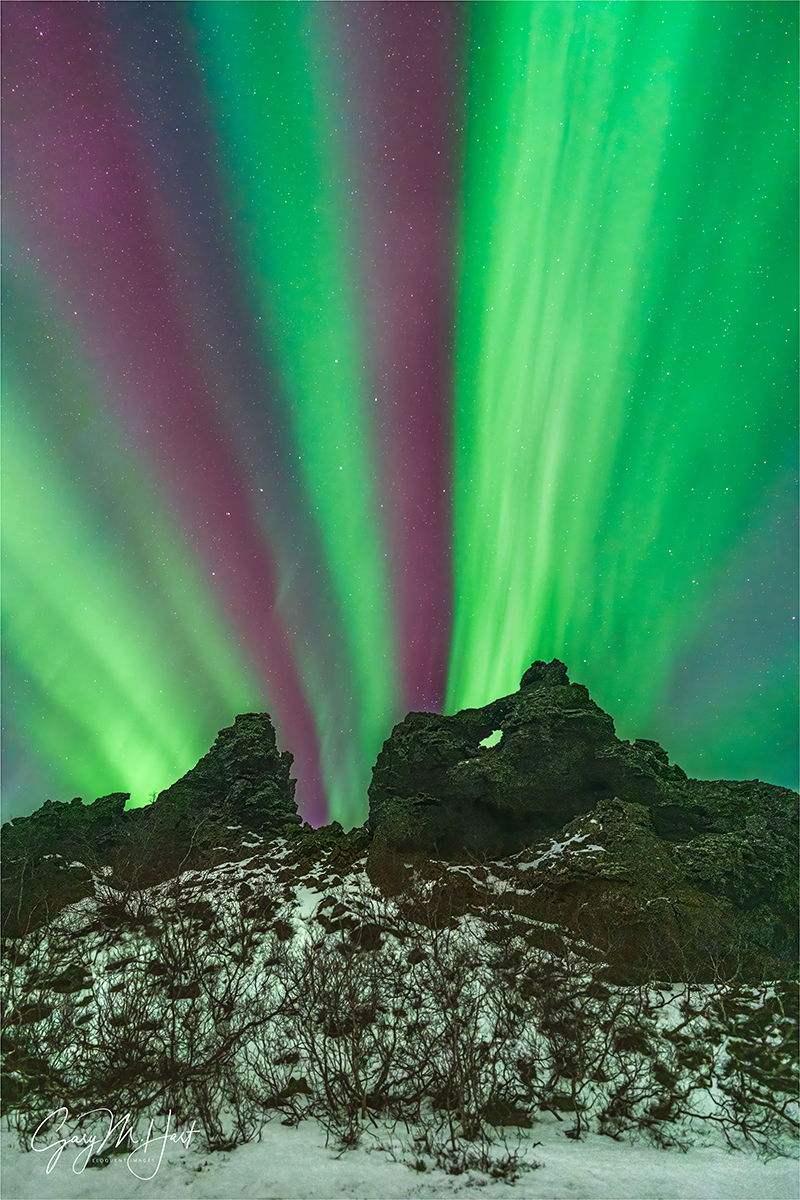
Aurora and Big Dipper, Dimmuborgir Lava Fields, Iceland
Sony α1
Sony 14mm f/1.8 GM
ISO 4000
f/1.8
4 seconds
Whether it’s rafting Grand Canyon, gaping at a comet, or chasing supercells and tornados across the Midwest, instead of scratching an itch and moving on (as I’d expected would happen), checking-off a bucket-list item only seems to fuel my desire for more.
Case in point
I saw my first aurora in 2019. As with all my prior bucket-list experiences, the aurora experience actually exceeded my lofty expectations. Puzzling over why sights I’ve dreamed of for so long so consistently exceed my expectations helped me appreciate the power of experience over simple observation. For me, the experience component—that feeling like I’m part of something—is what motivates me to learn as much as I can about my subjects. Speaking only for myself (your results may vary), simply photographing beauty without taking time to understand just feels superficial.
Though I’d done a little research on auroras before my first Iceland visit, that obsession to truly understand what was going on didn’t fully kick in until I actually stood beneath those multi-colored shafts and sheets and watched them twist and fold above my head. Game on.
I learned about solar cycles, solar storms, the solar wind, Earth’s polarity, the magnetosphere, the magnetotail, ionization of atmospheric molecules, and how all these elements conspire to put on this dazzling show. And since, for photographers, a significant aspect of aurora science centers on the ability to predict when and where it will appear, I paid special attention to the Kp index: the measure of aurora-causing electromagnetic activity in Earth’s magnetosphere that is the prime focus of most aurora prediction resources.
So, armed with just enough knowledge to be overconfident, and a Kp-based app that validated it, I enjoyed reasonable aurora success in subsequent Iceland visits. But despite this success, and access to Kp forecasts that stretched out 30 days, it didn’t take long to realize that predicting tonight’s aurora activity by Kp-tracking alone is not very reliable—less reliable even, than a weather forecast that says it’s going to rain in 7 days. While there was a clear correlation between high Kp values and an active aurora, I couldn’t figure out why so many high Kp nights disappointed, and low Kp nights dazzled.
What was I missing?
Digging deeper, I saw that my aurora app measured a lot of electromagnetic behavior besides Kp. I’d never really paid a lot of attention to these other cryptic values, but having become pretty comfortable with aurora-science basics, I thought my brain cells might be primed to dig a little deeper. The first thing I learned was that many of these measurements, while significant to solar scientists, aren’t terribly useful to aurora watchers. But I did identify one that is: Bz.
In the simplest terms possible, Bz measures the north/south orientation of the interplanetary magnetic field (IMF) that originates at the sun and propagates outward, eventually interacting with Earth’s magnetic field. Turns out, for predicting auroras, the Bz orientation might just be more important than the Kp index.
In fact, the Bz value can completely make or break an aurora show. Without getting too deep into the scientific weeds (by diving into knowledge that’s far beyond my pay grade), a south-oriented IMF, represented by a negative Bz value, stimulates Earth’s magnetosphere in way that greatly increases the chances for an active aurora; when the IMF is positive (north oriented), the IMF subdues magnetosphere activity and stifles the aurora.
The problem—and likely the reason aurora forecast apps focus mostly on Kp—is that while Kp can be (kind of) predicted days or (more dubiously) weeks ahead, Bz can only be measured, not predicted. The best we can do is park satellites at the gravitationally stable Lagrange Point 1 (L1)—where Earth/Sun gravity balance each other—to monitor the solar wind as far out in space as possible (about 932,000 miles from Earth). Depending on the speed of the solar wind, the IMF can take from 15 to 60 minutes from the time we measure it until affects the magnetosphere and delivers an aurora show (or not).
Though Bz can’t really be predicted, the 15 – 60 minute lag time between measurement and arrival does provide one extra benefit: the ability to see what’s coming in the next hour or so to decide whether or not this would be a good time to pack up and go home, or maybe stick around a little longer.
Applying my new knowledge firsthand
This year’s Iceland Aurora photo workshop was the first opportunity Don Smith and I had to put our Bz knowledge to the test. Regardless of the Kp forecast, we always go out unless the sky is completely covered by clouds, with no hope for clearing. This year we made it out 4 nights, at 3 different locations.
Winter Night, Aurora Over Vatnsnes Peninsula, Iceland
Our first attempt was at Kirkjufell, but the Kp was low and the Bz stayed positive and, as expected, the aurora was never more than a faint green, invisible to our eyes and barely visible in our images. We ended up having a beautiful moonlight shoot at one of the most photogenic mountains in the world, but no real aurora display.
The next night was on Vatnsnes Peninsula in far north Iceland. Despite a similarly low Kp forecast, when we finished dinner and saw stars overhead, we went out aurora chasing again. When we started the aurora was definitely better than the prior night, but nothing spectacular. Then the Bz turned moderately negative about half-way through our shoot—it was as if someone had flipped a switch to give us firsthand demonstration of what a negative Bz can do. The show this night far from the most dynamic that Don and I have seen, but it was very nice—especially for the first-time aurora viewers in our group.
The next night we had clear skies again, so our guide took us to Dimmuborgir Lava Fields. With a network of trails that wind beneath striking volcanic rocks (used in Game of Thrones), this turned out to be a fantastic spot for the northern lights—sadly, despite a pretty good Kp forecast, the Bz didn’t cooperate and the aurora that night, while better than the Kirkjufell show, didn’t come close to the prior night.
Which brings me to the workshop’s final northern lights shoot. With a forecast for clear skies, a decent Kp, and a Bz that had been mostly negative for several hours, we returned to Dimmuborgir with high hopes. From the second we exited our van and saw the lights dancing overhead, I knew we were in for a treat. Since the group had already been here twice—once for that earlier aurora shoot, and then again the next afternoon, Don and I just gave everyone a be-back time and set them free (then stood back to avoid being trampled).
I took a lot of pictures of this spectacle, but had almost as much fun watching everyone’s reaction to it. All the while, I monitored the Bz on my aurora app, further confirming its correlation with the brilliance and spread of the aurora above us.
The show this night might not have been the most spectacular northern lights display I’ve ever seen, but it was definitely in my personal top 5—made even better by a location that provided the best variety of striking foreground subjects I’ve ever had for an aurora. And being able to include the Big Dipper with this scene was an unexpected treat.
Join Don and me for next year’s Circle of Iceland Northern Lights photo workshop (a brand new itinerary)
Workshop Schedule || Purchase Prints || Instagram
The Lights Fantastic


