Eloquent Images by Gary Hart
Insight, information, and inspiration for the inquisitive nature photographer
Milky Way Photography
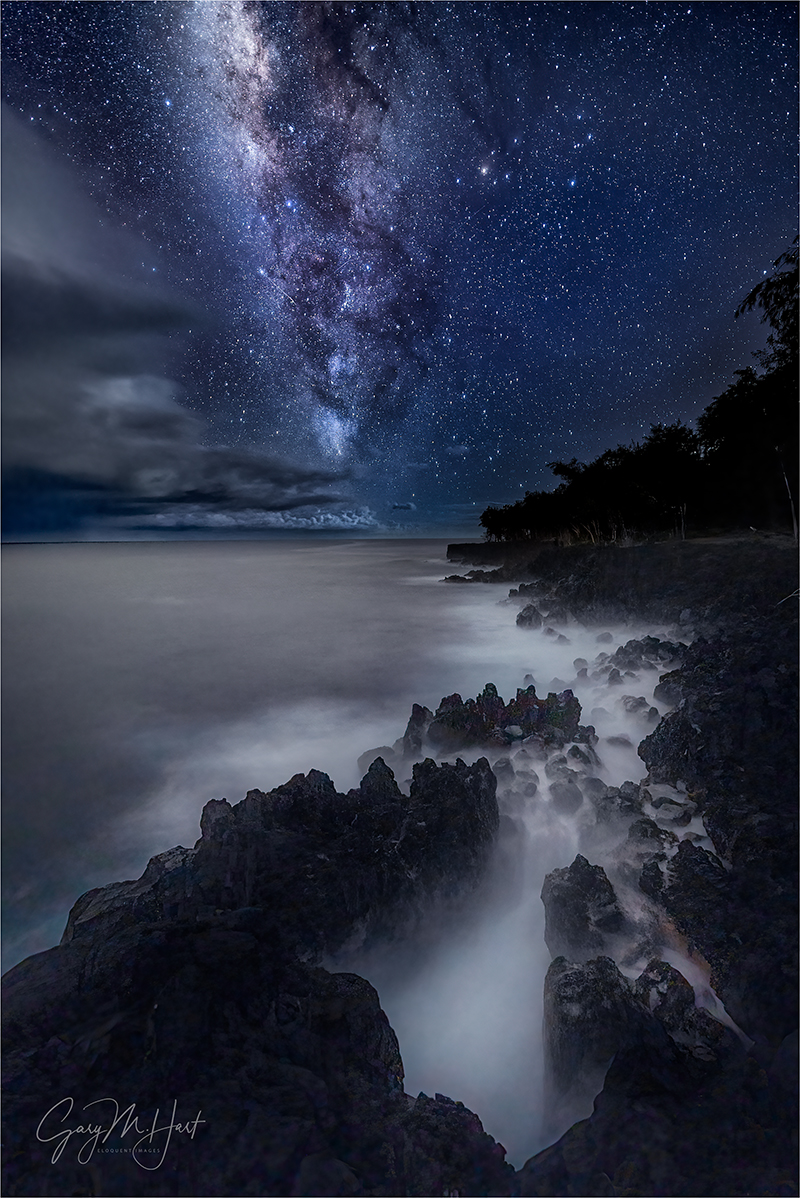
Heaven and Earth, Milky Way Over the Puna Coast, Hawaii
Sony a7SIII
Sony 14mm f/1.8 GM
ISO 6400
f/1.8
20 seconds
See the Milky Way
Look heavenward on a moonless summer night (in the Northern Hemisphere) far from city light. The first thing to strike you is the shear volume of stars, but as your eyes adjust, your gaze might be drawn to a luminous band spanning the heavens. Ranging from magnificently brilliant to faintly visible, this is the Milky Way, home to our solar system, as well as up to a half trillion other stars of varying age, size, and temperature.
Size and shape
Though every star you’ve ever seen is part of our Milky Way galaxy, stargazers use the Milky Way label more specifically to identify this luminous river of starlight, gas, and dust that encircles the night sky. As you feast your eyes, appreciate that some of the Milky Way’s starlight has traveled 25,000 years to reach your eyes, and that light from a star on one edge of the Milky Way would take 100,000 years to reach the other side.

Milky Way look-alike spiral galaxy: This is something like what our galaxy would look like from the outside, looking in. (The individual stars visible here are “local” and not part of the spiral galaxy depicted here.) Earth would be between two of the spiral arms, about halfway out from the center.
While rest of the sky appears to be filled with far more discrete stars than the region containing the Milky Way, don’t be deceived. Imagine that you’re out in the countryside where the individual lights of a distant city blend into a homogeneous glow on the horizon—similarly, the stars in the Milky Way’s luminous band are simply too numerous and distant to resolve individually. On the other hand, much like the lights of nearby farmhouses, the distinct pinpoints of starlight that we name and mentally assemble into constellations are simply closer. The dark patches in the Milky Way aren’t empty space—like the trees and mountains that block our view of the city, they’re starlight-blocking interstellar dust and gas, remnants of exploded stars and the stuff of future stars.
Just as it’s impossible to know what your house looks like by peering out a window, it’s impossible to know what the Milky Way looks like by simply looking up on a dark night. Fortunate for us, really smart people have been able to infer from painstaking observation, measurement, reconstruction, and comparison with other galaxies that our Milky Way is flat (much wider than it is tall) and spiral shaped, like a glowing pinwheel, with two major arms and several minor arms spiraling out from its center. Our solar system is in one of the Milky Way’s minor arms, a little past midway between the center and outer edge.
Blinded by the light
Sadly, artificial light and atmospheric pollution have erased the view of the Milky Way for nearly a third of the world’s population, and eighty percent of Americans. Worse still, even though for most people some part of the Milky Way is overhead on every clear night, many people have never seen it.
The good news is that advances in digital technology have spurred a night photography renaissance that has enabled the Milky Way challenged to enjoy images of its splendor from the comfort of their recliner. But there’s nothing quite like viewing it in person. Fortunately, with just a little knowledge and effort, you too can enjoy the Milky Way firsthand; add the right equipment and a little more knowledge, and you’ll be able to photograph it as well.
Horizon to Horizon
Understanding that our Solar System is inside the Milky Way’s disk makes it easier to understand why we can see some portion of the Milky Way on any night (assuming the sky is dark enough). In fact, from our perspective, the plane of the Milky Way forms a complete ring around Earth (but of course we can only see half the sky at any given time), with its brightness varying depending on whether we’re looking toward the dense center or sparse outer region.
Where the action is

Milky Way and Small Magellanic Cloud, Lake Wakatipu, New Zealand
Though the plane of the Milky Way stretches all the way across our sky, when photographers talk about photographing the Milky Way, they usually mean the galactic core—the Milky Way’s center and most densely packed, brightest region. Unfortunately, our night sky doesn’t always face the galactic core, and there are many months when this bright region is not visible at all.
To understand the Milky Way’s visibility in our night sky, it helps to remember that Earth both rotates on its axis (a day), and revolves around the sun (a year). When the side of the planet we’re on rotates away from the sun and into night, the stars we see are determined by our position on our annual trip around the sun—when Earth is between the sun and the galactic core, we’re in position to see the most brilliant part of the Milky Way when our side of the planet rotates into night; in the months when the sun is between earth and the galactic core, the bright part of the Milky Way is behind the sun and not visible.
Put in terrestrial terms, imagine you’re at the neighborhood playground, riding a merry-go-round beneath a towering oak tree. You’re sitting, facing outward, with your back to the merry-go-round’s center post (axis of rotation). As the merry-go-round spins, your view changes—about half of the time of each rotation you’re on the side facing the oak and can see its trunk; the other half of the rotation your back is to the trunk. Our solar system is like that merry-go-round: the center post is the sun, the Milky Way’s core is the tree trunk—in the year it takes our celestial merry-go-round to make a complete circle, we’ll face the Milky Way about half the time.
Finding the Milky Way
Just like every other celestial object outside our solar system, the Milky Way’s position in our sky changes with the season and time of night it’s viewed, but it remains constant relative to the other stars and constellations. This means you can find the Milky Way by simply locating any of the constellations that happen to be aligned with the galactic plane. Here’s an alphabetical list of the constellations* through which the Milky Way passes (with brief notes by a few of the more notable constellations):
- Aquila
- Ara
- Auriga—faintest
- Canis Major—faint
- Carina
- Cassiopeia—faint; its easily recognized “w” (or “m”) shape makes Cassiopeia a good landmark for locating the Milky Way in the northern sky
- Cepheus
- Circinus
- Crux
- Cygnus—bright
- Gemini
- Lacerta
- Lupus
- Monoceros
- Musca
- Norma
- Ophiuchus
- Orion—faint; another easy to recognize constellation that’s good for finding the galactic plane
- Perseus—faint
- Puppis
- Pyxis
- Sagitta
- Sagittarius—brightest, galactic core
- Scorpius—bright
- Scutum
- Serpens
- Taurus—faint
- Triangulum
- Vela
- Vulpecula
* Constellations are comprised of stars that only appear connected by virtue of our Earth-bound perspective—a constellation is a direction in the sky, not a location in space.
If you can find any of these constellations, you’re looking in the direction of some part of the Milky Way’s band (if you can’t see it, your sky isn’t dark enough). But most of us want to see the center of the Milky Way, where it’s brightest, most expansive, and most photogenic. The two most important things to understand about finding the Milky Way’s brilliant center are:
- From our perspective here on Earth, the galactic core is in Sagittarius (and a couple of other constellations near Sagittarius)—when Sagittarius is visible, so is the brightest part of the Milky Way (assuming you can find a dark enough sky)
- Earth’s night side most directly faces Sagittarius in the Northern Hemisphere’s summer months (plus part of spring and autumn)
Armed with this knowledge, locating the Milky Way’s core is as simple as opening one of the (too many) star apps you can add to your smart phone and finding out where Sagittarius is. Problem solved. Of course it helps to know that the months when the galactic core rises highest and is visible longest are May, June, and July. If you can’t wait until summer and don’t mind missing a little sleep, starting in mid-February, Northern Hemisphere residents with a dark enough sky can catch Sagittarius and the galactic core rising in the southeast shortly before sunrise, rising a few minutes earlier each day. And as summer slides into fall, the galactic core will be visible in the southwest shortly after sunset, setting a few minutes closer to sunset each night. By mid-November the dark sky window closes completely until the next February.
Into the darkness
The Milky Way is dim enough to be easily washed out by light pollution and moonlight, so the darker your sky, the more visible the Milky Way will be. To ensure sufficient darkness, you want to be out during night’s moonless hours. The complete darkness you need varies with your latitude, with sunset twilight ending sooner and sunrise twilight starting later at the lower latitudes. In the mid-latitudes, I usually target 90 minutes after sunset until 90 minutes before sunrise. New moon nights are easiest because the new moon rises and sets (more or less) with the sun and there’s no moon the rest of the night. But on any night, if you pick a time before the moon rises, or after it sets, you should be fine any time between the end of evening twilight and the start of morning twilight. Be aware that the closer the moon is to full, the greater the potential for its glow to leak into the scene while it’s below the horizon.
Getting away from city lights can be surprisingly difficult (and frustrating). Taking a drive out into the countryside near home is better than nothing, and while it may seem dark enough to your eyes, a night exposure in an area that you expect to be dark enough reveals just how insidious light pollution is as soon as you realize all of your images are washed out by an unnatural glow on the horizon. Since the galactic core is in the southern sky when viewed from the Northern Hemisphere, you can mitigate urban glow in your Milky Way images by heading south of any nearby population area, putting the urban glow behind you as you face the Milky Way.
Better than a night drive out to the country, plan a trip to a location with a truly dark sky. For this, those in the less densely populated western US have an advantage. The best resource for finding world-class dark skies anywhere on Earth is the International Dark-Sky Association. More than just a resource, the IDA actively advocates for dark skies, so if the quality of our night skies matters to you, spend some time on their site, get involved, and share their website with others.
It’s not a coincidence that I offer moonless night workshops at my two favorite Milky Way locations, the Grand Canyon and New Zealand.
Photograph the Milky Way
I am a 1-click, natural light photographer. The information I share below details my approach to capturing the Milky Way in a single frame using only available light (without blending images or using artificial light).


Viewing the Milky Way requires nothing more than a clear, dark sky. (Assuming clean, clear skies) the Milky Way’s luminosity is fixed, so our ability to see it is largely a function of the darkness of the surrounding sky—the darker the sky, the better the Milky Way stands out. But because our eyes can only take in a fixed amount of light, there’s a ceiling on our ability to view the Milky Way with the unaided eye.
A camera, on the other hand, can accumulate light for a virtually unlimited duration. This, combined with technological advances that continue increasing the light sensitivity of digital sensors every year, means that when it comes to photographing the Milky Way, well…, the sky’s the limit. As glorious as it is to view the Milky Way with the unaided eye, a camera will show you detail and color your eyes can’t see.
Knowing when and where to view the Milky Way is a great start, but photographing the Milky Way requires a combination of equipment, skill, and experience that doesn’t just happen overnight (so to speak). But Milky Way photography doesn’t need to break the bank, and it’s not rocket science.
Equipment
Bottom line, photographing the Milky Way is all about maximizing your ability to collect light with long exposures, big apertures, and extreme ISOs. And as much as photographers love to claim that “it’s the photographer, not the equipment,” Milky Way photography puts that truism to the test. Long exposures require a rock-solid tripod tripod; a large aperture means a fast lens—the faster the better; and a high ISO doesn’t do much good without a camera that can deliver it without excessive noise.
Tripod
Milky Way exposures are measured in multiple seconds—keeping your camera perfectly stable during such long exposures requires a sturdy tripod and head. You don’t need to spend a fortune, but the more you spend, the happier you’ll be in the long run (trust me). More expensive carbon fiber provides the best combination of strength, vibration reduction, and light weight, but a sturdy (albeit heavy) aluminum tripod will do the job.
An extended centerpost is not terribly stable, and a non-extended centerpost limits your ability to spread the tripod’s legs and get low, so I avoid tripods with a centerpost. But if you have a sturdy tripod with a centerpost, don’t run out and purchase a new one—just don’t extend the centerpost when photographing at night.
For landscape photography I much prefer a ball head (single adjustment knob) over a pan-tilt (separate levers to control each axis of movement). And while most tripod heads specify how much weight they can handle, I’m always skeptical of this number and suspect it’s usually provided by the marketing department, not the engineering team. Because it’s better to have a head that’s a little over-qualified than one that’s slightly under-qualified, I look for a weight limit that’s at least two-times the heaviest camera/lens combo I might use.
Read my tips for purchasing a tripod and head here.
Camera
Noise is the enemy of long, high ISO exposures. In general, the larger your camera’s sensor, the less noise it generates because a large sensor can handle larger, more spread out photosites (the “pixels” that capture the light)—larger photosites collect light more efficiently, and the farther apart the photosites are, the less heat they generate.
The best way to ensure large, less densely packed photosites is to have fewer of them on the sensor. Unfortunately, photosites (megapixel count) sell. But sensor technology keeps improving, so today’s 30+ megapixel sensors outperform yesterday’s lower resolution sensors in low light.
When considering a camera for Milky Way photography, a general rule is that the newer the technology, the better it will perform in low light. Even with their smaller, more densely packed sensors, many of today’s top APS-C bodies outperform in low light full-frame bodies that have been out for a few years, so full frame or APS-C, if your camera is relatively new, it will probably be at least adequate. But in a perfect world, you’ll have a relatively recent full frame camera. (A 4/3 Olympus or Panasonic camera might be okay, but as great as these cameras are for some things, high ISO photography isn’t their strength.)
When shopping for a new camera and think night photography might be in your future, compare your potential cameras’ high ISO capabilities—not their maximum ISO. Avoid anecdotal review in favor of technical reviews by credible sources like DP Review, Imaging Resource, or DxOMark (among many others) to see how your camera candidates fare in their objective tests.
An often overlooked consideration is the camera’s ability to focus in extreme low light. Autofocusing on the stars or landscape will be difficult to impossible, and you’ll not be able to see well enough through a DSLR’s viewfinder to manually focus. Some bodies with a fast lens might autofocus on a bright star or planet, but it’s not something I’d count on (though I expect within a few years before this capability will become more common).
Having photographed for years with Sony and Canon, and working extensively with most other mirrorless and DSLR bodies in my workshops, I have lots of experience with cameras from many manufacturers. In my book, focus peaking makes mirrorless the clear winner for night focusing. Sony’s mirrorless bodies (such as the α1, a7RIV, a7SIII) are by far the easiest I’ve ever used for focusing in the dark—what took a frustrating minute or more with my Canon bodies, I can do in seconds with my Sony bodies (especially the S bodies). I currently use the Sony a7SIII, but when I don’t want to travel with a body I only use for night photography, my Sony α1 or a7RIV do the job too. Of the major DSLR brands, I’ve found Canon’s superior LCD screen (as of 2019) makes it much easier to focus in extreme low light than Nikon. (More on focus later.)
Lens
Put simply, to photograph the Milky Way you want fast, wide glass—the faster the better. Fast to capture as much light as possible; wide to take in lots of sky. A faster lens also makes focus and composition easier because the larger aperture gathers more light. How fast? F/2.8 or faster—preferably faster. How wide? At least 28mm, and wider is better still. I do enough night photography that I have a dedicated, night-only lens—my original night lens was a Canon-mount Zeiss 28mm f/2; my current night lens is the Sony 14mm f/1.8.
Other stuff
To eliminate the possibility of camera vibration I recommend a remote release; without a remote you’ll risk annoying all within earshot with your camera’s 2-second timer beep. You’ll want a flashlight or headlamp for the walk to and from the car, and your cell phone screen for light while shooting. And it’s never a bad idea to toss an extra camera battery in your pocket. And speaking of lights, despite what you might have heard, never, never, NEVER use a red light for night photography (more on this later).
Getting the shot
Keep it simple
There are just so many things that can go wrong on a moonless night when there’s not enough light to see camera controls, the contents of your bag, and the tripod leg you’re about to trip over. After doing this for many years, both on my own and helping others in workshops, I’ve decided that simplicity is essential.
Simplicity starts with paring down to the absolute minimum camera gear: a sturdy tripod, one body, one lens, and a remote release (plus an extra battery in my pocket). Everything else stays at home, in the car, or if I’m staying out after a sunset shoot, in my bag.
Upon arrival at my night photography destination, I extract my tripod, camera, lens (don’t forget to remove the polarizer), and remote release. I connect the remote and mount my lens—if it’s a zoom I set the focal length at the lens’s widest—then set my exposure and focus (more on exposure and focus below). If I’m walking to my photo site, I carry the pre-exposed and focused camera on the tripod (I know this makes some people uncomfortable, but if you don’t trust your tripod head enough to hold onto your camera while you’re walking, it’s time for a new head), trying to keep the tripod as upright and stable as possible as I walk.
Flashlights/headlamps are essential for the walk/hike out to to and from my shooting location, but while I’m there and in shoot mode, it’s no flashlights, no exceptions. This is particularly important when I’m with a group. Not only does a flashlight inhibit your night vision, its light leaks into the frame of everyone who’s there. And while red lights may be better for your night vision and are great for telescope view, red light is especially insidious about leaking into everyone’s frame, so if you plan to take pictures, no red light! If you follow my no flashlight rule once the photography begins, you’ll be amazed at how well your eyes adjust. I can operate my camera’s controls in the dark—it’s not hard with a little practice, and well worth the effort to learn. If I ever do need to see my camera to adjust something, or if I need to see to move around, my cell phone screen (not the phone’s flashlight, just its illuminated screen) gives me all the light I need.
Composition
A good Milky Way image is distinguished from an ordinary Milky Way image by its foreground. Simply finding a location that’s dark enough to see the Milky Way is difficult enough; finding a dark location that also has a foreground worthy of pairing with the Milky Way usually takes a little planning.
Since the Milky Way’s center is in the southern sky (for Northern Hemisphere observers), I look for remote (away from light pollution) subjects that I can photograph while facing south (or southeast or southwest, depending on the month and time of night). Keep in mind that unless you have a ridiculous light gathering camera (like any of the Sony a7S-series bodies) and an extremely fast lens (f/2 or faster), your foreground will probably be more dark shape than detail. Water’s inherent reflectivity makes it a good foreground subject as well, especially if the water includes rocks or whitewater.
When I encounter a scene I deem photo worthy, not only do I try to determine its best light and moon rise/set possibilities, I also consider its potential as a Milky Way subject. Can I align it with the southern sky? Are there strong subjects that stand out against the sky? Is there water I can include in my frame?
I’ve found views of the Grand Canyon from the North Rim, the Kilauea Caldera, and the bristlecone pines in California’s White Mountains that work spectacularly. And its hard to beat the dark skies and breathtaking foreground possibilities at the bottom of the Grand Canyon. On the other hand, while Yosemite Valley has lots to love, you don’t see a lot of Milky Way images from Yosemite Valley because not only is there a lot of light pollution, and Yosemite’s towering, east/west trending granite walls give its south views an extremely high horizon that blocks much of the galactic core from the valley floor.
The last few years I’ve started photographing the Milky Way above the spectacular winter scenery of New Zealand’s South Island, where the skies are dark and the Milky Way is higher in the sky than it is in most of North America.
To maximize the amount of Milky Way in my frame, I generally (but not always) start with a vertical orientation that’s at least 2/3 sky. On the other hand, I do make sure to give myself more options with a few horizontal compositions as well. Given the near total darkness required of a Milky Way shoot, it’s often too dark to see well enough to compose that scene. If I can’t see well enough to compose I guess at a composition, take a short test exposure at an extreme (unusable) ISO to enable a relatively fast shutter speed (a few seconds), adjust the composition based on the image in the LCD, and repeat until I’m satisfied.
Focus
Needless to say, when it’s dark enough to view the Milky Way, there’s not enough light to autofocus (unless you have a rare camera/lens combo that can autofocus on a bright star and planet), or even to manually focus with confidence. And of all the things that can ruin a Milky Way image (not to mention an entire night), poor focus is number one. Not only is achieving focus difficult, it’s very easy to think you’re focused only to discover later that you just missed.
Because the Milky Way’s focus point is infinity, and you almost certainly won’t have enough light to stop down for more depth of field, your closest foreground subjects should be far enough away to be sharp when you’re wide open and focused at infinity. Before going out to shoot, find a hyperfocal app and plug in the values for your camera and lens at its widest aperture. Even though it’s technically possible to be sharp from half the hyperfocal distance to infinity, the kind of precise focus focusing on the hyperfocal point requires is difficult to impossible in the dark, so my rule of thumb is to make sure my closest subject is no closer than the hyperfocal distance.
For example, I know with my Sony 14mm f/1.8 wide open on my full frame Sony a7SIII, the hyperfocal distance is less than 20 feet. If I have a subject that’s closer (such as a bristlecone pine), I’ll pre-focus (before dark) on the hyperfocal distance, or shine a bright light on an object at the hyperfocal distance and focus there, but it’s not usually a problem making sure everything is at least 20 feet away. Read more about hyperfocal focus in my Depth of Field Photo Tips article.
By far the number one cause of night focus misses is the idea that you can just dial any lens to infinity; followed closely by the idea that focused at one focal length means focused at all focal lengths. Because when it comes to sharpness, almost isn’t good enough, if you have a zoom lens, don’t even think of trying to dial the focus ring to the end for infinity. And even for most prime lenses, the infinity point is a little short of all the way to the end, and can vary slightly with the temperature and f-stop. Of course if you know your lens well enough to be certain of its infinity point by feel (and are a risk taker), go for it. And that zoom lens that claims to be parfocal? While it’s possible that your zoom will hold focus throughout its entire focal range, regardless of what the manufacturer claims, I wouldn’t bet an entire shoot on it without testing first.
All this means that the only way to ensure night photography sharpness is to focus carefully on something before shooting, refocus every time your focal length changes, and check focus frequently by displaying and magnifying an image on your LCD. To simplify (there’s that word again), when using a zoom lens, I usually set the lens at its widest focal length, focus, verify sharpness, and (once I know I’m focused) never change the focal length again.
While the best way to ensure focus is to set your focal length and focus before it gets dark, sometimes pre-focusing isn’t possible, or for some reason you need to refocus after darkness falls. If I arrive at my destination in the dark, I autofocus on my headlights, a bright flashlight, or a laser 50 feet or more away. And again, never assume you’re sharp by looking at the image that pops up on the LCD when the exposure completes—always magnify your image and check it after you focus.
For more on focusing in the dark, including how to use stars to focus, read my Starlight Photo Tips article.
Exposure
Exposing a Milky Way image is wonderfully simple once you realize that you don’t have to meter—because you can’t (not enough light). Your goal is simply to capture as many photons as you can without damaging the image with noise, star motion, and lens flaws.
Basically, with today’s technology you can’t give a Milky Way image too much light—you’ll run into image quality problems before you overexpose a Milky Way image. In other words, capturing the amount of light required to overexpose a Milky Way image is only possible if you’ve chosen an ISO and/or shutter speed that significantly compromises the quality of the image with excessive noise and/or star motion.
In a perfect world, I’d take every image at ISO 100 and f/8—the best ISO and f-stop for my camera and lens. But that’s not possible when photographing in near total darkness—a usable Milky Way image requires exposure compromises. What kind of compromises? The key to getting a properly exposed Milky Way image is knowing how far you push your camera’s exposure settings before the light gained isn’t worth the diminished quality. Each exposure variable causes a different problem when pushed too far:
- ISO: Raising ISO to increase light sensitivity comes with a corresponding increase in noise that muddies detail. The noise at any particular ISO varies greatly with the camera, so it’s essential to know your camera’s low-light capability(!). Some of the noise can be cleaned up with noise reduction software (I use Topaz DeNoise 6)—the amount that cleans up will depend on the noise reduction software you use, your skill using that software, and where the noise is (is it marring empty voids or spoiling essential detail?).
- Shutter speed: The longer the shutter stays open, the more motion blur spreads the stars’ distinct pinpoints into streaks. I’m not a big fan of formulas that dictate star photography shutter speeds because I find them arbitrary and inflexible, and they fail to account for the fact that the amount of apparent stellar motion varies with the direction you’re composing (you’ll get less motion the closer to the north or south poles you’re aimed). My general shutter-speed rule of thumb is 30-seconds or less, preferably less—I won’t exceed 30 seconds, and do everything I can to get enough light with a faster shutter speed.
- F-stop: At their widest apertures, lenses tend to lose sharpness (especially on the edges) and display optical flaws like comatic aberration (also called coma) that distorts points of light (like stars) into comet shaped blurs. For many lenses, stopping down even one stop from wide open significantly improves image quality.
Again: My approach to metering for the Milky Way is to give my scene as much light as I can without pushing the exposure compromises to a point I can’t live with. Where exactly is that point? Not only does that question require a subjective answer that varies with each camera body, lens, and scene, as technology improves, I’m less forgiving of exposure compromises than I once was. For example, when I started photographing the Milky Way with my Canon 1DS Mark III, the Milky Way scenes I could shoot were limited because my fastest wide lens was f/4 and I got too much noise when I pushed my ISO beyond 1600. This forced me compromise by shooting wide open with a 30-second shutter speed to achieve even marginal results. In fact, given these limitations, despite trying to photograph the Milky Way from many locations, when I started the only Milky Way foreground that worked well enough was Kilauea Caldera, because it was its own light source (an erupting volcano).
Today (mid-2022) I photograph the Milky Way with a Sony a7SIII and a Sony 14mm f/1.8 lens. I get much cleaner images from my Sony at ISO 6400 than got a ISO 1600 on my Canon 1DSIII, and the night light gathering capability of an f/1.4 lens revelatory. At ISO 6400 (or higher) I can stop down slightly to eliminate lens aberrations (though I don’t seem to need to with the Sony lens), drop my shutter speed to 20 or 15 seconds to reduce star motion 33-50 percent, and still get usable foreground detail by starlight.
I can’t emphasize enough how important it is to know your camera’s and lens’s capabilities in low light, and how for you’re comfortable pushing the ISO and f-stop. For each of the night photography equipment combos I’ve used, I’ve established a general exposure upper threshold, rule-of-thumb compromise points for each exposure setting that I won’t exceed until I’ve reached the compromise threshold of the other exposure settings. For example, with my Sony a7SIII/14mm f/1.8 combo, I usually start at ISO 6400, f/1.8, and 20 seconds. Those settings will usually get me enough light for Milky Way color and pretty good foreground detail. But if I want more light (for example, if I’m shooting into the black pit of the Grand Canyon from the canyon rim), my first exposure compromise might be to increase to ISO 12800; if I decide I need even more light, my next compromise is to bump my shutter speed to 30 seconds. Or if I want a wider field of view than 24mm, I’ll put on my Sony 16-35 f/2.8 G lens and increase to ISO 12800 and 30 seconds.
These thresholds are guidelines rather than hard-and-fast rules, and they apply to my preferences only—your results may vary. And though I’m pretty secure with this workflow, for each Milky Way composition I try a variety of exposure combinations before moving to another composition. Not only does this give me a range of options to choose between when I’m at home and reviewing my images on a big monitor, it also gives me more insight into my camera/lens capabilities, allowing me to refine my exposure compromise threshold points.
One other option that I’ve started applying automatically is long exposure noise reduction, which delivers a noticeable reduction in noise for exposures that are several seconds and longer.
* In normal situations the Sony a7SIII can handle ISO 12,800 without even breathing hard, but the long exposure time required of night photography generates a lot of heat on the sensor with a corresponding increase in noise.
It’s time to click that shutter
You’re in position with the right gear, composed, focused, and exposure values set. Before you actually click the shutter, let me remind you of a couple of things you can do to ensure the best results: First, lower that center post. A tripod center post’s inherent instability is magnified during long exposures, not just by wind, but even by nearby footsteps, the press of the shutter button, and slap of the mirror (and sometimes it seems, by ghosts). And speaking of shutter clicks, you should be using a remote cable or two-second timer to eliminate the vibration imparted when your finger presses the shutter button.
When that first Milky Way image pops up on the LCD, it’s pretty exciting. So exciting in fact that sometimes you risk being lulled into a “Wow, this isn’t as hard as I expected” complacency. Even though you think everything’s perfect, don’t forget to review your image sharpness every few frames by displaying and magnifying and image on your LCD. In theory nothing should change unless you changed it, but in practice I’ve noticed an occasional inclination for focus to shift mysteriously between shots. Whether it’s slight temperature changes or an inadvertent nudge of the focus ring as you fumble with controls in the dark, you can file periodically checking your sharpness falls under “an ounce of prevention….” Believe me, this will save a lot of angst later.
And finally, don’t forget to play with different exposure settings for each composition. Not only does this give you more options, it also gives you more insight into your camera/lens combo’s low light capabilities.
The bottom line
Though having top-of-the-line, low-light equipment helps a lot, it’s not essential. If you have a full frame mirrorless or DSLR camera that’s less than five years old, and a lens that’s f/2.8 or faster, you probably have all the equipment you need to get great the Milky Way images. Even with a cropped sensor, or an f/4 lens, you have a good chance of getting usable Milky Way images in the right circumstances. If you’ve never photographed the Milky Way before, don’t expect perfection the first time out. What you can expect is improvement each time you go out as you learn the limitations of your equipment and identify your own exposure compromise thresholds. And success or failure, at the very least you’ll have spent a magnificent night under the stars.
Workshop Schedule || Purchase Prints
A Milky Way Gallery
Click an image for a closer look and slide show. Refresh the window to reorder the display.


