Eloquent Images by Gary Hart
Insight, information, and inspiration for the inquisitive nature photographer
Shoot the Moon
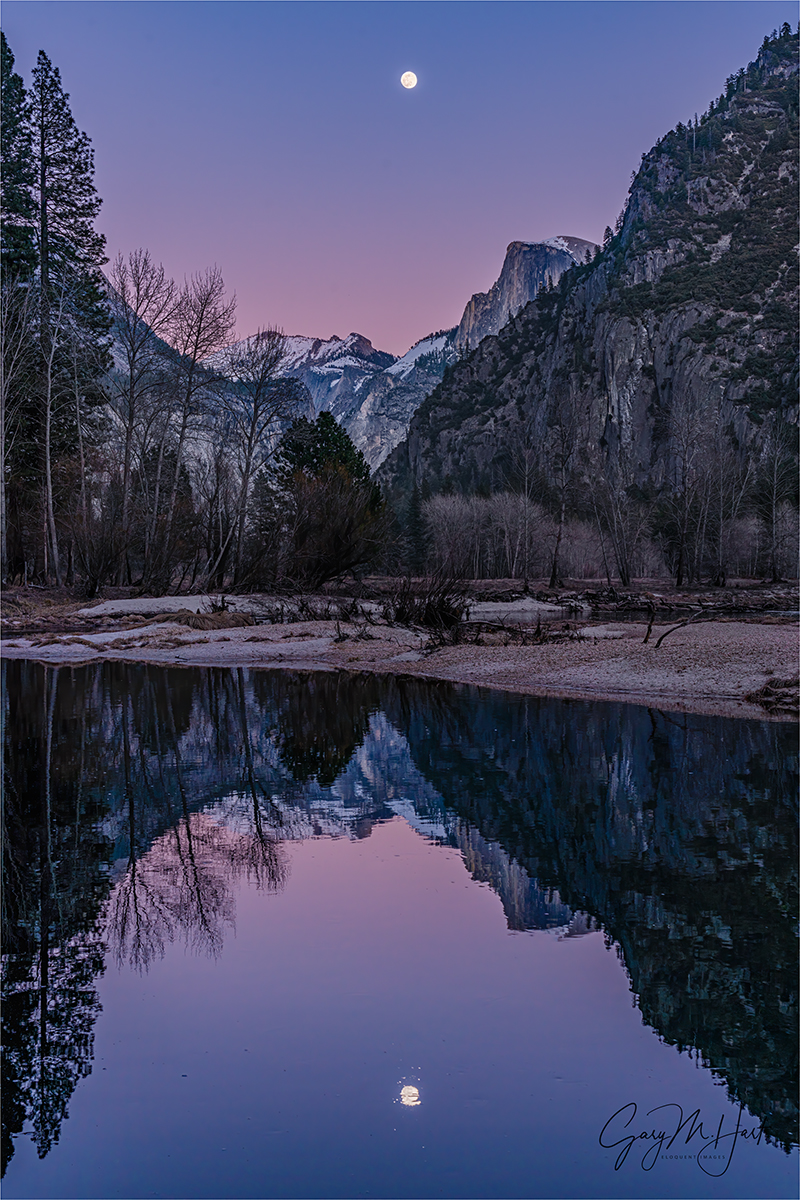
Magenta Moonrise, Half Dome and the Merced River, Yosemite
Sony a7RIV
Sony 24-105 G
1/13 second
F/11
ISO 100
The When, Where, and How of Full Moon Photography
Including a rising or setting moon can turn an ordinary landscape image into something special. Of course, like most things worth doing, moon photography adds a couple of layers of complication: First, there’s the matter of getting there when the light’s right and the moon is in the right place (it does little good to arrive as the moon rises if it’s skewed 90 degrees from the scene you came to photograph). And once you have everything lined up, you still have to contend with the often tricky exposure issues.
Many factors, some within our control, others completely beyond our control, determine the position, phase, and visibility of the moon at any time. We may not be able to control earth’s rotation and the moon’s orbit that determine the moon’s phase and position in the sky, but we can control our location, and take the steps necessary to align the rising or setting moon with the landscape we wish to photograph.
A little lunar geometry (you can skip this section of you’re more interested in “how” than “why”)
A full moon rises and sets directly opposite the sun, rising in the east at sunset and setting in the west at sunrise. This actually makes perfect sense when you take a little time to understand the monthly choreography of the earth, moon, and sun. Just as the earth revolves around the sun, the moon revolves around the earth; at any point in this dance, half of the earth is lit (daytime) and half of the earth is dark (nighttime), and half of the moon is lit and half is dark.
Visualize a photon of sunlight that starts at the sun and follows a straight line that passes through earth and continues into space: On its 29+ day journey around earth, the moon will cross that line twice, passing in front of earth once and behind earth once (as viewed from the sun). On the day the moon intersects that line behind earth (earth is between the sun and moon), we on earth are perfectly placed to see all of the fully lit half of the moon.
On that day only, as the point of your location on earth rotates from day to night, you’ll see the sun disappear in the west as the moon appears in the east. As your spot on earth keeps rotating away from daylight and deeper into night, the full moon rises higher and higher, reaching its highest point around midnight, then dropping as your location rotates back toward sunlight (sunrise). The next day the moon will have moved off that line and you’ll be able to see less of its fully lit side.
So then why do we rarely see a full moon rising exactly as the sun sets? That’s because: 1) the point of maximum fullness (when the sun, earth, and moon align perfectly) only happens at one instant on the full moon day—at every other instant of each month’s full moon day, the moon is only almost full (but still full enough to appear full); 2) sun/moon rise/set times we see published always assume a flat horizon—if you have mountains between you and the horizon, your view of the actual sun/moon rise/set will be blocked; and 3) The more extreme your latitude (angular distance from the equator), the more skewed the sun/moon alignment appears.
Due to the moon’s monthly orbit about the earth, each day (or night) it rises a little later that it did the previous day. For a couple of weeks before it’s full, the moon is in its waxing stage, when we see a little bit more of its disk each day. For a couple of weeks after it’s full, the moon is in its waning stage, when we see a little bit less of its disk each day. The waxing stage starts the day after the new moon and ends with the full moon; the waning stage starts the day after the full moon and ends with the new moon.
So the night after the moon is full, it rises after sunset and is a little less full. The next night it rises a little later still, and is even less full, and so on. Eventually (in a little more than two weeks after it was full) the moon has revolved all the way around the earth until it lies between the earth and sun (now our imaginary line goes sun->moon->earth)—all of its sunlit side faces away from the earth and we have a new (invisible from earth) moon.
We call the moon “new” because the night before it disappears into the sun, all that was left of the shrinking moon (that was completely full about two weeks ago) was a small sliver that shined briefly on the eastern horizon just before sunrise, then disappeared as soon as the sky brightened (it’s still up there, but completely overpowered by the sun’s brightness). The next day the moon won’t appear at all because seeing it would require looking directly into the sun; but the following day, there it is, this time as a thin sliver on the western horizon immediately after sunset (again, it was up there most of the day, we just can’t see it until the sun sets and the sky darkens). This brand new crescent slips below the horizon shortly after it appears. And for the next two-plus weeks it will rise a little later, and grow a little larger, each night, until it’s full again and rising at sunset. Cycle complete.
If we do the math (this won’t be on the test), we can infer that if the moon takes 29.5 days to complete its cycle (from full to new and back to full), and there are 24 hours in a day, the moon must be rising about 50 minutes later each day (29.5/24=48.8). This rough approximation varies with many factors; for simplicity I usually round it to an hour when I do rough lunar calculations in my head. And I always rely on much more precise software or astronomical charts for my critical calculations.
Locating the moon
Those who don’t do a lot of moon photography are amazed at how much the moon shifts above the landscape throughout the year—in Yosemite you can sight a full moon rising between Half Dome and El Capitan one month, and a few months later it’ll be rising above Leaning Tower (far to the south). Fortunately, like many things in nature that appear random to the uninformed, there is actually nothing random about the moon’s location once you take the time to figure it out (or let someone else figure it out for you).
If the idea of figuring anything saps the pleasure from your photography (or sends you into a panic), you’ll be happy to know that sometimes it’s enough to simply know that the moon will be rising in the east a little before sunset. This info is available in many places, in many forms, but in recent years I rely on my Focalware app; the most complete sun/moon website I’ve found is the US Naval Observatory website. Armed with that knowledge, you can go out to a location with a view of the eastern horizon, wait for the moon to appear, and start shooting.
On the other hand, juxtaposing the moon with a specific landmark requires more planning. And because its position is so not random, many others have done the heavy lifting for the rest of us. There are far too many moon phase/position resources to name even a small percentage of them, so rather than even try, I’ll just give you a couple of techniques, and the tools that enable them:
- My old fashioned way (old trick for an old dog): I figured out my technique for locating the moon long before computer software and smartphone apps took away most of the effort. Nevertheless, I continue to do it this way because I’ve already done all the hard work (figuring out how to do it), I can do it in the field, with zero connectivity (no wifi or cell signal required), and I kind of enjoy it. After relying for years on a the US Naval Observatory website for the info I need (moon phase and moon/sun rise, set, altitude, and azimuth), I now get all the pertinent data from my Focalware iPhone app (I never said I’m opposed to new technology), plugging it into my National Geographic Topo! (that’s NG’s exclamation point, not mine) mapping software (discontinued) to plot the direction of the moon’s rise/set. To determine when the moon will appear above (or disappear behind) the surrounding terrain, I plug distance and elevation information from Topo! into the trigonometric functions of my HP 11C scientific calculator (originally an actual calculator, but now also an iPhone 11C emulation app) to compute the elevation in of my horizon.
- Software (the better way for 99.999 percent of you): There are many, many apps that allow you plot the moon’s rise and set above any landscape feature. The ones I’ve used and recommend are The Photographer’s Ephemeris and PhotoPills—I probably would have never taken the time to figure out my technique had apps like these been available when I started. Not only do they give you the sun and moon’s location and elevation above the flat horizon, they also figure out the actual) horizon (terrain included. The downside is that because they need to download maps, they require connectivity and are best used in advance of your shoot (usually not a problem). You do have the option to pre-download the maps to your device for offline access—if I were a PhotoPills or TPE user, I’d be doing this before every trip.
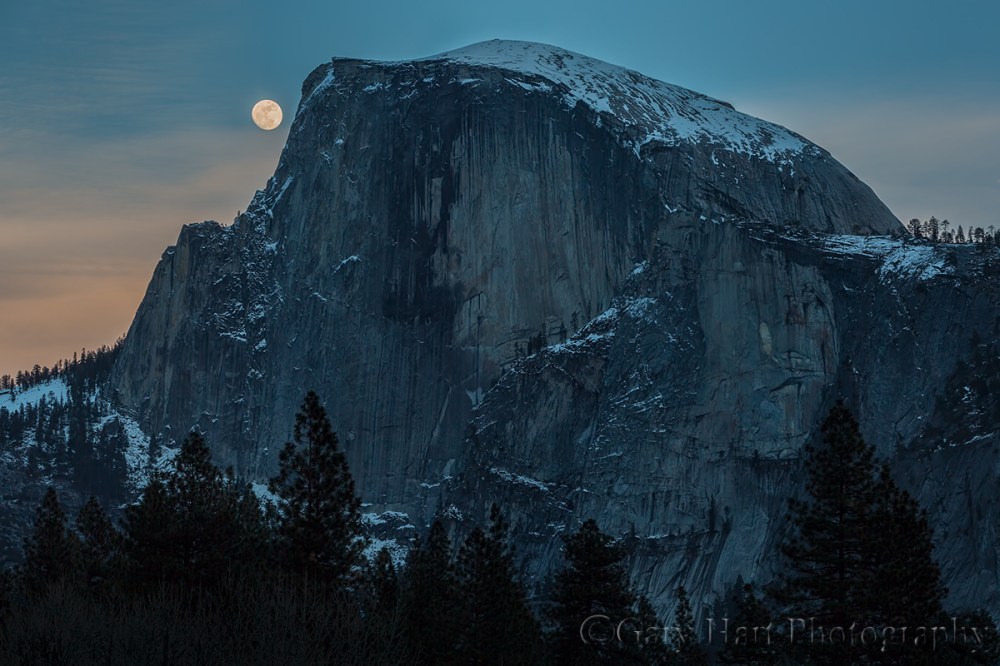
Moon Dance, Half Dome, Yosemite

Moon!, Half Dome, Yosemite
The apparent size of the moon
Many people are frustrated that the moon appears so large in person, yet so small in an image. This doesn’t really bother me because I think even a small moon makes a great accent that can elevate an already nice scene to something special. But if you do like the moon large in your frame (without cheating), find a subject that can be viewed at a great enough distance to be photographed with an extreme telephoto, then figure out when the moon will be aligned with it.
Take a look at the two images above: Though Half Dome occupies more or less the same amount real estate in the frame (albeit at slightly different angles), the first image was captured from less than 3 miles away, while the second one from 8 miles away. The moon is larger in the second image simply because I was far enough away to use a telephoto.
:: For more on photographing a really big moon, read my photo tips article: Big Moon ::
Exposure
My rule for photographing a rising/setting full moon is that I must capture detail in the landscape and the moon . Since the post-sunset landscape is in full shade, and the moon is as bright as a sunlit landscape (because it is a sunlit landscape), the dynamic range of a full moon scene is pretty extreme—often too extreme for a camera to handle with a single click (always my goal). If my landscape is black (or just too dark to see much detail), or my moon is a white disk (or blob), my moon image has failed.

Red Moonrise, Sentinel Rock, Yosemite
But here’s the great part—given that the moon rises about an hour later each day, and the full moon rises at sunset, it stands to reason that the day before it’s full, the moon will rise about an hour before the sun sets. Factoring in the terrain on the horizon (and assuming you’re not at the base of a mountain that forces you to look straight up to see the sky), that means that the day before the moon is full is often the best opportunity to photograph a nearly full (around 98%, give or take a percent or two) moon rising in the east above a landscape painted with the warm sunlight of the golden hour (such as the Half Dome images immediately above). Conversely, if your view is to the west, you can photograph a nearly full moon setting above a scene bathed in warm sunrise light the day after it’s full. Either way, the day before or after the full moon gives you everything you need to capture your scene in nice, photographable light that’s still sufficient to hold the moon’s highlights at bay.
I’ve found that if I’m really careful with my exposure, I can usually capture enough foreground and lunar detail until 10-15 minutes after sunset (dynamic range is king for these shots, a big reason I switched to Sony). Shooting high dynamic range moon images usually requires raw capture, then massaging the dark foreground brighter, and bright moon darker, in the raw processor. A graduated neutral density filter can increase this threshold another 10 minutes after sunset or before sunrise.
Another technique that works when the light gets too extreme is a composite—two images, one exposed for the landscape and the other exposed for the moon, combined in Photoshop. In the “Rules According to Gary,” this isn’t cheating if you don’t change the size or position of the moon. (But compositing does break my personal rules because I have this weird compulsion to get everything with one click.)
The final piece of exposure advice I’ll add is to make sure your camera’s blinking highlights (also called highlight alert), and zebras if you shoot mirrorless, are turned on. Since the moon is usually too small in your frame to register in the histogram, blinking highlights and zebras are usually the best way to know that you’ve blown out the moon.
I monitor my highlights closely after each exposure and have found that, when shooting raw (jpeg shooters don’t have as much margin for error), I can usually recover enough detail with an exposure 2/3 to 1 stop brighter than the exposure that first showed blinking. Once I’ve reached the maximum lunar exposure, I keep shooting until the foreground becomes too dark to recover usable detail.
Just do it
Like most things photographic, don’t expect resounding success the first time you try adding a full moon to your landscape. But each time you go out, not only will you improve, you’ll probably come away with ideas for how to do it differently the next time.
Workshop Schedule
The Moon, Big and Small
Click an image for a closer look and slide show. Refresh the window to reorder the display.


, Yosemite")


")


Read more moon photography how-tos

Sunrise Trio, El Capitan and Half Dome, Yosemite

Big Dipper, Alabama Hills, California

Very useful information Gary, many thanks.
Well put, Gary. One other reason why the moon and sun don’t always do a synchronous rise-set dance when the moon is full is because the moon’s orbit is inclined by 5 degrees to the plane of the earths orbit around the sun which effects the rise/set time of the moon relative to the sun.
The exact moment of the full moon is defined as you described, when the moon is exactly opposite the sun from the earth. For that reason the full moon can occur at say, 10:00 AM – when the moon is not visible locally – but of course for someone, somewhere on the planet at that moment the moon is rising for someone and setting for someone else. I’ve been chasing the moon and sun for quite a while. Always a great pleasure when everything works well. Finally, in addition to TPE, there are several new apps, like PhotoPills that aid greatly in the calculations. I’ve yet to find one that completely does the job, however.
What are some of the apps? I know about PlanIt, which seems to be pretty good.
The two I’m most familiar with are PhotoPills and The Photographer’s Ephemeris. There are many more but these are the only ones I’ve used enough to recommend.
Very helpful, Gary. Thanks for the clear explanation of the moon’s cycle. I look forward to experimenting more with moon photography. Beautiful image. Thanks for all your help at the workshop in Bryce Canyon.
My pleasure, Kathy, it’s great to hear from you.
As always, really great information. thanks for sharing.
Pingback: The twilight edge | Eloquent Nature by Gary Hart
Pingback: Half Dome moonrise | Eloquent Nature by Gary Hart
Pingback: Blue moon | Eloquent Nature by Gary Hart
This is a great tutorial. I learned a lot of things I’d like to try. Quick question: do you have a preference for F stops when trying to get detail in the moon? Or is it more a question of under-exposing a little? I see that you used F11 for a few of the images.
Thanks, Kavi. As far as your camera is concerned, the moon is at infinity regardless of the f-stop, so it’s best if you use your sharpest apertures. That generally tends to be in the f8-f11 range, but you can test each lens to find its sweet spot. The other thing to be careful about is avoiding diffraction, which usually means f11 or smaller.
Thanks for sharing. I’ve shot the moon many times on Kauai and Big Island both “straight” and “cheating”. Since I’m shooting ” art” and not journalism, I don’t call it cheating. While I already knew almost all the info in your article I always enjoy reading photo tips.
If you’d consider a workshop on Kauai, I’d like to apply as an assistant/guide. Alohadios. Jock happy 2016.
Pingback: Moon chasing: The rest of the story | Eloquent Nature by Gary Hart
Pingback: A few words about the “supermoon” | Eloquent Nature by Gary Hart
Pingback: A few words about the “supermoon” | Ecology Way
Beautiful images! Capturing the moon is landscape just adds that extra bit of majesty to any photo.
Pingback: Curing the Blues | Eloquent Images by Gary Hart
Great information, Gary! Thanks for taking the time to share your knowledge (once again!). I try to get a shot with one click also, but too many times that doesn’t work so then I go into “mad photographer” mode trying all kinds of settings. It has helped me to learn ( along with your info) and now I have fewer and fewer “throw aways” on my computer. You’ve peaked my interest for “moon” and night photography so I’m attempting some of that when we happen to get a clear night here in NY. Stay well in CA!
Pingback: Photography With Friends | Eloquent Images by Gary Hart
With a modern camera sensor that has a greater DR it is easier to capture the rising moon or any phase and postion. This is especially true for the Sony a7S II and now 3. I just thought about using a reverse grad for the rising moon for cameras that do not have that DR. Any thoughts out there…
Yeah, one of the things I love most about the Sony Alpha cameras is the extra dynamic range for moonrise/set images. I used to use a GND for these scenes when I shot Canon, but have found I don’t really need them anymore.
Gary…do you find a lot of difference btw the Ar73 and the A7s for night work. The Ar74 and A7s are too expensive for my current budget. Thanks
Yeah, there’s a pretty significant difference—I’d guess 2 stops. And just as important to me is how much easier it is to see in the dark through the a7S series viewfinder—major difference. The problem of course is that the a7Sx bodies have only 12 megapixels, which is really enough almost everyone. But as much night photography as I do, it’s not enough to justify a 12MP body as my primary body when there are great 40+MP options out there. So I only use my a7Sx bodies for night.
Pingback: The Third Time’s the Charm | Eloquent Images by Gary Hart
Pingback: You Had to Be There | Eloquent Images by Gary Hart
Pingback: Relationship Building | Eloquent Images by Gary Hart
Probably the most stunning moon shots I have ever seen in my life.
Thanks so much, Rubens. 🙏
Very nice bloog you have here