Eloquent Images by Gary Hart
Insight, information, and inspiration for the inquisitive nature photographer
Antelope Canyon
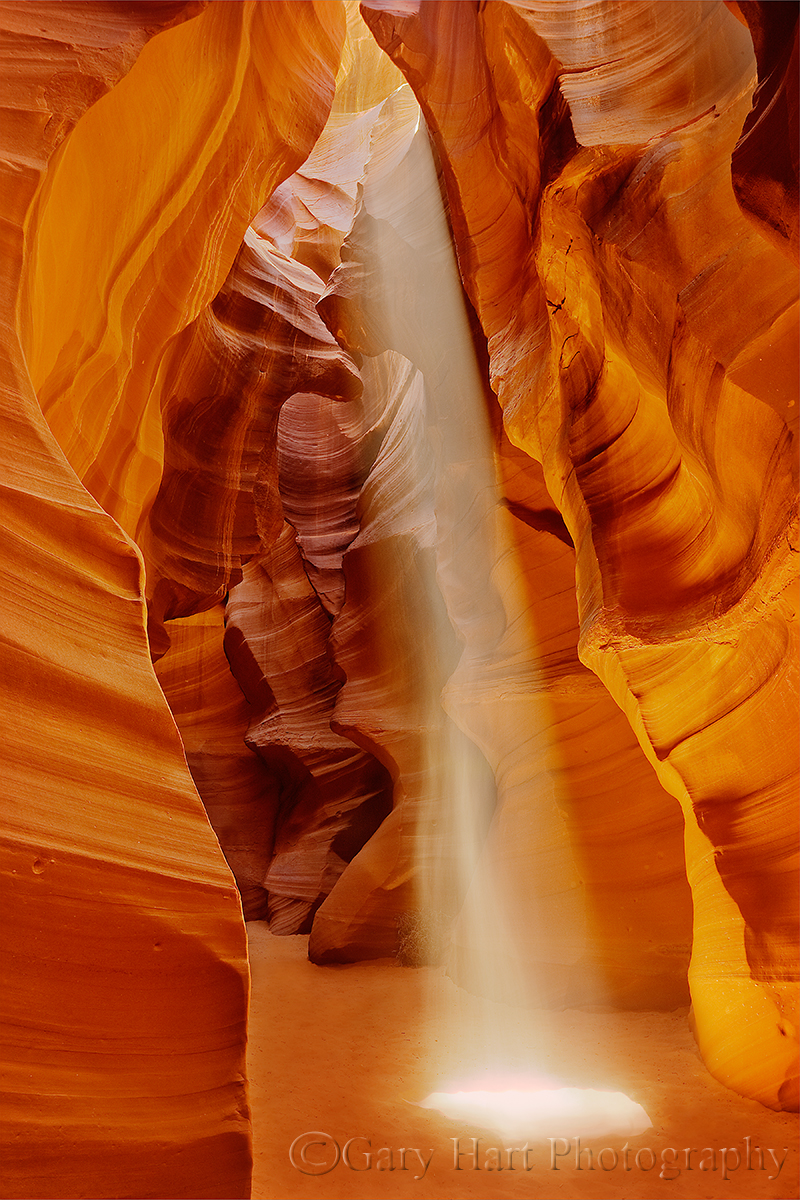
Heavenly Beam, Upper Antelope Canyon, Arizona
Effective December 2019, until further notice, photo tours are not offered in Upper Antelope Canyon.
Sightseeing tours (without tripods) are still available.
How to Photograph
Upper Antelope Canyon
Two canyons
Upper and Lower Antelope Canyons, just outside Page, Arizona, are the most visited of many narrow slot canyons carved into hard American Southwest sandstone by years of drought/flood cycles. Lower Antelope Canyon is narrower, steeper, and (slightly) less crowded than its upper cousin. But it’s Upper Antelope Canyon, with its laser-like beams of sunlight that seem shot from heaven, that draws the crowds—hundreds and hundreds of tourists and photographers each day, jammed tightly into this twisting, narrow 1/8 mile corridor like commuters in a Tokyo subway.
I’ve heard it said that the only guaranteed shaft you’ll Upper Antelope Canyon is the one you’ll get from the Navajos who oversee it, charging exorbitant fees to anyone willing to pay and with no regard for their experience, but I don’t think that’s a fair assessment. First, you can hardly fault the Navajos for profiting from this wonder (have you ever been to Disneyland in July? Or Yosemite?). And while the experience can be something of a shock to the unprepared, (despite appearances to the contrary) the number of visitors in the canyon at any given time is in fact limited, and the guides do a pretty decent job of managing the throngs, balancing the needs of the casual tourist with those of the tripod-toting photographers desperate to get their shots.
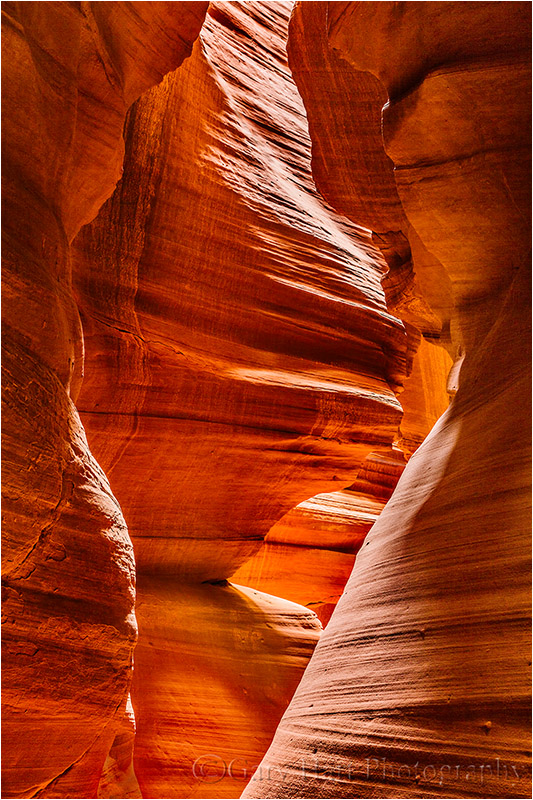
Divine Radiance, Upper Antelope Canyon
Chasing icons
Most photographers enter Upper Antelope with the single-minded goal of photographing a floor-to-ceiling light beam. For many the Antelope Canyon Holy Grail is the light shaft in the main room just inside the entrance. Like Horsetail Fall in February, Mesa Arch at sunrise, and the salmon-snacking grizzly at Katmai, it’s a true bucket-list shot. The fact that the world doesn’t really need any more versions of this particular image doesn’t seem to be a deterrent.
But there are other less known light shafts, some that reach all the way to the dusty floor, others that drill into the hard sandstone walls. And I’d argue that the best opportunity to find something unique in this heavily photographed location is to forego the beams and concentrate on the play of reflected light illuminating the canyon’s graceful curves, lines, and shapes. If it’s your first visit to Upper Antelope Canyon, by all means start with the cliché shot (I did), but challenge yourself to find something that’s uniquely yours.
The Upper Antelope circus
The popular Upper Antelope Canyon sunlight shaft image is ubiquitous because each sunny day from mid-March through mid-September (months the sun climbs high enough to reach the slot’s floor), and hundreds of photographers line up for their opportunity to capture it. And when I say line up, I mean that literally—most days two ranks of ten or so photographers assemble military volley style, the first rank kneeling in the dust behind their tripods in front of a second rank aiming over their shoulders. Off to the side are Navajo guides, arms outstretched to hold back the next wave, barking “Shoot!” orders like battlefield commanders. As soon as one group finishes (and sometimes before), they’re herded along so the next can line up.
To the unprepared, Upper Antelope Canyon at light shaft time is an incredibly stressful experience, nothing like the cathedral-like solitude conveyed by the images (though the footprints are a clue to the mayhem). I’ve seen photographers actually retreat from the canyon because they couldn’t handle the urgent pace, tight quarters, constant jostling, and frantic shouting. But after a ten or so Upper Antelope Canyon experiences (and counting), I’m finally starting to feel at ease in this incredibly stressful environment, an environment made even more stressful to photographers by the extreme dynamic range, ubiquitous dust, and a seemingly infinite number of composition decisions.
How do you define success?
Success in Upper Antelope Canyon starts with reasonable expectations going in. My Upper Antelope strategy starts by narrowing my goals: There may be several images on my “must-have” list, but it’s a huge mistake to think I’ll be able to effectively check-off more than one or two on a single visit, and in fact it’s usually counterproductive to try to do too much. On my first visit to Upper Antelope Canyon I had no expectations or plan—I was merely satisfied to escape with my life and a handful of cliché (albeit beautiful) shots. On subsequent visits I settled down enough to seek images that felt more uniquely mine, keeping my mind open enough to adjust to whatever opportunity presented itself.
Regardless of my location in the canyon, there are a few cornerstone objectives for all of my images. For example, I don’t want any sign of human activity, so at Antelope Canyon I avoid footprints (as much as is possible), the obviously staged scenes (like the tumbleweed on the ledge that has been there for as long as I’ve been visiting), and people in my images. Another of my “things” is that I never shoot HDR or otherwise blend multiple images. But these are just me—you, on the other hand, may like the story told by footprints, the serenity of an Antelope Canyon tumbleweed still life, the ability to blend a sliver of blue sky into the top of your image, or the sense of scale people provide. Whatever matters most in your photography, make sure (before entering the canyon) that you have an idea how you’ll accomplish it, because when the crazy starts, you’ll need to triage your list.
While getting something absolutely unique in such a heavily photographed location is pretty tough, success increases as you slow down—not just physically slow down (you probably won’t have much choice), but mentally as well. It helps me slow down when I identify one general theme to concentrate on, such as the many ephemeral, less known shafts bouncing around near the ceiling; tight shots that isolate compelling aspects of a larger scene; wide shots that reveal an entire room; or shapes and relationships formed by the play of shadow and light on the curved sandstone. Of course if something else jumps out at me I’ll give it a shot, but I try to maintain my focus on my narrow goal for the duration of my visit.
And finally, come to terms with the reality that success doesn’t mean getting every image you set out for, and prioritize your objectives accordingly: For example, if not getting a light shaft will mean a month of sleepless nights and kicking the dog, prepare to enter the canyon at the front of your group and to move without hesitation—but please, once you get a few good images, move to the back and let others have their chance. Honestly, the happiest Upper Antelope photographers are those who enter with no life-or-death objectives and are able to simply roll with the conditions, because even the best plans can disintegrate in the bedlam. I’ve grown to love lingering at the back of my group and shooting above everyone’s head.
Have a plan
Rolling with the conditions in Upper Antelope Canyon doesn’t mean that you shouldn’t be prepared. The world speeds up when sunlight shafts in Upper Antelope; the more you have ready before you start, the more productive you’ll be. So without further ado, here are my suggestions for getting the most out of your experience in Upper Antelope Canyon:
- Check the current rules: I have photographed Upper upper and Lower Antelope Canyons many times, but I don’t get there every year, and it seems like the rules change each year—especially the rules about cameras and tripods, and when you can and can’t bring them.
- The ceil-to-floor shafts only happen midday, in spring and summer: If your happiness depends on photographing light shafts in Upper Antelope Canyon, you’re setting yourself up for disappointment if you just show up and assume they’ll be there. The lower the sun, the higher on the walls the sunlight terminates, so you’ll only get the sunlight shafts midday only (late morning into early afternoon), from (roughly) mid-March through mid-September, when the sun is high enough in the sky that it can reach all the way to the floor without first running into a wall. And of course the shafts require direct sunlight, so cloudy days won’t work.
- It’s not all about the shafts: Believe it or not, some of the best images in Upper Antelope Canyon don’t require light shafts, so don’t let their absence ruin your day.
- Pay the extra money for the photo tour: If you want to take a tripod (and you definitely should), you must be on a photo tour. A photo tour will put you with like-minded visitors who understand that a flash causes more problems than it solves, that it’s not okay to walk in front of someone with a camera or to bump a tripod, and that they should get out of the way as soon as they get their shot. And your guide will (should) know the location and timing of each beam almost down to the minute, and do what he/she can to get you there at the right time. Not only that, photo groups get an extra hour (for a total of nearly two hours) in the canyon. While this extra hour usually comes after the shafts have left, it also comes when the canyon is much (!) less crowded—it will be your best time for undisturbed, creative photography.
- Dress for the canyon, not the weather in Page: It’s cool in the canyon, but not cold—on a summer day it can 20 degrees or so cooler than the outside temperature. In winter, it can feel warmer in the canyon than outside. Before getting on the truck that will take you out there, ask the guide what he/she wears in the canyon. I often visit in spring, when it’s cooler, and have sometimes brought a sweater and waited until I see the earlier groups’ guides leaving the canyon before deciding whether to wear it or leave it on the truck. If you’re going in summer, this probably won’t be necessary.
- Invest in a can of compressed air: Stop by the Walmart in Page and pick up a can of compressed air (if you’re with a group, you can share). I used to keep the compressed air in my room and do a thorough cleaning when I got back, but I’ve started carrying it with me to use in the canyon too. A bulb blower is usually okay in the canyon, but you’ll still want compressed air for later.
- Gear up for the ride: The twenty-minute ride to Antelope Canyon is a definite E-ticket. You’ll be crammed so tightly into a van or open-air truck that you may exit with the imprint of your neighbor’s belt loops on your hip. Depending on your driver (who will probably also be your guide), at various points on the journey, first through the streets of Page and later on the soft dust of Antelope Wash, you may feel that your life is in jeopardy as your chariot careens around corners and seems constantly on the verge of tipping.
- Wear a hat: At the canyon dust will be in the air even if it’s not windy, and if it is windy, dust will spill onto your head—I have learned not to go in the canyon without a hat.
- Bring a tripod (photo tour only): It’s dark in the canyon, so if you’re a serious photographer, don’t even think about photographing there without a tripod.
- Pick one lens and stick with it: Antelope Canyon is incredibly dusty—changing lenses in there pretty much guarantees dust in your camera and on your sensor. A zoom lens is best, but whether you go with an ultra-wide or a moderate-to-long telephoto zoom, there will be plenty of shots to keep any lens busy. A relatively wide lens is best if you want the ceiling-to-floor sunlight shaft shots, but the wider you compose, the harder it will be to keep your frame free of people and the unrecoverable brightness in the rafters. I shoot Sony mirrorless; my Upper Antelope lens of choice is usually my 24-105 because they’re wide enough on a full frame body to cover an entire room, and long enough to frame portions of a scene (with the crowds it’s just too hard to keep people out of the frame with my 16-35). If you don’t have a 24-105, a 24-70 will do the job as well. I’ve also been happy shooting Upper Antelope with my 70-200, a great lens for isolating the canyon’s graceful curves and for composing out people, but that might not be the best choice for a first-time visitor hoping to get the classic light beam shots. If you must change lenses, wait until you reach the back of the canyon and get outside.
- Practice changing lenses: If you must change lenses in the canyon, do it inside a plastic bag, and practice before going into the canyon.
- Consider carrying a second body: A second body is a great way to give yourself compositional variety without changing lenses. If you’re like me and don’t routinely use a camera strap, don’t forget to pack one for each body. And be aware that adding the bulk of an extra camera will make you less maneuverable in close confines. On one visit I took my full-frame a7RIII with the Sony 24-105 lens, and put my lensless 1.5-crop a6300 body in my pocket (without lens it actually fits in the hip pocket of my jeans). When I got outside at the back end of the canyon, I switched bodies (the a7RIII doesn’t fit in my hip pocket) and made the return trip through the canyon with a 50% longer focal length.
- Leave the camera bag at the hotel: The lighter you can travel, the faster you’ll be able to respond, and the easier time you’ll have getting through tight spaces. Also, if you’re wearing a backpack, not only will you be frequently bumped, you’ll be constantly be bumping others and scraping the walls.
- Cover your camera with a plastic bag when you’re not shooting: A used grocery bag or a garbage bag (not used, please) from your hotel room is great for minimizing dust exposure while your camera is waiting on the tripod.
- Wear something with pockets (the larger/looser the better): In cool months a sweater or light jacket is great. In the warmer months, you’ll have to get by with your pants or shirt pockets. I try to wear something with pockets big enough for my blower or compressed air. I also stuff my lens cap and the bag covering my camera in a pocket while I shoot. A small fanny pack that hangs in the front will do the job.
- Pre-set your exposure variables: The exposure varies greatly in Antelope Canyon, so there is no single ideal setting, not even close. But to keep things simple, I usually set my aperture and ISO before entering the canyon and touch them as infrequently as possible—I usually start with ISO 400 and f/11 and try to manage my exposure entirely with my shutter speed. I repeat: it’s amazing how much the light can change as you wind through the canyon, so you will be making exposure adjustments. In my DSLR days I spot metered in manual mode, but now that I shoot mirrorless I simply monitor the histogram in my viewfinder. If you know how to bring up the live-view histogram on your DSLR LCD, that will work too. You won’t have lots of time to figure things out, so for someone not real comfortable with managing exposure, matrix/evaluative metering in one of the auto modes is probably easiest. Since I’m on a tripod and nothing’s moving, I could shoot everything at ISO 100, but usually choose 400 ISO because in such a frantic environment, the difference between a two-second exposure and an eight-second exposure can be significant when everyone is clamoring for your space.
- Shooting raw will give you a much greater exposure margin for error.
- Monitor your histogram (and turn on blinking highlights): Get in the habit of checking for exposure problems and adjust if necessary before recomposing (remember, you’re on a tripod—right?). Blown highlights are almost always worse than black shadows, which can often be recovered later (as long as they’re not too dark). If you have the base of a light shaft (where it hits the floor or wall) in your frame, if you’re not careful there’s a good chance that contact point will be hopelessly blown. In those situations I try to make the hot spot as bright as I can without completely blowing it out, then hope I can recover the shadows and highlights in post.
- Don’t forget your RGB histogram: The standard luminosity histogram is better than nothing, but the color in Antelope Canyon skews drastically to the red channel. What your luminosity histogram doesn’t tell you is a that an apparently properly exposed frame may in fact include a blown red channel. If you’re shooting raw and the overexposure isn’t too extreme, you can probably recover the blown channel, but the last thing you want is to realize too late that you lost some of the canyon’s fabulous color.
- Don’t automatically assume autofocus is making the right choices: Given the canyon’s tight confines, even with a small aperture, unless you’re extremely wide you may find it difficult to achieve front-to-back sharpness. Make sure your focus point falls on or slightly behind the most important part of your composition. Autofocus can do this if you’re careful, but with all the nooks, crannies, curves, intersections, and front-to-back elements for autofocus to lock onto, you need to monitor the focus point closely. I’m almost always in manual focus mode in Upper Antelope, and think live-view focus is a God-send. If your camera autofocuses effortlessly in live-view, consider that. I never trusted precise focus choices to my DSLR, but in my Sony mirrorless bodies I can very quickly set the focus point and autofocus.
- The best compositions are often above everyone’s head: You’ll be doing a lot of waiting, but that doesn’t mean you can’t be shooting. Because my Antelope Canyon visits are with always a photo workshop leader, I’m pretty much always at the rear (the leaders’ shots are always lowest priority), which means when the shafts are present I often don’t get to shoot anything that’s not toward the top of the canyon. On the other hand, my favorite Antelope Canyon images have come from looking up.
- There’s more to Upper Antelope than light shafts: Much like photographing sand dunes, in Antelope Canyon you’re shooting curves, lines, and contrast. The more you can train your eye to see a scene the way your camera will see it (limited dynamic range and constrained view), the more productive your visit will be.
- Consider visiting Lower Antelope Canyon: Lower Antelope, while similar in many ways, is quite different to photograph. It’s narrower, steeper (requiring steep metal stairs in places), and less crowded. While you won’t find many (or any) light shafts there, you will find lots of creative opportunities. You’ll also be able to stay longer and move at a more comfortable pace.
- Tip your guide: I have no idea where the proceeds of the Antelope Canyon gold mine end up, but it’s safe to say it isn’t with the guides. If you think your guide did a good job, don’t be shy about expressing your appreciation with a $5 or $10 (or more) gratuity.
- Clean up your gear: Camera, lenses, tripod will be coated with dust when you’re done, so this is where you’ll really appreciate that compressed air you picked up before you left. The sooner and more thoroughly you clean your gear, the less you’ll experience that disconcerting crunching whenever you twist the focus ring or extend a tripod leg.
Examples
-
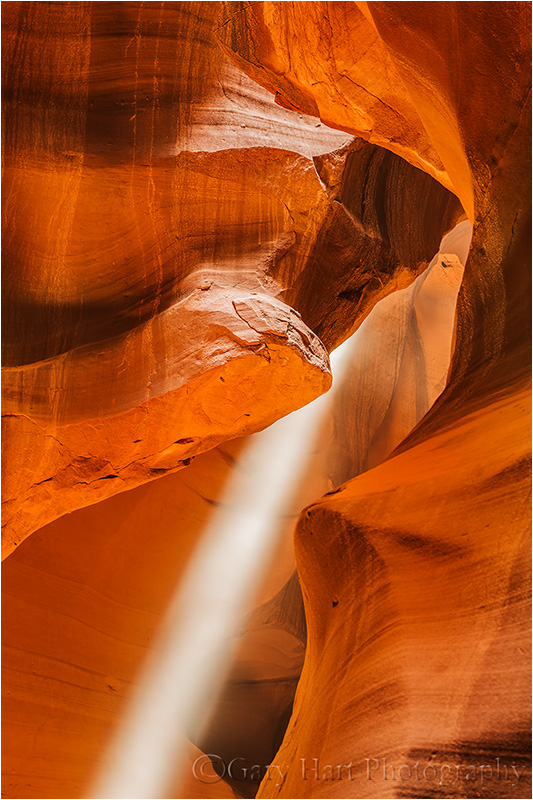
Focused Beam, Upper Antelope Canyon, Arizona

I got this version of the upper half of Antelope’s “classic” shaft while hanging back waiting for everyone in our group to get their classic shot. While waiting I had tons of time to play with compositions, manage my exposure, and ensure the correct focus point without feeling rushed.
Because the shafts show best when there’s dust in the air, the canyon guides carry scoops for flinging dust into the light’s path. While working this scene I was able to figure out the sweet spot between exposing too soon after the dust was tossed, when the shaft was too bright (completely blown out), and too late, when the shaft faded past the point of dramatic effect. This insight served me quite well on subsequent shafts when I only had time for one or two frames.

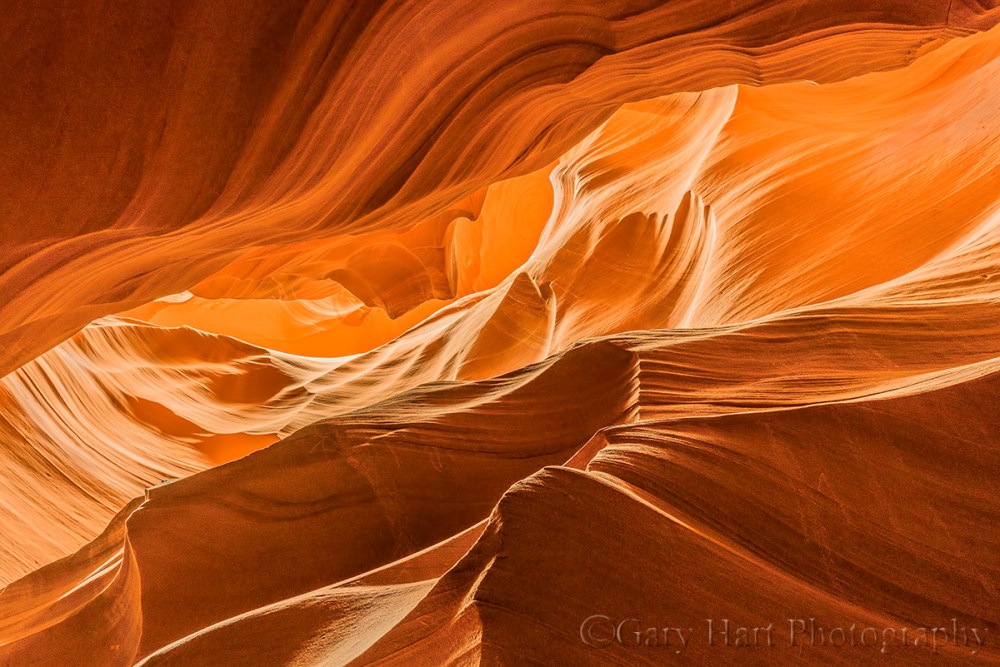
Here’s another composition I found overhead while waiting behind the group. Again, with lots of idle time, I started wide in the direction of this glow originating around the bend, studying each frame on my LCD and incrementally tightening and balancing my composition. Once I had my composition I was able to scrutinize my results to ensure exposure and focus were right.
Like a summer afternoon reclined beneath a cumulus sky, quiet time in Upper Antelope Canyon allows the creative brain cells to connect curves, lines, and relationships into recognizable shapes. Your guide will probably point some of these out to you, but you can find them on your own too. I “discovered” this human profile (see it in the upper right?) in the second hour of our group’s photo tour, when we were on our own to wander in peace. (I’m pretty sure this face is sometimes pointed out by the guides too.) While the canyon is far from empty, it is no longer crowded and the vibration is far more relaxed.
I stayed with this scene for about fifteen minutes, working around others who occasionally strolled through. Not wanting to inconvenience anyone by making them wait, but stubbornly refusing to move on until I knew I had what I wanted, I dropped my ISO to 100 and my f-stop to 16. The resulting 20-second exposure enabled me to usher people through quickly without any sign of them in my frame. A couple of times people lingered slightly, creating a cool ghost effect—this isn’t something I wanted, but it might be fun to try if you like that sort of thing.
Enjoy!
What you get from Antelope Canyon is ultimately up to you and the attitude you bring. Enter with reasonable expectations, slow your mind, look up a lot, and whatever you do, don’t forget to occasionally disconnect from your photographic needs long enough to appreciate the unique beauty of this genuine natural wonder.
While I don’t offer photo workshops in Antelope Canyon, I do offer them in many other extremely cool places:
Photo Workshops in New Zealand, Iceland, Yosemite, Grand Canyon, Hawaii, Eastern Sierra, Pacific Northwest, and Death Valley

Antelope Canyon Gallery


Hi Gary. I just finished posting 5 HDR images of Upper Antelope Canyon from our late March 2013 workshop to my aminus3 blog and wanted to revisit your advice and approach to shooting in the slot canyon. This is a well-written piece, and I enjoyed the experience again through your images and words. Thanks to you and Don for prepping us so expertly-it really made the shoot successful for me. I am happy with the images I got from my first time there, but would definitely go again!
Thanks so much, Julie. Those are gorgeous images that demonstrate the power of HDR done right. I hope you don’t mind if I share them with everyone else: http://juliebrown.aminus3.com. (And here’s the Antelope Canyon piece Julie mentions: https://garyhartblog.com/photo-tips/antelope-canyon/.)
Hi Gary,
Thanks for your comment regarding my HDR images. I don’t think I saw this until now. What made me come back to this blog post was a message I received through my photoblog from someone who read this and wanted the link to my Antelope Canyon images.
My pleasure, Julie. Hope you’re doing well.
To get a challenge is one thing, to solve it an other. I think you have made it. Thank You
Any thoughts about use of a polarizer or other filter? Thanks
Phenomenally well written article. Thanks for the insights.
I did wonder if you had any recommendations on your preferred focal lengths for shooting in the canyon. What’s too wide?
Thanks!
Thanks, Danny. I’ve had good luck with everything from 16mm to 200mm. The problem with the wider focal lengths isn’t so much a lack of compositions as it is trying to find compositions that don’t include people. The longer focal lengths make isolation shots so much easier. In past (Canon) years my preferred lens was the 24-105. On this year’s trip (last week), I went in with the Sony/Zeiss 24-70 on my full-frame a7R, and put my 1.5-crop a6000 (without a lens) in my back pocket. When I exited at the back of the canyon, before turning around for the return trip I put the 24-70 on the a6000. This allowed me to shoot the canyon again with an effective focal range of 36-105. Next year I’ll remember my camera straps and will probably just take two full-frame bodies, one with the 24-70 and one with the 70-200.
A few years ago, while driving from MD to CA, an early Fall snowstorm forced me to reroute and abandon plans to shoot in Antelope Canyon. Now I don’t mind that it happened, because I can enjoy the serene beauty of your images without the associated memory of the circus atmosphere. Thanks.
How to make a digital photographer cry? Give him a 35 mm slide show on an 8ft by 8 ft screen in your family room. So here I am, former slide shooter, now digital. For decency of my digiatal shows, I shot horizontal only, crop to 16:9. Viewing vertical shots on a monitor or TV would make me cry – so dwarfed they are.
So here is a question: does any of you have a similar aproach of limiting to horizontal shots and how do oyu cope with that – or use to best artisctic advantage in the canyon that calls so strongly for vertical shots.
Amazing photos and great article! I will be visiting Antelope Canyon in about 2 weeks. I’m even more excited now after seeing your work and reading your blog. Thank you!
What a wonderful article and photos. Humorous and informative. I got all my questions answered. Thank you Gary for sharing your knowledge and experience. I’m looking forward to my first trip to Antelope Canyon and I know now, thanks to you, what to expect and how to prepare. Thank you kindly!!! 🙂
My pleasure, Kasia—thanks for reading. Have a great trip!
Gary, do you absolutely need to be part of a photo tour to use a tripod? I’ll have hours to burn, and don’t much care about the light shafts (i’ve never understood everyone’s fascination with them).
I’d like to be able to take my time and am a consummate planner (i’m researching about 6 or so months before putting boots on the ground). Is there a time when I can just go in on my own without the crowds?
Yes, I’m afraid you can’t go into Upper Antelope Canyon without a guide. If you’re not interested in the shafts, go early morning, late afternoon, when it’s cloudy, or in winter. You may not get any more time in the canyon, but at least you’ll feel less rushed. You could also try Lower Antelope, which is different but similarly photogenic. And because it doesn’t get the shafts, it tends to be less crowded. But both require guides.
Hello !
I plan to visit Upper Antelope Canyon with a friend of mine on a photography tour in June.
We booked our spot for the tour.
Now, I am wondering if we need any photography permit to be allow to post our photographies on facebook, Instagram and on my blog. We will not sell them.
Thanks for your help!
I’m wondering if you have tips for getting overhead shots with no articulating screen? Are you shooting those handheld?
Always with a tripod. Always. Not sure I completely understand your overhead question: I just get underneath the camera and look up through the viewfinder—I very rarely (never?) use the articulating screen. It helps to have a tripod I can elevate above my head (RRS TVC-24L)—it gives me much more compositional flexibility.
Hi Gary –
Great shots – some of the best I’ve seen. What is the best time of day to shoot in Lower Antelope Canyon?
Thanks, Travis. With little to no direct sunlight in Lower Antelope, you can find great shots any time of day. And since it doesn’t get the light shafts that Upper Antelope gets, timing is generally less critical overall. Nevertheless, when you go does effect the quality of the light. If you like soft light (more blues and purples), go early in the morning or later in the day; if you like the more contrasty, bounced light (more yellows and reds), shoot for the middle of the day. Either way, you’ll find plenty to shoot.
Thanks for your very informative article. It helped so much to know what to expect when I took the Photo Tour through Lower Antelope Canyon yesterday (7-21-16). Even though it probably wasn’t as stressful as the upper canyon, it was still quite crowded for the 2:30 tour, but knowing what to expect helped me to stay relaxed and be able to still get some great shots. I highly recommend photographing either canyon with a photo tour, because the other tours are so rushed it would be extremely difficult to take the time to compose and get the shot you want. Also, just a note I learned from my guide. The upper canyon has 6-8 tour companies taking people through it while the lower canyon only has two, so the volume of visitors is much lower.
Thanks, Eddie, I’m glad it was useful. Yeah, Lower Antelope has become much more crowded in recent years, but it doesn’t compare to Upper Antelope.
It was one of my favourite places when i did a road-trip in the USA. Lovely place with amazing colors… This place is astonishing !
Hello Gary,
I will be traveling with my family, all excited to see the slot canyon, but not all photographers. Do you now if any photo tours allow for family members to join in? I have heard that the only way to shoot with a tripod is through a photo tour. I am stuck between a family experience and the beautiful photographs to come away with. Any insight you might have would be very welcome. Thank you for the amazing information you have given in this post. I feel so prepared!
Hi Kristi,
I actually wrote a blog about that very topic (family versus photography)—it’s a difficult balance to find. It seems that the rules at Antelope Canyon change each year (we used to be able to take a tripod with the non photo tours, but those days are long gone). Is it possible for you to do the photo tour while the rest of the family does a standard tour. Otherwise, you’re going to need to choose one or the other. Or, you could do both, the photo tour by yourself and the standard tour with the family. If you want the shafts of light, you’ll need to schedule a tour for mid-day at Upper Antelope. If you don’t care about the shafts, Lower Antelope my might be better—because it’s less crowded, the rules might be a little more flexible.
Hi Kristi. My wife and I were out there last October. We did the photo tour of lower Antelope Canyon. I would highly recommend this if you want to get some great photos. Tour size is small and more time is spent in the canyon. Consider doing a family tour of upper Antelope, and then a photo tour of lower Antelope for yourself to concentrate on photographs. Tripod and SLR or DSLR are required for the photo tour. Tripods are not allowed on the family tour due to tour sizes and time limitations.
Gary and timmaupinphoto thank you for your insight. I think we will try as suggested and I will do the photo tour while family does the standard tour of upper and then do the photo tour of lower while they play in the water at lake powell 🙂 Something along those lines. I appreciate the quick response.
Yeah, your life gets a lot easier if you don’t care about the shafts of light. Enjoy!
you won’t regret it!
Thank you so much for writing this article. I am going to Antelope Canyons this June and I am trying to study up and get as much info as possible and this is a huge help. Now I can be prepared instead of surprised. Just wondering if you ever tried covering your camera with one of those plastic bag type rain guards?
I’ve considered using a rain cover in Antelope Canyon but given how crowded it is in there, I think it would be more trouble than it’s worth.
Hi Gary. Loved the article. Very informative and well written. Of course, the images are amazing. I’ll be visiting Monument Valley and Antelope Canyon in April. Which tour guide company do you recommend?
Thanks, Jay. We’ve always used Antelope Canyon Tours, but I think they’re all pretty good given the circumstances they have to work with. Of course some guides are better than others, but that’s more a function of the individual guide than company he or she works for.
Wonderful detailed article. I’m also a pro photographer but on the east coast. I spent 6 weeks in Utah and northern Arizona during the autumn of 2016. On a whim as I was near Page I decided to check out Upper Antelope Canyon. Your blog accurately portrays the anxiety photographers experience during the photography tours. The entire days events jaded my thoughts for some time. It wasn’t until I began to process the image files and open my crated 60″ acrylic glass prints for the gallery that the natural beauty of the canyon was once again the subject. I felt inclined to write a blog this December and published for New Years after being encouraged by other photographers I met in Utah. Most blogs I read tend to avoid the honest truth. Appreciate your authentic and forthright writing. I began to feel I wrote a rogue article until I found yours!
Thanks for reading, Tom. Antelope Canyon can still be a great experience if you’re prepared going in. The problems people have are usually because they have no idea what they’re getting themselves into.
Hi Gary,
I am planning a trip to Antelope Canyon and I came across your blog. Thanks a lot for sharing all this info. I am not a professional photographer but I love taking photos. I have a Canon Eos T2i and 2 lenses 18-55mm F/4.0-5.6 and 70-300 mm F/4.05.6, so my camera and lenses are not high end and I was wondering if it’s worth it to take a photography tour or my camera won’t be able to capture the details well.
Also, do you recommend any tour company?
Thanks a lot
You’re welcome, Summer. I can’t answer for you, but I can say if the photography is important to you, a photo tour is definitely worth it. I don’t have a particular Antelope Canyon tour company that I recommend.
Hi Gary, great piece, your photo tips are nothing short of phenomenal and some of the most detailed I’ve ever read. I know what you mean about the “Upper Antelope Canyon Circus,” which unfortunately grows worse by the year. Antelope Canyon “Alternative” tours are fast growing in popularity and thus far the tour operators have committed to keeping the same thing from happening in these other slot canyons such as Antelope X, Secret Canyon (aka “Horseshoe Bend Slot Canyon”), Owl Canyon and Mountain Sheep. Here’s more info if interested ->: http://antelopecanyon.az/antelope-canyon-alternative-tours/
Thanks, Alley.
Gary, not only is your photography is top notch, you write well too. I enjoy your blogs and forward them to my family of photo nuts. I’ve done the ‘antelope canyons’ twice, to be sure Page AZ is again on my list of places to reshoot and re-familiarize myself this spring to the wondrous Southwest.
Very helpful article. What white balance do you recommend?
Glad you liked it, Craig. I always shoot in raw using auto white balance, then adjust the white balance in Lightroom.
Gary,
I just finished reading your article and found it vey insightful. My wife and I are planning a visit to Antelope Canyon (along with other canyons in UT, AZ) in September and had several questions about what to expect as well as camera settings. Your advice will be most helpful. We are Amateur photo buffs who aspire to take better pictures on our trips. My wife has for the most part been a ‘point and shoot’ photographer. I am presently trying to convert her to a DSLR and tripod user since we’ve signed up for a photo tour of Antelope Canyon. I believe setting the Aperture and letting the camera set the shutter speed (AV) might be best for her given her relative newness to this camera. We are both using Pentax DSLR bodies (K-3II, K-70) with 18-135mm, 18-270mm. I have a 15mm f/4 and a 10-17mm f/3.5-5.6, but after reading your article will stick with the zooms. Also, will set the ISO to 400 given the time constraints in the canyon itself. A couple of questions I do have involve the use of filters. Should we just use a clear/UV/Skylight filter and none others or are their other filtes that would enhance pics? Also, do we attach our cameras to the tripods and carry them around like that? Both of our cameras have quick release plates attached to them. I will be carrying both outfits since my wife has limited walking abilities. Thank you again for this wonderful article.
Thanks, Earl. Aperture priority is fine if she has a basic understanding of metering and can make the appropriate adjustments—if not, I’d go with one of the full-auto modes. ISO 400 is a good baseline to minimize the need to change ISO. I’d probably use the 18-135 for its focal range and compactness. You don’t need any other filters. Yes, it’s best to just attach the camera to the tripod, with one lens per camera, and leave your camera bag behind. Make sure you sign up for a photo tour, and it’s not to soon to do it.
Amazing
Thanks.
Hi Gary, We are also planning our trip-of-our-lifetime crossing the ocean from the Netherlands and make the west-USA visit and have Antelope top of our bucket list. We will be there in mid-July and are wondering what would be the best timeslot to book our tour?
If you want to see the shaft of light, schedule the late morning photo tour. If you want fewer people, the first or last tours of the day are better. Have a great trip.
Gary, My scheduled tour for Upper Antelope Canyon is at 7 AM on May 15, 2018 (other tours are sold out). I’m not allowed a tripod, but can take a monopod. I have a new Nikon D3400 camera with an 18-55 mm lens and also an older Nikon D3100 with a 18-55 mm lens. Will I be able to get any decent photos with these restrictions at that early hour? What ISO setting should I use? Thank you very much! Bernie Casey
You won’t get any light shafts then, but the diffuse light will still be nice for photography. I can’t tell you what settings to use because it’s impossible to know what the light will be, and what you’re trying to achieve (your settings will vary with the shot and light). Use the maximum ISO you can get away with without ruining the picture, make sure your polarizer is off, and your stabilizer is on. Given all the limitations, you might want to stick with wider focal lengths for more depth of field and to reduce camera shake. Best of luck.
Great information, Gary. I’m going to be doing photo tours of Upper Antelope, Rattlesnake and Canyon X in February. I know I won’t get the light beams, which is fine with me. I am shooting on a Nikon D7200 and have a Tokina 11-20 f2.8. That’ll give me roughly a 17-30mm full frame equivalent range. Would you consider that a good lens to use or should I bring my 18-55 kit?
Other zooms I have are 55-200 kit and Tamron 70-200 f 2.8. Thanks for your thoughts.
Thanks, Abuko. No matter which lens you take, you’ll find shots that require a different one. But it’s important to keep it simple on the first time through, the 11-20 f/2.8 is the one I’d take, especially if you’re hand-holding. If you’re on a tripod, the 18-55 kit would work too—if you’re satisfied with the quality.
Superb piece Gary. Thanks so much. The ability to prep intelligently makes all the difference. Been going back & forth about what camera to take my first time in next month. This gives me the confidence to take the Cambo and Rodenstock, slow down, and shoot what presents.
Thanks, Greg. Since I wrote this, things have become even more difficult for photographers in both Upper and Lower Antelope Canyons (more crowds and restrictions). Just make sure you get on a photo tour, whatever the cost. And if you’re there for the shafts, you’ll be doing a lot of waiting around—it’s really important to use that time wisely, either by shooting over everyone’s head, and/or metering for your turn at the shaft. If you’re prepared it’s definitely worth the hassle and stress.
Thanks again for the advice. Yes, going this month with Alain Briot. After consulting with a few others, I think I am going to rely on the Nikon D850 and a Milvus 25 for the “mayhem” shots. I’ll use a Cambo and Rodenstock lens (yet to be determined) for the places where I can actually take my time.