Eloquent Images by Gary Hart
Insight, information, and inspiration for the inquisitive nature photographer
Live-view Focus

Poppy Pastel, Sierra Foothills, California
Canon EOS 5D Mark III
1/125 second
F/4.0
ISO 400
100 mm
Because sometimes getting the precise focus point is so essential (even the slightest slip might ruin an image), for most of my DSLR (and film SLR—FSLR?) days I rarely used autofocus. That’s because DSLR autofocus redirects some of the light entering the lens to a second, autofocus sensor, and I just didn’t trust critical focus decisions to an autofocus system that didn’t use the actual image I trying to focus. The problem was this approach is that it was based on the assumption that my eyes through a viewfinder were more accurate than the potentially untrustworthy DSLR autofocus.
Enter live-view, first on DSLR LCD screens, and now (even better!) in mirrorless viewfinders. My Canon 1DS III had live-view, but since that camera didn’t magnify the view, it had limited focus value. But when I got my Canon 5DIII, its ability to pick a focus point and magnify it made me a live-view convert.
Because LCD screens on the backs of cameras are subject to ambient light that can make them difficult to see, live-view focus still had its frustrations. But the switch to Sony Alpha mirrorless in 2014 became the real tipping point because it offered the best of both worlds—a magnifiable live-view screen in my viewfinder.
Live-view focus, both auto and manual, becomes second nature to mirrorless shooters because it’s their only option, but I’ve found that many shooters don’t take full advantage of their camera’s live-view focus benefits. But it’s not hard, and has the ability to improve your focusing bullseyes. Here’s my recipe:
- With your camera on the tripod, compose your shot (it won’t work without a tripod holding your camera stationary).
- Turn on live view (on some cameras you need to go into the menu settings to enable live-view the first time—once it’s enabled, you’ll be able to engage live-view with a simple button push).
- Position the live-view’s selection window (usually a small square that can be moved with the camera’s arrow keys or joystick) over the point at which you want to focus.
- Magnify the view to maximum (+/- button on the camera’s back).
- Focus: most newer cameras allow you to autofocus at this point
- Click
- To verify your results, review the image you just capture and magnify the focus point you used (I’ve found live-view focus so reliable that I rarely verify my focus unless I’m concerned about vibration or motion in the scene)
I especially like live-view focus for macro photography, where even a fraction-of-an-inch miss can mean failure, but it works well for any scene.
Below are some examples:

Raindrops, Orchid in Lava Tree State Park, Hawaii
Not only did I use a wide aperture for this image, I used a 100mm macro lens with 58mm of extension, leaving me a paper-thin focus plane and not a lot of light in my viewfinder with which to view it. Using live-view enabled me to see the image exactly as I’d capture it, and to decide the focus point that gave the best combination of foreground sharpness and background softness.
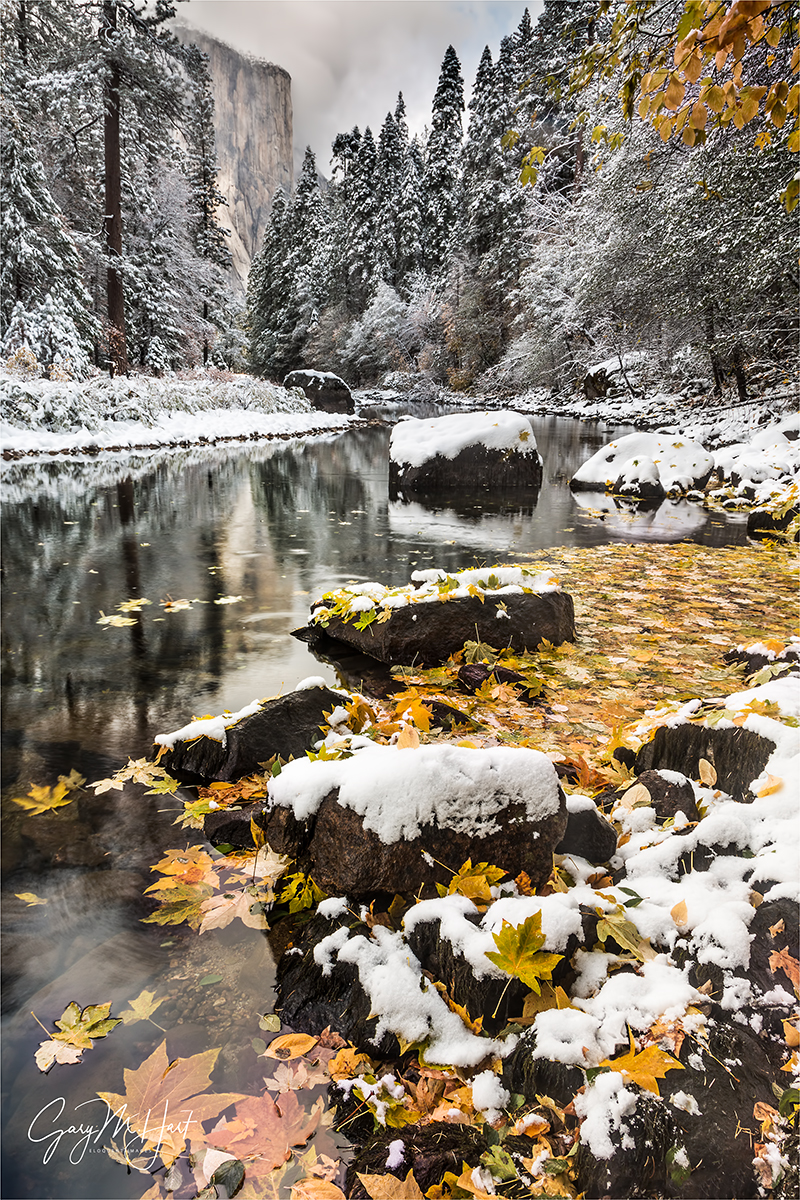
First Snow, El Capitan, Yosemite
Needing lots of depth of field for this image, I checked my hyperfocal to determine the hyperfocal distance that would give me the closest focus that would still be sharp at infinity. I then estimated that distance and placed my LCD’s selection rectangle on it, magnified the view, and manually focused. Because the margin of error was so small, I verified the sharpness by magnifying the captured image on my viewfinder.

Raindrops on Poppy, Sierra Foothills, California
Adding an extension tube to my 100-400 lens and shooting wide open gave me the extremely soft background I wanted, but narrowed my margin of focus error to just about zero. The only thing in this frame that had to be sharp was the large raindrop near the base of the poppy, an easy target in magnified live-view. The position was awkward for bringing my eye to the viewfinder, but because my mirrorless camera allows me to autofocus the magnified view, I simply autofocused on the magnified water drop.
Workshop Schedule || Purchase Prints || Instagram
Critical Focus
Click any image to scroll through the gallery LARGE


Pingback: Cameras are stupid, Part deux | Eloquent Nature by Gary Hart
Your statement is so true and simple Gary and yet we (especial I) fail to do so when presented with an photo opportunity. Sometimes I feel a self impose rush or believe its requires too much complex complications or too difficult to set up and believe the results wouldn’t be worth it. Obviously from your results, they are worth it. Thanks for reenforcing the basic’s, yet again.
The beauty of digital photography is that, unlike film, each shutter click is free. Not only that, nobody else needs to see your failures, not even the guy in the lab. So if you experiment freely when things aren’t happening fast, you’ll soon find that what you learn then has become second nature when it’s time to react.
Oh so true Gary-I have friends that think I’m crazy when I bring this up but it has changed the way I capture macros-thanks for driving this home. Great image.
I’m enjoying your articles, Gary.
I’ve been a live view convert for several months, and I want to echo what you’ve said here about it. Now that I’m using live view, it’s hard to imagine how I got good macro shots before.
I also use live view for sunrise and sunset images: set everything to manual, choose an ISO speed (usually 100 or 200, depending upon how dark it is), set the aperture, and adjust the exposure while watching live view until I get exactly the image I want. It takes all of the guesswork and trial-and-error out of getting exactly the right exposure to show off those sunset colors.
I’m guessing this technique may work well for rainbows, too, but I haven’t had an opportunity yet to try that out.
As always, great tips…I have found this to be very true. I don’t like to be a technology doubter, but when I take the time to focus manually as you described, nails it every time!
Add a Hoodman loupe and voila!
I’m totally enjoying your articles Garyl.Hopefully this will help those macros I’ve been trying to get 🙂
Great article and love using live mode for focusing macros and as above, adding a Hoodman loupe really helps to make sure the image is in focus!
Thanks, Denise. I just don a pair of reading glasses when I want a closer look. 🙂