Eloquent Images by Gary Hart
Insight, information, and inspiration for the inquisitive nature photographer
Fall Color How-To
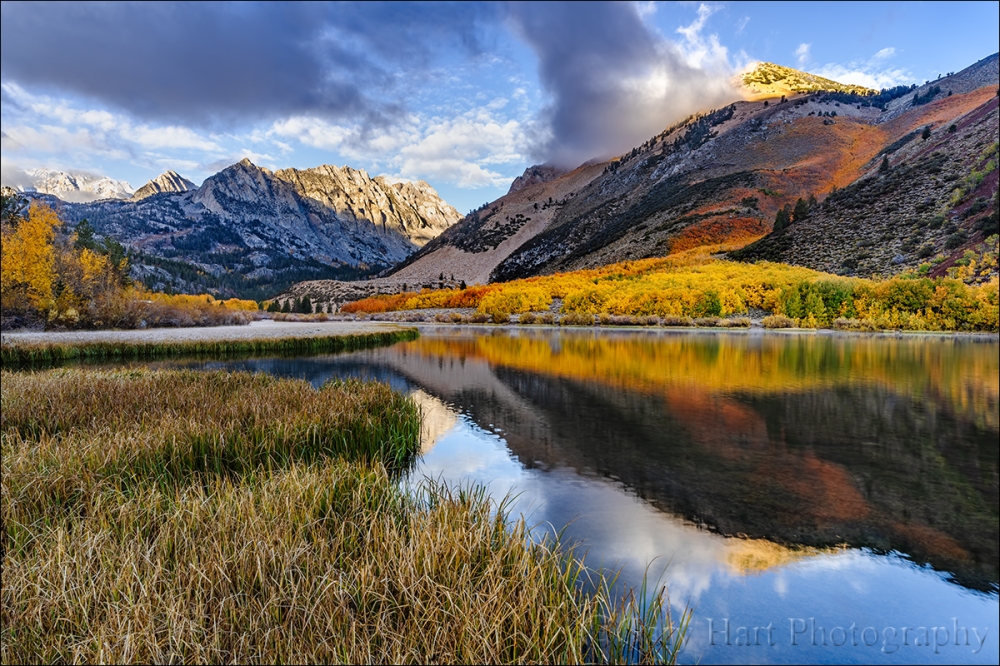
Autumn Morning, North Lake, Eastern Sierra
Sony a7RIII
Sony 16-35 f/2.8 GM
1/4 second
F/16
ISO 100
To better understand the science and timing of fall color, read…
The Why, How, and When of Fall Color
Vivid color and crisp reflections make autumn my favorite season for creative photography. While most landscape scenes require showing up at the right time and hoping for the sun and clouds to cooperate, photographing fall color can be as simple as circling your subject until the light’s right. For photographers armed with an understanding of light and visual relationships, as well as the ability to control exposure, depth, and motion with their camera’s exposure variables, fall color possibilities are virtually unlimited.
Backlight, backlight, backlight
The difference between the front-lit and backlit sides of fall foliage is the difference between dull and vivid color. Glare and reflection make the side of a leaf facing its light source, whether that leaf is in direct sunlight or simply faces an overcast sky, appear flat. But the other side of the same leaf, the side that’s opposite the source of its illumination, glows with color.
In the image below (Leaves and Reflection, Convict Lake, Eastern Sierra), the sky this day was cloudy, but despite no direct sunlight, the light illuminating the leaves still came from the sky. By positioning my camera to face the opposite side of the leaves (the side facing the ground), I was able maximize the color by eliminating the glare of direct light.
Leaves and Reflection, Convict Lake, Eastern Sierra
The moral of this story? If you ever find yourself disappointed that the fall color seems flat and washed out, check the other side of the tree.
Isolate elements for a more intimate fall color image
Big fall color scenes are great, but isolating your subject with a telephoto, and/or by moving closer, enables you to highlight and emphasize specific elements and relationships.
- Train your eye to find leaves, groups of leaves, or branches that stand alone from the rest of the tree or scene, or that stand out against a contrasting background.
- Zoom close, using the frame’s borders to ban distractions to the world outside the frame.
- Don’t concentrate so much on your primary subject that you miss complementary background or foreground elements that can balance the frame and provide an appealing canvas for your primary subject.
Selective depth of field is a great way to emphasize/deemphasize elements in a scene
Limiting depth of field by composing close with a large aperture and/or telephoto lens can soften a potentially distracting background into a complementary canvas of color and shape. Parallel tree trunks, other colorful leaves, and reflective water make particularly effective soft background subjects. For an extremely soft background, reduce your depth of field further by adding an extension tube, which allows you to focus even closer.
Underexpose sunlit leaves to maximize color
Bright sunlight creates highlight/shadow extremes that photographers avoid. But contrary to what many believe, fall foliage in bright sunlight is still photographable if you isolate backlit leaves against a darker background and slightly underexpose them. The key here is making sure the subject leaves are the brightest thing in the frame, and to avoid including bright sky in the frame. Photographing sunlit leaves, especially with a large aperture to limit DOF, has the added advantage of an extremely fast shutter speed that will freeze wind motion.
Slightly underexposing brightly lit leaves not only emphasizes their color, it turns everything that’s in shade to a dark background. And if your depth of field is narrow enough, points of light sneaking between the leaves and branches to reach your camera will blur to glowing jewels.


A sunstar is a great way to liven up an image in extreme light
If you’re going to be shooting backlit leaves, you’ll often find yourself fighting the sun. Rather than trying to overcome it, turn the sun into an ally by hiding it behind a tree. A small aperture (f16 or smaller is my general rule) with a small sliver of the sun’s disk visible creates a brilliant sunstar that can serve as the scene’s focal-point. Unlike photographing a sunstar on the horizon, hiding the sun behind a terrestrial object like a tree or rock enables you to move with the sun.
When you get a composition you like, try several frames, varying the amount of sun visible in each. The smaller the sliver of sun, the more delicate the sunstar; the more sun you include, the bolder the sunstar. You’ll also find that different lenses render sunstars differently, so experiment to see which lenses and apertures work best for you. I have the best results with higher quality wide lenses.


Motion blur
When photographing in overcast or full shade, it’s virtually impossible to freeze the motion of rapid water at any kind of reasonable ISO. Rather than fight it, use this opportunity to add silky water to your fall color scenes. There’s no magic shutter speed for blurring water—in addition to the shutter speed, the amount of blur will depend on the speed of the water, your distance from the water, your focal length, and your angle of view relative to the water’s motion.
All blurs aren’t created equal. When you find a composition you like, don’t stop with one click. Experiment with different shutter speeds by varying the ISO (or aperture as long as you don’t compromise the desired depth of field).
Reflections make fantastic complements to any fall color scene
By autumn, rivers and streams that rushed over rocks in spring and summer now meander at a leisurely, reflective pace. This slow water creates many reflection opportunities that can double the color, and add a sense of tranquility. The recipe for the best reflection is still water, sunlit reflection subjects, and shaded reflective surface.
When photographing leaves floating atop a reflection, it’s important to know that the focus point for the reflection is the focus point of the reflective subject, not the reflective surface. This is seems counterintuitive, but try it yourself—focus on the leaves with a wide aperture and watch the reflection go soft; then focus on the reflection and watch the leaves go soft.
A wide focal length often provides sharpness from the nearby leaves to the infinite reflection, but sometimes achieving sharpness in your floating leaves and the reflection requires careful hyperfocal focus. While a small aperture helps, as will focusing toward the back of your foreground, when I can’t get both my foreground and reflection sharp, I usually focus in the foreground and live with a slightly soft reflection.
Don’t forget the polarizer
I can’t imagine photographing fall color without a polarizer. Fall foliage has a reflective sheen that dulls its natural color, so a properly oriented polarizer can erase that sheen and bring the underlying natural color into prominence. Not are reflections on the foliage a problem, reflections on nearby water and rocks can pull the eye and distract from your primary subject.
To minimize the scene’s reflection, slowly turn the polarizer until the scene is darkest (the more you try this, the easier it will be to see). If you have a hard time seeing the difference, concentrate your gaze on a single leaf, rock, or wet surface. If you still can’t see a difference, the polarizer probably isn’t doing much for this composition (but don’t remove it, because it may make a big difference for the next one).

Fallen Color, Rock Creek Canyon, Eastern Sierra
A polarizer isn’t an all-on or all-off proposition. When photographing a scene with still water, it’s often possible to maximize a reflection in the water without dialing up the reflection on the leaves. To achieve this, rotate the polarizer’s ring and watch the reflection change, stopping when you achieve the effect you desire. This technique is particularly effective when you want your reflection to share the frame with submerged feature such as rocks, leaves, and grass. In the image below, I turned my polarizer just enough to reveal the nearby submerged rocks without removing the mountain a trees reflection.

Morning Reflection, North Lake, Eastern Sierra
Nothing communicates the change of seasons like fall color with snow
Don’t think the first snow means your fall photography is finished for the year. Hardy autumn leaves often cling to branches, and even retain their color on the ground through the earliest weeks of winter. An early snowfall is an opportunity to catch fall leaves etched in white, an opportunity not to be missed. And even after the snow has been falling for a while, it’s possible to find a colorful rogue leaf to accent an otherwise stark winter scene.
Workshop Schedule || Purchase Prints || Instagram
To better understand the science and timing of fall color, read
The Why, How, and When of Fall Color
A Gallery of Fall Color


, Yosemite")


:: More photography tips ::

Descent, Whitney Portal Fall, Whitney Portal

All of these are beautiful!
Thanks for sharing all your wonderful tips on “Fall Color” I hope to apply some of them soon. Romona Wiseman
Thanks so much, Gary, for sharing. You’re a true inspiration. Heading to Oregon for the month of October and hope to find a lot of fall color.
My pleasure, Gail—wish I could make it to the Columbia River Gorge in October but it’s my busiest month. Have a great trip.
Love your photo tips! I believe it to be additionally helpful to add the photo info with each image like: ISO, f-stop, shitter speed etc. it would also become a teaching tool for all. Keep up the great work that you do and share in the photographic community! “Teaching so that others continue to learn”!
Thank you Gary!!!
Gary, you are an inspiration for all of us who love what nature shows us. Thanks so much for your tips and your great classes.
Thank you, Phil.
Thank you, I have been doing some things correct but not really knowing what was making those few good pictures work. But I have been frustrated by not being able to capture the colors of fall by choice. Your tips are going to make tomorrows outing much more fun!
I’m going out tomorrow to photograph fall colors in my native Oregon. Look out leaves, I am coming for you!
Good luck!
Beautiful examples and great instruction. Thank you Gary.
My pleasure, Betty. Thank you for reading.
Always learn something on your site!!
Thanks, Ralph. I’ll keep posting as long as I have something to say. 🙂
Excellent article. Thank you for the fantastic tips!
Thanks, Ken.
Theses pictures are ABSOLUTELY BREATHTAKING !!!
Hey, I love nature and loved this post. I am a new bloger on wordpress please follow and support me 😊