Eloquent Images by Gary Hart
Insight, information, and inspiration for the inquisitive nature photographer
Addition by Subraction

Big Sun, Bright Angel Point, Grand Canyon
Sony a6300
Sony 100-400 GM
Sony 2x teleconverter
ISO 200
f/11
1/160 second
Sometimes making a good photo is as much about what you leave out as it is about what you put in. The downfall of many images, both mine and others’, is the inclusion of too much visual activity—sometimes that activity is simply unappealing visual busyness, but often it’s elements that are visually appealing in their own right, but nevertheless distract from the main point of the image, that need to be removed.
Distraction subtraction starts with proper cropping—simply knowing what to put in and what to leave out. But because nature rarely cooperates, we usually end up having to include stuff we really don’t want. Whether it’s smoothing choppy water, softening a busy background, or banishing distracting terrain to blackened shadows, subtracting unwanted detail usually requires managing the exposure variables (shutter speed, ISO, and aperture) that control photography’s “creativity triad” (motion, light, and depth).
For example
Each summer, Don Smith and I do back-to-back Grand Canyon Monsoon photo workshops. One of the small perks of two workshops is do-overs—the opportunity to re-shoot something that didn’t work out the first time. This year for me that was the sunrise shoot from Bright Angel Point. We do this shoot on each group’s final morning on the North Rim and it’s a workshop highlight. Because the sun rises hot and white above the flat and bland (compared to its surroundings) Kaibab Plateau in the east, the better shot from Bright Angel Point is usually the low angled light brushing the canyon walls opposite the sun.
This year, smoke from nearby fires dulled the “good” light in the canyon, but transformed the sun into a mesmerizing orange ball. Instead of something to be avoided, the sun became a feature I wanted to highlight in the best way possible. But how? I wasn’t crazy about the hillside above which the sun would appear, but simply attaching a telephoto and photographing a big sun by itself would have been boring. Instead, I planned to eliminate all foreground detail with a silhouette of the ridge-top evergreens whose shape and contrast would provide the sun the very emphasis I was looking for. To further ramp-up the drama, I decided to shoot the scene as long as possible, adding the Sony 2X teleconverter to my Sony 100-400 GM lens—on my full frame Sony a7RIII, that gave me 800mm.
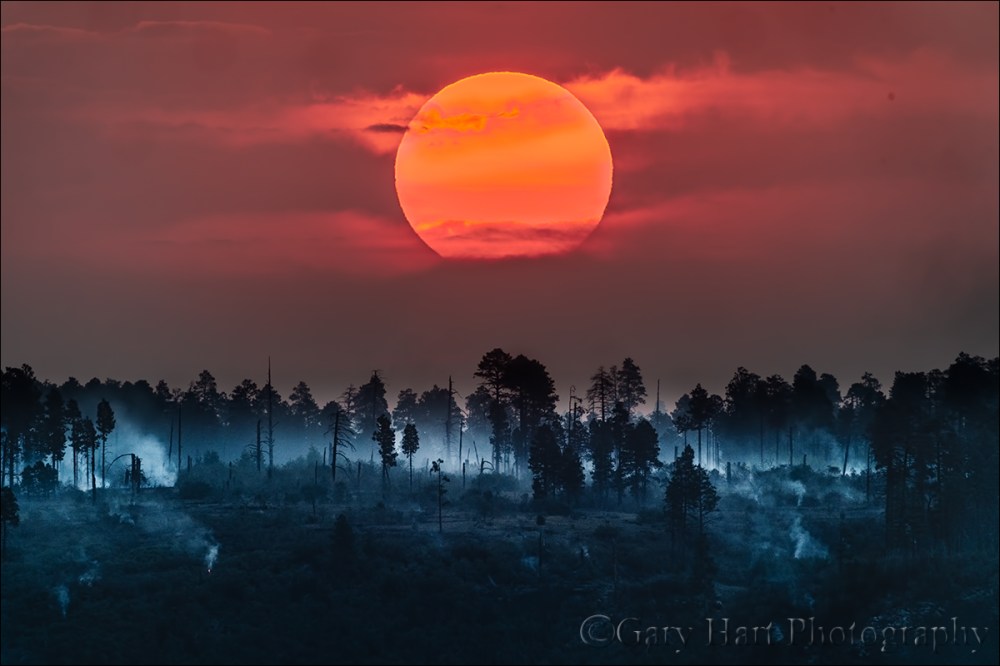
Sun and Smoke, Bright Angel Point, Grand Canyon
But…. In photography, plans can be much better in theory than they are in execution, which was exactly what happened on my first Bright Angel Point sunrise attempt. The low-hanging smoke was so dense that morning that we didn’t see the sun until it was too far above the trees for the silhouette I wanted, forcing me to quickly improvise Plan B: forego the silhouette and give the scene enough light to bring out detail in the hillside. And since the hillside was now an actual subject, I also went with a wider composition.
Largely because of the smoke, I like the image I shot that morning. But it wasn’t what I had in mind and I was thankful for a second chance a few days later. Guiding the second workshop group out to Bright Angel Point in the dark, I kept checking the east horizon to get a read on the smoke. As the sky brightened it looked like the smoke would be just right—dense enough to redden the sun without completely obscuring it. I was in business.
This morning’s silhouette composition was going to be even tighter than the failed first one because a day or two earlier while rummaging through my suitcase and I discovered that at the last minute I must have tossed in my 1.5-crop Sony a6300 body (I don’t remember doing this, but there it was)—that meant I could shoot a 1200mm (full frame) equivalent focal length.
A successful silhouette, especially an ultra-long silhouette, requires careful selection of the silhouette subject—you can’t just plop down the tripod and accept whatever you end up with. So I did my best to figure out where the sun would appear, identified the best silhouette subjects in that direction, then riveted my eyes on the horizon for the first sign of the sun. While waiting I took meticulous care to focus—1200mm is extremely unforgiving, so even something that looks sharp on the LCD can be soft when viewed at 100%. I clicked several test frames, both using autofocus and manual focus, magnifying each in my viewfinder (I love mirrorless) and studying it closely until I was satisfied that I had the focus as sharp as it could be.
The instant the sun’s first glow peeked up behind the trees I grabbed my tripod and ran about 100 feet up the trail to align the sun with my chosen foreground. I used the zebra highlight alert to determine my exposure, pushing my shutter speed a couple of clicks longer once the zebras appeared. This exposure gave me enough contrast between the sun and the trees for the trees to stand out, but without losing color in the sun or including detail in the foreground.
As with many situations nature photographers encounter, this one presented difficult conditions that became a creative opportunity with the application of simple exposure technique to subtract unwanted detail. The next time you’re out in nature with your camera, challenge yourself to use your exposure variables to do something creative with your scene’s motion, light, or depth—not only will your photography improve, I think you’ll have a lot of fun.
Grand Canyon Photo Workshops
Workshop Schedule || Purchase Prints
Managing Motion, Light, and Depth


, California")


I just wanted to say thanks Gary and Don for making this workshop one to remember and especially for keeping me refreshed with my camera gear, and learning about that sweet spot, the group was fantastic and hoping to work with you again creating wonderful images.
You’re very welcome, Jesus. It was really great seeing you in another workshop——it’s been far too long. (Great photography and a fantastic group didn’t hurt either.) 🙂