Eloquent Images by Gary Hart
Insight, information, and inspiration for the inquisitive nature photographer
Creative Selective Focus (revisited)

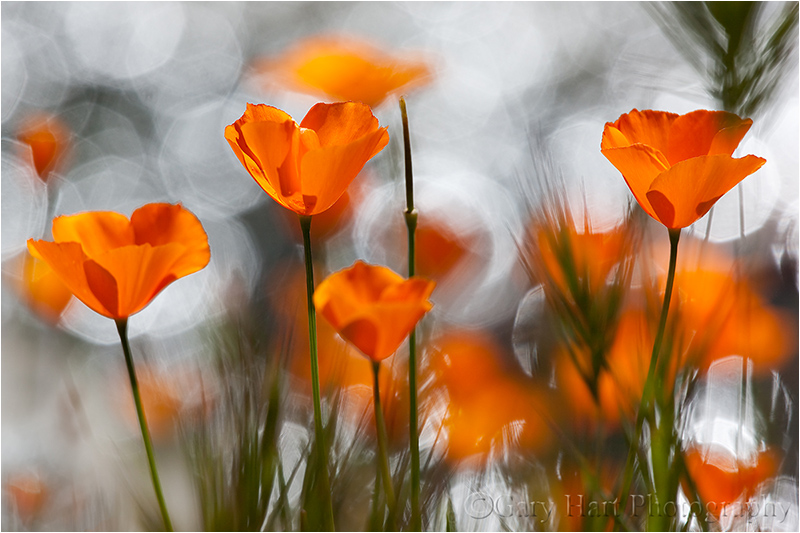
Champagne Glass Poppies, Merced River Canyon, California
Canon 10D
Canon 100mm f2.8 macro
f/2.8
Kenko 20mm extension tube
ISO 100
1/1000 second
After a winter that didn’t seem like it would ever end, spring has finally arrived in California. With poppies springing up throughout the state, and the dogwood bloom right around the corner, this seemed like a good time to update my Creative Selective Focus article.
In this day of ubiquitous cameras, automatic exposure modes, free information, and powerful processing tools, taking a good picture has never been easier. But capturing a great photo, an image with enough uniqueness to stand out from the rapidly expanding crowd, seems to be getting harder and harder.
It seems that some photographers have decided to attack this problem by risking life and limb to chase increasingly exotic subjects. This is great for those with the time, money, and physical ability to allow it, but there are other opportunities closer to home.
One of photography’s most accessible and underutilized paths to unique images is creative depth control. Anyone with a camera can compose the two-dimensional, left/right/up/down aspect of a scene. But in a photograph, the front/back plane—the scene’s depth that we human’s take for granted—is missing. Conveying this missing depth requires abstract vision and camera control beyond the ability of most casual photographers.
While skilled photographers frequently go to great lengths to maximize front to back sharpness—depth of field (DOF)—many ignore the ability of limited DOF to:
- Guide the viewer’s eye to a particular subject
- Provide the primary subject a complementary background that doesn’t compete
- Provide background context for a subject (such as its location, time of day, or season)
- Smooth or eliminate a busy and distracting background
- Create an image that no one will ever be able to duplicate
They call it “bokeh”
We call an image’s out of focus background its “bokeh.” While it’s true that bokeh generally improves with the quality of the lens, as with most things in photography, at least as important than the lens is the photographer behind it. More than anything, achieving compelling bokeh starts with understanding how your camera sees the world, and how to translate that vision to your photos. The image’s focus point, its depth of field (a function of the sensor size, f-stop, focal length, and focus distance), and the characteristics of the blurred background (color, shapes, lines) are all under the photographer’s control.
No special equipment required
Compelling bokeh doesn’t require special or expensive equipment—chances are you have everything you need in your bag already. Most macro lenses are fast enough (large aperture) to limit DOF, have excellent optics that provide pleasing bokeh, and allow for extremely close focus (which shrinks DOF). And a telephoto lens near its longest focal length has a very shallow DOF when focused close.
Many of my selective focus images are accomplished without a macro or even a particularly fast lens. Instead, preferring the compositional flexibility of a zoom, I opt for my 70-200 and 100-400 lenses.
Extension tubes
One piece of equipment that will allow you to shrink your DOF without breaking the bank is an extension tube. An extension tubes is an empty (no optics) cylinder that attaches between the camera and lens to shift the focus range closer to the camera: with an extension tube you can focus closer, but you can no longer focus to infinity. Most extension tubes pass communication between the camera and lens so you can still meter and autofocus.
Not only are extension tubes relatively inexpensive, depending on the lens, they enable you to focus as close or closer than you could have with a macro lens. Extension tubes can also be stacked—the more extension, the closer you can focus (and the shallower your DOF). And because extension tubes have no optics, there’s no glass to compromise the quality of the lens (unlike a teleconverter or diopter).
But there’s no such thing as a free lunch in photography—the downside of extension tubes is that they reduce the amount of amount light reaching the sensor: the more extension, the less light. Fortunately, given the high ISO capability of today’s cameras, you can usually recover this lost light by simply bumping your ISO.
Managing depth of field
The amount of softness you choose falls somewhere on a continuum that starts with an indistinguishable blur of color that includes unrecognizable shapes, and ends with soft but easily recognizable objects. When using creative soft focus, I usually go for a background that’s soft enough that it doesn’t simply look like a focus error or compete with my subject. In other words, I usually (but not always) want my background really soft.
Your DOF will be shallower (and your background softer):
- The closer your focus point
- The longer your focal length
- The larger your aperture (small f-stop number)
A macro lens and/or extension tube is the best way to get extremely close to your subject, to create the absolute shallowest DOF. But sometimes you don’t want to be, or can’t get, that close. Or maybe you want just enough DOF to reveal a little (but still soft) background detail. In this case, a telephoto zoom lens may be your best bet. And even at the closest focus distances, the f-stop you choose will make a difference in the range of sharpness and the quality of your background blur. All of these choices are somewhat interchangeable and overlapping—you’ll often need to try a variety of focus-point/focal-length/f-stop combinations to achieve your desired effect. Experiment!
Foreground/background
Composing a shallow DOF image usually starts with finding a foreground subject on which to focus, then positioning yourself in a way that places your subject against a complementary background. Or you can do this in reverse, starting with a background you think would look great out of focus, then finding a foreground subject that would look good against that background.
Primary subjects can be whatever moves you: a single flower, a group of flowers, colorful leaves, textured bark, a clinging water drop—the sky’s the limit. A backlit leaf or flower can radiate with a glow that appears to originate from within, creating the illusion it has its own source of illumination—even in shade or overcast, most of a scene’s light comes from the sky and your subject will indeed have a backlit side. And an extremely close focus on a water droplet will reveal a world that’s normally invisible to the unaided eye—both the world within the drop, and a mini-reflection of the surrounding world.
My favorite backgrounds include things like parallel tree trunks, splashes of lit leaves and flowers in a mostly shaded forest, flowers that blur to color and soft shapes, pinpoint jewels of daylight shining through the trees, sunlight sparkling on water. I also like including soft but recognizable landscape features that reveal the location—nothing says Yosemite like a waterfall or Half Dome; nothing says the ocean like crashing surf.
Focus point
The final piece of the composition puzzle is your focus point. This creative decision can make or break an image because the point of maximum sharpness is where your viewer’s eyes will land. In one case you might want to emphasize a leaf’s serrated edge, in another its intricate vein pattern. Or maybe you’ll need to decide between the pollen clinging to a poppy’s stamen, or the sensual curve of the poppy’s petals. When I can’t decide, I take multiple frames with different focus points.
Exposure
Exposing selective focus scenes is primarily a matter of spot-metering on the brightest element, almost always the primary subject, and dialing in an exposure that ensures that it won’t be blown out. Often this approach turns shaded areas quite dark, making your primary subject stand out more if you can align the two. Sometimes I’ll underexpose my subject slightly to saturate its color and further darken the background.
Tripod
And let’s not overlook the importance of a good tripod. In general, the narrower the area of sharpness in an image, the smaller the focus point margin of error. Even the unavoidable micro-millimeter shifts possible with hand-holding can make the difference between a brilliant success and an absolute failure, making a tripod essential.
Virtually all of my blurred background images are achieved in incremental steps. They start with a general concept that includes a subject and background, and evolve in repeating click, evaluate, refine, click, … cycles. In this approach, the only way to ensure consistent evolution from original concept to finished product is a tripod, which holds in place the scene I just clicked and am now evaluating—when I decide what my image needs, I have the scene sitting there atop my tripod, just waiting for my adjustments.

Forest Dogwood, Yosemite Valley
I worked this scene for about a half hour before I was satisfied. I started with this dogwood branch and moved around a bit until the background was right. Then I tried a variety of focal lengths to simplify and balance the composition. Once I was satisfied with my composition, I used live-view to focus toward the front of the center cluster. Finally, I ran the entire range of f-stops from f4 to f16, in one-stop increments, to ensure a variety of bokeh effects to choose from.

Bridalveil Dogwood, Yosemite
This raindrop-laden dogwood image uses Yosemite’s Bridalveil Fall as a soft background to establish the location. An extension tube allowed me to focus so close that the nearest petal brushed my lens.

Poppy With a View, Point Reyes National Seashore
My goal this gray spring afternoon was to juxtapose a poppy against the distant surf, a relationship made possible by sprawling on Point Reyes’ Chimney Rock’s precipitous edge. Once I found the right poppy, I dropped to the ground to frame the flower with the arcing coastline, experimenting with several apertures before finding the ideal balance of foreground sharpness and background softness.

Champagne Glass Poppies, Merced River Canyon, California
The background color you see here is simply a hillside covered with poppies. To achieve this extremely limited DOF, I used an extension tube on my 100mm macro, lying flat on the ground as close as my lens would allow me to focus. Since my tripod (at the time) wouldn’t go that low, I detached my camera, rested the tripod on the ground in front of the poppy, propped my lens on a leg, composed, focused on the leading edge, and clicked my remote release.

Autumn Light, Yosemite
I had a lot of fun playing with the sunlight sneaking through the dense evergreen canopy here, experimenting with different f-stops to get the effect I liked best.
Sparkling Poppies, Merced River Canyon
The background jewels of light are sunlight reflecting on the rippling surface of a creek. I had a blast controlling their size by varying my f-stop.

Hidden Leaf, Mt. Hood, Oregon
Here, rather than background bokeh, I framed this leaf with leaves in front of my focus point.

Dogwood, Merced River, Yosemite
Looking down from the Pohono Bridge, finding the composition was the simple part. But as soon as I started clicking I realized that the sparkling surface of the rapidly Merced River was completely different with each frame. So I just clicked and clicked and clicked until I had over 30 frames to choose between.
Bokeh Gallery
Click an image for a closer look and slide show. Refresh the window to reorder the display.


Superb article Gary. Well done!