Eloquent Images by Gary Hart
Insight, information, and inspiration for the inquisitive nature photographer
Modern Metering
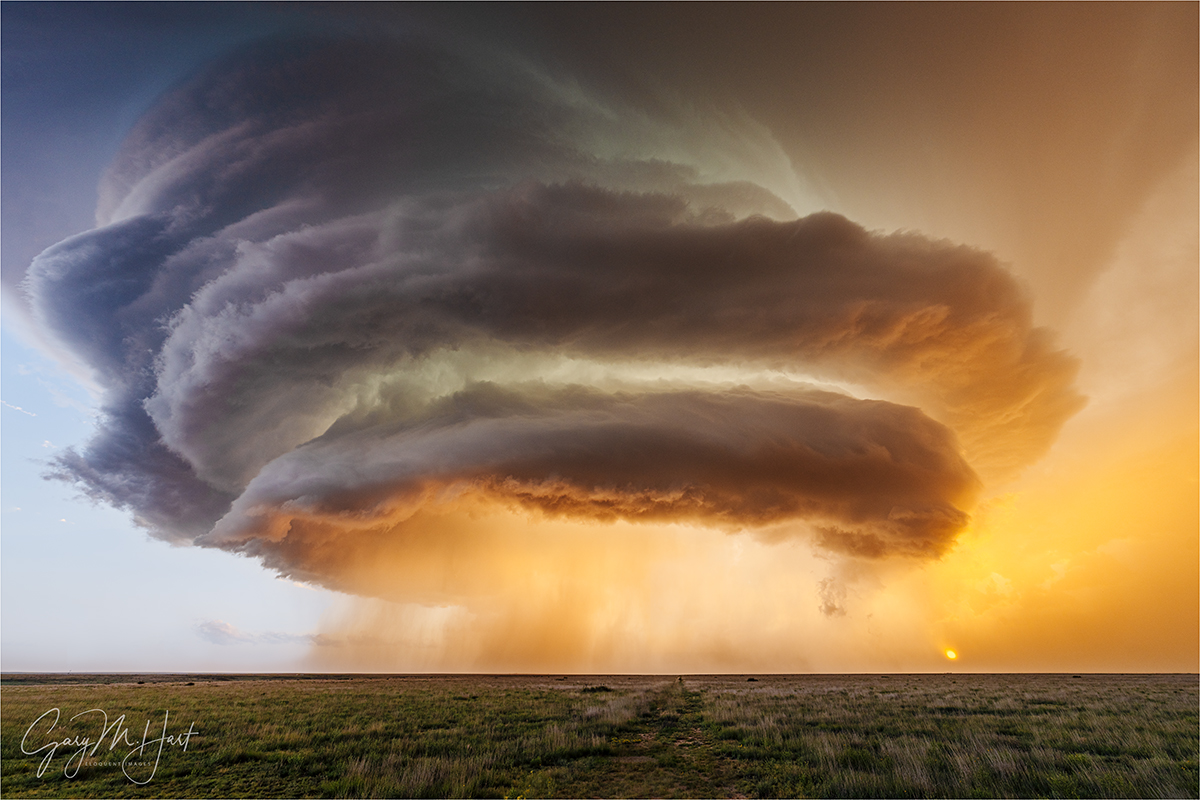
Alien Spaceship, Amistad, New Mexico
Sony α1
Sony 12-24 GM
1/25 second
F/9
ISO 100
Metering is like birth control: It doesn’t really matter how you do it, as long as it achieves the desired result. So if you’re happy with the exposures you’re getting, there may be nothing here for you. But if you want to know how I do it (metering, that is), and why, please read on.
You’re smart—your camera isn’t
Let’s start with the basic premise that your camera is stupid. In other words, despite any experience to the contrary, you’re smarter than your camera. Really. When your camera gives you the wrong exposure, it’s because of the camera’s limitations, not yours. And while your camera isn’t going to get any smarter, your potential for learning is unlimited.
Another undeniable true is, even if your camera nails the exposure, it has no idea about the depth of field you seek, or the scene’s motion and how you want to handle it. And controlling these scene variables while achieving the ideal exposure requires solid understanding of metering and exposure. In other words, getting the exposure perfect is often not enough to attain the result you want.
What your meter really sees
A camera’s meter only sees the world in black and white. Not only that, all it understands is a “middle tone.” (I don’t use the common term “middle gray” because your world is in color, every color has a middle tone, and exposure is all about your experience, not your camera’s.) When you use an automatic metering mode (program, auto, aperture priority, shutter priority, and any other metering mode where your camera choses an exposure setting), and you point your meter at something, your camera adjusts its settings to make whatever it sees a middle tone.
But since very few things in the world are exactly a middle tone, most scenes require some thought to compensate. Want a dramatic illustration? Photograph a white sheet of paper, making sure it fills the entire frame; then photograph a black sheet of paper (again filling the frame) without adjusting your settings. You’ll end up with two gray frames because without any external input, that’s what the meter thinks everything should be. (Hey, it just occurred to me that not only is your subject in this test stationary, it’s also stationery. Sorry.)
If you’re using a fully automatic mode that incorporates some kind of matrix metering (some cameras have different names for this), your camera tries to figure out the scene and make the adjustments for you. This is often successful, but serious photography requires more control than this. In aperture and shutter priority modes, you set one and the camera sets the other—but it’s still up to you to use exposure compensation (the +/- button or dial) to tell the camera whether what its meter sees is brighter or darker than middle tone.
But in manual mode, you select all the exposure settings yourself.
Exposure basics
Before I give you the exposure how-to you came for, let me lay an exposure foundation. As you no doubt know, your camera records an image by capturing light on its sensor (or film). The exposure of an image is determined by the amount of light the sensor receives, which is a function of the size of the opening that lets the light in (the aperture, specified in f-stops), the length of time the light hits the sensor (the shutter speed), and the sensor’s sensitivity (ISO).
This might be a good time to distinguish between aperture and f-stop. They’re often used interchangeably, including by Yours Truly, but there is a difference. Aperture refers to the physical opening, while f-stop is the way we measure the opening to report the amount of light it lets in. So f-stop is a ratio: the size of the opening (that lets light in) divided by the distance from the front of the lens to the sensor (or film). But in common photography talk, photographers use the aperture and f-stop interchangeably, and you can too. (What tends to confuse people is that as the aperture gets bigger, the f-stop value gets smaller: f/4 allows in more light than f/5.6, which allows in more light than f/8, and so on.)
| Big aperture (smaller f-stop value, like f/2.8) | lots of light | shallower depth of field |
| Small aperture (larger f-stop value, like f/16) | less light | greater depth of field |
| Slow shutter | lots of light | more motion/blur |
| Fast shutter | less light | less motion |
| Low ISO | less light | less noise (more quality) |
| High ISO | more light | more noise (less quality) |
As far as the light you capture is concerned, it doesn’t matter whether you add or subtract light with the aperture, shutter speed, or ISO—or some combination these. But your image can vary significantly with the way you choose to manage the exposure, because your f-stop choice affects depth of field, while shutter speed affects motion freeze/blur and ISO affects noise.
One of the great things about photography is the reciprocal relationship between the three exposure variables. Light added/subtracted by a larger/smaller aperture can be compensated by a corresponding faster/slower shutter speed and/or lower/higher ISO.
We measure light added or subtracted by aperture/shutter/ISO adjustments in “stops”: You can think of a stop as a measuring cup of light—a stop is always the same amount of light, whether it’s controlled by the aperture, shutter speed, or ISO. For example, giving a scene two more stops of light by opening the aperture, keeping the shutter open longer, or increasing the ISO, will render the same exposure.
Shutter stops are measured the seconds, or fractions of seconds, the shutter is open. Keeping the aperture constant and doubling or halving the shutter speed changes the amount of light in your exposure recipe by one stop. Doubling or halving the shutter speed always adds or subtracts one stop. Here are conventional shutter speeds in one stop increments: … 1/2, 1/4, 1/8, 1/15, 1/30, 1/60, 1/125, 1/250 and so on. (Note that convention rounds some values slightly for convenience—trust me when I say there’s no functional difference between, for example, 1/60 and 1/62.5 or 1/120 and 1/125.)
Aperture stops are measured in ratios that have the numerator omitted for convenience: f-stop. Because they’re fractions, the smaller the f-stop number, the larger the opening. Here are standard aperture stops, from large to small: f/1, f/1.4, f/2, f/2.8, f/4, f/5.6, f/8, f/11, f/16, /f22, and so on.
As with shutter speed, doubling or halving ISO increases or decreases the exposure by one stop. So there’s a one stop change between ISO 100 and ISO 200, ISO 200 and ISO 400, ISO 400 and ISO 800, and so on. Know this, it’s pretty easy to infer that ISO 400 is 2 stops more light than ISO 100, and ISO 3200 is 4 stops more than ISO 200.
Note that cameras allow you to manage shutter and aperture stops in 1/3- or 1/2-stop increments, with 1/3 stop by far the most prevalent in the digital age.
A one stop aperture increase (more light, lower f-stop value) can be exactly compensated by making a one stop shutter speed decrease (faster shutter speed), This knowledge, combined with memorizing the incremental 1-stop values for each of the exposure variables, makes it easy to reason out any exposure adjustment.
This might be a good time to point out that each click of the shutter-speed, aperture, or ISO dials will move the meter pointer 1/3 or 1/2 stop (depending on how your camera is set up). Many cameras allow you to choose this increment, though it’s often buried deep in the custom menus. Mine are always set to 1/3 stop adjustment increments, and in fact most cameras now default to 1/3 stop adjustments (and I see no reason to change that). Knowing how much each exposure-setting click alters the exposure, I can make exposure without looking at my meter. For example, say that I click a frame, check my histogram, and determine that I need to be 2/3 of a stop brighter: I simply count two clicks of one of my exposure dials and fire off the next shot.
The depth of field and motion blur trade-off
From the “You can’t have your cake and eat it too department” comes this regrettable photographic truism: Increased depth of field leads to a corresponding increase in motion blur. That’s because greater depth of field requires a smaller aperture. To compensate for the reduced light caused by the smaller aperture, you need a longer shutter speed. So for any given exposure, a longer shutter speed is an unavoidable byproduct of a smaller aperture. And with a longer shutter speed comes an increase in the potential for motion blur. Enter ISO.
For example, let’s say you have a poppy that’s perfectly exposed at ISO 100, f8, and 1/125. But you decide you want more depth of field, and shrink your aperture to f/16. Since going from f/8 to f/16 cuts 2 stops, to keep your exposure right, you add those 2 stops back by increasing your shutter speed to 1/30 second. Fine, if everything is stationary, but maybe there’s a breeze, and you think 1/60 second would be best to avoid motion blur. How do you keep your f-stop at f/16, your shutter speed at 1/60, without losing light? That’s right—you bump your ISO to 200. (Or to 400 if you want to use 1/125 shutter speed.)
Stop for a second and catch your breath
If all this sounds confusing, take comfort in the knowledge that there’s a beautiful symmetry to exposure. Really, all this info I’m throwing at you boils down to one thing: There are only two primary exposure variables, aperture and shutter speed, and changing one in one direction can be compensated by changing the other in the other direction. ISO your safety net—a last resort solution that shouldn’t move from the camera’s native ISO (usually, but not always, 100—it depends on the camera, so check your manual), but it’s there if you decide the slight (or not so slight) quality loss justifies keeping the scene’s essential depth of field and motion effects.
Dynamic range
If the camera saw the world exactly as you do, you could be out taking pictures instead of reading this. But one of the primary limitations of a camera (film or digital) is the limited range of light it sees compared to what the human eye sees at any given instant (or during any single exposure, no matter how short or long). This is dynamic range.
But comparing the way your camera and your eyes see is kind of an apples/oranges thing, so simply saying a camera’s dynamic range is X stops, while our eyes see X+more stops, isn’t very useful. Put in layman’s terms, the dynamic range of a camera equals “not very much,” while the human eye’s dynamic equals “quite a bit.”
This dynamic range difference is one reason we need light meters in the first place. In high contrast scenes, you (or your camera) must decide between capturing the highlights while turning the shadows black, or capturing the shadows while turning the highlights white. Bummer. (As I used to tell my kids, just because you want something doesn’t mean you can have it.) I shoot in manual mode because I don’t want my camera making these exposure decisions.
But the camera has one distinct advantage over our eyes: the ability to accumulate light. If you take that into account, not only can a camera use a long exposure to “see” detail in color invisible to your eyes, with an exceptionally short exposure, it can also see color and detail too bright for your eyes—the best example being a view directly into the sun. So in that sense, a camera actually has more dynamic range than your eyes.—just not in a single frame
Manual metering
Most photographers who want to take their craft to the next level quickly grow frustrated by the lack of control fully automatic exposure modes offer. But lacking confidence, they’re reluctant to shoot completely untethered, opting instead for one of the semi-automatic modes, aperture or shutter priority.
But light in the kind of images I’m after, in the conditions I shoot, is often too extreme, or atypical, for conventional metering. And since I’m smarter than my camera (and so are you—remember?), I don’t want my camera making anydecisions for me. So I shoot in manual mode.
As soon as I bring up “manual mode” I see panic in the eyes of all the automatic shooters as they flash back to their first experience with a manual transmission. But unlike controlling a vehicle, manual metering is actually easier than automatic metering. (Okay, maybe it’s not easier than full automatic metering, but I can make the case that it is easier than aperture or shutter priority—and there are many reasons serious landscape photographers shouldn’t be shooting in full automatic mode.)
In manual metering mode, I usually start with ISO 100 (my camera’s best ISO), then determine the f-stop that gives me the depth of field I want. As a landscape shooter on a tripod to remove camera shake from the exposure equation, in a static landscape shutter speed is irrelevant. So, when there’s no motion in the scene, after deciding on my composition, I pick my a focus point, then adjust the shutter speed until my histogram or meter indicates the exposure I want. If there’s motion in the scene, I may need to adjust my ISO to achieve the motion effect I want (freeze of blur) while keeping the f-stop where it needs to be.
Why not aperture priority? Aperture priority is fine, but I think it requires more thought and effort than manual. But that’s a personal preference—there’s nothing wrong with using aperture priority if you understand metering and exposure compensation.)
In aperture priority mode, I set my aperture and the camera sets the shutter speed that makes the scene a middle tone—what could be simpler? But remember, most scenes are not exactly a middle tone (sometimes not even close), so I still have to evaluate the light and set the exposure compensation to tell the meter how far from middle tone the scene is. I just find manual metering more straightforward.
In shutter priority mode, you set the shutter speed and the camera determines the aperture that renders a middle tone. But if you’re a landscape shooter, I’m afraid your camera just doesn’t care about depth of field as much as you do.
Reading a camera meter
Today, virtually every mirrorless of DSLR camera displays a histogram that can be viewed before capture, rendering old-style metering obsolete. But I still think it’s beneficial to understand how to read a camera meter.
Your camera’s meter displays the range of light it sees on a horizontal or vertical bar with a “-” on the far left, “+“ on the far right, with a “0” (middle tone) in the center. There are also numbers along the bar. It looks something like this:
– |-3 -2 -1 0 1 2 3| +
As I said, this bar can also be vertical, and on Nikon cameras, the plus and minus sides were once (inexplicably) reversed. However it’s laid out, you’re only concerned with how far on the minus or plus side your exposure is—minus is darker than middle tone, plus is brighter than middle tone.
Don’t forget, the 0 position does not indicate the correct exposure, it’s the middle tone your meter strives for (but not necessarily, or even usually, the correct exposure). Each whole number step on the meter represents a one stop change in light captured. Most meters also broken further into intermediate hash marks representing 1/3 or 1/2 stop increments.
If you haven’t done so already, put your camera in manual mode and point at different subjects while watching the metering bar. The indicator will move up and down depending on the brightness of whatever it points at; if you don’t see the indicator move, it means your current exposure is either to bright or too dark to register. Now put your camera on a tripod and make the meter-pointer move by adjusting your shutter speed, or by pointing at something different.
Learn how to read a histogram
You look like you’re ready for some good news. So let me tell you about the fabulous tool at the disposal of all digital photographers: the histogram. Before digital capture, photographers had to resort to guesswork and bracketing in tricky exposure situations.
Enter the histogram. The histogram provides a picture of your exposure, essentially eliminating the guesswork and significantly reducing the need to bracket exposures. Despite its power and simplicity, I’m surprised by the number of photographers who don’t know how to use their histogram.
A histogram is a simple graph of the tones, dark to light, the sensor records. While I imagine that any graph has the potential to evoke high school science flashback trauma, a histogram is simple enough to be interpreted in the blink of an eye. Not only is your histogram easy to read, it’s almost always the most reliable source of exposure feedback in the field.
When an image is captured on a digital sensor, your camera’s “brain” samples each photosite (the individual pixels in the megapixel number used to measure sensor resolution), assigning a tone value that ranges from 0 (black) to 255 (white). Every tone value from 1 to 254 is a shade of gray—the higher a photosite’s number, the brighter its tone.
Armed with the brightness values for each photosite in the image, the camera is ready to build that image’s histogram. Think of the horizontal axis of the histogram as the foundation for 256 discrete, parallel vertical columns (0-255), one for each possible brightness value. On the far left is the 0/black column; on far right is the 255/white column (that they don’t display as individual columns is a prudent display choice by camera manufacturers, allowing them to display the exposure info in the most compact form possible).
Even with millions of photosites to sample, your camera builds a new histogram for each image virtually instantaneously, placing each photosite’s brightness value atop its corresponding column on the histogram. It’s like stacking poker chips—the more photosites of a particular brightness value, the higher its corresponding column will spike.
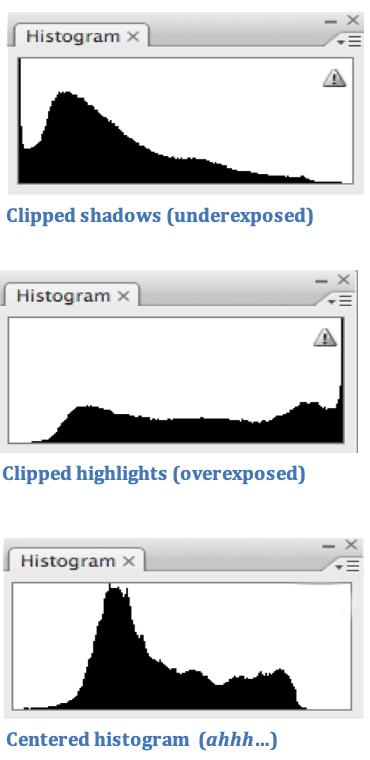
Sample Histograms
Despite the scary math/science flashbacks the histogram conjures, a histogram is startlingly simple to read because all you really need to concern yourself with is whether the ends of the graph exit on the left vertical (bad), right vertical (really bad), or the bottom horizontal (good) boundary. And you don’t need to worry at all about it cutting of at the top—when you see that, all it just means the graph container isn’t tall enough to display the light in that narrow tonal range.
The histogram’s left vertical axis represents completely black; the right axis is completely white. Any part of the image that falls outside the left axis detail-less black; if it falls outside the right axis it is detail-less white. This is called “clipping,” and while some minor clipping can be partially corrected in Photoshop, it’s best to avoid it when you take the picture.
As a general rule, your goal should center the histogram as much as possible. If you do that, you can be fairly confident that you captured enough essential information to tweak your exposure in post-processing.
When you see the histogram data cut off on the left (the data line disappears off the left side), but there’s room between the histogram data and right side of the graph (it disappears off the bottom), simply increase the amount of light in your exposure; if the data cuts off on the right and there’s room on the left, decrease your exposure.
Sometimes you’ll encounter a scene with so much dynamic range that the histogram is cut off on both sides: clipped shadows and highlights. There are many ways to address this situation, including returning when the light is better, taking multiple exposures and blending them on your computer, using a graduated neutral density filter to darken the sky relative to the foreground, or simply clicking the frame and trying to fix it in your processing. If you choose the final option (as I often do), it’s almost always best to spare the highlights at capture, and attempt to recover the shadows in processing. When I do that, I always try to push the highlights as far to the right as possible without clipping them.
And finally, you may hear “experts” talk about “exposing to the right”—pushing the histogram as far to the right as possible without clipping in every shot (regardless of the scene’s dynamic range). Though it’s true that this can result in a slightly cleaner (less noisy) image, I don’t recommend this approach to anyone not completely comfortable with exposure, because for most photographers the limited benefit doesn’t justify the decreased margin for error the approach brings. But once you’re completely comfortable managing exposure using your histogram, feel free to revisit exposing to the right. Until then, centering the histogram will serve you fine.
Putting it all together
Armed with all this knowledge, you’re now ready to shoot like a pro. Here’s my simplified exposure approach in recipe form:
- Start with your camera’s native (best) ISO. This is usually 100, but check your manual.
- Determine the best f-stop for the scene. I’m shooting landscapes, using a tripod, so there’s no need to account for.—most often, my top f-stop priority is depth of field. Do I want lots of depth of field or a shallow depth of field? Something in between? If depth of field doesn’t matter (everything in my scene is at infinity), I go with my lens’s sharpest f-stop, usually between f8 or f11. (Some photographers test each lens to determine it’s best f-stop—I usually assume f/8 to f/11 and only test if I think it’s necessary.)
- Adjust the shutter speed. Click the shutter dial (or knob) with an eye on the histogram. When the histogram looks good…
- That was easy.
- Review the histogram. I usually check the captured image’s histogram after a shot, just to be sure, and adjust if necessary.
I only deviate from my camera’s native ISO is when there’s motion in the scene and changing the ISO is the only way to get the correct exposure using the f-stop and shutter-speed combination I need.
And finally, when the dynamic range in the scene is so great that my histogram clips on both sides, I usually go darker to save the highlights. It’s usually better to loose detail in the shadows than the highlights because shadows are easier to recover, and usually what’s in the highlights is more important than what’s in the shadows.
Now what?
Don’t expect to perfectly understand the information I’ve given you. My goal is to give you the information necessary to go out in the field and teach yourself. I’ve succeeded if you’re able to take this information in the field with you, and through trial and error, turn it into understanding. Happy shooting.
Join me in a photo workshop
Managing the Entire Scene (Motion, Depth, and Light) With Exposure


")


, Yosemite")


")


