Eloquent Images by Gary Hart
Insight, information, and inspiration for the inquisitive nature photographer
Grad School
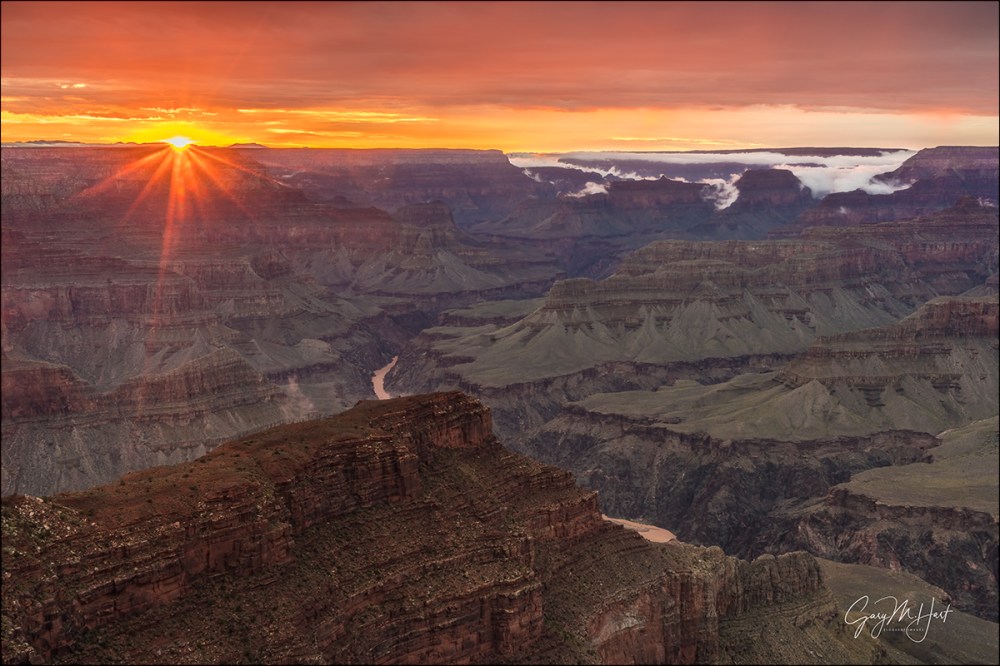
Sunset, Hopi Point, Grand Canyon
Sony a7R II
Sony/Zeiss 24-70 f4
2.5 seconds
F/18
Breakthrough 3-stop hard GND
Since the first photon struck a photographic plate, photographers have struggled to stuff the broad range of light their eyes see, into the relatively narrow range their camera can capture. When we shot film, the time waiting for the film to return from the lab was filled with self-doubt and second guessing, punctuated by ecstasy or despair. Then came digital capture, with its immediate image review, histograms, and a host of processing tricks that made one-click exposure-angst a thing of the past—we still had to be careful, but there was a safety net.
Despite digital’s advantages and advances, photographers are still faced with a world illuminated by a much greater range of light than our cameras can handle. Of course this creates opportunities to use our cameras’ limited dynamic range creatively, for example to create a silhouette or a high-key background that helps our subject stand out, but more often than not we’re looking for ways to squeeze all of a scene’s dynamic range into a single frame.
HDR software and layer masks are great post-capture solutions, but I prefer minimizing processing time by getting as much right as possible at capture and am never far from my graduated neutral density (GND) filters. Portable, simple, and effective, I can’t imagine photography without GNDs. And rather than being rendered irrelevant by digital’s ever-improving dynamic range and advanced blending techniques, digital processing enhances GND use.
GNDs explained
A standard (not graduated) neutral density (ND) filter is a uniform, neutral (doesn’t affect color) piece of glass (usually) that darkens a scene (the “density” part) without affecting the scene’s color (the “neutral” part). Its prime purpose is to slow shutter speed, usually to blur motion. While an ND (photographers usually shorten the name by just pronouncing its initials) filter can be rectangular, most are circular, with threads that screw onto the front of a lens. The amount of darkness an ND filter adds is measured in stops of light.
A graduated neutral density filter is half dark, with its density (dark) part on top and the bottom half completely transparent (alters nothing). Like its ND filter cousin, a GND filter’s density is measured in stops. The “graduated” part of the name refers to the transition between the dark and clear halves of the filter.
Despite their similar names, a graduated ND serves an entirely different purpose than a neutral density filter. Rather than a tool for increasing shutter speed, a GND is used to reduce contrast in opposite halves of a scene, usually by darkening a bright sky enough to pull detail from a shaded foreground.
Most GNDs are glass or (more commonly) acrylic rectangles that you move up and down in front of the lens until it’s situated on the best place to disguise the transition. While you can purchase a circular GND that screws onto your lens, a circular GND is nearly worthless because it forces you to place the horizon transition zone in the center of your frame. In other words, don’t buy any GND that’s not rectangular.
It might be natural to assume that glass GNDs are better than plastic, but that hasn’t been my experience: Quality acrylic (sometimes called optical acrylic or optical resin) can be more visually pure than glass. And while glass doesn’t scratch as easily as acrylic, it’s heavier and breaks more easily if stressed or dropped.
GNDs come in three primary flavors that describe their all-important transition from light to dark—hard, soft, and reverse—each with its own purpose, advantages, and disadvantages:

Hard GND: Most of the filter’s dark half is its maximum darkness, with a very abrupt transition across the middle separating maximum darkness and completely clear. With this abrupt transition, a hard GND will darken a greater percentage of the upper half of your scene (usually the sky). The disadvantage of this abrupt (“hard”) transition is that the transition is more difficult to hide. A hard GND is most effective when there’s a distinct break between the bright sky and dark foreground, such as at the beach or flat landscape. In this image, a 3-stop hard GND allowed me to reveal shadow detail beneath a bright Grand Canyon sky. The hard transition blended easily into the flat horizon.

Reverse GND: A reverse GND’s darkest region is just above the center, with a hard transition to clear below, and a gradual transition lighter above. While the dark portion gradually lightens toward the top of the filter, it never becomes completely clear. A reverse GND is best for sunrises and sunsets, when the brightest part of the sky is directly on the horizon. In this Mono Lake sunrise image, a 3-stop reverse GND put the darkest part of the filter on the horizon, right where I needed it, without darkening the sky too much.

Soft GND: A soft transition GND only delivers its maximum density (darkness) near the top of the scene, and transitions very gradually to a completely clear bottom half. While this gradual transition makes a soft GND less effective for most of the scene, its subtle effect is much easier to disguise. A soft GND is best suited when there’s no an obvious place to hide the transition, such as a scene with an uneven horizon line. Above, a 3-stop soft GND held back just enough of the Yosemite sky to prevent the beautiful sunset pastels from washing out. The gradual transition blended smoothly into the uneven horizon beneath Half Dome.
Buying a GND
As I said earlier, while you can purchase a circular GND that screws onto your lens, these are pretty much useless, so my comments assume you’re using a rectangular GND. And I’m going to give you my own GND preferences—if you’re happy doing things differently, more power to you.
Hand-hold vs. filter holder
Given the large combination of options (size, density, transition), buying your first GND can be somewhat daunting. And size really does matter. But before you commit to a size, you need to decide whether you want to insert your GNDs into a filter holder that attaches to your lens, or simply hand-hold your GNDs.
The advantage to using a holder is that it frees a hand, which can occasionally be handy but is rarely something I can’t work around. And if you think you might be using a GND without a tripod (shame on you), you must use a holder and can skip the next paragraph.
At the risk of offending those photographers who use a holder, let me say that I find using a holder for my GNDs far more trouble than it’s worth: a holder can cause vignetting; a holder doesn’t play well with other things mounted to the lens, such as a lens hood (which I don’t use either) or polarizer; a holder makes it difficult to impossible to move the GND during exposure (more on this later); extracting (not to mention locating in my bag!) and attaching a holder is just one more step before I can start shooting; a holder only handles one width filter, so if you decide you never want to hand-hold, your holder choice locks in the filter size you’ll be purchasing. (If you hand-hold your filters, you can purchase a variety of filter sizes to suit various lens-opening widths.)
GND size
Holder or not, the filter you purchase must be wide enough to cover the front of your lens. I used to automatically purchase a larger size (100mm x 150mm, or about 4″ x 6″) believing that it would be easier to hand-hold without getting fingers in the frame, but I’ve slowly transitioned to a smaller size (66mm x 100mm, or about 2.6″ x 4″), keeping a couple of 4×6 filters for my largest lenses.
I prefer the smaller size not just because they’re cheaper, but because I found the bigger filter’s transition from dark to clear spans an area that’s too large to be completely effective on most of my lenses—to get maximum density with a large filter, I need to pull the transition zone down much farther into the darker part of my scene than I want to. This is especially a problem for the large soft transition and reverse GNDs.
Which GNDs to purchase
Because I don’t think one GND will give you enough flexibility for every situation, I recommend at least two. If you’re only getting two, a 2-stop hard and a 3-stop soft should handle most of your GND needs, albeit with somewhat limited flexibility. But because I prefer flexibility, and GNDs are small and light, in addition to the 2-hard and 3-soft filters, I also have a 3-stop hard and a 3-stop reverse.
I know photographers who carry far more GNDs than I do, and certainly the more filters to choose between, the more flexibility you’ll have. I try to balance flexibility with convenience, and too many GNDs can be difficult to carry and organize—four to six GNDs is my sweet spot on the flexibility/convenience continuum.
A big part of flexibility for me is the ability to carry my filters in small slotted, padded filter pouch that attaches to my tripod. With my GND filters always within reach, I’m much more likely to use them. If I care any more than six, not only do they start getting disorganized, I have less room in the pouch for spare batteries, a lens cloth, and the lens cap for my current lens.
Which brand to purchase
You don’t need to purchase the most expensive filters, but if you’ve invested in quality lenses, you’ll defeat their value by putting a cheap filter in front of them—in other words, price shouldn’t be an important factor in your brand choice (it’s better to buy one or two good filters than four or five cheap filters). Poor quality filters scratch and break easily, are often imperfectly calibrated (may be darker or lighter than advertised), and worst of all, are often not truly neutral (add a color cast).
There are two quality GND brands that I can recommend (there may be more, but I have no direct experience with them): Singh-Ray and Lee. Because of their quality, service, and variety, I’ve always used Singh-Ray (without having specific numbers, I’d guess that Singh-Ray is the most popular GND brand among pros). The only other brand with which I’ve had direct experience is Cokin, which I can’ t recommend because they add an unnatural color cast (they’re not truly neutral).
Using a GND
A typical GND scene is a landscape with a broad tonal range, from bright sky to dark foreground, that exceeds your camera’s ability to capture. While this is often addressable in processing, the more manageable you can make the scene’s dynamic range at capture, the more flexibility you’ll have when processing.
Choosing the right filter for the scene
Effective GND use starts with using the correct filter (or filters). Hard? Soft? Reverse? And how many stops? Your goal is always to defeat the scene’s dynamic range with minimal evidence a filter was used. Too much density, not enough density, improperly placed transition will be ineffective and/or betray the filter’s use.

Stacking a 3-stop reverse and 2-stop hard GND darkened the bright sky enough for me to bring out foreground detail. In post-processing I dodged (brightened) the darker parts of the sky a bit.
When shooting toward the sun, I prefer a hard or reverse GND with as much density as I can get away with. A hard-transition filter’s effect is much more pronounced than a soft-transition’s because a greater percentage of the filter is maximum density (a smaller transition zone), but its abrupt transition is also much harder to disguise in the scene.
A hard GND is especially effective for a scene with a flat horizon that spans the frame, such as the ocean or the rim of Grand Canyon. A darker, low-detail region spanning the frame between a bright sky and shaded foreground, such as a line of trees at the base of a mountain, is also a good place to hide a hard GND’s transition.
In the most extreme light conditions, for example when the sun is on the horizon and I want to pull lots of detail from the foreground shadows, I’ll stack two GNDs (pancake, one filter in front of the other). For example, combining a 2-hard and 3-reverse GND gives me up to 5 stops of density spread fairly evenly across the top half of the frame. Every scene is different, so experiment.

A 3-stop soft GND allowed me to capture detail in the trees without washing out the blue in the sky. Its gradual transition was subtle enough to be completely imperceptible.
A soft GND is easier to disguise when there’s no obvious place to hide the transition. I usually use a soft GND when I want to hold back the sky opposite the sun (e.g., the eastern horizon at sunset) enough to prevent sunset/sunrise color from washing out. For example, in Yosemite Valley, where both El Capitan and Half Dome jut into the brightest part of the sky, a hard-transition filter darkens them right along with the sky, while a soft-transition filter’s subtle transition blends much better.
Disguising your GND use
The better you are at disguising your GND use, the more effective your GND will be. Here are some common problems that betray a GND’s use:
Visible dark/light transition: Disguising the transition between the dark top and clear bottom of the filter is an art that improves with practice. Getting it right starts by choosing the right filter for the scene.
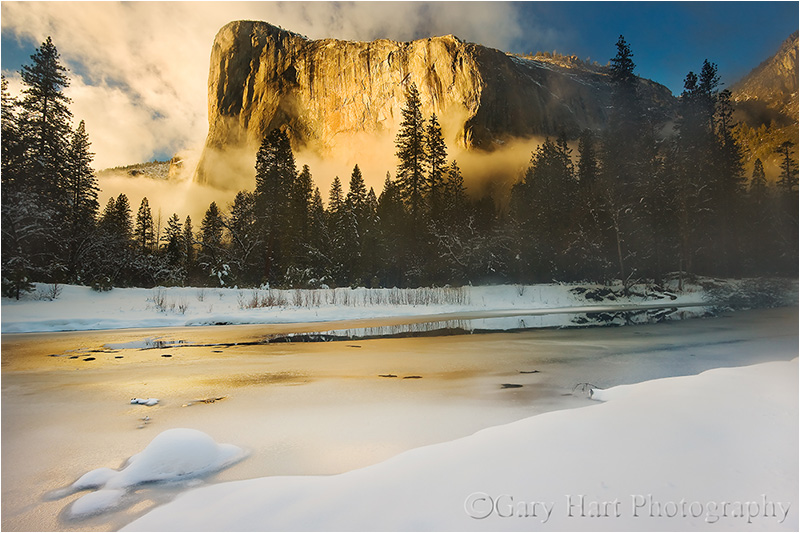
The band of trees enabled me to hide the transition of the 2-stop hard GND that held back the brilliant sunlight on El Capitan’s granite.
Most visible transitions are caused by a hard filter with too much density for the scene, and or misplacement of the GND transition. A soft GND, while usually not strong enough in extreme dynamic range conditions, is much easier to disguise.
If extreme dynamic range demands a hard or reverse GND, you need to train your eye to identify the best place for the transition. Placing the transition directly upon a flat, uniform horizon is usually best. When I don’t have a flat horizon, I look for an area of uniform darkness that spans the frame, such as a line of trees at the base of a mountain.
Often I can fix a visible transition by dodging/burning in post-processing. And some scenes just aren’t suited for a GND, in which case you’ll need to blend multiple exposures, look for a creative alternative like a silhouette, or simply move on to a different scene.
Too much density (a sky that’s too dark): Too much density causes the sky to appear too dark for the foreground. Often the problem is as simple as a sky that’s unnaturally dark, but sometimes its more subtle. I see this most frequently in reflections, when the reflection is brighter than the reflective subject—since that’s impossible, it’s a dead giveaway that a GND (and/or poor processing) was used.
Here’s one big advantage of GND use in the digital age—correcting a too much density problem can be as simple as dodging the too-dark sky and burning the too-bright foreground. The less extreme the difference, the easier it will be to correct, so an easy processing solution isn’t an excuse to be sloppy with your GND selection.
Vignetting from the filter holder: When the lens’s angle of view is too wide for the holder, vignetting (darkening on the edges) will be visible. While increasing your focal length will eventually eliminate the vignetting, that renders the lens unusable with a GND at its wider focal lengths. The better solution is to get a wider holder (and the filters to go with it). Better still, start by purchasing a holder/filter ensemble that will handle your widest lens and its widest focal length without vignetting. Or best—toss the holder and hand-hold your filters.
Visible fingertips: As someone who hand-holds every time, I have a vast assortment of images of my fingertips enjoying beautiful landscapes. Fortunately, this only happens when I’m sloppy, do-overs are no problems, and keeping your fingers out of the frame is easy if you’re careful. With the larger filters it’s usually pretty easy to simply pinch a corner that’s outside the frame.
The smaller filters I prefer often don’t have enough real estate outside the lens’s field of view, requiring a different technique. Instead of pinching a corner, I hold the smaller filters on the outside, by their edges with my thumb and middle or index finger (one on each vertical side), so my fingertips never touch the front or back of the filter. (When someone asks how much three inches is, you hold your fingers three inches apart—now, just slip a filter between those fingers and you’re ready to go.) Holding the filter like this, the rest of my hand is out of the way, either above or below the filter. It’s actually pretty simple, but I suggest practicing at home first.
Metering
In my film days (when exposure failure was not an option), when a GND was called for, I carefully spot-metered first on the highlights and and again on the shadows—the difference between the two gave me the scene’s dynamic range in stops. With this information, I knew how much light to give my shadows, and how many stops to subtract with a GND (but I still bracketed to hedge my bet).
Then came digital with its post-capture histogram that enabled me to streamline my metering—I soon found myself (after setting my ISO and f-stop) spot-metering once on the shadows, dialing the shutter speed to a value that ensured sufficient foreground light, and selecting the least extreme GND necessary to subdue the highlights. After my first shutter click, I’d check the histogram and adjust the shadows and/or GND as needed. What could be simpler?
I thought you’d never ask….
Since switching to mirrorless, I pull out the GND I think the scene calls for and with my eye on my pre-capture histogram, dial up the shutter speed until the highlights start to clip, then click. Reviewing the post-capture histogram, I determine what, if any, adjustments are needed—for example, if my shadows are still too dark, I might pull out a stronger GND and add more light. (This approach also works with a DSLR that displays the histogram in live-view mode.)
GNDs with a polarizer
I get asked so much if it’s okay to use a GND with a polarizer so much that I’ve created a whole section for my answer:
Yes.
Technique
Proper placement of the GND transition happens through the viewfinder (or live-view LCD). Compose the scene, place your

In this Mono Lake sunrise image, the brightest part of the scene was on the right, and the fine detail I wanted to pull out was on the bottom-left. By angling my 3-stop soft GND about 45 degrees across the right half of the frame (maximum density on the top-right), I was able to give the foreground tufa enough light without overexposing the sky and reflection.
GND in front of the lens, and position it where the transition will be least visible. If you can’t see the GND transition, it often helps to move the filter up and down and watch the scene slide between light and dark—just a few up/down strokes should be enough to locate and position the transition.
To prevent reflections, gently rest the filter flush against the lens when you click. But to minimize scratches, and to avoid moving the camera during exposure, it’s also important that you don’t apply too much pressure against the lens. (And there’s nothing wrong with holding the filter a couple of millimeters away while you position it.)
Sometimes we get scenes with the region of greatest brightness not distributed horizontally across the frame. Fortunately, there’s no law that mandates a GND to be oriented horizontally. I guess that in at least a quarter of my GND images the filter isn’t oriented perfectly horizontally.
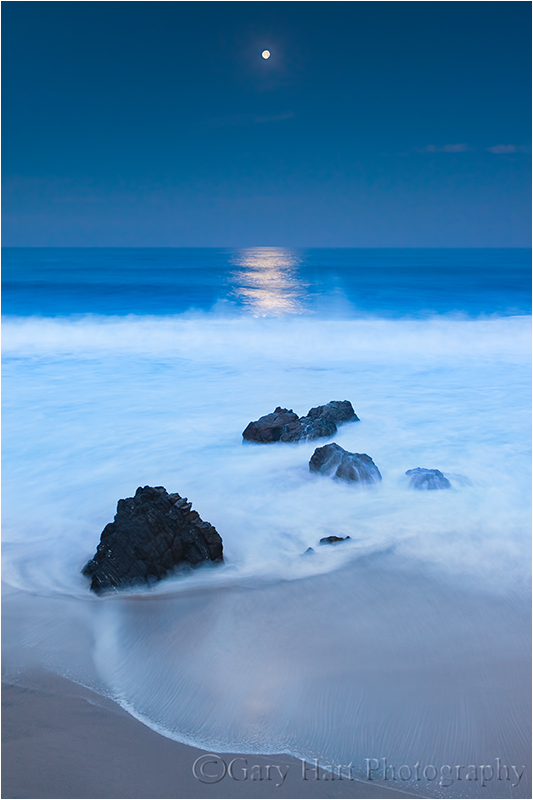
A 3-stop hard GND allowed me to avoid a glowing white lunar disk in this extremely dark twilight scene.
When I have shutter speeds approaching a second or longer, I often further disguise my GND transition by moving the filter up and down slightly during the exposure. This is especially effective for hard-transition filters. You don’t need to move it much, and the amount of movement will vary with the size of the brightness you’re trying to hold back (sometimes it’s the entire sky, other times it’s just a bright stripe on the horizon) and the size of the transition zone. If you’re not sure how much motion to use, practice a bit first by watching the motion in your viewfinder.
A GND can stretch by ten to fifteen minutes the twilight window when I can get detail in the darkening foreground and the daylight-bright moon. Since I do a lot of moonrise/moonset photography, and consider a full moon image a failure if I don’t get detail in both the foreground and the moon, the extra time a GND buys me is a huge advantage.
GNDs in the digital age
The advent of digital capture has brought a photography renaissance. Image quality improves steadily, as does our post-capture control of our images. It’s easy to forget (if you’ve been around long enough to have ever known), or believe obsolete, the basic tools that were once a landscape photography staple.
But not so fast….
Missing link
Digital processing provides the missing link for GND use. The late Galen Rowell, GND-filter pioneer and its strongest advocate, was a film shooter who was stuck with imperfect in-camera GND results—no matter how much he tried to disguise his GND’s use, there were situations where the transition or over-darkening was impossible to eliminate at capture. Google Rowell’s images, or better yet, stop by his beautiful Mountain Light Gallery in Bishop, to see a number of images with visible signs of GND use.
Even the best photographer, film or digital, will have visible GND transitions at capture. Rowell’s GND technique was impeccable, he just lacked the ability touch things up after capture. But today, with careful dodging and burning in Photoshop, digital shooters can virtually eliminate all signs that a GND was used.
As digital sensor dynamic range improves, some photographers argue that GNDs are becoming obsolete. For example, my Sony a7R II give me 2 to 3 stops more dynamic range than my Canon 5D III did. That means without filters I now get the same dynamic range I could only get by using my 5D III with a 2 or 3 stop GND. This significant improvement allows me to keep my GNDs in my bag for many shots that, in my Canon days, I would never have attempted without a GND.
But this doesn’t mean that I use GND filters any less, or that other digital shooters can use improved dynamic range as a reason to leave their GNDs home. Because for every shot improved dynamic range allows me to capture without a GND, I can find a new shot with so much dynamic range that I wouldn’t have considered attempting it even with a GND.
For example, the Grand Canyon sunset image at the top of the page wouldn’t have been possible in one click without the ridiculous dynamic range of my a7R II, a 3-stop reverse GND and the dodge/burn capabilities of Photoshop. Thanks to digital tools and my good old fashioned GNDs, I’m now closer than I ever dreamed possible to capturing natural images with the dynamic range my eyes see.
I use Breakthrough Filters
Workshop Schedule || Purchase Prints
A GND gallery
Click an image for a closer look, and a slide show. Refresh the screen to reorder the display.


Gary,
One of your best posts ever and I read them all of course.
Thanks, Steve.
Very useful information. I am saving it. Also love your photography.
Thanks, Sherry. And thanks for reading.
Not so long ago, I used circular screw-in GNDs because they were less expensive than high quality rectangular filters. Often I’d stack one on a circular polarizer, and keeping the polarizer properly oriented while also keeping the GND correctly oriented was challenging. Also, stacking could cause vignetting around the edges. On your advice, I bought a Singh-Ray GND (3-stop soft edge) and I now understand. As usual, you’re right. Sometimes it goes into a holder, but more often I simply hand-hold it and this has saved time when there’s no time to waste.
Ok Gary- I’m finally convinced! I’m moving to Singh-Ray Filters and I’ll go with the four you’ve recommended. Excited about moving to a bit more skilled photography.- Brian
Hi Gary. I am very glad I came across your blog. I have question regarding the hand held filter. Does holding in your hand create problems with a long exposure image?
No problem aside from a little arm fatigue. I hand-hold my GNDs up to 30 seconds and take advantage of that time to move the filter slightly to disguise the transition.