Eloquent Images by Gary Hart
Insight, information, and inspiration for the inquisitive nature photographer
Bonus Blog: Eclipse Special
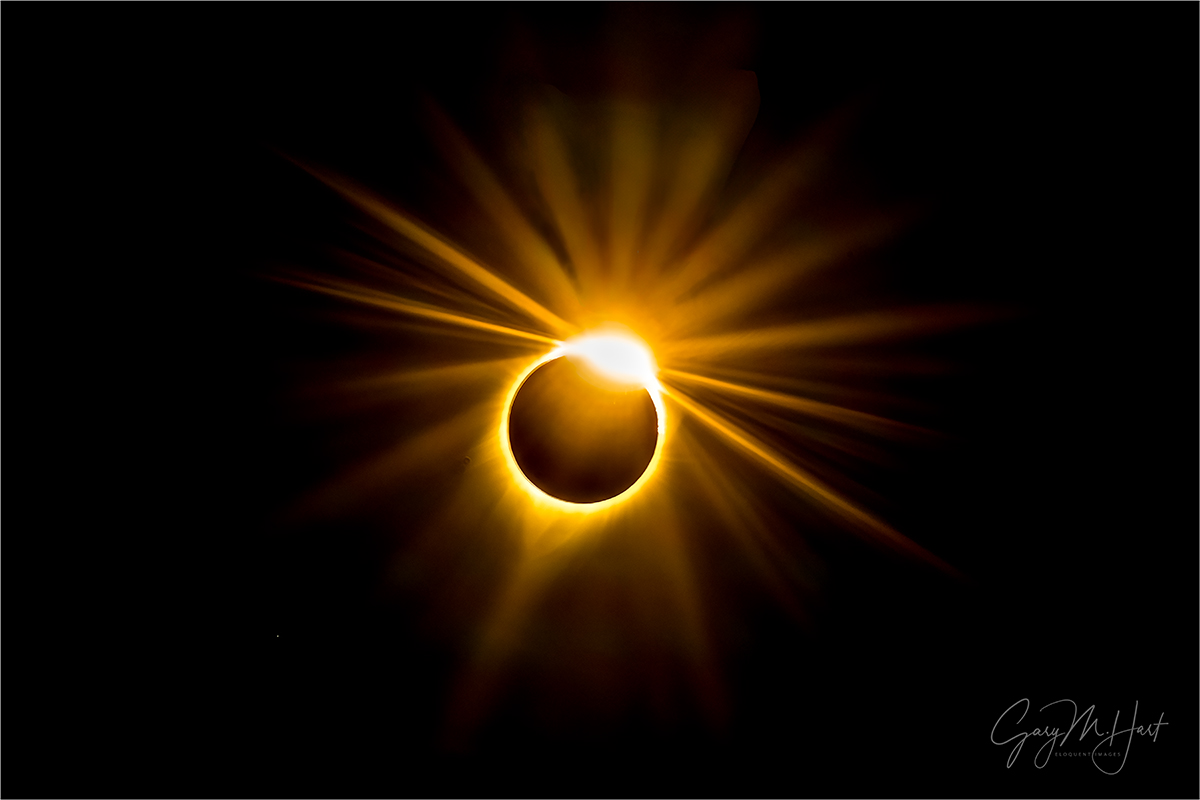
Solar Return, Total Solar Eclipse, Central Idaho (August 21, 2017)
Sony a7RII
Sony 100-400 GM
ISO 100
f/16
1/6 second
The following article isn’t a comprehensive eclipse photography how-to, but for eclipse viewers, it might be worth reading anyway
I’m getting a lot of questions about next week’s (April 8, 2024) total solar eclipse. In addition the standard “how-to” questions, many have asked if I plan to write a blog about how to photograph it. My response has been that, having photographed exactly one total solar eclipse in my life, I’m far from qualified to portray myself as an eclipse expert. But the questions keep coming, so I figured I’ll put my limited knowledge, along with some unsolicited experience-based advice, in a short(-ish) blog post with the qualifier that there are many people out there with far more eclipse photography experience than I have. And please note that the words that follow are intended for my kindred spirits, those whose passion for photography is an extension of their love of Nature—if your goal is a career-making eclipse image that you can retire on, you probably want to look elsewhere.
Safety first
And before I say anything else, don’t even think about viewing the eclipse without proper eye and camera lens protection—anything less risks permanent eye and sensor damage. Rather than try to provide safety guidance here, I’ll just refer you to NASA’s Eclipse Viewing Safety page.
Trust me
Based on my 2017 experience, my number one piece of advice to anyone lucky enough to be in position for eclipse totality is don’t get so caught up the photography that you fail to appreciate the majesty above you. I can’t emphasize this enough. For many, this will be a once-in-a-lifetime experience, and (I promise) if you’re trying to photograph it, the short duration of totality (four minutes or less) will take your breath away (like a knee to the midsection if you realize you missed it fiddling with your camera).
After my experience in 2017, my recommended approach to photographing any total eclipse while prioritizing the experience, is to put your camera on a tripod well in advance, attach your longest lens, and frame up the sun. In other words, don’t get fancy.
Trying to add landscape features to your eclipse image is probably a mistake, because during totality the sun will be so high in the sky that any (legitimate) image that includes the landscape will be so wide, the eclipse will shrink close to insignificance in the frame. Even going wide enough to include stars and planets will shrink the eclipse more than I’d prefer.
Not only will shooting a telephoto of the eclipse maximize the eclipse’s beauty, a tight frame eliminates all terrestrial objects, making your location within the path of totality irrelevant—whether you’re at a beautiful mountain lake or the parking lot of a 7/11, your telephoto eclipse images will look the same. That said, if you can be in a relatively remote area away from crowds, by all means do it. While the photography aspect won’t be any different, the multi-sensory personal aspect will be much better.
Time to start clicking
Don’t misunderstand: I’m not saying you shouldn’t photograph the eclipse—I can’t imagine witnessing something this special and not photographing it. I just want to make sure your priorities are straight before you begin. So here goes…
I think the best eclipse images happen in the few seconds before and after totality, so make sure you’re ready for both of these very brief windows. During the actual period of totality, you’ll have time to catch your breath, appreciate the view, and prepare for the sun’s return.
Though in 2017 I took a ton of images long before and after totality, I never did a thing with them—they just weren’t that interesting (a bright disk with a bite taken out). But that doesn’t mean these images didn’t have value, especially my before images, because there’s no better way to appreciate the speed of Earth’s rotation than to frame up any celestial object in a long telephoto lens and watch how quickly it exits the frame. If nothing else, even if you won’t use your before images, this is your best opportunity to gauge the sun’s pace across the frame at your chosen focal length, and its general path across the sky. In 2017, armed with this knowledge, I set a timer on my watch (can’t remember how long—30 seconds?) to remind me to check my framing. Don’t forget, the longer your focal length, the more frequently you’ll need to check your framing.
In final minute (or so) before totality, remove the solar filter (from the lens, not your eyes), stop down to f/16 or smaller (for a sunstar as the sun shrinks to nothing), and reframe the sun by moving it toward the edge of your frame to maximize the length of time until you’ll need to reframe again—ideally you won’t need to touch your camera again until after totality starts and you’ll have about four glorious minutes to enjoy a view that doesn’t change a lot. (FYI, the reason you don’t see any 2017 pre-totality sunstar images from me is because I was just a few seconds late removing my solar filter until it was too late—fortunately, I was prepared when the sun returned two minutes later.)
Don’t forget to check your exposure, both after removing the solar filter, and again when the sun is completely eclipsed. Since most of your frame will be black, your histogram will be skewed far to the left, but don’t worry about this—the most important thing is to make the remaining sunlight as bright as possible without clipping those highlights.
In the final seconds before and after totality, look for the Baily’s Beads and the diamond ring effects on sun’s perimeter (you might not see them until you view your images later). Both are brilliant splashes of light on the sun’s rim, caused when the last rays pass through irregularities on the lunar surface. Once the sun has disappeared completely, you can increase your exposure and remove eye protection (but keep it nearby—like on top of your head) until the sun returns.
Once totality arrives, a possible compositional option that will require a wider focal length is to include Venus, about 15 degrees below and right of the eclipse, and Jupiter, about 30 degrees above and to the left of the eclipse. As cool as that sounds, they’ll just be white dots, and as I said earlier, the wider focal length will shrink the sun. But if that sounds appealing, you’ll have time to do this in the four minutes of totality without completely distracting yourself from the eclipse experience. (But if you change your focal length for any reason, don’t forget to refocus.)
One potentially very cool addition to your eclipse frame is Comet Pons-Brooks, in the sky near Jupiter. On the cusp of naked-eye visibility, the comet should be visible to a camera during the few minutes of eclipse totality darkness. Don’t expect anything like 2020’s NEOWISE, but you might get a small tail that will identify the fuzzy dot as a comet, a truly rare opportunity that could set your eclipse photos apart.
If you must include landscape with your eclipse, to avoid an image that’s merely a single tiny sun somewhere near the top of the frame, you’ll probably want to do a time-lapse composite: a series of images captured at regular intervals, then combined in the computer with a before or after picture of the landscape, which will depict in one frame the eclipse’s evolution and path above the landscape. If you attempt a composite, please don’t cheat and manufacture a composite that shows the eclipse above an unrelated landscape—for example, an image of the Golden Gate Bridge with an eclipse series transposed above it (yuck). Nor should you magnify the eclipse larger than its actual size. (If you do either of these things, I don’t want to see them.) Since my 2017 composite attempt was a failure, and trying to do that composite was the distraction I most regret, I’ll refer you to the countless other photographers who have had more time-lapse success and generously offer guidance online.
A few processing points
The three images I’ve processed from 2017 (below) are cropped. Even though I used a 400mm lens (I’d have used a 200-600 if it had been available at the time), I wanted the eclipse bigger, so I cropped closer in Photoshop. Because there’s not a lot of fine detail in an eclipse image, you have a fair amount of latitude for cropping without doing great harm, so if you’re disappointed by the size of the eclipse in whatever lens you use, you’re not necessarily stuck with that.
I shoot everything in raw, which enabled me to warm the color temperature quite a bit in Lightroom. To my eyes, the eclipse looked more blue than this, but I just like my images being the yellow color we associate with the sun.
I also had to clean up some lens flair in Photoshop. Lens flair is pretty much unavoidable if the sun is in your frame, but the Photoshop Remove tool handles it pretty well.
Experience first, then photography
However you choose to photograph the eclipse, during totality step away from the camera and bask in the experience. As totality approaches, observe the sunlight’s subtle dimming, and the way shadows appear more crisply etched as the area of the sun providing illumination diminishes. With a good view of the surrounding landscape, in the final seconds you might see the moon’s shadow rapid approach before engulfing you in totality.
Now you’re eclipsed. Marvel at the sun’s corona dancing against the surrounding blackness. As your eyes adjust, look for stars, planets, and (if you’re lucky) Comet Pons-Brooks. And don’t limit your focus to the visual. When the sun disappears, note the rapturous awe, or elated celebration, of those surrounding you. Monitor animal behavior, and check in with your non-visual senses: notice the cooler temperature, listen for bird, insect, and other creature sounds to go quiet, perhaps replaced by the calls of nocturnal creatures.
There you have it, the extent of my eclipse photography knowledge. If you encounter advice from a photographer with more eclipse experience than I have, it’s entirely possible (likely) that they know more about it than I do. But don’t let them talk you into trying something so complicated that you miss your four-minute opportunity to experience one of Nature’s most special gifts, because there are no do-overs.
Now enjoy, and good luck!
Read about my 2017 eclipse experience
August 21, 2017
Click any image to scroll through the gallery LARGE
")
")
")

I had the good fortune to be staying in Park City and got my son-in-law to drive me, my daughter and their two children to Idaho Falls. I got many images of course and put together using Matt Kowalski’s video as a guide about how to make a composite. Fortunately I did remember to take off the filters from the lens 400mm. I was using a Sony A 99 version 2. I had a 15 stop neutral density filter and I think also a circular polarizer. The URL of my composite image is:
https://petersidell.smugmug.com/Travels/North-America/Eclipse-August-2017-Idaho-Falls/i-BS33Spv/A Eclipse August 2017 Idaho Falls – PeterSidell petersidell.smugmug.com
I have also attached a jpeg copy. 
Since my last workshop with you I have moved to California and really want to try and do a Yosemite winter workshop. I’ll have to look at your schedule and find a way to make it work.
Peter Sidell psidell@comcast.net
>
Fortunately, not removing the filter was no big deal. I was just a couple of seconds too late at the start of the eclipse, and more than ready at the end. (The link doesn’t work for me.)
I’m speechless, I’ve never been able to achieve this result. In mountainous France, we’re not as spoiled as the French on the west coast, who have much clearer skies that are ideal for viewing these eclipses.
Thank you, Marie.
Thank you very much for the indications you give, I believe they will be very useful to many of us and will enable us to improve in the technique of shooting an eclipse.
Thank you very much for the indications you give, I believe they will be very useful to many of us and will enable us to improve in the technique of shooting an eclipse.
You’re very welcome.
I appreciate the advice to not bother trying to get landscape features in. I was wondering how that would work. I thought maybe by using my 10 to 20 lens I could get something on the ground, but the eclipse would be too tiny to bother. I had to cancel my plans to go to Texas, so I’ll be shooting a partial eclipse here in Maryland. I’ll have to leave the filter on through the whole thing, which should simplify things.
Anonymous in Maryland is Al Marsh.
Thanks, Al. FYI, the difference between total and partial, even a greater than 90% eclipse, is so significant that I wouldn’t even drive across town for a partial eclipse. They’re entirely difference experiences. Drive to Akron or Buffalo. Trust me.
I hope you were able to see yesterday’s, as the east coast of the USA was announced as the area where it would be most visible.