Eloquent Images by Gary Hart
Insight, information, and inspiration for the inquisitive nature photographer
Speaking of Highlights…
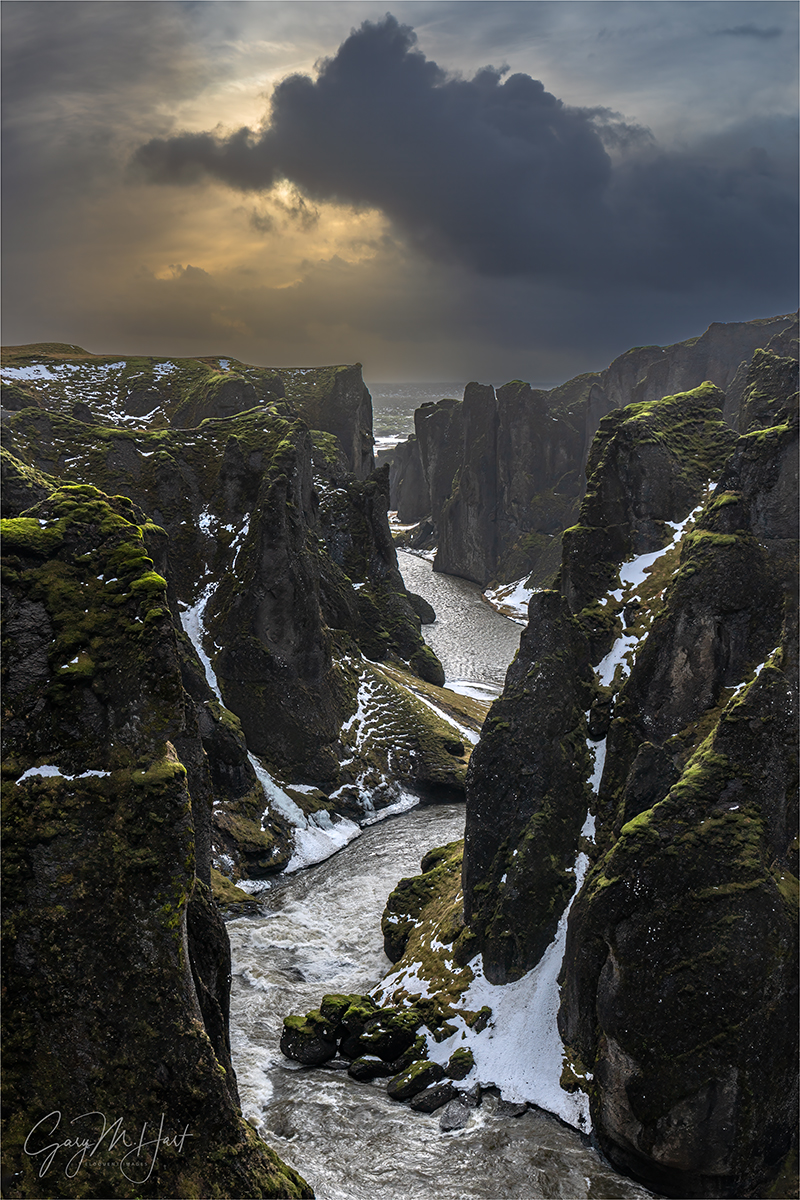
Frozen Canyon, Fjadrargljufur, Iceland
Sony a7R V
Sony 24-105 f/4 G
ISO 100
f/11
1/50 second
Fjadrargljufur, Iceland
In our annual Iceland photo workshop, Don Smith and I start with an assortment of must-see locations we’d be remiss to pass on: Kirkjufell, Glacier Lagoon, Diamond Beach, and Vestrahorn, to name a few. These Iceland highlights are well-known and photographed enough that they probably had much to do with the workshop students decision to sign-up for the workshop in the first place. But Iceland’s winter conditions, though not as cold as you might expect, can be quite harsh and unpredictable. So each, using the insights of our local guides, Don and I work to identify “new” (to us) highlights that enable us to pivot our original plan when conditions dictate. With several new waterfalls explored, this year had already been especially productive in the new options department when we explored Fjadrargljufur.
Fjadrargljufur is a short, narrow canyon carved into ancient lava flows by the Fjaðrá River. Just inland from Iceland’s rugged South Coast, access to Fjadrargljufur is via a steep (-ish), but well maintained, trail that offers several vantage points to catch your breath as you gaze up or down the canyon. After hiking a little less than a mile, you reach the trail’s end and are rewarded for your effort by two waterfalls and multiple vantage points from which to photograph them.
While not as well known as many Iceland natural icons, Fjadrargljufur is far from anonymous, so we weren’t the only ones there. But instead of the crowds that can clog some locations, the other visitors here were a complete non-factor. Last year, on our first visit to Fjadrargljufur, dense fog, snow flurries, and an icy trail prevented us from venturing far enough up the canyon to view the waterfalls. Nevertheless, we saw enough to know that this was a spot worth returning to and we were happy to make that happen this year.
On this visit we found a little snow and ice on the ground, but the trail was in much better condition. In locations like this, with well-defined trails and no forks to cause confusion (and especially when a lot physical exertion is required), we usually give everyone a be-back time and set them free to explore at their own pace. So, following a brief orientation, the group spread quickly—some didn’t venture beyond the closer (and less physically demanding) vistas, but about half of the group made it all the way to the waterfall reward at trail’s end.
I spent most of my time at Fjadrargljufur photographing the waterfalls, but as I started the walk back, I was stopped by the down-canyon view. The dense clouds that had been with us all morning had thinned, pouring sunlight into the canyon and illuminating rich green moss hugging the rocks. And the clouds that earlier had spread a homogenous, gray blanket overhead, were suddenly suffused with personality that shifted by the minute.
Surveying the scene for a composition, I knew that any camera would struggle to capture the extreme difference between the darkest shadows in the canyon and bright clouds. I also knew that my camera (Sony a7R V) would be up to the task, but only if I took extreme care with my exposure.
I digress…
In difficult exposure scenes, the single most important concern is sparing the highlights. First, since the human eye is always drawn to the brighter areas of an image (the brighter it is, the greater the attraction), blown highlights will be the first thing viewers see. If your subject is in shade surrounded by sunlight, you’re there at the wrong time. (Yes, I know that, like everything else in photography, there are exceptions, but they’re few and far between.) And second, dark shadows are usually easier to recover than bright highlights in post-processing.
This seems like a good time to mention the single biggest mistake I see workshop students make: Using the LCD preview image to make exposure decisions, instead of using the histogram. The LCD image is for composition; for exposure, you have to use the histogram. In fact, in a high dynamic range scene (a scene with dark shadows and bright highlights), if the image looks good on the back of your camera (the LCD image preview), you have almost certainly overexposed the highlights or underexposed the shadows beyond recovery.
Most common are already-bright sky scenes made impossibly bright by an inexperienced photographer exposing to make the shadows look good—the consequence is a completely white sky, or (at best) a sky with most of its color washed out. Another common rookie mistake is underexposing the sky to 0ver-saturate sunset color—the resulting sunset might look beautiful, but pulling up the shadows later will reveal mushy, detail-robbing noise.
In a properly exposed high dynamic range scene, on the camera the shadows will look a little too dark, and the highlights will look a little to bright, but neither will be too extreme to recover in post-processing (Lightroom/Photoshop for me). The best way to ensure the best possible exposure is to monitor and trust the histogram, regardless of what you see on your LCD. Want to learn more?
So anyway…

Fjadrargljufur Preview and Histogram: This is my original, unedited capture
As I always do in high dynamic range scenes like this, I started by working out my composition, taking extreme care to avoid cutting off the dark cloud that was soaring farther skyward by the second. Since motion and depth of field weren’t a factor in my composition, I just went with ISO 100 and f/11, and focused at infinity (somewhere down the canyon). That left my shutter speed to control my exposure.
With an eye on my live-view (pre-capture) histogram, I slowly lengthened the shutter time (slower shutter speed) until the histogram graph bumped up against the right side. My primary exposure concern was sparing the far more important, and more difficult to recover, highlights—even though the histogram showed my shadows were still slightly clipped, I knew my camera well enough to be confident that I could recover them later.
To illustrate why exposure decisions should never be based on the camera’s LCD preview image, I’ve shared the jpeg preview of the original raw file that appeared on my LCD, with the Lightroom version of the histogram. While the canyon looked quite dark, and the sky looked much too bright, my histogram told me everything was recoverable. Had I tried to make an image shadows or highlights that looked good, the other side of the exposure continuum would have been unusable.
Believe it or not, this file was extremely easy to process. With just two moves in Lightroom—pulling the Shadows slider to the right (+100), and the Highlights slider to the left (-100)—the scene instantly looked very close to finished result. After that, most of my processing work was minor refinements and some dodging and burning.
Speaking of Highlights…
When a workshop group spreads as far and wide as we did on this visit, it’s always fun to hear everyone’s report once we’re back on the bus. Even though people were photographing different things on our Fjadrargljufur visit, the enthusiasm seemed pretty unanimous. Of course we keep finding new locations (this year was especially productive), so it’s impossible to say we’ll be able to make it to all of the “keepers” every year, but given Iceland’s changeable and potentially extreme winter conditions, it’s always nice to be armed with more highlights than we can use.
Trusting My Histogram


Absolutely beautiful!!!
Outstanding photograph of frozen canyon. I love the feeling of depth. And the mood. This is the kind of photograph I could have in my home for years and not get tired of it.
Thanks so much for viewing, and for your kind words.
Gorgeous
Thanks, Sherry.