Eloquent Images by Gary Hart
Insight, information, and inspiration for the inquisitive nature photographer
A Diamond in the Surf
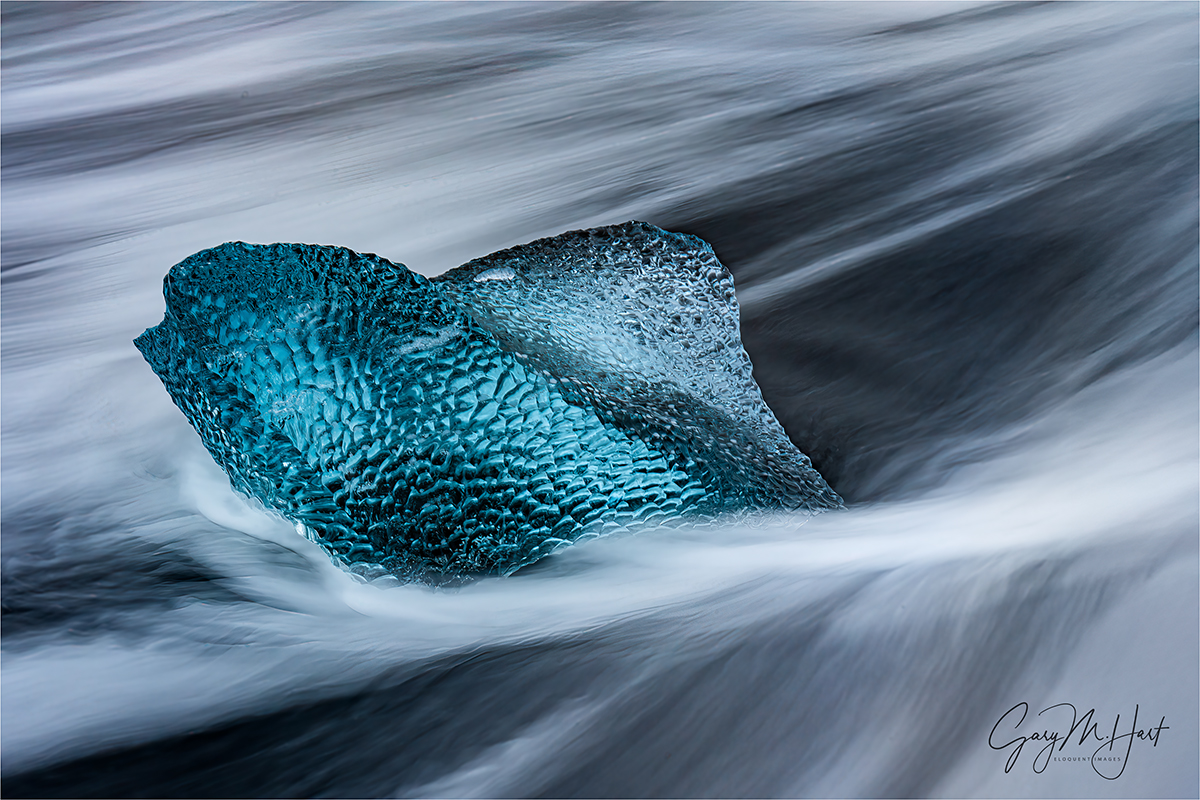
A Diamond in the Surf, Diamond Beach, Iceland
Sony a7R V
Sony 24-105 G
2 1/2 seconds
F/16
ISO 400
With a break in my workshop schedule (and to prepare for my upcoming 2025 Highlights post), I’m working hard to catch up on this year’s unprocessed images. Moving more or less chronologically, I’m really having a blast—such a blast that balancing this processing with family Holiday priorities and the endless demands of running a business, my weekly blog schedule has slipped a bit. But be patient, because I’m pretty excited about some of the images I have queued up to share, and am hoping I can crank out the blog posts to do them justice….
In addition to finding new images to get excited about, I never tire of revisiting locations (in general) and specific shoots (in particular) through my raw images. For example, returning to Iceland and remembering the sights and people Don Smith and I shared it all with really has me itching for our return in March. This year’s highlight was probably our exceptional and unexpected(!) Iceland northern lights experience on the workshop’s second night, a display that fostered a group-wide buzz that persisted throughout the workshop. So of course as soon as I returned home, I went straight to work processing those aurora images, then moved on to a handful of other new Iceland locations that had excited me, before my Yosemite winter workshop force me to focus on other priorities. After all that, Diamond Beach was just one of many Iceland locations that remained unprocessed, shrinking in my memory to the point where my first thought upon revisiting them was, Oh yeah…
Diamond beach is a long stretch of black sand spanning Glacier Lagoon’s narrow outlet to the Atlantic. As spectacular as all that black sand is, given the island’s volcanic origins, it’s simply standard equipment the Iceland coast. But garnish that black sand with large chunks of translucent blue ice, then stir it all up every few seconds with vigorous surf, and you have the recipe for a special visual treat.
The Diamond Beach ice you photograph today could very well be the Glacier Lagoon ice you photographed yesterday. Its origins are Jokulsarlon Glacier, which drains into Glacier Lagoon year-round. When conditions are right, in addition to continuous runoff, much larger ice chunks calve from the glacier and bob across the lagoon, slowly melting as they go. Eventually these icebergs have shrunk enough to fit into the channel that splits Diamond Beach as it drains into the ocean (each time we visit, we eyeball the beach from the highway and decide whether we want to be east or west of the channel). Once the ice makes it out to the sea, tides and active surf push it up onto the beach.
The prime goal at Diamond Beach is capturing motion blur in waving wash around the ice. I can tell you from experience that this is much easier said than done (and I have the images to prove it), because many variables need to align for success.
For starters, the light needs to be right. Ideal is the soft light beneath clouds or twilight, anabling the multi-second exposures these sweeping wave shots require (a neutral density filter can enable these shots in sunlight, but I’m not crazy about mixing harsh light with soft water). By arriving at Diamond Beach well before sunrise, even when the sky is clear we enjoy a half hour or more of gentle light before the sun arrives. (Another great thing about sunrise at Diamond Beach is that there aren’t a ton of tourists yet—it’s definitely far from empty, but once the tourists start swarming, photography becomes much more difficult.) When the sun comes out, I usually forgo the blurred water in favor of sunstar images that feature beautifully backlit ice. And if we’re lucky enough to get overcast, we can spend the entire morning making the intimate ice and flowing surf images everyone covets.
But even when the light is perfect, Diamond Beach can be a challenge. At the risk of stating the obvious, without ice, it’s just another beach (Diamond Beach without “diamonds” is just Beach), and the amount of ice varies a lot from year-to-year. Sometimes there’s hardly an ice cube to be seen. Other times, high tide and big waves have pushed all the ice to a high-and-dry, elevated flat platform just above the beach. One year we (the trip leaders) had to lug a few chunks from up there down to the surf just so our group had a chance to photograph ice with waves.
And ample ice on the beach by itself still isn’t enough when the tide’s and the waves don’t reach the ice. This is why I used to hope for high tide at Diamond Beach, the higher the better—that is, until one January morning when we arrived at high tide and found the surf so big and violent that we didn’t dare venture anywhere near the water. Instead, not wishing to be swept into the frigid North Atlantic, the group set up at an elevated “safe” vantage point and used moderate telephoto lenses (like a 24-105 or 70-200), only to be forced to completely reset our understanding of the term “rogue wave.”
And just when I believed I’d run out of obstacles to hinder the shot at Diamond Beach, our bus hit a reindeer on the way to our sunrise shoot, forcing us to turn around and limp back to the hotel (though we did make it for sunset that evening). So yeah, lots of stars need to align for Diamond Beach success.
But honestly, I’ve been shooting here long enough to know that there’s no substitute for just plain experience. Simply getting shots of ice and blurred water isn’t that hard, but finding the right ice subject, framing it perfectly, choosing the ideal shutter speed for the desired motion effect, timing the shutter-click for the best flow pattern around the ice, and avoiding wave-induced motion blur in the ice, is all a lot of balls to keep in the air simultaneously. Oh yeah—try keeping all those photography balls airborne while keeping one eye on aggressive and relentless surf that can soak you and your gear with little warning. Fortunately, as with most things, this all gets easier with each attempt.
This year, after more than a dozen Diamond Beach visits, reviewing my images, I remembered feelings of finally being in control and working proactively (instead of reacting and trying to adjust to continual failures) out there returned.
Because Diamond Beach stretches quite some distance, a workshop group becomes quite spread out almost immediately. So on the drive to the beach before each visit, Don and I share our own experience-based insights and answer questions while we’re all still together. While there’s no substitute for firsthand experience, this little jump-start does seem to increase the group’s success rate. This year’s mini training session continued as everyone bundled up and prepared for their assault on the beach, but pretty soon the bus was empty and I started getting myself ready (a rather time consuming process in Iceland in winter). I intentionally took my time so I could be the last one out there, slowly advancing along the beach and checking on everyone as I went. (Don and I don’t stick together out there, but I know he does the same thing.)
At the beach it was instantly clear that we had plenty of ice, the tide was high enough, and the surf just about right. For the first hour or so, between students I stopped to fire off a frame or two a handful of times, but my prime focus was making sure everyone was doing okay. Once satisfied that people we comfortable with what they were doing and content with what they’d found, I got a little more serious about finding subjects of my own. Even though I’d taken very few pictures to that point, the overcast sky gave me confidence that I had plenty of quality time remaining.
With ideal conditions like this, I look for ice that’s planted firmly in the sand, but close enough to the water for waves to reach it from time to time. Too far inland and there’s no water around the ice to blur; too far into the surf and the ice doesn’t stay put through an exposure.
In size terms we can all relate to, most of the ice we photograph tends to range from small microwave oven to full-size refrigerator—much smaller that and they move around too much; much larger and they can’t make it in close enough.
The mini-iceberg I share today was a little smaller than a small coffee table—not huge, but enough mass to resist shifting or rocking with the slightest wave pressure. After identifying it as a potential subject, I circled (not completely—I’d never put my back to the ocean) until I found the perspective I liked best, set up my tripod 20 or so feet away, trained my 24-105 lens on it, then framed up a composition. I found the exposure-setting combination that gave me a good histogram with ample depth of field at a shutter speed around 2 seconds (sometimes a little long, sometimes a little shorter). Then I stood and waited for the waves to arrive.
In the simplest possible terms, there are two opportunities when photographing waves sweeping around fixed ice: washing in, and washing back out. I usually prefer waiting until a wave is on its way out—not only does this provide a better (in my opinion) motion effect, the water has a little less force, making it less likely to introduce any motion blur in my subject. And after years of trying this, I’ve decided that exposures in the 1 – 3 second range seem to work best.
But anything with moving water is never a one-and-done thing. After each click I check the image on my LCD to identify motion effect and its timing, then do my best to avoid the effects I don’t like, and duplicate the effects I do like. I almost always, as I did with this subject, take at least a dozen shots (unless waves sweep my subject away, always a possibility). Every single frame is different, but it’s better to have too many choices than not enough. On the other hand (and this is a particular problem for me), unless I’m waiting for specific event (like a wave of a certain size or direction), I have to remind myself not to lock in on one subject so long that I miss out on opportunities elsewhere.
The image I chose to process and share today is of a wave on its way back out. And though almost a year later I have no specific memory of its capture, I can tell by the time of its capture (after sunrise) and my exposure settings that I used my Breakthrough 6-stop dark polarizer to enable the longer shutter speed necessary for wave effect I sought—in this case, 2 1/2 seconds.
As this image makes abundantly clear, perhaps the most striking feature of glacial ice is its not-so-subtle blue. Contrary to popular opinion, this blueness is not reflected color from the sky (the sky this morning was cloud-gray), it’s a quality of the ice’s glacial origins. If you paid attention during high school (or earlier?) science class, you know glaciers form from snow accumulated over hundreds or thousands of years. While air trapped in fallen snow makes it opaque, subjecting this snow to centuries of pressure from the accumulated weight above compresses it and forces out virtually all the air, leaving nothing but translucent ice crystals. This glacial ice is so dense, it absorbs all but the shortest wavelengths of visible light that enter. The only wavelengths not absorbed are the blue ones, which instead are scattered back to our eyes: blue ice. (Of course as you can see in some pictures in my Diamond Beach gallery below, ice infused with direct sunlight will take on the sun’s yellow/gold hue).
Diamonds in the Surf


