Eloquent Images by Gary Hart
Insight, information, and inspiration for the inquisitive nature photographer
A Diamond in the Surf
Posted on December 11, 2025
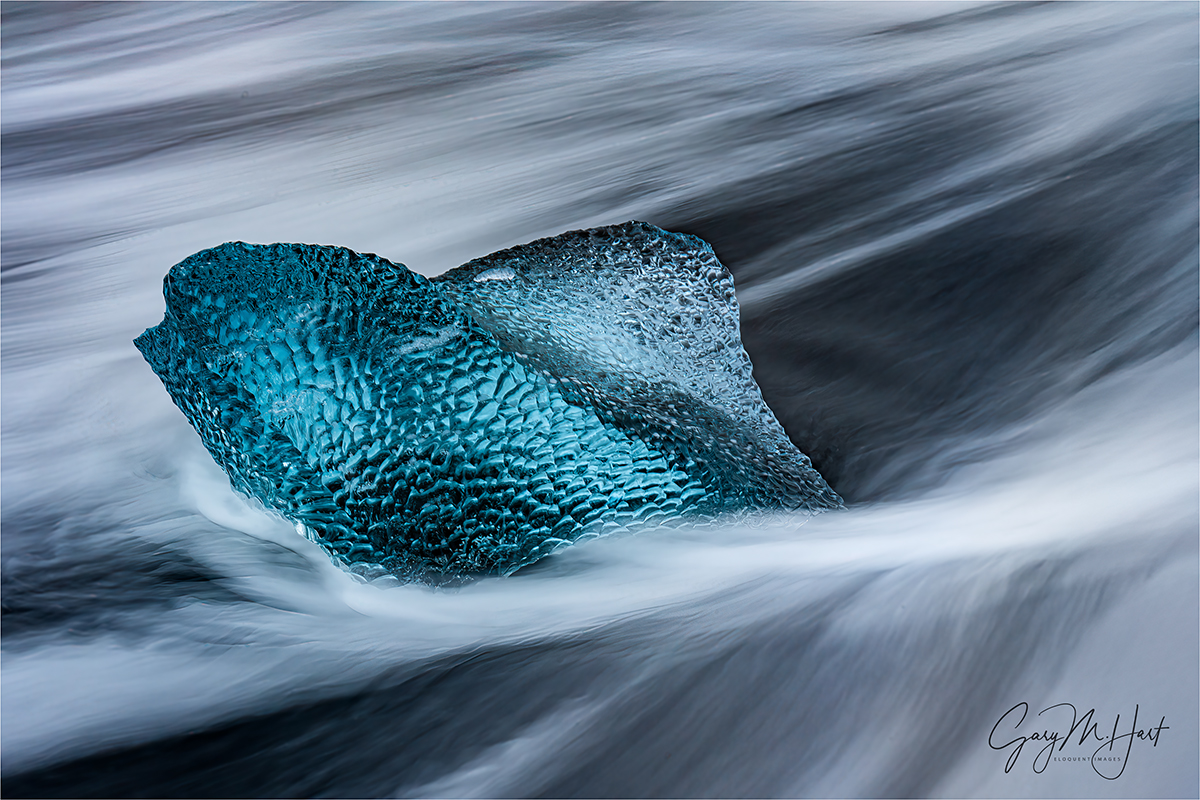
A Diamond in the Surf, Diamond Beach, Iceland
Sony a7R V
Sony 24-105 G
2 1/2 seconds
F/16
ISO 400
With a break in my workshop schedule (and to prepare for my upcoming 2025 Highlights post), I’m working hard to catch up on this year’s unprocessed images. Moving more or less chronologically, I’m really having a blast—such a blast that balancing this processing with family Holiday priorities and the endless demands of running a business, my weekly blog schedule has slipped a bit. But be patient, because I’m pretty excited about some of the images I have queued up to share, and am hoping I can crank out the blog posts to do them justice….
In addition to finding new images to get excited about, I never tire of revisiting locations (in general) and specific shoots (in particular) through my raw images. For example, returning to Iceland and remembering the sights and people Don Smith and I shared it all with really has me itching for our return in March. This year’s highlight was probably our exceptional and unexpected(!) Iceland northern lights experience on the workshop’s second night, a display that fostered a group-wide buzz that persisted throughout the workshop. So of course as soon as I returned home, I went straight to work processing those aurora images, then moved on to a handful of other new Iceland locations that had excited me, before my Yosemite winter workshop force me to focus on other priorities. After all that, Diamond Beach was just one of many Iceland locations that remained unprocessed, shrinking in my memory to the point where my first thought upon revisiting them was, Oh yeah…
Diamond beach is a long stretch of black sand spanning Glacier Lagoon’s narrow outlet to the Atlantic. As spectacular as all that black sand is, given the island’s volcanic origins, it’s simply standard equipment the Iceland coast. But garnish that black sand with large chunks of translucent blue ice, then stir it all up every few seconds with vigorous surf, and you have the recipe for a special visual treat.
The Diamond Beach ice you photograph today could very well be the Glacier Lagoon ice you photographed yesterday. Its origins are Jokulsarlon Glacier, which drains into Glacier Lagoon year-round. When conditions are right, in addition to continuous runoff, much larger ice chunks calve from the glacier and bob across the lagoon, slowly melting as they go. Eventually these icebergs have shrunk enough to fit into the channel that splits Diamond Beach as it drains into the ocean (each time we visit, we eyeball the beach from the highway and decide whether we want to be east or west of the channel). Once the ice makes it out to the sea, tides and active surf push it up onto the beach.
The prime goal at Diamond Beach is capturing motion blur in waving wash around the ice. I can tell you from experience that this is much easier said than done (and I have the images to prove it), because many variables need to align for success.
For starters, the light needs to be right. Ideal is the soft light beneath clouds or twilight, anabling the multi-second exposures these sweeping wave shots require (a neutral density filter can enable these shots in sunlight, but I’m not crazy about mixing harsh light with soft water). By arriving at Diamond Beach well before sunrise, even when the sky is clear we enjoy a half hour or more of gentle light before the sun arrives. (Another great thing about sunrise at Diamond Beach is that there aren’t a ton of tourists yet—it’s definitely far from empty, but once the tourists start swarming, photography becomes much more difficult.) When the sun comes out, I usually forgo the blurred water in favor of sunstar images that feature beautifully backlit ice. And if we’re lucky enough to get overcast, we can spend the entire morning making the intimate ice and flowing surf images everyone covets.
But even when the light is perfect, Diamond Beach can be a challenge. At the risk of stating the obvious, without ice, it’s just another beach (Diamond Beach without “diamonds” is just Beach), and the amount of ice varies a lot from year-to-year. Sometimes there’s hardly an ice cube to be seen. Other times, high tide and big waves have pushed all the ice to a high-and-dry, elevated flat platform just above the beach. One year we (the trip leaders) had to lug a few chunks from up there down to the surf just so our group had a chance to photograph ice with waves.
And ample ice on the beach by itself still isn’t enough when the tide’s and the waves don’t reach the ice. This is why I used to hope for high tide at Diamond Beach, the higher the better—that is, until one January morning when we arrived at high tide and found the surf so big and violent that we didn’t dare venture anywhere near the water. Instead, not wishing to be swept into the frigid North Atlantic, the group set up at an elevated “safe” vantage point and used moderate telephoto lenses (like a 24-105 or 70-200), only to be forced to completely reset our understanding of the term “rogue wave.”
And just when I believed I’d run out of obstacles to hinder the shot at Diamond Beach, our bus hit a reindeer on the way to our sunrise shoot, forcing us to turn around and limp back to the hotel (though we did make it for sunset that evening). So yeah, lots of stars need to align for Diamond Beach success.
But honestly, I’ve been shooting here long enough to know that there’s no substitute for just plain experience. Simply getting shots of ice and blurred water isn’t that hard, but finding the right ice subject, framing it perfectly, choosing the ideal shutter speed for the desired motion effect, timing the shutter-click for the best flow pattern around the ice, and avoiding wave-induced motion blur in the ice, is all a lot of balls to keep in the air simultaneously. Oh yeah—try keeping all those photography balls airborne while keeping one eye on aggressive and relentless surf that can soak you and your gear with little warning. Fortunately, as with most things, this all gets easier with each attempt.
This year, after more than a dozen Diamond Beach visits, reviewing my images, I remembered feelings of finally being in control and working proactively (instead of reacting and trying to adjust to continual failures) out there returned.
Because Diamond Beach stretches quite some distance, a workshop group becomes quite spread out almost immediately. So on the drive to the beach before each visit, Don and I share our own experience-based insights and answer questions while we’re all still together. While there’s no substitute for firsthand experience, this little jump-start does seem to increase the group’s success rate. This year’s mini training session continued as everyone bundled up and prepared for their assault on the beach, but pretty soon the bus was empty and I started getting myself ready (a rather time consuming process in Iceland in winter). I intentionally took my time so I could be the last one out there, slowly advancing along the beach and checking on everyone as I went. (Don and I don’t stick together out there, but I know he does the same thing.)
At the beach it was instantly clear that we had plenty of ice, the tide was high enough, and the surf just about right. For the first hour or so, between students I stopped to fire off a frame or two a handful of times, but my prime focus was making sure everyone was doing okay. Once satisfied that people we comfortable with what they were doing and content with what they’d found, I got a little more serious about finding subjects of my own. Even though I’d taken very few pictures to that point, the overcast sky gave me confidence that I had plenty of quality time remaining.
With ideal conditions like this, I look for ice that’s planted firmly in the sand, but close enough to the water for waves to reach it from time to time. Too far inland and there’s no water around the ice to blur; too far into the surf and the ice doesn’t stay put through an exposure.
In size terms we can all relate to, most of the ice we photograph tends to range from small microwave oven to full-size refrigerator—much smaller that and they move around too much; much larger and they can’t make it in close enough.
The mini-iceberg I share today was a little smaller than a small coffee table—not huge, but enough mass to resist shifting or rocking with the slightest wave pressure. After identifying it as a potential subject, I circled (not completely—I’d never put my back to the ocean) until I found the perspective I liked best, set up my tripod 20 or so feet away, trained my 24-105 lens on it, then framed up a composition. I found the exposure-setting combination that gave me a good histogram with ample depth of field at a shutter speed around 2 seconds (sometimes a little long, sometimes a little shorter). Then I stood and waited for the waves to arrive.
In the simplest possible terms, there are two opportunities when photographing waves sweeping around fixed ice: washing in, and washing back out. I usually prefer waiting until a wave is on its way out—not only does this provide a better (in my opinion) motion effect, the water has a little less force, making it less likely to introduce any motion blur in my subject. And after years of trying this, I’ve decided that exposures in the 1 – 3 second range seem to work best.
But anything with moving water is never a one-and-done thing. After each click I check the image on my LCD to identify motion effect and its timing, then do my best to avoid the effects I don’t like, and duplicate the effects I do like. I almost always, as I did with this subject, take at least a dozen shots (unless waves sweep my subject away, always a possibility). Every single frame is different, but it’s better to have too many choices than not enough. On the other hand (and this is a particular problem for me), unless I’m waiting for specific event (like a wave of a certain size or direction), I have to remind myself not to lock in on one subject so long that I miss out on opportunities elsewhere.
The image I chose to process and share today is of a wave on its way back out. And though almost a year later I have no specific memory of its capture, I can tell by the time of its capture (after sunrise) and my exposure settings that I used my Breakthrough 6-stop dark polarizer to enable the longer shutter speed necessary for wave effect I sought—in this case, 2 1/2 seconds.
As this image makes abundantly clear, perhaps the most striking feature of glacial ice is its not-so-subtle blue. Contrary to popular opinion, this blueness is not reflected color from the sky (the sky this morning was cloud-gray), it’s a quality of the ice’s glacial origins. If you paid attention during high school (or earlier?) science class, you know glaciers form from snow accumulated over hundreds or thousands of years. While air trapped in fallen snow makes it opaque, subjecting this snow to centuries of pressure from the accumulated weight above compresses it and forces out virtually all the air, leaving nothing but translucent ice crystals. This glacial ice is so dense, it absorbs all but the shortest wavelengths of visible light that enter. The only wavelengths not absorbed are the blue ones, which instead are scattered back to our eyes: blue ice. (Of course as you can see in some pictures in my Diamond Beach gallery below, ice infused with direct sunlight will take on the sun’s yellow/gold hue).
Diamonds in the Surf


Go With the Flow
Posted on May 16, 2024
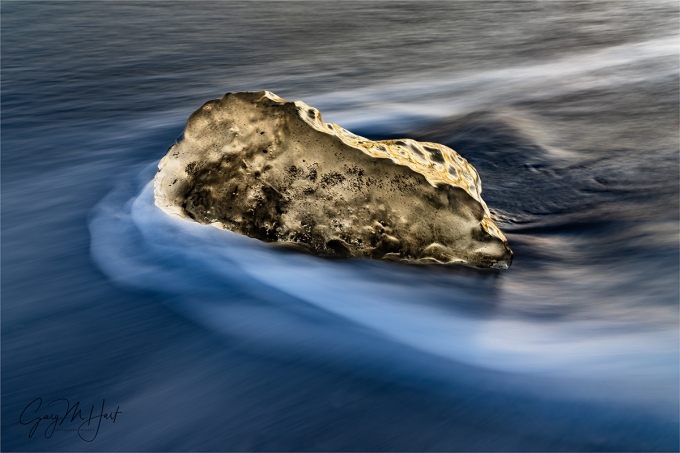
Blur, Diamond Beach, Iceland
Sony a7R V
Sony 24-105 f/4 G
ISO 50
f/11
1 second
Despite many visits to Diamond Beach over the last half-dozen or so years, I still don’t feel like I’ve mastered the iceberg blurred water shot to my complete satisfaction. But I keep working on it, and this year I was at least was able to capture something I like.
In previous visits, when my attempts to capture the perfect motion blur shot failed, I’d fall back on sunstar images—partly because I find them easier, but mostly because the backlit translucence of an iceberg is spectacularly beautiful. But as much as I like these sunstar images, I’ve seen other photographers’ Diamond Beach flowing surf images that I like even better, and can’t help going for my own.
The problem (aside from only getting one shot at it per year), is getting all the scene’s many moving parts working together. Blurring a waterfall, or the whitewater of a flowing river or creek, is relatively simple because, even though the water is moving, the surrounding scene, including the position of the water feature itself, is stationary. And while crashing surf is fairly random from one wave to the next, again the surrounding scene (the beach or rocks upon which the surf is crashing) is fixed. But nothing at Diamond Beach is still for long.
Foremost among the Diamond Beach moving parts the frigid North Atlantic’s unpredictable power, which requires unwavering attention—in 2022, a rogue wave swamped four workshop members who reasonably believed their position above the beach was safe. Trying to coordinate all the other variables with one eye constantly on the ocean is the photography equivalent of patting your head while rubbing your belly.
The first essential element to consider is the location of whatever mini iceberg I target, which needs to be planted in sand, yet close enough to the water for an occasional wave to wash up and around it. Too far from the surf and the waves never reach the ice; too close, and the subject will actually float away mid-exposure. Often it’s difficult to tell whether a potential subject is properly positioned until actually attempting to photograph it for awhile. And even the best ice subject doesn’t in one place for more than a wave or two.
Adding more frustration to these Diamond Beach iceberg scenes is the power of moving water, which, even when it doesn’t reposition the ice, can still impart micro-movement during the long exposure. I can’t tell you how often I’ve thought I’d nailed a Diamond Beach shot, only to zoom in on the ice afterward to find an imperceptible rotation or wobble had made it too soft to use.
Then there’s the timing of the click. I’ve found that the most appealing blur happens when the wave has swept past the ice and is actually washing back out. Equally important is the duration of the exposure, which needs to be long enough to blur the water, but not so long that all definition in the water is lost. Even if I’ve nailed all the above variables, since I focus on my chosen ice subject before the wave arrives, even if it stays perfectly stationary during my exposure, just the slightest shift in the ice’s position before my shutter click can invalidate my chosen focus point.
Of course all these machinations are irrelevant to the people don’t like the silky water effect in any image. And while I agree that at times blurring water verges on cliché, the truth is that fast water illuminated by anything less than full sunlight usually offers little choice. In those conditions the question isn’t whether to blur the water, it’s how much to blur it?
The argument against blurring moving water that always amuses me most is the one that says blurred water “isn’t natural.” The reasoning is that blurred-water images should be disqualified because we never see blurred water in nature. My question for these “purists” is, how many times have you seen the alternative to blurred water: individual water droplets suspended in midair?
This question just underscores a photographic truth I’ve been hammering on for years: The camera and human eye experience the world entirely differently. Discarding images simply because they aren’t “natural” would eliminate not only all black and white images, but also every image that’s not, uhhh, three-dimensional. Hmmm—let’s count how many images that leaves us with….
On the other hand, embracing your camera’s unique vision is empowering. It opens doors to many creative possibilities, of which blurred water is just a scratch on the surface. While there’s no magic formula to achieve it, blurring water isn’t hard once you learn to see the world as your camera does.
The prime determining factor in blurred water is the distance any individual water drop traverses your frame while the shutter is open: the more of the frame it spans, the greater the blur effect. The amount of blur you capture starts with the speed of the water, over which you have no control. But take heart, because there are several variables you can control:
- Focal length: The longer your focal length (more telephoto), the shorter the distance from one side the frame to the other (a wide angle vista can encompass many miles; a telephoto from the same vantage point can reduce the image’s width to a few hundred yards or less), so our imaginary water droplet will span a greater percentage of the frame’s width in a telephoto exposure.
- Subject distance: Moving closer achieves the same thing a telephoto lens does because the closer you are to the moving water, the shorter the distance our water droplet has to travel to span the frame.
- Shutter speed: The longer the shutter is open, the farther our droplet can travel during exposure. You can keep the shutter open by reducing your ISO, shrinking your aperture, and/or cutting the amount of light with a polarizer or neutral density filter.
Because long shutter speeds increase the amount of blur, blurring water is easier when you photograph in reduced light, such as overcast or shade, that requires a longer shutter speed. In full sunlight it’s pretty much impossible to blur water without a neutral density filter to cut the light illuminating the scene.
In a river or creek, whitewater generally works best because not only does it move fast, it also shows the blur effect much better than rapidly flowing green water. In other words, for any given combination of conditions and settings, while the amount of blur is the same for green water as it is for white water, the blur will be much more noticeable in the white water.
When the blur subject is ocean waves, there’s always an abundance of white water to work with. But rather than the relatively consistent flow pattern of river rapids, each ocean wave is significantly different from the others. I think this extreme variability from one wave to the next is what I most enjoy about ocean wave motion-blur images.
Approaching Diamond Beach this February morning, I scanned for ice in the narrow subject zone. I’ve had visits with more potential targets, but also some with less, so overall I was pleased with this year’s opportunities. I spent most of my time there strolling the black sand, working with workshop students, and occasionally targeting an ice chunk of my own for a few unsuccessful frames.
It wasn’t until I was confident everyone in the group was comfortable with the surroundings and happily at work on shots of their own that I got serious about my own photography.
I approached this little iceberg, maybe the size of a large microwave, and set up my tripod a couple of feet away. For the next 15 minutes or so, I worked carefully as up to 10 waves approached my subject, wrapped it, then flowed back out. Each wave nudged the ice slightly, forcing me to move my tripod and recompose before every frame.
Having an LCD and viewfinder to immediately scrutinize each capture was a huge advantage that allowed me to zero in on the shutter speed that worked for my focal length and distance, as well as verify the sharpness of my subject. Having waterproof boots that went up to within six inches of my knees was another advantage I quickly appreciated.
I still don’t think this Diamond Beach blurred wave image is as good as others I’ve seen, but I’m working on it…
Join Don Smith and me in Iceland next year
Workshop Schedule || Purchase Prints || Instagram
Water on the Move
Click any image to scroll through the gallery LARGE


, California")
Watch Your Backup
Posted on March 12, 2024

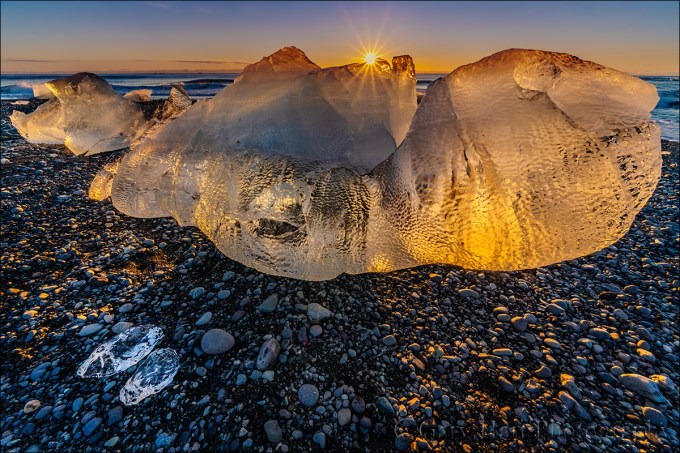
Sunrise Gem, Diamond Beach, Iceland
Sony a7R V
Sony 12-24 GM
1/13 second
F/22
ISO 50
A funny thing happened to me on the way to this image. And when I say “on the way,” I don’t mean taking the picture, I mean after it was safely loaded onto my computer and fully processed, it seems that someone (who wishes to remain anonymous), accidentally overwrote it with a completely different image. Oops.
Establishing a backup mindset
Overwriting an image is an easy thing to do; without a backup, it’s lost forever. In this case, I still had the raw file, but I’d have lost all the time and effort I’d put into processing the image, with no guarantee that I’d ever perfectly duplicate my original processing. Not the end of the world, but a real pain. Instead, since I did have a backup, I was simply able to restore the image and go about my business.
Though whole experience was just a blip in my day, it made me think about the data management practices that made it a non-event. These data practices I acquired in my previous life in the tech industry (way back when megabytes were big), but practices that might not be quite so second nature to others (especially those who don’t yet know the devastation of lost irreplaceable data). Which led me to thinking that perhaps some would be interested knowing how I keep my data safe. So I’ll share my own image (and data) workflow as an example of good data practices—not to advocate for my specific approach, but simply as an example.
However you choose to implement your own backup scheme, you should be fine long as you follow a few basic principles:
- Backup everything that’s important: Duh.
- Backup regularly—Ideally that will be automatically and as instantly as possible: Your data is only as good as your most recent backup.
- Redundant backups: Relying on a single backup of important data is playing with fire, and I daresay even two backups might not be not enough.
- At least one offsite backup: You never know what catastrophe might befall your abode.
- Multiple storage types: There is no “perfect” storage technology, so whatever your preference—spinning drives (cheaper but prone to crashing without warning); SSD drives (faster, relatively crash-resistant, and extremely compact, but expensive and not forever); CDs/DVDs (cheap, but also not forever); or the cloud (convenient but slow to populate, and even slower to restore—especially if you need to restore a lot of data at once)—never put all your backup eggs in one basket.
I’m going to concentrate on my image storage and backup, but since photography is my livelihood, there’s lots of non-image data that’s just as important and treated with the same care.
To the extent that it’s possible, for me a regular backup means an immediate backup. Because all of my cameras have two card slots and I write each image I capture to both cards, my image backups start the second I click my shutter. Card failures are rare, and usually survivable with the help of recovery software, but usually isn’t good enough. Not only that, media failure isn’t the only threat to my images. Don’t forget user error. For example, I know a photographer (the same one who overwrote the image above) who one time pulled a card out of his camera intending to upload the images from a recent weekend in Yosemite, stuck it in a pocket for the short walk down to his nearby Starbucks, and somehow lost the card. Instead of freaking out about a lost weekend, he simply pulled the other card from his camera and used it to import the weekend’s images. The stray card never did turn up, so he was out the cost of its replacement—a temporary bummer, but far from the crushing letdown losing a weekend’s worth of irreplaceable photography would have been.
As much as I’d like to automate the step of importing my images from my camera to my computer, my own import workflow does require some intervention because I use Lightroom’s Import program to name and organize my images. Without getting too deep into the weeds, I let Lightroom rename each image—retaining the camera-assigned image number and adding descriptive info—before copying them into a trip-specific folder on a 4TB SSD drive that always travels with me. And because I use two computers, my Lightroom catalog also lives on this drive—I just plug the drive into whichever computer I’m working on and away I go.
Once this Lightroom upload is complete, I immediately copy that trip’s newly populated folder onto a 10TB spinning hard drive that lives on my desk, and also to a RAID 6 configured NAS array (a possibly overkill but much appreciated backup set-up by my IT professional son-in-law). Only when all this is done do I format the camera’s media cards.
That sounds pretty good—3 copies (computer, hard drive, NAS array)—but it’s not enough. Consider the plight of Francis Ford Coppola, who lost 15 years worth of writing and images when his computer and its backup were stolen. Then think about the unthinkable things that could happen to your home—theft, fire, flood, nuclear missile, etc.—that might jeopardize everything inside. You need an offsite backup.
Places to host an offsite backup(s) include the home of a friend or relative, a safe deposit box, a storage facility, the office, to name a few. All those options are better than nothing, but not only are these manually generated backups only as good as the most recent update, updating them frequently enough to be worthwhile requires more discipline than I can take credit for.
Which is why my offsite backup uses a cloud service: Backblaze. There are many cloud backup options, but I chose Backblaze because it’s computer-based (it backs up every hard drive attached to my computer for the same price), not size limited (they’ll backup as much data as I connect to my computer), and not expensive (around $100/year). Almost the instant I add images to the 10TB drive on my desk, Backblaze recognizes the new data and starts backing it up—I never have to think about it again. With so much redundancy in my local backups, I consider this Backblaze backup to be my backup of last resort—I’ll probably (fingers crossed) never use it, but the peace of mind I get from the knowledge of its existence is worth far more than the service’s relatively small cost.
A de facto backup (it does backup my data, but that’s not why use it) is Dropbox, which holds every piece of data I might want to access regularly—processed images (but not raw files), documents, presentations, etc.—and syncs it all between my various devices. This allows me to work on something at home, then relocate to my remote “office” (Starbucks) without skipping a beat. I can also access all this essential data on my iPhone and iPad if when I find myself separated from my computers. I actually sync all of my Dropbox data to each of my computers, so once its synced I can still access it when I’m off the grid (I’m looking at you, Grand Canyon North Rim); on my iPhone and iPad, I pull most of my Dropbox data from the cloud when I need it, but do have a few important folders and files permanently downloaded for offline access.
The final piece of my backup paradigm is Mac OS Time Machine, which comes installed on every Mac, stores history for each file (I can go back to any date and recover a copy of any given file on that date), and is so easy to set up and use, I don’t understand why any Mac user wouldn’t use it. My primary Time Machine backup is a dedicated (not used for anything else) 5TB spinning hard disk that lives on my desk and is always connected. Because spinning hard drives can fail without warning, I also have a duplicate Time Machine backup on my NAS array.
In this case, when I someone overwrote a this fully processed image file, I didn’t panic, I just went to my backup. I had multiple options, but my Time Machine backup was right there on my desktop, so in less than a minute I was back in business with a fully restored image file.
One more very specific case
No example illustrates how backup obsessed I am than my workflow on a trip that requires flying. Since I’ll be so far from my whole home office backup paradigm, when I fly I carry a second 4TB SSD drive. After uploading the images onto my regular image drive and into the Lightroom catalog, I copy that folder onto that second drive, and hide it deep in my suitcase. If, God forbid, someone breaks into my room and steals my (insured) camera and computer bags, it’s unlikely they’ll find the second backup drive.
When I fly home, I make sure my images are in three different places: the primary image drive is in my computer bag over my shoulder and then under the seat in front of me; the backup drive is safely tucked into my checked suitcase; the SD cards containing the original raw files are in my cameras, which are in my camera bag on my back, and then in the overhead bin. The only way I’ll lose all three is if the plane goes down, in which case I likely have bigger problems.
About this image

Sunrise Gem, Diamond Beach, Iceland
The day after our aborted visit to Diamond Beach, this year’s Iceland workshop group enjoyed a far more successful return visit. It seems every time Don Smith and I bring a group here, it’s a little different. Last year there was much less ice; the year before the surf was so rough that we didn’t dare get close to the water—and still ended up being too close. Some years the advancing and receding surf gently wraps each ice chunk, and other years most of the ice is high and dry.
This year the tide was out, so most (but not all) of the ice was up the beach and rarely touched by the surf. I started here trying to get the standard Diamond Beach motion blur shots on the few ice cubes the waves reached, but when the sun arrived turned my attention to the much larger ice slightly (20 feet) inland from the waves’ farthest approach.
I love the way the ice lights up with the warm hues of the sun’s first rays, so to fill the screen with this beautiful translucent natural ice sculpture, I went with my 12-24 lens, dropped low, and positioned my tripod no more than two feet away. Because I was going for a sunstar, I dialed to f/22, then spent the time waiting for the sun micro-positioning myself to get all the elements in place. I liked the smooth rocks embedded in the black sand, and though that distant block of ice in the upper left was quite tiny at 12mm, I knew as soon as the sun hit it, it would stand out enough to create a little visual interest in that corner of the frame. I put the top of my frame just above the clouds to minimize the amount of blank sky.
As soon as the sun popped out, I started shooting. On my camera’s LCD the foreground looked nearly black—not just the sand, but the shaded part of the ice as well. But I didn’t want to blow out the sky, and knew my Sony a7RV well enough to be confident I could pull up the shadows in Lightroom/Photoshop. I’d love to say that the feathery sun-kissed waves were intentional, but I didn’t even notice them until I started working on the image.
Don Smith and I return to Iceland in 2025
Here Comes the Sunstar
Click any image to scroll through the gallery LARGE


The Sea Was Angry That Day, My Friends
Posted on February 20, 2022

Ocean and Ice, Diamond Beach, Iceland
Sony a7RIV
Sony 24-105 f/4 G
15 seconds
F/11
ISO 100
I returned from Iceland with a lot of memories, but none will stay with me longer than the events of this stormy February morning on Diamond Beach. I guess given how much of my life is spent chasing Nature’s most dramatic moments, every once in a while it’s good to be reminded of the suddenness with which Nature can surprise you to impose its uncompromising will. But still…
The wind was howling and sunrise was still nearly an hour away when Don Smith and I guided our workshop group out to Diamond Beach. In fact, it had been so cold and dark when we arrived that we’d hung out in the bus for about 10 minutes.
Our group had actually photographed Diamond Beach a couple of days earlier, on a sunny but chilly morning. The surf that day had been relatively benign, washing up a more-or-less predictable distance up the beach at regular intervals. On that visit we could wander among the ice chunks, advancing close enough to use a wide lens for close-ups of the waves washing around individual ice blocks.
The blocks of ice here, some as large as a small car, have calved from nearby Fjallsárlón Glacier, have drifted across Glacier Lagoon and eventually into the ocean, before being swept back onto this black sand beach to pose for our photographs. On that first visit the biggest concern was a slightly larger than average wave washing up over the top of our (nearly knee-high) waterproof boots if we somehow hadn’t paid enough attention to its approach. Wet feet might ruin your day, but they won’t kill you.
This morning, however, given the storm that had raged all night and the cold wind still blowing hard, we weren’t a bit surprised to find the surf frighteningly agitated. Each wave attacked the beach with an explosive vengeance, and no one needed to be told to give the ocean space. Making beach access even more difficult was the a very high tide that had crested less than an hour before our arrival.
The section of Diamond Beach we were trying to photograph slopes steeply, 30 diagonal feet or so down to the ocean. (Given the size and violence of the waves, it’s really impossible to say where the beach ends and the ocean begins.) Above this inclined beach stretches a broad and relatively flat plain of sand, elevated far enough above the water to provide the illusion of safety. On this morning we watched individual waves charge up the beach before petering out 10 feet or so feet from the top of the slope—some a few feet closer, some a few feet farther back, but none seemed to threaten the high ground we surveyed the scene from.
Bobbing in the surf and dotting the sand were the ice blocks we’d come to photograph. All of the best ice was down in the area under constant attack from the surf, but instead of walking down among the ice as we had on our previous visit, the group seemed content to put on longer lenses and stay in the safety of the elevated plain.
Given the day I’d spent with saturated socks following our previous Diamond Beach visit, on this visit I was very motivated to keep my feet dry. Planting my tripod several feet back from the edge, I attached my Sony 24-105 f/4 G lens to my Sony a7RIV and turned my attention to a pair of ice chunks a safe distance away. My first click came about 40 minutes before sunrise, when the sky was dark enough to stretch my exposures into the 15 to 30 second range, making it very challenging to avoid blurring the ice that shifted with almost every wave.
At one point I saw someone in our group venture down, close enough to the water to take a wave almost to his waist. Braced, with camera held high, he remained standing and came out laughing, but stayed further back after that. I went back to shooting, trying to time my exposures for the seconds between waves when my subjects were less likely to be shuffled mid-exposure. The image I share here was one of my earliest successes.
Waiting for an exposure to complete, I looked up and saw a human shape emerging from the darkness and heading my direction. It wasn’t until I heard the shape utter, “I went in,” that I squinted and realized I was looking at Don. And not until he got right up to me and repeated, “I went in,” did I register exactly what he meant.
He was dripping, head-to-toe, camera and tripod, with frigid North Atlantic seawater. Holy crap! With chattering teeth he gave me a quick summary of events. He’d seen a piece of ice he wanted to photograph, so after monitoring the waves enough to feel confident that he was safe (-ish), he’d moved down onto the sloping part of the beach to get closer. Once down there, he’d been so focused on making his shot that he hadn’t seen the large wave until it was on him. The wave came up to his waist, and just as he thought he might ride it out without going down, he was sucker-punched by a block of ice that sent him sprawling into the surf (turns out it left him a nasty bruise too, but I managed to refrain from suggesting that he ice it). Fortunately, this was our last morning there, so our suitcases were packed and loaded the bus, so it didn’t take any convincing to get him to return the bus to change into dry clothes.
My ice subjects had drifted away, so I wandered over to where a few members of the group were shooting comfortably in the “safe” zone, well back from the beach. Rather than feeling concerned about our safety, I considered Don’s mishap a one-off accident—a dedicated photographer a little too anxious to get the shot. I’ve been there, and I suspect most landscape photographers have as well at one time or another. So far, I rationalized, no wave had come close to our elevated sand platform.
About the time these thoughts were cementing in my brain, I glanced seaward and saw a massive, roiling wall of water charging my position. Usually when a wave approaches the first inclination is to backpedal, but this wave was on a completely different scale from any I’d ever encountered. Without conscious thought I turned and sprinted inland so quickly (picture George Costanza in a fire) that if my camera bag hadn’t been on my back, and my tripod in my hand, I’d have lost everything.
The wave caught up with me at least 50 feet back from the top of the sloping beach that just seconds earlier I’d believed was completely safe. By then it had lost significant momentum but still rose halfway up my calf (and just below the top of my very high boots). After retreating another 50 feet or so to dry ground, I turned and looked back toward the others and saw three people in the group down.
I planted my tripod and sloshed back through about 8 inches of water where there had been only dry sand just a few seconds ago. Fortunately, no one had been swept down onto the beach (and beyond) by the receding wave. By the time I reached them, those who were down were scrambling back to their feet. I looked around and saw that the others had managed to retreat far enough to remain upright, though all were some degree of wetter than they wanted to be.
After a few seconds to process what had just happened, pulled everyone from the beach and onto the bus. We stopped at Glacier Lagoon where there were bathrooms for people to change, but I think those who got wettest didn’t fully warm until we reached our hotel that afternoon. Once it was clear that we’d incurred no lasting personal harm, I took stock of the gear that suffered and learned that four cameras and lenses weren’t working. One of the camera/lens pairs returned to life later, but three were permanently demoted to paperweight status.
The images from this morning became an afterthought—I didn’t even think about them again until unloaded my card and saw that I had captured 10 frames before all hell broke loose. Many had too much motion in the ice, but it looks like I did manage to capture two or three worth processing—all variations on the same ice blocks with different wave action.
Born and raised in California, I’ve photographed and recreated at the beach more times than I can count. I’ve heard stories of “rogue” or “sneaker” waves, but this is the first time I’ve ever actually experienced one. Only after experiencing this wave do I realize that all those other large waves that surprised me were not the full extent of the potential risk, not even close.
Without getting too preachy (after all, you are reading advice from a guy who chases lightning), I just want to remind everyone to never take Nature for granted. Just because you feel safe, doesn’t mean you are safe. I tell my monsoon workshop students not to get too comfortable just because there’s been no lightning yet, that every lightning storm needs to strike first somewhere (and it could be here). And after this experience, I’ll certainly tell my ocean photographing students in Iceland and Hawaii that, no mater how many waves you’ve seen, the next wave could be several times bigger than anything you’ve seen so far. I know, because I’ve seen it.
Iceland Photo Workshops
Workshop Schedule || Purchase Prints || Instagram
Surf’s Up
Click an image for a closer look, and to view a slide show.


Blue Hour Photography
Posted on January 31, 2021

Blue Hour, Diamond Beach, Iceland
Sony a7RIV
Sony 100-400 GM
15 seconds
F/20
ISO 50
If you’re fortunate enough to be outside after the sunset color has subsided, but before the world is enveloped in total darkness, you may find yourself basking in the rarified hues of the “blue hour*.” It’s called the blue hour because, wait for it…, the landscape is indeed bathed in blue. (And also because it just rolls off the tongue better than “the blue 20-minutes,” which would actually be more accurate.)
The greatest joy I get from photography is the connection it gives me to the natural world. Whether it’s lightning, some celestial event or geological feature, a technical aspect of photography, the qualities of light, or whatever, whenever possible I try to share something of the science behind my blog image subject or its capture. The goal of this sharing isn’t entirely altruistic—it’s also a great excuse to dig deep into things that absolutely fascinate me. And as it turns out, the science behind the blue hour is especially fascinating.
The blue hour actually lasts less than one hour, with its duration decreasing with latitude because the sun ascends and descends at a steeper angle (faster) as the latitude (distance from the equator) decreases. This means that in Hawaii, if I’m on location 30-minutes before sunrise, I can probably catch the entire show, whereas in Iceland, even if I’m there an hour before sunrise (brrrr), I still might miss something. In the mid-latitudes, 20-minutes is a reasonable rule-of-thumb blue hour duration to rely on.
The cool thing about blue hour color is that, unlike daylight blue sky and sunrise/sunset color, it’s not a function of scattered sunlight. (Read my Sunset Color Photo Tips article for more on this.) Instead, until the sun drops about 8 degrees below the horizon, its blue wavelengths are absorbed by ozone in the upper atmosphere. Though this absorption (Chappuis absorption, if you must know) happens when the sun is above the horizon too, its effects are completely overpowered by direct sunlight. But as direct and scattered sunlight fades with the sinking sun, about the time the sun is about 4 degrees below the horizon, the blue ozone in the sky enjoys its 20-minutes of fame. (In other words, the blue hour reigns when the sun is between 4 and 8 degrees below the horizon.) Because the cones in our eyes require a certain amount of light to register color, this twilight blue is fairly subtle, but still noticeable, to human vision. A camera, on the other hand, with its ability to increase its light sensitivity (ISO) and accumulate light over time (shutter speed), has no problem capturing the dominant blue cast.
Nature photographers love the blue hour, both for the otherworldly hues that aren’t possible any other time of day, and for the exquisitely soft, shadowless light that’s a joy to photograph. The key for getting the most out of blue hour photography is understanding that the camera sees the world differently than you. Some of the best blue hour photography happens after the color is nearly gone from our eyes, tricking us into to packing up and going home too soon. But as I said earlier, the camera can see color too faint for our eyes to register. The color your camera might pick up can range from a purplish mix of the longest waves of sunlight and the beginning of the blue hour light, to the absolute deep-blue that soon fades to night.
The blue hour is also absolutely the best time to photograph the moon, which is why you see so many moon images in the Blue Hour gallery below. While fitting the dynamic range of a daylight-bright moon above virtually dark landscape is tricky, it’s definitely worth trying because the darker the sky, the greater the contrast between the daylight-bright moon and surrounding sky. (Check out my articles on moon photography in the Photo Tips menu above.)
One of my favorite blue hour subjects is the ocean, because the low light means long exposures that turn the surf into a gauzy haze. In Iceland for a workshop last January, I was photographing the surf washing up onto Diamond Beach in the fading twilight. As the blue hour descended, I was drawn the way the distant snow-covered peaks (that’s Vestrahorn on the right) seemed to glow in the bluish twilight. Looking for something to put in the foreground, my eyes landed on a pair of (relatively) large icebergs just offshore and I positioned myself to align them with mountains.
Though I’d spent most of the evening shooting with my widest lenses, for this shot I switched to my Sony 100-400 GM to compress the distance between the mountains and nearby ice. Before dialing in my exposure settings, I studied the icebergs to make sure they were stationary enough to not blur in a long exposure, and decided it would be work if I could expose between waves. It took a few tries, but I finally managed this 15-second exposure without motion blur in the ice.
* The blue hour of course happens in reverse before sunrise (from dark to light); for simplicity sake, I’ll just describe the evening half of the phenomenon.
Workshop Schedule || Purchase Prints || Instagram
Blue Hour


Expose yourself
Posted on March 10, 2019
Glisten, Diamond Beach, Iceland
Sony a7R III
Sony 12-24 f/4 G
1/25 second
F/18
ISO 100
With advanced exposure and metering capabilities, cameras seem to be getting “smarter” every year. So smart, in fact, that for most scenes, getting the exposure right is a simple matter of pointing your camera and clicking the shutter button. That’s fine if all you care about is recording a memory, but not only is there more to your exposure decision than getting the amount of light in your picture, there are many reasons to over- or underexpose a pictures. For the creative control that elevates your images above the millions of clicks being cranked out every day, giving control of one of its most important responsibilities to your camera overlooks an undeniable truth…
Your camera is stupid
Sorry—so is mine. And while I can easily cite many examples, right now it’s just important that you understand that your camera thinks the entire world is a middle tone. Regardless of what its meter sees, without intervention your camera will do everything in its power to make your picture a middle tone. Sunlit snowman? Lump of coal at the bottom of your Christmas stocking? It doesn’t matter—if you let your camera decide the exposure, it will turn out gray.
Modern technology offers faux-intelligence to help overcome this limitation. Usually called something like “matrix” or “evaluative” metering, this solution compares a scene to a large but finite internal database of choices, returning a metering decision based on the closest match. It works pretty well for conventional, “tourist” snaps, but often struggles in the warm or dramatic light artistic photographers prefer, and knows nothing of creativity. If you want to capture more than documentary “I was here” pictures, you’re much better off taking full control of your camera’s metering and exposure. Fortunately, this isn’t nearly as difficult as most people fear.
Laying the foundation
The amount of light captured for any given scene varies with the camera’s shutter speed, f-stop, and ISO settings. Photographers measure captured light in “stops,” much as a a cook uses a cup (of sugar or flour or almonds or whatever) to measure ingredients in a recipe. Adding or subtracting “stops” of light by increasing or decreasing the shutter speed, f-stop, or ISO makes a scene brighter or darker.
The beauty of metering is that a stop of light is a stop of light is a stop of light, whether you control it with the:
- Aperture: The opening light passes through when the shutter opens, measured in f-stops
- Shutter speed: The time the shutter is open, allowing light to pass through the aperture to reach the sensor—slower shutter speeds mean more light; faster shutter speeds mean less light
- ISO: The sensitivity of the sensor (or film) to light
But while an aperture stop adds/subtracts the same amount of light as a shutter speed or ISO stop, the resulting picture can vary significantly based on which exposure variable combination you choose. Your shutter speed choice determines whether motion in the frame is blurred or frozen, while the aperture choice determines the picture’s depth of field. And while an ISO stop also adds/subtracts the same amount of light as shutter speed and aperture without affecting motion and depth, image quality decreases as the ISO increases. So getting the light right is only part of the exposure objective—you also need to consider how you want to handle any motion in the scene, and how much depth of field to capture.
For example, let’s say you’re photographing autumn leaves in a light breeze. You got the exposure right, but the leaves are blurred. To freeze that blur, you halve the time the shutter is open (faster shutter speed) to freeze the motion, but also reducing the light reaching the sensor by one stop. To replace that lost light, you could open your aperture by a stop (change the f-stop), double the ISO, or make a combination of fractional f-stop and ISO adjustments that total one stop. That’s a creative choice your camera isn’t capable of.
Metering modes
Today’s cameras have the ability to measure, or “meter” the light in a scene before the shutter clicks. In fact, most cameras have many different ways of evaluating a scene’s light. Your camera’s metering mode determines the amount of the frame the meter “sees.” The larger the area your meter measures, the greater the potential for a wide range of tones. Since most scenes have a range of tones from dark shadows to bright highlights, the meter will take an average of the tones it finds in its metering zone.
Metering mode options range from “spot” metering a very small part of the scene, to “matrix” (also know as “evaluative”), which looks at the entire scene and actually tries to guess at what it sees. Each camera manufacturer offers a variety of modes and there’s no consensus on name and function (different function for the same name, same function for different names) among manufacturers, so it’s best to read your camera’s manual to familiarize yourself with its metering modes.
Since I want as much control as possible, I prefer spot metering because it’s the most precise, covering the smallest area of the frame possible, an imaginary circle in the center three (or so) percent (depending on the camera) of what’s visible in the viewfinder. Spot metering, I can target the part of the frame I deem most important and base my exposure decision on the reading there.
Spot metering isn’t available in all cameras. In some cameras, the most precise (smallest metering area) metering mode available is “partial,” which covers a little more of the scene, somewhere around ten percent.
Exposure modes
Don’t confuse the metering mode with the exposure mode. While the metering mode determines what the meter sees, the exposure mode determines the way the camera handles that information. Most DSLR (digital single lens reflex) and mirrorless cameras offer manual, aperture priority, shutter priority, and a variety of program or automatic exposure modes. Serious landscape photographers usually forego the full automatic/program modes in favor of manual (my preference) or aperture/shutter priority modes that offer more control.
If you select aperture or shutter priority mode, you specify the aperture (f-stop) or shutter speed, and the camera sets the shutter speed or aperture that delivers a middle tone based on what the meter sees. But you’re not done. Unless you really do want the middle tone result the camera desires (possible but far from certain), you then need to adjust the exposure compensation (usually a button with a +/- symbol) to specify the amount you want your subject to be above or below a middle tone.
For example, if you point your spot meter at a bright, sunlit cloud, the camera will only give your picture enough light make the cloud a middle tone—but if you’ve only given your scene enough light to make a white cloud gray, it stands to reason that the rest of your picture will be too dark. To avoid this, you would adjust exposure compensation to instruct your camera to make the cloud brighter than a middle tone by adding two stops of light (or however much light you want to give the cloud to make it whatever tone you think it should be).
Rather than aperture priority, I prefer manual mode because I never want my camera making decisions for me. And once it’s mastered (a simple task), I think manual metering is easier. In manual mode, after setting my aperture (based on the depth of field I want), I point my spot-meter zone (the center 3% of the scene in my viewfinder) at the area I want to meter on and dial in whatever shutter speed gives me the amount of light I think will make that subject (where my meter points) the tone I want. That’s it. (In manual mode you can ignore the exposure compensation button.)
Trust your histogram
I see many people people base exposure decisions on the brightness of the image on the LCD. The typical approach is some variation of: 1) Guess at the exposure settings 2) Click 3) Look at the picture on the LCD 4) Adjust 5) Repeat. Not only is this approach lazy, it’s a waste of time and woefully inaccurate.
I call it lazy because these photographers (but of course I don’t mean you) don’t care enough about their craft to apply a skill that only takes minutes to learn (see above), a skill that will serve them best in the most difficult exposure situations. But that’s not the real problem—the real problem is the inaccuracy introduced by trusting the image on your LCD.
LCDs vary in brightness because viewing conditions change. With a brightness adjustment in every camera’s menu, many photographers simply turn their brightness to maximum because it’s easier to see, especially in sunlight, and a bright picture usually looks better. Other photographers use an auto-brightness setting that adjusts with ambient light—the more light it detects, the brighter the display.
Regardless of your LCD’s brightness setting, the variation in brightness of the screen and/or the ambient light make the image on the LCD a very unreliable exposure indicator. When people tell me their images are usually too dark on their computer or in prints, the first thing I do is check the brightness of their camera’s LCD—if it’s set to maximum, they’re likely fooled into thinking the exposure was brighter than it actually was.
How do you fix this? Simple: Learn to read a histogram, and never use your camera’s LCD for exposure decisions again. The histogram is as simple as it is useful.

Day’s End, Ke’e Beach, Hawaii

A histogram is a plot of the tones in an image. I’ll save a more complex explanation for another day, but all you really need to know is that the graph starts with black on the left and brightens to white on the right. Every pixel in the image is sampled for its brightness—the brighter it is, the farther to the right it falls on the histogram. Anything in the image that’s too dark to display detail (black) is “clipped” (cut off) on the left side; anything in the image that’s too bright too display detail is clipped on the right. Ideally, nothing will be clipped on either side. If your scene contains a greater range of light (dynamic range) than will fit in the histogram, one side or the other will clip and you have exposure decisions too make—HDR (blending multiple exposures), graduated neutral density filters, or deciding that it’s okay to lose one side or the other (shadows or highlights). For example, the Ke’e Beach image above is predominantly middle tones, with just a few extremely bright and extremely dark pixels.
One more time
So let’s review. Start by selecting your metering mode (the way your meters”sees” the scene: spot, partial, matrix, and so on), then take your camera out of auto exposure mode and put it in manual (my recommendation) or aperture priority (if you prefer) mode. (Remember, I’m a landscape photographer so I never use shutter priority; if you’re shooting action, to better control the motion in your frame, you probably want to consider shutter priority if you don’t like manual exposure.)
Before metering, set your camera to whatever aperture you decide your composition calls for. Then meter, remembering that your camera isn’t telling you what the exposure should be, it’s telling you the exposure that will make what it sees a middle tone. Finally, correct the meter’s middle-tone bias by dialing in the shutter speed (in manual mode) or exposure compensation (in aperture priority) that gives the correct exposure.
After you click, check your histogram to be sure you got the exposure right.
What’s the correct exposure? That’s a creative choice that’s entirely up to you—feel free to play until you’re comfortable with your results. And the more you do it, the easier it gets.
For example
Below are some sample images and the thought process I followed to get the exposure.

Winter Reflection, El Capitan, Yosemite After choosing the aperture that gave me the depth of field I wanted, I spot-metered on the sunlit portion of El Capitan’s reflect (because it was the brightest thing in my frame and dialed my shutter speed until the meter indicated +2. That setting gave me enough light to resolve details in the shadows, but not so much light that the El Capitan highlights were blown out. If I’d have followed my meter’s “suggestion” to make El Capitan’s highlights a middle tone, the entire scene would have been too dark.

Here’s one matrix/evaluative metering would have made a mess of. The dynamic range (range of light between the darkest shadows and brightest highlights) was off the charts. Rather than compromise, I exposed to hold the color in the sky and let the foreground go to silhouette. I metered on the brightest (goldish) part of the sky next to Half Dome and dialed my exposure to +.3 (1/3 stop above middle tone). The sky was brighter than what you see here, but underexposing like this allowed me to emphasize the sky’s rich blue and the very Yosemite outline of Half Dome and Sentinel Dome. The highlights in the thin lunar crescent were clipped, but I didn’t care about the moon’s detail, only it’s shape.

Who says you should never blow your highlights? Here I metered on the brightest part of the poppy (near the top), setting my exposure to .7 (2/3 stop above middle tone). Everything you see that’s white is blown blue sky (except the “star,” which is a sliver of the sun).
Now get to work
Don’t wait to apply all this for the first time until you really, really want the shot. Instead, find a time when the results don’t matter and play with your camera to find out how much control you have over exposure. In fact, you can do this right now in your backyard or even sitting right there in your recliner. Meter something nearby, set an exposure, and click. Look at the result, adjust the exposure, and click again. Watch your histogram, and watch how its shape shifts right as you increase the exposure, or left as you decrease it. Continue doing this until you’re confident in your ability to make a scene brighter or darker, and can consistently achieve the exposure you expect.
About this image

Glisten, Diamond Beach, Iceland
It not too difficult to figure out how Iceland’s Diamond Beach got its name. A black sand beach on Iceland’s south coast, just down stream from Glacier Lagoon, Diamond Beach is dotted with glistening blocks of ice ranging in size from a refrigerator ice cube, to an entire refrigerator.
As spectacular as Diamond Beach was on my first visit, it was also unlike anything I’d ever seen, so it took me a little while to figure out how I wanted to shoot it. I tried a few frames that used long shutter speeds to blur the motion of the waves around the ice, but when the sun appeared, I saw another opportunity.
With my Sony 12-24 G lens on my Sony a7RIII, I set up just a couple of feet from one of the larger icebergs, went all the way out to 12mm, and waited for the sun to peek above the ice, hoping to capture a sunstar. As I waited, I tweaked my exposure settings, dialing my aperture to f/18 to maximize my depth of field and to enhance the sunstar effect. When the sun appeared I was in business; as it rose, I dropped my camera lower to keep just a small sliver of sun visible above the ice.
Any frame that includes the sun is frame with lots of dynamic range. To get my exposure right for this image, I relied entirely on the histogram and ignored the image on the LCD, with its nearly black shadows and white sky. Despite the way histogram told me I’d captured all the tones, and I confirmed that as soon as I started processing in Lightroom.
Workshop Schedule || Purchase Prints
Taking Control in Difficult Light
Click an image for a closer look, and a slide show.


