Eloquent Images by Gary Hart
Insight, information, and inspiration for the inquisitive nature photographer
Photographic vision: Motion
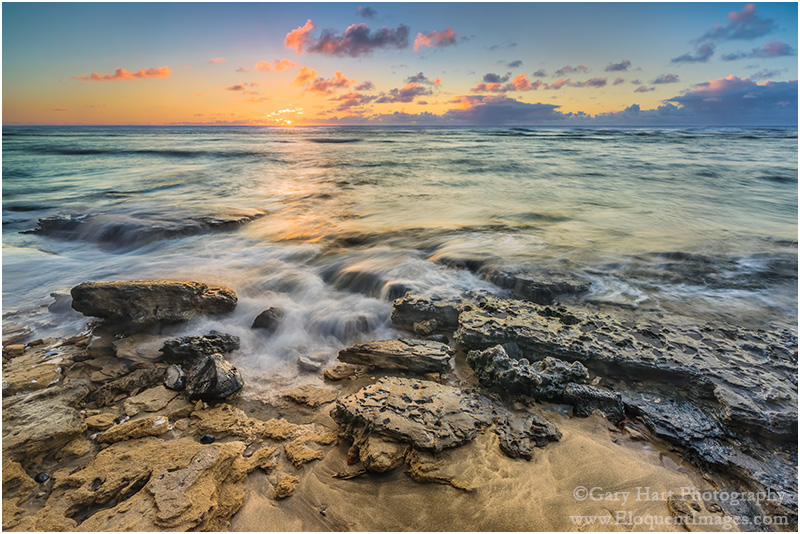
Sunset on the Rocks, Ke’e Beach, Kauai
Sony a7R
Sony/Zeiss 16-35
1 second
F/18
ISO 50
True story
I once had a photographer tell me that he didn’t like blurred water images because they’re “not natural.” The conversation continued something like this:
Me: “So how would you photograph that waterfall?”
Misguided Photographer: “I’d use a fast shutter speed to freeze the water.”
Me: “And you think that’s more natural than blurred water?”
Misguided Photographer: “Of course.”
Me: “And how many times have you seen water droplets frozen in midair?”
Misguided Photographer: “Uhhh….”
Photographic reality
The truth is, “natural” is a target that moves with the perspective. Humans experience the world as a 360 degree, three-dimentional, multi-sensory reel that unfolds in an infinite series of connected instants that our brain seamlessly processes as quickly as it comes in. But the camera discards 80 percent of the sensory input, limits the view a rectangular box, and compresses those connected instants into a single, static frame. In other words, it’s impossible for a camera to duplicate human reality—the sooner photographers get that, the sooner they can get to work on expressing the world using their camera’s very different but quite compelling reality.
Despite the creative opportunities in their hands (or on their tripod), many photographers expend a great deal of effort trying to force their cameras closer to human reality (HDR, focus blending, and so on)—not inherently wrong, but in so doing they miss opportunities to reveal overlooked aspects of our complex natural world. Subtracting the distractions from the non-visual senses, controlling depth of focus, and banishing unwanted elements to the world outside the frame, a camera can distill a scene to its overlooked essentials, offering perspectives that are impossible in person.
Motion
While a still image can’t display actual motion, it can convey an illusion of motion that, among other things, frees the viewer’s imagination and establishes the scene’s mood. Nothing like our experience of the world, a camera can freeze the extreme chaos of a single instant, or combine a series of instants to convey a pattern of motion.
Combining creative vision and technical skill, a photographer chooses where on the continuum that connects these extremes of motion will fall: The sudden drama of a crashing wave, or the soothing calm of soft surf; the explosive power of a plunging river, or the silky curves of tumbling cascades. Or perhaps someplace in the midrange of the motion continuum, stopping the action enough that discrete elements stand out, but not so much that a sense of flow is lost.
Blurred water
One question I’m quite frequently asked is, “How do I blur water?” And while there’s no magic formula, no shutter speed threshold beyond which all water blurs, blurring water isn’t that hard (as long as you use a tripod). In fact, when you photograph in the full shade or cloudy sky conditions I prefer, it’s usually more difficult to freeze moving water than to blur it (which is why I have very few images of water drops suspended in midair).
In addition to freezing motion or revealing a pattern of motion, an often overlooked opportunity is the smoothing effect a long exposure has on choppy water. I photograph at a lot of locations known for their reflections, but sometimes I arrive to find a wind has stirred the water into a disorganized, reflection thwarting frenzy. In these situations a long exposure can often smooth the chop, allowing the reflection to come through. Rather than the mirror reflection I came for, I get an ethereal, gauzy effect still captures the reflection’s color and shape.
The amount of water motion blur you get depends on several variables:
- The water’s speed—the faster the water, and the (especially) the more whitewater (green water, no matter how fast it’s moving, doesn’t usually display obvious motion blur), the greater the blur
- Your focal length—the longer the focal length, the greater the blur
- Your distance from the water—the closer the water, the greater the blur
- And of course, the shutter speed—the longer your shutter is open, the greater the blur
Of these variables, it’s shutter speed that gets the most attention. That’s because focal length and subject distance are compositional considerations, and we usually don’t start thinking about blurring the water until after we have our composition. (This is as it should be—when composition doesn’t trump motion, the result is often a gimmicky image without much soul.)
You have several tools at your disposal for reducing the light reaching your sensor (and thereby lengthening your shutter speed), each with its advantages and disadvantages:
- Reducing ISO: Since you’re probably already at your camera’s native ISO (usually 100), this option usually isn’t available. Some cameras allow you to expand the ISO below the native value, usually down to ISO 50. That extra stop of shutter duration you gain comes with a (very) slight decrease in image quality—most obvious to me is about 1/3 stop of dynamic range lost.
- Shrinking your aperture (larger f-stop value): A smaller aperture also buys you more depth of field, but it also increases diffraction. Also, lenses tend to be less sharp at their most extreme apertures. As a general rule, I resist going with an aperture smaller than f11 unless it’s absolutely necessary. That said, I often find myself shooting at f16 (and only very rarely smaller), but it’s always a conscious choice after eliminating all other options (or a mistake).
- Adding a polarizing filter: In addition to reducing reflections, a polarizer will subtract 1 to 2 stops of light (depending on its orientation). When using a polarizer you need to be vigilant about orienting it each time you recompose (especially if you change your camera’s orientation), and monitoring its effect on the rest of your scene.
- Adding a neutral density filter: A neutral density filter is, as its name implies, both neutral and dense. Neutral in that it doesn’t alter the color of your image; dense in that it cuts the amount of light reaching your sensor. While a dark enough ND filter might allow you to blur water on even the brightest of days, it does nothing for the other problems inherent in midday, full sunlight shooting. ND filters come in variable and fixed-stop versions—because I prefer the flexibility of variable NDs (the ability to dial the amount of light up and down), I live with the vignetting they add to my wide angle images.

Before Sunrise, South Tufa, Mono Lake
Here a 3-second exposure smoothed a wind-induced chop and restored the reflection.
Because blurring water depends so much on the amount of light reaching your sensor, I can’t emphasize too much the importance of actually understanding metering and exposure, and how to manage the zero-sum relationship between shutter speed, aperture (f-stop), and ISO.
Read my Exposure basics Photo Tips article
I use Singh-Ray filters
Bracketing for motion
Back in the film days, we used to bracket (multiple clicks of the same scene with minor adjustments) for exposure. But in today’s world of improved dynamic range and pre- and post-capture histograms, exposure bracketing is (or at least should be) limited to photographers who blend multiple exposures. Today I only bracket for scene changes that will give me a variety of images to choose between later.
Often my scene bracketing is for depth of field, as I run a series of clicks with a range of f-stops, then decide later whether I want a little or a lot of DOF. But my most frequent use of scene bracketing is to capture a variety of water motion effects. I start by finding a composition I like, then adjust my shutter speed (compensating for the exposure change with ISO and/or f-stop changes) to get different motion blur.
River and stream whitewater is usually (but not always) fairly constant, so my adjustments are usually just to vary the amount of motion blur. But when I’m photographing waves, the timing of the waves is as important as the motion blur. It helps to stand back and observe the waves for a while to get a sense for any patterns. Watching the direction of the waves and the size of the approaching swells not only allows me to time my exposures more efficiently, it also keeps me safe (and dry).
Star motion
Few images validate the power of the camera’s unique vision better than a scene etched with the parallel arcs of rotating stars (yes, I know it’s actually not the stars that are rotating). Nothing like human reality, the camera’s view of the night sky is equal parts beautiful and revealing. (Can you think of a faster, more effective way to demonstrate Earth’s rotation than a star trail image?)
Here are the factors that determine the amount of stellar motion:
- Exposure duration: The longer your shutter is open, the more motion your sensor captures.
- Focal length: Just as it is with terrestrial subjects, a longer focal length shrinks the range of view and magnifies the stars that remain.
- Direction of composition: Compositions aimed toward the North or South Poles will display less star motion than compositions aimed toward the celestial equator. That’s because, due to Earth’s rotation on its axis (an imaginary, infinite line skewering our North and South Poles), everything in the sky rotates 360 degrees, around the Poles, in 24 hours. But the farther a star is from a Pole, the greater the visual distance it needs to cover to complete its circuit (it appears to move faster).
As with water motion, you can choose between a long exposure that exaggerates stellar motion, or a shorter exposure that freezes the stars in place to display a more conventional night sky (albeit with more stars than our eyes can discern).
Read more in my Starlight photography Photo Tips article
So what’s the point?
In the static world of a photograph, it’s up to the photographer to to create a sense of motion. Sometimes we achieve this with lines that lead the eyes through the scene, but even more powerful is an image that uses motion to tap its viewers imagination. Your handling of the motion in your scene is a creative choice that’s enabled by your technical skill.
For example
I captured this beach sunset at Ke’e Beach on Kauai last month while co-teaching a workshop with Don Smith. I’ve photographed enough at Ke’e to know there are a couple of very different options there. One option is to follow a short trail west, toward the Na Pali Cliffs, to a rocky section of coast where the waves crash and large, rounded boulders predominate. But I’ve always preferred the calmer scene to the east, along the smooth beach, where the water is shallow and the surf laps gently at wave-carved sand and basalt.
So while Don led most of the group toward the rocky shore, I guided a small handful of outliers about a quarter mile in the other direction, up the beach, beyond the activity and around a bend until we had the pristine beach to ourselves. After a little time spent trying assemble the scene’s variables into a cohesive composition, we settled down and went to work. I finished with several dozen clicks of this composition, or something quite similar, each with different wave action—approaching, breaking, receding—and motion ranging from still to extreme blur.
A gallery of motion
Click an image for a closer look, and a slide show. Refresh the screen to reorder the display.


Gary, your images are so inspiring that I am ready to jump into the car and drive to our nearest river and then to the coast (about an hour+ from our home) and take photos according to your advice. I have been slowing water motion through trial and error with fairly good results but didn’t realize the other aspects of this type of photography. Now I want to buy the Nikon D810 but have been waiting to see what Nikon produces in FF Mirrorless variety. Your comments about the Sony have been intriguing and I don’t want to get another heavy camera unless I need to. So for now I’ll continue with my Nikon D7100 and have a good time. Thanks for the hard work you put in to help us become better photographers.
Thanks so much, Becky. Any time I can inspire someone to go out and shoot, I consider my effort a success. 🙂 Happy shooting!
Thank you for this article, Gary. I’ve been taking motion shots for some time but hadn’t cottoned on to the other factors important in getting the best shot, it’s been a hit or miss thing 🙂
You’re welcome, Lee.
Thanks for these tips. I saved your article.
My pleasure, Sherry. Thanks for reading.