Eloquent Images by Gary Hart
Insight, information, and inspiration for the inquisitive nature photographer
Happy Anniversaries to Me
Posted on January 26, 2026
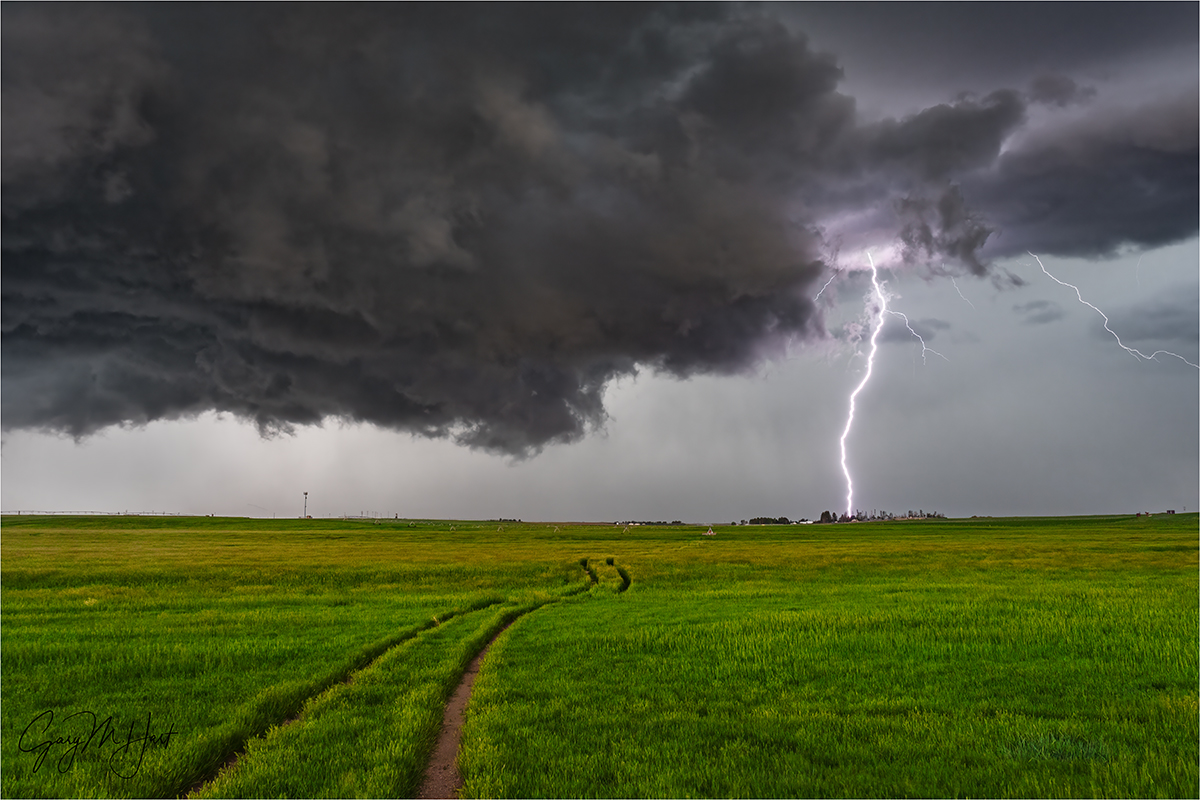
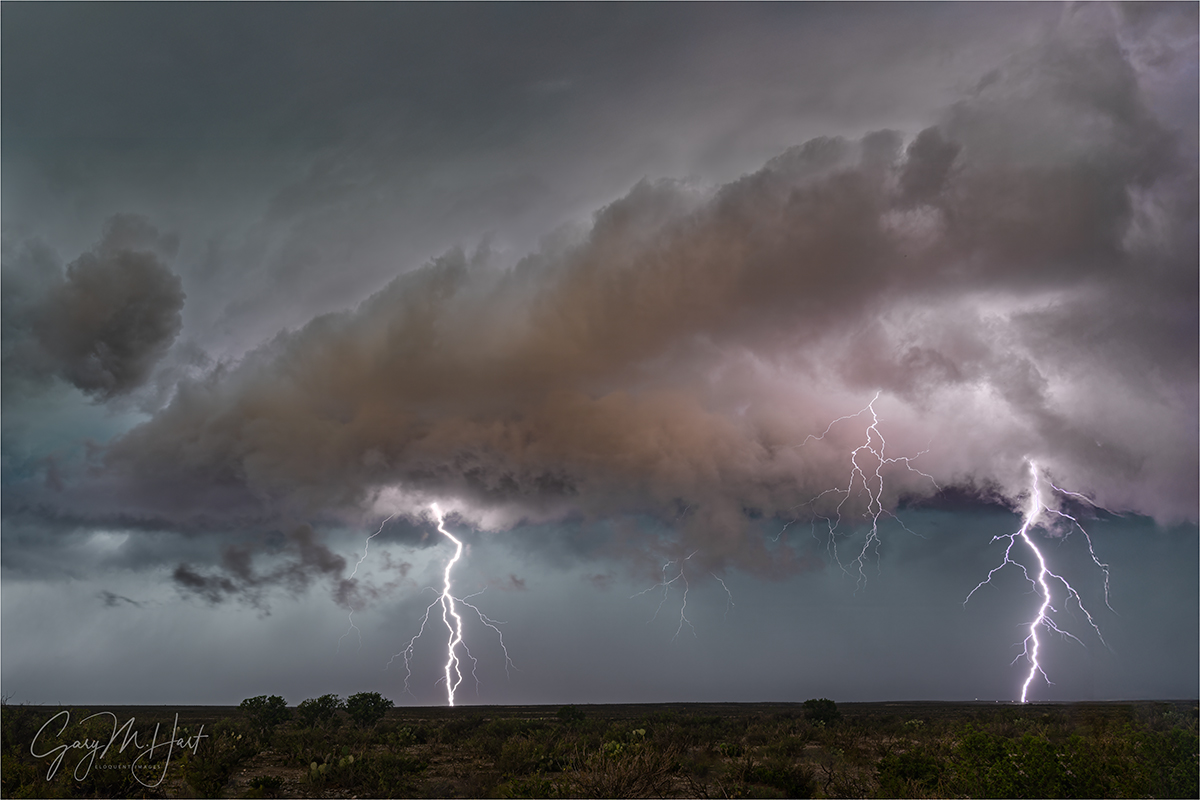
Rural Lightning Strike, Southeastern Wyoming
Sony a7R V
Sony 24-105 G
.6 seconds
F/8
ISO 800
I just realized that January 2026 marks a couple of milestones for me. Twenty years ago this month, I left my “real” job at Intel (good company, lousy manager) to pursue my dream of becoming a landscape photographer. And 15 years ago this month, I started writing this blog.
Leaving Intel was a leap of faith that, I now know, was far riskier than I believed at the time. That it worked out I attribute more to fortuitous timing than some kind of genius master plan. By the time I left Intel, I’d accumulated a pretty good portfolio of images that I’d printed and sold in weekend art shows. I also had prints in a few local galleries, but print sales alone didn’t generate anywhere near enough money to justify leaving a good job (or for that matter, even leaving a bad job).
My first post-Intel step was to ramp up my art show schedule and upgrade my art show booth lighting and display panels; despite decent art show success ($1000-$4000/weekend, doing the math told me that the time, effort, and relentless (intrastate) travel necessary to earn a fulltime income on the art show circuit would soon suck the joy from photography, and leave precious little time for actual photography. So I concentrated on a handful of quality shows within a 100 mile radius of my Sacramento home, and started looking for other ways to support myself with landscape photography.
I knew that many landscape photographers made a good living selling stock images, but by 2006 it was clear to me that digital photography was taking a toll on stock photography income, and there no end to the decline in sight. A couple of years earlier, just a few months after purchasing my first DSLR (a Canon 10D), I’d taken a weekend photography workshop to explore Point Reyes (thanks, Brenda Tharp!) and it occurred to me that I was qualified for something like that in Yosemite: I know photography well enough to teach it, I have a lifetime of Yosemite knowledge, my 20 years in the tech world had focused almost entirely on technical communications (training, writing, tech support), and (not insignificant) I like people. That this insight happened a few years before the photo workshop wave flooded the photography world was a fortunate fluke.
Pivoting to the photo workshop plan, I did a little teaching and guiding as 2006 progressed, but most of that first year was spent setting my workshop business up: building a website, scheduling workshops for the best times to photograph Yosemite, and getting the word out. I also stuck with my modest weekend art show schedule, doing one every two or three months.
Looking back now, I realize the I never would have succeeded had I not spent money I didn’t really have to hire a professional web designer to create a professional website (this was before website templates made web design easy for the masses), and display a monthly ad in “Outdoor Photographer” magazine. By the time my full workshop schedule kicked off in early 2007, every 2007 workshop had filled, and subsequent workshops started filling almost as soon as I posted them.
That first year was all Yosemite, but I soon expanded to include the Eastern Sierra and Death Valley, then Hawaii, Grand Canyon, and beyond. I owe a huge debt of gratitude to my friend Don Smith, who’d already had a very successful career as a professional sports photographer, but was hoping to transition to landscape photography. Don assisted virtually all of my early workshops, and within a year or two was doing his own workshops too, which I in turn assisted. (Over the years our workshop schedules became so packed that we’re no longer able to assist each other much, but Don and I still partner on the New Zealand and Iceland workshops, and stay in pretty close contact throughout the year.)
Between arranging lodging, applying for location permits (not to mention meeting all the criteria each permit requires), answering e-mails from workshop students and potential workshop students, preparing workshop material, and actually conducting the workshops, my plate became pretty full. As much as I enjoyed doing the art shows (I really did), I felt like I was running two businesses. When the Great Recession took and obvious bite from my art show sales, while my workshops attendance didn’t even flinch, dropping the art shows became a no-brainer.
To further increase my exposure, I started writing a blog on a small photoblog site in early 2009. I say this was to increase my exposure, but it was just as much in satisfy my insatiable urge to write. I’ve been a writer all the way back to first grade, when each Monday we were assigned a list of spelling words to learn before the Friday spelling test (am I dating myself, or do they still do that?). The week’s homework assignment was to a create a “spelling sentence” for each word. But instead of spelling sentences, I always wrote spelling stories that used all of that week’s words. I can’t explain why I gave myself that extra assignment for no tangible benefit, except that I thought it was fun.
Ever since, I’ve always had to be writing something. For many years it was short stories (plus a novel that has lived in my head, but so far hasn’t made it to the page). At Intel I was a tech writer, which helped me refine my technical communication skills while feeding my internal writing monster. (One reason I left was resistance from “above” to my attempts to make inherently dull writing more readable.)
While I enjoyed the small community of photographers on that original photoblog site, I quickly found its interface limiting, and soon realized my page wasn’t attracting the eyeballs I’d hoped for. So I started looking for a blogging site that addressed those concerns, and in January 2011 landed on WordPress. What started as a weekly (-ish) blog of a few hundred words, grew to include posts with word counts in the thousands, photo galleries, and a Photo Tips section. By my estimation, I’ve probably written close to two-million words—and counting….
As much I’d love to attribute that volume to my own herculean work ethic, I don’t think I, or anyone for that matter, could sustain a weekly blog, week-in and week-out, for 15 years on guts and willpower alone. This anniversary says less about my dedication and discipline than it does about the fact that I simply love to write.
According to WordPress, I have nearly 40,000 subscribers. But because this blog is as much (more?) for me as it is for my readers, I’ve never tried to monetize those numbers by displaying ads or intrusive affiliate links. It’s satisfying to know that it has led to many workshop signups—probably not enough to justify all the time I spend on it, but that’s okay. And I never tire of hearing that people actually read and benefit from what I’ve written.
Though it wasn’t my conscious intent at the beginning, this blog has become an integral part of my photography. That’s because the subjects I choose, and the way I choose to capture them, are very much a reflection of my relationship with the natural world. To me, much of the beauty in my subjects transcends the visual and resides in the underlying natural laws. Augmenting my images with descriptions and explanations of those natural processes, makes my subjects even more beautiful to me, and (I hope) through my words, to my readers.
For example, lightning. I will freely admit that lightning’s appeal might be much greater to a life-long Californian like me, than it is to, say, a Floridian, to whom lightning is at best a nuisance, and at worst a persistent source of danger. But I do love everything about lightning—not just the way it looks, but the processes that cause it. Along with enabling me to share my images of lightning, my blog gives me an excuse to learn more about lightning, and to share that knowledge. Whether it’s the fascinating science that causes lightning, how to read the sky to understand where lightning might strike next, staying safe when lightning threatens, or the even best way to capture lightning with a camera, I’ve learned so much and am grateful to have a platform for sharing it.
Even though I’ve photographed lightning at Grand Canyon every year since 2012, it took last June’s Midwest storm chasing trip to show me how much I don’t know. At Grand Canyon, we’re usually photographing distant thunderstorms across the canyon. But not only does storm chasing put you in much closer proximity to the electrical storms generating the lightning, these storms, whether rotating supercells or “merely” towering thunderheads, are on a totally different scale.
These insights came on the trip’s very first afternoon, when we hightailed it from our Denver hotel up through the plains of northeastern Colorado and into southeastern Wyoming. The image I share today I captured on the workshop’s second stop. It was my introduction to both the power and proximity of Midwest electrical storms, and with it the realization that unlike Grand Canyon storm chasing, where we generally set up a safe distance and then just wait for the lightning, Midwest storm chasing is actual get-in-the-van!-step-on-it-screech-grab-your-gear-sprint-shoot-retreat!-step-on-it-repeat STORM chasing.
Later this afternoon I got my first look at an actual supercell. And a few days after that, my first (and second, and third, and fourth, and…) tornado. A couple of days later we witnessed a supercell and lightning display that was one of the most breathtaking experiences of my life. And nearly every day of this nearly 2 week trip we saw lightning.
Calling this storm chasing experience life-changing might sound hyperbolic, and maybe even a little cliché, but I can think of few things in my photography life that have left me more awestruck. It certainly rivals other photography firsts, like rafting Grand Canyon, and viewing the northern lights and a total solar eclipse. To think that I’ve been able to earn my living witnessing these sights, and to share it all here, Is a blessing I never want to take for granted.
Workshop Schedule || Purchase Prints || Instagram
Storm Chasing Memories
Click any image to scroll through the gallery LARGE


The Range of Light
Posted on February 19, 2017

Twilight Crescent, Mt. Whitney
Sony a7R II
Sony 70-200 f/4
1/3 second
F/11
ISO 160
“… the mighty Sierra, miles in height, and so gloriously colored and so radiant, it seemed not clothed with light but wholly composed of it, like the wall of some celestial city…. Then it seemed to me that the Sierra should be called, not the Nevada or Snowy Range, but the Range of Light.” — John Muir
Anyone who has spent time in or around the Sierra Nevada has to agree that there’s something special about its interaction with light. Towering one to two miles above the surrounding terrain for nearly all of its 400-mile length, the Sierra Nevada are California’s most prominent natural feature. But it’s not just prominence that sets the Sierra apart. The Sierra are almost entirely granite, an intrusive igneous rock comprised primarily of light-toned feldspar and liberally infused with lustrous quartz and mica. Because igneous intrusive rocks form deep beneath the Earth’s surface, constituent minerals cool and harden slowly enough for large, reflective crystals to form.
In addition to its inherently reflective qualities, granite is quite hard and resistant to erosion. Unlike the overlying sedimentary and metamorphic rock that washed downhill as the Sierra pushed (and continues to push) upward, granite remains intact when subjected to wind and rain. Eventually small cracks form; water percolating into these cracks expands as it freezes, widening the cracks further until the granite fractures and a large block separates. The result is large vertical and domed surfaces whose extreme slope and hardness are particularly inhospitable to plant life, even well below the timberline. Granite’s hardness also means that rather than crumbling beneath the weight of the numerous glaciers to scour the Sierra, much of the Sierra granite has been polished to a glassy sheen.
Granite’s light complexion, reflective inclusions, and abundance of exposed, polished surfaces make the Sierra particularly inclined to reflect the color of whatever light illuminates it. This relationship with light is quite evident in Yosemite Valley, nestled in the range’s more moderately sloped west side. When the sun strikes Yosemite’s Half Dome and El Capitan at day’s end, warm sunset light paints these monoliths in brilliant orange and red hues just before the sun is snuffed by the horizon. While this color can be seen at sunset year round, it takes center stage each February when sunset shadow and light conspire to highlight normally insignificant Horsetail Fall’s tumble down El Capitan’s east face.
As exquisite as the light on Yosemite’s granite is, I’m even more drawn to the Sierra’s east side, which gets its best sun at sunrise. Unlike the Sierra’s gradually sloped, relatively moist, and largely foliated west slopes, the Sierra’s east side is much steeper, drier, and therefore sparsely foliated and more exposed. Enhancing the drama, the Eastern Sierra’s towering granite face also catches the earliest possible sunlight, sunlight that has traveled farther and through purer air (because there fewer airborne pollutants in the morning in general, and the sunlight east of the Sierra traverses much less densely populated terrain).
My favorite place to watch the light play on the Eastern Sierra granite is in and near the Alabama Hills, two vertical miles beneath Mt. Whitney and the Sierra’s most precipitous section. Looming above the Owens Valley, 14,505 foot Mt. Whitney is the highest point in the 48 contiguous United States. Unlike many towering peaks that stand by themselves, Mt. Whitney is bounded by 13,000 foot Lone Pine Peak and 14,000 foot Mt. Williamson, all connected by a serrated ridge of 13,000+ foot sharks tooth prominences.
Before sunrise I like to arrive early enough to see the Sierra crest reflect the pale blue of the pre-dawn sky, then watch it warm gradually as the sky brightened before the approaching sun. The color reaches a crescendo when the sun’s longest wavelengths first kiss the highest peaks with pink alpenglow. As the rest of the sun’s visible wavelengths join the party, the crest warms to amber before finally cooling beneath the daylight-blue sky.
At the end of the day the best color arrives after the sun has long disappeared behind the crest and the entire scene is illuminated by a sky well on its way to night. Though the mountains’ color is more subtle than the sunrise show, the Eastern Sierra’s granite when imbued with the pale mauve of evening twilight is no less beautiful. Eventually night takes over and once again the Sierra granite throbs a soft blue.
Early last October I guided my Eastern Sierra workshop group up to Whitney Portal at the base of Mt. Whitney to photograph cascading Whitney Portal Fall in late afternoon shade. On the drive back down we squeezed into a small turnout not too far down the road for the closest view of Whitney that doesn’t require a serious hike. This year’s group got a bonus when a thin slice of brand new moon appeared shortly after sunset.
Mounting my Sony 70-200 f4 on my a7RII, I framed the scene as tightly as I could while still including both Mt. Whitney and the crescent moon. Though the sky was clear, a steady stream of small clouds materialized as if issued by a cloud making machine just out of sight behind the crest to the right of Whitney. Each new cloud scooted to the left and dissipated quickly in drier air near the summit. After composing, metering, and focusing, I waited for the next cloud to appear and clicked this frame in the purple twilight.
PURCHASE PRINTS || PHOTO WORKSHOPS
The Many Colors of Mt. Whitney


Winter is coming
Posted on October 20, 2016

Elm in Blizzard, Cook’s Meadow, Yosemite (2007)
Canon EOS-1Ds Mark II
Canon 70-200 f/4L
1/4 second
F/11.0
ISO 100
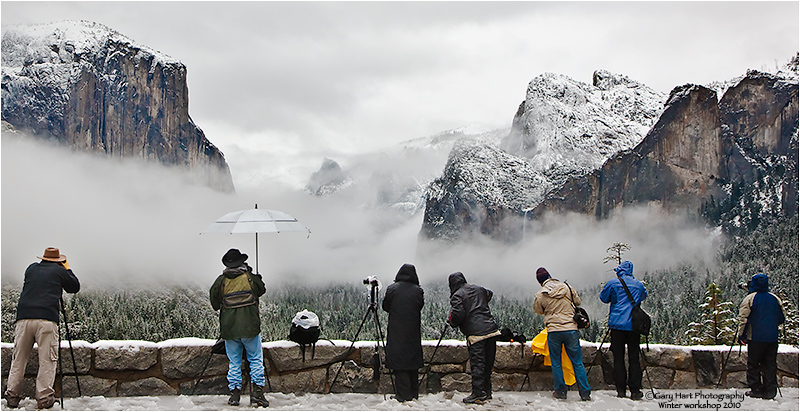
Photographing snow-covered Yosemite requires planning and patience: planning to ensure your arrival before the snow stops; patience to wait out the storm when visibility is so poor that you can barely see the nearest tree.
Planning
When the snow stops, Yosemite’s relatively mild temperatures (usually in the 30s when it snows) conspire with sunshine, wind, and gravity to clear the trees in a matter of hours. Meanwhile, park visitors driven inside by the storm, swarm outdoors to gape, quickly adding footprints and spreading mud with their boots, bikes, and cars. In other words, if you delay your departure for Yosemite until you hear that it snowed there, you’re too late. The key is being in the park during the storm.
All winter I monitor the National Weather Service Yosemite forecast and discussion (in-depth forecast analysis) pages for hints of a cold storm. I know there are lots of weather forecast options out there, but most either lack the resources of the NWS, or simply use the NWS data. The NWS may not always nail the forecast, but they’re more consistent and reliable than all the other options.
Sometimes the weather can change at the last minute, but I’m always ready. (It doesn’t hurt that I live less than four hours by car from Yosemite Valley.) In the back of my AWD Subaru Outback all winter are chains (required to be carried in Yosemite in winter, even with AWD/4WD), a portable charger that can recharge a car battery (among other things) in a pinch, and a duffle bag with all my cold weather gear (waterproof pants and upper shell, hat, gloves, umbrella, and ice grips for my shoes).
Patience
Once I decide I’m in, I’m all in. That usually means getting a room in or near Yosemite Valley, driving to the park a day early, and waiting for the snow to start. Once the snow arrives, I don’t hole up in my room, I’m out shooting. Even though Yosemite’s storms often erase all signs of its most recognizable features, stormy weather is a great time to photograph swirling clouds and accumulating snow in glorious (and rare!) solitude.
As much as I love photographing Yosemite in near white-out conditions, I sometimes get too cold, wet, or worn out to continue. But even when I reach that point, I don’t go in. Instead, I park at Tunnel View and wait for the weather to clear. Tunnel View is the perfect place to wait out a Yosemite storm because it’s on the west side of Yosemite Valley (where the clearing usually starts), provides an elevated vantage point with a view all the way down to Half Dome on the valley’s east side, and is spectacular to photograph when the storm clears. It even has decent cell service. And if I’m looking for an excuse to turn on the engine and warm things up, I drive through the tunnel for a view to the west, a preview of coming weather.
My final advice for anyone waiting out a storm at Tunnel View is when the storm clears, don’t spend so much time there that you miss opportunities elsewhere. This is easy to do because the photography will remain spectacular long after you should have moved on to other scenes.
Today’s image
Among my many snowy-Yosemite go-to spots is Cook’s Meadow. On this trip several years ago, until the snow arrived, the meadow was a field of lumpy brown grass, its sentinel elm a bare skeleton in the shadow of Half Dome. But a few inches of overnight snow transformed the bland meadow into an undulating sea of frozen white waves and etched the tree in white.
The snow was still falling when I arrived, wet and fast, slanted by a stiff breeze. Half Dome was gone. I positioned my tripod so the elm stood by itself, balanced in the frame by a stand of evergreens. The falling snow added an interesting dynamic to the otherwise static scene and I chose a 1/4 shutter speed that would blur its motion to streaks of white.
Yosemite Photo Workshops
Snowy Yosemite
Click an image for a closer look and slide show. Refresh the window to reorder the display.


Practicing what I preach
Posted on October 10, 2016
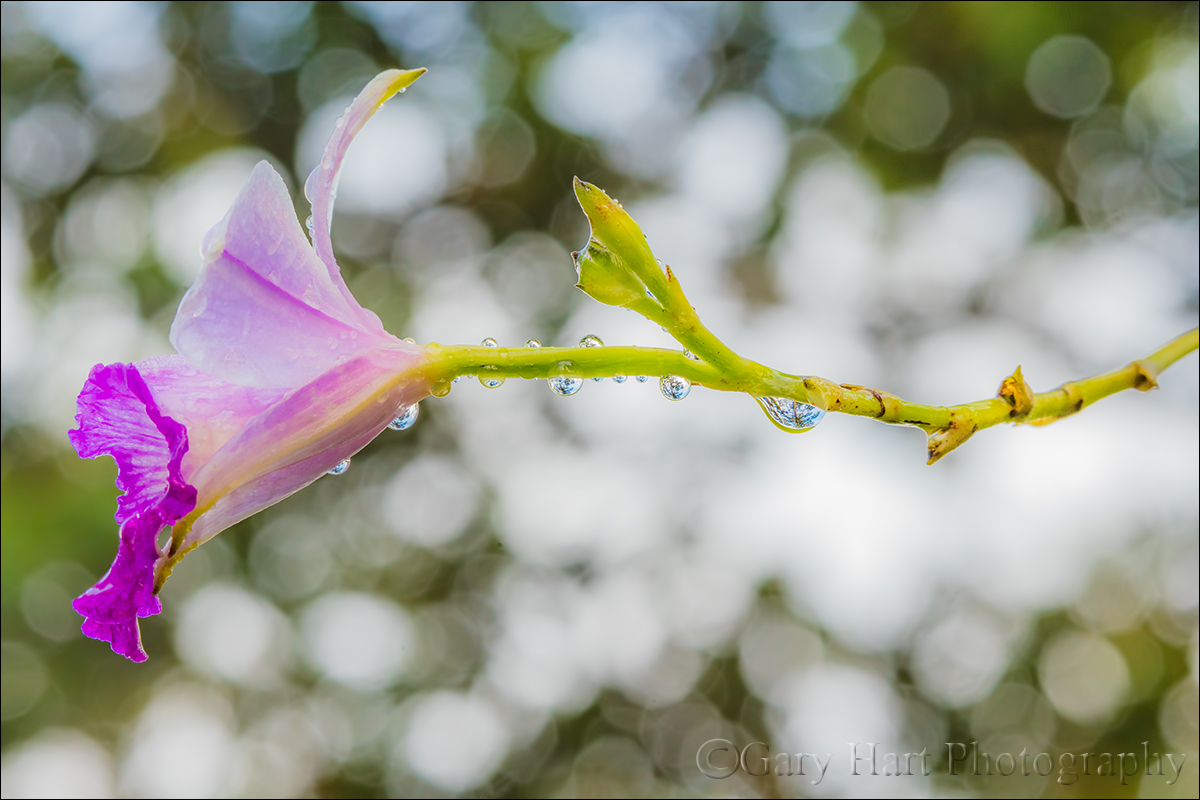
Raindrops on Orchid, Lava Tree State Park, Hawaii
Sony a7R II
Sony FE 90mm f2.8 Macro
1/30 second
F/11
ISO 800
The morning (last week) I started this post I was photographing South Tufa at Mono Lake in 26 degree temperatures. It’s hard to believe that less than three weeks earlier I was wearing a tank top, shorts, and flip-flops while photographing orchids in Hawaii. And later today I’m off to Moab, Utah.
I’d taken my Hawaii workshop group to Lava Tree State Park, long a personal favorite spot for its quiet beauty and intimate scenes. A recent heavy downpour had soaked the ground and left virtually every square inch of foliage glistening with raindrops. Recognizing an opportunity for some extreme close-focus photography, I immediately loaded my macro and extension tubes into my bag and herded my group onto the loop trail that circumnavigates the park.
In the shade just off the trail at the back of the park, a solitary, raindrop-laden orchid caught my eye—exactly what I look for when close-focus photography is my goal. Unfortunately, even with my tripod extended to its maximum height (6 inches above my head), the flower was a few inches too high to photograph at what I considered a good angle. No matter how I tried, I couldn’t find a position that allowed me to emphasize the orchid and its raindrops without blowing out the brilliant sky in the background. Tugging at the back of my brain as I stalked my subject was that frequently uttered photographic mantra, “Never blow the highlights.” But rather than give up, I stood back and considered my options.
Photographic rules are usually based on sound, proven reasoning that guides the neophyte to competent, appealing images. And while I’ll acknowledge that a broken photographic rule can indeed ruin an image, I’ve also spent my entire photographic career espousing the creative merits of breaking rules. If true artistic achievement means doing something new, and there’s already a rule for something, doesn’t that mean it’s been done? In other words, genuine creativity requires breaking the very rules that are supposed to lead to good images.
So what was my problem? Among the most ubiquitous and absolute pieces of photograph dogma is, “Never blow your highlights!” And for the most part I agree that blown highlights ruin an image—in fact I’ve spent a lot of time writing about how to deal with difficult light, and it’s all been based on the premise that we need to save the highlights at all costs. Over the years I’ve written and spoken about exposure techniques, graduated neutral density filters, HDR blending, and silhouettes to save the highlights.
In this case, after exhausting my conventional solutions, it would have been far easier to move on to a different orchid. But I liked this orchid, with its rich color and shimmering raindrops, and the more time I spent with it, the more I liked it. So what if I make it okay to blow the highlights? What if instead of trying to subdue them, I made the highlights a feature of my scene?
Suddenly unshackled, an entirely new world of possibilities opened for me. I eyed the background and realized that turning the bright sky white, I’d have a striking contrast for the properly exposed orchid. Furthermore, the sky breaking through the canopy overhead would be softened by a paper-thin depth of field—if I could find the right aperture, the effect could be quite appealing.
To focus as close as possible, I added a 15mm extension tube to my macro and worked on identifying the angle of view and front/back relationships, eventually refining my the composition in small increments until all felt right. To mitigate a very slight breeze, I set my ISO to 800 and metered on the flower, ignoring the violently flashing highlights. The final piece of the puzzle was determining the f/stop that would give me the best effect. Rather than trust the result on my LCD, I ran the range of f/stops from f/2.8 to f/16, increasing my shutter speed to keep the exposure uniform. Regardless of the f/stop, with my lens more or less parallel to the orchid’s stem, I had a fairly large area of sharpness that included all of the raindrops, most the flower, and much of the stem.
I know this scene won’t garner as much attention as a vivid sunrise or dramatic lightning strike, but really like this image. So I guess the moral here is if you find yourself bound by rules, aggressively seek the unconventional. If a “rule” applies, go ahead and follow the rule for a shot or two, then challenge yourself to break it. You may end up with more failures than successes (but of course nobody needs to know that), but I’ll bet your successes will turn out to be among your favorite images.
Workshop Schedule || Purchase Prints || Instagram
Playing with light
(Creative use of the camera’s “limited” dynamic range)


The nature of time
Posted on October 2, 2016

Electric Dance, Grand Canyon
Sony a7R II
Sony/Zeiss 24-70 f4
1/8 second
F/13
ISO 50
Lightning Trigger LT-IV
A few years ago I listened to an NPR show about Time and the arbitrary ways we earthlings measure it. The guest’s thesis was that the hours, days, and years we measure and monitor so closely are an invention established (with increasing precision) by science and technology to serve society’s specific needs. The question posed to listeners was, “What is the most significant measure of time in your life?”
Most callers responded with anecdotes about bus schedules, school years, and work hours that revealed how conventional time measurement tools, the arbitrary units of clocks and calendars, rule our existence. Listening while on my morning run, I was unable to call in to share my own (significantly different) relationship with time, so you’re stuck with reading about it here instead.
Landscape photographers are governed by far more primitive time constructs than the bustling majority. We follow the fundamental laws of nature that inspire but ultimately transcend clocks and calendars: the earth’s rotation on its axis, the earth’s revolution about the sun, and the moon’s motion relative to the earth and sun. The clocks and calendars that have little to do with the picture taking aspect of my life are useful only when I need to interact with the rest of the world on its terms (that is, run the business).
While my days are inexorably tied to the sun’s and moon’s arrival, and my years are ruled by the changing angle of the sun’s rays, I can’t help long for the ability to mark my calendar for the rainbow that arcs above Yosemite Valley at 4:29 p.m. every May 26, or the lightning bolt that strikes the Grand Canyon’s South Rim at 2:45 p.m. each August 18. But Nature, despite human attempts to measure and manipulate it, is its own boss. The best I can do is schedule my personal photo trips and photo workshops to maximize my odds for the good stuff, then show up and hope for the best.
The insignificance of clocks and calendars is never more clear than the first morning following a time change. On the second Sunday of March, when “normal” people moan about rising an hour earlier, the sun thumbs its nose at Daylight Saving Time and rises a mere minute (or so) earlier than it did the day before. So do I. And on the first Sunday of November, as others luxuriate in their extra hour of sleep, I get to sleep an entire minute longer. Yippee.
There’s irony in the immutability of the natural laws responsible for the (perceived) randomness of the very events we landscape photographers covet: Earth’s revolution and rotation, our orbiting Moon, each predictable down to microseconds, set in motion the atmospheric and tidal dynamics that are the catalysts for the unpredictable seasons, weather, and waves we photograph. Ironic or not, I love nature’s mixture of precision and randomness. Though I try to maximize my odds for photographically special natural phenomena, understanding that “it” might not (probably won’t) happen only enhances the thrill when something special does happen.
The lightning in today’s image was certainly not on anyone’s calendar, but knowledge of the Grand Canyon’s August monsoon enabled Don Smith and me to schedule our annual Grand Canyon Monsoon workshops for the best time to be there. And despite the uncertainty, it was no fluke that we had our group on the North Rim and within sprinting distance of the Grand Canyon Lodge viewing deck (with Lightning Triggers primed and ready) when the clouds started building and darkening across the canyon.
This turned out to be a special day. After several fruitless afternoons of ticking seconds that stretched to minutes and hours, our group was treated to a two-hour electric show that left us all giddy and breathless. This strike came and went in milliseconds, so fast that I had no idea that it was actually a pair of intertwined bolts, a secret revealed only by my camera’s ability to freeze time.
Workshop Schedule || Purchase Prints || Instagram
Right place, right time
Click any image to scroll through the gallery LARGE


, Yosemite")


")


You’re smarter than your camera, because…
Posted on September 24, 2016

Cradled Crescent, Sierra Foothills
Sony a7RII
Tamron 150-600 (Canon-mount with Metabones IV adapter)
.4 seconds
F/8
ISO 400
Your camera is stupid (and you’re not)
In a previous life, I spent a dozen or so years doing technical support. In this role, job-one was convincing people that, despite all failures and error messages to the contrary, they are in fact smarter than their computers. Most errors occur because the computer just didn’t understand: If I misspel a wurd, you still know what I meen (rite?); not so with a computer. A computer can’t anticipate, reason, or create; given a task, it will blithely continue repeating a mistake, no matter how egregious, until it is instructed otherwise, fails, or destroys itself.
All this applies equally to today’s “smart” cameras—no matter how advanced its technology, a camera just can’t compete with your brain. Really. If I’d have allowed my camera to decide the exposure for this crescent moon scene, I’d have ended up with a useless mess: The camera would have decided that the foreground hillside was important and allowed in enough light to expose distracting detail and completely wash out the color in the sky. But I knew better. Wanting to simplify the scene, I manually metered and banished the insignificant details to the black shadows, capturing only the moon’s delicate shape and a solitary oak silhouetted against the indigo twilight.
It’s scenes like this that cause me to never trust my camera’s decision making, and why, in my (many) decades of serious photography, I’ve never used anything but manual metering. And since I try to have elements at different depths throughout my frame, focus is almost always my decision, not my camera’s, as well.
Today’s cameras are more technologically advanced than ever—their auto exposure and focus capabilities are quite good, good enough that nobody should feel they must switch to manual if they fear it will diminish the pleasure they get from photography. But if you define photographic pleasure as getting the best possible images, try spending a little time mastering manual metering and hyperfocal focus, then use that knowledge to override your camera’s inclinations. In my workshops, where I teach (but never require) manual metering and hyperfocal focus to all who are interested, people frequently marvel at how easy and satisfying it is to take control of their camera.
Photo Workshop Schedule
Overriding my camera’s “brain”
(Images I couldn’t have done in Auto mode)


My camera is a time machine
Posted on September 17, 2016

Sunset Pastoral, Sierra Foothills (2015)
Sony a7R
Tamron 150-600 (Canon-mount with Metabones IV adapter)
.6 seconds
F/9
ISO 100
Photographers frequently complain about what their camera can’t do, and take for granted the things it does well. A lot of this is a frustration with the inability to duplicate the world the way we see it. But honestly, what fun is that? My favorite photographs are those that show me something I might have overlooked or were not visible to my eye to my eye at all. As someone who tries to photograph a world untouched by the hand of Man, I particularly love the camera’s ability to return me to simpler times, reducing a scene to its essence by subtracting reminders of human incursion.

Tequila Sunset, Sierra Foothills, California (2005)
I recently returned to this small stand of oak trees huddled atop a hill in the low foothills east of Sacramento. Since I first photographed this scene over ten years ago, the peaceful country road “my” hill overlooks has evolved into a bustling artery for oblivious commuters. More recently, fencing has sprung up and an arcing dirt road has been carved into the hillside, a harbinger I fear of an impending subdivision. They’re everywhere up here now, these cookie-cutter developments with meaningless, corporate-crafted street names (Aspen Meadows Drive, Teakwood Court), devouring this once bucolic setting like a stage-4 cancer.
Despite the distractions, my camera’s “limited” vision instantly returns me to more peaceful times. Gone in a shutter-click are the highway’s roar and choking exhaust, while the encroaching suburbs are banished by the narrow view of a telephoto lens. And that scar of a road? It disappears in the shadows of the camera’s narrow dynamic range.
Photo workshop schedule
Celebrating the camera’s “limited” vision
Click an image for a closer look and slide show. Refresh the window to reorder the display.


Here comes the sun
Posted on September 12, 2016

Here Comes the Sun, Mather Point, Grand Canyon
Sony a7R II
Sony/Zeiss 16-35 f4
1/8 second
F/18
ISO 100
I rarely shoot at Mather Point because I’m usually working with workshop students struggling to corral the extreme dynamic range of a summer sunrise there. But on this morning a couple of weeks ago, about half the group had congregated at the rail in near the Mather Point amphitheater, allowing me to set up my tripod and occasionally visit my camera. When it became clear that the clouds were setting up for something special, I prepared my composition, set my f-stop to f/18 (in the sunstar zone), and ready my graduated neutral density filter in anticipation of the sun’s first rays peeking out from behind Wotan’s Throne.
Knowledge is power
As with many of my images, I can trace this image’s creation to long before the shutter clicked. That’s because, whenever possible, I avoid arriving at a location without knowing at the very least when and where the sun will appear or disappear. In this case I was familiar enough with the Mather Point in August to know that the sun would rise between Wotan’s Throne and Vishnu Temple. But I needed to be more precise than that.
We’re living in an era of ubiquitous information, carrying mini computers with the potential to make virtually everyone an instant astronomical genius. Though my own workflow for computing sun/moon arrival/departure information was established long before smartphones, it amazes me both how easy the internet and smartphones have made preparation, and how few photographers do it.
I got a little head start because I studied astronomy in college for a few semesters (long enough to learn that the essential math would would wring the marvel from my mind), enough to have good mental picture of the celestial rotations and revolutions that determine what we see overhead and when we see it.
While I’m just geeky enough to prefer plotting all this stuff manually, for most people I recommend starting with one of the excellent apps that automate most of the process. Of the two apps I recommend, PhotoPills and The Photographer’s Ephemeris, I prefer PhotoPills because it seems more complete, but they’re both excellent.
If you’ve tried either of these apps and found them too complicated, don’t be discouraged—neither is so intuitive that you should expect to simply pick it up and use it. But each is logical and well designed, and I promise that the more you use it, the easier it will become. In other words, practice!
Practice
As with most things in photography, it’s best not to be trying to learn to predict the timing and position of the sun or moon when the results matter. Rather, I suggest that you plot tonight’s sunset from the park down the street, or tomorrow’s sunrise from your backyard. Figure out where and when the sun will set or rise, be there to check your results, and then figure out why it didn’t happen exactly as expected. You’ll be surprised by how quickly your predictions improve after repeating this process a few times. Once you feel comfortable with your ability to anticipate a sun or moon rise or set from home, it’s time to take the show on the road—pick a spot you know fairly well and apply your new knowledge there.
Working it out on the fly
For me, celestial preparation from the comfort of my recliner is only half the job. It’s great when I know exactly where I’ll be and when I’ll be there, but the reality of nature photography isn’t quite so simple. On a first visit to a new location, I often end up places I never imagined I’d be—Hmmm, I wonder where that road goes…, or, Gee, I bet the view from the top of that hill would be great…—often with no connectivity.
On location with no connectivity, I need to be able to figure out the celestial details with only the resources at hand. The two iPhone apps I’ve come to rely on most are Focalware (I couldn’t live without this app) and MotionX-GPS.
- Focalware provides sun and moon rise/set times, the moon phase, and the altitude and azimuth of the sun and moon—all for any any time and date, and any location on earth. It uses my phone’s GPS to determine my current location, but doesn’t require cell or wifi connectivity.
- MotionX-GPS gives me topo maps and the ability to plot point-to-point linear distance as well as azimuth. While its maps do require connectivity to download, I can pre-download them to my phone so they’ll be available when I’m offline.
Using these two apps, plus my basic understanding of astronomical dynamics, I’m able to figure out everything necessary to plan a shoot. On this morning at Mather Point, I pulled out my iPhone and opened Focalware to determine the sunrise time and azimuth. I used the MotionX-GPS Measure tool to drop a pin at my current location, then stretch a line, at the angle of the sunrise azimuth, across the canyon until it intersected the horizon. That was all I needed—seeing that this sunrise line passed just to the right of Wotan’s Throne, I was able to set up the composition I wanted.
Workshop Schedule
A gallery of celestial timing


Concise guide to tripod selection for the serious landscape photographer
Posted on September 5, 2016

Electric Scribble, Grand Canyon Lodge, North Rim
Sony a7R II
Sony/Zeiss 24-70 f4
1/6 second
F/9
ISO 200
Lightning Trigger LT-IV
Tripod axiom
There’s an axiom in photography (popularized by Thom Hogan): Photographers purchase three tripods: the first tripod is a flimsy, cheap aluminum/plastic monstrosity; next comes a sturdy but heavy “value” tripod; and finally, they spring for the tripod they should have purchased in the first place—a sturdy, light, expensive tripod that will serve them for decades. You’ll save yourself tons of money by biting the bullet and just starting with the tripod that you covet (and probably already know you’ll eventually end up with).
How tall?
Stooping, even just a few inches, may not seem like a big deal at first, but it gets old really fast. Your primary tripod should be tall enough to elevate your camera to eye level without extending the centerpost—it’s okay if the tripod has a centerpost, and to use it as a last resort when wind or long exposures aren’t a factor, but a centerpost adds weight and makes it impossible to lower your camera all the way to the ground. While not essential, even taller than eye level is better because extra height adds compositional flexibility, the ability to elevate above obstacles, and makes it easier to handle uneven terrain.
Your minimum tripod height (MTH) determines the shortest tripod you can use without stooping or raising the center post. But you don’t need a tripod that’s as tall as you are because you’ll be mounting a camera and head atop the tripod, and your eyes are probably not on top of your head.
Here are the steps for determining if a trip is tall enough for you:
1. Start with the tripod’s fully extended height (legs extended, center post down), easy to find in the manufacturer’s specifications 2. Add the height of your ball-head 3. Add the distance from the base of your camera to the viewfinder 4. Subtract 4 (or so) inches from your height, including shoes (unless you photograph barefoot), to account for the distance from the top of your head to your eyes.Variables dictated by need and preference
- Carbon fiber is lighter and and less prone to vibration than aluminum, but more expensive (see Tripod axiom above). Carbon fiber also doesn’t get as cold on those frigid winter mornings.
- Three leg-section tripods are less work to set up and take down; four leg-section tripods collapse smaller. In theory, the more leg sections a tripod has, the more it’s prone to vibration (each junction is a point of weakness), but this isn’t a big factor with a good tripod.
- And speaking of leg sections, you’ll need to choose between twist locks and flip locks. I find the flip locks a little easier when I’m fully extending and collapsing the tripod at the beginning and end of a shoot, but the twist locks easier for partial adjustments of the legs while I’m shooting. The flip locks can be noisy, and can catch on things.
Tripod head
For landscape photography, I strongly recommend a ball head (pivoting ball that can be controlled by loosening and tightening a single knob) rather than a pan/tilt (a lever for each axis of motion). And stay away from the pistol-grip ball heads—they don’t handle weight well.
Quick-release system
You’ll definitely want some kind of quick-release mechanism that allows you to quickly attach/detach the camera to/from the head. The simplest kind is a metal plate (don’t even consider anything with plastic parts) that mounts to the camera’s tripod screw and matches a corresponding clamp on the head. The clamp might engage/disengage with a lever or twist-knob—get the lever kind.
The flat plates are okay, but the easiest, sturdiest quick-release system is the Arca-Swiss L-plate (the Arca-Swiss style is a standard offered by many quick-release manufacturers). An L-plate is a 90-degree (L-shaped) piece of machined aluminum; one axis mounts flush with the bottom of the camera body, attaching via the tripod mount screw, and the perpendicular axis hugs one side of the camera body (providing a quick-release plate on the bottom and side of the camera). The entire length of both plate axes are quick-mount rails that attach (with a lever or knob) to the corresponding mounting clamp on the tripod head. This rail setup is more secure and easier to mount/unmount than a conventional quick-release plate, making switching between horizontal and vertical orientation a simple mater of releasing the clamp, rotating the body, and re-securing the clamp (it takes longer to read the description than to execute it).
If you’re really serious about your photography, you’ll invest in an L-plate system—once you do, it’ll be hard to imagine how you lived without it. Because every camera model has its own dimensions and unique cable, control, memory card, and battery access points, the best L-plates (like Really Right Stuff) are custom-machined for the body (when you get a new camera, you’ll need a new L-plate).
My tripods
I use two Really Right Stuff tripods: the larger RRS TVC-24L is my primary tripod; I also use a smaller, lighter RRS TQC-14 when I fly or hike. My TVC-24L has a RRS BH-55 (purchased when I was a DSLR shooter but overkill for my Sony mirrorless system— I’d probably get a BH-40 if I had to do it now); my TQC-14 has a BH-30. I’m about 5’ 9” and without the centerpost extended the TQC-14 is just a little shorter than ideal (I need to extend my centerpost a few inches to get my camera to eye level), but it’s a justifiable compromise when weight and/or storage length is a factor. All of my camera bodies and tripod heads are outfitted with RRS Arca Swiss type L-plates and corresponding clamps.
Links
Making the case for using a tripod
Really Right Stuff
Electric Scribble, Grand Canyon Lodge, North Rim
About this image
Electric Scribble, Grand Canyon Lodge, North Rim
The best nature images reveal aspects of the world that the human eye misses. For example, though lightning strikes so fast that it’s already a memory before the brain can process them, the camera’s ability to freeze an instant in time preserves magic moments like this that otherwise would be lost forever.
Lightning’s speed makes photographing it without a tripod virtually impossible: in daylight, it requires a lightning sensor that mounts atop the pre-composed camera and waits for lightning to fire; at night it can be captured with a manual shutter press, but at exposures far too long for hand-holding.
On this afternoon on the North Rim last month, Don Smith and I had our workshop group set up to photograph a series of active thunderstorms skirting the South Rim about 15 miles away from our vantage point on the Grand Canyon Lodge viewing deck. The deck was packed with people enjoying the show. In crowded locations like this I particularly appreciate the height of the RRS 24L, which gave me the flexibility to elevate above heads and other obstacles. The 24L’s sturdiness gave me peace of mind that my camera would remain stable despite all the heavy footsteps nearby.
Virtually all of the strikes were vertical, cloud-to-ground strokes directly across the canyon. But already having a pretty good selection of images like that, my camera was set up (on my tripod, Lightning Trigger ready for action) to favor the composition I wanted rather than in the direction of the most lightning activity.
Most of my lightning captures this afternoon were recorded relatively close to my memory, albeit with much more intricate detail than my eyes saw. This cloud-to-cloud strike, the only lightning I captured with this composition, followed a far too circuitous path for my eye/brain to register, but it was etched forever in pixels by my sensor. Better still, the resulting 42 megapixel raw file gives me the luxury of much closer scrutiny than you get with this 800 pixel jpeg. Magnifying the full file to 100 percent, I’m able to infer that what I have here is only a portion of a rather tangled mess of electricity that skipped in and out of clouds, appearing, disappearing, and doubling back on itself like a tangled thread—all in the blink of an eye.
Photo Workshop Schedule
A gallery of frozen moments in nature


Lightning lessons
Posted on August 31, 2016

Hand of God, Grand Canyon
Sony a7R II
Sony/Zeiss 24-70 f4
1/13 second
F/13
ISO 50
Lightning Trigger LT-IV
Let’s start with the given that lightning is dangerous, but if “safety first” is a criterion for intelligence, photographers are stupid. It’s impossible to be 100 percent safe photographing lightning, but the more you understand lightning, how to avoid it and maximize your safety in its midst, the greater your odds of surviving to take more pictures. And not only does a healthy respect for lightning’s fickle power make you safer, understanding lightning will also help you anticipate and photograph lightning.
The shocking truth about lightning
Lightning is an electrostatic discharge that equalizes the negative/positive polarization between two objects (when you get shocked touching a doorknob, you’ve been struck by lightning). The convective air motion (convection is up/down circular flow caused when warm, less-dense air rises, cools and becomes more dense, and finally falls and repeats the process; convection is also what causes bubbling in boiling water) in a thunderstorm transports positively charged molecules upward and negatively charged molecules downward. Because opposite charges attract each other, the extreme polarization (positive charge at the top of the cloud, negative charge near the ground) is quickly (and violently) equalized: Lightning.
With lightning comes thunder, the sound of air expanding rapidly (exploding) when heated by a 50,000 degree lightning bolt. The visual component of the lightning—the flash or bolt that you see—travels to you at the speed of light, over 186,000 miles per second (virtually instantaneous regardless of distance). But lightning’s aural component, thunder, only travels at the speed of sound (a little more than 750 miles per hour—a million times slower than light).
Knowing that the thunder occurred simultaneous with the lightning flash, and that they travel at different speeds, we can infer that the farther we are from the lightning, the greater the time elapsed between the arrival of the lightning and thunder. And since we know how fast both travel, we can compute the approximate distance the lightning struck from our location
At 750 miles per hour, thunder will travel about a mile in about five seconds, so dividing by five the number of seconds between the lightning’s flash and the thunder’s crash give you the lightning’s distance in miles (divide the interval by three for the distance in kilometers). If five seconds pass between the lightning and the thunder, the lightning struck about one mile away; fifteen seconds elapsed means the lightning struck about three miles away.
Lightning safety
The 30 people killed by lightning in the United States each year had one thing in common: each didn’t believe he or she would be struck by lightning when they started whatever it was they were doing when they were struck. The surest way to be safe in an electrical storm is to be in a fully enclosed structure or metal vehicle, away from open windows, plumbing, wiring, and electronic devices (ideally, 100 miles away). But since that would preclude our ability to photograph lightning, we need to find a middle ground.
While there’s no completely safe way to photograph lightning, there steps to improve your odds of surviving to enjoy the fruits of your labor. This is where more knowledge comes to the rescue. Most lightning strikes within a six mile radius of the previous strike. So, if less than thirty seconds elapses between the flash and bang, you’re too close. And since “most” doesn’t mean “all,” it’s even better to allow a little margin for error. Thunder isn’t usually audible beyond ten miles, so if you can hear the thunder, it’s safe to assume that you’re within the range of the next strike.
But if you do find yourself caught outside in an electrical storm, with no available shelter, try to do as many of the following steps:
- Avoid water
- Avoid high ground
- Avoid exposed areas
- Avoid metal or electronic objects
- Avoid tall objects such as trees and open structures (and tripods)
- Stay at least fifteen feet from other people
- If you’re surrounded by trees, position yourself near shorter trees, as far from trunks as possible
- Do not lie down
- Crouch with your feet together and your hands covering your ears
- A lightning strike is often preceded by static electricity that makes your hair stand on end and an ozone smell (best described as the smell of electricity—I think of bumper cars at the amusement park or the smell of my electric slot cars when I was a kid)—if your hair starts to stand up and/or you notice a distinct odor that could be ozone, follow as many of the above steps as you can, as quickly as possible (often you’ll only have time to crouch).
Night lightning
Photographing lightning at night is fairly straightforward, following most of the rules and difficulties that apply to any other night photography shoot: metering, composition, and finding focus in low light. My exposure settings are usually a function of the lightning’s frequency—if it’s only firing every five or ten minutes, I need stretch out my exposure time with a lower ISO and/or smaller aperture.
Rather than try to meter a night scene conventionally, I find the easiest way to get a proper night exposure is to start with a 30-second, large aperture, extreme ISO (ISO 6400 or higher) test exposure. When I get an exposure that works, I determine the shutter speed that suits the lightning frequency, and the lightning density I want in my frame, figure out how many stops more than my 30-second test exposure that is, and subtract the same number of stops from my ISO and f-stop. This test exposure is a good way to check my composition and focus in extreme low light situations.
Daylight lightning
Until recently, most lightning photography was either at night, when a long exposure will capture as many strokes that occur while the shutter’s open, or the product of pure luck—the shutter just happened to be open when the lightning fired. Daylight lightning is difficult because if you’re relying on your reaction time, the strike will almost certainly come and go before you can react (people who claim success with this technique have usually captured a secondary or tertiary bolt). But now we have lightning sensors, which can detect and respond much faster than any human can react.
A lightning sensor attaches to your camera’s hot shoe and connects via a special cable to the camera’s remote-release port. When engaged, it fires the shutter immediately upon detecting lightning.
There are many lightning sensors from which to choose. I went with the one that was the consensus choice among photographers I know and trust: Lightning Trigger from Stepping Stone Products in Dolores, CO. At slightly less than $400, including a cable to match your DSLR, the LT-IV is far from the cheapest option, but from all I’ve read, heard, observed, and (especially) experienced first hand, lightning sensors are not generic products, and the internal technology matters a lot. The Lightning Trigger is the only one I’d use (I get no kickback for this).
A good lightning sensor should detect lightning at least 20 miles away. And you can count on a lot of extra clicks—for every click with lightning in my camera’s field of view, I get many clicks caused by lightning not visible to me, or outside my camera’s field of view (better too sensitive than not sensitive enough). But when lightning does fire somewhere in my composition, I estimate that my Lightning Trigger clicked the shutter at least 95 percent of the time.
But even firing in response to a visible bolt doesn’t ensure a successful image—sometimes the bolts are so short that the camera can’t click fast enough. This is a limitation of your camera, not your sensor—some cameras are significantly faster than others (more on this later). In general, the more violent the storm, the greater the likelihood of bolts with long duration and/or multiple strokes that significantly increase your odds.
Exposure settings
The daylight lightning shutter speed sweet spot is between 1/15 and 1/4 second—faster shutter speeds risk completing the exposure before some or all of the secondary strokes fire; slower shutter speeds will wash out the lightning (which is why you can’t just put on a neutral density filter and dial in a long exposure to capture daylight lightning).
Achieving daylight shutter speeds around 1/8 second isn’t always easy. I shoot in Manual mode, use a polarizer, often at ISO 50 and f16 or smaller. Of course exposure will vary with the amount of light, and you may not need to go to such extremes if you’re shooting into an extremely dark sky. You can also use a neutral density filter to slow the shutter speed, but take care not to slow the shutter speed beyond 1/4 second and risk washing out the lightning entirely. And if you’re in manual mode (as I am), be aware of the rapidly changing light in a thunderstorm—an exposure that worked five minutes ago might be all wrong now.
After doing this for many years, I’ve developed an exposure approach that seems to work fairly well for me. When the scene is fairly bright, I tend to go with faster shutter speeds like 1/10 to 1/15 second. I find that longer shutter speeds in these situations tends to was out the lightning I capture, making it less dramatic or even virtually invisible. But when dense, saturated clouds block the sunlight and darken the clouds significantly, I usually extend my shutter speeds into the 1/4 to 1/8 second range. The lightning still stands out quite nicely against the dark clouds, and the longer shutter speeds allow me to capture more multiple strokes.
Shutter lag
Because shutter lag (the time elapsed between the press of the shutter button and the shutter opening) is death to lightning photography, you’ll want a camera with as little as possible shutter lag. Too much delay, and the bolt will be gone before the camera clicks. (Using shutter speeds in the 1/15 to 1/4 second range, there’s no concern that your shutter will be too fast.)
Shutter lag is one area where the Sony mirrorless cameras shine—after years of shooting Canon, and working with Nikon and other camera brands in my workshops, I’m pretty confident that the Sony mirrorless bodies are the fastest, often by a large amount.
Ideally, you’ll want a camera with shutter lag faster than 60 milliseconds. Somewhat slower shutter lag won’t shut you out completely, but the slower your camera, the lower your success rate will be.
The best resource I’ve found for camera shutter lag times is http://www.imaging-resource.com. In the Camera Review section, look for the Pre-focused time on the Performance tab (though I can’t guarantee that any sensor but the Lightning Trigger is able to pre-focus).
Regardless of the camera you’re using, there are a couple of things you should do to do to minimize shutter lag:
- Turn off autofocus. Even with back-button focus (focus not tied to the shutter button), on some cameras autofocus will initiate a brief communication between the lens and camera that will slightly delay response. If you must autofocus, go ahead and do it each time you recompose, then turn autofocus off as soon as you’re focused.
- Though the Lightning Trigger documentation suggests Aperture Priority, I recommend manual exposure mode to eliminate any metering when the shutter trips (again, this could vary with the camera).
- Turn off any pre-click detection, such as face-recognition. (Noise reduction settings shouldn’t matter, since that’s a post-click function.)
It may very well be that your camera isn’t slowed with these features enabled, but since it’s virtually impossible to get camera manufacturers to commit to a camera’s performance at this level (and despite the wealth of self-proclaimed experts who claim to know), I think it’s wise to minimize your chance for problems by simplifying your camera’s capture process as much as possible.
Other equipment
Other essential or recommended equipment*:
- A sturdy tripod (and despite what you might have heard, you’re no safer with carbon fiber than you are with aluminum)
- Rain gear that will keep you dry from head-to-toe
- An umbrella for shielding your camera and lightning sensor (many sensors, including the Lightning Trigger, aren’t waterproof) while composing and shooting in the rain
- Lens hoods to reduce the raindrops that might mar the front element of your lenses
- Neutral density filter and/or polarizer to slow shutter speed
- A garbage bag (my choice) or rainproof camera jacket (haven’t found one I like) to protect your camera
- Extra lightning sensor batteries (better safe than sorry)
- An infrared remote to make sure the sensor is functioning (I sometimes borrow the remote from the hotel)
- A towel (also borrowed from the hotel)
* While I don’t recommend risking staying out when the thunderstorm is on top of you, there will be times when the rain sneaks up on you (I’ve had to leave my camera out in a downpour when a too-close bolt chased me to shelter).
Getting the shot
My goal is to photograph lightning that’s happening somewhere else. In other words, if I’m in the storm, I’m too close. For example, places like the rim of the Grand Canyon and Yosemite offer vantage points with expansive views that allow me to photograph thunderstorms from many miles away (which of course still doesn’t absolutely guarantee safety).
Do your homework
Before attempting a lightning shoot, research potential vantage points and familiarize yourself with the weather patterns in the area you’d like to photograph. It’s possible that most storms in your area will tend to form at around the same time of day, and move in the same direction—this knowledge will definitely improve your chances. It’s also a good idea scout escape routes and have a plan if you’re caught off-guard by an advancing or developing cell.
Because you can’t be everywhere at once, I strongly recommend using a smartphone app that reports current lightning activity. For example, when I’m at the Grand Canyon’s South Rim, I usually stay in Tusayan, about 15 minutes from the rim, and often don’t know exactly when the lightning has started, or whether it’s west or east. I can also get a pretty good idea of where the storms are building and the direction they’re moving to get myself out to the rim before the show starts.
The app I use on my iPhone is Lightning Finder, which reports (with a minimal annual subscription), virtually real-time, every lightning strike in North America. Another subscription-based (for real-time lightning) app that I’ve heard good things about but haven’t tried is RadarScope. This is by no means a comprehensive list, so you might want to do some research to see what’s out there.
Maximize your odds
Choosing a conventional landscape scene usually involves some planning to ensure the best light for my planned subject, and that the weather will cooperate. But lightning photography is far more opportunistic—we may know that a chance for lightning exists, but we rarely know exactly where it will appear. So while I may have an idea of a landscape to put with my lightning, but if the lightning’s not happening there, my lightning shoot won’t be terribly productive unless I adjust.
The greater the vertical distance raindrops rise and fall in the clouds, the greater the potential for the extreme polarization that’s conducive to electrical activity. So look for towering thunderheads, the higher the better. I also look for gray curtains of rain hanging beneath dark clouds, which is usually an indication of where the cell is most active. The darker the rain curtains, the heavier the rain and the more likely there will be lightning. But be aware that the lightning doesn’t necessarily fire in the darkest part of the clouds—sometimes you can see lightning in the thinner gray areas out front of the main rain band.
My general approach is to identify the most likely lightning source (rain curtain) and find the best composition that includes it. The wider your composition, the greater your odds of capturing lightning somewhere in your frame, but the smaller the lightning will appear. I tend to start wider to ensure success, then tighten my composition once I’m fairly confident I captured something.
Sometimes I encounter a situation where the best lightning is firing above a boring scene, but I see potential (but so far no lightning) above a much better scene. That’s a classic risk/reward dilemma without an absolute best solution. Because I have so many lightning images, I tend to go with the better composition rather than the best chance for lightning. On the other hand, I advise those who have few or no lightning captures to opt for the sure thing until they know they’ve had some success.
A frequent composition problem I see in the initial images of my workshop students is too much sky. Monitor the storm until you know the height of the lightning’s origin, then put the top of the frame a little above that—more sky if there’s something interesting above, less if it’s homogenous gray clouds. But it’s better to have a little too much sky than to have the lightning coming out of the top of your frame.
With a lightning sensor engaged and firing, it’s easy to feel like there’s not much to do. But lightning storms move, so in addition to the obvious safety implications (which should be your primary concern), it benefits you to monitor and anticipate the lightning activity’s path. Armed with this knowledge, I’ll frequently shift, tighten, or widen my composition as the situation dictates.
Since my Lightning Trigger is so sensitive, picking up lightning well out of my frame and (most frequently) in inter- and intra-cloud lightning that’s invisible to the naked eye in daylight, I get far more frames than I get lightning. This going through hundreds of frames on my computer to find the ones with lightning a very tedious task. That job becomes much easier if, when my Lightning Trigger is armed and ready, I lock my eye on the horizon. When I see lightning and hear my shutter click, I mark that frame by quickly clicking another with my hand in front of the lens. (If I don’t hear my shutter click, I check to make sure everything is working and set up properly.)
Be aware that electrical storms can move quite quickly, so monitor the storm you’re photographing, and the sky around you in all directions, closely and continuously. Not only will this enable you to adjust your composition to account for a cell’s movement, it can save your life when an active cell threatens your location.
Grand Canyon Monsoon Photo Workshops
A Lightning Gallery
Click an image for a closer look and slide show. Refresh the window to reorder the display.


