Eloquent Images by Gary Hart
Insight, information, and inspiration for the inquisitive nature photographer
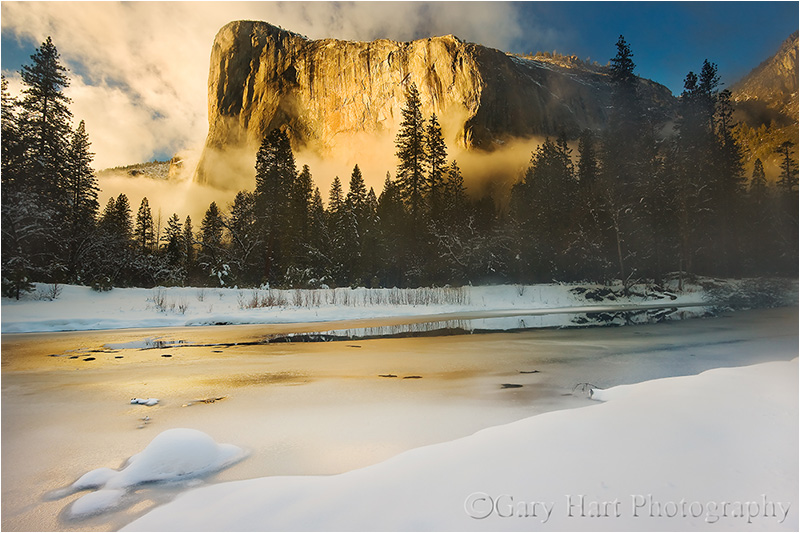
Photograph Yosemite’s weather

Valley Mist, Yosemite
Canon EOS 5D Mark III
1/10 second
F/11.0
ISO 100
80 mm
If you’re not prepared to miss a little sleep, get a little wet, or feel a little cold, you probably won’t make it as a Yosemite photographer. Last week Yosemite received daily doses of unusual (for May), but most welcome, rain. But those hardy few who endured the slippery rocks, soggy clothes, and wet gear, were rewarded with a variety visual treats that the comfortable masses never got to see.
When I’m shooting for myself (no scheduled workshop or personal guided tour), I only visit Yosemite when I expect something interesting in the sky. Sometimes that simply means a special moonrise, but usually it’s the promise of a storm that draws me.
Fresh snow
Yosemite is never more spectacular than it is with a coat of fresh snow draping rocks and branches. But if it’s fresh snow you’re after, you pretty have to be in Yosemite during the storm—even those who live in the Bay Area or Southern California are too late if they leave for Yosemite the second they hear Yosemite got snow. That’s because temperatures in Yosemite Valley during a snow storm are usually in the mid-30s—the melting starts as soon as the snow stops, and within hour or so of the sunlight hitting the snow, the trees have shed their white veneer. And while Yosemite Valley’s snow often remains on the ground for days, rapidly accumulating footprints and dirt quickly rob it of its pristine appeal.

Winter Reflection, El Capitan reflected in the Merced River, Yosemite
During the storm
Storms in Yosemite often submerge the entire valley in a dense, gray soup, sometimes obscuring all but the closest trees and rocks. The narrow contrast range makes this kind of photography perfect for intimate, moody scenes, more than enough to keep me occupied while I wait for the storm to clear.

Bridalveil Dogwood, Valley View, Yosemite

Elm in Blizzard, Cook’s Meadow, Yosemite
Clearing storm
A clearing storm is Yosemite’s main event. Photographers have been capturing them for as long as cameras have been in the park, long before Ansel Adams. Tunnel View’s elevated vantage point offers the best combination of easy access and photogenic scene, making it by far the most popular location to photograph Yosemite’s clearing storms. Because Yosemite’s weather clears from west to east, Tunnel View is where Yosemite Valley clears first; it’s where I usually wait out a storm. Tunnel View is also the best place to find a rainbow if you’re lucky enough to be there when the afternoon sun breaks through before the storm is done with the rest of the valley.

Double Rainbow, Tunnel View, Yosemite
The problem with starting your Yosemite clearing storm shoot at Tunnel View is that it’s so spectacular, with conditions changing by the minute, that you may never leave. And that costs you a lot of opportunities to get some equally spectacular images at other, less photographed locations. When I’m by myself, leaving Tunnel View during a clearing storm is like ripping off a bandaid—it really hurts, but I’m always glad I did it. When I’m leading a group it’s an invitation to mutiny, but they usually come around when they see what they’d have missed had I not cracked the whip.
Winter Sunset, El Capitan, Yosemite
Be prepared
In the back of my car is a gym bag with all my wet weather clothing: wool gloves (wool will keep you warm even when it’s wet), a hat that covers my ears, at wide-brim waterproof hat for rain, a light rain parka (it goes over whatever jacket I’m wearing), waterproof over-pants, an umbrella, extra socks. It’s always there. With this gear and my waterproof boots, I can stay dry and cozy warm in the wettest weather.
The biggest problem photographing in weather isn’t keeping myself comfortable, it’s keeping my camera dry. While I do my best to keep my camera dry, I don’t really worry about a little rain on my camera or lens—the weather seal seems to be good enough for a light to moderate rain. And if I’m going to be standing in the rain for any period of time, I’ll put a plastic garbage bag over my camera and tripod. I usually keep a box of garbage bags in my car, but the trash liner or dry cleaning bag from the hotel room works just as well. The final piece of my wet weather ensemble is a towel, usually borrowed from my hotel room (just don’t forget to return it).
When it’s time to shoot, all of my effort goes to keeping water off the front of my lens. A lens hood helps in light, vertical rain, but I find them more trouble than they’re worth (I know this is blasphemy to some photographers, but the steps I take to eliminate lens flare are a topic for another day). Because I don’t own any kind of waterproof lens or camera cover, the umbrella I pack isn’t for me, it’s for keeping my lens dry when I’m shooting. The umbrella is usually sufficient, but when the rain is really coming down, and/or blowing in my face, I don’t even worry about water while I compose, meter, and focus. When I’m ready to shoot I dry the lens with my towel and click.
Getting to Yosemite during a storm
My favorite route into Yosemite is Highway 140, through the Arch Rock entrance. While that’s no more than personal preference most of the time, it’s downright essential when weather threatens. All the other three routes into Yosemite—41 from Fresno, 120 west from Manteca, and 120 east from Lee Vining (closed in winter)—climb over 6,500 feet and are frequently subject to ice, snow, chain requirements, and even closure. But the highest point on Highway 140 is Yosemite Valley. At only 4,000 feet, it’s much less likely to have weather problems.
Regardless of your route into the park, in winter you’re required to carry chains in Yosemite, even if you have four-wheel drive. You may be asked to show your chains when you enter the park, especially if weather threatens, and will be turned away without them. And if you’re in Yosemite Valley without chains and a chain requirement goes up, you can count on encountering a checkpoint—if that happens you’re pretty much stuck there until the requirement is lifted.
Today’s image
The image at the top of this post was captured last week, during a light rain at Tunnel View. My original sunrise plan was for a different location, but it was soon clear that we’d get no sunrise color that morning so I detoured my workshop group to Tunnel View. This was our first morning, and therefore our first opportunity to photograph a clearing storm—it turned out that we had many more opportunities during the workshop, but we were all pretty excited by what we saw as the light came up and the clouds lifted that morning.
I only clicked a handful of shots, mostly to demonstrate the composition variety Tunnel View offers. (Yosemite neophytes tend to spend too many clicks on the wide frames, and I want to show them that there are lots of tighter compositions possible too.) I don’t shoot black and white, but several people in the group had great success converting images from that shoot to black and white.

These are amazing! Seriously all of these are incredible. So sharp, beautiful, quality images, wow…. What camera are you using? You’re a very skilled photographer. Keep it up, thanks for sharing. 🙂
Thanks. I shoot with Canon DSLRs.
Which one? Just curious.
The pictures on my site and blog were captured with a Canon 10D, 50D, 1D Mark II,1DS Mark II,1DS Mark III, or 5D Mark III. Many of the blog images specify the camera used.
Cool, cool, cool. Thanks 🙂
No problem. Sorry I couldn’t be more specific. 🙂
As usual, incredible, Gary. Your posts are always full of little gems. Thanks for sharing your amazing talent!
Thanks, Gail.
Sorry – hit the post button too early.
The pictures are amazing !!! I really want to go to Yosemite … your posts are amazing, you have a great talent.
Thank you, Rafaelle.
Once again, I learn as much from your writing as from your photographs. You have a gift for both. Have you published any books?
Thanks, Peggy. I do have a book, but it’s a book of my images with classic poetry (Frost, Dickinson, etc.), not a book about photography. At some point I’d like to compile everything I’ve written here on my blog, in the Outdoor Photographer articles, and my workshop material, into a book. But until then, here’s the link to my book, The Undiscovered Country, http://www.garyhartphotography.com/shop/books.html.