Eloquent Images by Gary Hart
Insight, information, and inspiration for the inquisitive nature photographer
Taking One for the Team…
Posted on May 29, 2026
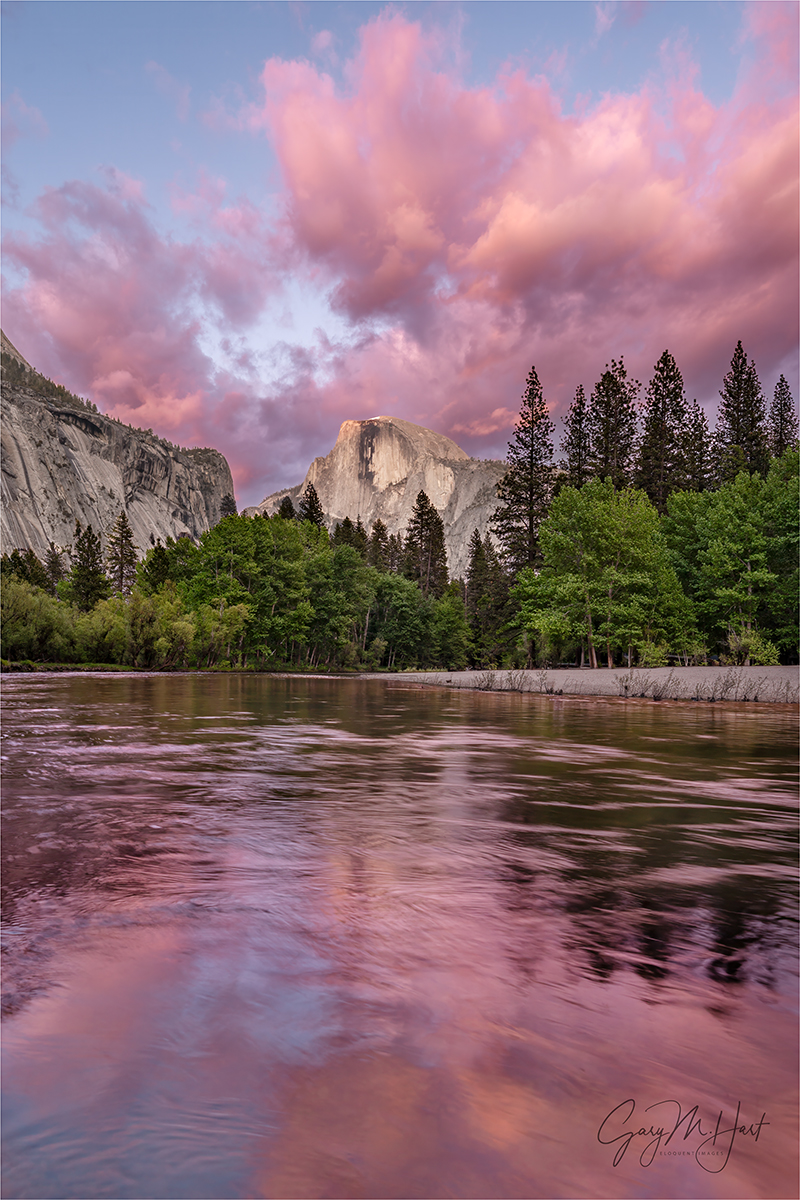
Color and Clouds, Half Dome and Merced River, Yosemite
Sony a7R V
Sony 12-24 GM
1/5 second
F/11
ISO 100
If there’s one thing every nature photographer agrees on, it’s this: Before the really good stuff can happen, someone needs to take one for the team. In other words, the truly spectacular (sunset, aurora, rainbow, lightning, and so on.) display everyone hopes for will not happen unless, 1) someone who could have been there opts out, or 2) at least one person gives up and leaves.
Over the years this truth has been proven time and again: Kilauea eruptions, Horsetail Fall color, and Grand Canyon lightning shows, to name three, but today I’m thinking about my most recent experience.
By the time our final sunset rolled around, my April Yosemite spring workshop had already been memorable for several reasons, from the road conditions uncertainty that threatened the start of the workshop, to an assortment of waterfall rainbows, to the welcome return of the Yosemite Falls moonbow. In fact, coming into the workshop’s final shoot, this group had already enjoyed so much beautiful Yosemite springtime photography, I figured whatever happened for that evening would just be the cherry on top. And when I saw that the weather forecast called for blank skies, I lowered my expectations further. Until…
For absolutely valid reasons, earlier that final day three people had decided to cut and run before the workshop ended. Two participants wanted to get a head start on their long journeys home (one had driven out from Tennessee), while my brother Jay, who was assisting the workshop and sharing my hotel room, decided to call in sick. That’s when I started having flashbacks to the last day of my spring workshop two years ago, when Jay thought he was having a heart attack and ended up getting an ambulance ride to the hospital in Mariposa—followed by four months (that’s not a typo) in UC Med Center in San Francisco with what turned out to be acute necrotising pancreatitis. (Talk about taking one for the team.) This time it was either food poisoning or norovirus, a distinction that made little difference to the sufferer, but a great difference to his roommate. So Jay got no argument from me when he opted out of that final day and went home.
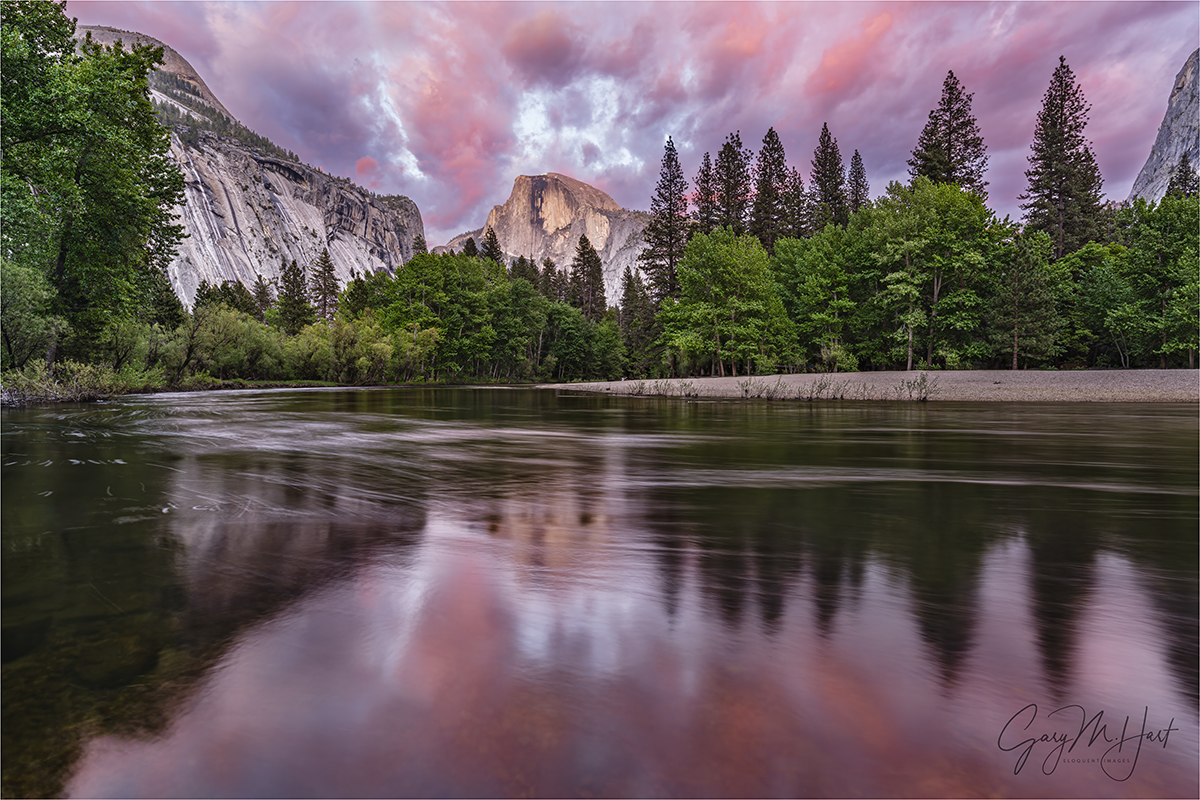
Majesty, Half Dome Sunset Reflection, Yosemite
The rest of the group enjoyed a pleasant afternoon that included an image review and moonbow processing talk, more nice photography, and a visit to the Ansel Adams gallery. We wrapped up about an hour before sunset, taking thea short walk to a favorite riverside view of Half Dome and its reflection, that I often save for the workshop’s final shoot.
Because I’ve photographed this spot so many times, when the conditions don’t look especially promising I’ve been known to taunt the photography gods by leaving my camera gear in the car. But this time I inexplicably decided to don my backpack before leading everyone into the woods. Never have I been happier with a decision that was in all honesty pretty-much a coin-flip. Whether or not it would have happened if the group had been at full strength, but it’s fun to imagine.
I already wrote about this sunset a couple of weeks ago, but let me emphasize the importance of composing your images to fit the conditions, rather than forcing them into a preconceived bias of how the scene should look. This bias can be the product of prior visits, viewing the images of others, or just noticing what others around you are doing—whatever the reason, don’t let your bias blind you to what’s happening right now, because you might be pretty amazed to discover the variety of ways a single scene can be photographed.
I frequently time my visits here to coincide with a moonrise I can use to accent a wide shot, or as a scene partner to pair with Half Dome in a tight frame. In low-flow months, the main event at this spot is the Merced River’s mirror-like reflection, while in spring, the Merced’s volume and speed turns the surface into a swirling abstract that looks very cool in a multi-second exposure. Either way, I often compose wide enough to include the reflection with whatever is happening on and behind Half Dome. And when there are no clouds, assuming I take any pictures at all, they tend to be tighter portraits of Half Dome, or of nothing but Half Dome’s reflection.
This evening, with the clouds catching late sunlight and clearly hanging around longer than usual, I soon switched to my 12-24 lens—something I rarely do here. But since the warming clouds were so exquisite, and the reflection doubled the size of the scene, I wanted the option to include as much of this beauty as possible, even if that meant shrinking Half Dome. When the sky and reflection turned about as red as a sunset can get in Yosemite, I was ready to catch the whole thing. I also made a point of composing both horizontal and vertical versions of the scene.
Even though I was using focal lengths in the 12mm – 16mm range, note how straight the trees are. Though many photographers blame flaws in their ultra-wide lenses for the perspective distortion that skews trees and other vertical lines, it’s simply what every lens does when angled up or down—the wider the focal length, the greater the effect. Point the lens straight ahead and everything magically straightens.
So what about the people who took it for the team so the rest of the group could enjoy this beautiful sunset? Everyone made it home safely and (eventually) healthy, and focused more on what they saw than what they missed. As it should be.
Yosemite Photo Workshops
Variations on a Scene (same place, different conditions)
Click any image to scroll through the gallery LARGE


An Old Friend Returns
Posted on May 22, 2026
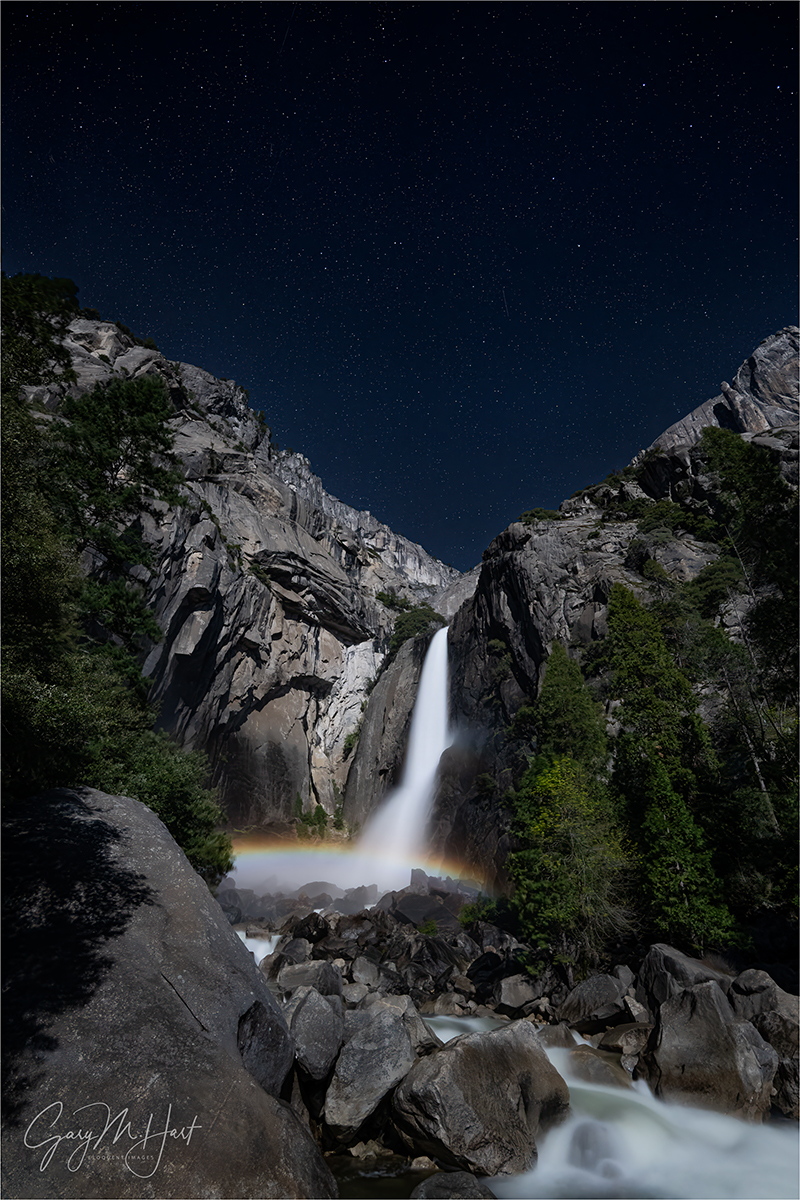
Moonlight Prism, Lower Yosemite Fall Moonbow, Yosemite
Sony α1
Sony 14mm f/1.8 GM
ISO 1600
f/1.8
4 seconds
Has anyone noticed that Yosemite becomes a completely different park with each season? I feel quite fortunate to live close enough that I’m able to enjoy each Yosemite season, and to offer Yosemite workshops in three of four seasons. (Actually, you can probably infer that I live close enough to offer workshops in all four seasons, but I leave summer to the tourists.)
Each Yosemite season offers its own distinguishing qualities. In autumn, though the falls are nearly dry (Bridalveil still trickles), red and gold leaves fill the trees, carpet the ground, and reflect gloriously in the low and slow Merced River. Winter is when the waterfalls return to life, and also the best time to find Yosemite draped in powdery white—but since snow is never guaranteed, I always schedule a workshop around the natural firefall light on Horsetail Fall (while still crossing my fingers for snow). Spring is the Yosemite of postcards and calendars, when waterfalls peak, dogwood blooms abound, low-lying meadows host (reflective) vernal pools, and rainbows color the waterfalls.
Each of these Yosemite workshops has a potential bonus lunar event that I try to include when it corresponds with the season’s primary distinguishing quality. Many autumns and winters I can align a rising full moon with Half Dome at sunset, and spring is when the light of a full moon paints a rainbow at the base of Lower Yosemite Fall.
For years I scheduled two workshops around this moonbow, but finally decided that the window for the absolute best moonbow experience is open only during a four week span from early April into early May. Though a moonbow also happens with the full moon from late March and into June, in late March and early April the moonbow appears in the mist billowing too far left of the fall; later in May and into June, the crowds swarming Yosemite Valley make an unpleasant experience for everyone.
Despite the remarkably predictable moon/landscape geometry that creates a moonbow, its appearance is never certain. Clouds are the biggest nemesis, but low water can also diminish the experience. Coming into this year, limiting my moonbow workshops to a single full moon in that four-week window, combined with factors beyond my control (in addition to clouds, you can add a sudden park closure and global pandemic), has meant that my previous successful moonbow sighting was in 2019. And for a while, it appeared 2026 would continue that streak of futility.
There was a time when I didn’t believe it possible for Yosemite’s spring runoff to be so low that the moonbow would essentially be erased. But as California’s wet season progressed and the Sierra Nevada range found itself on the way to an historically poor snowpack year, I couldn’t help flashing back to 2015. That’s the year PBS Newshour arranged for a film crew to follow me and my Yosemite spring workshop group as we photographed Yosemite’s spring splendor, with a particular emphasis on the moonbow. But 2015 also happened to be the year an unprecedented drought shrunk Yosemite’s normally booming spring waterfalls to mere trickles. Rather than cancel the Newshour segment and keep the film crew home, they adroitly pivoted to a piece on California’s drought and its impact on Yosemite. Check it out. (FYI, I haven’t aged a bit since then.)
Would history repeat this year? As April approached, the answer appeared to be yes. Then a series of unseasonably cold storms arrived, filling our rivers and bolstering the Sierra snowpack just in the nick of time. A couple of days before the workshop (scheduled for the last four days of April), another storm landed, further recharging the falls and even lingering through the workshop’s first couple of days—just enough rain and clouds to provide excellent photography, but not enough to wash us out. Suddenly, my concern wasn’t that there would be enough water, it was whether the clouds would depart in time for my planned Wednesday night moonbow shoot.
Even with all this last-minute moisture, spring 2026 was not especially wet in Yosemite. Though still flowing beautifully, all the falls were noticeably on the low side of average for this time of year (peak runoff is usually around May 1). Nevertheless, there was more than enough water exploding on the rocks beneath the falls to form the billowing mist Yosemite’s signature waterfall rainbows require.
Throughout the workshop my group enjoyed an assortment of daylight rainbows, from various vantage points (I have the timing down to the minute for each location, creating the illusion that I’m much smart than I am), but it was the moonbow everyone was crossing their fingers for. I had one person in the group who had already taken this workshop twice, each time with the expressed desire to photograph the moonbow. With Kent was returning for a third attempt, the pressure was on and I was pretty committed to making it happen for him if at all possible.
Since the moonlight timing and angle would be best on Wednesday, the workshop’s penultimate night, I tried to get everyone up to speed on moonlight and moonbow photography during that afternoon’s training session. The evening’s sunset shoot featured the full moon rising over Bridalveil Fall, photographed from an elevated turnout on Big Oak Flat Road. As soon as we finished there, I zipped the group back down to the Yosemite Valley Lodge parking lot, where we grabbed our gear and made the short walk, in the gathering dark, up to the bridge at the base of Lower Yosemite Fall.
The below average flow in the fall meant that this year’s moonbow wouldn’t be as big, or last as long, as it does in the wettest years. That’s because less water means a smaller cloud of mist for the bow to form in, not only shrinking the moonbow’s breadth, but also terminating the show sooner, as the rising moon shifts the necessary 42 degree rainbow angle downward and eventually out of the mist. (Rainbows drop as the sun or moon rises—read more about the geometry of rainbows on my blog) But this year’s moonbow was plenty big enough to thrill everyone, providing about 40 minutes of quality photography between the time the sky was dark enough for the moonbow to appear, and when it dropped out of the mist.
Even with less water than usual, the moonbow was obvious to the unaided eye as a shimmering silver band. And the rainbow colors were clearly visible in our mirrorless viewfinders or live-view LCD screens, even before a picture was captured.
The diminished flow in Yosemite Fall had one major advantage: at no point did we feel like we were photographing in a rainstorm. Every once in a while we’d get sprinkled with a small amount of mist, but I’ve photographed the moonbow from here when everyone had to don rain gear, and even a single 5-second exposure—that started with a dry lens—would finish with the front lens element completely misted over. When it gets like this, the only way to do it is with an umbrella in one hand and a towel in the other.
There were quite a few people the bridge this evening, but I’ve seen far more here. We’d become a little scattered on the walk up to the fall, so it took me a little while in the darkness to ensure everyone in my group had found a suitable spot to set up. Once I was confident my group was positioned satisfactorily, I tried to get around to everyone to make sure they were doing okay.
Exposure for the moonbow is pretty easy, and I’d given them settings to use before we started. Composition is a little tougher given the limited light, but I’d very strongly encouraged everyone to put their lens at its widest focal length and leave it there—this simplifies things, and today’s digital cameras have more than enough resolution to allow ample cropping later.
Not only does shooting wide streamline composition in the dark, it simplifies the most challenging aspect of night photography: focus. Since changing focal length requires refocusing, and finding focus in the dark is not easy, once you’ve achieved sharpness you don’t want to do it again. Most of my time this evening was spent moving around between the members of my group, helping them get focused, or checking their focus to make sure it was good. I started with Kent, but eventually made it around to nearly everyone (and even helped one or two people who weren’t in my group).
Eventually I found a few minutes for some frames of my own, squeezing in between a member of my group and another person who was okay with me and my tripod up in his space (I checked). I take both horizontal and vertical versions of virtually every scene I photograph, but I always photograph the moonbow vertically because I just haven’t found a horizontal composition that pleases me. For starters, I want to include as much sky as possible, and I think Yosemite Creek churning through granite boulders is a far more interesting than the trees on the left and right. This evening, I used my 14mm prime lens, enabling me to include a lot of starry sky above the fall (including 5/7 of the Big Dipper), while still getting plenty of moonlit creek and granite beneath it.
You can tell that I captured this toward the of the moonbow window by how low the moonbow is. When we arrived, it hovered above the visible mist, just below the top of the lower section (where the fall starts to spread). So even though my moonbow is not quite as broad as the earlier ones, it is brighter, thanks to all that water.
I should probably add a few words about my exposure. I started doing moonlight photography about 20 years ago, and established my full moonlight exposure values very early on. Back then, then ISO 400 was about as high as I could go without noticeable noise; since my fastest lens at the beginning of my digital years was f/4, so my exposure settings were usually in the ballpark of ISO 400, f/4, 30 seconds.
The problem with 30 seconds is you get a little star movement—not a deal-breaker, but enough to be visible if you look closely. So as sensor technology improved, and I acquired faster lenses, my ISOs went up and my shutter speeds dropped, while my exposure values (amount of light captured) remained constant. For this one, I used f/1.8, ISO 1600, and 5 seconds.
With limited time, and even more limited ability to move around, I still managed to get a handful of frames this night. But that was fine because my photography is never the priority in a workshop (and I certainly don’t lack for moonbow images from past years). Even though this year’s version may not be my best moonbow shot ever, I’m still pretty pleased with my results.
In the image review the next day, I invited everyone to share a moonbow image in addition to their review image—it was wonderful to see that everyone had a success! That includes Kent, who had to leave the workshop early, but who reported to me that his moonbow image is beautiful and he’ll no longer need to repeat the course.
Workshop Schedule || Purchase Prints || Instagram
Yosemite Falls, Day and Night


More Than a Pretty Picture
Posted on April 26, 2026
Morning Light, Half Dome and Merced River, Yosemite
Sony a7R V
Sony 24-105 G
1/25 seconds
F/11
ISO 100
Before exploring for the scene that ultimately delivered the image in my prior blog post, I got my February group set up at what I’ve always felt was the primary view at this location. With Half Dome framed on the left by towering evergreens, on the right by a long diagonal ridge, and the tree-lined Merced River in the foreground, this spot has all the landscape ingredients a beautiful image needs. Stir in fresh snow, translucent clouds, and warm sunlight, and the beauty is ratcheted off the charts.
I interrupt this photo blog to share a little about what’s been disrupting my life this week: a “minor” home remodel. In the grand scheme of things you can do to improve a house, upgrading kitchen cabinets (completely new exteriors, all new drawers, pull-out shelves) is no big deal. But anything that requires my wife and me to completely pack up the kitchen and basically camp out in our living room at least feels quite major.
Before the installers even started, our preparation included emptying the original cabinets into boxes, relocating our refrigerator to the dining room, removing the above-range microwave, and expanding the dining room table enough to host our kitchen essentials—convection oven, microwave, espresso machine, and Vitamix—while somehow leaving just enough remaining space for meal prep and dining for two.
Suddenly, our entire downstairs was a an obstacle course of boxes and countertop items (who knew a relatively small kitchen could hold so much?). My wife and I both work from home, but while I could retreat to my upstairs office, her workspace was downstairs amidst the mayhem. To get any work done amidst the din of power saws and sanders, each of us had to resort to noise-cancelling headphones at multiple points.
I’m happy to report that the just-completed cabinets exceed our lofty expectations, and the cars are back in the garage where they belong. On the other hand, at least half of our stuff is still in boxes as we meticulously unpack and reorganize our “new” kitchen.
Since every hardship is a learning opportunity, here are the things this experience taught us to never take for granted again: a kitchen sink, a dishwasher, parking inside, on-demand filtered water straight from the fridge, and not having to rummage through boxes to find that thing we never imagined we should leave out (cheese grater, coffee filters, 1/4 measuring cup, and on, and on…).
Next up? Hmmm, this 20-year old interior paint is starting to look a little dated…
So, anyway…
Finding the confluence of all these landscape and atmospheric elements is the stuff landscape photographers dream of. But I think far too many, when gifted this opportunity, simply settle for capturing the beautiful scene. (Not that there’s anything wrong with that.) In so doing, they miss an opportunity to elevate their images something extraordinary.
I see examples of this kind of settling everywhere. Whether it’s social media, hotel room “art,” screensavers, calendars, postcards, or any other medium that displays beautiful landscape photography, I can’t help shaking my head at clearly beautiful scenes that could have made much better images had the photographer taken a few simple steps.
It seems almost as if they said, “Wow, this is so beautiful, all I have to do is click my shutter before it goes away.” And if your only goal is to save the moment, read no further. But to my mind, the more beautiful a scene, the more important it is to squeeze every ounce of beauty from it. I could probably go on for hours on this topic, but I’ll try to distill my thoughts down to a few basic points.
Foremost is the need to be aware of the way the viewer’s eye moves through the frame. When I decide a scene is worth photographing, I start by identifying what I want the image to be about—a spectacular view, a specific subject, a collection of subjects, beautiful light, and so on (or some combination of these)—then identify the best way to guide my viewers’ eyes there.
With the “about” decided, I survey the scene to identify elements that possess “visual weight”—objects or features that pull the eye like gravity pulls celestial objects. Qualities that give an object visual weight include size, brightness, contrast, color, position in the scene, or any other characteristic that makes something stand out from its surroundings.
The value (in an image) of an object possessing visual weight isn’t necessarily a function of the object’s aesthetic appeal. A very ordinary feature in the right position qualifies as a desirable VW feature when it serves a scene’s most striking element, either by creating a balance point, by completing a virtual line that connects to the primary subject or other VW object, or through some combination of these. On the other hand, a beautiful but poorly positioned feature could actually work against the scene’s primary subject.
Undesirable objects with visual weight draw the eye away from the focal point of the image. I try to compose these out of the scene, or deemphasize them in the composition—for example, putting them in a less prominent location, burying them in the foreground of a silhouette, or deemphasizing them with soft focus. When none of those options are available, burning (darkening) the offending object in processing often works wonders.
Viewers subconsciously draw virtual lines connecting objects with visual weight. Desirable objects with visual weight can be “connected” virtually by creating appealing positional relationships. I’m especially drawn to diagonal connections between these objects, and look to create them whenever possible.
Another frequently overlooked aspect of “pretty scene” pictures that fall short of their potential is distracting elements that pull the eye from whatever the scene is supposed to be about. In addition to, and often even worse than, misplaced visual weight objects in the main part of the scene, is messy borders. Since the visual weight of objects seems to increase on the border of the frame (this is just a personal observation that feel pretty strongly about), I always strive for clean borders by avoiding cutting things off (most of it in the frame, but just a little piece missing), or having them jut in (most of an object outside the frame, with just a small piece visible).
But since we’re photographing the natural world, scenes usually don’t cooperate, often making it impossible to avoid objects cut off or jutting in at the edges of the frame. In that case, it’s most important to make cutting your border objects a conscious choice, rather than not checking at all and placing the border wherever it happens to fall while you concentrate on the main part of the scene. This border awareness includes clouds at the top of the frame, which I find to be an especially overlooked flaw that’s usually a pretty easy to fix—if you make the effort to look.
In the Half Dome image above, in a very general sense this was the first composition I saw when I arrived here. But not wanting to settle for the (undeniably) pretty scene, I went to work finding my about and visual weight objects and overall framing. Half Dome was the obvious “about” choice, but I also wanted to feature the snow and morning light in the clouds.
The first thing I noticed when I framed up something that featured these elements while composing wide enough to include the river too, was the log jutting in on the lower left. Eliminating it completely also eliminated the best part of the river, so I went with Plan B: composing wide enough to make the log one of my VW objects, taking it off the border and far enough into the scene to create a nice diagonal connection with Half Dome.
Including all of the rock (from which the log emerges) meant going much wider than I wanted to, and introduced other undesirable elements, like other workshop students (I know what you’re thinking: no, the students were not undesirable, I just didn’t want them in my frame). But I got enough of the rock so it didn’t appear to be an afterthought, making sure not cut off that small, horizontal patch of snow beneath the (unavoidable) snowy cap.
The right side of my frame was determined by a protruding branch that I didn’t want to include. With the left and right setting my focal length, I just had to aim my camera up and down until I found the right combination of foreground snow below, and translucent clouds above.
Assembly Required
Click any image to scroll through the gallery LARGE

")

, Yosemite")


")


Who’s Counting?
Posted on April 18, 2026
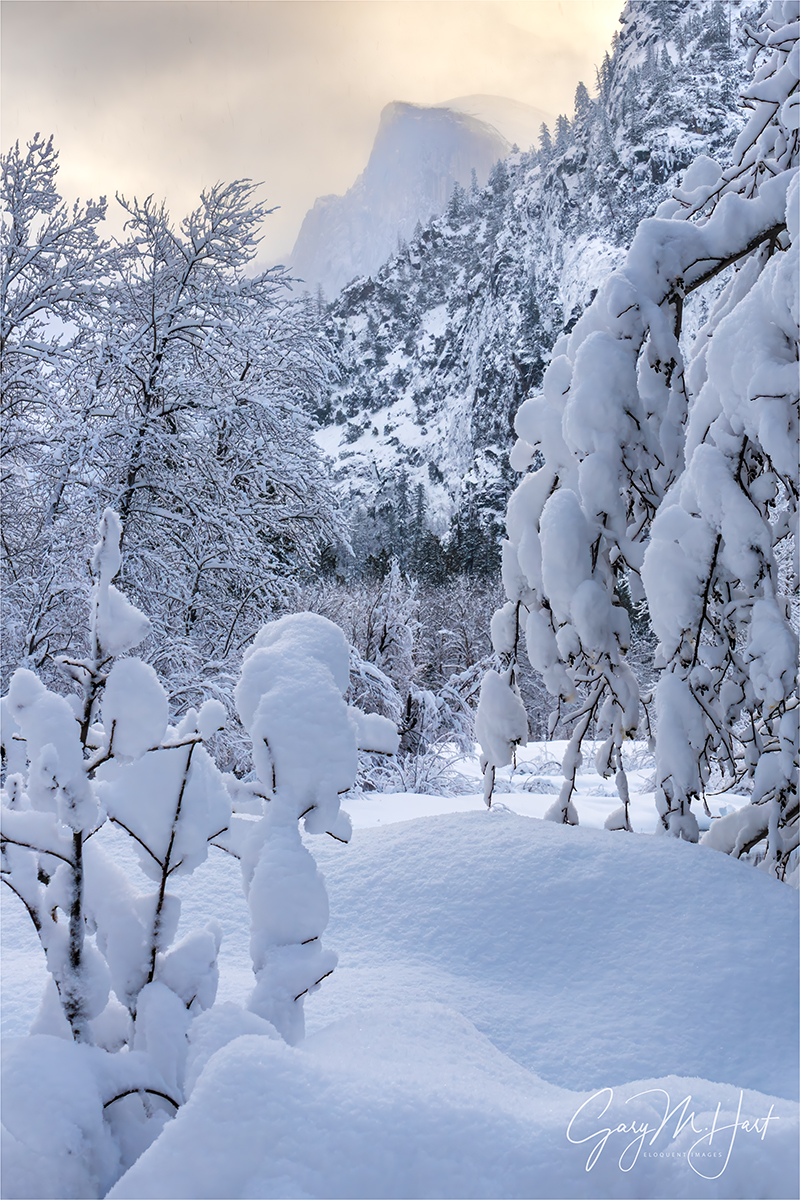
Winter Morning, Half Dome and Clouds, Yosemite
Sony a7R V
Sony 24-105 G
1/25 seconds
F/11
ISO 100
I get a lot of questions during a photo workshop, but about 80% of them are some version of, “Should I do it this way or that way?”:
- “Should I shoot this with a wide or telephoto lens?”
- “Should I shoot this horizontal or vertical?”
- “Should I include that rock or leave it out?”
- “Should I polarize this or not?”
- “Should I freeze or blur the waterfall?”
- “Should I…?”
Some photographers are so paralyzed by these choices, they choose to do nothing rather than make a “mistake.” They forget that, as with every other artistic endeavor, in photography there’s no universal right or wrong, no consensus on the best way to render a scene.
Other photographers are inhibited by the subconscious need to conserve resources at all costs. That need to conservative probably started way back in our childhood, when we were constantly warned not to waste: clean your plate, turn off the light when you leave the room, don’t leave the water running, and a host of other waste-related proclamations are a right of passage for American (and likely everywhere else) youth.
Adding to our formative-years’ “don’t waste” anxiety, when film shooters graduated to our first “grown-up” camera (one that didn’t involve a film cartridge and pop-on flash cube—I’m looking at you, Kodak 104), after being rendered destitute by our complex new equipment, we were suddenly punched in the wallet again (and again, and again…) by the perpetual expense of film and processing. It’s no wonder we grew accustomed to sparing every frame, an inclination that for most became ingrained.
Conserving resources is certainly important, but that parsimony shouldn’t come at the expense of your photographic success. In the immortal words of Michael Scott:
Still not convinced? Here’s a paradigm bending insight that might help: While every click with a film camera costs money (film and processing), every click with a digital camera increases the return on your investment. That’s right: each time you take a picture with your digital camera, your cost per click drops. So click freely and stop counting—there’s no limit to the number of pictures it takes to get to the one you’re hoping for.
I’m not suggesting that you put your camera in continuous shooting mode and fire away*. But I am encouraging you to shoot liberally, the more the better—albeit with a purpose. And there’s no law saying that purpose must be a successful image.
A shutter click can just be a way to get in the mood, or to determine whether there really is a shot there (I don’t always know whether a scene is worth shooting until I’ve clicked a couple of frames), or simply an experiment.
Following that mindset, I frequently play “what-if?” games with my camera: “What if I do this?” I’d be mortified if people saw some of these what-if? images, but I do usually learn something from even the worst of them. Often that learning is simply what not to do, because a failure is at least a way to understand why something didn’t work, and often leads to ideas for how it might work the next time.
Even when a scene is so beautiful that a successful picture feels inevitable, I always consider my first click a draft: rather than a completed masterpiece, my goal for the first few clicks of a scene is to establish a foundation that I can incrementally improve until I’m satisfied the finished product is as “perfect” as it can be.
When I’m not sure of the best way to handle a scene, I shoot it multiple ways, deferring the decision until I view the images on a large monitor. Not only using a variety of compositions, but a variety of depth, exposure, and motion effects as well.
And never settle for just one excellent image. When photographing a scene that truly thrills you, slow down and shoot it with as much variety as possible: horizontal/vertical, wide/tight, as well as multiple foregrounds, backgrounds, and framing—as many variations as you can come up with. I mean, you never know when a magazine might want to put a vertical version of that horizontal Half Dome in the snow image on their cover—even if it’s not obvious at first, most great horizontal scenes have great vertical scenes as well (and vice-versa).
Which brings me to today’s image of, not coincidentally, Half Dome in the snow.
This was the first morning of the workshop formerly known as “Yosemite Horsetail Fall.” Click the images below to read more (I’ll still be here when you get back):

Circling Yosemite Valley, we feasted our eyes on the new snow covering every exposed surface. My job was to find the best views to put with all that still pristine snow. Beauty surrounded us, but with filling the bowl of Yosemite Valley, views beyond 100 yards had disappeared.
Approaching Sentinel Bridge, I glimpsed Half Dome peeking through the clouds; my instant inclination was to pull into the Sentinel Bridge parking lot, but we found the lot covered with a foot of overnight snow still waiting for the day’s first snowplow. I was pretty sure my Outback could handle it, but I was less confident about the other two cars in our caravan. So I crossed my fingers that Half Dome would hang in a little longer and continued toward another favorite, and less known, view of Half Dome.
We found the parking at this next spot, about a mile beyond Yosemite Lodge, a little less problematic. The downside here was that getting to the view requires a (roughly) quarter mile “hike” on a flat and normally well-worn riverside trail. But of course that trail was now obscured by at least a foot of fresh powder. Since I was the only one who knew where we were going, it fell to me to blaze a new trail. Concerned about missing the window to photograph Half Dome before it disappeared again, I quickly grabbed my camera bag and headed through the forest as fast as the snow allowed, my group in tow.
At first the going was pretty manageable, but whenever we exited the evergreen canopy into a more open stretch, the powder doubled and I sunk in above my knees with each step. Normally when leading a group to a new spot, I need to take care not to walk too fast, lest those not familiar with the route lose track of me. But battling through the snow slowed me enough to allow everyone drafting behind me to keep up—and even if someone did fall a little behind, they’d have no problem following the path cut by the rest of us.
Needless to say, bundled for winter and hurrying as quickly as I could, I worked up a real sweat in that quarter mile. The rest of the group wasn’t far behind, and we shared the thrill of the workshop’s first peek at Half Dome, never a certainty in stormy weather. We photographed here for nearly an hour, watching Half Dome disappear and emerge from the clouds many times, creating new opportunities every minute, and also a constant reminder Half Dome could disappear for good any second.
To my eye, the obvious composition was horizontal, with a foreground that included the river (with a partial reflection) and lots of snow-draped trees and rocks. But after working on many versions of that scene, including some vertical versions, I went exploring to see what else I could find.
Less than 20 feet from my original spot, I found this view of Half Dome framed by snowy trees and the graceful curves of drifting snow. I tried many versions of this scene as well, both horizontal and vertical, before landing on this one that was a little tighter than most of the other frames I’d come up with.
In the dozens of photos I came away with are probably more clunkers than classics, but I don’t care. And honestly, this was one of those extra frames that I forced myself to shoot because the scene was too nice to quit, not because I saw something special—it wasn’t until I reviewed my images on my big monitor at home that I realized it was an image worth processing and sharing. (And I know there are probably more keepers in this morning’s folder, just waiting for me to uncover.)
Photography often requires instantaneous choices, and Nature doesn’t usually wait until you’re ready. Just because you’re not sure what you’ll end up with, or don’t have a pro photographer whispering guidance and reassurance in your ear, doesn’t mean you should stop shooting. Even if you don’t see any winners at the time, at the very least you’ll learn something—and who knows, you might just surprise yourself later.
* True story: I once had a woman in a workshop put her Nikon D4 in continuous shooting mode, hold the camera in front of her, depress the shutter button, and spin. When I asked her what in the world she was doing, she replied, “It’s Yosemite—there’s bound to be something good in there.”
Workshop Schedule || Purchase Prints || Instagram
Half Dome Views
Click any image to scroll through the gallery LARGE


, Yosemite")


Yosemite at its Best
Posted on April 5, 2026
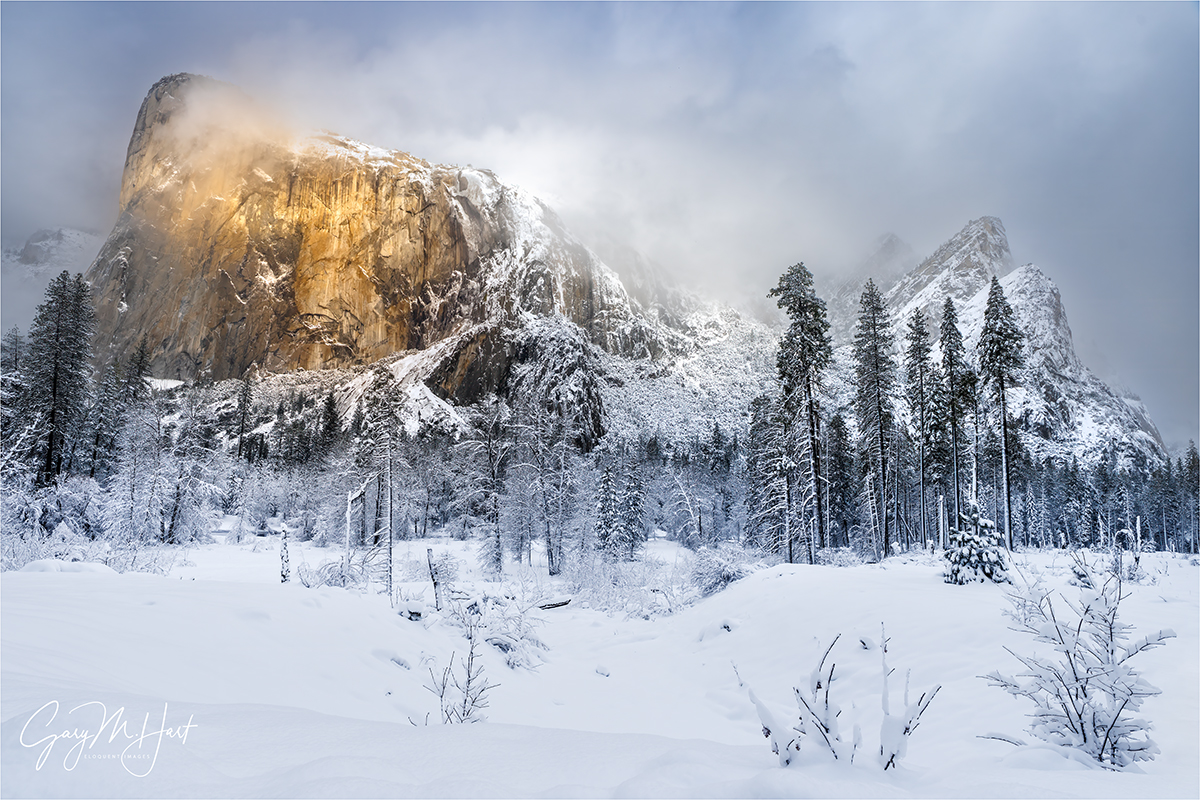
White Gold, El Capitan and the Three Brothers, Yosemite
Sony α1
Sony 16-35 GM II
1/100 second
F/10
ISO 100
If anyone had told me that my annual Yosemite Horsetail Fall photo workshop would get no opportunity to photograph the molten sunset light on El Capitan; that many of my go-to locations, including Tunnel View, would be inaccessible for the entire workshop; that Half Dome would be shrouded in clouds for all but a few hours; that the park would actually shut down the afternoon before our final day, I’d have started preparing to placate a lot of disappointed photographers. Instead, though all of that did in fact come true, this group got to see Yosemite at its absolute best.
Rather than the clear skies and sunset fire every Horsetail chaser prays for, the day before the workshop a series of cold winter storms descended on Yosemite, obscuring the sun and delivering more snow than I’ve ever had to deal with in 20 years of Yosemite photo workshops. In fact, I can’t think of any workshop at any location, including Iceland and New Zealand in winter, that had this much snow.
With all this white stuff came all the inconveniences you might imagine (and some you might not): challenging driving, difficult (to impossible) access to many photo sites, chilly photography conditions, wet clothes and gear, and vanishing Yosemite icons. Not only were some of my favorite views inaccessible, the views that were accessible aren’t much use when the featured monolith or waterfall isn’t visible.
Some of my workshops locations are so spread out, I don’t have a lot of location timing flexibility. But Yosemite Valley’s compactness enables me to change plans on the fly. I start each workshop with a mental list of must-see locations, plus a list of secondary and tertiary locations to augment the prime spots as schedule permits—exactly when we get to these locations depends on the conditions. But all this workshop’s snow really forced me to dig deep into my (lifetime’s worth) bag of location tricks.
One of my favorite locations to take my groups is a riverside view of El Capitan that has been unofficially, and affectionately, dubbed “Tahiti Beach.” Though no secret to photographers, being a little bit off the road with no obvious trail to the river makes Tahiti Beach relatively free of tourists. But if you’ve been in one of my Yosemite workshops, you’ve been here. Not just a great El Capitan view, it’s hands-down the best Yosemite Valley view of the Three Brothers. And if that’s not enough, Tahiti Beach’s proximity to an especially flat stretch of the Merced River means great reflections. (Continued below)
“Tahiti Beach”


Throughout Yosemite, the best Merced River reflections are possible when the spring snowmelt has subsided and the rushing Merced has slowed to a more leisurely pace—that’s usually from mid-summer through early the following spring. That’s the case at Tahiti Beach too, but if you’re especially lucky, you’ll find yourself here at peak spring runoff following a wet winter, usually sometime in May, when the river rises enough to leave its banks and flood the meadow and form a shallow, perfectly still reflective pool.
Tahiti Beach can be very nice in late afternoon light, but I’m especially fond of the morning’s first sun on El Capitan, and the opportunity to add a reflection makes this one of my favorite spots for that. In a normal Yosemite workshop, conditions are predictable enough that I can get my group to each of my prime locations in the best conditions, and Tahiti beach is often on the menu for our second morning.
This year, a look at the forecast was enough to know that the conventional location rules would be completely different for this workshop, and I emphasized in the orientation that we’d need to be quick on our feet to adjust to rapidly changing conditions. That reality became immediately clear from the instant we set out for our first shoot, and was further reinforced the following morning, when my plans were immediately thwarted by closed roads and low clouds at several of my first-choice locations.
Refusing to be defeated, we slowly circled the valley, waiting for the inevitable clearing. I eventually took everyone on a short but sweet hike to an off-the-beaten-path spot where we enjoyed a brief but beautiful view of Half Dome before the clouds lowered again. Leaving there in very limited visibility, my plan was to circle back to the Lower Yosemite Fall trail, hoping that we might be able to get close enough to the fall to photograph it through the low clouds. I was afraid that this driving and waiting for openings was frustrating my group, but took heart in their unbridled awe for the beauty surrounding us.
Most of Yosemite Valley is navigated via a pair one-way roads: eastbound Southside Drive for those entering the park; westbound Northside Drive for those exiting; and a mid-point crossover to shortcut the loop. As we navigated the crossover and headed back east on Southside Drive, I saw hints that El Capitan might soon emerge and made a quick decision to pull over at the parking area for Tahiti Beach. Tahiti Beach wasn’t part of my plan for this morning, but I knew there were no more good views of El Capitan beyond here.
I parked and exited my car, and told everyone to stay put while I surveyed the scene. Though access to Tahiti Beach isn’t treacherous, even in good conditions it can be a little problematic for people with mobility problems—fortunately, multiple routes down to the river that range from short-but-steep to long-but-gradual allow me to offer my group multiple choice. But this morning I also had to factor in all this fresh snow that meant whichever route we chose, we’d be blazing a new trail.
About the time I decided I probably could get everyone down to the river, El Capitan and the Three Brothers popped out of the clouds. Though this roadside parking area provides nice views of El Capitan and the Three Brothers, its foreground—a scrubby meadow filled with similarly scrubby shrubs and small trees—can’t compete with the reflections possible at the river. But the snow had erased all of the negatives, replacing it with an undulating carpet of pristine white. Since there was no telling how long the increasingly spectacular El Capitan and Three Brothers view would last, I made a snap decision to not attempt to get to the river and just shoot from here.
Within minutes a shaft of warm sunlight split the swirling clouds to spotlight El Capitan, and I knew I’d made the right call. That was further validated when the direct light disappeared for good within a few minutes. Fortunately, the clouds stayed open long enough for everyone to get a wonderful assortment of beautiful and truly unique images of two Yosemite icons.
This workshop was filled with stories like this: frustrating disappearances, surprise appearances, sudden adjustments to plans, and ubiquitous beauty. Through it all, my group responded with euphoric enthusiasm, ignoring minor discomfort and inconvenience. Despite ending a day early, we all came away with memory cards filled with one-of-a-kind Yosemite images—no small feat in one of the most photographed places on Earth.
Workshop Schedule || Purchase Prints || Instagram
The Many Faces of El Capitan
Click any image to scroll through the gallery LARGE


, Yosemite")


Too Much of a Good Thing
Posted on March 10, 2026

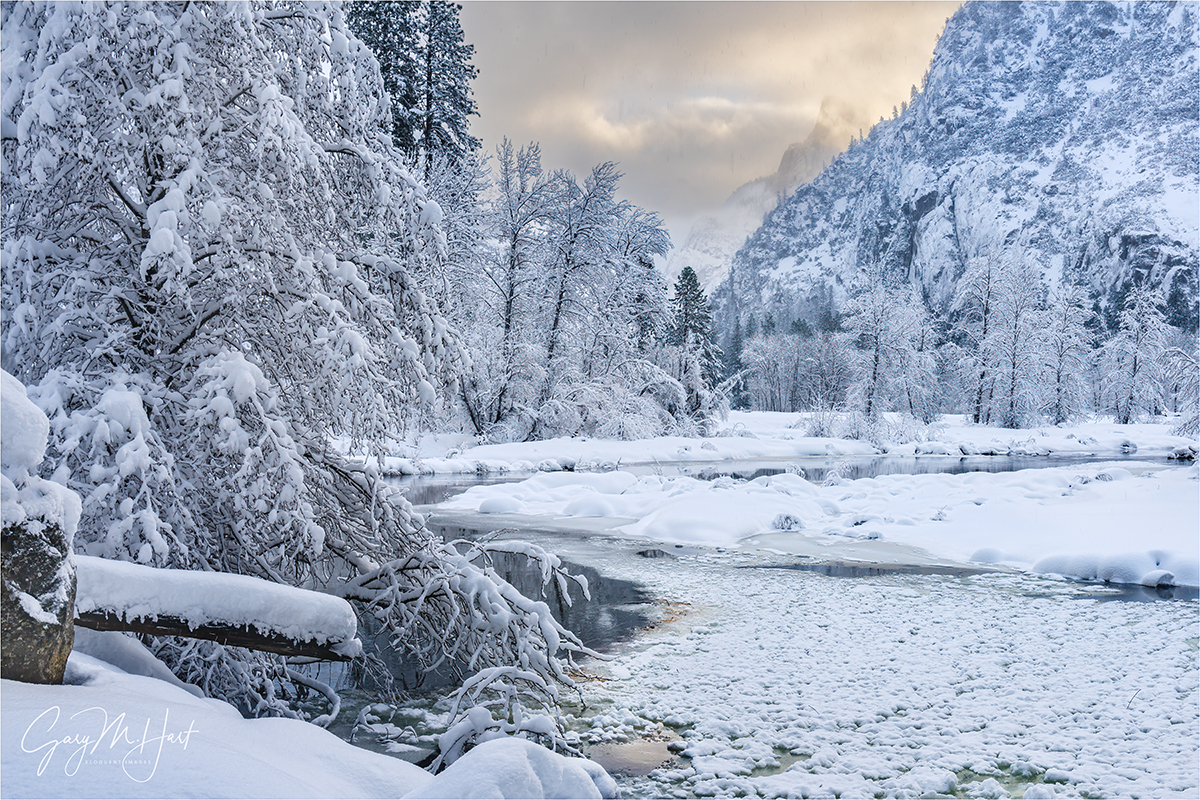
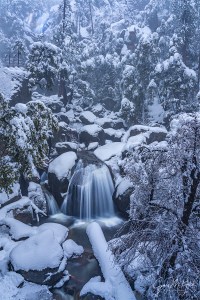
Snowfall, Upper Cascade Fall, Yosemite
Sony a7R V
Sony 24-105 G
2.5 seconds
F/11
ISO 100
Greetings from Iceland! And no, despite appearances to the contrary, this image is not Iceland (or even Snowland), it’s Yosemite. (Actually, if you know Iceland, the “not Iceland” giveaway would be all the trees.)
People ask me all the time, what’s the best season to be in Yosemite? While I honestly can’t pick a “best” Yosemite season, I can say that each season in Yosemite offers its own set of good things that distinguish it from the other seasons. Even my least favorite season—yes, I can give you a least favorite Yosemite season—has many good things that I feel fortunate to have witnessed.
My least favorite is easy: summer. Summer is when the crowds swarm every square inch of Yosemite Valley, the waterfalls and meadows dry up, and the sky is chronically blank. But summer is also the only time Yosemite’s high country—Tuolumne Meadows, Olmsted Point, Glacier Point, Sentinel Dome, Taft Point, and the breathtaking High Sierra backcountry—is easily accessible.
While spring is when the tourists start returning to the park after their winter hiatus, it has enough booming waterfalls, fresh green meadows, reflective vernal pools, and ubiquitous dogwood blooms to make the increasing crowds (more than) tolerable. Spring is the Yosemite of postcards and calendar pictures, and probably the best season for first-timers.
In autumn, the now depleted snowpack has completely dried, or at least slowed to a trickle, Yosemite’s heralded waterfalls. But that diminished flow means the low and slow Merced River splits the length of Yosemite Valley like a twisting, reflective ribbon. Adding to these reflections a surprising abundance and variety of fall reds and golds elevates autumn to my personal favorite Yosemite season for creative photography.
That brings me to Yosemite’s most variable of seasons: winter. Come to Yosemite during a dry winter and you’ll find lots of dirt, bare deciduous trees, dry meadows, and unimpressive to nonexistent waterfalls. On the other hand, with the exception of the last couple of weeks in February, Yosemite in winter is refreshingly serene—and even late February’s Horsetail Fall mayhem doesn’t compare to the summer swarms. And even at its worst, winter reflections are quite nice, and it’s still Yosemite (El Capitan, Half Dome, et al haven’t gone anywhere), so I’ll take even the driest Yosemite winter without people over the nicest summer day.
But a Yosemite winter at its best is a sight to behold. Winter is Yosemite’s wet season, making it the best season for capturing a clearing storm. Most of the precipitation in Yosemite Valley falls as rain, but if you’re fortunate enough for your Yosemite visit to coincide with a cold storm that smothers Yosemite Valley in white, you’ll see it at its hands-down most beautiful. And while you may find yourself sharing this beauty with other ecstatic photographers, even the slightest threat of inclement weather seems to repel virtually all tourists.
Falling snow does introduce a host of difficulties that include: limited to impossible access to certain locations, treacherous driving, the potential for chain requirements (usually limited to vehicles without 4WD/AWD), and clouds temporarily shrouding Yosemite’s soaring monoliths and waterfalls. Not to mention the difficulties inherent to photographing in snowy conditions. But if you can overcome these hardships, the payoff is worth it.
The thing is, to witness Yosemite’s fresh-snow majesty, you need to be present among the falling flakes, no matter how cold the temperature or poor the photography. That’s because swirling clouds of a clearing storm vanish so quickly, and the trees start shedding their white coats almost the instant the sun comes out—if you wait until you hear it snowed in Yosemite Valley before rushing to the park, you’re too late. In fact, even if you’re actually present in the park and simply retreat to the shelter of your hotel room or a valley restaurant until the clearing starts, you risk missing some or all of the best stuff.
Living less than four hours from Yosemite Valley, monitoring the Yosemite forecast gives me enough advance notice to get to the park while the snow is still falling. In other words, it’s not by accident that my galleries are filled with so many Yosemite snow images.
But sometimes I just get lucky. Scheduling workshops a year or more in advance means no clue what the conditions will be—the best I can do is try to maximize the chances for something. Horsetail Fall happens in mid to late February, but all the tumblers clicking into place is never guaranteed. Similarly, while I know February is one of the most likely months for snow in Yosemite Valley, no snow is always more likely—but that doesn’t keep me from wishing. (As much as I hope for ideal Horsetail Fall conditions for my workshop—lots of water in the fall and unobstructed sunlight at sunset—I’ll take snow any day.)
This year’s Yosemite Horsetail Fall workshop, which wrapped up just a week before I departed for Iceland, fulfilled those snow dreams many times over. How much snow did we get? Look at the picture above, and consider that it came on our first day, at our second photo location, and that at least two more feet above what you see here fell before the workshop finished.
The compactness of Yosemite Valley, combined with lifetime of Yosemite visits, enables me to adjust my plans on the fly in rapidly changing conditions. On that first afternoon, with a moderate snow falling in the valley I expected poor visibility, so my original plan was to start at Bridalveil Creek, where we could photograph nearby scenes. But when I saw that Bridalveil Fall and El Capitan were still visible despite the falling snow, I headed straight to Valley View.
We enjoyed about 30 minutes of quality photography there before the ceiling dropped and erased everything more than a few hundred yards away. I quickly collected the troops and we beelined up Big Oak Flat Road to Upper Cascade Fall, which I was confident would provide the best combination of photogenic scene that was close enough to still be visible.
I was actually a little surprised to find the top segment of this multitiered waterfall (upper left corner of the image) slightly obscured by the falling snow—fortunately it was visible enough to still be worth photographing. Our biggest challenge turned out to be a strong breeze blowing snow straight down the mountainside and directly onto the front element of any lens trained on the scene.
Normally I shield my camera with an umbrella in rain and snow, but the wind made using an umbrella problematic, so I switched to Plan B and pulled out the large microfiber cloth that lives in my camera bag. While composing, metering, and focusing, I just ignored the snowflakes accumulating on the front of my lens. When everything was ready, I wiped the lens clean, then draped the cloth over it while waiting for my 2-second timer to count down (have I mentioned lately how much I hate Sony’s cable and Bluetooth remotes?), whipping the cloth away at the latest possible instant before the shutter clicked. I continued this way through a series of compositions, until I was confident I’d captured something worthy of processing.
Turns out, this was just the first of many spectacular shoots my group enjoyed. As the workshop continued and we handled every single discomfort and inconvenience the storms served up, all while watching the photography just keep getting better and better, I became more and more convinced that there was no such thing as too much snow in Yosemite, and just kept hoping for more. And more, and more, and more…
On the afternoon before our final day, just as I started believing nothing could go wrong, the National Park Service said, “That’s enough,” and closed the park. I was stunned, and for some reason recalled the time my college baseball team, while on a roadtrip to a distant city, was gorging at an “all you can eat” buffet—until the manager came out and informed us, “That’s all you can eat.”
Even though we were shut out of the park for the workshop’s final day, we still gathered for one last image review on that final day. Based on the images shared, and the excitement everyone had with all of their captures, no one was too disappointed. It was almost as if we all felt that, given what we’d seen so far, to expecting more might just be a little greedy.
I couldn’t agree more. And honestly, despite missing a day and not having access to every location, I have to say this turned out to be one of the most photographically successful workshops in my 20 years leading photo workshops.
Workshop Schedule || Purchase Prints || Instagram
Yosemite Snow
Click any image to scroll through the gallery LARGE


Hidden Treasures
Posted on January 8, 2026
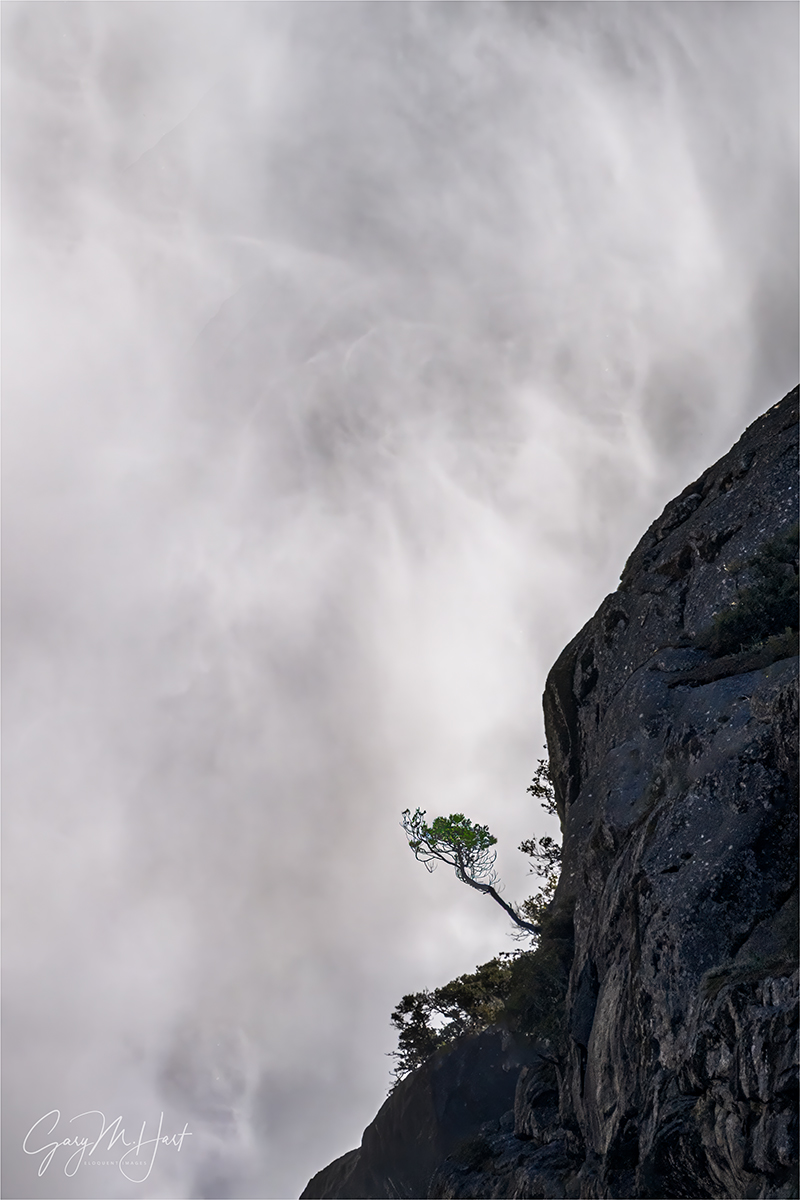
Clinging Tree, Upper Yosemite Fall, Yosemite
Sony a7R V
Sony 100-400 GM and 1.4X teleconverter (560mm)
ISO 800
f/11
1/1600 second
I’m aware that most of the images I share feature familiar subjects and eye-grabbing vistas that (justifiably) attract thousands of daily visitors and inspire millions of photographs—Nature’s celebrities. But that’s not a complete reflection of my personal photographic instincts. There are several reasons the subjects I share skew toward more acclaimed beauty: for example, the relatively close proximity of that beauty to my home in Northern California; and the obvious fact that I make my living leading photography workshops that I need to fill.
Though celebrated subjects are coveted by the vast majority of nature photographers, today I’d like to issue a shout-out to “ordinary” beauty that doesn’t jump out and grab the eye of everyone present (and doesn’t necessarily inspire people to sign up for workshops). I’m talking specifically about Nature’s hidden treasures that require the photographer to look closer and work harder to uncover. These little scenes may not garner the acclaim of their more spectacular counterparts, but I’ve come to realize that I’m never more content than I am when I photograph them.
Given Yosemite’s proximity, and the fact that I lead 4 to 6 Yosemite photo workshops each year, I probably spend more of my photography time there than anyplace else. But as the years click past, I find that I take my camera out in Yosemite far less than I once did—not because I find it less beautiful, or that I’ve tired of photographing it, but simply because it’s become harder and harder to find the unique scenes I covet. And of course when leading a workshop, my priority is never my own photography. I have to honor the fact that most of my workshop students want to photograph the beautiful Yosemite they’ve seen in pictures, not a leaf, or flower, or tree they could probably find at home.
That said, one of the points I emphasize to my students is trying to make the iconic shots that drew them their starting point, not their goal. So we spend a lot of time, both in the field and in the daily image reviews, on how to see and use the less obvious elements in a scene, with the goal of creating images that are uniquely their own. It’s a mindset that once established, starts becoming automatic.
To jumpstart that mindset, I have certain subtle features I point out at many of the locations I take my groups to—hidden treasures I’ve uncovered over the years that are potentially powerful but easily missed. One of my favorites is this little tree in front of Upper Yosemite Fall, only visible from a certain location on the trail to the bridge beneath Lower Yosemite Fall. It’s been on my radar for decades, though I rarely photograph it anymore. In fact, I hardly ever take my camera on my groups’ walks to Lower Yosemite Fall anymore. But in April of last year, with the fall booming and thin clouds diffusing the morning sunlight, I grabbed my camera bag with the sole purpose of shooting this tree again.
For me this is a telephoto shot, the longer the better. So on the walk back down from the bridge (where we photographed a rainbow at the base of Lower Yosemite Fall), I pulled out my 100-400 lens, added my 1.4X teleconverter, and went right to work. To avoid losing the tree against the dark, wet granite, the key here is waiting until the wind blows the water behind the tree. There was so much water on this spring morning that I rarely had to wait long.
I’m sure I clicked more than 50 frames, repositioning the tree from time to time in both horizontal and vertical orientation. Each time I recomposed, I shot at least a half dozen frames just to get different background water patterns—it’s amazing how much it changes from one second to the next. Pretty soon others in the group joined me, and it was fun watching them get excited about this anonymous little tree that’s so easily overlooked.
Of course the moral of this story is that there are hidden treasures like this everywhere, just waiting to be discovered—and hunting for them is half the fun.
Workshop Schedule || Purchase Prints || Instagram
Hidden Treasures
Click any image to scroll through the gallery LARGE (best viewed on a computer)


")


Let’s Get Vertical (Again)
Posted on November 16, 2025

New Day, Tunnel View, Yosemite
iPhone 17 Pro
(This seed of today’s blog is a post from many years ago—but the image and its story are brand new.)
What’s your orientation?
I’ve always questioned the reasoning behind labeling horizontally oriented images, “landscape,” and vertically oriented images, “portrait.” Despite my profession as a landscape (-only) photographer, nearly half of my images use “portrait” orientation. So it concerns me that this arbitrary naming bias might subconsciously encourage photographers to default to a horizontal orientation for their landscape images, even when a vertical orientation might be best.
The orientation of an image imparts implicit visual motion that’s independent of the eyes’ movement between an image’s visual elements. Photographers who understand that viewers’ eyes tend to move along the frame’s long side have an extra tool for guiding those eyes, and even to convey a mood.
For example, when orienting an image of a sunset on the coast, it’s easy to default without thinking to the same horizontal orientation that the distant horizon follows. And a waterfall image that’s oriented vertically certainly encourages the viewers’ eyes to move in the same direction as the water’s motion, so orienting the frame to match certainly seems reasonable. But, despite the natural instinct to match the frame’s orientation to the scene’s dominant flow, there is no absolute best way to orient an ocean, waterfall, or any other scene—there’s always a choice, and that choice matters. While matching the image’s orientation to the scene’s natural movement in this manner can instill a calmness to the image, a vertical ocean sunset, or horizontal waterfall, can create visual tension that can also be quite compelling.
Since I don’t need to convince most landscape photographers to take more horizontal pictures, I’m going to concentrate on the benefits of a vertical frame. One thing I especially like about orienting my landscape scenes vertically is the way it moves my viewer’s eyes through the scene from front to back, enhancing the illusion of depth that’s so important in a two-dimensional photo. And because of a vertical frame’s relative narrowness, a foreground element (that might get lost in a wider horizontal frame) instantly becomes the focal starting point that starts my viewer’s visual journey through the frame to whatever striking background I want to feature.
More than just guiding the eye through the frame, vertical orientation narrows the frame, enabling me to eliminate distractions or less compelling objects left and right of the scene’s prime subject(s). This makes vertical my preferred orientation when I want to emphasize an especially striking foreground from above (like Tunnel View), or a sky brimming with colorful clouds or a host of stars.
While a horizontally oriented scene is often the best way to convey the sweeping majesty of a broad landscape, I sometimes enjoy guiding my viewers’ eyes with vertical compositions of traditionally horizontal scenes. Tunnel View in Yosemite, where I think many photographers tend to compose too wide, is a great example. The scene to the left of El Capitan and the right of Cathedral Rocks just can’t compete with the El Capitan, Half Dome, Bridalveil Fall triumvirate, yet the world is full of Tunnel View images that shrink this trio to include (relatively) nondescript granite.
That’s why, when the foreground and sky aren’t particularly interesting, I often go for fairly tight horizontal compositions at Tunnel View. And while Tunnel View is among the most spectacular views on Earth, the foreground beneath the vista is usually quite bland, and overhead California’s chronic blue skies are frustratingly boring. So I’m afraid many of my Tunnel View images are horizontal, and rarely stray far left of El Capitan, or right of Cathedral Rocks.
Fortunately, there are exceptions. One of my favorite exceptions is those rare times when fresh snow smothers the evergreen valley floor. Another favorite is dramatic clouds, whether in the valley below or sky above. Faced with visual treats like this, vertical frames are wide enough to feature the foreground and/or sky without diluting the Tunnel View drama by including extraneous granite.
More specifically…
In Yosemite, one thing I never count on when there’s no weather in the forecast is a nice sunrise. That’s because Yosemite’s (default) blank skies, coupled with Tunnel View’s east-facing view, forces sunrise shooters to photograph fully shaded subjects (El Capitan, Half Dome, Cathedral Rocks, and Bridalveil Fall) against the brightest part of the sky. That’ why, without clouds, Tunnel View is much better late afternoon to sunset. For me, on a typical (empty sky) Yosemite morning, the real show is the first light on El Capitan, which arrives about 15 to 20 minutes after sunrise. On mornings with no clouds forecast, I usually start my groups with an El Capitan reflection of that first light—not only is this a reliably beautiful sight, everyone gets to sleep an hour longer (since going for the actual sunrise means being on location at least 30 minutes before sunrise instead of 20 minutes after).
But for whatever reason, and despite a promise of clear skies all morning (until a storm was forecast to start moving in that afternoon), I decided to hedge my bets on the final sunrise shoot of this month’s Yosemite Autumn Moon photo workshop. Normally we spend this final morning at Bridalveil Creek, arriving as soon as it’s light enough to start shooting in the dense shade there. Instead, I got everyone out about 30 minutes earlier and headed straight to Tunnel View. While this wouldn’t be early enough to shoot sunrise from start to finish, it would get us there in time for the best color in the remote chance the clouds arrived earlier than forecast. And that’s exactly what happened.
We were pulling in just as the cirrus precursors to the evening rain started lighting up. Since my group had already been up here twice, everyone was out of the cars and grabbing their gear before my seatbelt was off. Half the group beelined to the standard view with my brother (who was assisting me in this workshop), while the rest joined me on a granite ledge above the TV parking lot (a similar view, but with fewer people—also a little more physically challenging, and not the favorite spot of anyone bothered by heights).
As beautiful as the sky was, since I rarely photograph at Tunnel View anymore, my camera stayed in the car and I was content to just enjoy the show. Or so I believed. But as I stood there watching the color keep getting better and better, I started to second guess my decision to forego my camera. I knew I could be down to my car any back in less than 5 minutes, but the color was changing so rapidly, I also knew that would mean missing the best stuff. So I whipped out my iPhone 17 Pro, put it into RAW mode, and quickly framed up the scene.
With the great sky and bland foreground, I didn’t consider anything but vertical compositions. At first I went wide enough to include Bridalveil Fall, and though it was flowing nicely for autumn, it really wasn’t impressive enough to justify going that wide. So I quickly tightened my framing to include only El Capitan and Half Dome, putting in only the minimum amount of foreground so I could maximize the spectacular sky. I’d love to tell you what focal length, f-stop, and shutter speed I used, but my iPhone made all those decisions for me, and clearly did a pretty great job. What a time to be alive!
A few thoughts on iPhone image quality
Okay, seriously, as great as the iPhone (or any other current smartphone) camera is, let me remind you that smartphone image quality is nowhere near the quality of today’s full frame sensors and lenses. And I actually got a firsthand reminder of this fact while processing this image. Though I was truly blown away by the detail my iPhone captured, on the day I processed today’s image, I also prepared three large prints that had been ordered by an interior designer for the home of one of her customers. Though two of these images were captured more than 15 years ago with my Canon 1DS III (21 megapixels); the other was about 10 years old, from my Sony a7R II (42 megapixels), I was pretty confident the quality and detail this job required was all there.
-

- Stillness, South Tufa, Mono Lake
-

- First Light, Yosemite Valley
-

- Yosemite Sky, Tunnel View, Yosemite (2016)
And because maximizing this quality was the highest priority for her customer, she opted for custom prints rather than just going through my standard (much cheaper) SmugMug prints website (www.garyhartprints.com), where the images are pre-uploaded, medium resolution jpegs waiting for anyone to order (full disclosure: I’ve never had a single complaint about one of these prints). To prepare the images for printing, I returned to the original files and did extensive prep (using the latest processing technology) to ensure that the noise reduction, up-res, and sharpening got the most out of every single pixel.
I am absolutely certain I could print an iPhone image as large as these custom orders were (24×36) without apologizing. But getting up-close and personal with these three full-frame sensor prints at the same time I was processing an iPhone image, the detail captured left little doubt that, for anything much larger or more demanding than computer/web display, smartphone capture has a long way to go to catch “real” cameras. (But I’m still pretty thrilled to know that I can get useable quality any time Nature catches me without my real camera.)
Join me in Yosemite
Workshop Schedule || Purchase Prints || Instagram
Let’s Get Vertical
Click any image to scroll through the gallery LARGE
, Yosemite")


Super? Moon
Posted on November 8, 2025
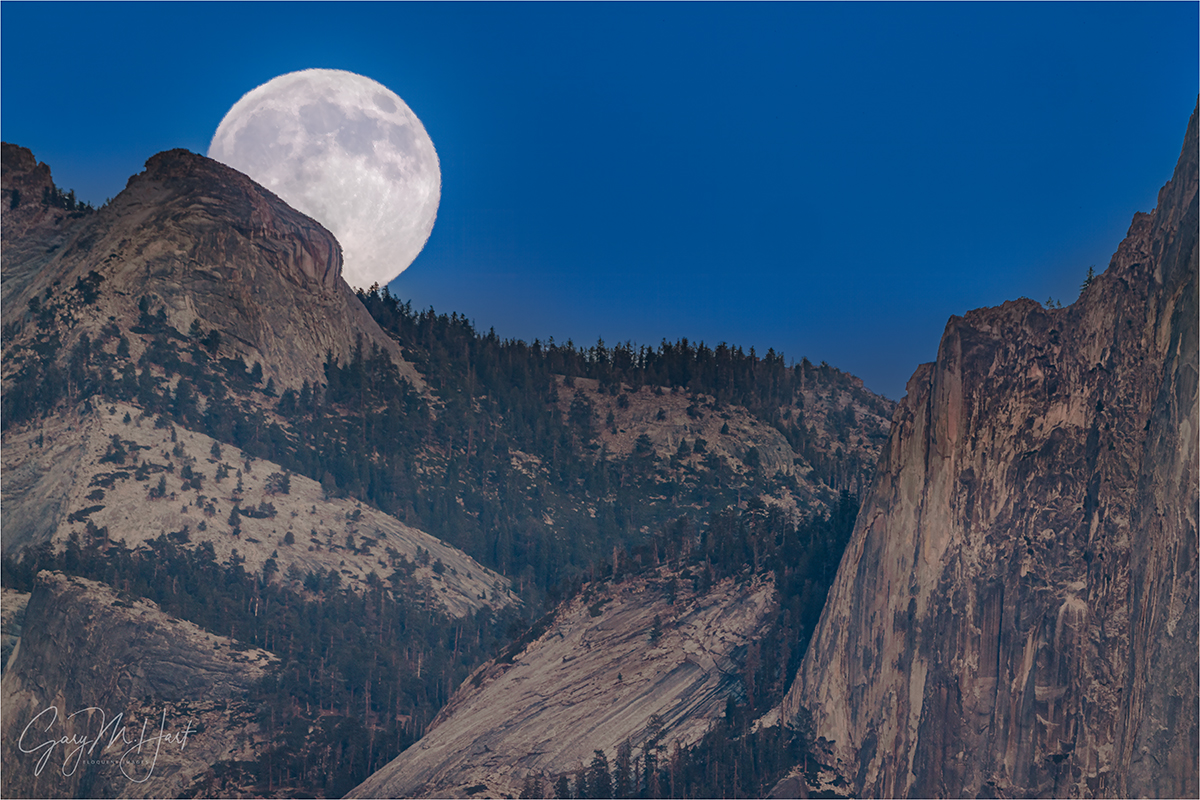
November Moon, Half Dome from Tunnel View, Yosemite
Sony a7R V
Sony 200-600 G
Sony 1.4x teleconverter
ISO 200
f/9
1/80 second
This week’s full moon was a “supermoon”—or, as the media frequently proclaimed, “The biggest moon of 2025!” And while that is technically true, the size difference between a super and average moon is barely perceptible.
So, as a public service, I’ve dusted off and updated a prior article explaining the supermoon phenomenon (any hyperbole)—and what better time to share it than just days after photographing the November supermoon?
What’s the big deal?
So what exactly is so “super” about a “supermoon?” Answer: Not much. Or, maybe a better way to answer the question would be: When presented with a random series of full moon images, would you in fact be able to identify the supermoon? Doubtful. So why the media frenzy? And why do we see so many huge moon images every time there’s a supermoon? So many questions….
Celestial choreography: Supermoon explained
To understand what a supermoon is, you first have to understand that all orbiting celestial bodies travel in an ellipse, not a circle. That’s because, for two (or more) objects to have the gravitational relationship an orbit requires, each must have mass. And if they have mass, each has a gravitational influence on the other. Without getting too deep into the gravitational weeds, let’s just say that the mutual influence the earth and moon have on each other causes the moon’s orbit to deviate ever so slightly from the circle it seems to be (without precise measurement): an ellipse. And because its orbit isn’t round, as the moon circles Earth, its distance varies with the position in its orbit.
An orbiting object’s closest approach to the center of its ellipse (and the object it orbits) is at perigee; its greatest distance from the ellipse’s center is apogee. And the time it takes an object to complete one revolution of its orbit is its period. For example, earth’s orbital period around the sun is one year (365.25-ish days), while the period of our moon’s orbit is slightly more than 27 days.
But if the moon reaches perigee every 27 days, why don’t we have a supermoon every month? That’s because we’ve also added “syzygy” to the supermoon definition. In addition to being a great Scrabble word, syzygy (though it would cost you 2 blank tiles) is the alignment of celestial bodies—in this case it’s the alignment of the sun, moon, and earth (not necessarily in that order). Not only does a supermoon need to be at perigee, it must also be syzygy.
Syzygy happens twice each month, once when the moon is new (moon between the sun and Earth), and again when it’s full (Earth between the sun and moon). While technically a supermoon can also be a new moon, the full moon that gets all the press because a new moon is lost in the sun’s brightness and never visible, so no one cares. Since Earth circles the sun while the moon revolves around Earth, to achieve syzygy, with each orbit the moon has to travel a couple extra days to catch up. That’s why the moon reaches perigee evey 27 days, but syzygy comes every 29.5 days—the moon’s distance from earth is different with each syzygy because it comes at different points in the orbit.
The view from earth: Supermoon observed
While lunar perigee, apogee, and period are precise terms that can be measured to the microsecond, a supermoon is a non-scientific, media-fueled phenomenon loosely defined as a moon that happens to be at or near perigee when it’s full. To you, the viewer, a full moon at perigee (the largest possible supermoon) will appear about 14% larger and 30% brighter than a full moon at the average distance. The rather arbitrary consensus definition of the distance that qualifies a moon as a supermoon is a full moon that is within 90 percent of its closest approach to earth.
I really doubt that the average viewer could look up at even the largest possible supermoon and be certain that it’s larger than an average moon. And all those mega-moon photos that confuse people into expecting a spectacular sight when there’s a supermoon? They’re either composites—a picture of a large moon inserted into a different scene—or long telephoto images. (I don’t do composites, but they’re a creative choice that I’m fine with others doing as long as they’re clearly identified as composites.)
For an image that’s not a composite, the moon’s size in the frame is almost entirely a function of the focal length used. I have no idea whether most of the moons in the full moon gallery below were super, average, or small.
Can you identify the supermoon?
, Yosemite")

Well, if you said the big moon is a supermoon, you’d be right. But it’s kind of a trick question, because these are both images of Tuesday’s supermoon. The size difference is entirely a function of the focal length I used: around 100 mm for the small moon, more than 800 mm for the large one. What these images also make clear is that what I gain in moon size, I lose in field of view—you can’t have both. So when you see a wide angle scene with a huge moon, don’t think supermoon, think composite: a big moon dropped into a wide scene. Or worse still: AI. (Yuck.)
Every full moon is super
As far as I’m concerned, a rising or setting full moon is one of the most beautiful things in nature. But because a full moon rises around sunset and sets around sunrise, when most people are eating dinner or sleeping, seeing it is often an accident—maybe the moon catches your eye as you walk out of the store, or you spot it in near the horizon when your car rounds a bend. But viewing a moonrise or moonset doesn’t need to be an accident. There’s loads of information available online that will tell you which night to look for a full moon, and the general time and direction to look. And for people like me, who try to photograph moonrises and moonsets around an alignment with a terrestrial feature, there is also slightly more technical info that enables more precise planning.
About this image
Which brings me to this week’s image (images), captured Tuesday evening from my very favorite location to view a moonrise: Tunnel View in Yosemite. Why is Tunnel View my favorite moonrise location? Because I can’t think of a better combination beautiful subjects and distant view (nearly 9 miles to Half Dome), that allows me to photography the moon large with with a long telephoto lens and include a striking foreground subject. And if I just want to use the moon to accent a broader scene, the wide angle view at Tunnel View is not too shabby either.
As with most of my moonrise images, this one had been on my radar for over a year. And like many of my moonrise opportunities, I scheduled a workshop so I could share it with other enthusiastic nature photographers. But, since I don’t care about supermoons, I had no idea this November full moon would be a supermoon—and as I grew tired of hearing in the preceding weeks, the largest full moon of 2025! (Yawn.)
The way this month’s full moon set up, I was able to get my group a couple of practice moonrises from other Yosemite locations leading up the Tuesday moonrise—one with a reflection of Half Dome, and another from Glacier Point. Not only did they lear exposure and processing techniques that allow the capture of lunar and landscape detail with a single click, they got beautiful (albeit wider, with a small moon) moon images. I also demonstrated in a training session how I plot the moonrise (without using celestial plotting apps like Photographer’s Ephemeris and Photo Pills).
There’s often drama surrounding an impending moonrise as I stress about forecasts that promise clouds, or a sky filled with more clouds than forecast. This year, despite the threat of rain the following day, the Tuesday evening forecast was clear skies. And true to expectations, the entire afternoon was cloud free.
I got my group up to Tunnel View about a half hour before the moon’s expected arrival, so we all had plenty of time to get set up and settled in. About half of the group joined me on a granite slab above the Tunnel View parking lot, with the rest of the group setting up with my brother Jay and the hoards of other photographers at the wall in front of the parking lot (the standard Tunnel View vista).
I had two tripods set up: one with my (big and sturdy) RRS TVC-24L, with my Sony a7R V and 1.4X teleconverter; one with my Sony a1 and 100-400. My plan was to switch between the two bodies, and to switch out the 200-600 for my 24-105 once the moon separated from the landscape. In other words, I’d be using the a1 with the 100-400 for the entire shoot, and the a7R V with the 200-600 (first) and 24-105 (after a few minutes).
As we waited, I reminded my group that the moon would appear just a little left of Half Dome at around 4:45 (about 15 minutes before sunset), plus/minus 5 minutes. I also told my group that, depending on their camera and metering skills, we’d be able to continue photographing up to 15 minutes after sunset before the foreground became too dark to capture both lunar and landscape detail with one click. The moon arrived right on schedule, right around 4:44 and we were in business….
So maybe the best thing to come of the recent supermoon hype is that it’s gotten people, cameras or not, to appreciate the beauty of a full moon. If you like what you see, mark your calendar for every full moon and make it a regular part of your life—you won’t be sorry.
Join me in a Yosemite workshop
Workshop Schedule || Purchase Prints || Instagram
Tunnel View Moonrise Collection (Super and Otherwise)
Click any image to scroll through the gallery LARGE


, Yosemite")


Navigating the Path to Exceptional
Posted on May 20, 2025
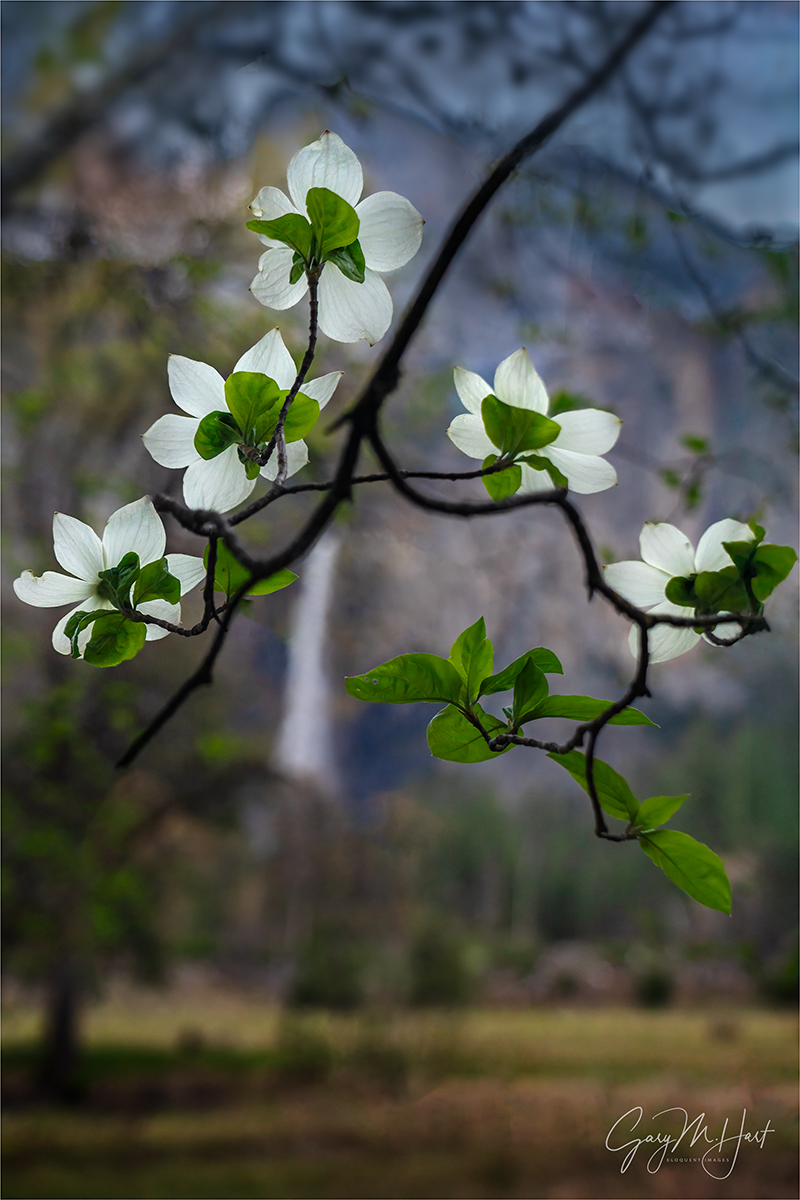
Bridalveil Fall and Dogwood, Valley View, Yosemite
Sony a7R V
Sony 24-105 f/4 G
ISO 800
f/4
1/250 second
Who doesn’t love being exceptional? Exceptional among your friends, or in your camera club, among your peers, or even in the world. Though I suspect the happiest photographers are simply content with being the best possible photographer they can be without measuring themselves against others, what fun is that?
Once upon a time, capturing exceptional images required little more than being at the most beautiful spots during the most spectacular conditions, and having a general sense for composition and metering. Today? Not so much. While there’s nothing wrong with chasing beautiful locations and conditions, these days when you work hard to get someplace special at just the right time, there’s a pretty good chance you won’t be the only one there. (But that doesn’t mean you should stop chasing beauty for beauty’s sake.)
In a world where pretty much everyone carries a camera 24/7, universal access to information makes “expert” guidance just a click away, and there’s virtually no such thing as a “secret” location, I’m afraid the “exceptional” bar just keeps rising. So, instead of settling for beautiful scenes in beautiful conditions (not that there’s anything wrong with that), how can we create images that truly stand out?
Laying the foundation
The key to capturing images that are more creative than cliché starts with understanding the vast difference between your camera’s view of the world and your own. Rather than forcing your camera to see the world as you do, lean into those differences and reveal the world in ways the eye can’t.
Fortunately, the biggest differences between camera and human vision have a corresponding exposure variable to manage them: for depth there’s aperture (f-stop); for motion we have shutter-speed; and ISO gives us control over light sensitivity. Even though you can get a perfect exposure with many combinations of these three exposure variables, there’s often only one combination where all the tumblers fall into place for the perfect combination of depth, motion, and light.
For example, photographing a crashing wave at the beach, (depending on the decisions I make with my exposure variables) the water in a perfectly exposed image could range from individual water droplets frozen in midair, to a homogenous froth of hazy white—or any degree of blur in between. Or, when I photograph a poppy that stands out in a field of wildflowers, my perfectly exposed image could range from every flower sharply defined, to only my subject-poppy sharp and the rest of the flowers some degree of soft—so soft, some are simply shapeless blobs of color.
One more factor to consider before making your depth of field choice, is the difference between humans’ naturally stereoscopic, 3-dimensional view of the world, and the camera’s single lens, 2-dimensional perspective. Even though our cameras can’t render our 3-dimensional world in their 2-dimensional medium, our perspective choices are essential to creating the illusion of depth that elevate an image.
Putting it all together
All of these factors should inform the decisions you make in the field. Instead of settling for the obvious, the path to “exceptional” requires conscious awareness of front-to-back relationships in your frame, and careful, deliberate exposure variable choices to manage the scene’s depth, motion, and light.
Which brings me to this image from last month’s Yosemite Waterfalls and Dogwood photo workshop. For good reason, Valley View (aka, Gates of the Valley for Yosemite purists) is almost certainly second only to Tunnel View on the list of most popular Yosemite photo spots. Which of course is somewhat problematic for those of us seeking to be exceptional.
Pulling into the parking lot here, before you’re even out of the car your eyes are slammed with a view of El Capitan, Cathedral Rocks, and Bridalveil Fall, with the Merced River in the very near foreground. And because the most obvious beauty is very first thing you see at Valley View, many photographers head straight down to the river to claim their version of this classic shot without first considering the other great options here.
For starters, there are three primary places to photograph Valley View: the first, and most obvious, is the view directly in front of the parking area that I just described; next, is the view slightly downstream where, instead of photographing across the river, you can photograph upstream and make El Capitan your prime subject with more foreground options; finally, there’s the view of Bridalveil Fall and its reflection, found just upstream from the parking area.
Each time I arrive at Valley View, I survey the conditions before deciding where to set up. Sometimes the whole scene is fantastic and I stay in front of the parking lot for my version of the shot that’s been taken a million times. But when El Capitan is getting the best light, I usually head strait downstream and try to build a foreground from the rocks, rapids, logs, and grass mounds. And when I want to feature Bridalveil Fall and Cathedral Rocks, I go (just a little) upstream for reflections and maybe a few protruding or submerged rocks. Regardless of my choice, I’m rarely more than 100 feet from my car, but my results are completely different.
Wherever I am, every time I compose a scene, I try to find a foreground that complements my background, or vice versa. At Valley View, my primary subject is almost always in the background (some combination of El Capitan, Cathedral Rocks, and Bridalveil Fall), so I’m usually trying to find a complementary foreground. Looking at the gallery below, you can see that sometimes I succeed, and sometimes I simply settle for a beautiful scene.
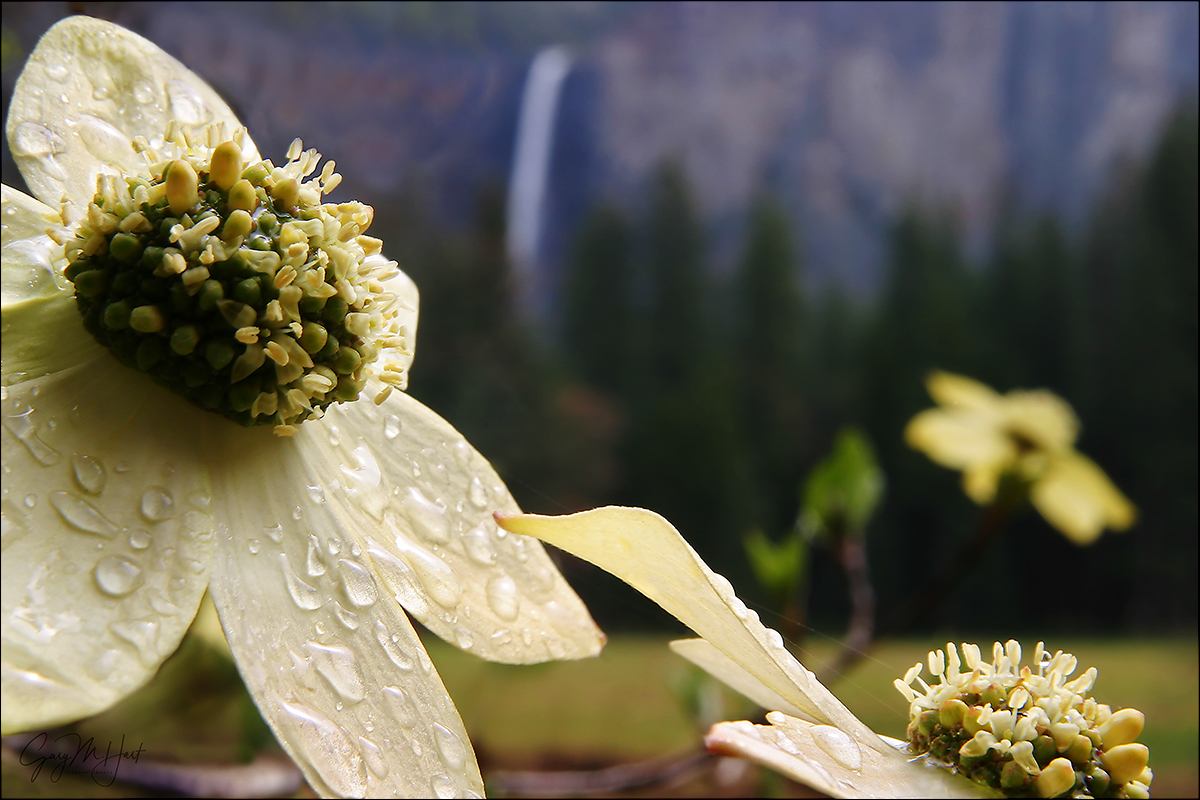
Bridalveil Dogwood, Yosemite
What sets today’s image apart in my mind is that my primary subject is in the foreground. I have the dogwood to thank for that. In fact, even though the results are entirely different, this is the very same tree I used for one of my oldest (and still favorite) images.
When I took my original Bridalveil Dogwood image, I visualized the concept (close dogwood subject, soft Yosemite icon background) on my drive to the park, then spent the day driving around until I found this scene.
Since then, that experience has made me very aware of the relationship between this dogwood tree and Bridalveil Fall, and I can’t help checking it out when the dogwood are in bloom. But, aside from the fact that I wasn’t interested in repeating myself, I couldn’t have duplicated that image even if I wanted to, because so much has changed in the last 20+ years.
First, the conditions were completely different. In the original scene, I benefited from clouds that provided softbox light, and a gentle rain and sprinkled water droplets everywhere. This time I was working with a mostly clear sky that, while less than ideal in many ways, made the backlit flowers (technically bracts, but I’m sticking with flower) and leaves light up as if illuminated from within.
The other significant difference was the tree itself, which had grown so much that my once clear line of sight from the flowers to Bridalveil was now clogged with branches, leaves, and other flowers. So instead of getting super-close to one flower, I identified an inverted v-shaped branch sporting a collection of backlit flowers.
Moving back, I shifted until Bridalveil Fall was framed by the flowers. Then I zoomed my 24-105 lens tight and open the aperture wide for maximum background softness. The flowers swaying in a slight breeze, I bumped my ISO to 800 to ensure a fast enough shutter speed. I took a half-dozen or so image, each with micro-adjustments to the composition, until I was satisfied.
Disclaimer
Is this picture “exceptional”? I have no idea. That really isn’t even my call. In fact, many of my images that feel exceptional to me barely register a reaction from others; then I’ll share an image that feels pretty ordinary to me, and people will rave about it. So who knows? But since chasing other people’s definition of exceptional can make you crazy, I just think I’ll call any image that makes me happy exceptional (in my own personal Universe) and leave it at that.
Lots of Yosemite Photo Workshops Here
Valley View: Variations on a Scene
Click any image to scroll through the gallery LARGE


, Yosemite")


