Eloquent Images by Gary Hart
Insight, information, and inspiration for the inquisitive nature photographer
The right stuff at the Grand Canyon

After Sunset, Point Imperial, Grand Canyon
Canon EOS-5D Mark III
47mm
8 seconds
F/16
ISO 100
I’ve been to the mountaintop
Personal growth should be a lifelong journey. But as a longtime tripod evangelist, I considered many truths carved in stone. Granted, like everyone else, my tripod use (and selection) evolved through my formative photography years. On my path to (perceived) enlightenment, I made the same mistakes most photographers make, mistakes like settling for the tripod I could afford rather than tripod I needed, which only meant spending more money than I would have when I eventually (inevitably) broke down and bought the tripod I needed. And there were those dark years when I believed that in most cases a hand-held shot was just as good as one captured on a tripod. But since my “the center post is more trouble than it’s worth” epiphany about ten years ago, I pretty much believed I knew it all where tripods were concerned.
But last month at the Grand Canyon, I realized that over the last couple of years, some of my tripod truths weren’t immutable as I’d imagined. This was underscored for me during a shoot at Point Imperial, the canyon’s highest vista, when I was able to use my Really Right Stuff tripod and live-view to get shots that wouldn’t have been possible a few years ago.
My (original) tripod commandments
For years my tripod sermon was delivered something like this:
- A tripod for every shot—no exceptions
- Sturdy trumps everything
- Forego the center post—it’s destabilizing, adds extra weight, and makes it impossible to drop your camera to the ground (without a shovel)
- Size does matter—you need a tripod that’s tall enough for you to see through your viewfinder without stooping (without extending the center post)
- Ball-head all the way for landscape shooters (no pan/tilt, no exceptions)
- An L-plate will change your life
Those are the basics; the other tripod variables—cheap vs. light (you can’t have both, no matter what the salesperson or marketing brochure says), three vs. four leg sections, leg-lock design, and collapsed length (for transport in a suitcase or camera bag)—come down to personal preference and budget.
And what’s the big deal about an L-plate?
And L-plate is an L-shaped plate (duh) that attaches at the bottom of your camera and wrapping 90 degrees up one side. It’s really just a two-sided quick-release plate—instead of the standard quick-release that only mounts to the bottom of your camera (forcing you to rotate the head 90 degrees to orient the camera vertically), to orient an L-plate-equiped body vertically, you pop the camera off the head, rotate the camera 90 degrees, and reattach it to the head using the plate’s other side, keeping the head upright (unchanged). Not only does this keep your camera at the same height regardless of its orientation, it’s just much more stable.
Lacking an L-plate, photographers whose tripod is tall enough when the camera is oriented horizontally are sometimes force to stoop or contort when they switch to vertical. Without realizing it, they often compensate for this awkwardness by simply avoiding vertical compositions. I know this because I was one of those photographers—when I switched to an L-plate, my percentage of vertical compositions increased markedly (I actually verified this using Lightroom filters to count the number of horizontal and vertical frames in my library), to the point where my vertical/horizontal images are about 50/50.
What’s your MTH?
By the time they’re serious enough to sign up for a photo workshop, most (but not all) photographers have a sturdy tripod. Still, things aren’t necessarily completely rosy. In addition to a deficient head—either a pan/tilt, or a ball head that’s not strong enough for the camera/lens it’s trying to support (both problems easily solved by going to reallyrightstuff.com and picking the head that best suits your needs, but that’s a discussion for a different day)—a too-short tripod is where I see most novice photographers struggle. Stooping, even just a few inches, may not seem like a big deal at first, but it gets old really fast.
Your minimum tripod height (MTH) is the shortest tripod you can use without stooping or raising the center post. Here are the steps for determining if a trip is tall enough for you:
1. Start with the tripod’s fully extended height (legs extended, center post down), easy to find in the manufacturer’s specifications 2. Add the height of your ball-head (if you have a pan/tilt you need a new head and will be doing this calculation all over again when you get it) 3. Add the distance from the base of your camera to the viewfinderThis gives you the tripod’s maximum usable height. Wait a minute, you say, that’s still not tall enough. To get your MTH, there’s one more step:
4. Subtract 4 inches from your height to account for the distance from the top of your head to your eyes.Old dog, new trick
But in the last year I’ve experienced a minor conversion, opening my mind enough to modify my rigid tripod height recommendations (I used to believe that a tripod that extended above my standing height was unnecessary weight and length)—not only should your tripod be tall enough to use while you stand upright, the ideal tripod is even taller than that, at least 4 inches taller than your viewing height when the legs are planted on flat ground. Extra tripod height allows me to comfortably stand on the uphill side of my camera when the tripod on uneven ground. (If you’re a landscape shooter, how often do you photograph on flat ground?)
Of no less significance is the way a tall tripod allows me to shoot over obstacles. In “ancient” times, photographers needed to to see through their viewfinder to compose and (sometimes) meter, but with the genesis of live-view came the ability to compose and meter without the eyepiece. So while a tall tripod has always been helpful for shooting on level ground, to me this ability to shoot over obstacles is the real game changer.
Going straight to the source
My conversion started with a pilgrimage to Really Right Stuff in San Luis Obispo, about a year-and-a-half ago. I was ready for a new tripod and wanted the best. I’d been quite happy with my Gitzo tripods, but they were purchased before RRS offered tripods—given my long-time experience with RRS heads and L-plates, and what I’d observed in my workshops, I thought I should see whether RRS tripods had supplanted Gitzo at the tripod summit.
RRS doesn’t actually have a retail store, but their beautiful new facility has a nice reception area with many products on display—you might even find the lobby empty when you walk in, but it won’t be long before a door from the back opens and you’ll be greeted by someone who knows more about tripods than you do. My expert was Erik—he spent close to an hour, first patiently demonstrating why the RRS tripods are the best tripods in the world (the comparison was to Gitzo, but his emphasis was on what makes RRS tripods great, rather than what makes Gitzo tripods bad, an approach I appreciated), and then helping me determine which model would best suit me.
I’d arrived with the RRS TVC 33 in mind, but on Erik’s suggestion ended up switching to the RRS TVC 24L Series 2, even though it has four leg sections (extra work extending and collapsing, but more compact when collapsed) and is quite a bit taller than I (believed I) needed. So tall, in fact, that I can almost (but not quite) use it by extending only three leg sections. I’m not going to go into all the reasons I love this tripod (but trust me, I do), but I will say that the extra 8 or so inches above my MTH (I’m about 5’9″) has enabled me to photograph in ways I wouldn’t have been able to do without it.
The paradigm shifting “revelations” I share here (extra-tall is important; Gitzo is no longer the Holy Grail of tripods) apply to photography, but one of the things I love about being forced to reconsider long-held “truths” is the reminder that the instant we believe we have all the answers is the instant we stop growing.
Case in point
All this (finally) brings me to the above image from Point Imperial on my recent Grand Canyon trip. Point Imperial is probably my favorite spot on the North Rim. The railed viewing area isn’t quite large enough for an entire workshop group to work comfortably, but there are enough spots nearby that nobody is disappointed. My favorite location here is on the rocks, just below the railed vista, that jut about 1,000 vertical feet above the canyon. There isn’t a lot of room out here either, and very little margin for error, so after guiding the brave photographers who aren’t afraid of heights out to the edge, I found an out of the way spot a few feet behind them.
It turned out this location was no less precarious than everyone else’s, but being behind the others and a couple of large rocks and shrubs made composing a challenge. Looking around, I decided the best view was on an uneven slope right on the edge, the closer the better. Yikes.
This is where I really appreciated the extra inches my tripod offers. Extending each leg fully, I pushed two legs right up to the edge, keeping myself a safe distance back. With the front (closest to the edge) legs’ planted, to elevate further and get the camera even nearer the edge, pushed the leg closest to me toward the cliff until the other two legs were nearly perpendicular to the ground (directly on the edge). Finally, I leveled the tripod with minor adjustments in the height and placement of the leg closest to me. Once the camera was positioned (about five inches above my eyes), I switched on live-view, composed, metered, and clicked.
As evidenced by the long shutter speed, it was fairly dark when I clicked the image above. Often the best light for photography is opposite the sun after sunset (or before sunrise). The smooth quality of this shadowless light, and the gradual deepening of the rich hues on the horizon, are often missed by the casual observer who is mesmerized by the view toward the setting or rising sun (not possible at Point Imperial at sunset), or unable to appreciate the camera’s ability to bring out more light than the eye can see. But then, you already knew that (right?)….
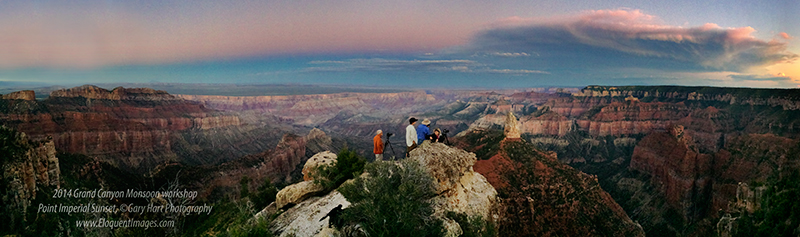
The view from just below the Point Imperial vista (iPhone panorama)
Extra credit
- Read The tripod difference (why I think every landscape shot should be on a tripod)
- Here’s Thom Hogan’s excellent article on buying a tripod
- Visit the Really Right Stuff website: in addition to the best camera support money can buy, there’s great information here

Of course I learned the hard way. Now, on my third, and hopefully final (for now) tripod from RRS, I have found tripod nirvana. Tall enough, with a little extra, when I want to plant it below me…she’s a keeper and I love her. My wallet is seriously depleted, but no more that all the $$$ I wasted on previous models. Nary a center post in sight. 😉
And that is exactly the case with my tripod story! It was through Gary’s “guidance” that I now have my ideal RRS setup- no more stooping and the L bracket has made landscape to portrait a non-issue.
I’m also drinking from that Koolaid! ‘ L’ brackets are the bomb.com!
Another great post, Gary. Not sure if you remember or not, but you (and Don Smith) years ago talked me into buying a new tripod and ball-head AND L bracket (RRS)!!! I’ve never been sorry and know my photography has certainly benefited. Also no center post period. Thanks for all the good advice you have past along throughout the years.
Thanks, Gail. And always happy to convert someone to my brand of tripodism. 🙂
Well, Gary, you’re going to love (or hate) this, but, last March, I wound up getting the TVC-24 and also purchased the Quick Collumn (they installed it for me, …thank goodnessd – took me three days and a phone call to RRS to learn how to take it off and put it on). The “reason” I got the TVC-24 and quick column was that I hate center columns too…but I am often asked by family to shoot the kids/grandkids/Uncle Buck and Cousin Ralph (My concocted names) and family group shots…- something I know you avoid like the plague (Bravo I say!).
So Annnnyway, I got it knowing that it was shorter than your TVC-24L (I had read your post back then I think). Finally, my final”reason” was kinda dumb but I was about to travel to Concord, CA to see our new granddaughter and have fun and I wanted a short tripod (like yours when folded up) to fit in my Think Tank Commuter bag….. I get paranoid about carrying all that stuff on board…Well the flight was a breeze – bag and tripod in the overhead (yea)…Grampa Denny was a happy camper…The cost difference between yours and mine is negligible and I DO miss having a taller stand as you describe. But I guess I just make do with the tools that I have but if I had to do it all over again – I DEFINITELY would have chosen yours…I rarely use the center column (hate the suckers) but I an see using it for certain things…but I keep it off as general rule. OK Sorry for this terribly long diatribe..But THANK YOU as always for your informative and entertaining posts.. Cheers – dj