Eloquent Images by Gary Hart
Insight, information, and inspiration for the inquisitive nature photographer
In a Fog
Posted on August 21, 2022

Morning Glory, Point Imperial Sunstar, Grand Canyon
Sony 𝛂1
Sony 24-105 G
.6 seconds
F/20
ISO 100
Born and raised in California, my relationship with fog is both long and complex. I spent the first 12 years of my life in the San Joaquin Valley, where winter “tule fog” could be so thick that sometimes drivers could only navigate by opening the door and hanging their head out to follow the yellow line. Accidents involving dozens of cars were common. In elementary school (we called it grammar school back then), my classmates and I celebrated the “fog days” when school was cancelled because the visibility was too poor for the school buses to safely navigate their routes. On the foggy days school wasn’t cancelled, a favorite recess activity was to venture far enough onto the playground for the school to disappear, spin a few times to erase all sense of direction, then try to find our way back to school before the bell rang. And at least once I actually got lost walking to school in a dense fog.
When we moved to Berkeley the summer before I started middle school (a.k.a., junior high), my relationship with fog changed. No longer a winter phenomenon, fog in Berkeley blew in through the Golden Gate on summer afternoons, turning a shorts and T-shirt lunchtime into a long pants and sweater dinnertime. Most summer days required multiple wardrobe changes.
Playing baseball at Skyline College (San Bruno) and San Francisco State University, I realized that Bay Area fog provided a true home field advantage. I have very vivid memories of sitting in the dugout or bullpen, toasty-warm in my insulated warm-up jacket, and watching our opponent, who had arrived dressed for the comfortable warmth of pretty much any other California location, huddled against the wind and fog in the visitors’ dugout—and, I suspect, contemplating rubbing bats together to start a fire (yes, all baseball bats used to be made of wood, even in college).
Photographing Yosemite in my adult years, I quickly grew to appreciate the fog that hovers on the floor Yosemite Valley on chilly, still mornings. And to many, the shape-shifting fog that wraps Yosemite Valley as a storm clears is the Holy Grail of Yosemite photography.
Though fog comes in many forms, it can be a simple matter of perspective: to the viewer at sea level, a missing mountain peak has been swallowed by clouds; the mountain climber on the summit, however, thinks she’s ascended into a fog bank. Both are right. And while many processes are at play, the bottom line is that fog (and clouds) will form when the temperature of moist air drops to its saturation point.
Despite (or maybe because of) my lifelong relationship with fog, I’m afraid I’ve taken it for granted. This fact became pretty clear one morning at the Grand Canyon earlier this month. On a trip where lightning was the undeniable goal, the most memorable shoot of the first workshop was a foggy sunrise at Point Imperial. To say this wasn’t on my radar would be an understatement.
At 8900 feet above sea level, Point Imperial is the highest vista in Grand Canyon National Park. This extreme elevation provides a top-of-the-world view to the north, east, and south to a who’s who of Northern Arizona landmarks: the Vermillion Cliffs, the Painted Desert, Marble Canyon, and the confluence of the Colorado and Little Colorado Rivers (you can’t see the rivers themselves, but you can see the intersection of their canyons). And as if weren’t enough, Point Imperial’s foreground landscape is dotted with an assortment of prominent mesas, buttes, and other rocky outcrops. My favorite view here is facing east and south, where a natural bowl filled with layered sedimentary prominences is anchored by nearby Mt. Hayden, a towering spire that dominates the view.
Sunrise was still more than 30 minutes away when I guided my first workshop group into the parking lot at Point Imperial. Below us, a few wisps of fog dotted the bowl, but offered no hint of what was in store. With several spots to set up here, in the darkness I was more focused on making sure my group was situated than I was on the scene, but when I looked back toward the view it was pretty clear that the fog was spreading and rising. With everyone in place, I raced back to the car and grabbed my camera bag.
For the next hour or more, we watched (and photographed!) the rocky features become islands in the clouds, submerge completely, then gradually reappear. A couple of times the fog rose enough to completely engulf us and erase the view. The first time this happened, the group was ready to pack up and return to the cabins with the morning’s (already thrilling) spoils, but remembering similar fog formation experiences in Yosemite, I suggested that there’s a good chance the fog will retreat as quickly as it advanced, and that we might be able to photograph everything we just witnessed, only in reverse. Sure enough, within five minutes the rocky island reemerged, and soon the entire view was back. And just when it looked like the show might be over, here came the fog again.
Because my group gets a little spread out at Point Imperial, I wasn’t able to take as many pictures as I otherwise would have, but here are three of the morning’s highlights I did manage to capture (with brief descriptions below).
One Foggy Morning at Point Imperial (July 28, 2022)


Before rising into a cloud layer that covered most of the sky, the sun slipped through a small opening on the horizon long enough to fringe the billowing fog with golden light just as I’d set up for a sunstar. And the sun wasn’t quite done. I’ve always been a fan of the way the rising sun illuminates Mt. Hayden and the surrounding rocks with warm light, but when I glanced in that direction, I saw no direct sunlight on the rocks. I did, much to my surprise, see a small fragment of rainbow that served as a perfect accent to the foggy scene in that direction. The third image came toward the end of the shoot, shortly after the final wave of fog had started to retreat. The rocky spire peaking through the fog in the foreground is Mt. Hayden.
Lots More Fog
Click an image for a closer look, and to view a slide show.


Thanking My Stars (and Moon, and Lightning, and Rainbows, and…)
Posted on August 18, 2019

Surprise Rainbow, Point Imperial, Grand Canyon
Sony a7RIII
Sony 24-105 f/4 G
1/4 second
F/8
ISO 100
So lately I’ve been thinking about the things I photograph and why I photograph them. Then the other day, after boarding a plane following my recent Grand Canyon monsoon trip, I squeezed into my seat and rummaged through my computer bag, loading the knee-jamming magazine holder on the seat-back in front of me with the two books I’m currently reading. One was “All About Lightning,” by Martin Uman (published in 1971 and revised in 1986); the other was “The Weather Machine: A Journey Inside the Forecast,” by Andrew Blum. On my AirPods was an astronomy podcast (“Orbital Path”). I have no illusions (anymore) of becoming an astronomer or a meteorologist, and the movie version these books is unlikely to be coming soon to a theater near you—no, I’m filling my mind with this stuff simply because it interests me. A lot.
I think everyone has those things that fascinate them so much that there’s no effort learning them. I have a history of finding something interesting and devouring every possible word on the subject. Some were passing obsessions (handwriting analysis, Lincoln head pennies, and—uhhhhh… The Monkees), and others have stuck with me (baseball, astronomy, geology, meteorology, and certain writers).
Which brings me back to the things I photograph, and the realization that we can probably tell a lot about most photographers’ relationship with the world by viewing their images. Anyone who checks the percentage of my images that have a weather or celestial component wouldn’t (or shouldn’t) be surprised by my in-flight entertainment, or to learn that for a few misspent college semesters I majored in astronomy, then geology (and have since kept them as hobbies, where they belong).
The longer I do this, the more I appreciate how lucky I am to actually make my living photographing only the things I love. Nearly 15 years ago I left a good career in the tech industry, naively planning to turn a photography passion into a profession. I can’t tell you how many people since then have told me that doesn’t work—fortunately, I didn’t hear them until it was too late.
For photographers, there’s a fine line between self-employed and unemployed, a line I didn’t fully appreciate when I made my decision to jump into it with both feet. Like millions of other photographers, all I wanted to make a living photographing the beautiful natural world I love so much—how hard could that be? But as many have learned (some sooner than others), not only is there very little market for landscape images, there seems to be pretty much infinite competition—competition that causes landscape photographers to sell digital images for pennies, and prints for little more than their cost. But somehow, for reasons I like to attribute to foresight but must acknowledge dash of shovel full of good luck as well, I’ve managed to make my living photographing only what I love.
Before leaving my tech job, I was doing art shows and making pretty decent money for a weekend’s work. But a weekend art show is so much more than just a weekend of effort, and after doing the math I realized that I’d need to be on the road at least 40 weeks per year to even have a chance to make ends meet through art shows. Gallery sales were a non-starter because the galleries just want too much of the small number of sales they generate, and the stock photography market was already on life support. Open my own gallery? That just sounded like an anchor that would prevent me from taking pictures.
So I started leading photo workshops, which were just starting to catch on and seemed ideally suited to my skillset. Not only was I intimately familiar with Yosemite and other California destinations that pretty much sell themselves, my background was in technical communications (tech writing, training, support), and I genuinely like people.
When I started offering workshop, I still did the art shows, but then came 2008 and the economic downturn. Despite a lot of hand wringing, my workshops continued filling, helped a lot by repeat customers who kept me afloat through the recession. And after one particularly unsuccessful weekend in San Francisco, I decided to drop the art shows altogether and focus on the workshops. I haven’t looked back.
Since making my mid-life career change, I’ve also managed to create a small niche as a writer, both through this blog (which pays nothing but has developed a pretty loyal following), and as a regular contributor to “Outdoor Photographer” and other photography publications (and which earns just slightly more than nothing). Not enough to live on, but at least enough to scratch my life-long writing itch.
So here I am, nearly 15 years into this ride and still going strong. I’m not getting rich, and least financially, but there are better measures of success than dollars. Whether alone or sharing with others, I still get as excited as anyone when the moon rises behind Half Dome, the Milky Way brightens above a New Zealand lake, or the setting sun paints a rainbow against a Grand Canyon sky.
About this image
After a day with a lot more rain than lightning, Don Smith and I took our Grand Canyon Monsoon photo workshop group up to Point Imperial for sunset. The vestiges of the storm still lingered as we set up, but there was no sign of the lightning that had been in the forecast, or even the rain that had drenched us for most of the day. Though lightning was on everyone’s mind, soft light in the canyon and the play of sunlight and clouds overhead kept everyone happy as we waited for sunset.
We’d been photographing for about a half hour when I noticed a tiny fragment of rainbow balanced atop the rim in the south. Not nearly prominent enough to be a prime subject, I nevertheless pointed it out to others and composed a few frames of my own before moving on to other opportunities in a view filled with them. Since there was no sign of rain, I only occasionally checked on the tiny rainbow, each time fully expecting it to have vanished, but each time noticed that it was hanging in there—not really any bigger, but still somewhere on the continuum from vivid to nearly-faded-to-oblivion.
Just a few minutes before sunset and with no rain visible, that little spot of color intensified and stretched skyward. Those of us with eyes on it alerted the rest of the group, sending everyone into a shooting frenzy that lasted until the light faded with the setting sun. I’ve photographed bigger rainbows, and (slightly) brighter rainbows, but only a few that have thrilled me as much as this one that seemed to come out of nowhere.
Grand Canyon Workshops
Personal Favorites: Moon, Stars, and Weather
Click an image for a closer look and to view a slide show.


The Shocking Truth About Lightning
Posted on April 7, 2019
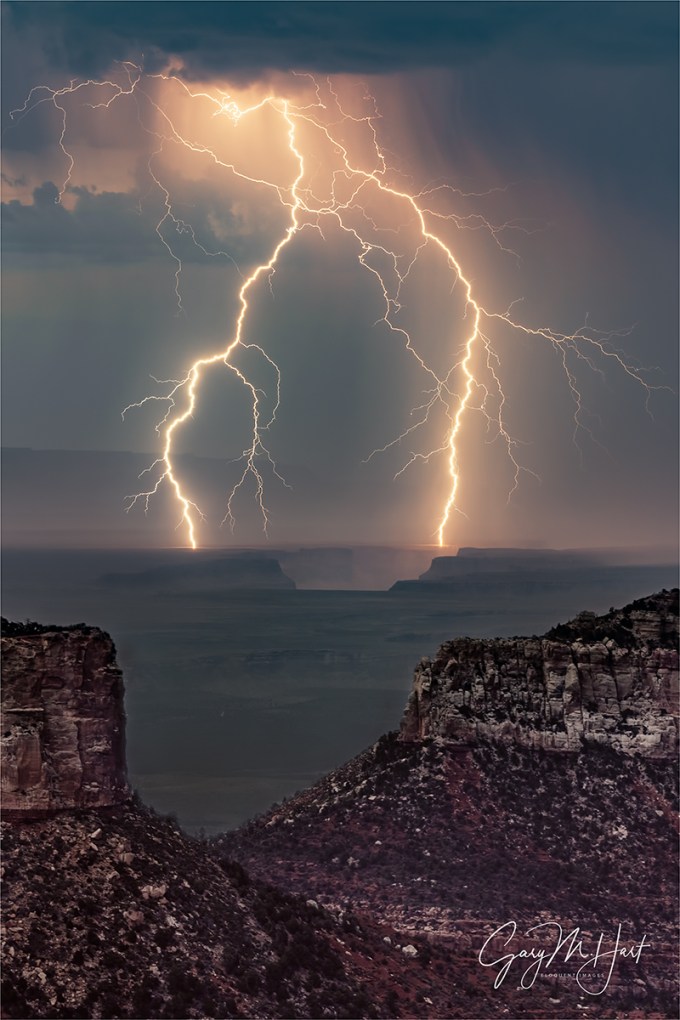
Forked Lightning, Point Imperial, Grand Canyon
Sony a7RIII
Sony 100-400 GM
Lightning Trigger LT-IV
ISO 400
f/7.1
.4 seconds
Every year for the last 10 (or so) years I’ve traveled to the Grand Canyon during the Southwest summer monsoon to photograph lightning. Not only have I captured hundreds of lightning strikes and lived to tell about it (yay), I’ve learned a lot. A couple of years ago I added an article sharing my insights on photographing lightning to my photo tips section. With lightning season upon (or almost upon) us here in the United States, I’ve updated my article with new images and additional info. You can still find the article (with updates) in my Photo Tips section, but I’m re-posting it here in my regular blog feed as well.
Read the story of this image at the bottom of this post, just above the gallery of lightning images.
How to Photograph Daylight Lightning Without Getting Killed (Probably)
Let’s start with the given that lightning is dangerous, and if “safety first” is a criterion for intelligence, photographers are stupid. So combining photographers and lightning is a recipe for disaster.
Okay, seriously, because lightning is both dangerous and unpredictable, before attempting anything that requires you to be outside during an electrical storm, it behooves you to do your homework. And the more you understand lightning, how to avoid it and stay safe in its presence, the greater your odds of living to take more pictures. Not only will understanding lightning improve your safety, a healthy respect for lightning’s fickle power will also help you anticipate and photograph lightning.
Lightning enlightenment
Lightning is an electrostatic discharge that equalizes the negative/positive polarization between two objects. In fact, when you get shocked touching a doorknob, you’ve been struck by lightning. The cause of polarization during electrical storms isn’t completely understood, but it’s generally accepted that the extreme vertical convective air motion (convection is up/down circular flow caused when less-dense warm air rises, becomes more dense as it cools with elevation, and ultimately becomes cool/dense enough to fall. Convection is also what causes bubbling in boiling water. Convection in a thunderstorm carries positively charged molecules upward and negatively charged molecules downward. Because opposite charges attract each other, the extreme polarization (positive charge at the top of the cloud, negative charge near the ground) is quickly (and violently) equalized: lightning.
With lightning comes thunder, the sound of air expanding explosively when heated by a 50,000 degree jolt of electricy. The visual component of the lightning bolt that caused the thunder travels to you at the speed of light, over 186,000 miles per second (virtually instantaneous regardless of your distance on Earth). But lightning’s aural component, thunder, only travels at the speed of sound, a little more than 750 miles per hour—a million times slower than light. Knowing that the thunder occurred at the same time as the lightning flash, and how fast both travel, we can compute the approximate distance of the lightning strike. At 750 miles per hour, thunder will travel about a mile in about five seconds: Dividing the time between the lightning’s flash and the thunder’s crash by five gives you the lightning’s distance in miles; divide the interval by three for the distance in kilometers. If five seconds pass between the lightning and the thunder, the lightning struck about one mile away; fifteen seconds elapsed means it’s about three miles away.
Lightning safety
The 30 (or so) people killed by lightning in the United States each year had one thing in common with the rest of us: they didn’t believe they’d be struck by lightning when they started whatever it was they were doing when they were struck. The only sure way to be safe in an electrical storm is to be in a fully enclosed structure or metal-framed vehicle, away from open windows, plumbing, wiring, and electronics.
While there’s no completely safe way to photograph lightning, it doesn’t hurt to improve your odds of surviving to enjoy the fruits of your labor. (Unfortunately, photographing lightning usually requires being outside.) Most lightning strikes within a six mile radius of the previous strike. So, if less than thirty seconds elapses between the flash and bang, you’re too close. And since “most” doesn’t mean “all,” it’s even better to allow a little margin for error. Thunder isn’t usually audible beyond ten miles—if you can hear the thunder, it’s safe to assume that you’re in lightning range.
But if you absolutely, positively must be outside with the lightning crashing about you, or you simply find yourself caught outside with no available shelter, there are few things you can do to reduce the chance you’ll be struck:
- Avoid water
- Avoid high ground
- Avoid exposed areas
- Avoid metal or electronic objects
- Avoid tall objects such as trees and open structures (and tripods)
- Stay at least fifteen feet from other people
- Do not lie down
- If you’re surrounded by trees, position yourself near shorter trees, as far from trunks as possible
- Crouch with your feet together and your hands covering your ears
- A lightning strike is often preceded by static electricity that makes your hair stand on end and an ozone smell (best described as the smell of electricity—I think of bumper cars at the amusement park, or the smell of my electric slot cars when I was a kid)—if your hair starts to stand up and/or you notice a distinct odor that could be ozone, follow as many of the above steps as you can, as quickly as possible (often you’ll only have time to crouch)
 Three Strikes, Bright Angel Point, North Rim, Grand Canyon
Lightning How-to
Photographing lightning at night is mostly a matter of pointing your camera in the right direction with a multi-second shutter speed and hoping the lightning fires while your shutter’s open—pretty straightforward. Photographing daylight lightning is a little more problematic. It’s usually over before you can react, so without a lightning sensor to recognize lightning and click your shutter, success is largely dumb luck (few people are quick enough see it and click). And using a neutral density filter to stretch the exposure time out to 20 or 30 seconds sounds great in theory, but a lightning bolt with a life measured in milliseconds, captured in an exposure measured in multiple seconds, will almost certainly lack the contrast necessary to be be even slightly visible.
Lightning Trigger: The best tool for the job
Most lightning sensors (all?) attach to your camera’s hot shoe and connect via a special cable to the camera’s remote-release port. When engaged, the sensor fires the shutter (virtually) immediately upon detecting lightning, whether or not the lightning is visible to the eye or camera. With many lightning sensors from which to choose, before I bought my first one I did lots of research. I ended up choosing the sensor that was the consensus choice among photographers I know and trust: Lightning Trigger from Stepping Stone Products in Dolores, CO. At around $350 (including the cable), the Lightning Trigger is not the cheapest option, but after many leading lightning-oriented photo workshops, I can say with lots of confidence that lightning sensors are not generic products, and the internal technology matters a lot. Base on my own results and observations, the Lightning Trigger is the only one I’d use and recommend (I get no kickback for this). On the other hand, if you already have a lightning sensor you’re happy with, there’s no reason to switch.
I won’t get into lots of specifics about how to set up the Lightning Trigger because it’s simple and covered fairly well in the included documentation. But you should know that of the things that sets the Lightning Trigger apart from many others is its ability to put your camera in the “shutter half pressed” mode, which greatly reduces shutter lag (see below). But that also means that connecting the Trigger will probably disable your LCD replay, so you won’t be able to review your captures without disconnecting—a simple but sometimes inconvenient task. You also probably won’t be able to adjust your exposure with the Lightning Trigger connected.
The Lightning Trigger documentation promises at least a 20 mile range, and after many years using mine at the Grand Canyon, I’ve seen nothing that causes me to question that. It also says you can expect the sensor to fire at lightning that’s not necessarily in front of you, or lightning you can’t see at all, which I will definitely confirm. For every click with lightning in my camera’s field of view, I get many clicks caused by lightning I didn’t see, or that were outside my camera’s field of view. But when visible lightning does fire somewhere in my composition, I estimate that the Lightning Trigger clicked the shutter at least 95 percent of the time (that is, even though I got lots of false positives, the Lightning Trigger missed very few bolts it should have detected). Of these successful clicks, I actually captured lightning in at least 2/3 of the frames.
The misses are a function of the timing between lightning and camera—sometimes the lightning is just too fast for the camera’s shutter lag. In general, the more violent the storm, the greater the likelihood of bolts of longer duration, and multiple strokes that are easier to capture. And my success rate has increased significantly beyond 2/3 since switching from a Canon 5DIII to Sony mirrorless (more on this in the Shutter Lag section).
The Lightning Trigger documentation recommends shutter speeds between 1/4 and 1/20 second—shutter speeds faster than 1/20 second risk completing the exposure before all of the secondary strokes fire; slower shutter speeds tend to wash out the lightning. To achieve daylight shutter speeds between 1/4 and 1/20 second, I use a polarizer, with my camera at ISO 50 and aperture at f/16 (and sometimes smaller). Of course exposure values will vary with the amount of light available, and you may not need such extreme settings when shooting into an extremely dark sky. The two stops of light lost to a polarizer helps a lot, and 4- or 6-stop neutral density filter is even better with fairly bright skies (but if you’re using a neutral density filter, try to avoid shutter speeds longer than 1/4 second).
Shutter lag
Lightning is fast, really, really fast, so the faster your camera’s shutter responds after getting the command from the trigger device, the more success you’ll have. The delay between the click instruction (whether from your finger pressing the shutter button, a remote release, or a lightning sensor) and the shutter firing is called “shutter lag.”
The less shutter lag you have, the better your results will be. The two most important shutter lag factors are:
- Camera model: It’s surprising how much shutter lag can vary from manufacturer to manufacturer and model to model. In a perfect world, for lightning photography your camera’s shutter lag will be 60 milliseconds (.006 seconds) or faster (the lower the number the better), but 120 milliseconds (.012 seconds) or faster can give you some success. The top cameras from Sony, Nikon, and Canon are all fast enough, but the latest Sonys are the definite shutter lag winner (fastest), with Nikon a not too distant second, and Canon third. And shutter lag can vary with the manufacturer’s model: While my Sony a7RII is one of the fastest cameras out there, my a7R was unusably slow, so you need to check your model. Since I don’t check every camera released, it’s possible this ranking will change well before I update this article, so I recommend that you research shutter lag for your camera model. Unfortunately, shutter lag isn’t usually in the manufacturers specifications, so it’s hard to find. The best source I’ve found is the “Pre-focused” time in the Performance tab of the camera reviews at Imaging Resource.
- Camera settings: Basically, to minimize the “thinking” the camera needs to before firing, you want to be in manual everything mode—metering and focus. If your camera offers an electronic front curtain option (as my Sonys do), use it. If you must autofocus, go ahead and do it each time you recompose, then turn autofocus off as soon as you’re focused. Though the Lightning Trigger documentation suggests Aperture Priority metering, I use and recommend Manual metering mode to eliminate any camera-slowing metering (but Aperture Priority is fine if you have a strong preference). And, also despite what the Lightning Trigger documentation suggests, noise reduction is a post-capture function that might slightly delay continuous frames, but it won’t increase shutter lag.
Other equipment
In addition to a lightning sensor and fast camera, you’ll need:
- A solid tripod and head: Don’t even think about trying to photograph lightning hand-held
- Rain gear that keeps you dry from head-to-toe
- Umbrella (a.k.a., Wile E. Coyote Lightning Rod) to shield your camera and lightning sensor (many sensors, including the Lightning Trigger, aren’t waterproof) while you compose and wait in the rain. The umbrella is for when you’re photographing storm cells at a great distance, such as on the rim of the Grand Canyon and the lighting is across the canyon. Obviously, when the lightning gets within 10 miles, put the umbrella down and run for cover.)
- Lens hood to shield some of the raindrops that could mar the front element of your lenses
- Neutral density filter and/or polarizer to slow shutter speed into the ideal range (1/4 – 1/20 second)
- A garbage bag (my choice) or rainproof camera jacket (haven’t found one) to keep your camera and sensor dry during a downpour
- Extra lightning sensor batteries (better safe than sorry)
- Extra memory cards: When a storm is very close or active, your lightning sensor could detect 20 or 30 strikes per minute (even when little or no lightning is visible to the eye)
- Infrared remote to test your Lightning Trigger; I sometimes borrow the remote from my hotel room, but the Apple TV remote works great and is extremely compact (fits nicely into the Lightning Trigger pouch)
- A towel
Getting the shot
Lightning is most likely to strike in or near the gray curtains (clearly recognizable as distant rain) that hang beneath dark clouds. In addition to visible rain curtains, the darkest and tallest clouds are usually the most likely to fire lightning. Here are a few more points to consider:
- The wider your composition, the greater your odds of capturing lightning, but the smaller the lightning will appear in your image.
- Identify the most likely lightning cell and find the best composition that includes it. I tend to start with wider compositions to ensure success, then tighten my composition once I’m fairly confident I captured something.
- Note the height from which the lightning originates and be sure to include enough cloud to get all of the stroke. On the other hand, don’t include too much room above the lightning—the most frequent rookie mistake I see is too much sky/clouds in the frame. The second most frequent is lightning cut off at the top. Unless the storm is too close for safety, for any given cell, most lightning will originate from about the same height above the ground.
- The best lens is usually a midrange zoom such as a 24-70 or 24-105—if you find yourself reaching for the 16-35 (or wider), you’re too close.
- On the other hand, once you’re sure you’ve captured some good strikes, try putting on a 70-200. The narrow field of view can significantly reduce the number of frames with lightning, but the ones you get will be much larger in the frame and therefore more spectacular.
- Don’t forget to try some vertical compositions. I usually wait until after I know I’ve captured some in a horizontal frame because vertical narrows the horizontal field of view and lowers the odds of success a little.
- Lightning stands out better in a slightly underexposed image. My target shutter speed is usually 1/8 second (slow enough to include multiple pulses, but not so slow that I risk washing out the lightning). When the sky is relatively bright, dropping to 1/15 or even 1/20 second can make the lightning stand out better than 1/8 (but risks losing secondary strikes). Conversely, when the sky is extremely dark and the lightning is firing like crazy, extending to 1/4 second might increase your chances for multiple pulses.
- Just because you’re standing around waiting for things to happen, doesn’t mean there’s nothing to do. Keep your eyes glued to the sky and adjust your composition as the lightning shifts, or as new activity starts elsewhere. If you wait until you hear your shutter click or someone else exclaim before looking up, you won’t see the lightning. And monitor the light—your exposure can change by several stops as the storm moves, intensifies, or winds down.
- Try not to check your captures on your LCD until you’re done (or better yet, until you upload your images to your computer). With the Lightning Trigger (and some other sensors), viewing the LCD requires turning off the sensor, which risks missing a shot (I’m pretty sure lightning waits for me to turn off my sensor), and you’ll also find that many successful captures, especially wide compositions with a relatively bright sky, just aren’t that visible on an LCD viewed in daylight anyway.
Do as I say (not as I do)
Be aware that electrical storms can move quite quickly, so you need to monitor them closely. Sometimes this simply means adjusting your composition to account for shifting lightning; other times it means retreating to the car if the cell threatens your location. No shot is worth your life.
About this image

Forked Lightning, Point Imperial, Grand Canyon
On the first evening of last year’s second Grand Canyon Monsoon photo workshop, Don Smith and I took the group to Point Imperial for a sunset shoot. Based on the forecast we had little hope for lightning, but one thing I’ve learned over the many years of photographing the monsoon here is that the forecast isn’t the final word. We got another reminder of this that evening.
The view from Point Imperial is both expansive and different from other Grand Canyon vistas, stretching east across the Painted Desert and north to the Vermillion Cliffs. As the group made their way down to the vista platform, in the corner of my I thought I a lighting strike far to the north. A second bolt confirmed my discovery and soon we had the entire group lined up with cameras pointed and triggers ready.
With everyone in business, I set up my tripod and attached my Lightning Trigger to my Sony a7RIII. Since this lightning was close to 30 miles away, maybe farther than any lightning I’ve tried to photograph, so I hauled out my Sony 100-400 GM lens and zoomed in as tight as I could. I didn’t have to wait long to confirm that my Lightning Trigger would catch strikes this distant—it didn’t hurt that these were massive bolts, many with multiple pulses and forks.
Everyone was thrilled, so thrilled that it didn’t immediately register that the storm was moving our direction. I started at 400mm, but by the time I captured this frame I was just a little more than 100mm. That’s still a pretty safe distance, but with night almost on us and another cell moving in from the east, we decided to take our winnings and go home.
One final note: If you check my exposure settings, you’ll see that my shutter speed here was .4 seconds, well outside the 1/20-1/4 second range I suggest. But if you look at the other settings, you’ll see that I’d opened up to f/7.1, and had cranked my ISO to 400, an indication that twilight was settling in. Successful lightning photograph is all about contrast, and the darker the sky, the better the bolt stands out, even in a longer exposure. Had we stayed past dark (and lived), we could have jettisoned the Lighting Triggers and used multi-second exposures.
Join Don Smith and me in our next Grand Canyon Monsoon Photo Workshop
Read my article in Outdoor Photographer magazine, Shooting the Monsoon
Workshop Schedule || Purchase Prints
A Lightning Gallery
Click an image for a closer look and slide show. Refresh the window to reorder the display.


The right stuff at the Grand Canyon
Posted on August 28, 2014

After Sunset, Point Imperial, Grand Canyon
Canon EOS-5D Mark III
47mm
8 seconds
F/16
ISO 100
I’ve been to the mountaintop
Personal growth should be a lifelong journey. But as a longtime tripod evangelist, I considered many truths carved in stone. Granted, like everyone else, my tripod use (and selection) evolved through my formative photography years. On my path to (perceived) enlightenment, I made the same mistakes most photographers make, mistakes like settling for the tripod I could afford rather than tripod I needed, which only meant spending more money than I would have when I eventually (inevitably) broke down and bought the tripod I needed. And there were those dark years when I believed that in most cases a hand-held shot was just as good as one captured on a tripod. But since my “the center post is more trouble than it’s worth” epiphany about ten years ago, I pretty much believed I knew it all where tripods were concerned.
But last month at the Grand Canyon, I realized that over the last couple of years, some of my tripod truths weren’t immutable as I’d imagined. This was underscored for me during a shoot at Point Imperial, the canyon’s highest vista, when I was able to use my Really Right Stuff tripod and live-view to get shots that wouldn’t have been possible a few years ago.
My (original) tripod commandments
For years my tripod sermon was delivered something like this:
- A tripod for every shot—no exceptions
- Sturdy trumps everything
- Forego the center post—it’s destabilizing, adds extra weight, and makes it impossible to drop your camera to the ground (without a shovel)
- Size does matter—you need a tripod that’s tall enough for you to see through your viewfinder without stooping (without extending the center post)
- Ball-head all the way for landscape shooters (no pan/tilt, no exceptions)
- An L-plate will change your life
Those are the basics; the other tripod variables—cheap vs. light (you can’t have both, no matter what the salesperson or marketing brochure says), three vs. four leg sections, leg-lock design, and collapsed length (for transport in a suitcase or camera bag)—come down to personal preference and budget.
And what’s the big deal about an L-plate?
And L-plate is an L-shaped plate (duh) that attaches at the bottom of your camera and wrapping 90 degrees up one side. It’s really just a two-sided quick-release plate—instead of the standard quick-release that only mounts to the bottom of your camera (forcing you to rotate the head 90 degrees to orient the camera vertically), to orient an L-plate-equiped body vertically, you pop the camera off the head, rotate the camera 90 degrees, and reattach it to the head using the plate’s other side, keeping the head upright (unchanged). Not only does this keep your camera at the same height regardless of its orientation, it’s just much more stable.
Lacking an L-plate, photographers whose tripod is tall enough when the camera is oriented horizontally are sometimes force to stoop or contort when they switch to vertical. Without realizing it, they often compensate for this awkwardness by simply avoiding vertical compositions. I know this because I was one of those photographers—when I switched to an L-plate, my percentage of vertical compositions increased markedly (I actually verified this using Lightroom filters to count the number of horizontal and vertical frames in my library), to the point where my vertical/horizontal images are about 50/50.
What’s your MTH?
By the time they’re serious enough to sign up for a photo workshop, most (but not all) photographers have a sturdy tripod. Still, things aren’t necessarily completely rosy. In addition to a deficient head—either a pan/tilt, or a ball head that’s not strong enough for the camera/lens it’s trying to support (both problems easily solved by going to reallyrightstuff.com and picking the head that best suits your needs, but that’s a discussion for a different day)—a too-short tripod is where I see most novice photographers struggle. Stooping, even just a few inches, may not seem like a big deal at first, but it gets old really fast.
Your minimum tripod height (MTH) is the shortest tripod you can use without stooping or raising the center post. Here are the steps for determining if a trip is tall enough for you:
1. Start with the tripod’s fully extended height (legs extended, center post down), easy to find in the manufacturer’s specifications 2. Add the height of your ball-head (if you have a pan/tilt you need a new head and will be doing this calculation all over again when you get it) 3. Add the distance from the base of your camera to the viewfinderThis gives you the tripod’s maximum usable height. Wait a minute, you say, that’s still not tall enough. To get your MTH, there’s one more step:
4. Subtract 4 inches from your height to account for the distance from the top of your head to your eyes.Old dog, new trick
But in the last year I’ve experienced a minor conversion, opening my mind enough to modify my rigid tripod height recommendations (I used to believe that a tripod that extended above my standing height was unnecessary weight and length)—not only should your tripod be tall enough to use while you stand upright, the ideal tripod is even taller than that, at least 4 inches taller than your viewing height when the legs are planted on flat ground. Extra tripod height allows me to comfortably stand on the uphill side of my camera when the tripod on uneven ground. (If you’re a landscape shooter, how often do you photograph on flat ground?)
Of no less significance is the way a tall tripod allows me to shoot over obstacles. In “ancient” times, photographers needed to to see through their viewfinder to compose and (sometimes) meter, but with the genesis of live-view came the ability to compose and meter without the eyepiece. So while a tall tripod has always been helpful for shooting on level ground, to me this ability to shoot over obstacles is the real game changer.
Going straight to the source
My conversion started with a pilgrimage to Really Right Stuff in San Luis Obispo, about a year-and-a-half ago. I was ready for a new tripod and wanted the best. I’d been quite happy with my Gitzo tripods, but they were purchased before RRS offered tripods—given my long-time experience with RRS heads and L-plates, and what I’d observed in my workshops, I thought I should see whether RRS tripods had supplanted Gitzo at the tripod summit.
RRS doesn’t actually have a retail store, but their beautiful new facility has a nice reception area with many products on display—you might even find the lobby empty when you walk in, but it won’t be long before a door from the back opens and you’ll be greeted by someone who knows more about tripods than you do. My expert was Erik—he spent close to an hour, first patiently demonstrating why the RRS tripods are the best tripods in the world (the comparison was to Gitzo, but his emphasis was on what makes RRS tripods great, rather than what makes Gitzo tripods bad, an approach I appreciated), and then helping me determine which model would best suit me.
I’d arrived with the RRS TVC 33 in mind, but on Erik’s suggestion ended up switching to the RRS TVC 24L Series 2, even though it has four leg sections (extra work extending and collapsing, but more compact when collapsed) and is quite a bit taller than I (believed I) needed. So tall, in fact, that I can almost (but not quite) use it by extending only three leg sections. I’m not going to go into all the reasons I love this tripod (but trust me, I do), but I will say that the extra 8 or so inches above my MTH (I’m about 5’9″) has enabled me to photograph in ways I wouldn’t have been able to do without it.
The paradigm shifting “revelations” I share here (extra-tall is important; Gitzo is no longer the Holy Grail of tripods) apply to photography, but one of the things I love about being forced to reconsider long-held “truths” is the reminder that the instant we believe we have all the answers is the instant we stop growing.
Case in point
All this (finally) brings me to the above image from Point Imperial on my recent Grand Canyon trip. Point Imperial is probably my favorite spot on the North Rim. The railed viewing area isn’t quite large enough for an entire workshop group to work comfortably, but there are enough spots nearby that nobody is disappointed. My favorite location here is on the rocks, just below the railed vista, that jut about 1,000 vertical feet above the canyon. There isn’t a lot of room out here either, and very little margin for error, so after guiding the brave photographers who aren’t afraid of heights out to the edge, I found an out of the way spot a few feet behind them.
It turned out this location was no less precarious than everyone else’s, but being behind the others and a couple of large rocks and shrubs made composing a challenge. Looking around, I decided the best view was on an uneven slope right on the edge, the closer the better. Yikes.
This is where I really appreciated the extra inches my tripod offers. Extending each leg fully, I pushed two legs right up to the edge, keeping myself a safe distance back. With the front (closest to the edge) legs’ planted, to elevate further and get the camera even nearer the edge, pushed the leg closest to me toward the cliff until the other two legs were nearly perpendicular to the ground (directly on the edge). Finally, I leveled the tripod with minor adjustments in the height and placement of the leg closest to me. Once the camera was positioned (about five inches above my eyes), I switched on live-view, composed, metered, and clicked.
As evidenced by the long shutter speed, it was fairly dark when I clicked the image above. Often the best light for photography is opposite the sun after sunset (or before sunrise). The smooth quality of this shadowless light, and the gradual deepening of the rich hues on the horizon, are often missed by the casual observer who is mesmerized by the view toward the setting or rising sun (not possible at Point Imperial at sunset), or unable to appreciate the camera’s ability to bring out more light than the eye can see. But then, you already knew that (right?)….
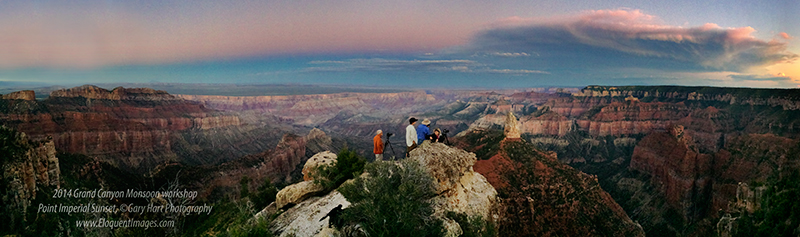
The view from just below the Point Imperial vista (iPhone panorama)
Extra credit
- Read The tripod difference (why I think every landscape shot should be on a tripod)
- Here’s Thom Hogan’s excellent article on buying a tripod
- Visit the Really Right Stuff website: in addition to the best camera support money can buy, there’s great information here

