Eloquent Images by Gary Hart
Insight, information, and inspiration for the inquisitive nature photographer
The Art of Subtraction
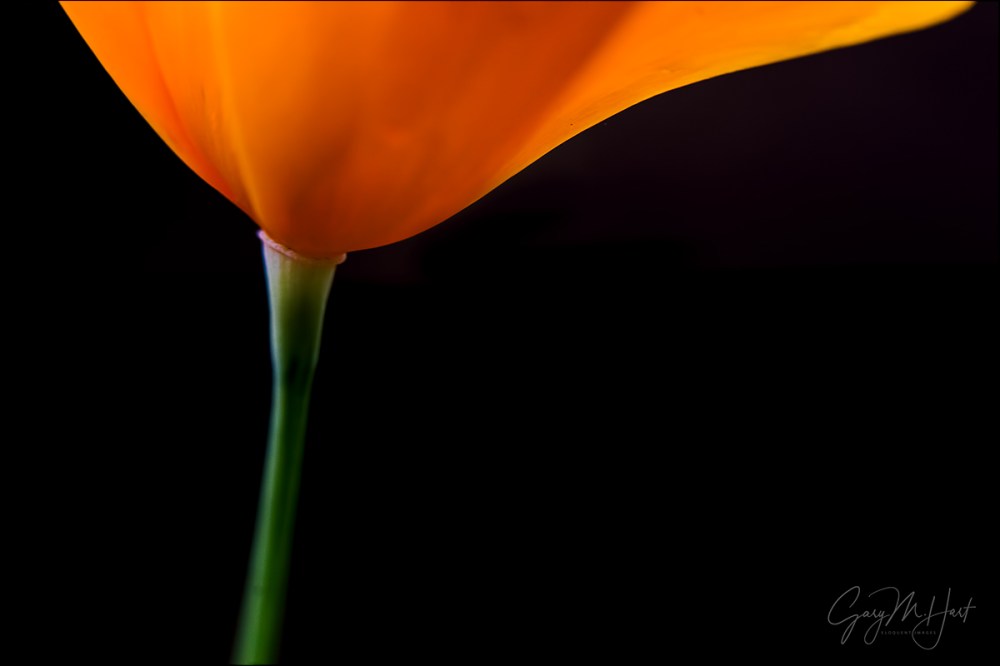
Golden Elegance, California Poppy, Sierra Foothills
Sony a7R II
Sony FE 90mm f2.8 Macro
1/200 seconds
F/4
ISO 3200
Photography is an art of subtraction—presented with a complex world, we identify and organize objects of visual interest and (ideally) do our best to eliminate everything else. It’s this last point that’s often overlooked. The best pictures often work as much for what’s not in them as for what’s in them. Most photographers have no problem seeing what to put in their images, but many struggle with what to leave out. Or how to do it.
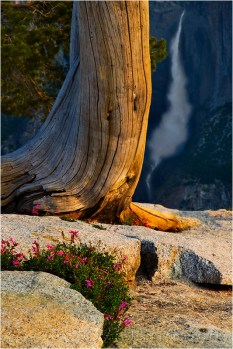
Morning Light, Upper Yosemite Fall from Sentinel Dome, Yosemite
Anything in your frame that doesn’t enhance it is a potential distraction. Removing distractions is often as simple as tightening the composition, or repositioning the camera.
For example, admiring a dramatic waterfall in the distance, you might walk around until you find a colorful bouquet of wildflowers for your foreground—so far so good. With your camera at eye level, you frame the scene with the flowers at the bottom and the waterfall at the top. Click.
The problem is that you also included a vast empty region in the middle of the frame, a region that does nothing more for your image than occupy space. The solution is as simple as dropping your camera to ground level, allowing you to subtract the empty space and replace it with larger flowers and waterfall (because with the flowers and waterfall more aligned, you can increase the focal length).
But compositional adjustments are only the beginning. Where most people stumble is when they have an opportunity to further simplify an image by incorporating the areas of their camera’s vision that differs most significantly from their own vision: light, focus depth, and motion.
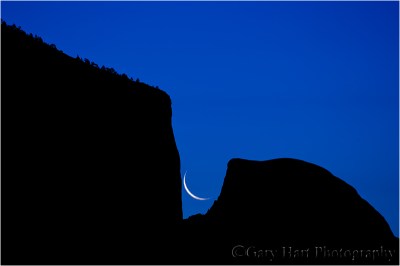
Captive Crescent, El Capitan and Half Dome, Yosemite
Read the story of this image
Light
Photographers frequently lament their camera’s limited dynamic range. And while extra dynamic range in a camera is great, limited dynamic range creates great opportunities to remove distractions and emphasize shape over detail.

Brilliant Poppy, American River Parkway, Sacramento
Metering and underexposing the highlights in a backlit scene can saturate color and hide distracting details in blackness. I try to find striking subjects that stand out against the sky. Hilltop oak trees work well for this, but I can think of no subject in nature more suitable to silhouette photography than El Capitan and Half Dome in Yosemite. And since a crescent moon is always in the brightest part of the sky just before sunrise or after sunset, I always look for an opportunity to pair a waning crescent against Yosemite’s striking skyline.
But this approach isn’t limited to silhouettes. In the image at the top of this post, I didn’t want anything to distract from the poppy’s graceful curves, so I positioned the poppy against deep shade and underexposed the scene. This saturated the rich color and blackened everything that wasn’t poppy.
And using dynamic range to subtract distractions isn’t just about turning shadows black. Don’t like a blank blue sky? Metering on a shaded subject against a blue sky can completely blow out the highlights, creating a striking white background for your primary subject.
Focus depth

Poppy Lanterns, Merced River Canyon
One of my favorite techniques for photographing colorful wildflowers and fall foliage is to narrow the range of focus until just a select part of my subject is sharp, softening the rest of the scene to an appealing blur of color and shape. This blur effect improves as depth of focus shrinks, and depth of focus shrinks with:
- Subject distance—the closer the better
- Focal length—the longer the better
- F-stop—small f-stop means large aperture
While I’ve used pretty much every lens in my bag to blur my backgrounds (and foregrounds), I most frequently use telephoto and macro lenses, often with extension tubes.
Not only does this approach help the primary subject—or specific aspects of the primary subject—stand out, when executed properly it can eliminate virtually any background distraction. The most important thing to remember is that even when it will be blurred beyond recognition, the background matters.
Motion
Blurred water often gets labeled as “unnatural” or “cliché.” The unnatural part I’ll dismiss as misinformed—it’s no less natural than water droplets suspended in midair. While I’ll acknowledge that reflexively reaching for a neutral density filter at the slightest hint
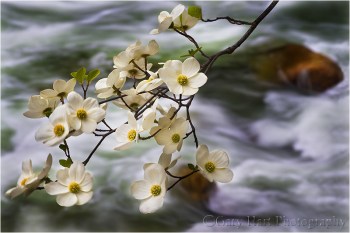
Dogwood and Rapids, Merced River, Yosemite
of whitewater might be overdoing it a bit, the cliché label ignores the fact that blurred is often the only way to render moving water (ever try freezing a waterfall or churning cascade in shade or overcast?).
Regardless of your position on blurred water, detail in moving water can create a distraction that competes with your primary subject for attention. Smoothing moving water to one degree or another subtracts this distracting busyness.
Motion blur isn’t just about water—pretty much anything that moves can be softened or eliminated with motion: clouds, blowing leaves and flowers, stars, and so on. While it’s not landscape photography, a device employed by architectural (and other) photographers is adding many stops of neutral density to slow the shutter speed so much that people and vehicles moving in the scene completely disappear.
Regardless of the object that’s moving, as with narrow focus depth, softening the secondary areas of a scene also helps the primary subject stand out by allowing your viewers to focus all their attention where it belongs.
It’s all about control
Because of the zero-sum relationship between photography’s exposure variables—changing one variable requires a complementary change in another—controlling light, depth, and motion is difficult-to-impossible unless you get out of the full auto exposure modes and start making your own exposure decisions. While it can be done in Aperture or Shutter Priority modes, I find Manual metering works best for this level of control. So, if you don’t have enough understanding of metering to shoot in Manual mode, that’s the place to start.
Here are some links from my Photo Tips tab that will help:
Workshop schedule
A gallery of subtraction


Excellent
Subtract and eliminate things that don’t enhance the subject and make sure the image works using all the layout and design tricks possible. I try to do that. You said it very well. Thanks.
Pingback: fokussiert.com | Fotografie ist die Kunst der Subtraktion: Ablenkungen fotografisch eliminieren