Eloquent Images by Gary Hart
Insight, information, and inspiration for the inquisitive nature photographer
Tips to improve your full moon photography
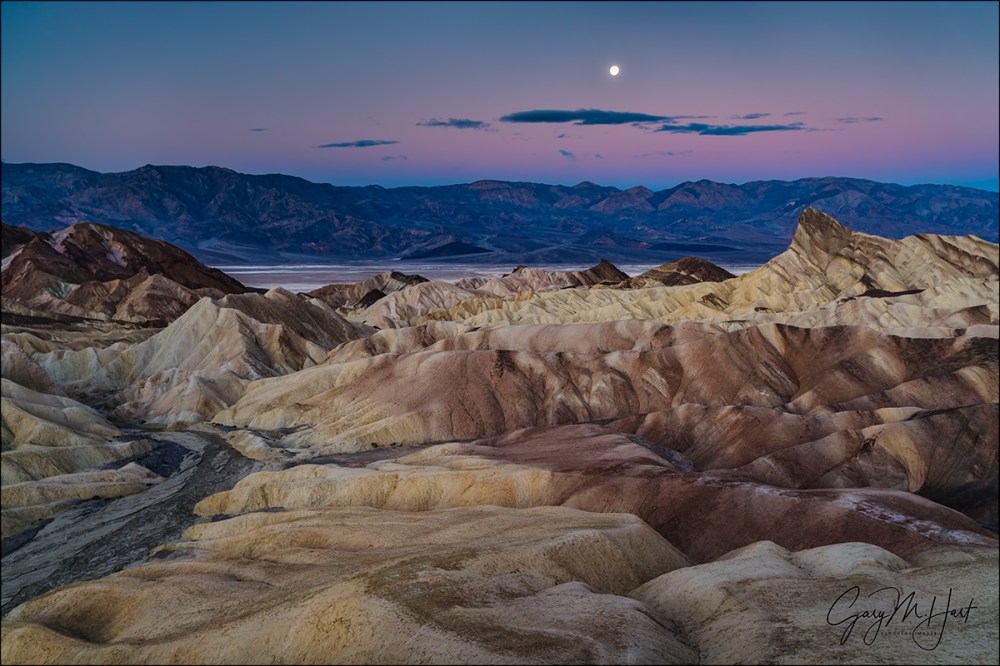
Winter Moon, Zabriskie Point, Death Valley
Sony a7R II
Sony/Zeiss 24-70 f4
1/6 second
F/8
ISO 100
Have you ever seen a glowing full moon suspended above a beautiful landscape and been moved enough to grab your camera? And how many times have those pictures actually matched your memory of the moment? Not too many, I’d guess. Either your landscape was completely black, or (more likely) the moon was an ugly white blob. You’ve just experienced an example of the human eye’s vastly superior dynamic range—while you could see detail in the landscape and the moon, your camera could only see one or the other.
Lot’s of scouting and plotting goes into aligning a full moon with a terrestrial subject, as close to the horizon as possible, when the light’s just right. For me, just right means a sky dark enough for the moon to stand out (the darker the better), but not so dark that I lose foreground detail in the twilight shadow. Since I don’t blend images, I need to get the landscape and lunar detail with a single click.
I’ve found that the “right-time” sweet spot for single-click full moon photography is a window about 10 minutes on either side of sunrise/sunset. Since the published sun/moon rise/set times assume a flat-horizon—unless you’re on a boat at sea, the sun and moon will probably be below the horizon when they’re advertised to be rising and setting.
It helps to know that as the moon goes through its 29-day cycle from new to full and back, it rises a little less than an hour later each day (that’s an average that varies with several factors, but it’s a good rule-of-thumb). This generally makes the moon visible in my 20-minute exposure sweet spot the day before it’s full for a sunset moonrise, and the day after it’s full for a sunrise moonset, because there’s more foreground light to work with. But even then the landscape will be bathed in shadow, while the moon remains daylight bright, so getting myself on location in this 20 minute window is only half the battle.
In general, digital cameras have made exposure easier. Shooting film, difficult exposures meant a lot of guessing, bracketing, and (especially) hoping. Shooting digitally, not only can we instantly eyeball each image, the histogram shows us exactly how our exposure worked. Unfortunately, the histogram isn’t much help when the moon’s involved, because the moon doesn’t usually occupy enough image real estate to register on the histogram. If you’re not careful, you might find yourself reveiwing an evening’s worth of images with beautiful histograms and a hopelessly blown moon. What’s a photographer to do?
The key to exposing any high dynamic range scene is pushing the highlights as far as you can without blowning them out. For most scenes the histogram is sufficient, but exposing for the moon requires help from your camera’s Highlight Alert (blinking highlights) feature. And since most cameras allow you to view images in multiple modes (e.g., with the luminosity histogram, RGB histogram, no histogram, full capture information, no capture information, and so on), it’s also important to determine which view or views actually show the blinking highlights (not all do)—if you’re not sure, I suggest intentionally overexposing a scene and reviewing the image in the camera’s various display modes.
Moonrise
When photographing a rising full moon at sunset, simply metering for the landscape works at the outset because there’s still plenty of light to capture foreground detail without overexposing the moon. At this point the histogram tells me everything I need to know. But as the sky darkens, so does the foreground, while the moon remains unchanged.
To keep my histogram in the ideal range as twilight deepens, I add light to my image by bumping the shutter speed in 1/3 stop increments. Each time I increase the shutter speed, I check the image to ensure that the moon’s not blinking. As soon as my exposure causes the moon to blink, I know I’ve reached my highlight threshold and I’m pretty much done adding light.
Once I’ve pushed the moon to my camera’s highlight threshold, I continue shooting until the shadows are so dark that no useable data can be recovered. Because highlight and shadow recovery varies with the camera, I strongly encourage you to familiarize yourself with your camera’s shadow and highlight threshold (how far to the left and right can push the histogram and still get usable detail).
If you’re shooting raw, you can probably push your exposure until part of the moon is blinking, but if the entire lunar disk blinks, you almost certainly will need to back down your exposure. Adding a graduated neutral density filter will hold back the moon enough to buy you five or ten minutes of shooting before the moon blows out.
Moonset (an example)
Photographing a setting full moon at sunrise is the sunset process in reverse—we start with the moon glowing above a landscape much too dark to get detail without hopelessly blowing out the moon, and finish when the moon sets, or when the sky brightens to the point that the moon starts to wash out.
In January, I got my Death Valley Winter Moon workshop group out to Zabriskie Point about 45 minutes before sunrise. The moon was indeed beautiful, but far too bright to photograph with the dark foreground. But it was high enough that I was able to do long exposures without the moon while I waited for the scene to brighten.
About 20 minutes before sunrise I pulled out a 3-stop hard-transition graduated neutral density filter and started including the moon, dialing my exposure down until the moon stopped blinking—the most light I could give the scene without losing the moon. At first the foreground was still far too dark to contain usable detail, but within 5 minutes I started to feel like the scene had brightened enough to allow usable detail (albeit with a fair amount of Lightroom Shadow/Highlight work later).
From that point on, I just worked on a variety of compositions that included the moon. Monitoring my histogram, I shortened my shutter speed to reduce the exposure as the foreground brightened. Eventually the foreground brightened enough that I didn’t need the GND filter.
In a perfect world the moon reaches the horizon while it’s in the sunrise/sunset 20(-ish) minute exposure sweet-spot (sky dark enough that the moon stands out, but not so dark that I can’t get landscape and lunar detail), but this morning the moon was high enough that the contrast flattened before it set.
The above image I captured early in the sweet spot—the foreground looked quite dark on my LCD, while the moon was mostly intact, with a couple of blinking specks. But I knew my Sony a7R II well enough to be confident that simple highlight and shadow adjustments in Lightroom would recover all the necessary detail.
Photo Workshop Schedule
A Full Moon Gallery (Large and Small)


Thank you for the education and awesome photos!
My pleasure, Ralph—thanks.
Thanks. I’ll file this tutorial in the hopes that I can get outside NYC soon and try it.
My pleasure—thanks for reading.
Gary
That is just so well written !!
Steve
Sent from my iPhone
>
Thanks for reading, Steve.
Gary, you photos are without a doubt astounding, however you gave no reference to f/stop , aperture or delay (time) ….
Can you expand on this???
Robert Smith
Oops. Forgot to add it. I’ll put it in as soon as I get to a computer.
Wow, great photos and thanks for the tips. I still shoot 4×5 film when I get the chance, but lately I don’t seem to have much of a chance. I still have several boxes of Fuji Astia 100 in my freezer waiting for me to get back into photography seriously, and living on Hawaii island, there are a lot of seriously great places to get incredible photographs.
Thanks, Richard. I have fond memories of my film days, but no plans to go back.
Pingback: You Had to Be There | Eloquent Images by Gary Hart