Eloquent Images by Gary Hart
Insight, information, and inspiration for the inquisitive nature photographer
(Another) Grand Canyon Lightning Show
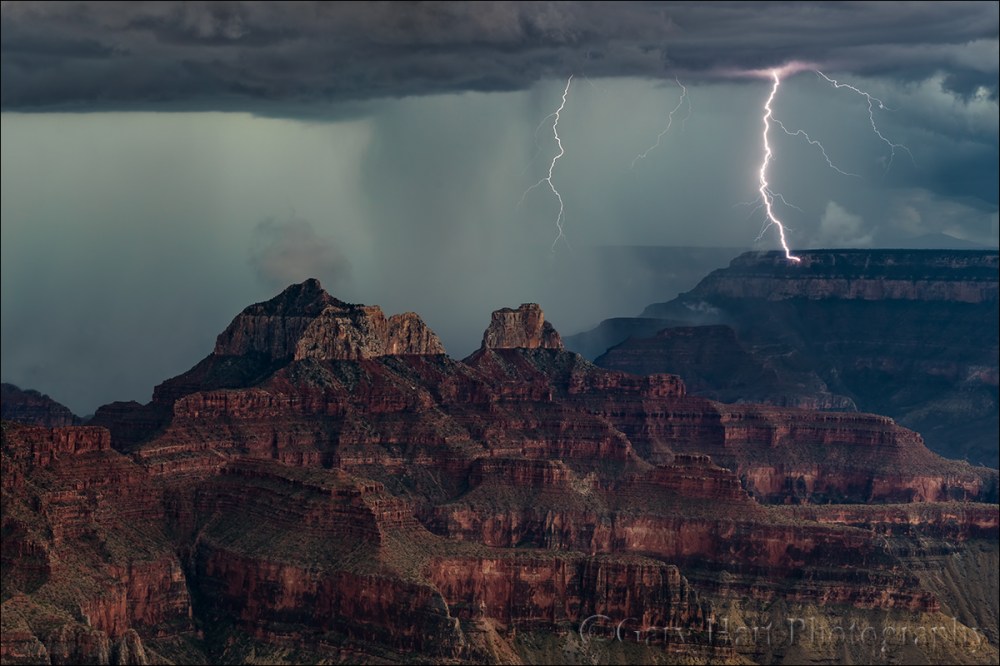
Direct Hit, South Rim Lightning Strike, Grand Canyon Lodge (North Rim)
Sony a7R II
Sony/Zeiss 24-70 f4
1/8 second
F/16
ISO 50
Earlier this month Don Smith and I traveled to the Grand Canyon for our annual Grand Canyon Monsoon photo workshops. I enjoy every workshop, but as a true weather nerd, these monsoon workshops are particular highlights in my year, and in Northern California we just don’t get that much weather—that is, unless you consider homogenous blue (summer) or gray (winter) skies weather.
For this trip, I started monitoring the Grand Canyon forecast about a week before the first workshop (okay, maybe a little earlier than that), and ramped up my queries as the workshop approached. If hoping and handwringing could make lightning, I’d never have a bad day at the Grand Canyon, but after three days of fairly benign conditions, workshop group number one was still waiting for their lightning. Then, like a walk-off grand slam, on our final full day Mother Nature gifted us with a spectacular, two-hour lightning show. Phew. In fact, that afternoon we got an entire workshop worth of dramatic weather in about five very intense hours. The day’s highlights included lightning and two rainbows, and wrapped up a mammatus (google it) sunset at Cape Royal. All’s well that ends well.
Contrast group one’s eleventh hour salvation with workshop group two, which hit the ground running (quite literally) before we could even have an orientation. The second workshop was scheduled to start with a 1 p.m. orientation at Grand Canyon Lodge on the North Rim. As go most mornings in monsoon season, the day started quietly, but a little after noon lightning started up across the canyon and Don and I set up our tripods, cameras, and Lightning Triggers. With the designated gathering place in front of the lodge, but the viewing deck and lightning show in the back, Don and I took turns running up front and dragging folks down to our location. Those who had arrived with camera gear were put right to work, while the ones who had left their gear in their car or cabin and had to race back up the hill to fetch it.
By 1:15 we were seeing one or two strikes per minute, sometimes more, spread across a fairly broad area of the South Rim. Soon Don and I had a dozen photographers spread across two outside decks separated by an enclosed viewing room. Most of them had never used a Lightning Trigger, or even photographed lightning, so once we got everyone assembled, most of the next hour was spent running around setting up and testing Lightning Triggers, helping people achieve the right exposure, and suggesting compositions.
During that first hour our cameras, set up and primed for action, enthusiastically fired away unattended. When I’m with my camera during a storm, I’m constantly tweaking my composition, exposure, and Lightning Trigger sensitivity. Left to its own devices, my camera ended up with over 400 frames of the very same scene, most of which had no lightning (because the trigger was detecting lightning too faint to register). Fortunately, by the time everyone had settled into a comfort zone with their cameras and Lightning Triggers, not only was the lightning display still going strong, it had moved closer (but remained at a relatively safe distance) and was isolated to the most photogenic part of the view. Our second hour was pure joy, as each dramatic strike seemed designed to outdo the one that preceded it.
The image I share at the top of this post came when the storm was at its most intense, moving southwest to northeast across (right to left) the canyon, just a little east of our location. The brightest bolt you see is striking just below the South Rim, between Yaki and Shoshone Points, but ten miles away.
When all was said and done, I got about 50 strikes that afternoon, and everyone in the group got multiple strikes as well. We had another productive lightning day the next day, but this is the day I’ll remember.
Lightning Photography Revisited
This is an excerpted and updated section from the Lightning article in my Photo Tips section
Photographing lightning at night is mostly a matter of pointing your camera in the right direction with a multi-second shutter speed and hoping the lightning fires while your shutter’s open—pretty straightforward. Photographing daylight lightning is a little more problematic. It’s usually over before you can react, so without a lightning sensor to recognize lightning and click your shutter, success is largely dumb luck (few people are quick enough see it and click).
Lightning Trigger: The best tool for the job
A lightning sensor attaches to your camera’s hot shoe and connects via a special cable to the camera’s remote-release port. When engaged, the sensor fires the shutter (virtually) immediately upon detecting lightning—whether or not the lightning is visible to the eye or camera. With many lightning sensors from which to choose, before I bought my first one I did lots of research. I ended up choosing the sensor that was the consensus choice among photographers I know and trust: Lightning Trigger from Stepping Stone Products in Dolores, CO. At a little less than $400 (including the cable), the Lightning Trigger is not the cheapest option, but after leading lightning-oriented workshops for five years, I can say with lots of confidence that lightning sensors are not generic products, and the internal technology matters a lot. The Lightning Trigger is the only one I’d use and recommend (I get no kickback for this).
I won’t get into lots of specifics about how to set up the Lightning Trigger because it’s simple and covered fairly well in the included documentation. But you should know that connecting the Trigger will disable your LCD replay, which means you won’t be able to review your captures without disconnecting (a simple but sometimes inconvenient task). You also won’t be able to adjust your exposure with the Lightning Trigger operational.
The Lightning Trigger documentation promises at least a 20 mile range, and I’ve seen nothing that causes me to question that. It also says you can expect the sensor to fire at lightning that’s not necessarily in front of you, or lightning you can’t see at all. For every click with lightning in my camera’s field of view, I get many clicks caused by lightning I didn’t see, or that were outside my camera’s field of view. But when visible lightning does fire somewhere in my composition, I estimate that the Lightning Trigger clicked the shutter at least 95 percent of the time (that is, even though I got lots of false positives, the Lightning Trigger missed very few bolts it should have detected). Of these successful clicks, I actually captured lightning in about 2/3 of the frames.
The misses are a function of the timing between lightning and camera—sometimes the lightning is just too fast for the camera. In general, the more violent the storm, the greater the likelihood of bolts of longer duration, multiple strokes that are easier to capture. And my success rate has increased significantly beyond 2/3 since switching from a Canon 5DIII to a Sony a7RII (more on this in the Shutter Lag section).
The Lightning Trigger documentation recommends shutter speeds between 1/4 and 1/20 second—shutter speeds faster than 1/20 second risk completing the exposure before some or all of the secondary strokes fire; slower shutter speeds tend to wash out the lightning. To achieve daylight shutter speeds between 1/4 and 1/20 second, I use a polarizer, with my camera at ISO 50 and aperture at f/16 (and sometimes smaller). Of course exposure values will vary with the amount of light available, and you may not need such extreme settings when shooting into an extremely dark sky. The two stops of light lost to a polarizer helps a lot, and 4- or 6-stop neutral density filter is even better.
Shutter lag
Lightning is fast, really, really fast, so the faster your camera clicks the shutter after getting the command, the more success you’ll have. The delay between the click instruction (whether from your finger pressing the shutter button, a remote release, or a lightning sensor) and the shutter firing is called “shutter lag.” The less shutter lag you have, the better your results will be. The two most important shutter lag factors are:
- Camera model: It’s surprising how much shutter lag can vary from manufacturer to manufacturer and model to model. In a perfect world, for lightning photography your camera’s shutter lag will be 60 milliseconds (.06 seconds) or faster (the lower the number the better), but 120 milliseconds (.o12 seconds) or faster can give you some success. The top cameras from Sony, Nikon, and Canon are all fast enough, but the latest Sonys are the definite shutter lag winner (fastest), with Nikon second, and Canon third (slowest). And shutter lag can vary with the manufacturer’s model: While my Sony a7RII is one of the fastest cameras out there, my a7R was unusably slow, so you need to check your model. Unfortunately, shutter lag isn’t usually in the manufacturers specification, so it’s hard to find. The best source I’ve found is the “Pre-focused” time in the Performance tab of the camera reviews at Imaging Resource.
- Camera settings: Basically, to minimize the “thinking” the camera needs to before firing, you want to be in manual everything mode—metering and focus. If your camera offers an electronic front curtain option (as my Sonys do), use it. If you must autofocus, go ahead and do it each time you recompose, then turn autofocus off as soon as you’re focused. Though the Lightning Trigger documentation suggests Aperture Priority metering, I use and recommend Manual metering mode to eliminate any camera-slowing metering. And, also despite what the Lightning Trigger documentation suggests, noise reduction is a post-capture function that might slightly delay continuous frames, but it won’t increase shutter lag.
Other equipment
In addition to a lightning sensor and fast camera, you’ll need:
- A solid tripod and head: Don’t even think about trying to photograph lightning hand-held
- Rain gear that keeps you dry from head-to-toe
- Umbrella (a.k.a., Wile E. Coyote Lightning Rod) to shield your camera and lightning sensor (many sensors, including the Lightning Trigger, aren’t waterproof) while you compose and wait in the rain. (And obviously, when the lightning gets close, put the umbrella down and run for cover.)
- Lens hood to shield some of the raindrops that could mar the front element of your lenses
- Neutral density filter and/or polarizer to slow shutter speed into the ideal range (1/4 – 1/20 second)
- A garbage bag (my choice) or rainproof camera jacket (haven’t found one I like) to keep your camera and sensor dry during a downpour
- Extra lightning sensor batteries (better safe than sorry)
- Extra memory cards: When a storm is very close or active, your camera could click 20 or 30 frames per minute (even when no lightning is visible)
- Infrared remote to test your Lightning Trigger; I sometimes borrow the remote from my hotel room, but the Apple TV remote works great and is extremely compact (fits nicely into the Lightning Trigger pouch)
- A towel
Getting the shot
Lightning is most likely to strike in or near the gray curtains (clearly recognizable as distant rain) that hang beneath dark clouds. In addition to visible rain curtains, the darkest and tallest clouds are usually the most likely to fire lightning. Here are a few more points to consider:
- The wider your composition, the greater your odds of capturing lightning, but the smaller the lightning will appear in your image.
- Identify the most likely lightning cell and find the best composition that includes it. I tend to start with wider compositions to ensure success, then tighten my composition once I’m fairly confident I captured something.
- Note the height from which the lightning originates and be sure to include enough cloud to get all of the stroke. On the other hand, don’t include too much room above the lightning—one of the most frequent rookie mistakes I see is too much sky/clouds in the frame. Unless the storm is too close for safety, most lightning will originate from about the same height above the ground.
- The best is usually a midrange zoom such as a 24-70 or 24-105—if you find yourself reaching for the 16-35 (or wider), you’re too close.
- On the other hand, once you’re sure you’ve captured some good strikes, try putting on a 70-200. The narrow field of view can significantly reduce the number of frames with lightning, but the ones you get will be much larger in the frame and therefore more spectacular.
- Lightning stands out better in a slightly underexposed image. My target shutter speed is usually 1/8 second (slow enough to include multiple pulses, but not so slow that I risk washing out the lightning). When the sky is relatively bright, dropping to 1/15 or even 1/20 second can make the lightning stand out better than 1/8. Conversely, when the sky is extremely dark and the lightning is firing like crazy, extending to 1/4 second might increase your chances for multiple pulses.
- Just because you’re standing around waiting for things to happen, doesn’t mean there’s nothing to do. Keep your eyes glued to the sky and adjust your composition as the lightning shifts, or as new activity starts elsewhere. If you wait until you hear your shutter click or someone else exclaim before looking up, you won’t see the lightning. And monitor the light—your exposure can change by several stops as the storm moves, intensifies, or winds down.
- Try not to check your captures on your LCD until you’re done (or better yet, until you upload your images to your computer). Viewing the LCD requires turning off the sensor, which risks missing a shot (I’m pretty sure lightning waits for me to turn off my sensor), and you’ll also find that many successful captures, especially wide compositions, just aren’t that visible on an LCD viewed in daylight anyway.
Do as I say (not as I do)
Be aware that electrical storms can move quite quickly, so you need to monitor them closely. Sometimes this simply means adjusting your composition to account for shifting lightning; other times it means retreating to the car if the cell threatens your location.
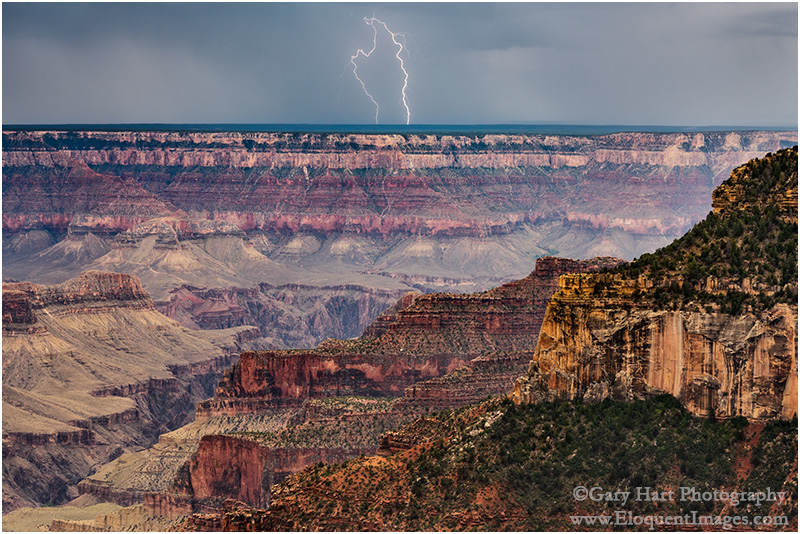
Two Bolts, Grand Canyon
Join Don Smith and me in our next Grand Canyon Monsoon Photo Workshop
Read my article in Outdoor Photographer magazine, Shooting the Monsoon
Workshop Schedule || Purchase Prints
A Lightning Gallery
Click an image for a closer look and slide show. Refresh the window to reorder the display.


Spectacular!
Thanks!
I agree, spectacular!! I particularly like the first image. Thanks for the tips!! 😀
You’re very welcome, Norma. Thanks for reading.
Gary
One the best blog posts I’ve read. So packed with usable information my friend. A tip for a camera bag “dry bag for marine boating” is perfect slip it over your camera on the tripod and you can just leave it in the pouring rain.
Cheers
Dave Knight
Thanks, David. Good suggestion–the garbage bag is the poor man’s dry bag. 🙂 I like it because I don’t even know it’s in my camera bag.
Fantastic post, Gary. You do a great job of explaining the details of setting up for this kind of challenging shoot. Your images are spectacular, as always.
Thank you, Jane. I create a lot of this stuff in a vacuum, so while I think it’s comprehensible when I write it, I’m never sure.
Always concise and inspiring. You live in a very good vacuum! 😄
Yeah, my life doesn’t suck. 😬
Amazing shots!
These are some of the coolest photos of the Grand Canyon I’ve ever seen! Thanks for the tips on photographing lightening.
You’re very welcome. Thank you for reading.
Marvelous. I do not think that I have the courage to stand there while lightening is striking nearby.