Eloquent Images by Gary Hart
Insight, information, and inspiration for the inquisitive nature photographer
Happy Anniversaries to Me
Posted on January 26, 2026
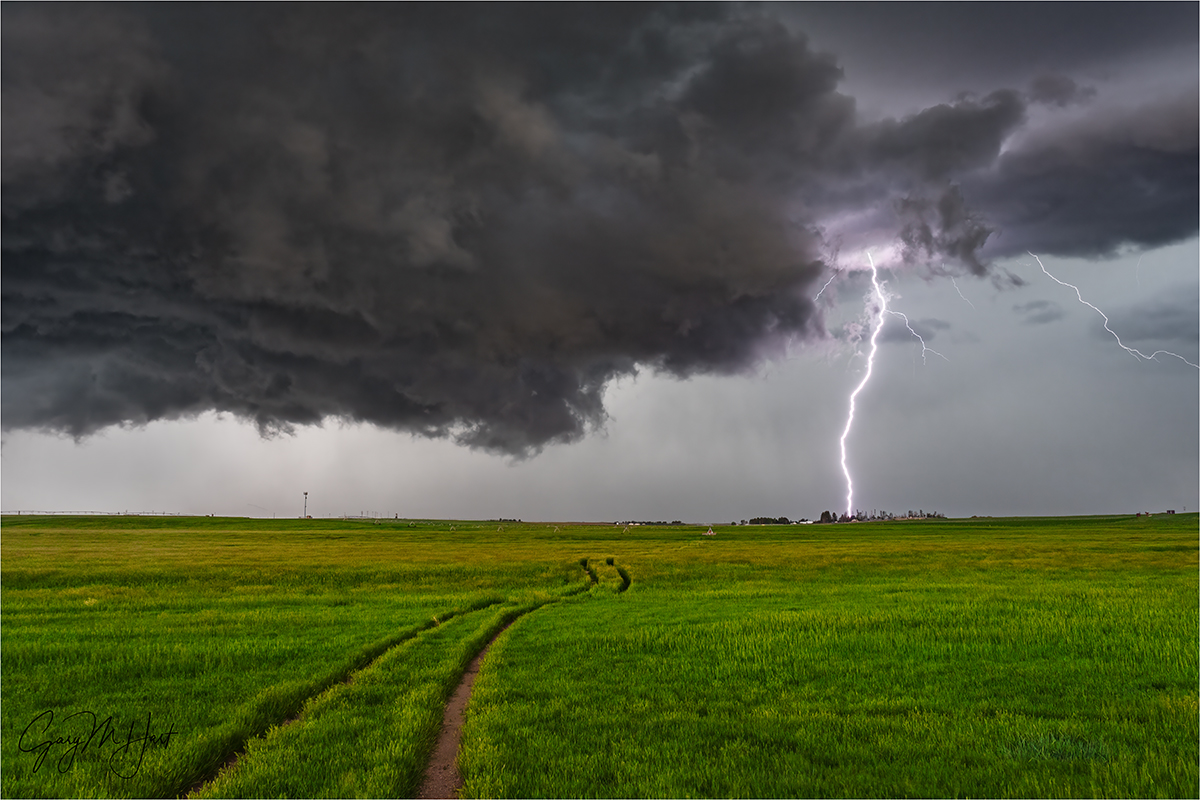
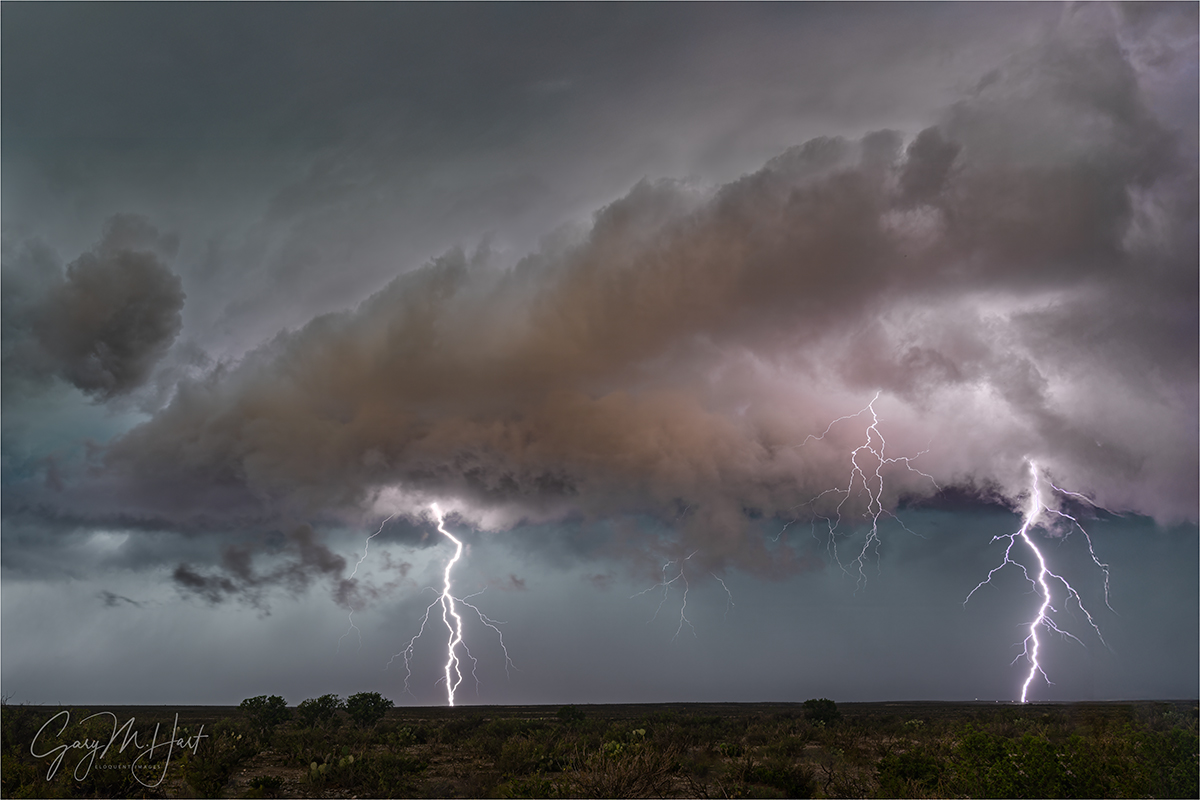
Rural Lightning Strike, Southeastern Wyoming
Sony a7R V
Sony 24-105 G
.6 seconds
F/8
ISO 800
I just realized that January 2026 marks a couple of milestones for me. Twenty years ago this month, I left my “real” job at Intel (good company, lousy manager) to pursue my dream of becoming a landscape photographer. And 15 years ago this month, I started writing this blog.
Leaving Intel was a leap of faith that, I now know, was far riskier than I believed at the time. That it worked out I attribute more to fortuitous timing than some kind of genius master plan. By the time I left Intel, I’d accumulated a pretty good portfolio of images that I’d printed and sold in weekend art shows. I also had prints in a few local galleries, but print sales alone didn’t generate anywhere near enough money to justify leaving a good job (or for that matter, even leaving a bad job).
My first post-Intel step was to ramp up my art show schedule and upgrade my art show booth lighting and display panels; despite decent art show success ($1000-$4000/weekend, doing the math told me that the time, effort, and relentless (intrastate) travel necessary to earn a fulltime income on the art show circuit would soon suck the joy from photography, and leave precious little time for actual photography. So I concentrated on a handful of quality shows within a 100 mile radius of my Sacramento home, and started looking for other ways to support myself with landscape photography.
I knew that many landscape photographers made a good living selling stock images, but by 2006 it was clear to me that digital photography was taking a toll on stock photography income, and there no end to the decline in sight. A couple of years earlier, just a few months after purchasing my first DSLR (a Canon 10D), I’d taken a weekend photography workshop to explore Point Reyes (thanks, Brenda Tharp!) and it occurred to me that I was qualified for something like that in Yosemite: I know photography well enough to teach it, I have a lifetime of Yosemite knowledge, my 20 years in the tech world had focused almost entirely on technical communications (training, writing, tech support), and (not insignificant) I like people. That this insight happened a few years before the photo workshop wave flooded the photography world was a fortunate fluke.
Pivoting to the photo workshop plan, I did a little teaching and guiding as 2006 progressed, but most of that first year was spent setting my workshop business up: building a website, scheduling workshops for the best times to photograph Yosemite, and getting the word out. I also stuck with my modest weekend art show schedule, doing one every two or three months.
Looking back now, I realize the I never would have succeeded had I not spent money I didn’t really have to hire a professional web designer to create a professional website (this was before website templates made web design easy for the masses), and display a monthly ad in “Outdoor Photographer” magazine. By the time my full workshop schedule kicked off in early 2007, every 2007 workshop had filled, and subsequent workshops started filling almost as soon as I posted them.
That first year was all Yosemite, but I soon expanded to include the Eastern Sierra and Death Valley, then Hawaii, Grand Canyon, and beyond. I owe a huge debt of gratitude to my friend Don Smith, who’d already had a very successful career as a professional sports photographer, but was hoping to transition to landscape photography. Don assisted virtually all of my early workshops, and within a year or two was doing his own workshops too, which I in turn assisted. (Over the years our workshop schedules became so packed that we’re no longer able to assist each other much, but Don and I still partner on the New Zealand and Iceland workshops, and stay in pretty close contact throughout the year.)
Between arranging lodging, applying for location permits (not to mention meeting all the criteria each permit requires), answering e-mails from workshop students and potential workshop students, preparing workshop material, and actually conducting the workshops, my plate became pretty full. As much as I enjoyed doing the art shows (I really did), I felt like I was running two businesses. When the Great Recession took and obvious bite from my art show sales, while my workshops attendance didn’t even flinch, dropping the art shows became a no-brainer.
To further increase my exposure, I started writing a blog on a small photoblog site in early 2009. I say this was to increase my exposure, but it was just as much in satisfy my insatiable urge to write. I’ve been a writer all the way back to first grade, when each Monday we were assigned a list of spelling words to learn before the Friday spelling test (am I dating myself, or do they still do that?). The week’s homework assignment was to a create a “spelling sentence” for each word. But instead of spelling sentences, I always wrote spelling stories that used all of that week’s words. I can’t explain why I gave myself that extra assignment for no tangible benefit, except that I thought it was fun.
Ever since, I’ve always had to be writing something. For many years it was short stories (plus a novel that has lived in my head, but so far hasn’t made it to the page). At Intel I was a tech writer, which helped me refine my technical communication skills while feeding my internal writing monster. (One reason I left was resistance from “above” to my attempts to make inherently dull writing more readable.)
While I enjoyed the small community of photographers on that original photoblog site, I quickly found its interface limiting, and soon realized my page wasn’t attracting the eyeballs I’d hoped for. So I started looking for a blogging site that addressed those concerns, and in January 2011 landed on WordPress. What started as a weekly (-ish) blog of a few hundred words, grew to include posts with word counts in the thousands, photo galleries, and a Photo Tips section. By my estimation, I’ve probably written close to two-million words—and counting….
As much I’d love to attribute that volume to my own herculean work ethic, I don’t think I, or anyone for that matter, could sustain a weekly blog, week-in and week-out, for 15 years on guts and willpower alone. This anniversary says less about my dedication and discipline than it does about the fact that I simply love to write.
According to WordPress, I have nearly 40,000 subscribers. But because this blog is as much (more?) for me as it is for my readers, I’ve never tried to monetize those numbers by displaying ads or intrusive affiliate links. It’s satisfying to know that it has led to many workshop signups—probably not enough to justify all the time I spend on it, but that’s okay. And I never tire of hearing that people actually read and benefit from what I’ve written.
Though it wasn’t my conscious intent at the beginning, this blog has become an integral part of my photography. That’s because the subjects I choose, and the way I choose to capture them, are very much a reflection of my relationship with the natural world. To me, much of the beauty in my subjects transcends the visual and resides in the underlying natural laws. Augmenting my images with descriptions and explanations of those natural processes, makes my subjects even more beautiful to me, and (I hope) through my words, to my readers.
For example, lightning. I will freely admit that lightning’s appeal might be much greater to a life-long Californian like me, than it is to, say, a Floridian, to whom lightning is at best a nuisance, and at worst a persistent source of danger. But I do love everything about lightning—not just the way it looks, but the processes that cause it. Along with enabling me to share my images of lightning, my blog gives me an excuse to learn more about lightning, and to share that knowledge. Whether it’s the fascinating science that causes lightning, how to read the sky to understand where lightning might strike next, staying safe when lightning threatens, or the even best way to capture lightning with a camera, I’ve learned so much and am grateful to have a platform for sharing it.
Even though I’ve photographed lightning at Grand Canyon every year since 2012, it took last June’s Midwest storm chasing trip to show me how much I don’t know. At Grand Canyon, we’re usually photographing distant thunderstorms across the canyon. But not only does storm chasing put you in much closer proximity to the electrical storms generating the lightning, these storms, whether rotating supercells or “merely” towering thunderheads, are on a totally different scale.
These insights came on the trip’s very first afternoon, when we hightailed it from our Denver hotel up through the plains of northeastern Colorado and into southeastern Wyoming. The image I share today I captured on the workshop’s second stop. It was my introduction to both the power and proximity of Midwest electrical storms, and with it the realization that unlike Grand Canyon storm chasing, where we generally set up a safe distance and then just wait for the lightning, Midwest storm chasing is actual get-in-the-van!-step-on-it-screech-grab-your-gear-sprint-shoot-retreat!-step-on-it-repeat STORM chasing.
Later this afternoon I got my first look at an actual supercell. And a few days after that, my first (and second, and third, and fourth, and…) tornado. A couple of days later we witnessed a supercell and lightning display that was one of the most breathtaking experiences of my life. And nearly every day of this nearly 2 week trip we saw lightning.
Calling this storm chasing experience life-changing might sound hyperbolic, and maybe even a little cliché, but I can think of few things in my photography life that have left me more awestruck. It certainly rivals other photography firsts, like rafting Grand Canyon, and viewing the northern lights and a total solar eclipse. To think that I’ve been able to earn my living witnessing these sights, and to share it all here, Is a blessing I never want to take for granted.
Workshop Schedule || Purchase Prints || Instagram
Storm Chasing Memories
Click any image to scroll through the gallery LARGE


Storm Chasing Diary: Saving the Best For Last
Posted on July 27, 2025
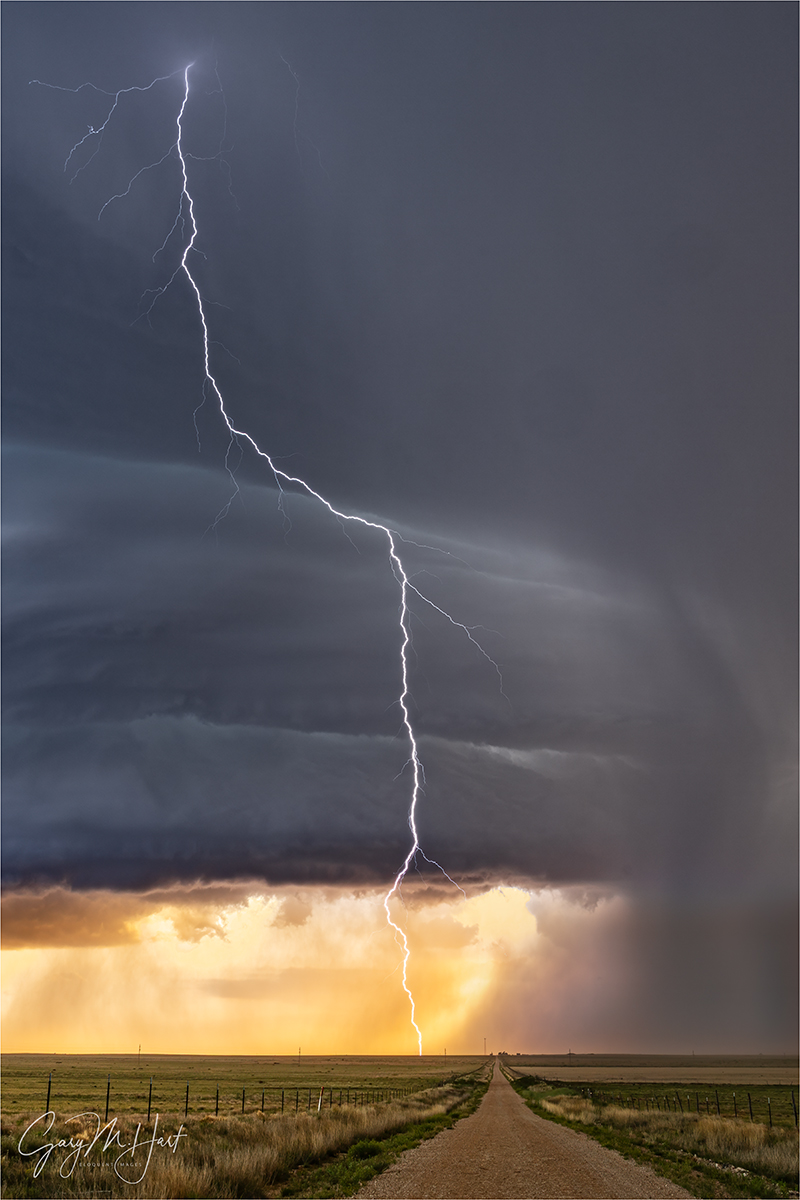
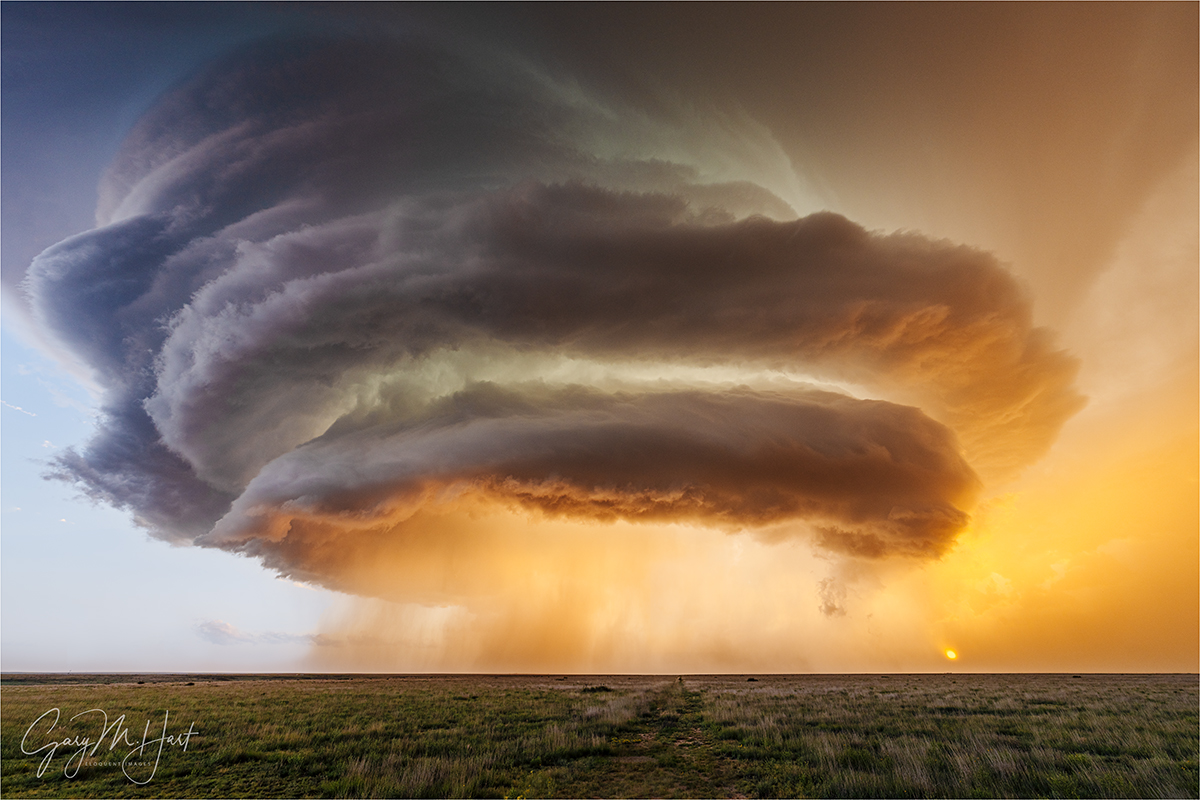
Sunset Supercell Lightning, Amistad, New Mexico
Sony a7R V
Sony 24-105 f/4 G
ISO 50
f/18
1/4 second
I’ve really enjoyed sharing my storm chasing images and experiences with everyone here on my blog, but need to end this “Storm Chasing Diary” series so I can return to some the unprocessed images from other recent trips. So the “last” referred to in the title is the series, not the images, which will keep coming as time permits.
“Best” is a very subjective term. I can’t even decide for sure that this image is the best one I captured this day, but I’m going with it because at the very least, it was the most thrilling.
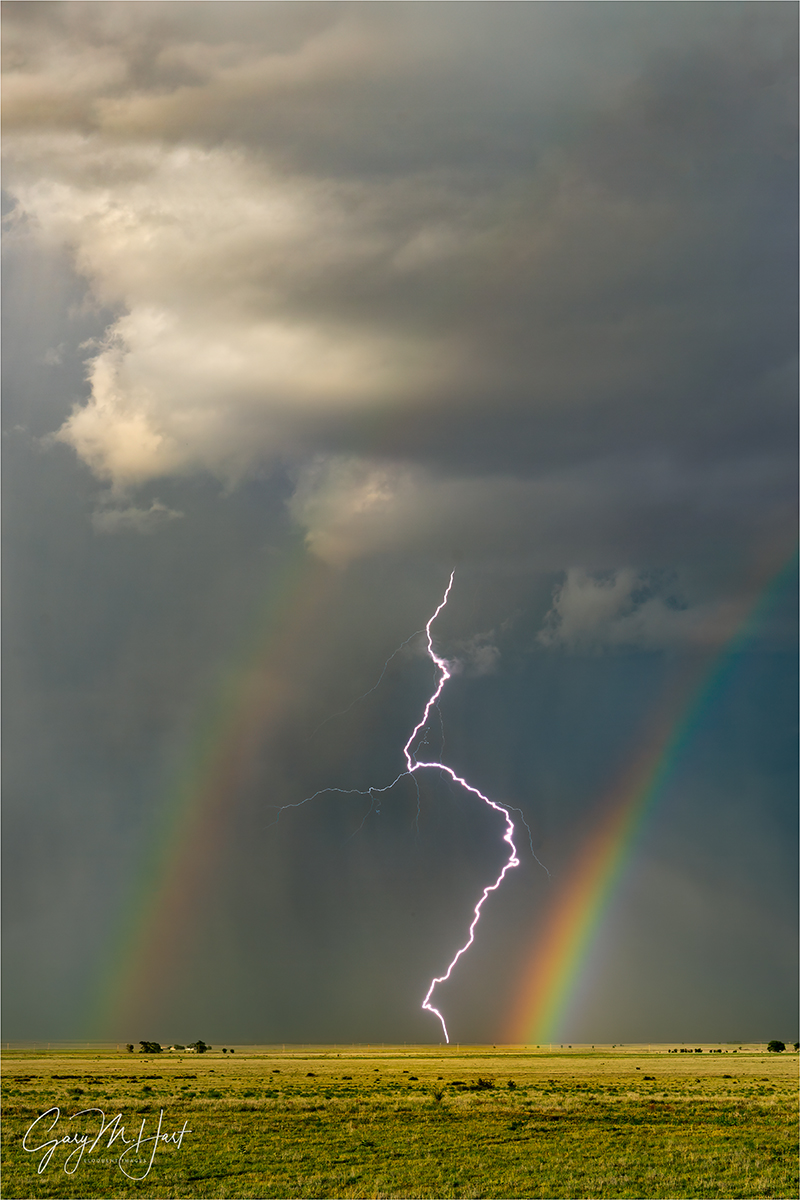
After finishing with the storm cell I wrote about in my previous blog—the one with the double rainbow split by a lightning bolt, I looked around, wondering where everyone had gone. A minute ago we were all-in on the rainbow, but now I was alone. No, they weren’t playing a trick on me, they were lined up on the road about 100 feet away, aiming their cameras the other direction, toward a storm that had organized into a massive supercell while I was off chasing rainbows.
Surveying that scene, I said aloud and to no one in particular, “Well, this looks interesting,” then ambled off to join them. Surely I wouldn’t be able to top what I’d just captured, so on the way I stopped to share my excitement over capturing a double rainbow with a lightning bolt with our trip leader, Chris Gullikson. As I prepared to pull up the image on the back of my camera, a lightning bolt like none I’d ever seen froze me. This electric monster stretched from the base of the new supercell’s anvil—a thunderstorm’s cap, where the convection ceases and the clouds spread horizontally—all the way to the ground, instantly infusing me with deeper understanding of why everyone was so focused on this new storm. (Not to mention a renewed sense of urgency.)
This lightning was on a completely different scale from the ones I’d just been photographing—certainly in intensity, but even more impressive (and unprecedented in my personal history) was its length. The storm’s anvil topped out over 50,000 feet above the ground, and though the anvil’s top wasn’t visible from down on the ground, the bolt I’d just seen must have spanned several vertical vertical miles before stabbing the ground only about a mile away.
I quickened my pace (okay, sprinted), found a slot in the group’s already established firing line, and hastily set up. Since my Lightning Trigger was already attached and ready to go, all I need to do was compose and re-meter. To this point, most of my supercell images had used a 12-24 or 16-35 lens—wide enough to include the entire structure. But both were back in the van and I didn’t want to take my eyes off the storm to go fetch them if I didn’t need to. So I twisted my 24-105 all the way out to 24mm, and found it was just wide enough to include all of the most important components of the scene: the wall cloud, the rain curtain and sun, plus a little of the road. Though the cell was moving pretty rapidly from right to left, I reasoned I could stick with the 24-105 as long as I monitored my composition and adjusted for the motion every minute or two. Then I crossed my fingers, hoping that my composition would reach high enough to include all of whatever lightning I saw.
With everything ready for the next lightning strike, I took the time to appreciate the view. Of course every supercell is spectacularly beautiful, but this one was made even more special by its proximity to the sun, which etched its glowing disk in the dense rain curtain, and infused the backlit the clouds with a rich, golden hue. Surely, I thought, adding a lightning bolt like the one I just saw to something already so beautiful would be too much to ask for.
Apparently not. While I’ve seen many storms dispense more lightning than this one, the emphasis here was clearly on quality over quantity. In the 30 or so minutes I photographed it, I captured 6 bolts of similar brilliance and length to that first one. The one I’m sharing here was not only the evening’s strongest, eliciting the most ooohs and ahhhs from the group, it was also the most perfectly positioned, making it an easy to choice to be the first to process. I eventually went back and processed a couple of others as vertical frames, partly to add variety, and partly because they were just too beautiful to let languish on a hard drive.
If you’d have told me before the storm chasing workshop that we’d have one day where we saw multiple tornadoes, but that our best day would be a day with zero tornadoes, I wouldn’t have believed you. But if someone held a gun to my head and told me to pick one “best” day of the storm chasing trip, I’d have to say (before disarming them and rendering them unconscious, of course) this day would be the one.
June 7, 2025, Near Amistad, New Mexico (processed so far)


It’s days like this one, as well as our nearly as memorable tornado day, that remind me why I am a nature photographer. The unpredictability of the natural world, combined with its absolute insistence on doing exactly what it wants to do, can make photographing it an extremely frustrating endeavor. But then we get rewards like this.
One other thing this whole storm chasing experience did for me was reinforce my message to people who tell me how lucky I am to live in California, where I have so much world class beauty right at my doorstep. And while I can’t disagree (or complain!), I remind them that California skies are generally quite boring. The atmospheric sights I witnessed were every bit as spectacular as any more permanent terrestrial feature I’ve witnessed. Which is why I’m jealous of anyone who lives somewhere that serves up skies like this from time-to-time. Fortunately, until I return, I have the bounty I collected on this trip, both processed and yet-to-be processed, to keep me happy. So while this may be the last of my “Storm Chasing Diary” series, it absolutely won’t be the end of new images from this trip.
I’m also excited to say that this experience so greatly exceeded my expectations in so many ways (far beyond the photography itself, believe it or not), that I’ve decided to continue doing (this thing that was supposed to be a one-off) on into the future. In fact, Jeremy Woodhouse and I have already scheduled a storm chasing workshop for next summer, and are in the planning stages for another one in 2027.
Join me on another storm chasing adventure next summer
The Joy of Lightning
Click any image to scroll through the gallery LARGE


Storm Chasing Diary: Safety, Schmafety
Posted on June 29, 2025
Too Close, Somewhere in West Texas
Sony a7R V
Sony 24-105 f/4 G
ISO 100
f/10
1/2 second
It feels pretty weird writing about sweltering Texas June afternoons while, only a couple of weeks later, shivering through frigid New Zealand June mornings, but welcome to my world. We’ve had some gorgeous photography Down Under again this year, and while I’d love to be able to capture, process, and blog in something closer to real time, my workshop priorities just don’t permit that. So here I am in extraordinarily beautiful New Zealand, still thinking about storm chasing in the Midwest. (But I’m definitely not complaining about this life I’ve chosen.)
So anyway…
It seems like every time I post a lightning image, I get admonished by someone who insists that I’m too close, too foolish, or that I must have a death wish. And while I appreciate the concern about my wellbeing, (tongue in cheek title of this post notwithstanding) I really am not a careless person.
These unsolicited lectures seem to have been exacerbated by this year’s decision to chase storms in the Midwest. After fielding enough (ostensibly) well-intended scoldings, I’ve decided that some people just don’t understand the research and planning that goes into storm chasing, and the care taken to ensure the safety of all—safety really is a non-negotiable priority. And then there those people who, no matter how careful my planning and execution, simply can’t comprehend why someone else would do something they themselves wouldn’t dream of doing.
To the latter group, let me point out that risk management is part of virtually every human activity, from a trip to the store, to free-soloing El Capitan (I’ve actually done one of these things), and pretty much every other activity in between.
Before any act, on some level, conscious or unconscious, we decide whether the benefit justifies the risk. And as you might imagine, the individual calculus behind those choices is all over the map, because one person’s thrill is another person’s terror. Which is why I’m always amused when someone scolds me for doing something simply because they’d never do it.
Yes, pursuing a subject that might kill you—suddenly, violently, and in multiple ways—on the surface sounds pretty nuts. But people every day most of us get behind the wheel fully cognizant of the potential that some random event completely beyond our control, from a sudden mechanical failure to a clueless fellow driver, could injure or kill us without warning. And what about that steak you had for dinner last night? Did you know that more than 5000 American die from choking each year?
Alex Honnold, everyone’s poster-child for risk taking, talks about the difficulty people have distinguishing difference between risk and consequence. He asserts that most people focus too much on the consequence of failure (almost certain death for someone free-soloing), and not enough on its risk. He believes, and so far has proven, that his preparation, physical abilities, and experience, make free-soloing a very low risk endeavor.
Far-be-it from me to compare myself to Alex Honnold, but I will say that majority of people who storm chase (myself included) don’t just race willy-nilly into a violent storm—we do an immense amount of research, arm (or surround) ourselves with the necessary expertise and tools, and make informed decisions on where to be, when to be there, and how we’ll retreat when things don’t go exactly as expected. As a nature photographer, this kind knowledge and preparation enables me to satiate my passion for natural drama and beauty while minimizing the non-zero chance I’ll die doing it. But your results may vary.
Is throwing caution to the wind how I live every aspect of my life? Absolutely not—not even close. For example, living vicariously through climbers, I think free-soloing El Capitan sounds like a blast—but all the preparation, knowledge, and ropes in the world are nowhere near enough to compel me to try rock climbing, in any form. In fact, even the knowledge that simply standing still is enough to keep me completely safe on the rim of Horseshoe Bend (near Page, Arizona—all who have been there know what I’m talking about), couldn’t get me within three feet of that edge. But, as I said, your results may vary.
Back to storm chasing
The big three storm-chasing weather phenomena that can kill you are tornadoes, hail, and lightning. (Despite words to the contrary from self-appointed lightning experts) I have enough general understanding and firsthand experience with lightning to possess a pretty good sense for what’s safe and what’s too close. But a charging tornado? Not so much. Before the trip, all I knew about tornado safety was that the ever popular grizzly attack strategy—just be faster than the person you’re standing next to—doesn’t work for tornadoes. And hail? Just looking at pictures of cars and buildings pummeled by large hail was enough to give me pause, and to seriously wonder whether storm chasers need to don helmets.
Given these concerns, it didn’t take long to appreciate the advantage of a trip leader who is a meteorologist with more than 20 years’ experience chasing storms. Specifically, our leader Chris’s ability to read the storms well enough to not only identify the best burgeoning supercell to target, but also to put us in the safest place to photograph whatever our chosen storm delivered, and when it’s time to exit, paid off time and time again.
From Chris, I learned (and later confirmed through my own observation) that tornadoes tend to form in very a specific region of a supercell, and only after tipping their hand with visible tells. Before dispensing a tornado, supercell starts visibly rotating, then drops a “wall cloud” down to ground level. On the day we saw a half-dozen or so tornadoes, Chris called each in advance, actually pointing out just where they’d drop.
And once on the ground, tornadoes tend to follow a predictable (to those who can read supercells) path. So even though we were within a mile of several tornadoes that day, we were able to safely observe them moving across our line of sight, and never felt the slightest anxiety.
Large hail was another danger novelty for this California boy. After seeing photos and hearing stories graphically depicting an assault by baseball-sized (and larger) frozen projectiles, I had no desire to experience large hail firsthand. But, since (as I know now) large hail tends to fall in certain regions of a storm that can be seen from a great distance, and you can actually hear hail coming, we were always able to avoid dangerous hail.
Lightning, on the other hand, still made me nervous. Turns out our experienced, storm-chasing meteorologist was perfectly comfortable defying all the lightning rules I’ve applied during my Grand Canyon monsoon storm chasing trips (where lightning is our prime target). Wide open spaces? Sure, whatever provides the best view. Nearly simultaneous lightning/thunder? Keep shooting!
I eventually asked Chris if he has some kind of secret lightning-whisperer insight that enables him to get so close to lightning. And though his answer wasn’t exactly comforting (“No.”), he did share that his lightning strategy is founded on more than 20 years of consequence-free exposure to supercell lightning.
Too close for comfort (but I’d do it again)
By the time we were on our tenth day of chasing, I’d come to terms with our cozy relationship with lightning, and certainly couldn’t argue with the results: lots of great lightning captures, and no storm chasers lost. Win/win.
But we weren’t out of the woods yet. Day 10 day found us motoring from the Texas Panhandle into eastern New Mexico, and finally down to southwest Texas, not far (as the crow flies) from Big Bend National Park. The day’s highlight was chasing a beautiful supercell across the Texas badlands in typical (by now) stop/start fashion, tracking the blue hail core, monitoring visible rotation for a possible tornado, and grabbing occasional lightning strikes.
At one point, the limited road network out there forced us to “punch through” the core of the storm, where we endured about 30 minutes of torrential downpour, drifting small (-ish) hail that deposited up to two inches of white, grape-size pellets on the road, and a barrage of frequently close lightning. After reaching the other side, several times we found ourselves far enough out front to stop and photograph the storm’s advance for a few minutes before retreating.
At our final stop, we had enough time to break out the tripods—a real luxury. The closest lightning was no more than a mile or two away as I took up position along a fence and set up my tripod, camera, and Lightning Trigger. Though the foreground here wasn’t great (understatement), the blue of the hail core was clearly visible, and a howling wind continuously pushed spectacular clouds rapidly across the scene, each one armed with an arsenal of ground-stabbing lightning.
After composing and metering, I just stood back and let my Lightning Trigger do all the work, and enjoyed the show. Occasionally, I’d adjust my framing as I became more aware of where the most lightning was firing. As the intensifying blue of the hail core signaled the storm’s approach, I could that the lightning was advancing with it. About the time I started getting a little nervous, Chris called us all back to the vans, but just as I reached for my camera to pack it up, the most spectacular, and closest, strike fired and the thunder exploded almost immediate my camera’s final click of the day.
I made it to the van before the next bolt landed, and we were soon down the road safely ahead of the hail. Had we been too close? Possibly. But as much as we’d grown to trust Chris, who had been right every time leading up to this shoot, we all hung in there. Seasoned storm chasing veterans by now, every single one of us was well aware of the risks, and each made the conscious choice to stay out and keep shooting rather than return retreat to safety as the lightning approached.
I always wear a seatbelt in a car, a helmet when I bike, and wait for the WALK sign. And you’ll never find me clinging to the side of El Capitan, or even standing on the edge at Horseshoe Bend (my Horseshoe bend pictures require a tall tripod and 3-foot remote cable to keep me a comfortable distance from the edge). But I’d do this storm chasing thing again in a heartbeat—even if that heartbeat might be my last.
Workshop Schedule || Purchase Prints || Instagram
Worth the Risk
Click any image to scroll through the gallery LARGE


Storm Chasing Diary: Hit the Ground Running
Posted on June 6, 2025
Supercell and Lightning, Northeast ColoradoSony α1
Sony 12-24 GM
.4 seconds
F/14
ISO 50
What would you think if I told you that, on my 12-day storm chasing trip in the Midwest, we drove from Colorado, to Wyoming, to Nebraska, back to Colorado, back to Nebraska, and finally to Kansas? Pretty nuts, right?
Please don’t judge me when I tell you all that was just our first day. But when crazy weather is your subject, lots of miles and crazy hours are not negotiable. Fortunately, our storm chasing leaders did give us a small break on day-two, when we started in Kansas and finished the day in Texas, via Oklahoma. As I write this, it’s day-three and I’m sitting in one of our two vans in Vaughn, New Mexico, waiting with my group for our trip-leader/meteorologist to decide whether to stay put with the current storm, head northwest toward an active storm near Albuquerque, or motor east to Fort Sumner to take advantage of increasingly favorable conditions there. (Note: We ended up with, “None of the above.”)
Day-one (Monday) was my first-ever storm chasing experience, and saying we hit the ground running would be an understatement. After a morning orientation at our Denver hotel that included introductions and a lecture that seemed designed specifically to satisfy my inner weather geek, all 16 of us (me, our tour-guide/meteorologist, my co-leader and driver Jeremy Woodhouse, our other driver, and the 12 photographers/chasers comprising the workshop group) piled into our two 12-passenger vans and pointed northeast. Within a couple of hours we were on a storm in southeastern Wyoming, where I got to photograph my first-ever supercell. But spectacular as that was, we didn’t stay long, because (apparently) a better storm was blooming back in Colorado.
After leaving Wyoming, the rest of our day was filled with so much, I don’t have the memory or time to provide blow-by-blow specifics. We’d be racing to get in position for a brewing storm, then see something too good to pass and make an unscheduled brake-slam/hop-out/click/retreat stop, before continuing on our way. Plan changes were routine and came faster than I could keep up.
The weather only intensified as the afternoon progressed. Near Merino, Colorado, we finally got out in front of a storm, enabling us to settle down long enough for the tripods to come out. I set up up with my Sony a1 and 12-24 f/2.8 lens—the only lens wide enough to capture the entire cell as it bore down on us. When I realized how much lightning was firing (mostly to the right of the cell), I quickly attached my Lightning Trigger and went all the way out to 12mm to maximize my lightning chances.
The plan to follow my standard compose/click/evaluate/refine/click workflow went right out the window when I saw how quickly the storm was moving (right-to-left and approaching). Since I needed to be at 12mm, horizontal, with the supercell centered to include all of it, there wasn’t much opportunity to add variety to my compositions. My Lightning Trigger was clicking my camera so rapidly, at bolts seen and unseen, I adopted a new strategy: just let the Lightning Trigger handle the clicking, while I stood back and absorbed the spectacle. My only job was to monitor my exposure and occasionally reframe to account for the storm’s movement. I even had time to capture some video with my iPhone while my grown-up camera did the real work.
This storm actually displayed enough rotation that we thought it might dispense a tornado, and at one point we even heard a tornado siren, but no such luck. Most of its lightning was intra-cloud and out of my frame, but rather than recompose for lightning shots, I kept my composition on the star of the show: the supercell. Though the scene that afternoon was really about this truly magnificent storm, I was thrilled to find a few frames accented with squiggles of lightning.
That night we finished shooting in Nebraska (I think) with a different cell that generated several tornado alerts on our phones (picture a van with 8 people receiving slightly out of synch tornado warnings), but we never saw one. We finally rolled into our hotel in Goodland, Kansas at around 11 p.m., too late for dinner—a not uncommon experience, I’ve learned.
It’s now day-5 and soooooo much has happened since then. And we still have a week to go. No guarantees, but I’ll try to post occasional updates as time permits. Stay tuned….
Join Me On An Upcoming Storm Chasing Adventure
Workshop Schedule || Purchase Prints || Instagram
Cloud Collection
Click any image to scroll through the gallery LARGE


, Yosemite")


, Death Valley")


Grand Canyon Lightning 2024: Part 2
Posted on August 16, 2024

Bent, Grand Canyon Lightning
Sony a7R V
Sony 24-105 f/4 G
ISO 50
f/18
1/6 second
When I returned from my Grand Canyon Monsoon photo workshop earlier this month, I was so excited about this year’s last-day lightning experience that I immediately processed a few images and sat down to blog about them. But when my blog started approaching 4000 words, I thought for everyone’s sanity (both yours and mine), it might not be a bad idea to split my ramblings into two blogs. In the first one I detailed, among other things, the story of the actual shoot that produced nearly 60 lightning images on the day the workshop ended. I also wrote about the Southwest monsoon in general, and the genesis of my lightning chasing obsession.
Now I’ll move on to some of the science of lightning, and my thoughts on including lightning in an image. Without further adieu…
Here’s Part 2
When you’ve been writing a weekly photo blog for over 13 years, at some point you’re bound to run out of new things to say. When that happens, the goal becomes finding fresh ways to express potentially stale thoughts. So forgive me if you’ve heard this before, but it bears repeating: Landscape photography captures the relationship between Nature’s enduring and ephemeral elements.
In the simplest terms possible, Nature’s enduring elements are those landscape features we travel to view and photograph, confident in the knowledge that they’ll be waiting for us when we arrive: mountains, lakes, rocks, trees, waterfalls, and so on. On the other hand, Nature’s ephemeral phenomena include the always changing light and weather, celestial events, and seasonal variations that play in, on, and above the landscape—never-guaranteed phenomena we might hope (and plan) to find when we arrive at our enduring destinations, but also those conditions that simply surprise (or disappoint) us. Regardless of how they converge, the landscape photographer’s job is to combine the best of Nature’s enduring and ephemeral elements in the most compelling way possible.
Pretty straightforward, right? For some things perhaps, but maybe not so much for others. I’d put lightning in the not-so-much category: for starters, we never know where it will strike next, or if it will even strike at all. And even when it does happen, lightning comes and goes faster than our shutter fingers can respond. But, like most of Nature’s most fickle ephemeral phenomena (alliteration anyone?), the more I understand lightning, the better my success.
Where my lightning pursuit is concerned, it doesn’t hurt that I’ve always been something of a weather nerd, starting in my early teens with an inexplicable fascination with the weather forecast segment of KGO-TV’s (Channel 7 in San Francisco) nightly news (thank you, Pete Giddings), continuing with meteorology classes in college, as well as my ongoing consumption of weather articles, books, blogs, and podcasts.
Despite this general interest in meteorology, I never really took the time to study lightning closely until I started trying to photograph it. I knew the basics, but the deeper I looked, the more fascinated I became. And not coincidentally, the more lightning success I had.
For starters, a lightning bolt is an atmospheric manifestation of the truism that opposites attract. When two oppositely charged objects come in close proximity, an equalizing spark is produced. For example, when you get shocked touching a doorknob, on a very small scale, you’ve been struck by lightning.
On the atmospheric scale, understanding the mechanism isn’t too difficult to get your mind around if you remember a few basic facts:
- Warm air rises because it’s less dense than cold air. And cold air falls because it’s more dense.
- This warm air rising, cold air falling thing is the underlying engine of convection: air that’s warmer than its surroundings rises, until it cools enough be colder than its surroundings.
- Since warm air holds more moisture (water vapor) than cold air, anything that makes air cooler (like rising through the atmosphere) squeezes its moisture out, which causes its contained water vapor to condense and form clouds.
- The greater the temperature difference between the warmer lower layers of the atmosphere, and colder higher layers, the more unstable the atmosphere is said to be. This instability drives the convection process that leads to thunderstorms.
- Warm air will continue rising until it is no longer warmer than the surrounding air, potentially ascending high enough for the water vapor it carries to condense and freeze. Or until it encounters an inversion.
- An inversion is a cap (layer) of warmer air sitting atop cooler air, an aberration that puts the brakes on the rising warm air.
Of course weather phenomena are rarely simple, but in general the ingredients for lightning are moist air (high humidity), an unstable airmass atmosphere uncapped by inversion, and surface heating to initiate the convection process. With these ingredients in place, adjacent columns of ascending and descending air generate collisions between the contained water molecules.
When ascending and descending water molecules collide, negatively charged electrons stripped by the collision attach to descending molecules, giving them a net negative charge; the remaining molecules, now with a missing electron and a net positive charge, are lighter and continue upward. This electron imbalance is called ionization. The result is a polarized cloud that’s positive on top and negative at the bottom. The most powerful convective updrafts carry water droplets high enough that they freeze, shifting the ionization process into overdrive with ice particle collisions.
Since nature really, really wants to correct a charge imbalance, and always takes the easiest path, if the easiest path to electrical equilibrium is between the cloud top and cloud bottom, we get intra-cloud lightning; if it’s between two different clouds, we get inter-cloud lightning. And when the net charge beneath the cloud is positive while the cloud bottom is negative, we get cloud-to-ground lightning. (This describes negative lightning; positive lightning, where the cloud/ground charges are reversed, is also possible, but less common.)
In addition to the vertical motion within a thunderstorm, there is also horizontal motion that moves a cell across the landscape. This movement feels a little more random because it’s driven by invisible winds in the middle levels of the atmosphere. But keeping an eye on a storm can at least enable a general understanding of the direction it’s moving—important information when you want to photograph lightning (also when you want to stay alive).
With lightning comes thunder, the sound of air expanding explosively when heated by a 50,000-degree jolt of electricity. While lightning’s flash zips to our retinas at more than 186,000 miles per second, thunder lumbers along at the speed of sound, a pedestrian 750 miles per hour—nearly a million times slower than light.
Knowing that the thunder occurs at the same instant as the lightning flash, and the speed at which both travel, we can calculate the approximate distance of the lightning strike. While we see the lightning pretty much instantaneously, thunder takes about 5 seconds to cover a mile. So dividing by 5 the number of seconds between the instant of the lightning’s flash and the arrival of the thunder’s crash gives you the lightning’s approximate distance in miles (divide by 3 for kilometers).
Technically, if you’re close enough to hear the thunder, you’re close enough (probably within 10 miles) to be struck by the next lightning bolt. But watching lightning at Grand Canyon over the last dozen years, I’ve become pretty comfortable reading the conditions and determining when the storm’s too close. I still err on the side of safety, shutting down a shoot sooner than many in the group might like, but I haven’t lost anyone yet, so I must be doing something right. (And seriously, I know people understand when I terminate a shoot because lightning is too close, and it frustrates me just as much as it does them.)
Understanding thunderstorms in general, and lightning creation in particular, has helped me more accurately determine where to point my camera for the best chance of success. Given the number of Grand Canyon vistas with views extending dozens of miles up, down, and across the canyon, at the beginning I’d just point my camera and Lightning Trigger in the direction of any cloud that was producing rain. But now I know that all rainclouds aren’t created equal, and that the clouds most likely to produce lightning are the darkest and tallest. The darker a cloud, the more moisture it contains, and the greater the potential for ionizing collisions. The taller a cloud, the more likely it is to contain the ice that supercharges the ionization process.
And since lightning often precedes thunderstorm’s motion, striking the rim (or inside the canyon) in front of the falling rain I’d previously targeted my compositions on, I’ve become better able to anticipate where the next bolt might strike and adjust my composition proactively.
On the day I captured this (and nearly 60 other) lightning images, with ample monsoon moisture from the Gulf of Mexico and an uncapped atmosphere, all that was needed was warming sunlight to kick off the convection process that sends the moisture skyward. The morning started cloudless, and from my vantage point at Grand Canyon Lodge (right on the North Rim), by midmorning I could see billowing clouds far to the south. Even though the workshop had ended that morning, about half the group had stayed, so I summoned them with a text message.
We started seeing lightning less than an hour later. During the three or so hours of activity, it was fun watching various cells bloom, mature, and peter out. During most of that period of activity there was overlap, as one cell was diminishing, another was starting up—sometimes in the same general direction, other times over a completely different part of the canyon. The overall trend of the storms’ motion was east-to-west, across the canyon, along the South Rim.
I’ve said it before, but it bears repeating that I think the absolute best way to really appreciate lightning is to spend time closely scrutinizing a still image. With a lifespan measured in milliseconds, a lightning bolt is the epitome of ephemeral—whether in person or in a video, it’s a memory before we fully register that lightning just fired. We have a general idea of its location and overall shape, but it’s not until we’re presented with a frozen instant of that lightning bolt’s peak energy that we fully understand the details of what took place.
It doesn’t take long to realize that each strike has its own personality, distinctly different from all others. Examining my images later, I always look to process the lightning images with the most personality. One bolt’s most striking (pun unavoidable) feature might be the circuitous route it followed to get from cloud to ground, or the network of related simultaneous bolts associated with it, or the numerous spiderweb filaments it produced, or maybe the sheer power and brilliance it displayed.
Thinking in terms of matching these ephemeral features with the enduring canyon, on a macro scale the enduring aspect was determined when I decided to visit Grand Canyon during monsoon season. But my decisions for how to combine the landscape ephemeral lightning have evolved, influenced now by the knowledge I’ve gained, and also by shifting priorities. With so many in my images lightning portfolio, my goal is no longer to capture lightning no matter what (by simply pointing in the direction most likely to get lightning, regardless of the scene there)—now I can now afford to factor the better composition into my framing decisions. While that shift might reduce the number of strikes I capture, it increases the chance of getting strikes I especially like.


Above is a series of four strikes from the afternoon’s most active cell, captured over a 12 minute span. Despite similar origin and landing locations, you can see that each bolt is unique. I remember them in a very general sense because each induced from the group reflexive, giddy exclamations that far surpassed the standard “Ooooh!” every lightning bolt elicits. Despite retaining a vague memory of their shapes and paths, I love that I was able to freeze each one for detailed examination.
JOIN ME FOR NEXT YEAR’S GRAND CANYON LIGHTNING CHASE
Workshop Schedule || Purchase Prints || Instagram
Lots More Lightning
Click any image to scroll through the gallery LARGE


Grand Canyon Lightning 2024: Part 1
Posted on August 11, 2024

Fire in the Hole, Grand Canyon Lightning
Sony a7R V
Sony 24-105 f/4 G
ISO 50
f/18
1/6 second
Back at it—the chase is on
Every year I schedule one or two (and one time three) photo workshops for the peak weeks of the Southwest US monsoon. Despite the summer crowds (which I’ve become pretty good at avoiding), I’d argue that monsoon season is the best time to photograph Grand Canyon. Given the monsoon’s frequent mix of thunderstorms and sunlight, adding colorful sunrises/sunsets and rainbows to Grand Canyon’s splendor are always a real possibility. And photographing the Milky Way above Grand Canyon is a true highlight for everyone. But despite these undeniable visual treats, more than anything else, foremost in almost everyone’s mind is lightning.
Each time I start with a new workshop group (that is clearly brimming with lightning aspirations), I’m reminded of the first time I tried chasing lightning—both the extreme disappointment of failure, and (especially) the ultimate euphoria of success. So even with hundreds (thousands?) of lightning images to my name, reviving these memories help me live vicariously through the joy and disappointment of my workshop students.
Though (or maybe because) I’ve never lived anywhere that got much lightning, I’ve been fascinated by lightning since I was a child. (Lightning is so rare here, when Californians hear thunder, instead of sheltering safely like sane people, we run outside so we don’t miss anything.) So I guess it makes sense that ever since I picked up a camera, I’ve dreamed of photographing lightning.
In the beginning…
In 2012, Don Smith and I drove to Grand Canyon to try and make that happen. I mean, how hard could it be? Armed with our cameras and virgin Lightning Triggers, on that first trip we endured enough frustration—lots of lightning that for a variety of rookie reasons, we couldn’t seem to capture—our initial dreams of dozens of lightning images became prayers for just one.

Lightning Strike, Zoroaster Temple and Brahma Temple, Grand Canyon (2012)
Those prayers were answered many times over toward the end of the visit, when a surge in monsoon thunderstorms on and near the South Rim coincided with just enough of a bump in experience (and humility) to equal success. On our last day, so thrilled were we by our South Rim lightning experience, that instead of heading straight home as planned, we detoured four hours in the opposite direction to the North Rim. There, in just a few hours, we captured even more new lightning, more than enough to energize our long drive back to California. I was hooked.
After those beginner’s ups and downs, my lightning success has increased each year. Of course when no lightning happens, there isn’t much I can do about it, but learning to interpret the forecasts (including the fairly technical NWS forecast discussions), understanding the patterns of monsoon storm development and behavior in and around Grand Canyon, increased familiarity with my Lightning Trigger, and (finally) finding an app that reliably alerts me about lightning far outside my range of vision, has significantly increased my lightning success rate.
Lightning Trigger love
For daytime lightning, I can’t overstate the importance of a reliable lightning sensor with range. First, don’t even think about trying to photograph lightning in daylight without a device that detects the lightning and triggers your camera. I know people try the see-and-react technique, but success with this approach is mostly luck—if you do get a bolt, it was almost certainly not the one that made you press the shutter, it was a secondary or tertiary (or later) bolt that followed the initial one. And one of the most common mistakes I see aspiring daylight lightning shooters make is adding an extreme neutral density filter to achieve the long exposures that yield so much success at night. But night lightning shows up because of the extreme contrast between the brilliant lightning against black surroundings; that contrast disappears in daylight, so you end up with a many-second/minute exposure with lightning bolts that last a minuscule fraction of a second, rendering the lightning faint or (more likely) invisible.
Fortunately, the lightning sensor Don and I started with has turned out to be the best, saving us lots of frustration, research, and money. You’ll find many lightning sensor options, most of which I’ve encountered in a workshop, but the only one that I’ve seen work reliably is the Lightning Trigger (though people use the name as a generic, this is the only one that can use it legally). There are fancier sensors, and cheaper sensors, but I’ve found none that combine reliability and range as well as the Lightning Trigger. (I’m not saying that the others don’t work, I’m saying that I’ve never seen any that work as well as the Lightning Trigger, so even though I get no kickback or other benefit from pushing it, the Lightning Trigger is the only lightning sensor I recommend.)
Playing the odds
On a textbook monsoon day, the storms start firing south of the canyon (around Flagstaff and Williams) mid-/late-morning, and move northward as the sun ascends, usually arriving at the canyon late morning or early afternoon. While waiting for the storms to arrive, I rely on my Lightning Tracker Pro app to monitor the approaching activity and get ahead of it, especially when I’m on the South Rim, where my groups stay about 10 minutes from the rim. (It’s easier on the North Rim because our cabins are right at the rim.)
Chasing lightning means obsessive monitoring of weather forecasts. And counterintuitively, my workshop groups have the most success not when the forecast calls for lots of thunderstorms, but when the thunderstorm odds are in the 20 to 40 percent range. That’s because Grand Canyon has a multitude of the vistas with broad, distant views up, down, and across the canyon. These views, combined with the Lightning Trigger’s incredible range (I’ve used mine to capture daylight lightning more than 50 miles away), enables us to safely photograph distant storms—storms usually so far away that we don’t hear the thunder.
So a 20 percent chance of thunderstorms means that (very roughly) 20 percent of the forecast area will get lightning, so it’s usually not difficult to stand on the rim and find lightning happening somewhere within the Lightning Trigger’s range. On the other hand, when the forecast calls for a 50 percent or higher chance of thunderstorms, we do indeed get much more rain and lightning, but usually there’s too much to photograph safely because you never want to be photographing the storm you’re in.
Let’s go fishing
As thrilling as chasing lightning might sound, it’s really about 95 percent arms folded, toe-tapping, just-plain-standing-around-scanning-the-horizon, suddenly interrupted by random bursts of pandemonium. Often, (and despite years of experience) after all that anticipation-infused waiting, the response to the first lightning bolt is either: 1) Crap, the lightning is way over there; or 2) CRAP! The lightning is right here! What ensues is a Keystone Cops frenzy of camera bag flinging, tire screeching, gear tossing, tripod expanding, camera cursing, Lightning Trigger fumbling bedlam. Followed by more waiting. And waiting. And waiting….
I’ve always found the waiting part of lightning photography a lot like fishing—spiced up by the understanding that these fish have the ability to strike you dead without warning. Both fishing and lightning chasing are an intoxicating mix of serene communing with nature, with an undercurrent of giddy anticipation. And whether you’re fishing or trying to photograph lightning, a strike is far from a guarantee that you’ll reel anything in.
Just as fish somehow slip the hook, seeing a lightning bolt is no guarantee that my camera recorded it. Some of my lightning “the one that got away” stories, especially when I was just starting, turned out to be something I did wrong (and my list of stupid mistakes is too long, and embarrassing, to detail in public), but usually it’s simply because lightning can sometimes come and go before even the fastest camera can respond.
One frustration that I’ve learned to deal with is that when a Lightning Trigger is attached and turned on, the camera is in its shutter half-pressed mode (to allow the absolute fastest response), which disables many/most (varies with the camera) controls and the LCD image review—and I guarantee that the surest way to ensure another lightning strike is to turn off your Lightning Trigger to review the last frame, because the instant you do, a spectacular triple-strike will fire right in the middle of your frame. Guaranteed. (This is an extension of the axiom every photographer knows: The best way to make something you’ve been waiting for happen, is to put away your camera gear.) And though there’s no way to prove it, I think we all know that each time we pull the line out of the water to make sure the worm is still there, the “big one” swims right by.
Better late than never
This year I only did one Grand Canyon Monsoon workshop, and true to form, nearly got carpal tunnel scrolling through the weather forecasts in the weeks leading up to the trip. One week in advance, the conditions looked promising, but as the workshop approached, I was alarmed to see it trending drier with each forecast. By the time we started, the NWS was promising clear skies from start to finish.
I’ve seen forecasts like this before, and while they often do come true, I’ve also seen them change on a dime. I also found hope in the forecasts for Flagstaff and Williams to the south (that’s right, I don’t just obsessively scroll the Grand Canyon forecasts, but the nearby forecasts as well), which had thunderstorm chances in the 20-30 percent range all week. This told me that the moisture was nearby, and only a very slight change would send it the 70 or so miles north to Grand Canyon.
The evening of the workshop’s first day (Monday), a few clouds were added to the Thursday forecast—no rain, but at least the moisture was moving in the right direction. Then, in the forecast released Tuesday evening, we were “promised” a 20 percent chance of rain on Friday. With each subsequent forecast (they’re updated several times a day), it appeared things were trending in the right direction for the end of the week and beyond. Unfortunately, the workshop ended Friday morning. So I encouraged everyone with flexibility in their schedule to extend their stay at least through Friday afternoon, and about half the group was able to do it—including Curt (the photographer assisting me) and me.
This workshop enjoyed beautiful sunrises and sunsets, including a real jaw-dropper at Cape Royal on Thursday evening, plus a pretty great Milky Way shoot the night before. And a few in the group stayed up late on Thursday night and got some nice, though fairly distant, night lightning from the Grand Canyon Lodge deck. But those of us who opted to stay an extra day hung our lightning hopes on the Friday and Saturday forecasts.
Much to the consternation of those who added a night hoping for lightning, Friday morning dawned cloudless. But I reassured everyone that this is actually a good thing (it really is), because clear skies maximize the surface heating that fuels the convection thunderstorms require. Though the workshop officially ended after that morning’s sunrise shoot, I promised them I’d be around and happy to help. For starters, I created a text thread that enabled me keep them up to date on the thunderstorm development.
Then I camped out in the Grand Canyon Lodge Sun Room, keeping one (or more) eye on the spectacular view across the canyon to the South Rim and beyond. Late morning my lightning app started reporting strikes north of Williams, less than 60 miles due south. A little before 1:00 p.m. clusters of towering cumulus started blooming just south of the rim, and I knew the lightning wouldn’t be far behind—right on schedule. I texted the group that it’s go-time, then started setting up.
I captured my first lightning strike at 1:15, and between then and 4:00 p.m. captured a total of 59 frames with lightning. I know the others who stayed also captured many nice strikes. Though first bolts were relatively distant, things started to get really good a little before 2:00. I can’t express how much fun it is to be set up and ready, waiting for the next strike, and hearing the exclamations from the group when one hits.
The first strikes started behind the South Rim, a little east (left) of straight across, more or less in the direction of (and beyond) Grandview Point. Gradually the activity moved to the right and closer, approaching the rim, with the strikes increasing in frequency, proximity, and size as they moved. The quantity and volume of the exclamations increased correspondingly. In the nearly two hours of peak activity, the best stuff happened south and southwest of our position.
The two things that I wish for most in a lightning image is a bolt that lands inside the canyon, and capturing a bolt’s actual point of impact. This image checks both boxes. You can clearly see the lightning strike several hundred feet below the rim, and while it might not be clear in this downsized jpeg, my full-size original clearly shows the red/orange point of impact, as well as a fainter branch landing even farther down.
Another thing I love about this image in particular (and one other very similar capture titled “Rim Shot” in the gallery below), is the distance it traveled, and the circuitous route it took. Those familiar with Grand Canyon might be interested to know that this bolt emerges from the clouds more or less above Pima Point on Hermit’s Rest Road, and after more random direction changes than a frightened squirrel, finally smacks the wall a few hundred feet below Yavapai Point, about 5 horizontal miles away. Pretty cool.
Epilogue
Given our successful Friday, Curt and I hit the road for home Saturday morning. But I did keep in contact with others, and the reports were that the Saturday lightning was at least as good as Friday.
In a few days I’ll post Part 2, with more images from this day, plus an updated explanation of the science of lightning.
Join me for next year’s Grand Canyon lightning chase
Lots of Lightning
Click any image to scroll through the gallery LARGE


Storm Chasing Grand Canyon Style
Posted on September 19, 2023

Electric Sunset, Desert View Lightning, Grand Canyon
Sony a7R V
Sony 24-105 f/4 G
ISO 200
f/8
10 seconds
Before returning to the Hawaii trip, I want to wrap up my Grand Canyon trip with another image from the wonderful lightning show on the last night of the second workshop. I wrote about this evening, and the frustrations that preceded it, in my August 29 “Feast or Famine” post. I’ve actually processed three of my favorite lightning strikes from that evening, and it occurs to me that viewing them in sequence adds a little context to the experience—not just for this storm, but for most of the best storms I’ve photographed over my many years storm chasing here.
My approach to photographing Grand Canyon lightning is to take advantage of the broad, distant views along the canyon’s rim to keep a safe(-ish) distance from the storms we photograph. These wide views are a prime reason I use (and strongly recommend to all of the photographers in my workshops) a Lightning Trigger LT IV from Stepping Stone Products in Colorado (I get no kickback or other perks from Stepping Stone—they’ve even discontinued the 10% discount my workshop participants used to get). Not only does the Lightning Trigger miss fewer lightning bolts than any lightning sensor I’ve seen, my groups and I have captured lightning up to 60 miles away—a huge advantage for the kind of lightning photography I do at Grand Canyon.
Since at least 80% of the storms my groups photograph are too distant for the thunder to reach us, the lens I recommend (and use more than 90% of the time) is a 24-105 (for anyone who doesn’t have a 24-105, a 24-70 is a good second choice). Since we can only guess where the next lightning bolt will strike, this focal range is wide enough for the loose compositions that ensure lightning somewhere in the frame, and long enough to pull in even the most distant lightning the LT captures. And we make our composition decisions with the full understanding that we’ll almost certainly be cropping any resulting lightning image—one of the few times I’m grateful for every single one of the 61 megapixels on my Sony a7R V’s sensor.
Having a distant vantage point has the added benefit of providing a ringside seat for the storms’ evolution and motion. I’ve watched storms develop in place, going from puffy white clouds to towering thunderheads in a matter of minutes. Often the storms will drift up from the south—some traveling great distances and lasting an hour or more, others building and dissipating quickly, only to be replaced by another new storm just a little farther north, until the activity reaches the canyon.
The North Rim is the best place to view these northward-trending storms. Since our North Rim lodging is right on the rim, we’ll often just hang out on one of the (lightning rod shielded) view decks at the lodge and wait for the lightning to come to us. Usually the storms don’t make it all the way across the canyon, but we have been chased inside a few times.
The South Rim is a little trickier for lightning photography for several reasons: more people; our hotel is 15 minutes from the rim; and many storms sneak up behind us. But when we do get in position to photograph a storm on the South Rim, it’s a real treat because this is where we find Grand Canyon’s most expansive views.
The Grand Canyon south-to-north storm path I describe is simply a tendency—far from a rule. We’ve also photographed many storms that have moved down from north of the canyon, as well as many that have moved toward us from up- or down-canyon. The storms can move east-to-west, west-to-east, or curve from a north/south to an east/west path (or vice versa). And then there are the storms that just stay put, dumping rain and stabbing the rim with lightning in one spot for more than an hour.
Because of the storms’ unpredictability, it’s very important to keep a constant eye on them, monitoring the general direction of movement. For safety reasons of course, but also to make the most informed composition decisions. Unlike pretty much every other kind of photography, in lightning photography you really don’t know where the scene’s most important feature will be. The difficulty is balancing the best composition for the scene, with where the lightning is most likely to strike.
I got my latest reminder of this for the Desert View lightning shoot on the the workshop’s final night. After starting the day with lots of optimism, we’d pretty much given up hope for a lightning experience. Sunset that evening was Desert View, one of my favorite Grand Canyon locations. The sunset was a treat, but as the sun dropped, I noticed the rain increasing about 15 miles down-canyon (west), to the point where I thought in might be worth breaking out the Lightning Triggers and crossing our fingers.
Fortunately, this was in the direction of one of Desert View’s best compositions, so we weren’t really losing much pointing this way. Meanwhile, I noticed some clouds with potential moving up from the south, just east of the canyon. Though the clouds to the west looked a little more promising for lightning, I liked a northeast-facing composition (wide enough to capture any lightning out there) even better and soon pointed my camera in that direction—a luxury I had (to choose the best composition over the best chance for lightning) because I have more than enough lightning images already.
To make a long story just a little shorter, I got nothing with my northeast composition, but the people facing west weren’t having any luck either. The (still unproductive) cell to the west seemed to be in a great hurry to move north, across the canyon, and I encouraged everyone pointing in that direction to adjust their compositions accordingly (and to keep their fingers crossed)—while I stubbornly stuck with my composition in the opposite direction.
As soon as the western cell made it across the rim, it made a 90 degree turn and started scooting across the North Rim, directly in front of us. It took a couple of excited exclamations (that could only mean lightning across the canyon) to change my mind, and I turned my camera in that direction (now northwest).
I like the Desert View compositions due west (where the rain had been), and northeast (where I’d been pointing). But the lightning was firing directly across the canyon—my least favorite canyon view at Desert View. So I widened up enough to include some of the really nice view to the west—if I’d guessed right, I’d get that view on the left of my scene, with lightning on the right.
I ended up with three really nice lightning images this evening, each well after sunset. The first one (shared above) came the earliest, when I still had most of the down-canyon view I like so much. The second came nine minutes later, after it had become clear that the lightning was moving east and I needed to adjust accordingly. The final strike was six minutes later, after the darkness had really started to take hold, but the activity had moved far enough east that I could completely change my composition to include the up-canyon northeast view I like so much.


I think from this series of images you can really get a sense for the storm’s movement, and my attempts to balance the best composition with the potential for the best lightning. I’m not always as successful as I was this evening, but I guess that’s part of the thrill of lightning photography.
Join me at the Grand Canyon
Lightning Sequences
Here’s a collection of groups of 2 or 3 images captured together (same shoot); I’ve placed each sequence together, in the order they were captured (it’s probably easier to see the sequences if you click through the gallery)
Click any image to scroll through the gallery LARGE


My Favorite Things
Posted on August 28, 2022

Sunset Triple Lightning, Hopi Point, Grand Canyon
Sony a7RIV
Sony 24-105 G
1/4 second
F/11
ISO 320
Maria von Trapp had them, you have them, I have them. They’re the favorite places, moments, and subjects that provide comfort or coax a smile no matter what life has dealt. Not only do these “favorite things” improve our mood, they’re the muse that drives our best photography. Sometimes they even inspire dreams about making a living in photography.
But sadly, turning a passion into a profession often comes at the expense of pleasure because suddenly earning money is the priority. When I decided to make photography my livelihood, it was only after observing other very good (formerly) amateur photographers who, lulled by the ease of digital photography, failed to anticipate that running a photography business requires far more than taking good pictures. Rather than an opportunity for further immersion in their passion, their new profession forced them to photograph not for joy, but to pay the mortgage and put food on the table. And with the constant need for marketing, networking, bookkeeping, collections, taxes, and just plain keeping customers happy, these newly minted photographers soon found that precious time remained for the very thing that led them to become photographers in the first place.
Nearly 20 years ago (yikes), armed with these observations I changed from photographer to Photographer. After seeing what this change had done to others, my transition was founded on a vow to photograph only my favorite things.
It shouldn’t take much time in my galleries to figure out where I find my photographic joy. I could point to locations like Yosemite, Grand Canyon, and New Zealand, but even more important to me than locations are the natural phenomena that fascinate me. Whether celestial or terrestrial, I find myself inexorably drawn to the natural processes that created and affect the world we share.
The why of this starts with growing up in a family that camped for our vacations—I just have lots of great memories of nature. But the other significant factor behind my favorite photographic subjects comes from a fascination with the physical sciences that started in my single-digit years with an interest in comets, and quickly grew to include pretty much anything in the night sky. But even then I wasn’t satisfied with simply looking at the night sky, I wanted to understand what was going on up there. And with that came a realization that Earth is actually part of the cosmos, and soon I was reading about geology and meteorology and pretty much any other ology that had to do with my place in the Universe.
All of this came before I ever picked up a camera. But it might explain why I feel so strongly actually understanding the things I photograph—if they give me join, they’re worth knowing. Whether it’s lightning, reflections, the Milky Way, rainbows, a beautiful location, or whatever, I’ve reached the point where I simply won’t post an image of something I don’t understand.
And because I enjoy writing as much as I enjoy photography, you may have noticed that I also virtually never share an image without writing something about it. I know a lot of people just follow my blog to see my images, and that’s totally fine. But these really are my favorite things in the world, and I truly appreciate that you’ve taken the time to view, and (especially) to read this far.
Keeping in that spirit, here’s a little information about lightning, excerpted from my Lightning Photo Tips article:
A lightning bolt is an atmospheric manifestation of the truism that opposites attract. In nature, we get a spark when two oppositely charged objects come in close proximity. For example, when you get shocked touching a doorknob, on a very small scale, you’ve been struck by lightning.
In a thunderstorm, the up/down flow of atmospheric convection creates turbulence that knocks together airborne water (both raindrops and ice) molecules, stripping their (negatively charged) electrons. Lighter, positively charged molecules are carried upward in the convection’s updrafts, while the heavier negatively charged molecules remain near the bottom of the cloud. Soon the cloud is electrically polarized, with more positively charged molecules at the top than at the base.
Nature really, really wants to correct this imbalance, and always takes the easiest path—if the easiest path to electrical equilibrium is between the cloud top and cloud bottom, we get intracloud lightning; if it’s between two different clouds, we get intercloud lightning. And the less frequent cloud-to-ground strikes occur when the easiest path to equilibrium is between the cloud and ground.
With lightning comes thunder, the sound of air expanding explosively when heated by a 50,000-degree jolt of electricity. Thunder travels at the speed of sound, a pedestrian 750 miles per hour, while lightning’s flash zips along at the speed of light, more than 186,000 miles per second—nearly a million times faster than sound.
Knowing that the thunder occurred at the same instant as the lightning flash, and the speed both travel, we can calculate the approximate distance of the lightning strike. While we see the lightning pretty much instantaneously, regardless of its distance, thunder takes about five seconds to cover a mile. So dividing by 5 the number of seconds between the instant of the lightning’s flash and the arrival of the thunder’s crash gives you the lightning’s approximate distance in miles (divide by three for kilometers).
But anyway…
About this image
As a lifelong Californian, lightning was just something to read about, and maybe see in movies, but rarely viewed in person. And photographing it? Out of the question.
That changed in 2012 when Don Smith and I traveled to the Grand Canyon with our brand new Lightning Triggers and absolutely no clue how to photograph lightning. We returned with enough success to be completely hooked on lightning photography, and a plan to offer Grand Canyon photo workshops focused on the Grand Canyon monsoon and (fingers crossed) lightning. After a few years Don cut back on his schedule and dropped most of his domestic workshops (we still partner for New Zealand and Iceland workshops), but I’ve continued with the Grand Canyon Monsoon workshops. This year I did two Grand Canyon Monsoon workshops, the second of which was probably my most memorable lightning workshop so far—if not for the quantity of the lightning (very good but not record breaking), certainly for the quality.
The image I’m sharing today came on that workshop’s penultimate evening, and came the day after a similarly spectacular lightning show at Cape Royal (I blogged about it two weeks ago). At Cape Royal I commented that this was one of the top five lightning shoots I’ve ever had. Little did I know…
The following night we rode the shuttle out Hermit’s Rest Road, stopping first at the very underrated Pima Point. After spending nearly an hour at Pima, pointing at a potential cell that only teased us, we packed up and headed to Hopi Point for sunset. There really wasn’t much going on when we got there, but the clouds were nice and the sky looked promising for a good sunset.
As sunset approached, what may have been the remnants of the cell that had disappointed us at Pima Point seemed to regroup and start moving from left to right across our scene and toward the canyon. The first reaction to this development was, “No big deal” (fool me once, …). But just one relatively weak bolt was enough to send us all scrambling for our Lightning Triggers. Everything after that is pretty much a blur because as the storm slowly advanced, some unseen force turned the lightning up to 11—both its frequency and intensity.
In my July 31 post I shared an image of a rogue Hopi Point lightning bolt that was somehow perfectly placed above the canyon right at sunset. As the only lightning we saw all evening, this one felt like a gift from heaven. This evening’s lightning was similarly positioned, but much bigger, and I lost track of the number of bolts we saw: double strikes, triple strikes, serpentine strikes—pretty much a lightning photographer’s entire wish list all in one show.
Hopi Point access is by shuttle-only, which means if we miss the last shuttle we’re walking more than 2 miles back in the dark. The lightning was still going strong when we hopped onto the final shuttle in growing darkness, but given what we all knew we had, no one was too disappointed.
Here are a couple of images from Cape Royal the night before this image


And here are the two more images from this night’s shoot at Hopi Point


I realize that I get far more excited about lightning than the average person. And I’m truly sorry for sharing so many lightning images, but you’ll just have to understand that not only is lightning a novelty for me, and (please) recognize my good fortune for being able to make my living photographing nothing but my favorite things.
These Are A Few Of My Favorite Things
Click an image for a closer look, and to view a slide show.


")


Wait for it…
Posted on July 31, 2022

Electric Sunset, Hopi Point Lightning, Grand Canyon
Sony 𝛂1
Sony 24-105 G
.4 seconds
F/16
ISO 200
Landscape photographers have a couple of ways to make nice images. By far the most important is the ability to see the special but less obvious, then know how to compose and expose that special vision in ways that clarify and convey the previously unseen beauty. But sometimes we just need to know when to show up and where to point the camera, and the patience to wait for the special to come to us.
Pretty much any sunrise or sunset at a nice location qualifies for the show up and wait approach, as can popular classics such as Yosemite’s Horsetail Fall in February, or the midday shaft of light in Upper Antelope Canyon’s main room. But whether it’s a planned sunset that went even better than hoped, or a rainbow that seemed to materialize out of nowhere, in their own way these gifts from Nature that don’t require great vision are just as thrilling as the hidden discoveries we work so hard for.
-

- Horsetail Fall and El Capitan, Four Mile Trail, Yosemite
-
- Heavenly Beam, Upper Antelope Canyon, Arizona
Lightning photography requires a lot of the show up and wait approach, because all the compositional skill in the world can’t make a great lightning image if the lightning doesn’t happen. I can’t tell you how many times I’ve been photographing lightning and seen a beautiful composition—some perfect combination of landscape and conditions—in a different direction, and said to myself, “Wow, wouldn’t it be great if the lightning fired right there.” Unfortunately, lightning is a fickle phenomenon that rarely does what photographers want it to do. In fact, it sometimes feels like the lightning is consciously avoiding the composition I want, always in favor of something much less interesting. Sigh…
Right now I’m at Grand Canyon, trying to take advantage of its expansive vistas that frequently provide views of multiple rain cells with lightning potential. While the vast majority of these potential lightning sources never deliver, my original approach to photographing them was to maximize my chances by identifying and targeting the cell with the most potential, without concern for the composition. An alternate approach to photographing lightning is to target the rain cell with the nicest composition, regardless of the strength of its potential—then hope.
Because I’ve learned that lightning neophytes are usually thrilled to capture any lightning, I generally encourage my workshop students, most of whom have never captured great (or any) lightning images, to favor success over the best composition by simply pointing in whatever direction the lightning is most likely to fire.
I’ll never forget the first time I traveled to the Grand Canyon with the sole desire to photograph lightning, and those first few fruitless days on the rim, pointing my camera toward a promising cell only to see it fizzle. I’d have given anything to have just one frame with lightning, composition be damned. And I also never forget the thrill the first time my camera captured lightning.
Ten years later, I’ve reached the point in my lightning photography where I’ve had enough successful captures that I can afford to be a little more selective. In recent years I frequently find myself pointing at the potential lightning spot that has the composition I like most, shunning the one that appears most likely to produce lightning. It’s often a recipe for failure, but the infrequent successes more than compensate.
I got my most recent dose of compensation last Wednesday evening, in this year’s first (of two) Grand Canyon monsoon photo workshops. My group had already enjoyed several lightning shoots from various locations on the South Rim, but nothing spectacular so far. For sunset Wednesday evening, we took the shuttle out Hermit’s Rest Road (no cars allowed). There are many vistas on this route, so I gave my group enough time to visit as many stops as the wanted to, with the understanding that we’d all gather back at Hopi Point to shoot sunset together there.
Soon after arriving at Hopi Point about 45 minutes before sunset, I checked my My Lightning Tracker app and saw that all of the activity was at least 50 miles away and didn’t really align with anything interesting. While the view at Hopi Point is one of my favorites, I’ve photographed here so much that now I only bring out my camera when there’s potential for something spectacular—either lightning, or great color and/or clouds. So my camera stayed in the bag.
With almost 100 percent cloud cover, my decision seemed reasonable, but as the sun dropped, a small opening appeared on the western horizon, directly in the sun’s path. “Hmmmm,” I said, inching toward my bag. I looked again. A sky filled with clouds and a hole on the horizon is the ideal combination for a colorful sunset, so I pulled out my Sony α1, already loaded with my Sony 24-105 G lens, and set up shop along the rail to wait with the rest of my group.
As we chatted, it became pretty clear that the opening would persist through sunset, and that something nice was in store. A few minutes later, when a small rain curtain spread just to the right of the sun’s path, I said out loud, “All this scene needs is a lightning bolt.” I was half joking, but this thought prompted me to check my lightning app one more time. Still nothing really exciting, but there were hints of distant, minor lightning activity in the general direction of the sunset, so I pulled out my Lightning Trigger—just in case. I encouraged the rest of the group to get theirs out too, then quickly scanned the horizon for other rain curtains with potential for lightning—I saw a couple that might produce, but nothing promising enough to justify anyone diverting from the sunset.
Then we waited and clicked as the sun dropped and started to light the sky. It turned out that the opening wasn’t as open as we’d hoped, so not enough sunlight made it through to color the entire sky, and we never actually even saw the sun. But all was not lost, as the clouds near the horizon throbbed a brilliant reddish orange and I could tell by all the clicking that everyone was pretty thrilled.
When a few higher clouds lit, I oriented my camera vertically and angled farther upward for more sky than I usually include here (Pro tip: the Grand Canyon is usually more interesting than the sky.) Already pretty content with what I had so far, imagine my surprise when, just as the color reached its crescendo, a streak of light darted from the clouds and kissed the horizon. My first reaction was that it came from higher in the sky than I’d have expected, but it happened so fast and unexpectedly that I really wasn’t sure what I’d seen. In fact, if the rest of the group hadn’t exclaimed in unison, I might not have believed I’d seen it at all.
The unified exclamation quickly turned to joyful laughter from those who had taken the time to attach their Lightning Triggers, and regretful moans from those who hadn’t. When a couple of people defied my recommendation to not check to see if they’d captured the bolt (you have to turn off the Trigger to review images, and often lightning’s not as visible on the review screen as it is on a computer) and reported success, I couldn’t resist and checked mine too.
There it was. I instantly saw why it had appeared to originate so much higher: the bolt had emerged high, slid across the front of the thunderhead, and weaved through a window in the clouds before disappearing and emerging one last time. And perfectly aligned with the Colorado River, it couldn’t have struck in a more ideal place if I’d have drawn it in myself.
I’ll admit that this image isn’t a creative masterpiece (the composition isn’t much different from several of my other Hopi Point images), but I will take a little credit for being there, and also for the foresight to be ready for lightning when its possibility wasn’t obvious. And honestly, it was simply an honor to be there for something so magnificent—my only job was to wait, and not screw it up.
My Lightning Gallery || My Lightning Photo Tips Article
Worth Waiting For
Click an image for a closer look, and to view a slide show.


Breaking Murphy’s Law
Posted on March 29, 2022
 Rain Curtain Lightning, Lipan Point, Grand Canyon
Sony a7RIV
Sony 24-105 G
1/8 second
F/9
ISO 160
Things go wrong. Or, as more succinctly attributed to 20th century aerospace engineer Edward Murphy, “Anything that can go wrong, will go wrong.”
In my previous post I wrote about some of the physical hardships nature photographers endure while chasing their shots. This got me thinking about all the things that can go wrong for a photographer, in the field for sure, but also at home, in the office, and on the road. I’m talking about lost, stolen, or broken gear, computer crashes, failed memory cards, and so on. I’ve personally experienced my share of these crises, and in workshops have witnessed firsthand the mishaps of others, ranging from amusing, to frustrating, to devastating.
In Iceland four photographers who believed they were being cautious lost cameras and lenses to a sneaker wave. In my most recent Yosemite workshop, a woman dropped her telephoto lens and cracked its body, then a little while later (in a completely unrelated mishap) discovered that none of the data on her memory card was readable. I’ve had workshop students lose cameras and computers to theft, and have a friend who drove off with his camera bag on top of his car and when he returned just a couple of minutes later, it was gone. I once had a memory card with an entire workshop’s worth of images somehow slip from my pocket while I was on a walk near home. The one thing each of the victims in these mishaps had in common was none of us believed anything would go wrong when we set out that day.
But yes, things do in fact go wrong. My trademark move seems to be leaving gear behind. I’ve done it several times, usually when I’ve set something down while working with a group, then forgetting about it when it’s time to move to the next location. My most recent such offense occurred on last May’s Grand Canyon raft trip, but there have been others before that. I usually rationalize this carelessness by playing the “I was distracted by my workshop group” card, but how then do I explain the time I reached into the trunk of my Lyft and realized I’d left my entire camera bag on the sidewalk in front of the Las Vegas Marriott?
Another source of trauma inflicted on our expensive gear is our own fumble-fingers. Here I don’t think I’m any better or worse than the average photographer—drops happen. In my many decades as a photographer, I’ve had a couple of drops that cost me a body and lens, but nothing that compares to the trauma I witnessed in a Yosemite workshop a few years ago.
This was during the peak of a record-breaking spring runoff, when every river and creek in the park flowed savagely high and fast. We were at Bridalveil Creek, beneath Bridalveil Fall. Normally this is a fairly benign creek, with photogenic cascades that tumble musically between reflective pools. But on this morning the creek was a roaring white torrent, higher than I’ve ever seen it, with no distinct cascades or pools—just a frothing churn.
In typical springs my groups leave the trail and wander upstream and down among the cascades, but this morning each person had safely set up somewhere along the paved trail. I was on the middle of three stone bridges that span the creek, and could feel the water’s vibration in my legs, something I’d never imagined was possible. About 15 feet to my left was one of my workshop students, a recent college graduate in the midst of a cross-country photo trip with his dad. He’d set up near the spot where the creek accelerated and disappeared beneath the bridge.
While marveling at the scene, I became aware of sudden movement on my left and looked just in time to see my student’s tripod, camera, and lens tip into the water (I learned later it had been an inadvertent hip-check as he bent for his bag) and get sucked faster than a flushing toilet under the bridge to downstream points unknown. I could see by his forward lean and the flex in his knees that his first reflex was to leap after his gear, a decision that very likely would have been fatal. He came to his senses before I could reach him or even call out, and instead let out the most pained wail I think I’ve ever heard. For the next 30 minutes he was literally inconsolable as he processed the loss of his camera, favorite lens, only tripod, and memory card containing I don’t know how many days worth of images, not to mention the ramifications of all this loss on his trip with his dad.
I’m sharing all this not to frighten you, but to remind you that being careful is only half the equation, and that you can act now to minimize the trauma of the inevitable unexpected equipment loss or failure. We all tend to get excited enough about a trip, or distracted by a scene, that our judgement suffers—we skip steps, leave things out, underestimate risks, and so on. And sometimes technology simply fails.
I have enough experience, both my own and witnessing others, to feel comfortable offering practical suggestions for preserve not just the wellbeing of your gear and images, but more importantly, your own mental wellbeing. Below are some of the things I do to keep myself sane when the unexpected tries to ruin my day:
- Insure your gear: I’ve lost track of the number of times someone in one of my groups has damaged or lost a piece of equipment in one of my workshops, and told me it’s not insured. At the very least, add your equipment to your homeowner’s insurance policy. Better still, get a completely separate policy, so when you file a camera gear claim, your entire homeowner’s premium doesn’t go up. For 20 years my gear has been insured through my membership in NANPA (North American Nature Photography Association)—the premiums are reasonable, the claims service is fantastic, and (because it’s a group policy) my claims don’t affect my rate. They even insure my computers. One time I lost a lens in the middle of a trip (set it down at a location and it somehow walked away before I returned—sigh)—I filed a claim right on the spot, ordered a new lens that was delivered the next day, and my check was waiting for me when I got home.
- Backup gearCamera: If you’re serious about photography, you really should have more than one camera body. For those photographers whose work is close to home and not time critical, I suppose if something breaks you could just go home and wait for it to be fixed, or for its replacement to arrive. But most of us shoot in situations where being without a camera for even a few hours or minutes means missing opportunities that will never come again. Full frame shooters on a budget should consider an APS-C (cropped sensor) backup body. They’re less expensive, more compact, and give you 50% more reach on all your lenses. I’ve been known to set down a full frame body in favor of my APS-C backup camera to make the moon as big as possible.
- Lens: Duplicating every lens in your bag is a luxury few can afford, but no matter how convenient that 18-300 lens is, you should never go on an important photo trip with only one lens.
- Tripod: If you’re as obsessive about using the tripod as I am, you’ll have more than one (I’m embarrassed to say how many I own). It’s a luxury I can’t afford when I fly, but when I drive to a location I always have a second tripod in my car. For workshops I don’t have to fly to, I also bring a loaner tripod and have lost track of the number of times someone has needed to borrow it.
- Image management—backup, backup, backup. And then backup some more. Below is my own image management workflow—I’m not saying you need to do what I do, I’m just saying that your image management needs to be organized, regular, and redundant.Because all my cameras take two cards (something I highly recommend), my image backups start with each click. I know there are several options for handling these extra cards, but I don’t think any is as important as insuring against data loss. Cards do fail (see above), and as rare as that might seem, cards go missing too (see above). When I lost my card, my reaction was, “Oh crap, I need to buy a new card,” not, “OH CRAP! I’VE LOST AN ENTIRE WORKSHOP WORTH OF IMAGES!”
- When I travel to a shoot, I try to import my images every day (and always when I think I’ve captured something special, but during a workshop I sometimes don’t have the time or energy at the end of the day). Because I like the option of processing on either of my two computers, my import destination is a 4TB SSD drive that lives in my computer bag. And even if I have imported my images, I never delete my cards until I get home. Those times I’m especially excited about what I’ve captured, before flying home I take the time to copy my images to a second SSD drive that stays in my suitcase. That means for the duration of my trip, I have two copies of my images in my camera (which lives in my camera bag), one copy on an SSD drive in my computer bag, and one copy on an SSD in my suitcase. Having them in so many locations while I travel makes it very unlikely I’d lose every copy.
- As soon as I’m home, I copy all of the trip’s images to a 10TB spinning drive that lives on my desk and is automatically backed up to the cloud using Backblaze. And finally, I also copy those images to a RAID 6 NAS (network attached storage) that lives in my office.
About this image
Rain Curtain Lightning, Lipan Point, Grand Canyon
I captured this lightning strike during the same storm that produced the thunderhead in the image I shared last week. It came nearly 40 minutes later, when the sun was near the horizon and the light was noticeably warmer. The rain curtain that’s so visible here was just starting to form in the earlier image, but once it did form it remained pretty stationary and continued to dump like this for at least 45 minutes—no doubt generating flash floods up the canyon.
Something I’ve learned when photographing lightning is to keep my eye on the sky. There’s so much waiting, long lulls where nothing happens, that it’s easy to get distracted by the view, fellow photographers, or a smartphone. As much as I try to advise everyone in my groups to keep watching, attention usually wanes until one or two people exclaim excitedly about a bolt—but by the time the rest of the group looks up (no matter how fast they are), it’s too late. By staying vigilant, you get a good idea of where your camera should be aimed, when the activity is waining, the direction the cell is moving, and whether activity is picking up elsewhere.
One of the cool things about photographing lightning at the Grand Canyon is the breadth of the view, which often provides multiple active cells to choose between. While this cell remained active for quite a while, most of its lightning was behind the rain and we were only aware of it when it registered in our lighting app (usually within a minute or two after the strike).
There were actually a couple of cells delivering more visible lightning, but one was more distant, and the other was out over the Painted Desert and away from the best view. So I stayed zeroed in on this cell, hoping to capture a bolt against the rain curtain. I got a couple that were close, but this is the only one to pierce the rain curtain during its peak.
I had one more realization while watching this intense downpour—anyone fortuitously positioned on the North Rim, perhaps somewhere around Roosevelt Point, would be enjoying an absolutely epic rainbow. All you need for a rainbow is direct, low-angle sunlight directly behind you as you look toward airborne water droplets. I had two out of three—low-angle sun striking airborne water droplets (you can clearly see the sunlight illuminating the falling rain)—but I was in the wrong place. Oh well.
Workshop Schedule || Purchase Prints || Instagram
Lots of Lightning
Click an image for a closer look, and to view a slide show.


