Eloquent Images by Gary Hart
Insight, information, and inspiration for the inquisitive nature photographer
Grand Canyon Lightning 2024: Part 2
Posted on August 16, 2024

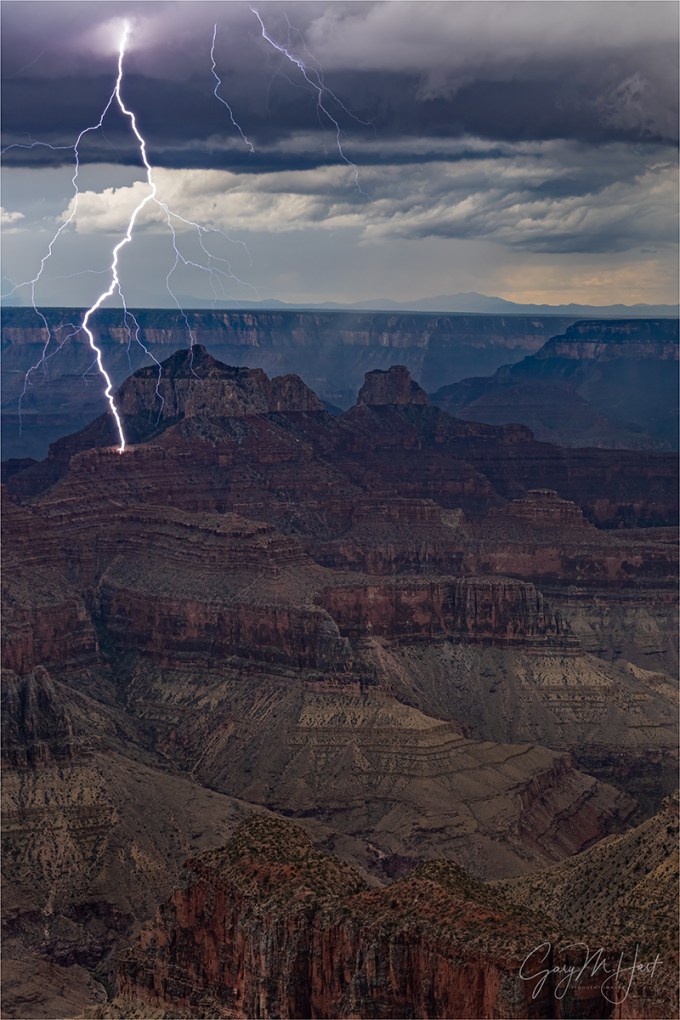
Bent, Grand Canyon Lightning
Sony a7R V
Sony 24-105 f/4 G
ISO 50
f/18
1/6 second
When I returned from my Grand Canyon Monsoon photo workshop earlier this month, I was so excited about this year’s last-day lightning experience that I immediately processed a few images and sat down to blog about them. But when my blog started approaching 4000 words, I thought for everyone’s sanity (both yours and mine), it might not be a bad idea to split my ramblings into two blogs. In the first one I detailed, among other things, the story of the actual shoot that produced nearly 60 lightning images on the day the workshop ended. I also wrote about the Southwest monsoon in general, and the genesis of my lightning chasing obsession.
Now I’ll move on to some of the science of lightning, and my thoughts on including lightning in an image. Without further adieu…
Here’s Part 2
When you’ve been writing a weekly photo blog for over 13 years, at some point you’re bound to run out of new things to say. When that happens, the goal becomes finding fresh ways to express potentially stale thoughts. So forgive me if you’ve heard this before, but it bears repeating: Landscape photography captures the relationship between Nature’s enduring and ephemeral elements.
In the simplest terms possible, Nature’s enduring elements are those landscape features we travel to view and photograph, confident in the knowledge that they’ll be waiting for us when we arrive: mountains, lakes, rocks, trees, waterfalls, and so on. On the other hand, Nature’s ephemeral phenomena include the always changing light and weather, celestial events, and seasonal variations that play in, on, and above the landscape—never-guaranteed phenomena we might hope (and plan) to find when we arrive at our enduring destinations, but also those conditions that simply surprise (or disappoint) us. Regardless of how they converge, the landscape photographer’s job is to combine the best of Nature’s enduring and ephemeral elements in the most compelling way possible.
Pretty straightforward, right? For some things perhaps, but maybe not so much for others. I’d put lightning in the not-so-much category: for starters, we never know where it will strike next, or if it will even strike at all. And even when it does happen, lightning comes and goes faster than our shutter fingers can respond. But, like most of Nature’s most fickle ephemeral phenomena (alliteration anyone?), the more I understand lightning, the better my success.
Where my lightning pursuit is concerned, it doesn’t hurt that I’ve always been something of a weather nerd, starting in my early teens with an inexplicable fascination with the weather forecast segment of KGO-TV’s (Channel 7 in San Francisco) nightly news (thank you, Pete Giddings), continuing with meteorology classes in college, as well as my ongoing consumption of weather articles, books, blogs, and podcasts.
Despite this general interest in meteorology, I never really took the time to study lightning closely until I started trying to photograph it. I knew the basics, but the deeper I looked, the more fascinated I became. And not coincidentally, the more lightning success I had.
For starters, a lightning bolt is an atmospheric manifestation of the truism that opposites attract. When two oppositely charged objects come in close proximity, an equalizing spark is produced. For example, when you get shocked touching a doorknob, on a very small scale, you’ve been struck by lightning.
On the atmospheric scale, understanding the mechanism isn’t too difficult to get your mind around if you remember a few basic facts:
- Warm air rises because it’s less dense than cold air. And cold air falls because it’s more dense.
- This warm air rising, cold air falling thing is the underlying engine of convection: air that’s warmer than its surroundings rises, until it cools enough be colder than its surroundings.
- Since warm air holds more moisture (water vapor) than cold air, anything that makes air cooler (like rising through the atmosphere) squeezes its moisture out, which causes its contained water vapor to condense and form clouds.
- The greater the temperature difference between the warmer lower layers of the atmosphere, and colder higher layers, the more unstable the atmosphere is said to be. This instability drives the convection process that leads to thunderstorms.
- Warm air will continue rising until it is no longer warmer than the surrounding air, potentially ascending high enough for the water vapor it carries to condense and freeze. Or until it encounters an inversion.
- An inversion is a cap (layer) of warmer air sitting atop cooler air, an aberration that puts the brakes on the rising warm air.
Of course weather phenomena are rarely simple, but in general the ingredients for lightning are moist air (high humidity), an unstable airmass atmosphere uncapped by inversion, and surface heating to initiate the convection process. With these ingredients in place, adjacent columns of ascending and descending air generate collisions between the contained water molecules.
When ascending and descending water molecules collide, negatively charged electrons stripped by the collision attach to descending molecules, giving them a net negative charge; the remaining molecules, now with a missing electron and a net positive charge, are lighter and continue upward. This electron imbalance is called ionization. The result is a polarized cloud that’s positive on top and negative at the bottom. The most powerful convective updrafts carry water droplets high enough that they freeze, shifting the ionization process into overdrive with ice particle collisions.
Since nature really, really wants to correct a charge imbalance, and always takes the easiest path, if the easiest path to electrical equilibrium is between the cloud top and cloud bottom, we get intra-cloud lightning; if it’s between two different clouds, we get inter-cloud lightning. And when the net charge beneath the cloud is positive while the cloud bottom is negative, we get cloud-to-ground lightning. (This describes negative lightning; positive lightning, where the cloud/ground charges are reversed, is also possible, but less common.)
In addition to the vertical motion within a thunderstorm, there is also horizontal motion that moves a cell across the landscape. This movement feels a little more random because it’s driven by invisible winds in the middle levels of the atmosphere. But keeping an eye on a storm can at least enable a general understanding of the direction it’s moving—important information when you want to photograph lightning (also when you want to stay alive).
With lightning comes thunder, the sound of air expanding explosively when heated by a 50,000-degree jolt of electricity. While lightning’s flash zips to our retinas at more than 186,000 miles per second, thunder lumbers along at the speed of sound, a pedestrian 750 miles per hour—nearly a million times slower than light.
Knowing that the thunder occurs at the same instant as the lightning flash, and the speed at which both travel, we can calculate the approximate distance of the lightning strike. While we see the lightning pretty much instantaneously, thunder takes about 5 seconds to cover a mile. So dividing by 5 the number of seconds between the instant of the lightning’s flash and the arrival of the thunder’s crash gives you the lightning’s approximate distance in miles (divide by 3 for kilometers).
Technically, if you’re close enough to hear the thunder, you’re close enough (probably within 10 miles) to be struck by the next lightning bolt. But watching lightning at Grand Canyon over the last dozen years, I’ve become pretty comfortable reading the conditions and determining when the storm’s too close. I still err on the side of safety, shutting down a shoot sooner than many in the group might like, but I haven’t lost anyone yet, so I must be doing something right. (And seriously, I know people understand when I terminate a shoot because lightning is too close, and it frustrates me just as much as it does them.)
Understanding thunderstorms in general, and lightning creation in particular, has helped me more accurately determine where to point my camera for the best chance of success. Given the number of Grand Canyon vistas with views extending dozens of miles up, down, and across the canyon, at the beginning I’d just point my camera and Lightning Trigger in the direction of any cloud that was producing rain. But now I know that all rainclouds aren’t created equal, and that the clouds most likely to produce lightning are the darkest and tallest. The darker a cloud, the more moisture it contains, and the greater the potential for ionizing collisions. The taller a cloud, the more likely it is to contain the ice that supercharges the ionization process.
And since lightning often precedes thunderstorm’s motion, striking the rim (or inside the canyon) in front of the falling rain I’d previously targeted my compositions on, I’ve become better able to anticipate where the next bolt might strike and adjust my composition proactively.
On the day I captured this (and nearly 60 other) lightning images, with ample monsoon moisture from the Gulf of Mexico and an uncapped atmosphere, all that was needed was warming sunlight to kick off the convection process that sends the moisture skyward. The morning started cloudless, and from my vantage point at Grand Canyon Lodge (right on the North Rim), by midmorning I could see billowing clouds far to the south. Even though the workshop had ended that morning, about half the group had stayed, so I summoned them with a text message.
We started seeing lightning less than an hour later. During the three or so hours of activity, it was fun watching various cells bloom, mature, and peter out. During most of that period of activity there was overlap, as one cell was diminishing, another was starting up—sometimes in the same general direction, other times over a completely different part of the canyon. The overall trend of the storms’ motion was east-to-west, across the canyon, along the South Rim.
I’ve said it before, but it bears repeating that I think the absolute best way to really appreciate lightning is to spend time closely scrutinizing a still image. With a lifespan measured in milliseconds, a lightning bolt is the epitome of ephemeral—whether in person or in a video, it’s a memory before we fully register that lightning just fired. We have a general idea of its location and overall shape, but it’s not until we’re presented with a frozen instant of that lightning bolt’s peak energy that we fully understand the details of what took place.
It doesn’t take long to realize that each strike has its own personality, distinctly different from all others. Examining my images later, I always look to process the lightning images with the most personality. One bolt’s most striking (pun unavoidable) feature might be the circuitous route it followed to get from cloud to ground, or the network of related simultaneous bolts associated with it, or the numerous spiderweb filaments it produced, or maybe the sheer power and brilliance it displayed.
Thinking in terms of matching these ephemeral features with the enduring canyon, on a macro scale the enduring aspect was determined when I decided to visit Grand Canyon during monsoon season. But my decisions for how to combine the landscape ephemeral lightning have evolved, influenced now by the knowledge I’ve gained, and also by shifting priorities. With so many in my images lightning portfolio, my goal is no longer to capture lightning no matter what (by simply pointing in the direction most likely to get lightning, regardless of the scene there)—now I can now afford to factor the better composition into my framing decisions. While that shift might reduce the number of strikes I capture, it increases the chance of getting strikes I especially like.


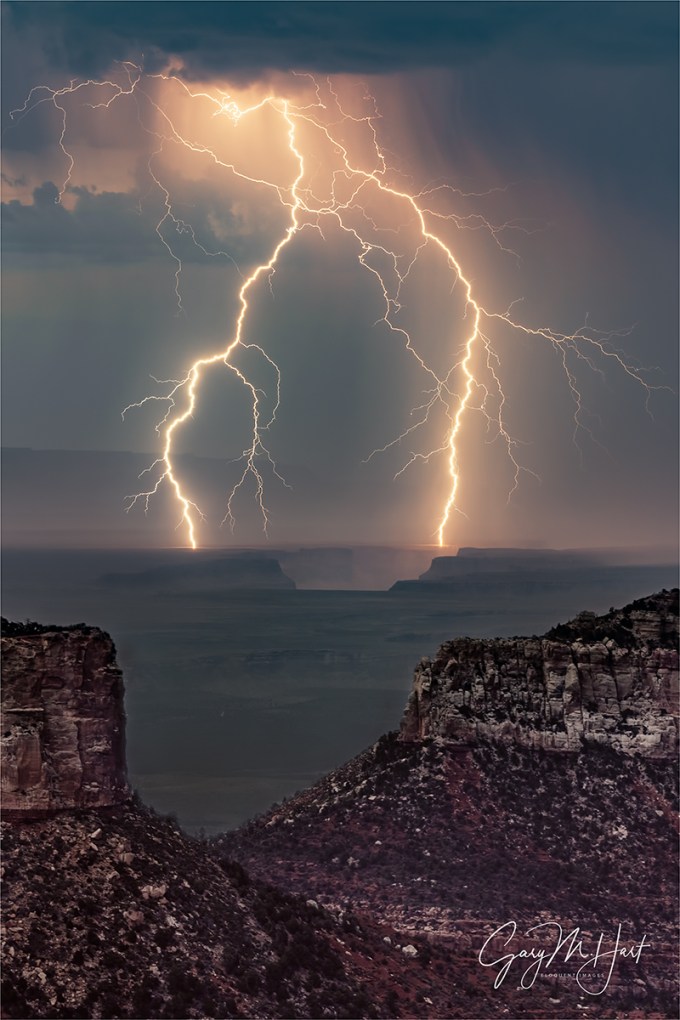
Above is a series of four strikes from the afternoon’s most active cell, captured over a 12 minute span. Despite similar origin and landing locations, you can see that each bolt is unique. I remember them in a very general sense because each induced from the group reflexive, giddy exclamations that far surpassed the standard “Ooooh!” every lightning bolt elicits. Despite retaining a vague memory of their shapes and paths, I love that I was able to freeze each one for detailed examination.
JOIN ME FOR NEXT YEAR’S GRAND CANYON LIGHTNING CHASE
Workshop Schedule || Purchase Prints || Instagram
Lots More Lightning
Click any image to scroll through the gallery LARGE


Frozen in Time
Posted on September 26, 2021
Lightning Strike, Brahma Temple, Grand Canyon
Sony a7RIV
Sony 24-105 G
1/4 second
F/8
ISO 250
I’ve always been intrigued by still photos’ ability to reveal aspects of the natural world that are missed by human vision. A couple of weeks ago I wrote about the camera’s ability to, through long exposures, blur motion and reveal unseen patterns in moving water. And last week I shared an image that used a long exposure to capture the Milky Way above crashing Hawaiian surf, a 20-second exposure that blurred that explosive wave action into a gauzy haze.
But I think my favorite still image motion effect is probably freezing a lightning bolt—an ephemeral phenomenon that comes and goes so quickly that it is already a memory before it even registers to my brain. The thrill of seeing a lightning strike always delivers a jolt of adrenalin, but it’s not until I can spend time with an image that froze it in time that I appreciate all that happens in a lightning bolt. Multiple prongs, meandering patterns, delicate filaments—each bolt seems to have a personality of its own.
For me, the holy grail of lightning captures is the splash of light that occurs at the primary bolt’s instant of contact with terra firma. Not only is getting the precise timing difficult, the strike also needs to be fairly close, and on a surface that’s angled to face my vantage point.
The lightning in this image checked those boxes, striking just a couple of miles away on the diagonal slope of Brahma Temple facing me. It was one of many lightning strikes captured on the second day of my first (of three) Grand Canyon monsoon workshops earlier this summer. On the day prior we’d had a nice lightning shoot just as the workshop started, but the storm that afternoon had moved parallel to the rim, staying near the South Rim, at least ten miles away.
This afternoon’s storm started in more or less the same area of the South Rim, but crossed the canyon, approaching less than two miles from where my group had set up on the view decks outside Grand Canyon Lodge. Protected beneath an array of lightning rods, and just a few feet from the safety of the fully enclosed lodge Sunroom, this spot is the location of some of my workshop groups’ closest lightning encounters. This afternoon was added to that list.
I usually prefer photographing lightning that’s across the rim, distant enough that we often don’t hear the thunder. At most locations, when the lightning gets as close as it got this afternoon, I’ve already rounded people up and herded them indoors or to the relative safety of the cars. But here I have (barely) enough cellular service to monitor the distance of each strike with my lightning app, and keep everyone apprised of its proximity, so they can make their own call on when to retreat.
Preparing to photograph lightning is a matter of setting up my tripod with my camera and Lightning Trigger, composing a frame that includes the area most likely to receive the next bolt, focusing and metering the scene, then standing back and waiting for the strike (not unlike fishing).
If everything is set up correctly, lightning photography a hands-off endeavor—when it senses lightning, my Lightning Trigger fires my camera’s shutter, then just waits patiently to do it again with the next lightning. So when this bolt hit, I wasn’t even with my camera—I was checking with others in my group. When it struck, it was the closest we’d seen so far. It was also farther to the left than any previous strike—so far, in fact, that I wasn’t even sure it was in my frame.
It wasn’t until I was processing my images that I found that I had indeed captured it. Not only that, this bolt struck close enough, on an exposed surface that was in perfect view for me to capture the precise point of contact in all of its glory. Unfortunately, it was on the far left side of my horizontal frame. This is when I appreciate having my Sony a7RIV, probably the best lightning camera made today. Not only do the Sony bodies have the fastest shutter lag (the time it take for the shutter to respond after receiving the instruction to fire), but 61 megapixels provides a crazy amount of latitude for cropping.
I usually like to get my crop right before capture, but I sometimes need to make an exception when photographing lightning, because I’m never sure where in the frame the lightning will land. In this case, having my lightning strike so close to the left side of a horizontal frame made the image feel very off-balance. To fix the problem, I simply turned it into a vertical composition, eliminating everything on the right 2/3 or the original composition. But with 61 megapixels to play with, the final product was still more than 25 megapixels—more than enough for pretty much all of my uses, including large prints.
Read my tutorial on photographing lightning
Frozen in Time
Click an image for a closer look, and to view a slide show.


Thanking My Stars (and Moon, and Lightning, and Rainbows, and…)
Posted on August 18, 2019

Surprise Rainbow, Point Imperial, Grand Canyon
Sony a7RIII
Sony 24-105 f/4 G
1/4 second
F/8
ISO 100
So lately I’ve been thinking about the things I photograph and why I photograph them. Then the other day, after boarding a plane following my recent Grand Canyon monsoon trip, I squeezed into my seat and rummaged through my computer bag, loading the knee-jamming magazine holder on the seat-back in front of me with the two books I’m currently reading. One was “All About Lightning,” by Martin Uman (published in 1971 and revised in 1986); the other was “The Weather Machine: A Journey Inside the Forecast,” by Andrew Blum. On my AirPods was an astronomy podcast (“Orbital Path”). I have no illusions (anymore) of becoming an astronomer or a meteorologist, and the movie version these books is unlikely to be coming soon to a theater near you—no, I’m filling my mind with this stuff simply because it interests me. A lot.
I think everyone has those things that fascinate them so much that there’s no effort learning them. I have a history of finding something interesting and devouring every possible word on the subject. Some were passing obsessions (handwriting analysis, Lincoln head pennies, and—uhhhhh… The Monkees), and others have stuck with me (baseball, astronomy, geology, meteorology, and certain writers).
Which brings me back to the things I photograph, and the realization that we can probably tell a lot about most photographers’ relationship with the world by viewing their images. Anyone who checks the percentage of my images that have a weather or celestial component wouldn’t (or shouldn’t) be surprised by my in-flight entertainment, or to learn that for a few misspent college semesters I majored in astronomy, then geology (and have since kept them as hobbies, where they belong).
The longer I do this, the more I appreciate how lucky I am to actually make my living photographing only the things I love. Nearly 15 years ago I left a good career in the tech industry, naively planning to turn a photography passion into a profession. I can’t tell you how many people since then have told me that doesn’t work—fortunately, I didn’t hear them until it was too late.
For photographers, there’s a fine line between self-employed and unemployed, a line I didn’t fully appreciate when I made my decision to jump into it with both feet. Like millions of other photographers, all I wanted to make a living photographing the beautiful natural world I love so much—how hard could that be? But as many have learned (some sooner than others), not only is there very little market for landscape images, there seems to be pretty much infinite competition—competition that causes landscape photographers to sell digital images for pennies, and prints for little more than their cost. But somehow, for reasons I like to attribute to foresight but must acknowledge dash of shovel full of good luck as well, I’ve managed to make my living photographing only what I love.
Before leaving my tech job, I was doing art shows and making pretty decent money for a weekend’s work. But a weekend art show is so much more than just a weekend of effort, and after doing the math I realized that I’d need to be on the road at least 40 weeks per year to even have a chance to make ends meet through art shows. Gallery sales were a non-starter because the galleries just want too much of the small number of sales they generate, and the stock photography market was already on life support. Open my own gallery? That just sounded like an anchor that would prevent me from taking pictures.
So I started leading photo workshops, which were just starting to catch on and seemed ideally suited to my skillset. Not only was I intimately familiar with Yosemite and other California destinations that pretty much sell themselves, my background was in technical communications (tech writing, training, support), and I genuinely like people.
When I started offering workshop, I still did the art shows, but then came 2008 and the economic downturn. Despite a lot of hand wringing, my workshops continued filling, helped a lot by repeat customers who kept me afloat through the recession. And after one particularly unsuccessful weekend in San Francisco, I decided to drop the art shows altogether and focus on the workshops. I haven’t looked back.
Since making my mid-life career change, I’ve also managed to create a small niche as a writer, both through this blog (which pays nothing but has developed a pretty loyal following), and as a regular contributor to “Outdoor Photographer” and other photography publications (and which earns just slightly more than nothing). Not enough to live on, but at least enough to scratch my life-long writing itch.
So here I am, nearly 15 years into this ride and still going strong. I’m not getting rich, and least financially, but there are better measures of success than dollars. Whether alone or sharing with others, I still get as excited as anyone when the moon rises behind Half Dome, the Milky Way brightens above a New Zealand lake, or the setting sun paints a rainbow against a Grand Canyon sky.
About this image
After a day with a lot more rain than lightning, Don Smith and I took our Grand Canyon Monsoon photo workshop group up to Point Imperial for sunset. The vestiges of the storm still lingered as we set up, but there was no sign of the lightning that had been in the forecast, or even the rain that had drenched us for most of the day. Though lightning was on everyone’s mind, soft light in the canyon and the play of sunlight and clouds overhead kept everyone happy as we waited for sunset.
We’d been photographing for about a half hour when I noticed a tiny fragment of rainbow balanced atop the rim in the south. Not nearly prominent enough to be a prime subject, I nevertheless pointed it out to others and composed a few frames of my own before moving on to other opportunities in a view filled with them. Since there was no sign of rain, I only occasionally checked on the tiny rainbow, each time fully expecting it to have vanished, but each time noticed that it was hanging in there—not really any bigger, but still somewhere on the continuum from vivid to nearly-faded-to-oblivion.
Just a few minutes before sunset and with no rain visible, that little spot of color intensified and stretched skyward. Those of us with eyes on it alerted the rest of the group, sending everyone into a shooting frenzy that lasted until the light faded with the setting sun. I’ve photographed bigger rainbows, and (slightly) brighter rainbows, but only a few that have thrilled me as much as this one that seemed to come out of nowhere.
Grand Canyon Workshops
Personal Favorites: Moon, Stars, and Weather
Click an image for a closer look and to view a slide show.


Chasing Rainbows
Posted on April 17, 2019
Heaven Sent, Grand Canyon Rainbow
The annual Grand Canyon monsoon is known for its spectacular electrical storms, but let’s not forget the rainbows that often punctuate these storms. A rainbow requires rain, sunlight, and the right viewing angle—given the ephemeral nature of a monsoon thunderstorm, it’s usually safe to assume that the sun probably isn’t far behind. To experience a rainbow after a Grand Canyon monsoon storm, all it takes is some basic knowledge, a little faith, and some good fortune.
To help with the knowledge part, I’m sharing the how-and-why of rainbows, excerpted from my just updated Rainbow article in my Photo Tips section. For the faith and good fortune part, read “The story of this image” at the bottom of this post.
Rainbows Demystified
Most people understand that a rainbow is light spread into various colors by airborne water drops. Though a rainbow can seem like a random, unpredictable phenomenon, the natural laws governing rainbow are actually quite specific and predictable, and understanding these laws can help photographers anticipate a rainbow and enhance its capture.
Let there be light
Energy generated by the sun bathes Earth in continuous electromagnetic radiation, its wavelengths ranging from extremely short to extremely long (and every wavelength in between). Among the broad spectrum of electromagnetic solar energy we receive are ultra-violet rays that burn our skin, infrared waves that warm our atmosphere, and a very narrow range of wavelengths the human eye sees.
These visible wavelengths are captured by our eyes and interpreted by our brain. When our eyes take in light comprised of the full range of visible wavelengths, we perceive it as white (colorless) light. Color registers when some wavelengths are more prevalent than others. For example, when light strikes an opaque (solid) object such as a tree or rock, some of its wavelengths are absorbed; the wavelengths not absorbed are scattered (reflected). Our eyes capture this scattered light, send the information to our brains, which interprets it as a color. When light strikes water, some is absorbed, some passes through to reveal the submerged world, and some light is reflected by the surface as a reflection.

Light traveling from one medium to another (e.g., from air into water) refracts (bends). Different wavelengths refract different amounts, causing the light to split into its component colors.
To understand the interaction of water and light that creates a rainbow, it’s simplest to visualize what happens when sunlight strikes a single drop. Light entering a water drop refracts (bends), with different wavelengths refracting different amounts, which separates the originally homogeneous white light into the myriad colors of the spectrum.
But simply separating the light into its component colors isn’t enough to create a rainbow—if it were, we’d see a rainbow whenever light strikes water. Seeing the rainbow spectrum caused by refracted light requires that the refracted light be returned to our eyes somehow.
A raindrop isn’t flat like a sheet of paper, it’s spherical, like a ball. Light that was refracted (and separated into multiple colors) as it entered the front of the raindrop, continues through to the back of the raindrop, where some is reflected. Red light reflects back at about 42 degrees, violet light reflects back at about 40 degrees, and the other spectral colors reflect back between 42 and 40 degrees. What we perceive as a rainbow is this reflection of the refracted light—notice how the top color of the primary rainbow is always red, the longest visible wavelength; the bottom color is always violet, the shortest visible wavelength.
Follow your shadow
Every raindrop struck by sunlight creates a rainbow. But just as the reflection of a mountain peak on the surface of a lake is visible only when viewed from the angle the reflection bounces off the lake’s surface, a rainbow is visible only when you’re aligned with the 40-42 degree angle at which the raindrop reflects the spectrum of rainbow colors.
Fortunately, viewing a rainbow requires no knowledge of advanced geometry. To locate or anticipate a rainbow, picture an imaginary straight line originating at the sun, entering the back of your head, exiting between your eyes, and continuing down into the landscape in front of you—this line points to the “anti-solar point,” an imaginary point exactly opposite the sun. With no interference, a rainbow would form a complete circle, skewed 42 degrees from the line connecting the sun and the anti-solar point—with you at the center. (We don’t see the entire circle because the horizon usually gets in the way.)
Because the anti-solar point is always at the center of the rainbow’s arc, a rainbow will always appear exactly opposite the sun (the sun will always be at your back). It helps to remember that your shadow always points toward the anti-solar point. So when you find yourself in direct sunlight and rain, locating a rainbow is as simple as following your shadow and looking skyward—if there’s no rainbow, the sun’s probably too high.
High or low
Sometimes a rainbow appears as a majestic half-circle, arcing high above the distant terrain; other times it’s merely a small circle segment hugging the horizon. As with the direction of the rainbow, there’s nothing mysterious about its varying height. Remember, every rainbow would form a full circle if the horizon didn’t get in the way, so the amount of the rainbow’s circle you see (and therefore its height) depends on where the rainbow’s arc intersects the horizon.
While the center of the rainbow is always in the direction of the anti-solar point, the height of the rainbow is determined by the height of the anti-solar point, which will always be exactly the same number of degrees below the horizon as the sun is above the horizon. It helps to imagine the line connecting the sun and the anti-solar point as a fulcrum, with you as the pivot—picture yourself in the center of a teeter-totter: as one seat rises above you, the other drops below you. That means the lower the sun, the more of its circle you see and the higher it appears above the horizon; conversely, the higher the sun, the less of its circle is above the horizon and the flatter (and lower) the rainbow will appear.

Assuming a flat, unobstructed scene (such as the ocean), when the sun is on the horizon, so is the anti-solar point (in the opposite direction), and half of the rainbow’s 360 degree circumference will be visible. But as the sun rises, the anti-solar point drops—when the sun is more than 42 degrees above the horizon, the anti-solar point is more than 42 degrees below the horizon, and the only way you’ll see a rainbow is from a perspective above the surrounding landscape (such as on a mountaintop or on a canyon rim).
Of course landscapes are rarely flat. Viewing a scene from above, such as from atop Mauna Kea or from the rim of the Grand Canyon, can reveal more than half of the rainbow’s circle. From an airplane, with the sun directly overhead, all of the rainbow’s circle can be seen, with the plane’s shadow in the middle.
Double Your pleasure
Not all of the light careening about a raindrop goes into forming the primary rainbow. Some of the light slips out the back of the raindrop to illuminate the sky, and some is reflected inside the raindrop a second time. The refracted light that reflects a second time before exiting creates a secondary, fainter rainbow skewed 50 degrees from the anti-solar point. Since this is a reflection, the colors of the secondary rainbow are reversed from the primary rainbow.
And if the sky between the primary and secondary rainbows appears darker than the surrounding sky, you’ve found “Alexander’s band.” It’s caused by all the light machinations I just described—instead of all the sunlight simply passing through the raindrops to illuminate the sky, some of the light was intercepted, refracted, and reflected by the raindrops to form our two rainbows, leaving less light for the sky between the rainbows.
Waterfalls are easy

From Yosemite’s Tunnel View each spring afternoon, a rainbow can be viewed at the base of Bridalveil Fall. As the sun drops, the rainbow climbs, taking about 30 minutes to complete its ascent.
Understanding the optics of a rainbow has practical applications for photographers. Not only does it help you anticipate a rainbow before it happens, it also enables you to find rainbows in waterfalls.
Unlike a rainbow caused by rain, which requires you to be in exactly the right position to capture the incongruous convergence of rainfall and sunshine, a waterfall rainbow can be predicted with clock-like precision—just add sunshine.
Yosemite is my location of choice, but there’s probably a waterfall or two near you that will deliver. Just figure out when the waterfall gets direct sunlight early or late in the day, then put yourself somewhere on the line connecting the sun and the waterfall. And if you have an elevated vantage point, you’ll find that the sun doesn’t even need to be that low in the sky.
Moonbows
Understanding rainbow optics can even help you locate rainbows that aren’t even visible to the naked eye. A “moonbow” (lunar rainbow) is a rarely witnessed and wonderful phenomenon that follows all the natural rules of a daylight rainbow. But instead of resulting from direct sunlight, a moonbow is caused by sunlight reflected by the moon.
Moonlight isn’t bright enough to fully engage the cones in your eyes that reveal color, though in bright moonlight you can see the moonbow as an arcing monochrome band. But a camera on a sturdy tripod can use its virtually unlimited shutter duration to accumulate enough light to bring out a moonbow in full living color. Armed with this knowledge, all you need to do is put yourself in the right location at the right time.

Moonbow and Big Dipper, Lower Yosemite Fall, Yosemite :: Each spring the full moon and Yosemite Falls conspire to deliver a breathtaking moonbow display. And as if that’s not enough, the Big Dipper is suspended above as if it’s the source of Yosemite Falls.

Rainbow, Lipan Point, Grand Canyon :: Sometimes the rainbow doesn’t appear exactly where you want it to. In a perfect world this rainbow would have connected the rims of the Grand Canyon, but there was no vantage point on the rim that gave me that view. Nevertheless, I was able to use the canyon’s red rock as a foreground, and balance its exquisite depth with the rainbow.
The story of this image

Heaven Sent, Monsoon Rainbow, Vista Encantada, Grand Canyon North Rim
Following a nice sunrise at the always beautiful Point Imperial, the Grand Canyon Monsoon photo workshop group spent two hours near Bright Angel Point photographing a spectacular electrical storm that delivered multiple lightning captures to everyone in the group. When the storm moved too close and drove us to safety (we’re resilient and adventuresome, not stupid), it would have been easy call it a day and tally our bounty. I mean, who likes getting rained on? Photographers, that’s who.
Don Smith and I herded our group into the cars and headed to Cape Royal Road, where we could follow the Grand Canyon’s East Rim above Marble Canyon all the way to Cape Royal. Knowing that monsoon showers are fairly localized, the plan was to drive out of the cell that was dumping on us at the lodge and either shoot back at it, or (more likely) find another cell firing out over the canyon. In the back of my mind though was the hope for a rainbow above the canyon—dropping in the west, the sun was perfectly positioned for rainbows in the east.
The rainbow appeared just after we passed the Point Imperial Road junction, arcing high above the forest. Climbing through the trees toward the rim (and its views of Marble Canyon), my urgency intensified with the rainbow’s vivid color, but we were stuck behind a meandering tourist who clearly had different priorities. As tempted as I was to pass him, I knew that would be a mistake with three more cars following me. So we poked along at a glacial pace. After what felt like hours, screeched to a halt at the Vista Encantada parking area with the rainbow hanging in there—I swear everyone was out of the car and scrambling for their gear before I came to a complete stop.
With a full rainbow above an expansive view, I opted for my Sony 12-24 lens on my a7RII, but immediately began to question that choice. While Vista Encantada offers a very pretty view, it’s not my favorite scene to photograph because of the less-than-photogenic shrubbery in the foreground—a telephoto lens definitely would have worked better to eliminate the foreground, but I wanted more rainbow. So after a few failed attempts to find a composition at the conventional vista, I sprinted into the woods to find something better. This turned out to be a wise choice, as the shrubs here were replaced with (much more photogenic) mature evergreens.
In a perfect world I’d have found an unobstructed view into the Grand Canyon, but as photographers know, the world is rarely perfect. Committed to my wide lens, I decided to use the nearby evergreens as my foreground, moving back just far enough for the rainbow to clear their crowns. Composing wide enough to include the trees top-to-bottom also allowed me to include all of the rainbow—suddenly my 12-24 lens choice was genius!
After finishing at Vista Encantada we continued down the road and photographed another rainbow from Roosevelt Point, then wrapped up the day with a sunset for the ages at Cape Royal. A great day indeed, all thanks to monsoon weather that would have kept most tourists indoors.
Join Me in a Grand Canyon Photo Workshop
Workshop Schedule || Purchase Prints
A Gallery of Rainbows
Click an image for a closer look and to view slide show.


The Shocking Truth About Lightning
Posted on April 7, 2019
Forked Lightning, Point Imperial, Grand Canyon
Sony a7RIII
Sony 100-400 GM
Lightning Trigger LT-IV
ISO 400
f/7.1
.4 seconds
Every year for the last 10 (or so) years I’ve traveled to the Grand Canyon during the Southwest summer monsoon to photograph lightning. Not only have I captured hundreds of lightning strikes and lived to tell about it (yay), I’ve learned a lot. A couple of years ago I added an article sharing my insights on photographing lightning to my photo tips section. With lightning season upon (or almost upon) us here in the United States, I’ve updated my article with new images and additional info. You can still find the article (with updates) in my Photo Tips section, but I’m re-posting it here in my regular blog feed as well.
Read the story of this image at the bottom of this post, just above the gallery of lightning images.
How to Photograph Daylight Lightning Without Getting Killed (Probably)
Let’s start with the given that lightning is dangerous, and if “safety first” is a criterion for intelligence, photographers are stupid. So combining photographers and lightning is a recipe for disaster.
Okay, seriously, because lightning is both dangerous and unpredictable, before attempting anything that requires you to be outside during an electrical storm, it behooves you to do your homework. And the more you understand lightning, how to avoid it and stay safe in its presence, the greater your odds of living to take more pictures. Not only will understanding lightning improve your safety, a healthy respect for lightning’s fickle power will also help you anticipate and photograph lightning.
Lightning enlightenment
Lightning is an electrostatic discharge that equalizes the negative/positive polarization between two objects. In fact, when you get shocked touching a doorknob, you’ve been struck by lightning. The cause of polarization during electrical storms isn’t completely understood, but it’s generally accepted that the extreme vertical convective air motion (convection is up/down circular flow caused when less-dense warm air rises, becomes more dense as it cools with elevation, and ultimately becomes cool/dense enough to fall. Convection is also what causes bubbling in boiling water. Convection in a thunderstorm carries positively charged molecules upward and negatively charged molecules downward. Because opposite charges attract each other, the extreme polarization (positive charge at the top of the cloud, negative charge near the ground) is quickly (and violently) equalized: lightning.
With lightning comes thunder, the sound of air expanding explosively when heated by a 50,000 degree jolt of electricy. The visual component of the lightning bolt that caused the thunder travels to you at the speed of light, over 186,000 miles per second (virtually instantaneous regardless of your distance on Earth). But lightning’s aural component, thunder, only travels at the speed of sound, a little more than 750 miles per hour—a million times slower than light. Knowing that the thunder occurred at the same time as the lightning flash, and how fast both travel, we can compute the approximate distance of the lightning strike. At 750 miles per hour, thunder will travel about a mile in about five seconds: Dividing the time between the lightning’s flash and the thunder’s crash by five gives you the lightning’s distance in miles; divide the interval by three for the distance in kilometers. If five seconds pass between the lightning and the thunder, the lightning struck about one mile away; fifteen seconds elapsed means it’s about three miles away.
Lightning safety
The 30 (or so) people killed by lightning in the United States each year had one thing in common with the rest of us: they didn’t believe they’d be struck by lightning when they started whatever it was they were doing when they were struck. The only sure way to be safe in an electrical storm is to be in a fully enclosed structure or metal-framed vehicle, away from open windows, plumbing, wiring, and electronics.
While there’s no completely safe way to photograph lightning, it doesn’t hurt to improve your odds of surviving to enjoy the fruits of your labor. (Unfortunately, photographing lightning usually requires being outside.) Most lightning strikes within a six mile radius of the previous strike. So, if less than thirty seconds elapses between the flash and bang, you’re too close. And since “most” doesn’t mean “all,” it’s even better to allow a little margin for error. Thunder isn’t usually audible beyond ten miles—if you can hear the thunder, it’s safe to assume that you’re in lightning range.
But if you absolutely, positively must be outside with the lightning crashing about you, or you simply find yourself caught outside with no available shelter, there are few things you can do to reduce the chance you’ll be struck:
- Avoid water
- Avoid high ground
- Avoid exposed areas
- Avoid metal or electronic objects
- Avoid tall objects such as trees and open structures (and tripods)
- Stay at least fifteen feet from other people
- Do not lie down
- If you’re surrounded by trees, position yourself near shorter trees, as far from trunks as possible
- Crouch with your feet together and your hands covering your ears
- A lightning strike is often preceded by static electricity that makes your hair stand on end and an ozone smell (best described as the smell of electricity—I think of bumper cars at the amusement park, or the smell of my electric slot cars when I was a kid)—if your hair starts to stand up and/or you notice a distinct odor that could be ozone, follow as many of the above steps as you can, as quickly as possible (often you’ll only have time to crouch)
 Three Strikes, Bright Angel Point, North Rim, Grand Canyon
Lightning How-to
Photographing lightning at night is mostly a matter of pointing your camera in the right direction with a multi-second shutter speed and hoping the lightning fires while your shutter’s open—pretty straightforward. Photographing daylight lightning is a little more problematic. It’s usually over before you can react, so without a lightning sensor to recognize lightning and click your shutter, success is largely dumb luck (few people are quick enough see it and click). And using a neutral density filter to stretch the exposure time out to 20 or 30 seconds sounds great in theory, but a lightning bolt with a life measured in milliseconds, captured in an exposure measured in multiple seconds, will almost certainly lack the contrast necessary to be be even slightly visible.
Lightning Trigger: The best tool for the job
Most lightning sensors (all?) attach to your camera’s hot shoe and connect via a special cable to the camera’s remote-release port. When engaged, the sensor fires the shutter (virtually) immediately upon detecting lightning, whether or not the lightning is visible to the eye or camera. With many lightning sensors from which to choose, before I bought my first one I did lots of research. I ended up choosing the sensor that was the consensus choice among photographers I know and trust: Lightning Trigger from Stepping Stone Products in Dolores, CO. At around $350 (including the cable), the Lightning Trigger is not the cheapest option, but after many leading lightning-oriented photo workshops, I can say with lots of confidence that lightning sensors are not generic products, and the internal technology matters a lot. Base on my own results and observations, the Lightning Trigger is the only one I’d use and recommend (I get no kickback for this). On the other hand, if you already have a lightning sensor you’re happy with, there’s no reason to switch.
I won’t get into lots of specifics about how to set up the Lightning Trigger because it’s simple and covered fairly well in the included documentation. But you should know that of the things that sets the Lightning Trigger apart from many others is its ability to put your camera in the “shutter half pressed” mode, which greatly reduces shutter lag (see below). But that also means that connecting the Trigger will probably disable your LCD replay, so you won’t be able to review your captures without disconnecting—a simple but sometimes inconvenient task. You also probably won’t be able to adjust your exposure with the Lightning Trigger connected.
The Lightning Trigger documentation promises at least a 20 mile range, and after many years using mine at the Grand Canyon, I’ve seen nothing that causes me to question that. It also says you can expect the sensor to fire at lightning that’s not necessarily in front of you, or lightning you can’t see at all, which I will definitely confirm. For every click with lightning in my camera’s field of view, I get many clicks caused by lightning I didn’t see, or that were outside my camera’s field of view. But when visible lightning does fire somewhere in my composition, I estimate that the Lightning Trigger clicked the shutter at least 95 percent of the time (that is, even though I got lots of false positives, the Lightning Trigger missed very few bolts it should have detected). Of these successful clicks, I actually captured lightning in at least 2/3 of the frames.
The misses are a function of the timing between lightning and camera—sometimes the lightning is just too fast for the camera’s shutter lag. In general, the more violent the storm, the greater the likelihood of bolts of longer duration, and multiple strokes that are easier to capture. And my success rate has increased significantly beyond 2/3 since switching from a Canon 5DIII to Sony mirrorless (more on this in the Shutter Lag section).
The Lightning Trigger documentation recommends shutter speeds between 1/4 and 1/20 second—shutter speeds faster than 1/20 second risk completing the exposure before all of the secondary strokes fire; slower shutter speeds tend to wash out the lightning. To achieve daylight shutter speeds between 1/4 and 1/20 second, I use a polarizer, with my camera at ISO 50 and aperture at f/16 (and sometimes smaller). Of course exposure values will vary with the amount of light available, and you may not need such extreme settings when shooting into an extremely dark sky. The two stops of light lost to a polarizer helps a lot, and 4- or 6-stop neutral density filter is even better with fairly bright skies (but if you’re using a neutral density filter, try to avoid shutter speeds longer than 1/4 second).
Shutter lag
Lightning is fast, really, really fast, so the faster your camera’s shutter responds after getting the command from the trigger device, the more success you’ll have. The delay between the click instruction (whether from your finger pressing the shutter button, a remote release, or a lightning sensor) and the shutter firing is called “shutter lag.”
The less shutter lag you have, the better your results will be. The two most important shutter lag factors are:
- Camera model: It’s surprising how much shutter lag can vary from manufacturer to manufacturer and model to model. In a perfect world, for lightning photography your camera’s shutter lag will be 60 milliseconds (.006 seconds) or faster (the lower the number the better), but 120 milliseconds (.012 seconds) or faster can give you some success. The top cameras from Sony, Nikon, and Canon are all fast enough, but the latest Sonys are the definite shutter lag winner (fastest), with Nikon a not too distant second, and Canon third. And shutter lag can vary with the manufacturer’s model: While my Sony a7RII is one of the fastest cameras out there, my a7R was unusably slow, so you need to check your model. Since I don’t check every camera released, it’s possible this ranking will change well before I update this article, so I recommend that you research shutter lag for your camera model. Unfortunately, shutter lag isn’t usually in the manufacturers specifications, so it’s hard to find. The best source I’ve found is the “Pre-focused” time in the Performance tab of the camera reviews at Imaging Resource.
- Camera settings: Basically, to minimize the “thinking” the camera needs to before firing, you want to be in manual everything mode—metering and focus. If your camera offers an electronic front curtain option (as my Sonys do), use it. If you must autofocus, go ahead and do it each time you recompose, then turn autofocus off as soon as you’re focused. Though the Lightning Trigger documentation suggests Aperture Priority metering, I use and recommend Manual metering mode to eliminate any camera-slowing metering (but Aperture Priority is fine if you have a strong preference). And, also despite what the Lightning Trigger documentation suggests, noise reduction is a post-capture function that might slightly delay continuous frames, but it won’t increase shutter lag.
Other equipment
In addition to a lightning sensor and fast camera, you’ll need:
- A solid tripod and head: Don’t even think about trying to photograph lightning hand-held
- Rain gear that keeps you dry from head-to-toe
- Umbrella (a.k.a., Wile E. Coyote Lightning Rod) to shield your camera and lightning sensor (many sensors, including the Lightning Trigger, aren’t waterproof) while you compose and wait in the rain. The umbrella is for when you’re photographing storm cells at a great distance, such as on the rim of the Grand Canyon and the lighting is across the canyon. Obviously, when the lightning gets within 10 miles, put the umbrella down and run for cover.)
- Lens hood to shield some of the raindrops that could mar the front element of your lenses
- Neutral density filter and/or polarizer to slow shutter speed into the ideal range (1/4 – 1/20 second)
- A garbage bag (my choice) or rainproof camera jacket (haven’t found one) to keep your camera and sensor dry during a downpour
- Extra lightning sensor batteries (better safe than sorry)
- Extra memory cards: When a storm is very close or active, your lightning sensor could detect 20 or 30 strikes per minute (even when little or no lightning is visible to the eye)
- Infrared remote to test your Lightning Trigger; I sometimes borrow the remote from my hotel room, but the Apple TV remote works great and is extremely compact (fits nicely into the Lightning Trigger pouch)
- A towel
Getting the shot
Lightning is most likely to strike in or near the gray curtains (clearly recognizable as distant rain) that hang beneath dark clouds. In addition to visible rain curtains, the darkest and tallest clouds are usually the most likely to fire lightning. Here are a few more points to consider:
- The wider your composition, the greater your odds of capturing lightning, but the smaller the lightning will appear in your image.
- Identify the most likely lightning cell and find the best composition that includes it. I tend to start with wider compositions to ensure success, then tighten my composition once I’m fairly confident I captured something.
- Note the height from which the lightning originates and be sure to include enough cloud to get all of the stroke. On the other hand, don’t include too much room above the lightning—the most frequent rookie mistake I see is too much sky/clouds in the frame. The second most frequent is lightning cut off at the top. Unless the storm is too close for safety, for any given cell, most lightning will originate from about the same height above the ground.
- The best lens is usually a midrange zoom such as a 24-70 or 24-105—if you find yourself reaching for the 16-35 (or wider), you’re too close.
- On the other hand, once you’re sure you’ve captured some good strikes, try putting on a 70-200. The narrow field of view can significantly reduce the number of frames with lightning, but the ones you get will be much larger in the frame and therefore more spectacular.
- Don’t forget to try some vertical compositions. I usually wait until after I know I’ve captured some in a horizontal frame because vertical narrows the horizontal field of view and lowers the odds of success a little.
- Lightning stands out better in a slightly underexposed image. My target shutter speed is usually 1/8 second (slow enough to include multiple pulses, but not so slow that I risk washing out the lightning). When the sky is relatively bright, dropping to 1/15 or even 1/20 second can make the lightning stand out better than 1/8 (but risks losing secondary strikes). Conversely, when the sky is extremely dark and the lightning is firing like crazy, extending to 1/4 second might increase your chances for multiple pulses.
- Just because you’re standing around waiting for things to happen, doesn’t mean there’s nothing to do. Keep your eyes glued to the sky and adjust your composition as the lightning shifts, or as new activity starts elsewhere. If you wait until you hear your shutter click or someone else exclaim before looking up, you won’t see the lightning. And monitor the light—your exposure can change by several stops as the storm moves, intensifies, or winds down.
- Try not to check your captures on your LCD until you’re done (or better yet, until you upload your images to your computer). With the Lightning Trigger (and some other sensors), viewing the LCD requires turning off the sensor, which risks missing a shot (I’m pretty sure lightning waits for me to turn off my sensor), and you’ll also find that many successful captures, especially wide compositions with a relatively bright sky, just aren’t that visible on an LCD viewed in daylight anyway.
Do as I say (not as I do)
Be aware that electrical storms can move quite quickly, so you need to monitor them closely. Sometimes this simply means adjusting your composition to account for shifting lightning; other times it means retreating to the car if the cell threatens your location. No shot is worth your life.
About this image

Forked Lightning, Point Imperial, Grand Canyon
On the first evening of last year’s second Grand Canyon Monsoon photo workshop, Don Smith and I took the group to Point Imperial for a sunset shoot. Based on the forecast we had little hope for lightning, but one thing I’ve learned over the many years of photographing the monsoon here is that the forecast isn’t the final word. We got another reminder of this that evening.
The view from Point Imperial is both expansive and different from other Grand Canyon vistas, stretching east across the Painted Desert and north to the Vermillion Cliffs. As the group made their way down to the vista platform, in the corner of my I thought I a lighting strike far to the north. A second bolt confirmed my discovery and soon we had the entire group lined up with cameras pointed and triggers ready.
With everyone in business, I set up my tripod and attached my Lightning Trigger to my Sony a7RIII. Since this lightning was close to 30 miles away, maybe farther than any lightning I’ve tried to photograph, so I hauled out my Sony 100-400 GM lens and zoomed in as tight as I could. I didn’t have to wait long to confirm that my Lightning Trigger would catch strikes this distant—it didn’t hurt that these were massive bolts, many with multiple pulses and forks.
Everyone was thrilled, so thrilled that it didn’t immediately register that the storm was moving our direction. I started at 400mm, but by the time I captured this frame I was just a little more than 100mm. That’s still a pretty safe distance, but with night almost on us and another cell moving in from the east, we decided to take our winnings and go home.
One final note: If you check my exposure settings, you’ll see that my shutter speed here was .4 seconds, well outside the 1/20-1/4 second range I suggest. But if you look at the other settings, you’ll see that I’d opened up to f/7.1, and had cranked my ISO to 400, an indication that twilight was settling in. Successful lightning photograph is all about contrast, and the darker the sky, the better the bolt stands out, even in a longer exposure. Had we stayed past dark (and lived), we could have jettisoned the Lighting Triggers and used multi-second exposures.
Join Don Smith and me in our next Grand Canyon Monsoon Photo Workshop
Read my article in Outdoor Photographer magazine, Shooting the Monsoon
Workshop Schedule || Purchase Prints
A Lightning Gallery
Click an image for a closer look and slide show. Refresh the window to reorder the display.


Should I or shouldn’t I?
Posted on February 25, 2018

Nature’s Prism, Rainbow Above Marble Canyon, Roosevelt Point, Grand Canyon
Sony a7R II
Sony/Zeiss 16-35
1/60 seconds
F/11
ISO 100
I get a lot of questions in the field during a photo workshop, but about 80% of them are some version of, “Should I do it this way or that way?”:
- “Should I use a polarizer (or not)?”
- “Should I shoot this horizontal or vertical?”
- “Should I shoot this wide or telephoto?”
- “Should I include that rock or leave it out?”
- “Should I…?”
Sometimes people seem so paralyzed by these choices, it seems they’d rather do nothing than make a mistake. Or maybe they’re inhibited by the subconscious belief that we must conserve resources at all costs. From our earliest years, we were admonished to not waste things: don’t leave the water running, turn of the light when you leave the room, clean your plate, and a host of other waste-related rules. Adding to our formative-years stress, when we recovering film shooters got our first adult cameras, already rendered destitute by the new equipment, we were suddenly punched in the wallet by the cost of film and processing. It’s no wonder we try to spare every frame.
Of course conserving resources is important, today more than ever. But my question for digital photographers is, exactly what resources are you conserving? Here’s a revolutionary thought: While every click with a film camera costs money, every click with a digital camera increases the return on your investment. That’s right: every time you take a picture with your digital camera, your cost per click drops.
I’m not suggesting that you put your camera in continuous shooting mode and fire away*. But I am encouraging you to shoot liberally, with a purpose. And there’s no law that says that purpose must be a successful image.
For example, a click can just be a way to get in the mood, or to determine whether there really is a shot there (I don’t always know whether a scene is worth working until I’ve clicked a couple of frames). And I frequently play “what-if?” games with my camera (“I wonder what would happen if I do this…”). I’d be mortified if people saw some of these what-if? images, but I often learn from them. Sometimes I simply learn what not to do, but often I see enough to understand why it didn’t work, and end up with ideas for how it might work the next time.
I usually use my first click the way I use a draft when I’m writing: rather than a completed masterpiece, my goal for the first few clicks of a scene is a foundation to incrementally refine until I reach the finished product. Or when I’m not sure of the best way to handle a scene, I shoot it multiple ways to defer the decision until I view the image on a large monitor.
At the very least, especially when photographing a scene that especially thrills you, shoot it with as much variety as time permits: horizontal/vertical, wide/tight, and as many perspectives as you can come up with. I mean, you never know when a magazine might want a vertical version of the horizontal Grand Canyon rainbow image you just installed on the wall of the local bank.
Photography often requires instantaneous choices, and Nature doesn’t always wait until you’re ready. So because you can’t always have a pro photographer whispering in your ear every time you’re out with your camera, any time you find yourself wondering whether you should or shouldn’t shoot a scene one way or another (or another, or another, or…), just shoot it both ways and rest easy.
* True story: I once had a woman in a workshop put her Nikon D4 in continuous shooting mode, hold the camera in front of her, depress the shutter button, and spin. When I asked her what in the world she was doing, she replied, “It’s Yosemite—there’s bound to be something good in there.”
About this image
I captured this rainbow about 15 minutes after capturing the rainbow in my February 18 post. Pulling into Roosevelt Point a few miles down the road from Vista Encantada (and the earlier rainbow), we were still very much in rush mode. I didn’t have a lot of opportunity to apply my deliberate, what-if?, multiple draft approach. But I did have time to flip my camera and shoot a variety of compositions before the rainbow faded. I started with the wider vertical and horizontal frames you see here, then moved on to tighter compositions.
Grand Canyon Photo Workshops
Grand Canyon Rainbows
Click an image for a closer look and slide show. Refresh the window to reorder the display.


Weather or not
Posted on February 18, 2018
Heaven Sent, Vista Encantada Rainbow, Grand Canyon
Sony a7R II
Sony 12-24 f/4 G
1/60 second
F/11
ISO 100
When the weather gets crazy, do you sprint for cover or reach for your camera? Your answer may be a pretty good indicator of your success as a landscape photographer. It’s an unfortunate fact that the light, color, and drama that make the most memorable landscape photos all come when most sane people would rather be inside: at sunrise, when the rest of the world is asleep; at sunset, when everyone else is at dinner; and during wild weather, when anyone with sense is on the sofa in front of the fire.
Not only do clouds keep tourists at bay, they’re usually a prerequisite for the best nature photography. Whether they simply diffuse sunlight to subdue extreme contrast into something much more camera-friendly, or contort themselves into diaphanous curtains and towering pillars that are subjects themselves, clouds are a photographer’s friend.
And with clouds, often comes rain. But the photographer willing to go out in the rain is also the photographer who captures lightning, rainbows, and vivid sunsets and sunrises. The key to photographing in rain is preparation. Regardless of the forecast, I never travel without my rain gear duffel that contains everything necessary to keep me dry and focused on photography: waterproof hat, gloves, parka, rain pants, and boots for me, and an umbrella for my camera. My go-to rain cover is a plastic garbage bag that keeps my camera and lens dry when I’m searching or waiting for a shot. The final essential wet weather accessory is a towel or chamois to dry any gear (especially the front of my lens) that gets wet.
Covered head-to-toe with my waterproof wardrobe, I’m ready to photograph whatever Mother Nature delivers. When I’m ready to shoot, my umbrella always comes out first, then off comes the bag and into a pocket. With one hand managing the umbrella, I have one hand free to compose, expose, focus, and click.
When the wind blows it’s often difficult to manage an umbrella and keep my lens free of water droplets. Since my Sony bodies are sufficiently sealed (as are many other mirrorless and DSLR bodies and lenses), I don’t worry about raindrops (but make sure you have the hot-shoe cap in place). Sometimes, when the wind is too extreme, I even briefly set the umbrella aside (but not too far). Once my composition, exposure, and focus are set, I point the umbrella’s convex side into the wind and lower it until it’s right on top of the camera (for maximum rain protection), pull out my towel and dry the front of the lens (and the rest of the camera and lens too if it’s raining hard), then lift the umbrella and click simultaneously (before more droplets land on my lens).
Learn more
- How to photograph rainbows
- How to photograph lightning
About this image
Last summer’s Grand Canyon Monsoon workshop group had already had a great day. Following a nice sunrise at the always beautiful Point Imperial, we spent two hours on the Grand Canyon Lodge view deck photographing a spectacular electrical storm that delivered multiple lightning captures to everyone in the group. Here’s a sample of the day’s bounty to this point:
When the storm moved too close and drove us inside to safety (we’re resilient and adventuresome, not stupid), it would have been easy to rest on our laurels and call it a day. I mean, who likes getting rained on?
Photographers, that’s who. Don Smith and I herded the group into the cars and headed to Cape Royal Road, where we could follow the Grand Canyon’s East Rim above Marble Canyon all the way to Cape Royal. Knowing that monsoon showers are fairly localized, the plan was to drive out of the cell that was dumping on us at the lodge and either shoot back at it, or (more likely) find another cell firing out over the canyon. In the back of my mind though was the hope for a rainbow above the canyon—dropping in west, the sun was perfectly positioned for rainbows in the east.
The rainbow appeared just after we passed the Point Imperial Road junction, arcing above the forest. Climbing through the trees toward the rim and its views of Marble Canyon, my urgency intensified with the rainbow’s vivid color, but we were stuck behind a meandering tourist who clearly had different priorities. As tempted as I was to pass him, I knew with three more cars following me, that would be a mistake. So we poked along at a glacial pace. After what seemed like hours, the rainbow was hanging in there as we pulled into the Vista Encantada parking area and screeched to a halt—I swear everyone was out of the car and scrambling for their gear before I’d come to a complete stop.
With a full rainbow above an expansive view, I opted for my Sony 12-24 lens on my a7RII, but immediately began to question that choice. While Vista Encantada offers a very pretty view, it’s not my favorite view to photograph because of all the less-than-photogenic shrubbery in the foreground—a telephoto lens would have worked better to eliminate the foreground. But I wanted more rainbow. So after a few failed attempts to find a composition at the conventional vista, I sprinted into the woods in search of something better. This turned out to be a wise choice, as the shrubs here were replaced with (much more appealing) mature evergreens.
In a perfect world I’d have had an unobstructed view into the Grand Canyon, but the world is rarely perfect. I decided to use the nearby trees as my foreground, moving back from the trees just far enough for the rainbow to clear their crowns, then left as far as the terrain permitted, separating the two left-most trees. Composing wide enough to include the trees top-to-bottom also allowed me to include all of the rainbow—suddenly my 12-24 lens choice was genius!
After finishing at Vista Encantada we continued down the road and photographed another rainbow from Roosevelt Point, before wrapping up the day with a sunset for the ages at Cape Royal. A great day indeed, all thanks to weather that would have kept most tourists indoors.
Grand Canyon Photo Workshops
Rainbows, Lightning, and So Much More
A Grand Canyon Monsoon Gallery
Click an image for a closer look and slide show. Refresh the window to reorder the display.


(Another) Grand Canyon Lightning Show
Posted on September 1, 2017

Direct Hit, South Rim Lightning Strike, Grand Canyon Lodge (North Rim)
Sony a7R II
Sony/Zeiss 24-70 f4
1/8 second
F/16
ISO 50
Earlier this month Don Smith and I traveled to the Grand Canyon for our annual Grand Canyon Monsoon photo workshops. I enjoy every workshop, but as a true weather nerd, these monsoon workshops are particular highlights in my year, and in Northern California we just don’t get that much weather—that is, unless you consider homogenous blue (summer) or gray (winter) skies weather.
For this trip, I started monitoring the Grand Canyon forecast about a week before the first workshop (okay, maybe a little earlier than that), and ramped up my queries as the workshop approached. If hoping and handwringing could make lightning, I’d never have a bad day at the Grand Canyon, but after three days of fairly benign conditions, workshop group number one was still waiting for their lightning. Then, like a walk-off grand slam, on our final full day Mother Nature gifted us with a spectacular, two-hour lightning show. Phew. In fact, that afternoon we got an entire workshop worth of dramatic weather in about five very intense hours. The day’s highlights included lightning and two rainbows, and wrapped up a mammatus (google it) sunset at Cape Royal. All’s well that ends well.
Contrast group one’s eleventh hour salvation with workshop group two, which hit the ground running (quite literally) before we could even have an orientation. The second workshop was scheduled to start with a 1 p.m. orientation at Grand Canyon Lodge on the North Rim. As go most mornings in monsoon season, the day started quietly, but a little after noon lightning started up across the canyon and Don and I set up our tripods, cameras, and Lightning Triggers. With the designated gathering place in front of the lodge, but the viewing deck and lightning show in the back, Don and I took turns running up front and dragging folks down to our location. Those who had arrived with camera gear were put right to work, while the ones who had left their gear in their car or cabin and had to race back up the hill to fetch it.
By 1:15 we were seeing one or two strikes per minute, sometimes more, spread across a fairly broad area of the South Rim. Soon Don and I had a dozen photographers spread across two outside decks separated by an enclosed viewing room. Most of them had never used a Lightning Trigger, or even photographed lightning, so once we got everyone assembled, most of the next hour was spent running around setting up and testing Lightning Triggers, helping people achieve the right exposure, and suggesting compositions.
During that first hour our cameras, set up and primed for action, enthusiastically fired away unattended. When I’m with my camera during a storm, I’m constantly tweaking my composition, exposure, and Lightning Trigger sensitivity. Left to its own devices, my camera ended up with over 400 frames of the very same scene, most of which had no lightning (because the trigger was detecting lightning too faint to register). Fortunately, by the time everyone had settled into a comfort zone with their cameras and Lightning Triggers, not only was the lightning display still going strong, it had moved closer (but remained at a relatively safe distance) and was isolated to the most photogenic part of the view. Our second hour was pure joy, as each dramatic strike seemed designed to outdo the one that preceded it.
The image I share at the top of this post came when the storm was at its most intense, moving southwest to northeast across (right to left) the canyon, just a little east of our location. The brightest bolt you see is striking just below the South Rim, between Yaki and Shoshone Points, but ten miles away.
When all was said and done, I got about 50 strikes that afternoon, and everyone in the group got multiple strikes as well. We had another productive lightning day the next day, but this is the day I’ll remember.
Lightning Photography Revisited
This is an excerpted and updated section from the Lightning article in my Photo Tips section
Photographing lightning at night is mostly a matter of pointing your camera in the right direction with a multi-second shutter speed and hoping the lightning fires while your shutter’s open—pretty straightforward. Photographing daylight lightning is a little more problematic. It’s usually over before you can react, so without a lightning sensor to recognize lightning and click your shutter, success is largely dumb luck (few people are quick enough see it and click).
Lightning Trigger: The best tool for the job
A lightning sensor attaches to your camera’s hot shoe and connects via a special cable to the camera’s remote-release port. When engaged, the sensor fires the shutter (virtually) immediately upon detecting lightning—whether or not the lightning is visible to the eye or camera. With many lightning sensors from which to choose, before I bought my first one I did lots of research. I ended up choosing the sensor that was the consensus choice among photographers I know and trust: Lightning Trigger from Stepping Stone Products in Dolores, CO. At a little less than $400 (including the cable), the Lightning Trigger is not the cheapest option, but after leading lightning-oriented workshops for five years, I can say with lots of confidence that lightning sensors are not generic products, and the internal technology matters a lot. The Lightning Trigger is the only one I’d use and recommend (I get no kickback for this).
I won’t get into lots of specifics about how to set up the Lightning Trigger because it’s simple and covered fairly well in the included documentation. But you should know that connecting the Trigger will disable your LCD replay, which means you won’t be able to review your captures without disconnecting (a simple but sometimes inconvenient task). You also won’t be able to adjust your exposure with the Lightning Trigger operational.
The Lightning Trigger documentation promises at least a 20 mile range, and I’ve seen nothing that causes me to question that. It also says you can expect the sensor to fire at lightning that’s not necessarily in front of you, or lightning you can’t see at all. For every click with lightning in my camera’s field of view, I get many clicks caused by lightning I didn’t see, or that were outside my camera’s field of view. But when visible lightning does fire somewhere in my composition, I estimate that the Lightning Trigger clicked the shutter at least 95 percent of the time (that is, even though I got lots of false positives, the Lightning Trigger missed very few bolts it should have detected). Of these successful clicks, I actually captured lightning in about 2/3 of the frames.
The misses are a function of the timing between lightning and camera—sometimes the lightning is just too fast for the camera. In general, the more violent the storm, the greater the likelihood of bolts of longer duration, multiple strokes that are easier to capture. And my success rate has increased significantly beyond 2/3 since switching from a Canon 5DIII to a Sony a7RII (more on this in the Shutter Lag section).
The Lightning Trigger documentation recommends shutter speeds between 1/4 and 1/20 second—shutter speeds faster than 1/20 second risk completing the exposure before some or all of the secondary strokes fire; slower shutter speeds tend to wash out the lightning. To achieve daylight shutter speeds between 1/4 and 1/20 second, I use a polarizer, with my camera at ISO 50 and aperture at f/16 (and sometimes smaller). Of course exposure values will vary with the amount of light available, and you may not need such extreme settings when shooting into an extremely dark sky. The two stops of light lost to a polarizer helps a lot, and 4- or 6-stop neutral density filter is even better.
Shutter lag
Lightning is fast, really, really fast, so the faster your camera clicks the shutter after getting the command, the more success you’ll have. The delay between the click instruction (whether from your finger pressing the shutter button, a remote release, or a lightning sensor) and the shutter firing is called “shutter lag.” The less shutter lag you have, the better your results will be. The two most important shutter lag factors are:
- Camera model: It’s surprising how much shutter lag can vary from manufacturer to manufacturer and model to model. In a perfect world, for lightning photography your camera’s shutter lag will be 60 milliseconds (.06 seconds) or faster (the lower the number the better), but 120 milliseconds (.o12 seconds) or faster can give you some success. The top cameras from Sony, Nikon, and Canon are all fast enough, but the latest Sonys are the definite shutter lag winner (fastest), with Nikon second, and Canon third (slowest). And shutter lag can vary with the manufacturer’s model: While my Sony a7RII is one of the fastest cameras out there, my a7R was unusably slow, so you need to check your model. Unfortunately, shutter lag isn’t usually in the manufacturers specification, so it’s hard to find. The best source I’ve found is the “Pre-focused” time in the Performance tab of the camera reviews at Imaging Resource.
- Camera settings: Basically, to minimize the “thinking” the camera needs to before firing, you want to be in manual everything mode—metering and focus. If your camera offers an electronic front curtain option (as my Sonys do), use it. If you must autofocus, go ahead and do it each time you recompose, then turn autofocus off as soon as you’re focused. Though the Lightning Trigger documentation suggests Aperture Priority metering, I use and recommend Manual metering mode to eliminate any camera-slowing metering. And, also despite what the Lightning Trigger documentation suggests, noise reduction is a post-capture function that might slightly delay continuous frames, but it won’t increase shutter lag.
Other equipment
In addition to a lightning sensor and fast camera, you’ll need:
- A solid tripod and head: Don’t even think about trying to photograph lightning hand-held
- Rain gear that keeps you dry from head-to-toe
- Umbrella (a.k.a., Wile E. Coyote Lightning Rod) to shield your camera and lightning sensor (many sensors, including the Lightning Trigger, aren’t waterproof) while you compose and wait in the rain. (And obviously, when the lightning gets close, put the umbrella down and run for cover.)
- Lens hood to shield some of the raindrops that could mar the front element of your lenses
- Neutral density filter and/or polarizer to slow shutter speed into the ideal range (1/4 – 1/20 second)
- A garbage bag (my choice) or rainproof camera jacket (haven’t found one I like) to keep your camera and sensor dry during a downpour
- Extra lightning sensor batteries (better safe than sorry)
- Extra memory cards: When a storm is very close or active, your camera could click 20 or 30 frames per minute (even when no lightning is visible)
- Infrared remote to test your Lightning Trigger; I sometimes borrow the remote from my hotel room, but the Apple TV remote works great and is extremely compact (fits nicely into the Lightning Trigger pouch)
- A towel
Getting the shot
Lightning is most likely to strike in or near the gray curtains (clearly recognizable as distant rain) that hang beneath dark clouds. In addition to visible rain curtains, the darkest and tallest clouds are usually the most likely to fire lightning. Here are a few more points to consider:
- The wider your composition, the greater your odds of capturing lightning, but the smaller the lightning will appear in your image.
- Identify the most likely lightning cell and find the best composition that includes it. I tend to start with wider compositions to ensure success, then tighten my composition once I’m fairly confident I captured something.
- Note the height from which the lightning originates and be sure to include enough cloud to get all of the stroke. On the other hand, don’t include too much room above the lightning—one of the most frequent rookie mistakes I see is too much sky/clouds in the frame. Unless the storm is too close for safety, most lightning will originate from about the same height above the ground.
- The best is usually a midrange zoom such as a 24-70 or 24-105—if you find yourself reaching for the 16-35 (or wider), you’re too close.
- On the other hand, once you’re sure you’ve captured some good strikes, try putting on a 70-200. The narrow field of view can significantly reduce the number of frames with lightning, but the ones you get will be much larger in the frame and therefore more spectacular.
- Lightning stands out better in a slightly underexposed image. My target shutter speed is usually 1/8 second (slow enough to include multiple pulses, but not so slow that I risk washing out the lightning). When the sky is relatively bright, dropping to 1/15 or even 1/20 second can make the lightning stand out better than 1/8. Conversely, when the sky is extremely dark and the lightning is firing like crazy, extending to 1/4 second might increase your chances for multiple pulses.
- Just because you’re standing around waiting for things to happen, doesn’t mean there’s nothing to do. Keep your eyes glued to the sky and adjust your composition as the lightning shifts, or as new activity starts elsewhere. If you wait until you hear your shutter click or someone else exclaim before looking up, you won’t see the lightning. And monitor the light—your exposure can change by several stops as the storm moves, intensifies, or winds down.
- Try not to check your captures on your LCD until you’re done (or better yet, until you upload your images to your computer). Viewing the LCD requires turning off the sensor, which risks missing a shot (I’m pretty sure lightning waits for me to turn off my sensor), and you’ll also find that many successful captures, especially wide compositions, just aren’t that visible on an LCD viewed in daylight anyway.
Do as I say (not as I do)
Be aware that electrical storms can move quite quickly, so you need to monitor them closely. Sometimes this simply means adjusting your composition to account for shifting lightning; other times it means retreating to the car if the cell threatens your location.

Two Bolts, Grand Canyon
Join Don Smith and me in our next Grand Canyon Monsoon Photo Workshop
Read my article in Outdoor Photographer magazine, Shooting the Monsoon
Workshop Schedule || Purchase Prints
A Lightning Gallery
Click an image for a closer look and slide show. Refresh the window to reorder the display.


A star is born
Posted on September 17, 2013

New Day, Bright Angel Point, North Rim, Grand Canyon
Canon EOS 5D Mark III
3.2 seconds
F/20
ISO 200
16 mm
Truth be told, I’m not a huge fan of sunstars (a.k.a. starbursts). Cool as they are, sunstars have become ubiquitous to the point of cliché. So why do I shoot them? Because sometimes there’s little else you can do when the sun intrudes on the scene you came to photograph. In other words, they’re often more of a lemonade-from-lemons kind of thing.
Despite their ubiquity, sunstars work because there’s universal resonance to witnessing the sun kiss the horizon—I mean, who doesn’t have a warm memory of watching from a special location as the sun begins or completes its daily journey? These moments touch us on a literal, visual level (they’re beautiful), but I think more significantly they serve as a metaphor for the hope or closure we all long for.
Unfortunately, doing justice to these moments in a photograph is difficult: Including the sun in your frame introduces lens flare, extreme (often unmanageable) contrast, and an unattractive eye magnet that overpowers the rest of the scene. And while a sunstar doesn’t capture the literal experience, it does do a pretty good job of conveying the metaphor.
The good news is, despite the difficulties, creating a sunstar is relatively straightforward. Here’s a quick recipe:
- Start with a brilliant, fine point of light: The sun is the most logical candidate, but you can do it with the moon, stars, and pretty much any bright artificial light (lighthouse, headlights, and so on). The finer the light source the more precise the star effect will be, and the less lens flare and blown highlights you’ll have. If it’s the sun you’re using, virtually all of it needs to be hidden to get the delicate, symmetrical distribution of beams that generally work best. In this image the horizon hides most of the sun, but you can use a cloud, tree, rock, or whatever.
- The smaller your aperture, the finer your sunstar will appear: I generally use f16 or smaller (larger f-number).
- Do something to control the highlights: When the sun is entering your frame, you’re invariably dealing with a sky that’s much brighter than your foreground and will need to take steps to avoid the foreground of murky shadows. If you have a foreground shape or shapes against the sky, you could turn the foreground into a silhouette. But when I want to capture foreground detail, I use graduated neutral density filters to hold back the brilliant sky. My 3-stop reverse is my go-to GND in these situations; in particularly difficult light I’ll stack it with a 2-stop hard GND. Whenever I use a GND, I find Lightroom or Photoshop dodging/burning is a great way to disguise the telltale GND transition. HDR blending of multiple images is another way to mitigate extreme sky/foreground contrast (but I don’t do HDR, so you’ll need to Google this).
- Different lenses will yield different results: Experiment with your lenses to see which one gives the most pleasing sunstar effect. For example, I recently replaced my faithful 17-40L lens with a 16-35L Series II lens, and while I was satisfied with the sunstars from my 17-40, the 16-35 results are clearly better.
- Practice: You can practice sunstars any time the sun’s out. Just go outside with your camera, dial in a small aperture, and hide the sun behind whatever object is convenient (a tree, your house, etc.).
On the morning of this image from last month at the Grand Canyon, I had no plan to photograph. But I was working with a workshop student and we found this nice little scene off the trail to Bright Angel Point. The clouds had assembled into an organized formation that seemed to emanate from just beyond the horizon, and when they started to vibrate with sunrise color, I couldn’t resist. I quickly composed my scene, dialed down to f20, metered on the foreground, and stacked my 3-stop reverse and 2-stop hard graduated neutral density filters. The sun appeared a few seconds later and I fired off several frames before its brilliance overcame my filters’ ability to hold it back.
It’s more than a hole with red rocks
Posted on September 1, 2013

Wildflowers and Aspen, North Rim, Grand Canyon
Canon EOS 5D Mark III
1/80 second
F/4
ISO 200
32 mm
Still charged with energy from the Grand Canyon lightning/rainbow Three Strikes morning, I decided to change things up and visit some of the trip’s more intimate, albeit less spectacular, images, scenes that portray the underrated diversity of the Grand Canyon’s beauty. Despite a wealth of options, I knew immediately that I wanted to start with a wildflower discovery the second group made at East Rim View. (Actually, credit for the discovery goes to workshop co-leader Don Smith.) Don and I had been at this spot on a scouting trip a few days before the workshops began, immediately recognizing it as the best location to combine the North Rim’s beautiful wildflower display with a more expansive view of the Grand Canyon and (especially) the Vermillion Cliffs. While we liked the view enough to stage both workshop group-photos here, we nevertheless tried to time our visits for the overcast skies and calm winds that make for the best wildflower photography.
As the group slowly trickled back to the the cars around the prescribed departure time, Don and a couple of participants returned with word of a wildflower discovery in the woods just a few hundred yards up the trail. The description sounded too good to be true, but when Don shared a few LCD previews of what he’d found, I was sold. So, after a quick consultation, Don and I jettisoned Plan A and added another hour to our East Rim View stay. Good call.
What we found was everything promised: a mature, sprawling aspen grove, carpeted with a dense array of yellow, daisy-like wildflowers (I don’t know what these flowers are, but I’m sure some reader will illuminate me). Virtually untouched by wind and evenly illuminated beneath a heavy, gray sky, this was macro photography heaven. But rather than do the obvious and pull out my macro lens and extension tubes, I decided to do the entire shoot with my 70-200 and 16-35 lenses, playing with compression, perspective, and depth. Using my 70-200, I compressed the background (made it appear closer to my subject than it really was); getting up-close with my 16-35, I emphasized the foreground and expanded the background. I also had tons of fun playing with depth of field—when I found a composition I liked, I ran entire range of f-stops, from f2.8 to f22, in one-stop increments. After reviewing these images on a big screen, I decided I prefer the narrow DOF frames for the way they guide the eye where I want it to go, rather than distract with the extraneous background detail the small aperture frames displayed.
I find it a bit ironic that, while intimate images like those in here are usually far more reflective of a photographer’s skill and creativity than the spectacular moments captured in scenes like the Three Strikes image, it’s the spectacular that commands the most attention (just count the number of Facebook “Likes”). In most of my lightning images, the most challenging aspect was being there; on the other hand, these wildflower scenes not only required discovery, most involved contorting while flat on the ground, and each required careful management of every aspect of the scene, from relationships, depth, light, and motion.
The entire group got similar stuff on our lightning morning (while so far I haven’t seen any others who were fortunate enough to get three parallel strikes, that’s exactly what my image was: the good fortune to click at just the right instant). On the other hand, I’m pretty sure nobody else got anything like these wildflower images (nor did I get wildflower images like the others got). So does that mean I like these wildflower images more my “Three Strikes” image? Uh…, no. That was a once-in-a-lifetime capture that every landscape photographer dreams of. But I think ultimately I take more pride in the skill and effort required to craft something like these.
Forest Wildflowers, North Rim, Grand Canyon
Canon EOS 5D Mark III
1/100 second
F/4
ISO 200
200 mm

