Eloquent Images by Gary Hart
Insight, information, and inspiration for the inquisitive nature photographer
Near and Far: Thinking in Three Dimensions
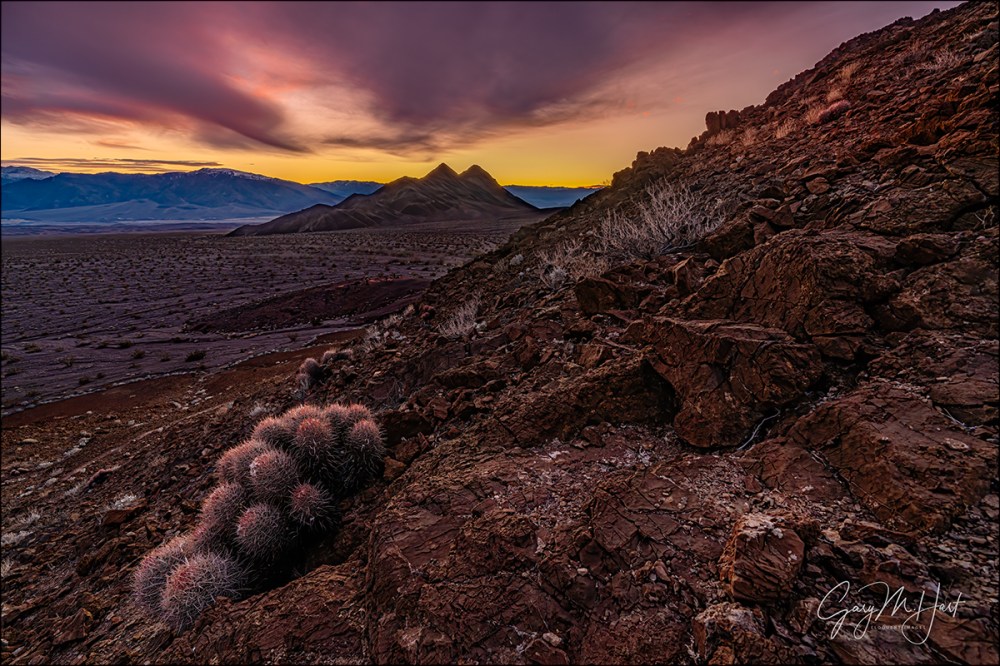
Prickly Sunset, Hell’s Gate, Death Valley
Sony a7RIV
Sony 12-24 G
.4 seconds
F/11
ISO 100
Photography is the futile attempt to render a three dimensional world in a two dimensional medium. It’s “futile” because including actual depth in a photograph is literally impossible—but impossible doesn’t mean hopeless. One of the simplest things photographers can do to elevate their images is to think about their scene in three dimensions, specifically how to create the illusion of depth by composing elements at multiple distances from the camera.
Many photographers miss opportunities by simply settling for the beautiful scene before them instead of looking for ways to make it even better. A more productive approach is to start with the beautiful aspect of the scene you want to emphasize (brilliant sunset, backlit flower, towering peak, vivid rainbow, plunging waterfall, whatever), then aggressively seek an object or objects nearer or farther to complement it (this is one reason I love including the moon in my images). Of course it’s sometimes easier said than done, but this near/far mindset should drive every capture.
Thinking foreground and background is a great start, but merely having objects at varying distances usually isn’t enough—you also need to be aware of how those objects guide your viewer’s eye through the frame. We hear a lot of photographers talk about using “leading lines” to move the eye, but a line doesn’t need to be a literal (visible) line to move the eye because viewers will subconsciously connect certain elements to create virtual lines.
To help me achieve virtual leading lines, a term I like to use is “visual weight”: a quality in an object that tugs the eye like gravity, subconsciously pulling the viewer’s gaze in its direction. Qualities in an object that can create visual weight include mass, shape, brightness, contrast, color, texture, and sometimes just position in the frame. A single one of these qualities can give an object visual weight, but usually a combination of more than one is more effective.
Additionally, an object’s emotional power can boost its visual weight. For example, a small moon will pull the eye more than a larger bright cloud, and Half Dome has more visual weight than a random rock occupying the same amount of frame real estate.
With my primary subject and complementary (eye moving) objects identified, I still need to consider the linear connection between these visual components. I usually prefer diagonal relationships because I like the visual tension created by moving the eye along multiple planes. Creating these virtual diagonals requires careful positioning, but it’s surprising how many photographers just remain planted with their tripod as if it has grown roots—either they don’t see the benefit of repositioning, or don’t think moving is worth the effort.
Whatever the reason, it’s important for photographers to understand the power of shifting position to control foreground and background relationships: move left and your foreground shifts right relative to the background; move right and the foreground shifts left relative to the background. Either way, the closer the foreground is relative to the background, the more dramatic the shift. And contrary to what you might believe, it’s impossible to change foreground/background perspective with focal length—to change perspective, you must change position: forward/backward, left/right, up/down.
An often overlooked shift that can be quite powerful is the up/down shift. Often I’m able to un-merge objects at different distances by simply raising my tripod or climbing atop a nearby rock. And when my frame has a large and boring empty space (such as a field of weeds or dirt) between the foreground and background, I drop lower to shrink that gap.
For example
On the first evening of my Death Valley Winter Moon workshop earlier this month, I took my group to Hell’s Gate. At Hell’s Gate the view south is straight down the valley toward Furnace Creek and Badwater; in the east are rutted hills that turn gold with the sun’s last light; the view west takes in nearby Death Valley Buttes, with the Panamint Range in the distance. While I like this spot for these grand vistas, it’s the assortment of cacti, rocks, and shrubs to include with the vistas that especially appeal to me.
Of the many barrel cacti that dotting the hillside at Hell’s Gate, I’m especially drawn to a large specimen above the trail and about halfway up the steep slope. But because I’m leading a group and this barrel cactus usually taken by someone else, I rarely get to photograph it at prime time. This year, however, the rest of the group was occupied with other foreground subjects, so when the sky started to turn pink with sunset, I scrambled up the talus and went to work.
The color was best in the direction of the pyramid-shaped Death Valley Buttes, so I started working on a composition in that direction. I knew my foreground would be the barrel cactus, and the background subject would be the buttes, but I still needed to turn the scene into a picture. Using my Sony a7R IV, I started with my Sony 12-24 G lens to allow me to get as close as possible to the photogenic barrel cactus. Scanning the scene, I quickly recognized the visual weight potential in the bare shrub—not for its inherent beauty, but for the its contrast (against the dark rock) and flame-like shape. These qualities gave it enough visual weight to balance the right half of the frame and move the viewer’s eye diagonally toward the buttes.
I positioned myself so the cactus was closest to the frame and left of center, and the shrub was right of center, with the Death Valley Buttes right down the middle. With my camera at eye level the empty plain in the middle distance occupied too much of the frame, so I dropped down to near cactus level. Doing this had the added advantage of increasing the prominence of the interesting jumble of rocks in the near-right—they don’t stand out enough to pull the eye from the cactus-shrub-buttes path I’d laid out, but their texture added some secondary visual interest in that part of the frame.
At 12mm I had a ridiculous amount of depth of field to play with, but I still took care with my focus choices. My rule of thumb for these extreme front-to-back scenes is to identify the closest thing that must be sharp (the cactus), and focus a little behind it—if I focus on the cactus, I get near sharpness I don’t need, at the potential risk of essential distant sharpness. I probably could have gotten away with f/8, but since the light was changing fast, I didn’t want to take the time to check my hyperfocal app. I stopped down to f/11, focused on a rock a foot or so behind the cactus, metered, and clicked.
Near and Far
Click an image for a closer look and to view a slide show.


Beautiful!
I think we outdoor photographers should call it Galen’s Arch (not Whitney). He deserves it.
Thanks, Anthony. Galen Rowell had a profound influence on me and my photography.