Eloquent Images by Gary Hart
Insight, information, and inspiration for the inquisitive nature photographer
Chasing Lightning at the Grand Canyon (Again)
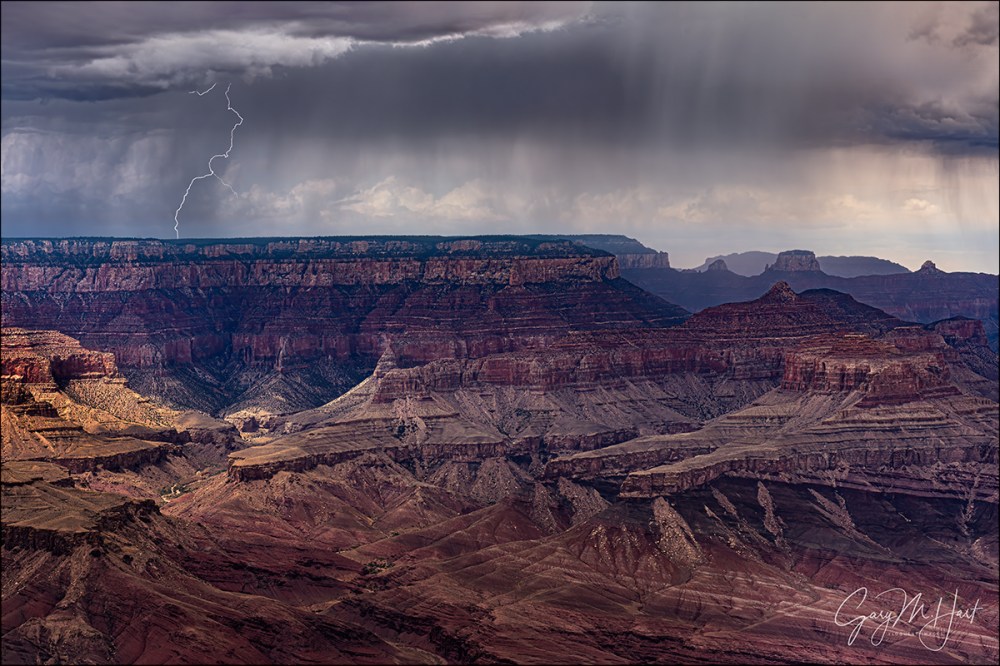
Rain and Lightning, Lipan Point, Grand Canyon
Sony a7RIV
Sony 24-105 G
1/8 second
F/18
ISO 50
Ten days ago my brother and I drove to the Grand Canyon to photograph the monsoon—you can read the story of our trip in my previous blog post.
I don’t get tired of photographing lightning. My brother Jay and I timed last month’s trip because the forecast promised lots of lightning, and though we did indeed see a lot of lightning, most of it was actually too close to photograph. Each day Jay and I headed out right after breakfast, stayed out most of the day, and returned to our room around dinnertime with lots of nice images, but no lighting to show for our effort.
I like to stand on the rim of the Grand Canyon and photograph lightning up, down, or across the canyon, but most of the lightning we saw was either coming up behind us, or right on top of us. The frustrating reality of lightning photography is that when there’s too much, it’s usually too close. How close? Fixing dinner one evening, we saw a bolt hit about 50 yards from our room. And one afternoon on the rim, while watching a storm approach from the south and hoping it would hold together long enough to make it over the canyon, I reached to adjust my camera and got a shock—we were back in the car within five seconds.
Given all the lightning we dodged on the South Rim, had we been on the North Rim, we’d have had a field day—but on the South Rim, all we got was wet. Despite our frustration, on our last day the forecast was again promising, so we went back out filled with optimism. As we had on our previous days, we pointed our cameras at lots of promising cells with no success. Lots of dry frames—shutter clicks when the Lightning Trigger detects lightning that wasn’t visible or in my frame (I could have turned down the sensitivity, but don’t usually do that until I’ve had some success)—but just one meh lightning strike I knew I’d never process. That’s just the way lighting photography goes.
But I’m nothing if not persistent, which is how we found ourselves out near Lipan Point late that final afternoon. Despite our lack of lightning success, we’d had a lot of the otherwise spectacular photography that the monsoon often delivers—billowing clouds, dark curtains of rain, light shafts, dappled light, and gorgeous sunset color—and this afternoon was no exception. I was composed on a broad area of falling rain that looked moderately promising, resigned to the fact that it too would probably fizzle (but nevertheless appreciating the gorgeous light and clouds), when a single bolt fired across the canyon. It caught me so off guard that I almost didn’t believe it, but I heard my camera click and Jay exclaim, so I marked the frame (took a picture of my hand to make it easier to find among the hundreds of empty frames) and crossed my fingers.
We saw two more lightning bolts that afternoon, but this turned out to be the only one I deemed worthy of processing. On the drive home Jay and I agreed that our trip was a great success—while we didn’t get as much lightning as we’d have liked, we got lots (and lots) of beautiful storm images, photographed a vivid sunset, and had two great Comet NEOWISE shoots. This lighting strike on our final afternoon was simply icing on the cake.
Lightning photography isn’t hard, but it does take a little education and preparation
Below is the just updated (August 2, 2020) Lightning article from my Photo Tips section
How To Photograph Lightning

Forked Lightning, Point Imperial, Grand Canyon
Sony a7RIII
Sony 100-400 GM
Lightning Trigger LT-IV
ISO 400
f/7.1
.4 seconds
Few things in nature are more dramatic than lightning. Or more dangerous. And if “safety first” is a criterion for intelligence, photographers are stupid. Because lightning is both dangerous and unpredictable, the more you understand lightning, how to anticipate it and stay safe in its presence, the greater your odds of surviving to take more pictures.
The shocking truth about lightning
A lightning bolt is an atmospheric manifestation of the truism that opposites attract. In nature, we get a spark when two oppositely charged objects come in close proximity. For example, when you get shocked touching a doorknob, on a very small scale, you’ve been struck by lightning.
In a thunderstorm, the up/down flow of atmospheric convection creates turbulence that knocks together airborne molecules, stripping their (negatively charged) electrons. Lighter, positively charged molecules are carried upward in the convection’s updrafts, while the heavier negatively charged molecules remain near the bottom of the cloud. Soon the cloud is electrically polarized, more positively charged at the top than at the base.
Nature always takes the easiest path—if the easiest path to electrical equilibrium is between the cloud top and bottom, we get intracloud lightning; if it’s between two different clouds, we get intercloud lightning. Less frequent cloud-to-ground strikes occur when the easiest path to equilibrium is between the cloud and ground.
With lightning comes thunder, the sound of air expanding explosively when heated by a 50,000-degree jolt of electricity. Thunder travels at the speed of sound, a pedestrian 750 miles per hour, while lightning’s flash zips along at the speed of light, more than 186,000 miles per second—nearly a million times faster than sound.
Knowing that the thunder occurred at the same time as the lightning flash, and the speed both travel, we can calculate the approximate distance of the lightning strike. While we see the lightning instantaneously, thunder takes about five seconds to cover a mile: Dividing by 5 the number of seconds between the lightning’s flash and the thunder’s crash gives you the lightning’s distance in miles (divide by three for kilometers).
Lightning safety
The 30 (or so) people killed by lightning in the United States each year had one thing in common with you and me: they didn’t believe they’d be struck by lightning when they started whatever it was they were doing when they were struck. The only sure way to be safe in an electrical storm is to be in a fully enclosed structure or metal-framed vehicle, away from open windows, plumbing, wiring, and electronics.
Unfortunately, photographing lightning usually requires being outside. And though there’s no completely safe way to photograph lightning, it doesn’t hurt to improve your odds of surviving enough to enjoy the fruits of your labor.
Most lightning strikes within a ten-mile radius of the previous strike. So, if less than thirty seconds elapses between the flash and bang, you’re too close. And since “most” doesn’t mean “all,” it’s even better to allow a little margin for error. Thunder isn’t usually audible beyond ten miles—if you can hear the thunder, it’s safe to assume that you’re in lightning range.
But if you absolutely, positively must be outside with the lightning firing about you, or you simply find yourself caught outside with no available shelter, there are few things you can do to reduce the chance you’ll be struck:
The thousands of humans killed by lightning each year had one thing in common with you and me: none believed they’d be struck by lightning. The safest place in an electrical storm is a fully enclosed structure or metal-framed vehicle (it has nothing to do with the tires), windows closed, away from windows, plumbing, wiring, and electronics.
The surest way to be struck by lightning is to be outside in an electrical storm, but photographing lightning usually requires being outside. And while there’s no completely safe way to photograph lightning, it doesn’t hurt to improve your odds of surviving.
Most lightning strikes within a six-mile radius of the previous strike, but strikes have been known to happen much farther from the storm. Since thunder isn’t usually audible beyond ten miles, if you hear thunder, you should go inside and stay there until at least 30 minutes after the thunder stops.
If you absolutely must be outside with lightning nearby, or you simply find yourself caught outside with no available shelter, there are things you should know and do to be safer:
- A lightning strike is often preceded by static electricity that makes your hair stand on end
- Avoid high ground
- Avoid exposed areas
- Avoid metal and electronics
- Avoid concrete, which is often reinforced with metal
- Avoid tall isolated objects such as trees and open structures (and tripods)
- Avoid water
- Stay at least fifteen feet from other people
- Do not lie down
- If you’re surrounded by trees, position yourself near shorter trees, as far from trunks as possible
- Rubber soled shoes provide no protection
- As a last resort, crouch on the balls of your feet, with your feet together and your hands covering your ears

Three Strikes, Bright Angel Point, North Rim, Grand Canyon
Lightning How-to
If, after factoring in all the risks, you still like the idea of photographing lightning, you need to gear up. The extreme contrast between darkness and brilliant lightning means photographing lightning at night is mostly a matter of pointing your camera in the right direction with a multi-second shutter speed and hoping the lightning fires while your shutter’s open—pretty straightforward.
Photographing daylight lightning is more problematic. It’s usually over before you can react, so any success just watching and clicking is probably dumb luck. And using a neutral density filter to stretch the exposure time out to multiple seconds sounds great in theory, but in daylight, a lightning bolt with a life measured in milliseconds, captured in an exposure measured in seconds, will almost certainly lack the contrast necessary to show up in an image.
Lightning Trigger: The best tool for the job
Most lightning sensors (all?) attach to your camera’s hot shoe and connect via a special cable to the camera’s remote-release port. When engaged, the sensor fires the shutter (virtually) immediately upon detecting lightning, whether or not the lightning is visible to the eye or camera. With so many lightning sensors from which to choose, I did lots of research before buying my first one. I ended up choosing the sensor that was the consensus choice among photographers I know and trust: Lightning Trigger from Stepping Stone Products in Dolores, CO. At around $350 (including the cable), the Lightning Trigger is not the cheapest option, but after many years leading lightning-oriented photo workshops, I can say with lots of confidence that lightning sensors are not generic products, and the internal technology matters a lot. Based on my own results and observations, the Lightning Trigger is the only one I’d use and recommend (I get no kickback for this). On the other hand, if you already have a lightning sensor you’re happy with, there’s no reason to switch.
I won’t get into lots of specifics about how to set up the Lightning Trigger because it’s simple and covered fairly well in the included documentation. But you should know that of the things that sets the Lightning Trigger apart from many others is its ability to put your camera in the “shutter half pressed” mode, which greatly reduces shutter lag (see below). But that also means that connecting the Trigger will probably disable your LCD replay, so you won’t be able to review your captures without disconnecting—a simple but sometimes inconvenient task. You also probably won’t be able to adjust your exposure with the Lightning Trigger connected.
The Lightning Trigger documentation promises a range of at least a 20 mile, and after using mine at the Grand Canyon for years, I’ve seen nothing that causes me to question that—if anything, without actually testing it, I’d guess that its range is at least 30 miles. The LT documentation also says you can expect the sensor to fire at lightning that’s not necessarily in front of you, or lightning you can’t see at all, which I will definitely confirm. For every click with lightning in my camera’s field of view, I get many clicks caused by lightning I didn’t see, or that were outside my camera’s field of view. But when visible lightning does fire somewhere in my composition, I estimate that the Lightning Trigger clicked the shutter at least 95 percent of the time (that is, even though I got lots of false positives, the Lightning Trigger missed very few bolts it should have detected). Of these successful clicks, I actually captured lightning in at least 2/3 of the frames.
The misses are a function of the timing between lightning and camera—sometimes the lightning is just too fast for the camera’s shutter lag. In general, the more violent the storm, the greater the likelihood of bolts of longer duration, and multiple strokes that are easier to capture. And my success rate has increased significantly since switching from a Canon 5DIII to the much faster Sony Alpha bodies (more on this in the Shutter Lag section).
The Lightning Trigger documentation recommends shutter speeds between 1/4 and 1/20 second—shutter speeds faster than 1/20 second risk completing the exposure before all of the secondary strokes fire; slower shutter speeds tend to wash out the lightning. To achieve daylight shutter speeds between 1/4 and 1/20 second, I use a polarizer and usually set my ISO to 50 and aperture to f/16 or smaller. Of course exposure values will vary with the amount of light available, and you may not need such extreme settings when shooting into an extremely dark sky. The two stops of light lost to a polarizer helps a lot, and 4- or 6-stop neutral density filter is even better with fairly bright skies (but if you’re using a neutral density filter, try to avoid shutter speeds longer than 1/4 second).
Shutter lag
Lightning is fast, really, really fast, so the faster your camera’s shutter responds after getting the command to fire, the more success you’ll have. The delay between the click instruction (whether from your finger pressing the shutter button, a remote release, or a lightning sensor) and the shutter firing is called “shutter lag.”
In general, interchangeable lens cameras (mirrorless and DSLR) have the fastest shutter lag. But even with an ILC, it’s surprising how much shutter lag varies from manufacturer to manufacturer, and even between models from the same manufacturer.
Ideally, your camera’s shutter lag should be 60 milliseconds (.06 seconds) or faster, but 120 milliseconds (.12 seconds) is usually fast enough. Most of the top cameras from Sony, Nikon, and Canon are fast enough—currently, Sonys are fastest, Nikon is a close second, and Canon is third.
And shutter lag can vary with the manufacturer’s model: While my Sony a7RIV may be the fastest camera out there, my original a7R was unusably slow, so you need to check your model’s shutter lag.
Unfortunately, shutter lag isn’t usually in the manufacturers’ specifications. The best source I’ve found is the “Pre-focused” time in the Performance tab of the camera reviews at Imaging Resource.
Other equipment
In addition to a lightning sensor and fast camera, you’ll need:
- Solid tripod and head: Don’t even think about trying to photograph lightning hand-held. And contrary to popular belief, a carbon fiber tripod is no safer than an aluminum tripod.
- Rain gear that keeps you dry from head-to-toe
- Umbrella (a.k.a., Wile E. Coyote Lightning Rod) to shield your camera and lightning sensor (many sensors, including the Lightning Trigger, aren’t waterproof) while you compose and wait in the rain. The umbrella is for when you’re photographing storm cells at a great distance, such as on the rim of the Grand Canyon and the lighting is across the canyon. Obviously, when the lightning gets within 10 miles, put the umbrella down and run for cover.)
- Lens hood to shield some of the raindrops that could mar the front element of your lenses
- Neutral density filter and/or polarizer to slow shutter speed into the ideal range (1/4 – 1/20 second)
- Garbage bag (my choice) or rainproof camera jacket (haven’t found one I like) to keep your camera and sensor dry during a downpour
- Extra lightning sensor batteries: Better safe than sorry
- Extra memory cards: When a storm is very close or active, your lightning sensor could detect 20 or 30 strikes per minute (even when little or no lightning is visible to the eye)
- Infrared remote to test your Lightning Trigger; I sometimes borrow the remote from my hotel room, but the Apple TV remote works great and is extremely compact (fits nicely into the Lightning Trigger pouch)
- Towel
Lightning app
I’ve used a few lightning apps, but I finally think I’ve found one worthy of recommending: My Lightning Tracker. I have the “pro” version, which just means I paid a few dollars so I don’t have to see ads. This app has too many useful features to list here, but the most important thing it does is give me a good idea where the lightning is firing now (as long as I have a cellular or wifi connection), and how far away it is. It will also alert me of any strikes within a user-specified radius. It’s easy to use and seems to be reliable.
Getting the shot
Even if you can photograph lightning from your front porch, it’s usually best to pick a nice scene, then monitor the weather so you can be there to capture lightning with a great foreground. I strongly recommend that you scout these lightning scenes in advance, not just for possible compositions, but for safe places to set up, escape routes, and a place to retreat to if the lightning gets too close. I try never to shoot more than a quick sprint from my car.
Once you’re there, don’t wait until you see lightning before setting up your gear. If the sky looks even a little promising, get everything ready: tripod out, camera and lens mounted, lightning sensor attached. Then test your lightning sensor to make sure it fires your camera—I can’t tell you how easy it is to overlook one little thing and wonder why the lightning is firing but your camera isn’t. I test my Lightning Triggers, with a TV remote, or with the flash from my iPhone camera.
As I said earlier, the trickiest part of lightning photography is getting the right shutter speed. Too fast and you risk missing all of the strokes; too long and you risk washing out the lightning. My target shutter speed is usually 1/8 second, +/- 1/8 second—long enough to include multiple pulses, but not so long that I risk washing out the lightning.
When the sky is relatively bright, dropping to 1/20 second can help the lightning stand out better than 1/8 second, but risks losing secondary strikes. Conversely, when the sky is extremely dark and the lightning is firing like crazy, extending to 1/4 second might increase your chances for capturing multiple pulses.
Even with a polarizer on, getting the shutter speed to my sweet spot usually requires dropping to ISO 50 and stopping down to f/16 or smaller. In these situations, a neutral density filter is a big help, but take care not to let the shutter speed go longer than necessary.
Lightning is most likely to strike in or near the gray curtains that hang beneath dark clouds (clearly recognizable as distant rain)—not only near the center, but often on the fringe or just outside. And the darkest and tallest clouds are usually the most likely to fire lightning. If you’re in the storm that you’re photographing, you’re too close.
The best lens for lightning is usually a midrange zoom, such as a 24-70 or 24-105. If you find yourself reaching for your 16-35 (or wider), you’re too close.
I generally start fairly wide to increase my margin for error (to avoid missing a bolt just outside my frame), but once I’m sure I’ve captured some good strikes, I often tighten my composition. While this narrower field of view can reduce the number of frames with lightning, the ones I get are much larger in the frame.
Here are a few more composition points to consider:
- Identify the most likely lightning cell and find the best composition that includes it.
- The more resolution you have, the looser you can compose, then crop to the best composition later.
- Don’t include too much room above the lightning—the most frequent rookie mistake I see is too much sky/clouds in the frame. I like my lightning bolts to originate just below the top of my frame.
- The second most frequent rookie mistake I see is lightning cut off at the top. Note the height from which the lightning originates and try to include enough cloud to get the stroke’s origin point. And if you’re really wide and still can’t get all the lightning, run! (Like I did after the image below.)
- Don’t forget to try some vertical compositions.

Lightning Explosion, Oza Butte, Grand Canyon North Rim
There’s a lot of standing around while photographing lightning, but storms move, so the more you can keep your eyes on the sky (instead of your phone), the better you’ll be at keeping lightning in your frame as the storm moves, and knowing when the activity is picking up or winding down. The light can change by several stops as the storm moves, intensifies, or winds down, so check your exposure frequently. And monitor your surroundings for active cells moving up behind you.
Be aware that electrical storms can move quite quickly, and more than one cell can be active in a given area, so monitor the sky closely—not just the storm you’re photographing, but scan for potential cells that could be sneaking up on you. Sometimes this simply means adjusting your composition to account for shifting lightning; other times it means retreating to the car if the cell threatens your location. No shot is worth your life.

One final note: If you check my exposure settings, you’ll see that my shutter speed here was .4 seconds, well outside the 1/20-1/4 second range I suggest. But if you look at the other settings, you’ll see that I’d opened up to f/7.1, and had cranked my ISO to 400, an indication that twilight was settling in. Successful lightning photograph is all about contrast, and the darker the sky, the better the bolt stands out, even in a longer exposure. Had we stayed past dark (and lived), we could have jettisoned the Lighting Triggers and used multi-second exposures.
Join and me in my next Grand Canyon Monsoon Photo Workshop
Workshop Schedule || Purchase Prints
A Lightning Gallery
Click an image for a closer look and slide show. Refresh the window to reorder the display.


Wowza – fantastic lightning pics. I haven’t managed to capture lightning yet, but I also live in SoCal so I don’t get much practice 😦
Thanks, M.B. Yeah, it’s frustrating to be a lightning photographer in California. Every once in a while the monsoon moisture slips far enough west, but that’s pretty rare. When that happens, I can head to the Sierra; for you, maybe Joshua Tree would work.