Eloquent Images by Gary Hart
Insight, information, and inspiration for the inquisitive nature photographer
Your camera is stupid (but you’re not)
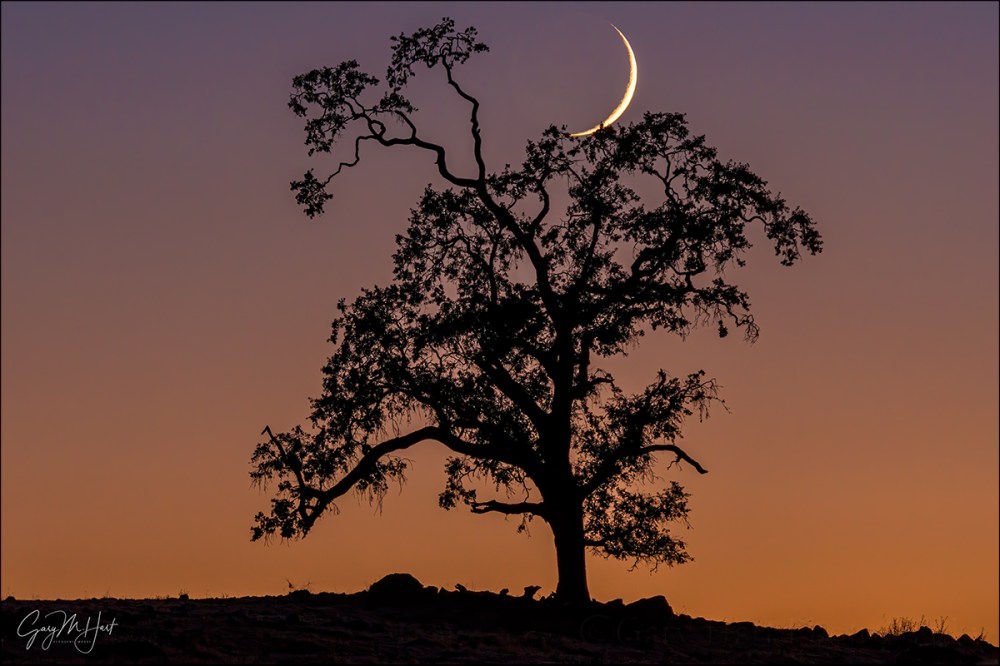
New Moon and Oak, Sierra Foothills, California
Sony a6300
Tamron 150-600 (Canon-mount with Metabones IV adapter)
.4 seconds
F/8
ISO 400
In a previous life I spent a dozen or so years doing technical support. In this job a key role was convincing people that, despite all failures and error messages to the contrary, they are in fact smarter than their computers. Most errors occur because the computer just didn’t understand: If I misspel a wurd, you still know what I meen (rite?). Not so with a computer. A computer can’t anticipate, reason, or create; assigned a task, it will blithely continue repeating a mistake, no matter how egregious, until it is instructed otherwise, fails, or destroys itself.
All this applies equally to today’s “smart” cameras, which are essentially computers at their core. But no matter how advanced its technology, a camera just can’t compete with your brain. Really.
For example, if I’d allowed my camera to decide the exposure for this crescent moon scene from 2016, I’d have ended up with a useless mess: While this image is all about color and shape, automatic exposure, deciding that the foreground hillside is important, would have brightened the scene enough to expose distracting detail and completely wash out the color in the sky. But I knew better. Wanting to simplify the scene, I manually metered and banished the extraneous foreground detail to the black shadows, capturing only the moon’s delicate shape and a solitary oak silhouetted against the indigo twilight.
Digital cameras become more technologically advanced each year, and their auto-exposure and -focus capabilities are quite good, good enough that nobody should feel they must switch to manual if they fear it will diminish the pleasure they get from photography. But if your photographic pleasure comes from getting the best possible images, it would benefit you to spend a little time mastering manual metering (and hyperfocal focus), then using that knowledge to override your camera’s programmed inclinations. It might help to know that in my photo workshops I teach (but never require) manual metering to all who are interested, and most who try it are surprised by how easy and rewarding it is to take control of their camera.
Trust your histogram
Exposure control starts by learning to use a histogram, a graph of the tones in an image (read more about histograms). Not only does every digital camera show us a histogram of the scene we just photographed, modern cameras (all mirrorless for sure, and all of the latest DSLRs that I know of) display the histogram for the scene we’re currently metering, before the shutter is clicked.
With a histogram, instead of clicking and hoping as we did in the film days, or clicking, checking, and adjusting as we did in the pre-live-view histogram days, the addition of a histogram before we shoot provides advance knowledge of the image’s exposure. For those who know how to read a histogram, manual exposure has never been easier—just monitor the histogram as you prepare your shot and dial the exposure until the histogram looks right. Click.
Setting up your live-view histogram
To ensure a valid pre-capture histogram (on your DSLR’s live-view screen, or your mirrorless camera’s live-view or viewfinder screen), make sure you are in whatever your camera manufacturer calls exposure simulation. When the camera simulates exposure, rather than always showing the ideal exposure on the live-view screen, it attempts to emulate the exposure settings you’re using. Here is a far from comprehensive guide to the exposure simulation designation used by the major camera manufacturers (though I can’t guarantee that all cameras from the same manufacturer do it the same way):
- Canon: Exposure Simulation (enabled)
- Fuji: Preview Exp. in Manual Mode (off)
- Olympus: Live-view Boost (off)
- Nikon: Exposure Preview (selected in the Info menu)
- Sony: Setting Effect (on)
On most camera’s the metering mode (the way the camera’s meter views the scene—not to be confused with exposure mode, which is the way the camera sets the exposure) doesn’t affect the pre-capture histogram, but to be safe, instead of spot or partial metering, I choose a metering mode that uses the entire frame. (With my Sony mirrorless bodies, I set my metering mode to Entire Screen Average.)
Once you’ve turned on exposure simulation, you need to figure out how to display the histogram. Most cameras, mirrorless or DSLR, offer multiple live-view screen options that display a variety of information about the scene you’re photographing. On most cameras, only one or two of these screens displays the histogram—finding it is usually a simple matter of cycling through the various displays until the histogram appears. To minimize the number of screens I need to scroll through to get to the information I need (such as the histogram or level), I always go into my camera’s menu system and disable the live-view screens I don’t use.
Using your live-view histogram
Using my pre-capture histogram, I start the metering process as I always have. In manual exposure mode, I start in my camera’s best ISO (100 for my Sony a7RIV), and the best f-stop for my composition (unless motion, such as wind or star motion, forces me to compromise my ISO and/or f-stop). With ISO and f-stop set, I slowly adjust my shutter speed with my eye on the histogram in my viewfinder (or LCD).
Most mirrorless bodies offer highlight warnings in their pre-capture view (often called “zebras”). While these alerts aren’t nearly as reliable as the histogram and should never be relied on for final exposure decisions, I use their appearance as a reminder to check my histogram. The first time I meter a scene, my current exposure settings (based on my prior scene) can be far from what the current scene requires—in this case, I push my shutter speed fast until the zebras appear (if my prior exposure was too dark) or disappear (if my prior exposure was too bright), then refine the exposure more slowly while watching the histogram.
In a low or moderate contrast scene, I’ll have room on both the shadows and highlights sides of the histogram—a pretty easy scene to expose. But in a high dynamic range scene (dark shadows and bright highlights), the difference between the darkest shadows and brightest highlights might stretch the histogram beyond its boundaries. When the high dynamic range is so great that I have to choose between saving the highlights or the shadows, I almost always bias my exposure choice toward sparing the highlights, carefully dialing the exposure until the histogram bumps against the right side—at that point I stop adding exposure, even if my shadows are cut off (black).
Because the post-capture histogram is more reliable than the pre-capture histogram, when high dynamic range gives me little margin for error, I verify my exposure by checking the post-capture histogram. Here’s where the RGB (red, green, blue) histogram becomes important. While the luminosity (white) histogram gives you the detail you captured, it doesn’t tell you if you lost color. Washed out color is always a risk when you push the histogram all the way to the right, so it’s best to check the post-capture RGB histogram to ensure that none of the image’s color channels are clipped.
An often overlooked aspect of mastering in-camera metering is simply learning how your camera reports exposure. Not only does every camera interpret and display its exposure information differently, the histogram returned is based on the jpeg, so raw shooters always have more information than their camera reports—it’s important to know how much more. With my Sony a7Rx bodies, I know I’m usually safe pushing my histogram’s exposure graph up to a full stop beyond the left or right (highlights and shadows) boundary—I have no problem using every available photon.
A few more words about this image
In addition to taking control of the exposure for this image, roaming a hilly cow pasture in the foothills east of Sacramento gave me full freedom of movement to control the new moon’s position relative to the tree. As the sky darkened and the moon dropped, I literally ran up and down the hill to capture as many moon/tree/frame relationships as possible before the moon disappeared.
This is the week (August 16-21, 2020) to photograph a crescent moon. My recommendation is Monday morning on the eastern horizon before sunrise, and Wednesday or Thursday low in the west after sunset.
A Crescent Moon Gallery


")


