Eloquent Images by Gary Hart
Insight, information, and inspiration for the inquisitive nature photographer
Leveraging Light
Posted on April 11, 2023

Glow, California Golden Poppy, Merced River Canyon
Sony a7R V
Sony 100-400 GM
2 extension tubes (26mm total)
ISO 100
f/5.6
1/400 second
In last week’s post I wrote about the importance of distilling a scene to its essence. I suggested that the best way to achieve this is to eliminate all but the scene’s most essential elements, and emphasized using precise cropping to banish unwanted objects to the world outside the frame. And while it could be argued that this careful cropping might be the most essential part of the scene-distilling process (or at least the foundation upon which to build), it’s often not enough.
Many (most?) scenes, even after the most surgical cropping, can remain filled with distractions that dilute the image’s impact. Areas of brightness, distinctive but irrelevant features, and objects cut off or intruding at the sides of the frame are just a few examples of visual elements that can distract the eye and confuse viewers looking for clues about the image’s purpose.
But take heart, all is not lost for photographers able to jettison the urge to “reproduce the world just the way I saw it.” The truth is, reproducing the world as we see it is literally impossible, and the sooner you come to terms with that truth, the better off you’ll be.
Setting aside our own reality to leverage our camera’s reality starts with understanding that “reality” is in fact a moving target defined by the medium interpreting it. Humans’ definition of “real” is founded on the three-dimensional, 360 degree, continuous-motion, multi-sense input delivered to our eye/brain collaboration. A camera, on the other hand, captures a two-dimensional, static, mono-sensory version of our very dynamic world.
But before lamenting your camera’s limitations, pause to consider that, in the grand scheme of perpetual electromagnetic energy that surrounds us, what you and I see is an tiny fraction of the infinite continuum of electromagnetic wavelengths continuously (and ubiquitously) careening about the Universe.
For example, X-ray machines peer into the world of electromagnetic waves in the one nanometer (one billionth of a meter); TVs and radios “see” waves that are measured in centimeters; humans, on the other hand, see only the waves in a very narrow band between (about) 400 and 750 nanometers. Understanding all allows doctors to expose subcutaneous secrets, astronomers to explore our galaxy and beyond, and the military and law enforcement to view “invisible” (to us) infrared signatures that reveal people and objects in complete darkness. In other words, there’s no single absolute visual standard—it’s all relative to the frame of reference.
The photographer’s job is to embrace his or her camera’s unique frame of reference, and to understand the power they possess to convey aspects of the world missed by the human experience. That “instant” a still photo is limited to can actually be stretched with a long exposure that compresses a potentially infinite number of instants to reveal, in a single frame, patterns of motion and flow. And the information a camera can’t see gives photographers incredible power to hide or minimize distractions, to control the world inside their frame, and to emphasize select elements over other elements.
All this might explain why I’ve always considered myself a film photographer with a digital camera. That doesn’t mean I don’t appreciate and use the incredible processing power digital photography brings, but it does mean that the images I process are limited to the photons captured in a single click. I just find no joy in adding information through focus or exposure blending of multiple images. Rather, I prefer leaning into my camera’s visual shortcomings by subtracting the aspects of the scene that don’t serve the image. (There’s nothing wrong with honest image blending, it just doesn’t give me joy.)
The image I share today, a brand new one from last week’s Yosemite Moonbow and Wildflowers photo workshop, got me thinking about the importance of subtracting distractions, and the power of my camera’s relatively narrow (compared to human vision) dynamic range to emphasize the most important qualities my subject. I’ve always loved the way sunlit poppies seem to radiate from within, as if illuminated by their own internal light source, and am always looking for ways to highlight it.
Based on my observations last month (normally a reliable start to the poppy season in Northern California), and the persistence of California’s incredibly chilly spring (by our standards), I wasn’t even sure I’d have a chance do any poppy photography this year. But scouting my poppy spots near Yosemite for last week’s workshop, I was thrilled to see that the poppies were just starting to erupt. They were still quite small, and rather thinly distributed, but were already plentiful enough to photograph. I reasoned (hoped) that a few days of sun might really kick them into gear, so I planned the workshop wildflower shoot for our final afternoon. It turns out I’d reasoned right, and a few days of sunlight was indeed exactly what the doctor ordered.
I found this solitary poppy jutting from a rocky wall in the Merced River Canyon, about 10 miles west of Yosemite Valley. I was especially drawn to the flower’s warm glow, but no matter how I framed it, the rest of the scene was ugly rock, brown dirt, and scraggly weeds.
I’d armed myself this afternoon with my Sony a7R V camera and Sony 100-400 GM lens; to focus closer, I’d also added two extension tubes totaling 26mm. Though it was only mid-afternoon, with the sun well into its daily descent, the shadows were already stretching deep into nearby nooks and crannies.
After studying the scene, I lowered my tripod and positioned my camera beneath the flower for the best view of its backlit, glowing petals. Instead of trying to make the scene look the way I saw it, I took advantage of my camera’s “limited” dynamic range and underexposed enough to blacken the superfluous background detail. The result is this simple image (which required very little processing, BTW) that, while nothing like what my eyes saw, contains only the elements of the scene I was interested in: the glowing poppy and its softly lit stem on a canvas of black shadow.
Workshop Schedule || Purchase Prints || Instagram
Leveraging Light


")


")


Spring is a State of Mind
Posted on March 20, 2023
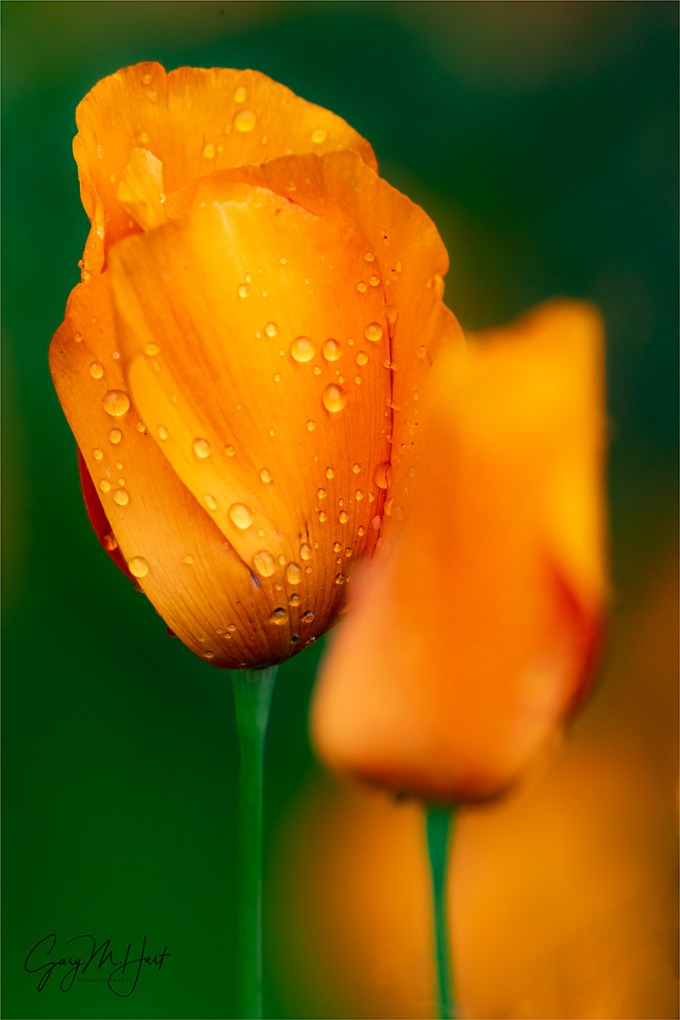
Rainy Day Poppy, Sierra Foothills, California
Sony a7R III
Sony 100-400 GM
Sony 2X Teleconverter + extension tubes
ISO 1600
f/11
1/125 second
According to the calendar, today is the first day of spring—so…, Happy Spring! On the other hand, here in Northern California Mother Nature is delivering very mixed signals. A few trees are blooming, and every few days the sun pops out long enough to forgo a jacket or sweater—but the rain still seems to be coming several times a week, which means (lots of) snow is still falling in the mountains. And the temperatures remain chilly enough that I’ve only dared a short-sleeve shirt once, and my shorts and sandals are still buried in the closet.
Attempting to jumpstart spring, on Saturday my wife and I took advantage of a brief break between storms to drive up into the foothills to check out some of my favorite poppy spots. Usually by mid-March I’ve made this foothills trip several times and am deep into processing the year’s poppy bounty. But on Saturday’s drive we didn’t see a single poppy. Not. One. Poppy. While I was a little disappointed, I certainly wasn’t surprised.
Despite the wildflower shutout, it was a nice drive, and with definite hints of spring. We saw some blue sky, lots of water in the creeks, and hills covered with that happy emerald green that’s only possible in spring (Californians know what I’m talking about).

Poppy Hillside, Highway 49, California Gold Country
Our first stop was the site of what remains one of my favorite, and most successful, poppy images. We found the hillside blanketed with peak green, but no poppies. We stayed long enough for me to pull up the picture on my phone and try to figure out where I’d stood for this shot. The fence persists in a similar state of skewed dilapidation, and as my eyes followed its line I mentally relived scaling the deceptively steep hillside. So steep, in fact, that I jettisoned gear to make it up the steepest spot.
A short distance down the hill from this spot is a road that has been the source of many of my favorite poppy images. Sadly, when we got there we found it gated with a “Road Closed” sign, an all too common site this year. This was the final nail in this year’s poppy photography coffin.
But I wasn’t going to go down easy because all this nostalgia really got my poppy juices flowing. So, with no new poppy images to work on, the next day I decided to dig into the archives and try to uncover some I’d missed in previous years. Since I often don’t have time to process everything from any given shoot, I was hopeful that I wouldn’t need to look too long. Starting with a search of processed poppy images, I quickly identified a rainy day shoot from a few years ago that had potential for untapped opportunities.
It actually rained lightly the entire time I was out there, but some of my favorite photography has happened in the rain. And even though poppies don’t usually open when it rains, I found the raindrops more than enough compensation. And with rain gear in my car for just these situations, I stayed warm and dry. My camera? Not so much. I tried working with an umbrella, but after a few minutes realized I was one arm short and just decided to test the water resistance of my Sony a7RIII. I’m happy to say that it passed with flying colors.
A couple of years ago I wrote an article for “Outdoor Photographer” magazine on what I call creative selective focus. (You can read my blog version of this article here.) In it I write about using minimal depth of field to emphasize very select aspects of a scene, and letting the surrounding scene retreat to a complimentary blur.
If you read the article, you know the 3 primary factors for minimizing depth of field: large aperture (small f-number), long focal length, and close focus point. While I could have used my Sony 90mm f/2.8 macro, for close focus photography I really like the compositional flexibility of a zoom lens, so this afternoon I went with my Sony 100-400 GM lens. To increase my focal length (and shrink my depth of field) further, I added my 2X teleconverter (which, I might add, handled the rain perfectly as well). And to focus even closer, I added 26mm of extension. My original plan was try a few lens/extension-tube/teleconverter configurations (including my macro), but I was having so much fun that I ended up shooting with this setup the entire time.
There’s no free lunch in photography—the downside of adding a teleconverter and extension tubes is significantly reduced light. A 2x teleconverter cuts two stops of light, which means my 100-400 that’s normally wide upon f/5.6 at 400mm, wide open becomes f/11. To compensate for light lost to the smaller aperture, added extension, and a cloudy sky, I shot everything this afternoon at either ISO 1600 or ISO 3200 (grateful that there was no wind).
One of the cool things about this kind of photography is how different the world looks through the viewfinder. I love putting my eye to my camera, moving the lens around, and changing focus slowly to see what snaps into view. In this case I was looking for poppies to isolate from their surroundings, as well as nearby features (like other poppies) that I could soften enough to complement my primary subject without competing. Sometimes I had a general idea of a subject before looking through my camera, other times I’d just explore with my eye to my viewfinder until something stopped me.
Because depth of field shrinks not only with focal length, but also with focus distance, every frame I clicked this afternoon had a paper-thin range of sharpness. With such a shallow depth of field, none of these images would have been possible without a tripod. With my composition set on my tripod, I’d pick a focus point (usually, but not always, a prominent raindrop), focus in my viewfinder until I was pretty certain it was sharp, then magnify the focus point in my viewfinder to confirm and tweak the focus.
I finally called it quits when the rain picked up and the approaching twilight forced too much shutter speed compromise.
Workshop Schedule || Purchase Prints || Instagram
My Favorite Poppies


Telephoto Landscapes
Posted on April 11, 2021

California Spring, Oak and Poppies, Sierra Foothills
Sony a7RIV
Sony 200-600 G
ISO 400
f/9
1/4 second
Over the years I’ve spent a lot of time photographing with my good friend and fellow Sony Artisan Don Smith. Both in workshops and on our personal trips, we’ll head out into the scene or meet back later at the car, and more often than not I’ll have a wide angle lens on my camera, while Don will have a telephoto. Each of us would usually end up with images that pleased us, and I think Don would agree that neither of us could say whose images were “better”—they were just different. But those observations have made me conscious of my wide angle bias, and helped remind me that I may in fact be missing a telephoto opportunity.
What’s it all about?
I’ve always felt strongly that an image needs to be about something, and the photographer’s job is to make it clear to viewers what that something is. I usually accomplish that with my wide lenses by positioning strong elements throughout my frame in a way that creates virtual connecting lines that guide my viewers’ eyes. The problem is, the wider the focal length, the greater the chance of introducing unwanted elements that pull my viewers’ eyes off their prescribed path.
The cure for this problem is often to simplify the scene by going tighter with a telephoto. That doesn’t necessarily mean forgoing the wide version; rather, it can just be a matter of also trying the scene through a telephoto to see what else might be there. If that doesn’t come naturally to you in the field, you might be able to teach yourself how many telephoto shots you left in the field (and to train your eyes in the process) by opening any wide angle image in Photoshop (or your photo editor of choice), setting the crop tool to 2/3 aspect ratio (to match what you see in your viewfinder), and see how many new compositions you can find.
Practicing what I preach
Over the years I’ve gotten better about using my telephoto, but I’d be lying if I said it’s usually the first thing I reach for when I work a landscape. My standard workflow in the field (not conscious, just the way I seem to work naturally) is to start wide and go tighter as I become more familiar with the scene. But last week I got a great reminder of the value of a telephoto as I was driving home from real nice poppy shoot in the foothills near Jackson, California. It was just a few minutes after sunset and my mind was already on dinner when I rounded a bend and saw an oak-studded hillside completely blanketed with poppies.

Poppy Hillside, Highway 49, California Gold Country
I was very familiar with this hillside because it’s the site of one of my oldest, and favorite images, captured in spring of 2005 (read the story). A 24×36 print of this 2005 scene graces the wall in my living room above my fireplace. The one thing I’ll never forget about photographing it is how much steeper this hill is than it appears in the image—so steep, in fact, that when I decided to scale it to get a better vantage point, I jettisoned my tripod so I could have two hands free to hold on and pull myself up. While it wasn’t quite mountain climbing, it was steep enough that I’d have rolled all the way to the bottom had I fallen (much like this).
But this time there was no time to ascend the hill because the scene was rapidly darkening (and the photographer is rapidly aging). The conditions weren’t quite as good as back then either: there were no clouds and the sky was completely colorless. But still, it was just so pretty…
I made the split-second decision to brake and pull over. Safely on the shoulder, I quickly hopped out, grabbed my tripod and Sony a7RIV, and surveyed the scene. I wanted to feature one striking oak that stood alone about 2/3 of the way up the hill, and tried to determine the best way to do it. The fence from my old image was not too far off to the right of the tree, but I now try to avoid manmade objects in my scenes—in fact, the 2005 image is the only image in my current portfolio I can think of with anything manmade. Other nearby concerns were a couple of kind of scraggly trees that definitely didn’t merit inclusion, a few brown patches, and several unsightly rocks. And the sky added absolutely nothing.
It was clear that the best way to highlight the oak and poppies was to eliminate all the surrounding distractions with a long telephoto. Given the distance, perhaps 350 yards, I went straight to my Sony 200-600 G lens. For this image I used 500mm, which completely eliminated all the problems. The light was dimming fast, and a slight breeze stirred the poppies, so I bumped my ISO to 400, focused. I ended up taking 18 frames, some a little wider, some a little tighter, but all more than 400mm. Most of my frames were horizontal, but I finished with a couple of verticals just to cover my bases. Then I packed up and headed to dinner.
Workshop Schedule || Purchase Prints || Instagram
Telephoto Landscapes
Click an image for a closer look, and to view a slide show.

")


, California")


Sunsets are Red Because the Sky is Blue
Posted on January 17, 2021

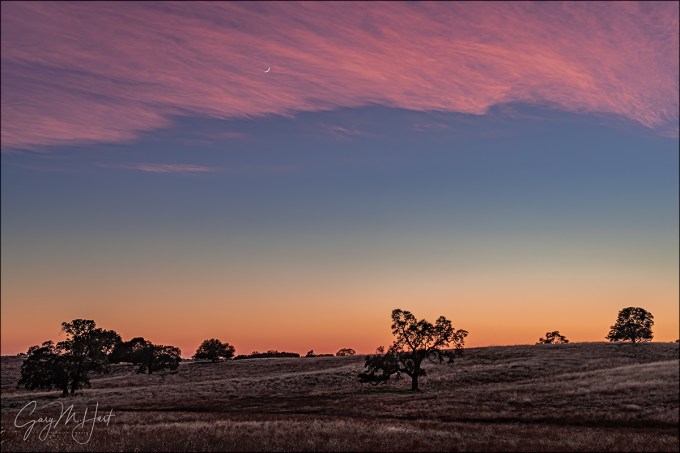
California Sunset, El Dorado Hills, Sierra Foothills
Sony a7R
Sony 70-200 f/4 G
ISO 100
f/8
1/200 second
From time to time I’ll edit one of the many articles in the Photo Tips section of my blog, tweaking and clarifying a few things just to keep it fresh. But every once in a while I do a complete rewrite. Here’s my latest such effort, a brand new article explaining how the interaction of sunlight with our atmosphere gives us blue skies and red sunsets. Spoiler alert: Sunsets are red because the sky is blue.
(And of course everything below applies to sunrise, only in reverse.)
Sunset Color
Nature photography isn’t rocket science, but a basic understanding of nature’s processes can make the difference between success and failure. That applies even to something as fundamental as sunsets and sunrises, from the way sunlight interacts with the atmosphere, to the conditions necessary for vivid sunset color.
Light and color
Sunlight reaches Earth in energy waves of varying length. The total of sunlight’s visible wavelengths combine give us light that appears white. The colors we perceive when specific wavelengths within the visible spectrum are absorbed or scattered, with each wavelength creating a distinct color. While the visible portion of the sun’s energy generates a virtually infinite number of colors, we’ve all become familiar with the arbitrary color name labels assigned to wavelength points throughout the spectrum.
Moving from the longest visible wavelength to the shortest, visible light breaks down into some shade of red, orange, yellow, green, blue, indigo, or violet. Not coincidentally, these are also the colors of the rainbow we see when the white light of the sun, separated by refraction in airborne water droplets, is reflected back to our eyes. Maybe you remember from your college physics days the mnemonic acronym for the rainbow colors and their order (from the outermost to the innermost color): ROY G BIV.
When a beam of sunlight passes through a vacuum (such as space), all of its wavelengths reach our eyes simultaneously and we perceive the visible portion as white. When sunlight encounters something (like a tree, a rock, air molecules, or whatever), some of its light will either be absorbed or scattered, depending on the wavelength and the properties of the interfering medium. So, unless we’re in space, the light that eventually reaches our eyes has either been reflected or stripped of certain wavelengths by whatever it encountered on its journey.
For example, a patch of fresh snow reflects all of the sun’s visible wavelengths uniformly and appears white to our eyes. A piece of coal uniformly absorbs most of the sunlight that strikes it, so we see coal as black. And when sunlight strikes a leaf, all of its wavelengths except those that we perceive as green are absorbed, while the green wavelengths bounce to our eyes.
Color in the sky
Since our atmosphere is not a vacuum, sunlight is changed simply by passing through the air. In an atmosphere without impurities (like dust, smoke, and water vapor), light interacts only with air molecules. In very simple terms, an air molecule will scatter any wavelength that’s smaller than it is, so the shortest wavelengths are most easily scattered. This scattering of incoming solar energy by atmospheric molecules becomes a filter that catches the violet and blue wavelengths first, allowing the longer wavelengths to pass through and continue their journey to more distant eyes.
When the sun is overhead, sunlight travels through a relatively small amount of atmosphere. The wavelengths that reach our eyes are the first to be scattered, the short violet and blue wavelengths, making the sky blue (the sky appears more blue than violet because our eyes are more sensitive to blue light).
On the other hand, when the sun is on the horizon, the light that reaches our eyes has passed through much more atmosphere than it did when the sun was directly overhead. The shorter violet and blue wavelengths are long gone, bluing-up the sky for others on their way, and the only remaining wavelengths are the longer, less easily scattered, orange and red wavelengths. It’s sunset! (Or sunrise.)
Airborne impurities dampen the atmosphere’s filtering process, so contrary to popular belief, a vivid sunset requires clean, unpolluted air. That’s because smoke, dust, and water molecules are much larger than air molecules. Rather than only scattering specific colors the way tiny air molecules do, larger molecules scatter much more completely—in other words, instead of scattering only the blue and violet wavelengths, polluted air catches lots of orange and red too (and everything in between).
Anyone who has blended a smoothie consisting of a variety of brightly colored ingredients (such as strawberries, blueberries, cantaloupe, and kale—uh, yum?) knows the smoothie’s color won’t be nearly as vivid as any of its ingredients, not even close. Instead you’ll end up with a brownish or grayish muck that at best might be slightly tinted with the color of the predominant ingredient.
Verify this yourself: The next time a storm clears, check the color in the sky—whether it’s midday blue, or sunset red, it’s easy to see how much more vivid the color is when the air is clean. And what’s better known for its sunsets, Hawaii, where it rains almost daily, or Los Angeles, with its urban sprawl and exhaust-spewing vehicles?
Another source of color at sunset has become all too familiar to anyone in or near wildfire-prone regions is red-rubber-ball sunsets when a fire is nearby. A vivid sunset requires intense sunlight, the more intense the better. In a typical brilliant sunset, while the rest of the sky is filled with color, the sun itself is far too bright to photograph as anything but a white disk (without rendering the rest of the scene much too dark). But when sunlight has to battle its way through smoke particles, the total amount of light is significantly reduced and there’s not enough scattered light of any wavelength to color the sky. But look straight at the sun—it’s so inherently bright that some of its longest wavelengths have battled their way to your retinas, turning the sun red while the rest of the sky is a murky brownish-gray.
Getting the most from your sunset images
Any time rain has cleared the atmosphere and the remaining clouds are mixed with sunlight, there’s a good chance for a vivid sunrise or sunset. I have a few go-to locations near home, and at my frequently visited photo locations (Yosemite, Grand Canyon, Death Valley, Hawaii, and so on) that I beeline to when the conditions for color in the sky look promising.
Wherever I am, as I prepare my shot shortly before the sunset show begins, I look for clouds receiving direct sunlight. This is the light that will most likely color-up at sunset, starting with an amber glow that transitions to pink, and red. Conversely, if no clouds are getting light shortly before sunset, that may be an indication that the sunset will fizzle. But don’t give up, because Nature is full of surprises.
A couple of mistakes inexperienced photographers often make is giving up on sunset too soon, and forgetting to check the sky behind them. Some of the best sunsets I’ve ever seen have happened when the sun slipped through an unseen hole in the clouds just below the horizon. And shortly after the sun sets, the pink vestiges of the longest wavelengths still color the eastern horizon. As this color deepens, the steely blue of the Earth’s shadow starts to descend. This combination of rich color and soft, shadowless light creates some of the best color and light for photography. Even when the scene appears too dark to your eye, don’t forget that your camera can accumulate light and bring out color and detail lost to your eye.
Maximizing color in the high dynamic range conditions of a sunset requires careful exposure. Rather than trusting the preview image on your scenes with extreme contrast, it’s essential to trust your histogram. If the histogram for a high dynamic range sunset scene looks good (highlights and shadows not clipped), it’s likely that on the LCD the highlights will look too bright, and the shadows too dark. Resist the urge to fix one or the other in the field, and instead trust that you’ll be able to recover both in processing later. If you’re not sure (or just don’t trust your ability to read the histogram), backet your exposures by a stop or two around what you think is best.
And don’t forget to check your RGB histogram—even if the luminosity histogram looks good, it’s possible that the red channel is clipped and you’ll need to reduce your exposure a little.
About this image
It was January 2015 and I had only recently made the switch from Canon DSLR to Sony Alpha mirrorless. With fewer than 1000 frames shot on my new Sony a7R, I’d already been completely blown away by its dynamic range compared to my Canon 5DIII, and was anxious for opportunities to reap these newfound benefits.
On this winter evening I ended up in the foothills south and east of Sacramento, my go-to photo location closest to home. I have a number of spots here, each highlighted by one or more oak trees atop a west-facing hill that gives me great silhouette opportunities from the back side.
Rather than return to one of my tried and true spots, I wanted to find something new. I was alarmed at all the development underway in this once pastoral area, but I was able to get to this spot because a new road had been carved into the hills behind it. Construction had already begun and while it’s illegal in California to cut down our beautiful oaks, it seems that they can develop right up to them and it wouldn’t be long before this trio was completely surrounded by homes. It was pretty clear that this shot wouldn’t be possible if I were to return in even just a few weeks.
As you can see here, I once again confirmed the dynamic range of my new Sony sensor. But of course no camera can shoot directly into a completely unfiltered sun, but this evening I benefited from the moisture-laden haze that hovers over the Central Valley in winter.
One other thing I remember exciting me about my new camera was its extra resolution. My longest lens at the time was the Sony 70-200 f/4 and I wanted to shoot this tighter. I just shot it at 200mm, but found that I had plenty of resolution to crop it down to what you see here.
Workshop Schedule || Purchase Prints || Instagram
Foothill Oaks
Click any image to scroll through the gallery LARGE


")


Your camera is stupid (but you’re not)
Posted on August 16, 2020

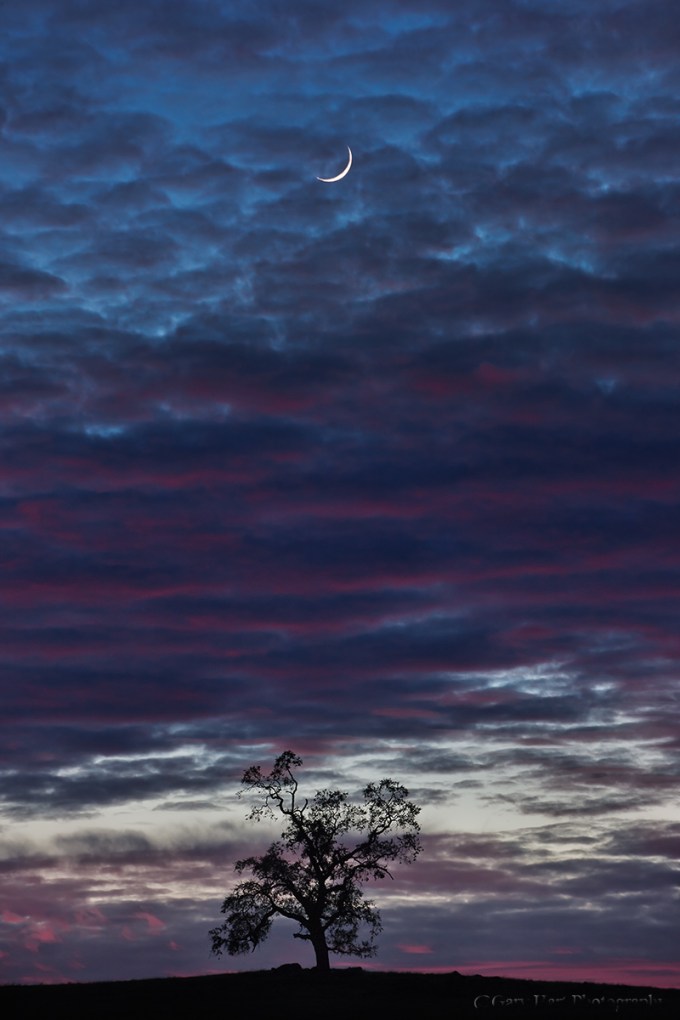
New Moon and Oak, Sierra Foothills, California
Sony a6300
Tamron 150-600 (Canon-mount with Metabones IV adapter)
.4 seconds
F/8
ISO 400
In a previous life I spent a dozen or so years doing technical support. In this job a key role was convincing people that, despite all failures and error messages to the contrary, they are in fact smarter than their computers. Most errors occur because the computer just didn’t understand: If I misspel a wurd, you still know what I meen (rite?). Not so with a computer. A computer can’t anticipate, reason, or create; assigned a task, it will blithely continue repeating a mistake, no matter how egregious, until it is instructed otherwise, fails, or destroys itself.
All this applies equally to today’s “smart” cameras, which are essentially computers at their core. But no matter how advanced its technology, a camera just can’t compete with your brain. Really.
For example, if I’d allowed my camera to decide the exposure for this crescent moon scene from 2016, I’d have ended up with a useless mess: While this image is all about color and shape, automatic exposure, deciding that the foreground hillside is important, would have brightened the scene enough to expose distracting detail and completely wash out the color in the sky. But I knew better. Wanting to simplify the scene, I manually metered and banished the extraneous foreground detail to the black shadows, capturing only the moon’s delicate shape and a solitary oak silhouetted against the indigo twilight.
Digital cameras become more technologically advanced each year, and their auto-exposure and -focus capabilities are quite good, good enough that nobody should feel they must switch to manual if they fear it will diminish the pleasure they get from photography. But if your photographic pleasure comes from getting the best possible images, it would benefit you to spend a little time mastering manual metering (and hyperfocal focus), then using that knowledge to override your camera’s programmed inclinations. It might help to know that in my photo workshops I teach (but never require) manual metering to all who are interested, and most who try it are surprised by how easy and rewarding it is to take control of their camera.
Trust your histogram
Exposure control starts by learning to use a histogram, a graph of the tones in an image (read more about histograms). Not only does every digital camera show us a histogram of the scene we just photographed, modern cameras (all mirrorless for sure, and all of the latest DSLRs that I know of) display the histogram for the scene we’re currently metering, before the shutter is clicked.
With a histogram, instead of clicking and hoping as we did in the film days, or clicking, checking, and adjusting as we did in the pre-live-view histogram days, the addition of a histogram before we shoot provides advance knowledge of the image’s exposure. For those who know how to read a histogram, manual exposure has never been easier—just monitor the histogram as you prepare your shot and dial the exposure until the histogram looks right. Click.
Setting up your live-view histogram
To ensure a valid pre-capture histogram (on your DSLR’s live-view screen, or your mirrorless camera’s live-view or viewfinder screen), make sure you are in whatever your camera manufacturer calls exposure simulation. When the camera simulates exposure, rather than always showing the ideal exposure on the live-view screen, it attempts to emulate the exposure settings you’re using. Here is a far from comprehensive guide to the exposure simulation designation used by the major camera manufacturers (though I can’t guarantee that all cameras from the same manufacturer do it the same way):
- Canon: Exposure Simulation (enabled)
- Fuji: Preview Exp. in Manual Mode (off)
- Olympus: Live-view Boost (off)
- Nikon: Exposure Preview (selected in the Info menu)
- Sony: Setting Effect (on)
On most camera’s the metering mode (the way the camera’s meter views the scene—not to be confused with exposure mode, which is the way the camera sets the exposure) doesn’t affect the pre-capture histogram, but to be safe, instead of spot or partial metering, I choose a metering mode that uses the entire frame. (With my Sony mirrorless bodies, I set my metering mode to Entire Screen Average.)
Once you’ve turned on exposure simulation, you need to figure out how to display the histogram. Most cameras, mirrorless or DSLR, offer multiple live-view screen options that display a variety of information about the scene you’re photographing. On most cameras, only one or two of these screens displays the histogram—finding it is usually a simple matter of cycling through the various displays until the histogram appears. To minimize the number of screens I need to scroll through to get to the information I need (such as the histogram or level), I always go into my camera’s menu system and disable the live-view screens I don’t use.
Using your live-view histogram
Using my pre-capture histogram, I start the metering process as I always have. In manual exposure mode, I start in my camera’s best ISO (100 for my Sony a7RIV), and the best f-stop for my composition (unless motion, such as wind or star motion, forces me to compromise my ISO and/or f-stop). With ISO and f-stop set, I slowly adjust my shutter speed with my eye on the histogram in my viewfinder (or LCD).
Most mirrorless bodies offer highlight warnings in their pre-capture view (often called “zebras”). While these alerts aren’t nearly as reliable as the histogram and should never be relied on for final exposure decisions, I use their appearance as a reminder to check my histogram. The first time I meter a scene, my current exposure settings (based on my prior scene) can be far from what the current scene requires—in this case, I push my shutter speed fast until the zebras appear (if my prior exposure was too dark) or disappear (if my prior exposure was too bright), then refine the exposure more slowly while watching the histogram.
In a low or moderate contrast scene, I’ll have room on both the shadows and highlights sides of the histogram—a pretty easy scene to expose. But in a high dynamic range scene (dark shadows and bright highlights), the difference between the darkest shadows and brightest highlights might stretch the histogram beyond its boundaries. When the high dynamic range is so great that I have to choose between saving the highlights or the shadows, I almost always bias my exposure choice toward sparing the highlights, carefully dialing the exposure until the histogram bumps against the right side—at that point I stop adding exposure, even if my shadows are cut off (black).
Because the post-capture histogram is more reliable than the pre-capture histogram, when high dynamic range gives me little margin for error, I verify my exposure by checking the post-capture histogram. Here’s where the RGB (red, green, blue) histogram becomes important. While the luminosity (white) histogram gives you the detail you captured, it doesn’t tell you if you lost color. Washed out color is always a risk when you push the histogram all the way to the right, so it’s best to check the post-capture RGB histogram to ensure that none of the image’s color channels are clipped.
An often overlooked aspect of mastering in-camera metering is simply learning how your camera reports exposure. Not only does every camera interpret and display its exposure information differently, the histogram returned is based on the jpeg, so raw shooters always have more information than their camera reports—it’s important to know how much more. With my Sony a7Rx bodies, I know I’m usually safe pushing my histogram’s exposure graph up to a full stop beyond the left or right (highlights and shadows) boundary—I have no problem using every available photon.
A few more words about this image
In addition to taking control of the exposure for this image, roaming a hilly cow pasture in the foothills east of Sacramento gave me full freedom of movement to control the new moon’s position relative to the tree. As the sky darkened and the moon dropped, I literally ran up and down the hill to capture as many moon/tree/frame relationships as possible before the moon disappeared.
This is the week (August 16-21, 2020) to photograph a crescent moon. My recommendation is Monday morning on the eastern horizon before sunrise, and Wednesday or Thursday low in the west after sunset.
A Crescent Moon Gallery


")


Random Thoughts on a Sunday Afternoon
Posted on June 14, 2020
Sunset Accent, Crescent Moon and Oaks, Sierra Foothills
Sony a7R
Sony/Zeiss 24-70
1/3 second
F/9
ISO 100
Here’s a brand new image that’s nearly six years old. Brand new because I processed it for the first time just yesterday; six years old because I found it after loading my pre-Lightroom raw files from 2014 into Lightroom, something I’ve been wanting to do for a long time and I finally ran out of reasons not to do it. Before 2015 I did all my raw processing in Adobe Camera Raw, which worked fine as far as individual image processing was concerned, but also made it pretty easy for things to get out of control on my hard-disk because there was no underlying organization to my import process. Want proof? I’m actually missing about a month’s worth of images from 2013—I know because I have several processed jpegs from that span for which I have no originals. Sigh.
This is also just my 282nd image after switching to Sony mirrorless in the fall of 2014. While I have no specific memories of this evening (there have been many, many like this, as you’ll see in the gallery), I imagine that I was still struggling with the Sony interface—partly because mirrorless was a new trick for this old dog, and partly because the original a7R’s interface pretty much sucked (a problem that has been incrementally, and now completely, addressed in succeeding models). But it was fun processing this “old” image and recalling why I was able to forgive the lousy interface and abysmal battery life (also addressed) of the a7R: man, even right out of the gate that Sony dynamic range just doesn’t quit.
Skeptics might might look at this image and think I added the moon because it appears to be in front of the clouds. Anyone who has been in one of my workshops, or who knows me even just a little, knows I don’t do that. But for the skeptics in the audience, let me assure you that it is indeed possible for clouds to catch sunset color while still being translucent enough for the moon to shine through (you can actually see other examples below).
It saddens me that photography has reached a point where every beautiful, or interesting, or revealing image is (often justifiably, I’m afraid) scrutinized with a cynical eye. Photographers have brought this on themselves with their never-ending quest for more social media Likes, or to make a case for something for which they have no evidence (as we’ve seen in some of the recent news reporting).
After spending a good chunk of my photography life as a color transparency (slides) shooter who was pretty much stuck with whatever came back from the lab, I appreciate the ability to process my images as much as the next photographer. But there’s a continuum with basic processing on one end (there’s no such thing as an unprocessed image, whether you do it yourself or leave the processing to your camera) and Frankenstein hybrids on the other. To me the decision about where to draw the line on the processing continuum is similar to the decision between wearing nice clothes and putting on makeup and resorting to cosmetic surgery (yes, I understand that there are in fact many valid reasons for cosmetic surgery, and that this is not a flawless analogy).
So it really comes down to honesty—a commitment not to deceive. I love nature and want to share my love by portraying my subjects at their absolute best, but I want people’s first thought when they see one of my images to be, “Wow, I need to get out in nature more,” and not, “Wow, what a great photographer, or, “Wow, that’s impossible.” The scene you see in this image really happened, and there’s a photo of it because I put myself in position for the (very predictable) confluence of a new moon hanging above rolling hills dotted with statuesque oaks, plus the fortuitous addition of thin clouds that lingered just long enough to catch sunset color. It helped that I had a camera that could easily handle the difference between the brilliant sky and darkening hills, and enough photographic skill to properly frame and expose the scene. The image itself was remarkably easy to process and required very little digital help. This image is a success if it first helps you realize how beautiful even the simplest foothill scenes are, without being distracted by my skill as a photographer (good or bad), or the processing decisions I made.
A Foothills Gallery
Click an image for a closer look, and to view a slide show.


All Wet
Posted on April 5, 2019
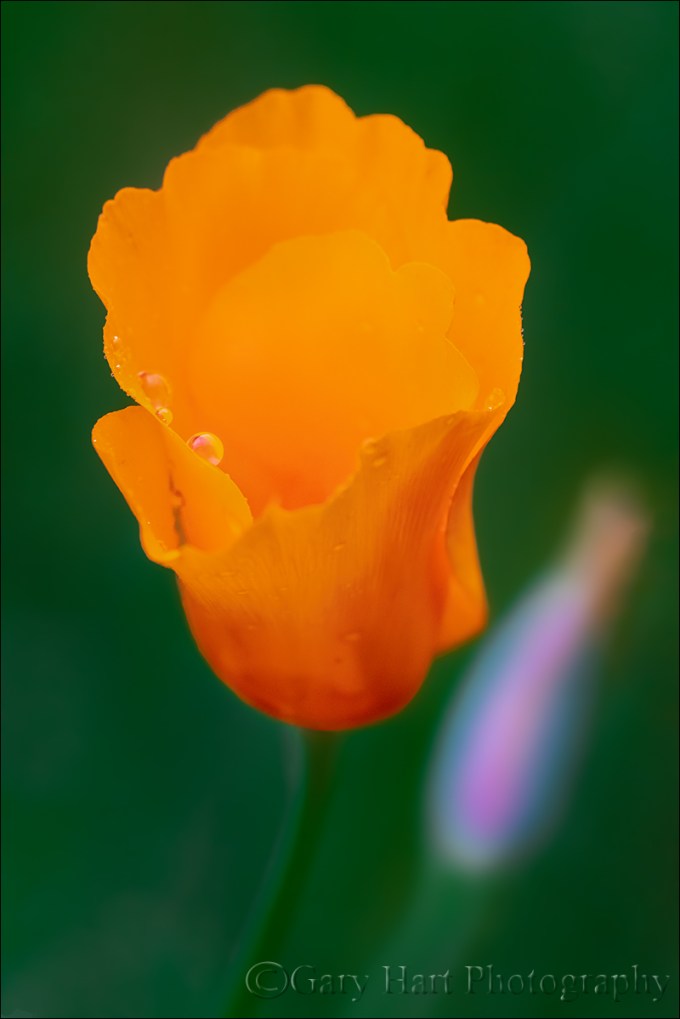
Raindrops on Poppy, Sierra Foothills
Last Monday seemed like the perfect day for a poppy shoot in the foothills. I had the afternoon wide open—with the California media buzzing about this year’s “superbloom,” plus a forecast promising ideal conditions (calm wind and thin clouds), I couldn’t help dreaming about my own images of poppy-saturated fields. What could possibly go wrong?
Getting on the road proved a little more problematic than anticipated, but by 2 p.m. I was on my way, encouraged forward by an occasional poppy beside the freeway. Adding to my optimism, the aforementioned clouds were just right: thick enough to diffuse the sunlight, but not so dark that they’d close the sun-loving poppies. I exited the freeway as soon as possible, opting to drive the 2-lane roads that follow the hills’ natural contours. While my preferred my route isn’t the most direct, it is the most scenic, winding me through oak-studded hills deeply greened by this year’s copious winter rain. Though this drive takes a little more than an hour, the time passes quickly with so much pastoral beauty filling my windshield.
I knew the poppies in Northern California were starting late due to our relatively late winter, but was fairly confident I’d allowed enough time for the golden hillsides to kick in. In a good spring, poppies dot the entire route, but by the time I was southbound on scenic Highway 49, I started realizing I hadn’t seen any poppies since leaving Sacramento. Soon I was pretty resigned to the fact that this year’s superbloom was limited Southern California, and wondered if I’d find any poppies at all. Then it started to rain.

Yosemite in a Raindrop, Valley View, Yosemite
As easy as it would have been easy to cut my losses and turn around, I simply changed my expectations. With fresh memories of a brief but rewarding raindrop experience in Yosemite, I realized I didn’t need to find entire hillsides covered with poppies, that even a single poppy could be nice. So, rather than zipping along Highway 49 at 50 MPH (-ish) looking for golden slopes, I started exploring some of the quieter tributary roads and quickly realized that there were a sprinkling of poppies out.
I ended up spending two hours photographing a small patch of poppies I found on a dead-end road near Jackson. It rained the entire time, but with rain gear in my car for just these situations, I stayed warm and dry. My camera? Not so much. I tried working with an umbrella, but after a few minutes realized I was one arm short and just decided to test the water resistance of my Sony a7RIII. I’m happy to say that it passed with flying colors, as did the Sony 100-400 GM.
In the two weeks since I shot those raindrops in Yosemite, I’ve been plotting how to get even closer. On the Yosemite shoot I added extension tubes to my 100-400; this afternoon I returned to the extension tubes, but added my 2X teleconverter (which, I might add, handled the rain perfectly as well). I thought I’d try a few lens/extension-tube/teleconverter configurations, but I was having so much fun that I ended up shooting this way the entire time.
On a rainy day, light is already limited. But adding a teleconverter and extension tubes compounds the light problem. Because f/stop is a ratio with focal length as the numerator and lens opening as the denominator, adding a teleconverter and extension increases the focal length, resulting in less light reaching the sensor. A 2x teleconverter cuts two stops of light, which means my 100-400 that’s normally wide upon f/5.6 at 400mm becomes f/11 at (the teleconverted) 800mm (400mm x 2). And adding extension tubes also extends the lens’s effective focal length, further reducing the light reaching the sensor. To compensate for all this missing light, I shot everything this afternoon at either ISO 1600 or ISO 3200.
One of the cool things about this kind of photography is how different the world looks through the viewfinder. I love putting my eye to the viewfinder, moving the lens around, and changing focus slowly to see what snaps into view. In this case I was looking for a poppy to isolate from its nearby surroundings, but that also has something nearby (usually another flower) that I could soften enough to complement without competing. Sometimes I had a general idea of a subject before looking through my camera, other times I’d just explore with my lens until something stopped me.
Because depth of field shrinks not only with focal length, but also with focus distance, every frame I clicked this afternoon had a paper-thin range of sharpness. With such a shallow depth of field, none of these images would have been possible without a tripod. With my composition set, I’d pick a focus point (usually, but not always, a prominent raindrop), focus in my viewfinder until I was “certain” it was sharp, then instantly debunk my that “certainty” by magnifying the image in my viewfinder. This little exercise quickly taught me that with such a small margin for error, the best I could reliably achieve without magnifying the view was almost sharp enough, making pre-click magnification an essential part of my focus workflow (instead of just a cursory focus-check).
Each time I do this kind of photography I learn something. In this case it was how far away I could be and still fill my frame with a poppy. All of the images I captured this afternoon were from four to six feet away.
I wrapped up when the sky darkened further and the rain started coming down pretty hard. I couldn’t believe I’d been out there two hours, and spent most of the drive strategizing new ideas for the next time.
Getting the Drop on Nature
Click an image for a closer look and to view slide show.


Where there’s smoke…
Posted on December 9, 2018

Sun and Smoke, Sierra Foothills, California
Sony a6300
Sony 100-400 GM
Sony 2x teleconverter
ISO 100
f/16
1/8 second
Humans, we have a problem
Earth’s climate is changing, and the smoking gun belongs to us. Sadly, in the United States policy lags insight and reason, and the world is suffering.
Climate change science is complex, with many moving parts that make it difficult to communicate to the general public. Climate change also represents a significant reset for some of the world’s most profitable corporations. Those colliding realities created a perfect storm for fostering the doubt and confusion that persists among people who don’t understand climate science and the principles that underpin it.
I’m not a scientist, but I do have enough science background (majors in astronomy and geology before ultimately earning my degree in economics) to trust the experts and respect the scientific method. I also spent 20 years doing technical communication in the tech industry (tech writing, training, and support) for companies large and small. So I know that the fundamentals of climate change don’t need to intimidate, and the more accessible they can be to the general public, the better off we’ll all be.
It’s personal
Recently it feels like I’ve been living on the climate change front lines. On each visit to Yosemite, more dead and dying trees stain forests that were green as recently as five years ago. And throughout the Sierra (among other places), thirsty evergreens, weakened by drought, are under siege by insects that now thrive in mountain winters that once froze them into submission. More dead trees means more fuel, making wildfires not just more frequent, but bigger and hotter.
Speaking of wildfires, for a week last month I couldn’t go outside without a mask thanks to smoke from the Camp Fire that annihilated Paradise (70 miles away). I have friends who evacuated from each of this November’s three major California wildfires (Camp, Hill, and Woolsey), and last December the Thomas Fire forced a two-week evacuation of Ojai, where my wife and I rent a small place (to be near the grandkids). Our cleanup from the Thomas fire took months, and we still find ash in the most unexpected places (and we were among the lucky who had a home to clean).
The debate is dead
Despite its inevitable (and long overdue) death, the climate change debate continues to stagger on like a mindless zombie. We used to have to listen to the skeptics claim that our climate wasn’t changing at all, so I guess hearing them acknowledge that okay-well-maybe-the-climate-is-changing-but-humans-aren’t-responsible can be considered progress.
Despite what you might read on social media or fringe websites, climate change alternative “explanations” like “natural variability” and “solar energy fluctuations” have been irrefutably debunked by rigorously gathered, thoroughly analyzed, and closely scrutinized data. (And don’t get me started on the whole “scientists motivated by grant money” conspiracy theory.)
Science we all can agree on
One thing that everyone does agree on is the existence of the greenhouse effect, which has been used for centuries to grow plants in otherwise hostile environments.
As you may already know, a greenhouse’s transparent exterior allows sunlight to penetrate and warm its interior. The heated interior radiates at longer wavelengths (infrared) that don’t escape as easily through the greenhouse’s ceiling and walls. That means more heat is added to a greenhouse than exits it, so the interior is warmer than the environment outside.
There’s something in the air
Perhaps the most common misperception about human induced climate change is that it’s driven by all the heat we create when we burn stuff. But that’s not what’s going on, not even close.
Our atmosphere behaves like a greenhouse, albeit with far more complexity. The sun bathes Earth with continuous electromagnetic radiation that includes infrared, visible light, and ultraviolet. Solar radiation not reflected back to space reaches Earth’s surface to heat water, land, and air. Some of this heat makes it back to space, but much is absorbed by molecules in Earth’s atmosphere, forming a virtual blanket that makes Earth warmer than it would be without an atmosphere. In a word, inhabitable.
Because a molecule’s ability to absorb heat depends on its structure, some molecules absorb heat better than others. The two most common molecules in Earth’s atmosphere, nitrogen (N2: two nitrogen atoms) and oxygen (O2: two oxygen atoms), are bound so tightly that they don’t absorb heat. Our atmospheric blanket relies on other molecules to absorb heat: the greenhouse gases.
Also not open for debate is that Earth warms when greenhouse gases in the atmosphere rise, and cools when they fall. The rise and fall of greenhouse gases has been happening for as long as Earth has had an atmosphere. So our climate problem isn’t that our atmosphere contains greenhouse gases, it’s that human activity changes our atmosphere’s natural balance of greenhouse gases.
Earth’s most prevalent greenhouse gas is water vapor. But water vapor responds quickly to temperature changes, leaving the atmosphere relatively fast as rain or snow, while other greenhouse gases hold their heat far longer.
The two most problematic greenhouse gases are carbon dioxide (CO2: one carbon atom bonded with two oxygen atoms) and methane (CH4: one carbon atom bonded with four hydrogen atoms). The common denominator in these “problem” gases is carbon. (There are other, non-carbon-based, greenhouse gases, but for simplicity I’m focusing on the most significant ones.)
Carbon exists in many forms: as a solo act like graphite and diamond, and in collaboration with other elements to form more complex molecules, like carbon dioxide and methane. When it’s not floating around the atmosphere as a greenhouse gas, carbon in its many forms is sequestered in a variety of natural reservoirs called a “carbon sink,” where it does nothing to warm the planet.
Oceans are Earth’s largest carbon sink. And since carbon is the fundamental building block of life on Earth, all living organisms, from plants to plankton to people, are carbon sinks as well. The carbon necessary to form greenhouse gases has always fluctuated naturally between the atmosphere and natural sinks like oceans and plants.
For example, a growing tree absorbs carbon dioxide from the atmosphere, keeping the carbon and expelling oxygen (another simplification of a very complex process)—a process that stops when the tree dies. As the dead tree decomposes, some of its carbon is returned to the atmosphere as methane, but much of it returns to the land where it is eventually buried beneath sediments. Over tens or hundreds of millions of years, some of that sequestered carbon is transformed by pressure and heat to become coal.
Another important example is oil. For billions of years, Earth’s oceans have been host to simple-but-nevertheless-carbon-based organisms like algae and plankton. When these organisms die they drop to the ocean floor, where they’re eventually buried beneath sediment and other dead organisms. Millions of years of pressure and heat transforms these ancient deposits into…: oil.
Coal and oil (hydrocarbons), as significant long-term carbon sinks, were quite content to lounge in comfortable anonymity as continents drifted, mountains lifted and eroded, and glaciers advanced and retreated. Through all this slow motion activity on its surface, Earth’s temperatures ebbed and flowed and life evolved accordingly.
Enter humans. We have evolved, migrated, and built civilizations based on a relatively stable climate. And since the discovery of fire we humans have burned plants for warmth and food preparation. Burning organic material creates carbon dioxide, thereby releasing sequestered carbon into the atmosphere. Who knew that such a significant advance was the first crack in the climate-change Pandora’s Box?
For thousands of years the demand for fuel was met simply by harvesting dead plants strewn about on the ground and the reintroduction of carbon to the atmosphere was minimal. But as populations expanded and technology advanced, so did humans’ thirst for fuel to burn.
We nearly killed off the whales for their oil before someone figured out that those ancient, subterranean metamorphosed dead plants burn really nicely. With an ample supply of coal and oil and a seemingly boundless opportunity for profit, coal and oil soon became the driving force in the world’s economy. Suddenly, hundreds of millions of years worth of sequestered carbon was being reintroduced to our atmosphere as fast as it could be produced—with a corresponding acceleration in greenhouse gases (remember, when we burn hydrocarbons, we create carbon dioxide).
Compounding the fossil-fuel-as-energy problem is the extreme deforestation taking place throughout the world. Not only does burning millions of forest and jungle acres each year instantly reintroduce sequestered carbon to the atmosphere, it destroys a significant sink for present and future carbon.
Scientists have many ways to confirm humans’ climate change culpability. The most direct is probably the undeniable data showing that for millennia carbon dioxide in Earth’s atmosphere hovered rather steadily around 280 parts per million (ppm). Then, corresponding to the onset of the Industrial Revolution in the late 18th century, atmospheric carbon dioxide has risen steadily and today sits somewhere north of 400 ppm, with a bullet.
Humans don’t get a pass on atmospheric methane either. While not nearly as abundant in Earth’s atmosphere as carbon dioxide, methane is an even more powerful greenhouse gas, trapping about 30 times more heat than its more plentiful cousin. Methane is liberated to the atmosphere by a variety of human activities, from the decomposition of waste (sewage and landfill) to agricultural practices that include rice cultivation and bovine digestive exhaust (yes, that would be cow farts).
While the methane cycle is less completely understood than the carbon dioxide cycle, the increase of atmospheric methane also correlates to fossil fuel consumption. Of particular concern (and debate) is the cause of the steeper methane increase since the mid-2000s. Stay tuned while scientists work on that….
Balancing act
For humans, the most essential component of Earth’s habitability is the precarious balance between water’s three primary states: gas (water vapor), ice, and liquid. Since the dawn of time, water’s varied states have engaged in a complex, self-correcting choreography of land, sea, and air inputs—tweak one climate variable here, and another one over there compensates.
Earth’s climate remains relatively stable until the equilibrium is upset by external input like solar energy change, volcanic eruption, or (heaven forbid) a visit from a rogue asteroid. Unfortunately, humans incremented the list of climate catalysts by one with the onset of the Industrial Revolution, and our thirst for fossil fuels.
As we’re learning firsthand in realtime, even the smallest geospheric tweak can initiate a self-reinforcing chain reaction with potentially catastrophic consequences for humanity’s long-term wellbeing. For example, a warmer planet means a warmer ocean and less ice, which means more liquid water and water vapor. Adding carbon dioxide to water vapor kicks off a feedback loop that magnifies atmospheric heat: More carbon dioxide raises the temperature of the air—>warmer air holds more water vapor—>more water vapor warms the air more—>and so on.
But that’s just the beginning. More liquid water swallows coastlines; increased water vapor means more clouds, precipitation, and warmer temperatures (remember, water vapor is a greenhouse gas). Wind patterns and ocean currents shift, changing global weather patterns. Oh yeah, and ice’s extreme albedo (reflectivity) bounces solar energy back to space, so shrinking our icecaps and glaciers means less solar energy returned to space even more solar energy to warm our atmosphere, which only compounds the problems.
Comparing direct measurements of current conditions to data inferred from tree rings, ice and sediment cores, and many other proven methods, makes it clear that human activity has indeed upset the climate balance: our planet is warming. What we’re still working on is how much we’ve upset it (so far), what’s coming, and where the tipping point is (or whether the tipping point is already in our rearview mirror).
We do know that we’re already experiencing the effects of these changes, though it’s impossible to pinpoint a single hurricane, fire, or flood and say this one wouldn’t have happened without climate change. And contrary to the belief of many, everyone will not be warmer. Some places are getting warmer, others are getting cooler; some are wetter, others are drier. The frequency and intensity of storms is changing, growing seasons are changing, animal habitats are shifting or shrinking, and the list goes on….
We won’t fix the problem by simply adjusting the thermostat, building dikes and levees, and raking forests. Until we actually reduce greenhouse gases in our atmosphere, things will get worse faster than we can adjust. But the first step to fixing a problem is acknowledging we have one.
About this image
The Camp Fire had been burning for ten days, devouring Paradise and filling the air in Sacramento with brown smoke so thick that at times not only could we not see the sun, we couldn’t see the end of the block. But on this afternoon, when an orange ball of sun burned through the smoke I donned a mask, grabbed my camera bag, and headed for the hills.
I have a collection of go-to foothill oak trees for sun and moonsets, but most of these trees are too close to my shooting position for the extreme telephoto image I had in mind. Too close because at this kind of focal length, the hyperfocal distance is over a mile. So I made my way to a quiet country road near Plymouth where I thought the trees might just be distant enough to work. But I’m less familiar with this location than many of my others, so I didn’t know exactly how the trees and sun would align. Turning onto the road, I drove slowly, glancing at the sun and trees until they lined up. Because there wasn’t a lot of room to park on either side, I was pleased that the shoulder at the location that worked best was just wide enough for my car.
Envisioning a maximum telephoto shot, I added my Sony 2X teleconverter to my Sony 100-400 GM lens. While my plan was to use my 1.5-crop Sony a6300, when I arrived the sun was high enough that that combination provided too much magnification, so I started with my full frame Sony a7RIII. But soon as the sun dropped to tree level I switched to the a6300 and zoomed as tight as possible.
When I started the sun was still bright enough that capturing its color made the trees complete silhouettes, with no detail or color in the foreground. But as the setting sun sank into increasingly thick smoke, it became redder and redder and my exposure became easier. It always surprises me how fast the sun and moon move relative to the nearby horizon, so found myself running around to different positions to get the right sun and tree juxtaposition as the sun fell. The smoke near the horizon was so thick that it swallowed the sun before it actually set.
Later I plotted my location and the sun’s position on a map and realized that I was pointing right at San Francisco, about 100 miles away, with a large swath of the Bay Area in between. Then I thought about this air that was thick enough to completely obscure the sun, and the millions of people who had been breathing that air for weeks.
I’d be lying if I said I don’t like this image—it’s exactly what I was going for. But I’d be very happy if I never got another opportunity to photograph something like this.
Learn more
- https://climate.nasa.gov/causes/
- https://grist.org/article/we-broke-down-what-climate-change-will-do-region-by-region/
- https://www.ncdc.noaa.gov/monitoring-references/faq/greenhouse-gases.php
Workshop Schedule || Purchase Prints
Solar Energy
Click an image for a closer look and slide show. Refresh the window to reorder the display.


Sony 24mm f/1.4 GM Lens: First thoughts
Posted on September 20, 2018

Moonlight, Sierra Foothills, California
Sony a7R III
Sony 24 f/1.4 GM
10 seconds
F/1.4
ISO 1600
Today Sony announced the lens I’ve been waiting for: the Sony 24, f/1.4 GM. I got a sneak preview of this lens on Maui last week, and again once I got home home. Hurricane Olivia, my workshop (no one was supposed to see me using the lens), and food poisoning significantly limited my use of it, but I did get to play with it enough to share a few thoughts.
Night photography is all about capturing light, the more the better. We bump our ISO as high as the image quality permits, dial in our lens’s widest aperture, and open our shutter as long as we can without obvious star streaks, pushing each exposure variable as far as possible squeeze out every last photon. The shortcomings of each of these compromises is mitigated by an improvement in the others, which is why night photography with the fastest possible lens means I can get the same exposure with a little less star motion and/or noise. So f/1.4 is great, currently pretty much as good as it gets for a lens wide enough for night photography.
Of course fast and wide isn’t much good if the lens is lousy, or difficult to use. I haven’t used the 24 GM a lot, but I’ve used it enough to know that lousy and difficult won’t be a concern.
First Impression
My very first impression, and I suspect this will be everyone’s first impression, is how small this lens is. When I knew it was coming my way I started strategizing how I’d rearrange my bag to accommodate it, but it turns out all I needed to do was empty the slot with a couple of extension tubes and my 2X teleconverter. Contrast that with the Sigma 20mm f/1.4, which is an absolute beast of a lens, both in weight and volume, that could never just live in my bag. But I flew home with the Sony in my bag and was completely unaware of the extra weight. Well done, Sony!

Two Galaxies, West Maui
I only got one night to use the on Maui before I had to return to the real world, and my location options had been severely limited by the recent passage Tropical Storm Olivia (downgraded from a hurricane shortly before landfall), so I drove about half-hour from my condo in Napili to the ultra-dark skies on the northern-most tip of West Maui, where I stumbled in the dark down to the edge of a cliff above the Nakalele Blowhole and shot into a 30-MPH headwind. Not the most ideal conditions, but I made it work for my purposes.
The benefit of a fast lens like this is not just the amount of light it allows into an image, it starts with the simple ability to see enough to simply compose and focus. And as I expected, both composition and manual focus were a piece of cake with Sony 24 1.4. For the Maui night shoot I composed, then magnified the viewfinder of my Sony a7SII and twisted the focus ring until the stars were the finest possible points of light—it took all of about 3 seconds. After my first exposure I magnified the image to verify that it was indeed sharp, then didn’t worry about focus again.
The image on the right features the dimmest part of the Milky Way, opposite the brilliant galactic core we all love to photograph. As a bonus, I also captured M-31, the Andromeda Galaxy—its fuzzy glow in the upper right has traveled over 2 million lightyears and is the farthest we can see with the unaided eye.
About this image
I’d have liked to have done more starlight photography after getting home from Maui, but by the time I recovered enough from a most unwelcome bout of food poisoning that showed up the day I returned, the moon was too prominent in the night sky. Nevertheless, a couple of days ago I sucked it up and drove out to the foothills about an hour from my home and put the lens through its paces beneath a 70 percent gibbous moon.
With the moon high over my right shoulder I looked for scenes facing northeast, where the skies were the least polluted by city glow. I eventually settled on a nearby hillside dotted with oaks fortuitously punctuated by an organized formation of the only clouds in the sky. With so much moonlight present I went with the Sony a7RIII instead of the Sony a7SII. Shooting moonlight at f/1.4 enabled me to get away with a 10-second exposure at ISO 1600.
In the past I’ve usually auto-focused on the moon for my moonlight scenes, but for laughs this night I tried autofocusing on the trees and was shocked to hear my focus indicator beep. Wow, I’ve never been able to autofocus on anything by moonlight, even when the moon was completely full. Next I tried autofocusing on a random star and again heard the confirmation beep—another first. And finally I magnified the view and manually focused on the tree: 3-for-3. Admittedly, with the recent ability to do starlight photography (moonless nights), I don’t do as much moonlight photography as I once did, and I’ve never done it with an f/1.4 lens (because it really isn’t necessary). Nevertheless, I think night focus struggles will be a thing of the past with this lens.
Processing my night images, the first thing I checked was the stars in the corners. In many years of night photography I used three dedicated “night” lenses (lenses that I only use for night photography): Zeiss 28mm f/2, Rokinon 24mm f/1.4, and Sigma 20mm f/1.4. In quest of more light I’ve shot all of them wide open, but I’ve had to live with a fair amount of coma (comatic aberration). My first reaction is that is that this lens is cleaner wide open than any of them.
The bottom line
I haven’t had tons of time to spend with my images, but my first impression is that I’m blown away by this lens. I’ve grown to accept that if I want quality in a lens I need to accept bulk along with it. Apparently that’s not the case, because this lens gave me crazy sharp images wide open, yet felt not much larger than a baseball in my hand.
A Sony 24mm f/1.4 GM Samples
Tapping your inner Dorothy
Posted on June 12, 2018
Alone Together, Oak and Crescent Moon, Sierra Foothills, California
Canon 1Ds Mark III
8/5 seconds
F/8.0
ISO 400
Canon 70-200 f/4 L
Spend enough time on Facebook and Instagram and you get a pretty good idea of what it takes to make a picture that generates attention. The unfortunate consequence is a photographic feedback loop, where one ostentatious image inspires more similarly ostentatious images, which inspire more…, well, you get the point. This uninspired feedback loop reminds me of top-40 music, where one groundbreaking success generates a flood of uninspired clones. Catchy tunes are fine for a few listens, but few possess staying power. Contrast that to the Beatles, who aggressively resisted repetition and pursued new sounds that the world has been listing to pretty much nonstop for more than 50 years.
Admittedly, few artists are blessed with the Beatles’ creative genius, but that’s no excuse to shortcut creativity. The same holds for photography: images that elicit a reflexive Like and Share from digital passersby, and maybe (if you’re lucky) a “Stunning!” in the comments section, are forgotten with the next click. But images that resonate on a personal level by revealing something unseen, or by touching a hidden place inside the viewer, not only stop people in their tracks, they grab them and don’t let go.
Of course this sounds great in theory, but how is it accomplished? If the answer were easy, we’d all be doing it. But like Dorothy and the Ruby Slippers, perhaps we’ve had the power all along.
Because most people long for a connection with the world around them—not simply a connection with nature, but more importantly a connection with kindred souls—a good place to start would be to give viewers of your images something of yourself to latch on to by concentrating on subjects that resonate with you.
My own photography took a huge leap forward when I started photographing simply to please myself. The more I pursue moments in nature that touch me personally, (as if by magic) the more unique, gratifying, and successful my images became. While my most personal images don’t please everyone, the people they do reach seem to feel a deeper connection than they do to my images intended to impress.
Familiarity is the first step toward intimacy. With many picturesque trees and hills to work with, on this evening (as with many shoots) my compositions started wider, but didn’t seem to be about anything. But as the moon fell and the light faded, the scene’s essence began to materialize.
So what moved me to this composition? At the time it was enough that the scene finally felt right. But given the benefit of time and introspection, even though the moon and tree share the same frame, each is isolated: the tree is grounded in its terrestrial world, while the moon soars in its celestial world.
I’m writing this at Starbucks, very much by myself, but in the company of a dozen or so other people similarly isolated at the center of their world. It occurs to me that the shared isolation of the tree and moon makes a great metaphor for the human experience.
On the other hand, maybe it’s just a pretty picture….
Workshop Schedule || Purchase Prints
A Gallery of Personal Connection


