Eloquent Images by Gary Hart
Insight, information, and inspiration for the inquisitive nature photographer
Heaven and Hell
Posted on September 8, 2013

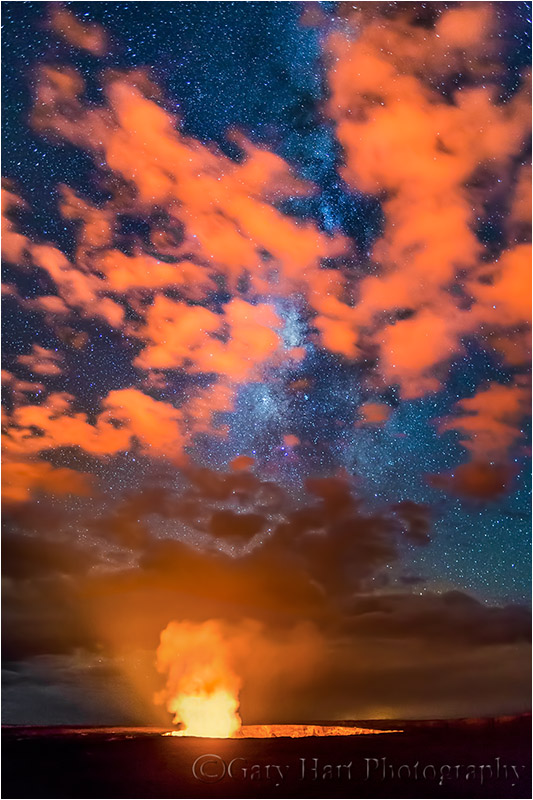
Gates of Hell, Halemaʻumaʻu Crater, Kilauea, Hawaii
Canon EOS 5D Mark III
4 seconds
F/2.8
ISO 3200
27 mm
Caving to demand, I took my Hawaii workshop group back up to Kilauea last Thursday night. While we didn’t get stars this time (not even close), we found something that was equal parts different and cool. If the first night’s display was Heavenly, the reprise was Hellish. We finished Tuesday with a new appreciation for our small place in this magnificent Universe; Thursday we were left awestruck by the power of nature’s creative force churning beneath us.
Everyone was thrilled to have the dark, clear skies we saw Tuesday night, but given that this was the first time doing night photography for most of the group, everyone wanted another opportunity apply their new-found skill. Before departing, I reminded them of Mother Nature’s fickle inclinations, and warned them that repeating Tuesday’s clear skies was far from a sure thing. However, I told them, clouds can be pretty cool too. They were dubious, and somewhat disappointed upon arrival—until the first images popped up on their LCDs.
Believe it or not, these images from our two volcano nights are pretty much what we all saw on our camera LCDs (very little processing necessary). They’re a good reminder of our camera’s ability to show aspects of the natural world that are missed in the human experience. A frequent photographer’s lament is the camera’s limited dynamic range (the range of tones between the darkest shadows and brightest highlights), but one advantage a camera does have over human vision is its ability to accumulate light over time. On Tuesday night, our sensors pulled from the darkness stars that were invisible to the naked eye (and also nicely brightened the Milky Way); on Thursday night, a long exposure revealed unseen cloud detail illuminated by Halemaʻumaʻu’s orange glow. Also, on Tuesday night so much of Kilauea’s glow escaped into space that the caldera floor (beyond the inner crater) remained nearly black despite a lengthy, high ISO, large aperture exposure. But on Thursday night the clouds reflected the volcano’s light back to Earth, bathing the caldera floor in an orange glow that our cameras captured beautifully.
Our cameras also allowed us to infer one more difference between the two nights: The crater glowed significantly brighter on Thursday night. I learned from a rim-side chat with a naturalist on Tuesday that Halemaʻumaʻu’s luminosity varies with the composition of its output—the higher the ratio of sulfur gas to water vapor, the brighter it glows. While this difference is sometimes difficult to detect with the naked eye from one night to the next, it became obvious when I realized that in Tuesday’s images the highlights in the crater’s burning core were recoverable in Lightroom, while the same bright region in Thursday’s images was hopelessly blown at the same exposure. Fortunately, on Thursday night I opted for a shorter shutter speed to better “freeze” Halemaʻumaʻu’s gas plume—this left the caldera a little dark (but still brighter than Tuesday), but really reveals the plume’s character.

Halemaʻumaʻu Crater, Kilauea, Hawaii
Canon EOS 5D Mark III
15 seconds
F/2.8
ISO 3200
16 mm
Last night, at the volcano…
Posted on September 4, 2013
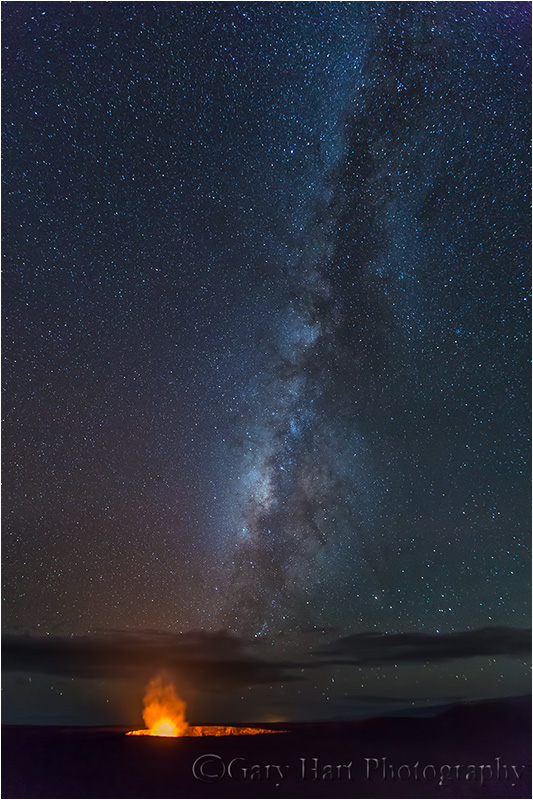
Milky Way Above Halemaʻumaʻu Crater, Kilauea, Hawaii
Canon EOS 5D Mark III
15 seconds
F/2.8
ISO 3200
16 mm
Sitting here on my balcony above Hilo Bay, it’s hard to believe that 10 days ago I was photographing sunrise lightning on a chilly morning at the Grand Canyon. But there’s Mauna Kea, and over there is Mauna Loa. And it’s 6 a.m. and I’m in shorts and flip-flops, so this really must be Hawaii. Ahhhh.
Oh yeah, it’s all coming back to me…. Last night I took my Hawaii workshop group up to Kilauea to photograph the volcano beneath the stars. I always stress about this shoot in particular because the opportunity to photograph the glow of Halemaumau Crater beneath the Milky Way is what brought many of the workshop participants to Hawaii in the first place. My stress is due to factors largely beyond my control: clouds, inadequate equipment (“The guy at Best Buy said this tripod should be fine”), technical problems (“Oh, I thought a five percent battery charge would be enough”), and just plain user error (“It looked sharp in the LCD”). Each year I do my best to mitigate as many problems as I can: I send copious reminders (“Don’t forget to bring…”) and how-to documents (starting months in advance), give a night photography training session the afternoon of the shoot, do a group equipment set-up and checklist in the parking lot before we walk out to the view point, and frequently check on participants during the shoot. But while all that preparation seems to help, so far I haven’t been able to do anything about the weather. The best I’ve been able to do is time my primary volcano shoot early enough in the workshop to allow us the option of returning in the event of a mass fail.
So yesterday afternoon we drove up to Kilauea, stopping first at the Visitor Center (I’m something of a souvenir T-shirt addict), then walking through the lava tube (always a hit), before wrapping up the daylight portion of the day with a really nice sunset at the Jaggar Museum (the closest point from which to view the caldera). Then we headed to dinner beneath a tantalizing (traumatizing) mix of clouds and sky—were the clouds incoming or outgoing? Dinner was great, but I’d have surely enjoyed it far more if I’d have known we’d leave the restaurant and see starry skies. And stars there were, millions and millions (or so it seemed). Phew.
Once the stars did their part, the rest of the night was up to me—despite all the preparation, I know from experience that basic photography skills such as composition, camera adjustments (even though I’d given everyone starting exposure values in the parking lot, most people usually need to tweak something), and (especially) finding focus, become completely foreign in the near absolute darkness of a moonless night. These problems are compounded by the fact that a flashlight, while necessary to light the path to the location, is absolutely taboo once we’re there (their light can leak into others’ frames, and flashlights make it almost impossible to adjust to the darkness)—instead we rely on the soft glow of our cell phone screen to see our controls.
I started with a test exposure to verify the exposure values I’d had everyone set earlier. So far, so good. Then the real fun began—for the next 45 minutes I bounced from pleading shape to pleading shape (faces are unrecognizable): “My camera won’t focus” (Try auto-focusing on the caldera—if that doesn’t work, we try creative solutions such as auto-focusing on a flashlight 100 feet up the trail or a best-guess manual focus on the caldera rim); “My camera won’t shoot” (Turn off autofocus);“ Is this image sharp?” (Magnify the LCD and zoom in on the stars or caldera wall); “My picture is black” (The correct exposure is 30 seconds, not 1/30 second). And so on. (I should make clear that these problems were more an indication of the disorientation caused by the darkness than a reflection of the photographer’s skill.)
But slowly the cries for help turned to exclamations of joy as successful images started popping up on LCDs. Pretty soon I was wandering around looking for someone who needed help, anyone…. When it finally became clear that my offers to help were more of a distraction, I returned to my camera (no small feat in the dark) and tried a few frames of my own. While I had no illusions of getting anything new (or even anything much different than what others had), I tried several variations. Most of my images were oriented vertically to maximize the length of the serpentine Milky Way, and to minimize the black void surrounding the glowing crater. I also varied my focal length a bit, and played with my ISO and shutter speed settings so I could choose later (with the benefit of a larger screen) between more noise, less star motion and vice versa.
In addition to the photography, I always make a point to stop everyone and remind them to simply appreciate what we’re viewing. The orange glow is molten rock, the newest material on the Earth’s surface; overhead are pinpoints of starlight that originated tens, hundreds, even thousands of years ago. It’s both humbling and empowering.
We finally wrapped up a little before 11. Everyone seemed quite happy (okay, downright giddy) with what they’d gotten. At breakfast this morning a few people said they’d checked their images after returning to the hotel, but most said they just collapsed into bed. Nevertheless, I’m already starting to receive whispered requests to return to Kilauea one more time. I won’t take a lot of convincing.
* * * *
:: Join me next year as we do this all over again in the 2014 Hawaii Big Island Volcanoes and Waterfalls photo workshop ::
Literally breathtaking
Posted on July 6, 2013

Under the Milky Way, Kilauea Caldera, Hawaii
Canon EOS-1Ds Mark III
30 seconds
F/2.0
ISO 800
28 mm
Even with the number beautiful things I get to photograph, certain natural wonders will forever thrill me. Near the top of that list is the view into the Kilauea Caldera on Hawaii’s Big Island. I thought I knew what to expect, but even after a lifetime of National Geographic specials and an occasional “Breaking News!” disaster video, I was little prepared for the in-person experience of peering into an active volcano.
Approaching Kilauea from Hilo, the first sign that something unusual is in store is the plume of thick smoke and vapor rising in the distance and spreading with the wind. If you didn’t know a volcano was nearby, you might mistake the smoke for a forest fire. The billowing plume becomes more prominent as you draw closer to the volcano, and once in Hawaii Volcanoes National Park you’re soon surrounded by white puffs of steam rising from the ground on both sides of the road.
On the drive to the caldera you’ll be tempted by several vista opportunities, but the best perspective is from the Jaggar Museum at the end of the road (the loop road that once circumnavigated the caldera is now closed at the museum due to the risk of noxious fumes beyond). For first-time visitors I recommend foregoing the preliminary views in favor of the Jaggar view, which makes the most impactful first impression—you can return to the other views on the drive out.
When visiting during the day you’ll see white smoke pouring from a large hole on the caldera’s floor, but no sign of orange flame—the sunlight simply overpowers the volcano’s fire. While any view of a volcano is memorable (trust me), nothing compares to the experience of seeing the caldera after dark. I usually arrive at the caldera in time for sunset, go to dinner, then return once darkness is complete. Not only does this break allow time for darkness, I also find that the clouds that frequently obscure the sunset sky dissipate once the sun is down (in other words, don’t forego a night visit simply because your daytime visit was cloudy).
Even if you do find clouds after dark, the clouds beautifully radiate the caldera’s glow to bathe the entire scene in orange, a subtle effect to the naked eye that comes alive in a long exposure. If you’re lucky enough to visit on a night with few or no clouds, you’ll be treated to the churning lava’s orange fire, reflected by belching white smoke, beneath a sea of stars. My first time seeing the caldera beneath the Milky Way I literally gasped, and it was several seconds before I realized I was holding my breath. Breathtaking indeed.
* * * *
Let me add that finding the Milky Way above the caldera isn’t without its difficulties. Even if the clouds cooperate, simply showing up at the Jaggar Museum after dark isn’t enough because the properly aligned vantage point varies with the date and time of night you visit. In the Northern Hemisphere the best views of the Milky Way are moonless summer nights (moonlight washes out the sky as much as city lights). If you find yourself there with the Milky Way visible, aligning it with the caldera is usually a matter of driving or walking the rim until you find the spot.
We’ll be photographing the Milky Way above Kilauea in my upcoming Hawaii Big Island workshop is September 2-6. While it filled several months ago, a recent cancellation leaves me with one opening. And I still have lots of openings in my 2014 Hawaii workshop, September 15-19.
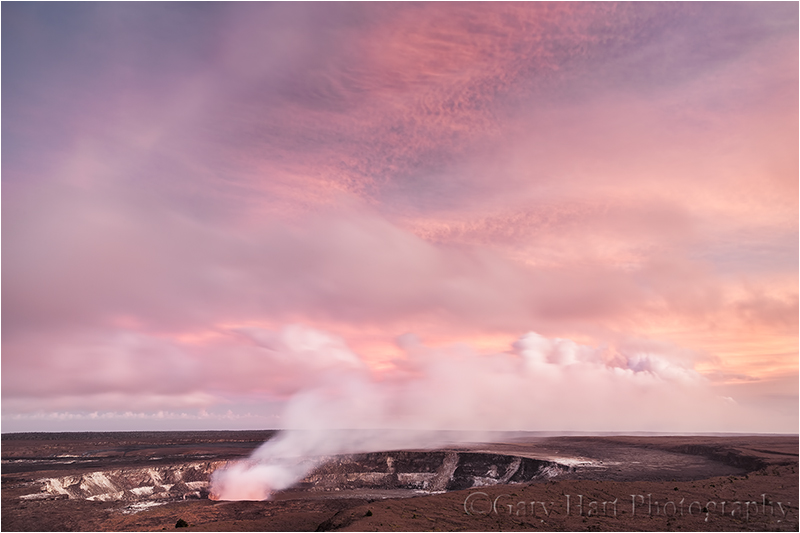
Earth on Fire, Kilauea Caldera, Hawaii :: The sunset light had dimmed just enough that the lava lake’s fiery orange is just visible. Even just few minutes earlier the scene was too bright to see any color in the caldera.
Milky Way and Clouds, Kilauea Caldera, Hawaii :: Here the clouds reflect the lava’s glow, but part just enough to reveal the Milky Way behind.
Glow in the dark
Posted on September 25, 2012

Kilauea Caldera, Hawaii
* * * *
An unfortunate reality of photographing the things I photograph, at the times I photograph them, is the doubt the results foster—“Is that real?” Sigh. That skepticism is compounded by the (understandable) ignorance of people who expect cameras to duplicate human reality, a fallacy no doubt perpetuated by photographers who proclaim each image to be, “Exactly the way the way my eyes saw it.” And then there are those unscrupulous photographers who alter images for personal or financial gain by adding or moving objects (the moon seems to be a popular subject), cranking up the color, and embellishing the hardship the capture required. It’s no wonder people don’t know what to believe.
So let’s take a look at this night shot of the Kilauea Caldera, captured during my recent Hawaii Big Island photo workshop. Is this the way I saw it? Absolutely not. First, my experience was three dimensional. It included wind motion in the caldera’s vapor plume, a dome of sky saturated with thousands of stars, the Milky Way stretching from horizon to horizon, and clouds wafting in and out, intermittently revealing and obscuring parts of the sky. The magic I experienced was far beyond my camera’s capability.
But my camera has reality of its own, and its own magic. By increasing my ISO (the sensor’s sensitivity to light), aperture (the size of the opening that allows light to reach the sensor), and exposure time, I was able to capture more light in one frame than my eyes could see at any instant. All this additional light on my sensor gave me a section of sky containing even more stars than my eyes saw, and clouds fully illuminated by the volcano’s glow.
This particular image was captured on the second of three nights on the rim. My first workshop group nailed it on the first attempt (see my September 9 post), but the second group’s first attempt was largely thwarted by the large cloud you see in this image. Nevertheless, as you can see, we had a small window of opportunity on this night as well, so while the group wrestled with their camera’s and tripods in the dark, I took a test exposure and gave everyone exposure values. As I moved around making sure they all had their settings dialed in and focus set, it was a blast listening to the gasps up and down the rim when the first image popped on each person’s LCD. But once that cloud settled in, the show was pretty much over. After waiting nearly two hours for more sky we packed it in, but by then everyone was hooked, so we returned a couple of nights later to smashing success.
The processing for this image was minimal. In fact, what you see here is pretty much we all saw on our LCDs, with mostly minor tweaks. In Lightroom I brushed a little color temperature reduction to cool the sky, made some slight exposure adjustments, and bumped the clarity to help the stars stand out. In Photoshop I did moderate noise reduction with Topaz DeNoise (love the high ISO performance of my new 5D III) and dodged the underside of the trailing vapor plume a little. And so intense was the color in the clouds that I desaturated the red channel somewhat. None of these adjustments were major, and in fact I was already mostly satisfied with the raw image and Adobe Standard processing (my Lightroom default) that I started with.
The one significant adjustment I did make in Photoshop was to fix the blown highlights at the caldera’s core, at the very center of the fire where it burned hottest, an area the width of the fire in length and about 2/3 of that width high (about 3/4 of the bright area you see beneath the smoke). That core area, while yellow to my eyes, was hopelessly blown (no color or detail) by the extreme exposure the rest of the scene required. To fix it I used Photoshop’s Eyedropper tool to select the yellow just beneath the cooler orange, and the Paint Bucket tool at about 20 percent opacity to replace the pure white with (very) pale yellow.
The objective of any art form is not to show us exactly what we can all see with our own eyes, but rather to expand our perception of reality and and help us see the world differently. While this is not they way my eyes saw it, it is the way my camera saw it (with the one exception noted above). As with a moonbow that’s not visible to the naked eye, streaking stars or blurred water recorded with a long exposure, and the enhanced contrast and shape of a black-and-white image, the camera gives us fresh insights into the natural world. That’s why I choose not to lament perceived “limitations” such as my camera’s inability to capture the range of light my eyes see, preferring instead to celebrate its ability to reveal things my eyes can’t see—in this case faint stars and the fiery, natural light illuminating the clouds and Kilauea’s plume. Nothing can compete with the experience of being there, but I’m thrilled to have images to remind me of that experience, and to show me what my eyes missed.
* * * *
Join me next September as I try to duplicate this shot in my Hawaii Big Island Volcanoes and Waterfalls photo workshop, September 2-6, 2013.

