Eloquent Images by Gary Hart
Insight, information, and inspiration for the inquisitive nature photographer
Moon Over Yosemite
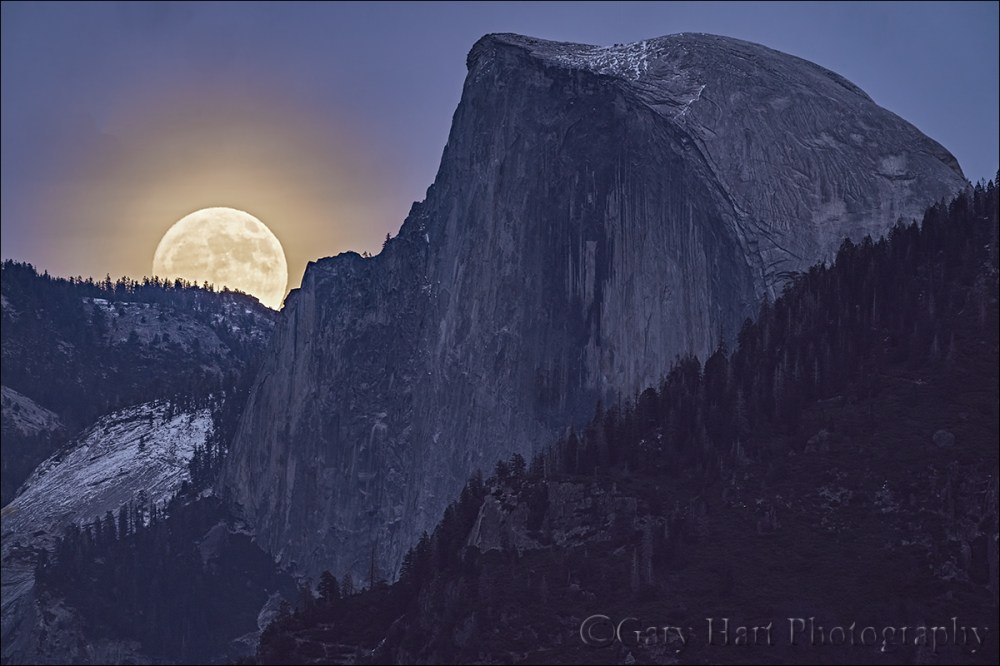
Winter Supermoon, Half Dome, Yosemite
Sony a7RIII
Sony 100-400 GM
Sony 2x teleconverter
ISO 400
f/11
1/8 second
Large or small, crescent or full, I love photographing the moon rising above Half Dome. The alignment doesn’t work most months, so those months when the alignment is right, I do my best to be there.
For last week’s Yosemite Winter Moon photo workshop I’d planned three moonrises: Thursday and Friday we got lucky with the never reliable December skies, but Saturday night concerned me. Not only was this moonrise the “main event,” the forecast was less than promising. And while the first two moonrises were absolutely beautiful, the moon was less full and we were on the valley floor, much closer to Half Dome. Our location required a wider focal length that meant a relatively small moon. But on Saturday (it would rise too late to photograph on Sunday) the moon would be 99 percent full and rise shortly after sunset, just left of Half Dome when viewed from Tunnel View. Tunnel View is eight miles west of Half Dome, a distance, when combined with the moon’s proximity to Half Dome, that would allow a long telephoto that would fill the frame with the moon and all of Half Dome.
Saturday started clear, but soon a thin layer of clouds moved in, bathing Yosemite Valley in diffuse light that was wonderful for photographing pretty much anything that didn’t involve the sky. These clouds weren’t dense enough to completely obscure the sun, but with a chance of rain coming overnight, I knew they’d be thickening at some point.
I got my group in position near Tunnel View about a half hour before sunset. I’ve attempted moonrises that were completely obscured by clouds, and some where we could see the moon’s glow through the clouds, but no detail. I tried to stay positive but the fading light made it impossible to tell exactly how thick the clouds were. Fearing the worst, I rationalized that we’d already had two nice moonrises and maybe wishing for a third was just greedy. But still….
Hoping for the best, I pointed out where the moon should appear about ten minutes after sunset, advising everyone to continue shooting normally until then, but to have an idea of their moonrise compositions. Practicing what I preach, I got out my Sony 100-400 GM, added my 2x teleconverter, and framed up the scene. Because I wasn’t going to shoot anything else (as you may have noticed, I already have a couple of Tunnel View images in my portfolio), I focused and waited.
About five minutes after sunset an amber glow in the clouds next to Half Dome signaled the moon’s imminent arrival. That we could even see any sign of the moon gave me hope and I held my breath as the glow intensified, still unsure whether we’d see lunar detail or just a white blob. The glow was actually unique and very beautiful in its own way and I started clicking. The instant the moon’s brilliant leading edge nudged into view, silhouetting the trees, I knew we were in luck. The landscape was already fairly dark by then, but because this was the group’s third moonrise, they’d become old pros at dealing with the scene’s extreme dynamic range—at that point the workshop’s mantra had become: “Push the exposure until the moon’s highlights start blinking, and fix the shadows in Photoshop.”
The experience that evening was even more spectacular than I had dared hope, a perfect storm of conditions I might never see repeated: the moon’s alignment with Half Dome, the telephoto distance, the timing of the moon’s arrival that put it on the horizon with just enough twilight remaining, and (especially) the translucent clouds that enveloped the moon in a golden halo and eased the scene’s dynamic range.
Some thoughts on the Sony a7RIII
A couple of weeks ago, at a Sony sponsored event in Sedona, I got the opportunity to do some night photography with the new Sony a7RIII. But this Yosemite trip was my first time using the new camera on my own. It’s too soon for any final proclamations, but my general sense is that this camera has even more dynamic range than the a7RII (which is pretty incredible). The other significant takeaway from this weekend is that I used the same battery for three-and-half days and came home with more than 25 percent remaining. Anyone who shot with the a7RII, knows how significant this is.
I’m still getting used to the new camera’s interface—while similar to the a7RII, there are definite differences. I do like the new button layout and improved menu interface, but am still getting used to the joystick and touchscreen—pretty sure I’ll learn to love them too. And the dual card slots are a necessary and most welcome improvement.
My biggest complaint with the new camera is that the back-button focus that I loved so much on the a7rII is broken on the a7RIII. Every camera I’ve ever used (Canon and Sony) has allowed me, after tweaking some settings, to switch seamlessly between auto and manual focus without requiring me to change the focus mode. So the first thing I do when I get a new camera is disengage autofocus from the shutter button and assign autofocus to a button on the back of the camera. With back-button focus enabled, my workflow has always been manually focus by default, but always with the ability to autofocus with the simple push of a button—no focus mode change required. Doing this with the a7RII was the easiest of any camera I’ve ever used, but for some reason Sony changed the focus behavior of the a7RIII, so now I have to deal with the added step of switching focus modes on the camera before focusing. This might not sound like a big deal, but I don’t want to have to think about my camera when I’m composing a scene, so this behavior is extremely frustrating. That said, I’ve already communicated my frustration to Sony’s engineers and am hopeful (confident?) this is a firmware fix that will come soon. Sony’s responsiveness to things like this is one of the reasons I’m so happy I made the switch from Canon.
I’m happily retracting those words after Sony found a solution for the a7RIII back-button focus problem. At last month’s Sony media event Sedona, I was surrounded by Sony’s best and brightest engineers; when I brought the BBF problem to their attention, we all scratched our heads over how to make it work, and they finally asked me to send them a detailed write-up. They promised to address it ASAP, but I didn’t think it would happen without a firmware update.
To enable back-button focus on a Sony a7RIII or a9, simply assign any custom button (Tab 2, Screen 8) to the AF/MF Control Hold option (AF1 screen). To use BBF, keep the camera in Manual Focus mode—this allows you to manually focus with the focus ring, or to autofocus by pressing whatever button you assigned AF/MF Control Hold.
Bottom line
I’m pretty sure this is the best camera I’ve ever had my hands on. In fact, the dynamic range improvement was obvious as soon as I started processing this moonrise shoot—we continued shooting about 25 minutes after sunset, and just a little processing reveals useable detail in my highlights and shadows, even in my final image. Ridiculous.
A couple of full moon photography tips
Sun and moon rise/set times always assume a flat horizon, which means the sun usually disappears behind the local terrain before the “official” sunset, while the moon appears after moonrise. When that happens, there’s usually not enough light to capture landscape detail in the moon and landscape, always my goal. To capture the entire scene with a single click (no image blending), I usually try to photograph the rising full moon on the day before it’s full, when the nearly full (99 or so percent illuminated) moon rises before the landscape has darkened significantly.
The moon’s size in an image is determined by my focal length—the longer the lens, the larger the moon appears. Photographing a large moon above a particular subject requires not only the correct alignment, it also requires distance from the subject—the farther back your position, the longer the lens you can use without cutting of some of the subject.
This moonrise image is a perfect example. Tunnel View in Yosemite is one of my favorite locations to photograph a moonrise because it’s about eight miles from Half Dome. At this distance I can use 500+ mm (250mm plus a 2x teleconverter) to fill my frame with Half Dome—with the moon nearby, I get an image that includes all of Half Dome and a very large moon.
Moon Over Yosemite
Click an image for a closer look and slide show. Refresh the window to reorder the display.


Gary. You are amazing. Donna and Bob
Thanks!
excellent!!!
Wow. Just wow. Beautiful. My family was in Yosemite over Thanksgiving and it’s a magically mystical place, and this photo just NAILS that mystical beauty. Thanks for sharing !!
That is a beautiful shot in an admirable portfolio of Yosemite/Moon shots.
Pingback: The first rule of photography: Just show up | Eloquent Nature by Gary Hart
Wow, Wonderful Shots
Thank you.
Can you help teach how to such a Shot. Especially that Moon Shot of Yours 😍, it’s amazing 👌😇
Thank you, Arjun. Did you read my tips at the bottom of the post? Here’s more info that might help: https://garyhartblog.com/photo-tips/full-moon/.