Eloquent Images by Gary Hart
Insight, information, and inspiration for the inquisitive nature photographer
Wild about wildflowers
Posted on March 29, 2016

Dancing Poppy, Sierra Foothills, California
Sony a7R II
Sony FE 90mm f2.8 Macro
1/800 second
F/4
ISO 1600
I’ve given up trying to predict California’s wildflower bloom. There are a lot of theories about the conditions that cause a great wildflower bloom: wet winter, early rain, late rain, warm spring, wet spring, and so on. For each condition correlation you can cite, I can cite an exception. So now I just cross my fingers and wait to see what spring delivers.
Well, it turns out this is a great year for wildflowers in California. Death Valley is winding down its “super bloom,” the best since 2005, my Facebook feed is suddenly saturated with California wildflower images, and it seems like every day I’m hearing about another don’t-miss poppy location.
While Death Valley’s bloom was dominated by yellow, daisy-like desert gold, with a few other varieties and colors sprinkled in, for most of California it’s the poppy that takes center stage each spring. The highlight of Sunday my drive from Phoenix to Sacramento (I know, not a lot of competition for highlights on this route) was top-to-bottom orange hillsides flanking the usually maligned Grapevine (if you’ve lived in California, you know what the Grapevine is; if you haven’t, just ask a Californian. But be prepared to endure a lengthy “that time my car broke down” story).
My close-focus technique
There are many ways to photograph poppies, ranging from wide panoramas that highlight poppies’ propensity to dominate vast expanses of the landscape, to tight macro views that emphasize their elegant curves and translucent gold and orange. Likewise, there are depth decisions to be made with each poppy composition, from complete front-to-back sharpness to a single, minuscule point of sharpness.
While I’ll employ whatever approach I think best serves the scene, my poppy images tend toward close focus and limited depth of field captures that use a paper-thin sharpness range to blur all but the most essential aspect(s) of my scene. With this approach, I can highlight my subject, blur away distractions, and create a complementary background of color and shape.
I start by identifying a flower or flowers that I can isolate from the surroundings. Finding the right background is as essential finding the right subject—without my subject and background working in unison, the image will almost certainly fail. What’s the right background? Other flowers, sparking water, deep shade (that I can turn dark green or black)—use your imagination, and experiment.
Given my desire for minimal depth of field, my lens choice is usually a function of the background’s distance from my subject—there’s an inverse correlation between focal length and depth of field, so the farther away the background, generally the longer the focal length I choose. Since a narrow depth of field is my goal, I usually start wide open (my lens’s widest aperture). To focus closer than the lens permits and further reduce the depth of field, I sometimes add one or more extention tubes.
With my subject, background, lens, and f-stop determined, I set up my tripod as close to the subject as I can focus and get to work. Because of the amount of review and refine I do, a tripod is an essential part of my approach—I can’t imagine doing close focus photography without one. With each click I scrutinize the result for adjustments, large or small—when I’m ready for the next click, having the scene I just reviewed waiting there for me on my tripod allows me to apply my refinements without having to recreate the image as I would if I had been hand-holding.
In the world of close focus photography, the scene looks completely different to the camera than it does to the eye, even more than most other types of photography. So I usually don’t identify my ultimate composition, focal length, and f-stop until I’ve worked the scene awhile. When I get the composition the way I want it, I usually run through a series of f-stops to give me a variety of subject sharpness and background blur effects to choose between when I review my images later on my large monitor.
At the kind of magnification I normally use for these close focus images, even the slightest breeze can introduce motion blur that ruins an image. I’ve become so comfortable shooting at high ISO with my Sony a7RII that my default close-focus ISO for shade or overcast is now 800. If there’s a breeze, I’ll go all the way to ISO 6400—sometimes higher. Whatever your camera’s high ISO capability, it’s very helpful to familiarize yourself with your ISO comfort zone for your camera.
Because your eyes see a close-focus scene so differently than the camera sees it, your close-focus photography will improve with experience. When you start, some of your best images may be accidents, blurred background effects that you didn’t anticipate. But soon you’ll come to learn what to look for, and how to achieve it.
Now go enjoy spring!
A Poppy Gallery
Click any image to scroll through the gallery LARGE


Seven reasons photographers love rain
Posted on October 22, 2014
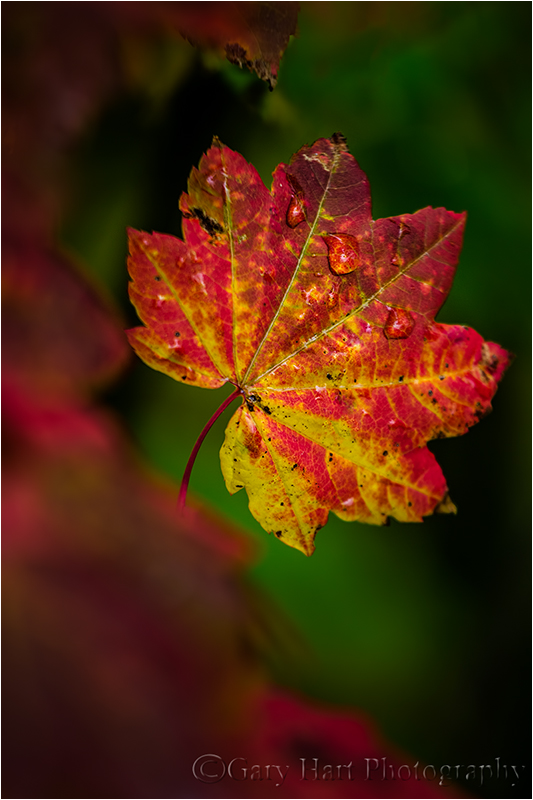
Hidden Leaf, Mt. Hood, Oregon
Canon EOS-5D Mark III
168 mm (plus 48mm of extension)
1/100 second
F/4
ISO 400
The difference between a photographer and a tourist is easily distinguished by his or her response to rain: When the rain starts, the photographer grabs a camera and bolts outside, while the tourist packs up and races for shelter.
Seven reasons photographers love rain
- Smooth, (virtually) shadowless light that eliminates the extreme contrast cameras struggle to handle, and enhances color saturation
- Clouds are vastly more interesting than blue skies
- The best stuff happens in the rain: rainbows, lightning, clinging water droplets
- Clean air means more vivid sunrises and sunsets
- Replenished lakes, rivers, streams, and waterfalls for days, weeks, or months of great photography (rain or not)
- Low light makes easier the long shutter speeds necessary for soft water effects
- (Last, but not least,) we have the landscape to ourselves
Case in point
This week Don Smith and I traveled to Hood River, Oregon for some autumn photography, and to do more prep and reconnaissance for next spring’s Columbia River Gorge photo workshops. It’s rained every day we’ve been here, and you won’t find two happier (albeit wetter) photographers. Not just because our California bones miss rain (they do), but because there is no better time to take pictures than a rainy day.
Monday morning Don and I drove to Lost Lake to scout it as a potential workshop location. Climbing from near sea level to over 3,000 feet in a steady rain, we passed through deciduous forests in varying stages of green, yellow, orange, and red. The fall color peaked at around 2,000 feet, dwindled as we climbed further, until by the time we reached the lake, most of the colorful leaves were on the ground or whisked away by mountain breezes. While Mt. Hood was completely obscured by rainclouds, we spent a couple of hours exploring near the lake before heading back down the mountain with no specific plan other than to stop somewhere and photograph the color we’d enjoyed on the drive up.
Partway down the mountain we pulled over beside an evergreen forest liberally mixed with yellow and red maples, donned our rain gear, and went to work. With dense, low clouds shrinking the view to just the immediate vicinity, grand panorama were out of the question and my 70-200 became my weapon of choice for its ability to isolate nearby leaves and limit depth of field.
An essential but frequently overlooked component of successful rainy day photograph is a (properly oriented!) polarizer to mitigate the ubiquitous, color-sapping sheen reflecting back from every exposed surface. This is a no-exception thing for me—I don’t care if it’s already dark and the polarizer robs me of two more stops of light, without it, images from wet scenes like this would be a complete failure. In this case I bumped my ISO to 400 (and would have as high as necessary if there had been more wind) before composing a single frame.
Beautiful as it was, a scene like this starts as a hodgepodge of disorganized color. Fortunately, it’s never long before individual elements start manifesting—the longer I stay, the more (and smaller) detail I see, until even the littlest thing stands out and I can’t believe it had been there all along. Knowing all this, I usually start at my lens’s wider range and gradually work tighter as the surroundings become more familiar.
And so it was with this little leaf, tucked into the forest behind several layers of dense and dripping branches, hiding from my gaze until nearly an hour into my visit. From the forest’s outskirts I zoomed to 200mm and composed a few frames through the tangle of branches, but it wasn’t long before I needed to be closer.
When I spy something interesting, it’s easy to crash through the forest like an angry grizzly (or frightened bison), but because I was extremely concerned about dislodging the fragile raindrops, I found myself deliberately stalking my prey, more like a stealthy cougar. (I could have just as easily compared my advance to a slithering snake, but for some reason this cougar analog resonated with me. Go figure.) When I made it so close that I was inside my lens’s focus range, I added an extension tube, and finally a second tube.
By this time I was just a few inches from the leaf, and while this ultra-close view was pretty cool, I felt my frame needed more that just a pretty leaf. Until this point I’d been pushing the nearby branches and leaves aside, out my view. But realizing that I was so close (the leaf closest brushed my lens), and my range of focus was so thin, that they would blur to a smear of red that cradled my subject.
With a paper-thin depth of field, finding the right focus point is essential. I also knew that I wouldn’t be able to get the entire leaf sharp, so I used live-view to focus on the center water drop (because that’s where I want my viewer’s eye to start).
Staying dry
The rain came and went for the duration of our stay, but never reached an intensity that made shooting difficult. In this case there wasn’t much wind, making my umbrella particularly useful for keeping raindrops off my lens. Nevertheless, without a little simple preparation, this image wouldn’t have been possible. I’ve learned never to take a photo trip without basic rain gear. For me that’s:
- A thin, waterproof shell that fits over whatever else I’m wearing (shirt, jacket, or whatever the temperature calls for)
- Waterproof pants that fit over my regular pants—I have an unlined pair for moderate temperatures, and a lined pair what I think it could get cold, and decide between when I pack
- Waterproof hiking boots
- Waterproof hat
- Wool or synthetic shirts, pants, and socks that will keep me comfortable when my rain gear causes me to perspire (no cotton!)
- Umbrella for my camera—because I’m dry (see above), I can dedicate the umbrella 100 percent to keeping raindrops off my lens
- Towel to dry things (especially my lens!) when they get wet—I often borrow one from my hotel, which isn’t a problem as long as I remember to return it
- Plastic garbage bag to drape over my camera when it’s on the tripod waiting for me to do something productive—if I forget a garbage bag, the hotel’s laundry or trash liner bags work fine
A rainy day gallery
Click an image for a closer look, and to enjoy the slide show


