Eloquent Images by Gary Hart
Insight, information, and inspiration for the inquisitive nature photographer
Hold My Gear (the Sequel)
Posted on October 18, 2025

Color and Clouds, North Lake Autumn Reflection, Eastern Sierra
Sony α1
Sony 16-35 GM II
1/100 seconds
F/9
ISO 100
After sharing in my prior post that I’ve been lugging a 30 pound camera bag through airports, it occurred to me that I haven’t updated you on the ever-changing contents of said camera bag lately. But before I continue, let me remind you that a photographer’s gear choice is no more relevant to his images than a writer’s pen is to her stories, or a chef’s cutlery is to her cuisine. Yes, these choices might make a difference on the fringe, but I imagine most would agree that a great chef will almost certainly get better results with Kirkland knives (with all due respect to Costco) than an average chef would get with top-of-the-line Zwilling.
But that doesn’t mean that I would voluntarily discard my current gear for some other brand. Far from it. I love the gear I use, and am always happy to share why. So what follows is a revised version of the first Hold My Gear post, from 2021—below that, you’ll find the story of today’s image.
I’ll start with my camera bag
Shimoda Action X50 with a Large Core Unit: This bag simply checks all the boxes for me: for starters, it’s large enough to carry everything I consider essential, with room to spare for a few things that are less than essential and that may change depending on the trip and my objective. In addition to 2 bodies and 5 lenses, it fits all the miscellany I always want with me (headlamp, rain and/or cold weather apparel, extra batteries and media cards, tools, among many things).
But more than capacity, my bag also needs to be comfortable on long hikes—whether across rugged High Sierra terrain, Iceland’s winter icescapes, or the endless concourses of Sydney International Airport—and (just as important) it must fit fully loaded into any overhead compartment I encounter. My Shimoda passes all these tests with flying colors.
Always in my bag
- Sony a7R V and Sony a1 bodies
- Sony 12-24 f/2.8 GM lens: Though I don’t use it as much as a couple of other lenses, having a lens as wide as 12mm allows me to photograph things I never could before, and I love that it’s still relatively compact.
- Sony 16-35 f/2.8 GM II lens (plus a Breakthrough polarizer), which is usually mounted on the a1: This focal range is covered by other lenses in my bag, but I love the lens too much to leave it behind—crazy sharp, and f/2.8 means it’s fast enough for night photography in a pinch. Plus, unlike the 12-24, I can use it with conventional polarizing and ND filters.
- Sony 24-105 G lens (plus a Breakthrough polarizer), which is usually mounted on the a7R V: Not only is this lens wonderfully sharp, its middle-of-the-road focal range fits so many situations—it’s no wonder this lens is my workhorse.
- Sony 100-400 GM lens (plus a Breakthrough polarizer): Replacing my 70-200 with this slightly bigger lens doubled my focal range, without adding tons of extra weight—and it’s a good match with the Sony 1.4X teleconverter.
- (Usually) Sony 14mm f/1.8 GM lens: This is my night lens, and though I only use it at night and don’t do night photography on every trip, since I have a slot for it and it’s not too heavy, my 14 GM usually just lives in my camera bag.
- Sony 1.4X teleconverter—I used to use the 2X, but found a noticeable sharpness improvement after switching to the 1.4X.
- Filters: Breakthrough 72mm and 77mm neutral polarizers (nearly fulltime on the 16-35, 24-105, and 100-400 lenses), Breakthrough 72mm and 77mm 6-Stop Dark polarizing filters (to switch out with my standard polarizers when I need a longer shutter speed).
- Memory cards: Each camera has two 128 GB Sony Tough cards, then I have a handful of other 128 GB and 64 GB SD cards rattling around in a pocket, just in case.
- Other stuff: Lens cloths, headlamp, insulated water bottle, extension tubes, memory cards, multiple spare batteries, Giotto Rocket Blower, and a couple of Luna Bars (because photography always trumps meals).
Specialty Equipment (lives in a second camera bag that gets tossed in the back of the car and stays there when I don’t need to fly to my destination)
- Sony 20mm f/1.8 G lens: For Milky Way and other moonless night photography—this one’s even more compact than the 24mm.
- Sony 24mm f/1.4 GM lens: For Milky Way and other moonless night photography—I can’t believe how compact this lens is.
- Sony 90mm Macro: I use this lens a lot with extension tubes to get super close for my creative selective focus work (wildflowers, fall color).
- Sony 200-600 G lens: When I want to go big on a moonrise/moonset—often pared with the 1.4x teleconverter. I also use this lens with extension tubes for selective focus fall color and wildflowers.
- 2 Stepping Stone LT-IV Lightning Triggers
Support
- Really Right Stuff Ascend-14L tripod with integrated head: Absolutely the best combination of light, tall, and sturdy I’ve ever found in a tripod. It’s so light and compact that I just attach it to my camera bag, even when flying, and just forget about it until it’s time to shoot (never a problem with TSA).
- Really Right Stuff 24L Tripod with a RRS BH-55 ball head: Sturdy enough for whatever I put on it, in pretty much whatever conditions I encounter. I also like that, even though it doesn’t have a centerpost, when fully extended (plus the head and camera), it’s several inches taller than I am. As much as love my Ascend, this is my tripod of choice in strong wind, or when I’m shooting extra long. As with my bag that carries my specialty lenses, this tripod usually lives in the back of my car and doesn’t usually fly with me (it would need to go in the suitcase), but is always available when I drive to a destination.
Color and Clouds, North Lake Autumn Reflection, Eastern Sierra
A few words about today’s image
Thanks to a great group and beautiful conditions, this year’s Eastern Sierra workshop was a great success. Though today’s image didn’t come during the workshop, you could call it ES workshop adjacent, because it came the day before the workshop, on my annual pre-workshop scouting visit to North Lake.
As familiar as I am with all my locations, I hate taking my groups to locations I haven’t been to in a year, because you just never know what might have changed. That’s especially important when the goal is fall color, which can vary significantly from year to year. It’s not always practical to pre-scout every location, but I do my best to make it happen when I can.
For my Eastern Sierra workshop, I always leave early the morning of the day before the workshop, which gives me time to hit all my spots on the way down. I can make it as far as Bishop, which makes for a long day, but from Bishop can finish my scouting the next morning by driving the final hour to Lone Pine, and leaving early enough to get eyes on my Lone Pine locations (Whitney Portal, Mt. Whitney, and the Alabama Hills) before the workshop starts that afternoon.
With the workshop always starting a Monday, Sunday is dedicated to scouting my locations. But this year’s Sunday scouting mission was a little problematic because I’d only just returned from Jackson Hole at 9 p.m. Saturday night, after assisting Don Smith’s Grand Teton National Park workshop (I’d get instant payback because Don would be assisting my Eastern Sierra workshop). After unpacking and repacking, the plan was to rise dark and early Sunday morning and be on the road by 7:00 a.m. This year, instead of bounding out the door at 7:00, I pretty much dragged myself out (with a shove from my wife) closer to 8:30. Still enough time, but not a lot of wiggle room.
I perked up pretty quickly once on the road, helped no doubt by an intermittent light-to-moderate rain that followed me down 395, and (especially) the beautiful clouds that came with it—a significant upgrade from the chronic blue skies that often plague this trip.
To ensure that I made it up to North Lake before dark, I didn’t take my usual swing through the June Lake Loop, and skipped the drives up to the McGee Creek and Mosquito Flat trailheads as well. Since these aren’t workshop stops (though I do recommend them as possible extra locations for anyone looking to photograph more color on the drive from Bishop to our Lee Vining hotel on Day 3), I felt okay about missing them in favor of North Lake.
On the steep ascent up Bishop Creek Canyon, I got a front row view of the peaks playing hide and seek with the clouds. By the time I climbed the last mile on the (mostly) unpaved, one-lane road to North Lake, a few sprinkles dotted my windshield. With so much workshop prep on my mind, I virtually never photograph at any point on this pre-workshop scouting trip, but for some reason (beautiful sky), this time I swung my camera bag onto my back for the 100-yard walk from the parking area to the lakeshore. I was beat, and hungry, and with darkness coming soon, I just wanted to get back to Bishop to check-in to my hotel to prepare (and rest up) for the workshop—but if the lake is real nice, maybe I’ll fire off a couple of frames before calling it a day.
The color couldn’t have been better, and the clouds were off the charts. A couple of other photographers were set up on the lakeshore where I usually like to shoot the reflection, but with a light breeze spreading small ripples across the water, I passed on the reflection in favor of the gold and green grass to fill my foreground.
After about five minutes I was pretty happy with what I had and was just about to pack up when I noticed that the water across the lake had flattened out, and a reflection had formed. It was a long way away and hardly visible, but looking closer, I could see the stillness expanding toward me. Soon—in no more than a minute—the entire lake surface a calmed to a reflection and all thoughts of leaving vanished.
With my usual reflection spot occupied, I moved about 30 feet closer to the road, to a tiny micro-cove sheltered by grass and a large rock. Here you can’t get as much reflection, but being so sheltered, it’s usually the last place the reflection leaves if a breeze picks up.
Given the narrowness of my foreground reflection here, combined with beautiful clouds and light high above, I opted for a vertical composition. Dropping lower, I positioned myself to include two small rocks as foreground anchors, then composed wide to include as much sky and reflection as possible.
Despite occasional sprinkles, the rain mostly held off and I ended up staying for nearly an hour, finally moving over to my usually spot when the other photographers moved on.
This was Sunday evening. I returned with my group for sunrise Wednesday morning. I was pretty confident the color would still be great, but crossed my fingers all the way up the canyon hoping we’d get a reflection. I was right about the color, and the reflection gods smiled on us as well, delivering an absolutely flawless mirror atop the water. We also had a couple of clouds, but nothing like my evening a couple of nights earlier, and as excited as my group was, I didn’t have the heart to tell them that I had it even better.
I Love Reflections (Perhaps You Noticed)
Click any image to scroll through the gallery LARGE


, Death Valley")


, Yosemite")


Things Always Work Out…
Posted on October 10, 2025

Setting Crescent Moon, Grand Teton, Grand Teton NP
Sony a7R V
Sony 24-105 G
.8 seconds
F/16
ISO 100
I’m a naturally positive person who doesn’t have to work too hard to stay optimistic about pretty much everything. And while this “things always work out” philosophy generally serves me quite well, it can sometimes cause problems. Case in point…
A couple of weeks ago I was in Jackson Hole to help out Don Smith with his Grand Teton workshop. Back in the pre-Covid days, when Don and I would trade off assisting several of each other’s workshops every year, my annual Jackson Hole trip was one I especially looked forward to. Since I hadn’t been there since 2018, returning this year was a particular treat.
In addition to the incomparable beauty of the Tetons, Jackson itself is has a great little downtown that I make a point of walking daily when I’m there. With so many shops, galleries, and restaurants, it’s hard to spend quality time at each, but the one place I always make sure I get to is Tom Mangelsen’s gallery on Cache Street.
This year I had so much other stuff on my plate, by the time our final day arrived, I still hadn’t made it there. So I got a late checkout and carved out a couple of morning hours to walk down there, browse, and return before heading to the airport.
While enjoying the beautiful gallery, I couldn’t help patting myself on the back for allowing enough time to feast on every print displayed without feeling rushed. Even though I’d estimate that at least 80% of Mangelsen’s images are of wildlife, and I don’t photograph wildlife, I couldn’t help but feel the inexplicable kindred connection that draws me to a very small cadre of nature photographers whose motivation seems, rather than to dazzle or impress, simply to share their own very personal relationship with natural beauty as it touches them. And while I won’t pretend to have tapped those instincts to the extent Mangelsen and those few others have, their images have a profound influence on me.
As much as I’d have loved to leave with a Mangelsen print, I knew that would be far beyond my ability to transport home (not to mention my budget). But during my meanderings I couldn’t help notice the variety of beautiful Tom Mangelsen coffee table books displayed throughout the gallery. Last year I wrote a post about, among other things, my relationship with coffee table books, and how it saddens me that the coffee table photo book appears to be a declining medium., so it always thrills me to encounter signs of CTB life. On a whim I asked if any of the books were signed (I’d looked but found none) to my delight she not only did she point me to some, she said there was no price premium for the signed books.
For context, I’m of the pre-selfie generation, coming of age way back in the time autographs, not selfies, were the ultimate commemoration of a transient connection to greatness. (Another nice thing about autographs is that they can be acquired without bothering a person who is most likely quite tired of accommodating intrusive strangers.) Though I’m not a collector, over the years I’ve assembled an eclectic inventory of signed memorabilia from people I admire.
How eclectic? Well, I have a baseball signed by Ted Williams; a bottle of wine signed by Mick Fleetwood; “August and Everything After,” in vinyl, signed by all of Counting Crows; CDs signed by Michael Franks and Pat Metheny; two signed Galen Rowell prints; and a personal postcard from Wallace Stegner. (And the person who scores me a cartoon personally signed by Gary Larson would be a friend for life.) So anyway, getting a signed Tom Mangelsen book just seemed like the thing to do.
I’d be lying if I said I’d forgotten that, on my flight out, my suitcase weighed in at 51 pounds, one pound above the checked bag limit, forcing me to transfer a pound worth of miscellany to my already 30-pound camera bag. (My computer bag, which must fit under the seat to qualify as a personal item, weighs about 10 pounds and was already stuffed to the brim.) Nevertheless, I of course chose the largest, heaviest Mangelsen book: “The Last Great Wild Places”— a whopping 12×18 inches and (including the lovely protective carryall) about ten pounds. My plan for how I was going to travel with an additional 10 pounds? It’ll work out.
Unfortunately, somehow the woman at the Jackson Hole United Airlines counter didn’t get that memo. While packing, after adding my new book, I’d made a token effort to transfer a few more things to my camera bag (oh yeah, I’d also purchased some T-shirts for me, a sweatshirt for my wife, plus a pound of coffee, so my suitcase was starting out even heavier than before), and strategically positioned a few other heavy-ish items near the top of the suitcase for easy access in case more transferring was required. At the airport, I held my breath as I hefted my suitcase onto the scale, flashing my best, “Hey, I’m nice guy—work with me here” smile. The counter person looked at the scale, then back at me, and issued her best, “You’ve got to be kidding me” stare. When I feigned ignorance, she simply said, “You’re ten pounds over.” Sigh.
After shifting my pre-staged heavier items and discovering that I was still seven pounds overweight, a small amount of panic started to leak in. Fortunately, we’d arrived at the airport more than 3 hours early. After 45 minutes of shifting, repacking, and reweighing (at least four times) I passed the weigh-in and queued up for TSA. (My new United airlines “friend” wouldn’t even reward me for getting down to just 1/2 pound over.)
I won’t bore you with the details, but suffice to say, if the plane had gone down and they sent my recovered belongings to my wife, she’d no doubt be scratching her head trying to figure out why my camera bag included a one pound bag of ground coffee, my toiletry kit, a Bluetooth speaker, and a pair of hiking boots—and why my computer bag also included a coffee mug, umbrella, and several pairs of socks.
But the bottom line is, after countless failed weigh-ins, then lugging (not to mention babysitting) over 50 pounds of bulky carryon through the Jackson Hole, (incomprehensibly large) Denver, and Sacramento airports, I did indeed make it home with the signed Tom Mangelsen book that’s now on display in my office. So I guess things really do work out.
Speaking of things working out
The workshop shoot that resulted in today’s image was not part of Don’s Grand Teton workshop master plan. It was an opportunistic response to a fortuitous confluence of blank skies and a crescent moon that just happened to come at the right time this year.
When scheduling a photo workshop, we have no idea of the conditions we’ll encounter. While I schedule many workshops using the moon as a hedge against blank skies, other factors can and do take priority—like fall color in a fall color workshop. Since this was Don’s workshop, I had nothing to do with the schedule, but I knew this one had to be scheduled for the best chance of peak fall color, moon be damned. (And to say Don nailed the fall color timing this year would be an understatement.)
Having just returned from my Hawaii Big Island workshop, and knowing I was departing for my Eastern Sierra workshop the day after returning from Jackson Hole, the moon had been the last thing on my mind until just a day or two before the workshop started. That we’d have a crescent moon in the west shortly after sunset had been on Don’s radar long before that, but we both agreed that it would probably be too far south to align with any of our prime sunset locations. But when mostly clear skies were forecast for the workshop, Don and I revisited the moon as a potential blank sky antidote to follow one of the workshop’s sunsets, and decide that we could indeed make it work.
After pulling up some topo maps and solar/lunar data, I plotted the waxing crescent’s altitude and azimuth for each evening of the workshop and determined that Thursday night would be the time to go for it. Then Don and I scouted the potential locations, both on maps and in person, and found a spot on the road between Jackson Lake and Oxbow Bend that would align the moon perfectly with Teton Peak on Thursday evening.
When the day arrived, we followed a nice sunset at Jackson Lake with a short drive to our predetermined spot, arriving in the warm glow of early twilight. To my eye the view here was the spectacular peaks to our south and west, but I couldn’t help notice that just across the the road and facing north (backs to the mountains), a dozen or so photographers were pointing very long glass at something far across the meadow. I looked more closely and barely made out a pair of elk doing whatever elk do (no, not that). Whatever. (Okay, seriously, I understand the appeal of wildlife photography, it’s just not for me.)
We landscape shooters pointed in the complete opposite direction, toward the brightening crescent hanging above Grand Teton, arguably America’s most striking mountain. To align the moon and peak with the foreground I wanted, I jogged about 5o yards down the road, staying only long enough to get a few frames. But being down there also gave me a great perspective of the conflicting priorities on display: wildlife shooters on one side of the road pointing north, landscape shooters on the other pointing south (it was actually a pretty amusing sight I wish I’d thought to take a picture of). I imagine they were just as baffled by our choices as I was about theirs.
Even though this moonset wasn’t a “featured” shoot of the workshop (people were there for fall color and the many views of the Tetons), it’s a great example of how things really do work out. Don and I used to stress about the conditions in a workshop and whether people might be disappointed, but we learned a long time ago that if you stay prepared and flexible, there will always be great stuff to photograph—and things really do work out.
Workshop Schedule || Purchase Prints || Instagram
A Peek at Peaks
Click any image to scroll through the gallery LARGE


")


Do You Really Need a New Camera?
Posted on November 22, 2024

Dancing Aspen, North Lake, Eastern Sierra
Sony a7R V
Sony 24-105 f/4 G
ISO 800
f/16
1/3 second
I had an idea germinating for this week’s blog post, but when Sony announced the brand new α1 II Tuesday, I pivoted to an experienced-based public service message. (You’re welcome.)
As you may have noticed, a new camera purchase is a significant investment. Nevertheless, for many photographers the new camera decision seems more emotional than rational. Case in point: Me. That is, once upon a time (okay, as recently as a couple of years ago), I’d have been all over this week’s Sony announcement, and by now almost certainly would have already ordered my new camera—regardless of how great my current camera is.
This new-camera purchase reflex takes me back to my first grown-up job, working for a small independent vehicle leasing company in the San Francisco Bay Area. “Independent” meant we were not affiliated with any auto manufacturer or dealership, which enabled us to offer our customers any make or model of vehicle and freed me to make honest recommendations rather than push a particular model. Handling every kind of car imaginable, from Toyota to Porsche to Rolls Royce, I soon noticed that many of my leasing customers seemed to be intent on replacing their perfectly excellent car (or truck) that still had lots of useful years remaining. It seemed they’d become so blinded by the allure of “new” that they’d lost contact with rational thought. Though their lease payments would persist for years after the car’s “new” wore off, they seemed to believe that driving this new Whatever would somehow make their life complete—trying to talk them down was fruitless. Sigh.
You’d think that experience would have immunized me against making similar emotional purchases, but sadly, I too have fallen into the trap of coveting the latest and greatest. In my case it hasn’t been cars (I do love new cars, but I usually wait 8-10 years between purchases, and only when I have enough saved to avoid car payments). No, my irrational exuberance skews more toward technology.
For example, many years ago I got sucked into Apple’s iPhone upgrade program (pay a monthly fee for the newest model, then return it for the next model as soon as it’s released) and so far haven’t been able to extricate myself (this is my weakness—it’s not like leaving Apple’s upgrade program is like trying to cancel a gym membership). And for more than a decade, I replaced my Intel-based Macs every 2 or 3 years. Fortunately, this costly predisposition was cured by Apple’s M processors, which are good enough to prevent me from fabricating any kind of credible rationalization for upgrading. So yay me.
Anyway, back to the camera thing. Earning my living as a photographer, it’s always been easy to justify buying the latest camera model. But despite all the marketing hype to the contrary (this applies to all manufacturers, not just the brand I use, Sony), I realized long ago that I’ll probably notice very little (or no) practical improvement in image quality from the new model—especially since I’m almost always replacing the model immediately preceding the new one. So what was my motivation? Being completely honest with myself, a large part of the appeal was simply the idea of owning the latest and greatest.
Given that my current cameras, a Sony a7RV and Sony α1, are everything I need (and more), my rational mind tells me that simply can’t justify spending $6500 to replace one. This isn’t a new insight, but what is new is that this time my rational mind is winning. In previous upgrade iterations, I’ve sometimes used the “photography needs to make you happy” mantra to rationalize the new purchase. After trying that on for this camera, I had to acknowledge that the is fallacy in my argument is confusing pleasure for happiness: Yes, getting that new camera will indeed give me a great deal of pleasure, but when transient pleasure comes at the price of enduring happiness, the biggest winner is Sony (or whoever your camera manufacturer is).
The truth is, regardless of who makes your camera (they’re all great), today’s (and yesterday’s as well) cameras capabilities surpassed the needs of most photographers many years ago. And no matter how great the marketing promoting the latest upgrade makes the camera sound, most photographers have better things to do with their money.
Am I saying you shouldn’t upgrade your camera? Absolutely not. I’m saying the criterion for springing for a camera upgrade shouldn’t simply be, “Is the new camera better than the camera I have?” (it almost certainly is); it should be, “Will the new camera make an appreciable difference in my photography?” (it probably won’t).
Here are some thoughts to bring to your next camera purchase:
- Filter the hype. Manufacturers are really good at spinning modest improvements into “game changing” essentials. Don’t buy it.
- Never, never, never chase megapixels. I can pretty much guarantee that you already have more megapixels than you’ll ever need, but megapixels sell. Until the photography public gets wise to the fact that adding resolution comes at the cost of image quality (really), manufacturers will keep giving us pixels we don’t need.
- Upgrade your more permanent gear first. Lenses and tripods might not be as sexy as a new camera, but there’s a decent chance you’ll notice more improvement in your images by upgrading your lenses and tripod than upgrading your camera.
- Take a trip. If you have all the lenses you need and already own the tripod of your dreams, consider spending that new camera money visiting locations you’ve always wanted to photograph. (Or sign up for that photo workshop you’ve had your eye on. Just sayin’….)
- And don’t forget, the longer you wait, the better your next camera will be. Seriously, your new camera, no matter how great, will probably be “obsolete” within a couple of years.
I need to make it clear that this is in not a review, or an indictment, of the Sony α1 II. I haven’t seen the camera, and have only scanned the (impressive) specs and (predictably hyperbolic) marketing claims. It looks like a fantastic camera. But as with any new camera, if it doesn’t add something that you believe will make a significant difference in your photography, there are probably better things to do with your money.
So what would induce me to replace one of my cameras? Believe it or not, fewer megapixels. Despite the perception (and marketing claims) to the contrary, megapixels are not a measure of image quality, they’re a measure of image size. Period. For any given technology, the fewer the number of photosites (measured in megapixels), the better the camera’s image quality will be. That camera manufacturers can continue cramming more and more photosites onto a 35mm sensor without sacrificing image quality speaks to the progress of technology. But the only way they can add photosites to a fixed space (like a 35mm sensor) is to shrink them, and/or reduce the distance separating them. Imagine the image quality spike we’d see if instead more photosites, they took the technological advances that enables more photosites without sacrificing dynamic range and high ISO performance, and created a sensor with larger (better light gathering) and more spread out (cooler) photosites.
Of course your priorities may (probably are) be different from mine, so I can’t tell you whether any new camera is right for you and your situation. Just don’t fall into the trap of buying the next model simply because it’s “better,” because where technology is concerned, better is quite possibly not good enough.
I return you now to your regular programming…
Dancing Aspen, North Lake, Eastern Sierra
On my way back to the parking area following an especially nice North Lake sunrise shoot, a stand of aspen grabbed my eye. I knew I was well into the 1o minutes I’d given the group to wrap up and make the short walk back to the cars (the light was changing fast and I had two more stops in mind), but these aspen were just too perfect to resist: backlit leaves at peak fall color, parallel trunks, and pristine white bark.
With the clock ticking (it’s never a good look when the leader is one everyone is waiting for), I’d normally just take a couple of iPhone snaps to preserve a beautiful scene I don’t have the time to do justice with a “serious” image. Even though I rarely do anything with these quick iPhone snaps, I find it hard to just walk away from scenes like this without a record of having witnessed it.
But in this case, my phone was buried deep in a pocket of one of my seemingly infinite layers of clothing. On the other hand, I (for some reason I can’t remember) was carrying my camera (which I usually return to my camera bag when I finish a shoot). So rather than mine for my phone, I turned my camera on, put it to my eye, and squeezed off a couple of frames, before continuing to the cars.
Because I have such a strong (irrational?) tripod bias (click, evaluate, refine, repeat…), I honestly didn’t think about these pictures again for the rest of the workshop. But going through my images after the trip, these aspen images stopped me. Slowly the memory of my quick stop returned, and as I spent more time with them, the more I liked what I saw.
Processing this image, and as much as I liked it, I could also tell that I didn’t give the scene my usual (obsessive) attention to detail, quickly identifying a few things I’d have done differently if I’d taken a little more time. For example, I’d probably have shifted around a bit to see if I could eliminate, or at least minimize, some of the gaps in the foliage, and to get a little more separation between some of the trunks. And I’d definitely have paid more attention to some of the minor distractions on the frame’s border. But despite these oversights, I was surprised by how much I like this image, and how well it captures so much about what I love about aspen.
So I guess the moral of this story is, even though a tripod almost always makes my pictures better, just because I can’t use one doesn’t mean I shouldn’t take the picture.
Join my next Eastern Sierra photo workshop
Workshop Schedule || Purchase Prints || Instagram
If you’ve made it this far, thank you. If you enjoy reading my blog, please share it with your friends.
More Aspen
Click any image to scroll through the gallery LARGE


Isolate and Conquer
Posted on November 8, 2024

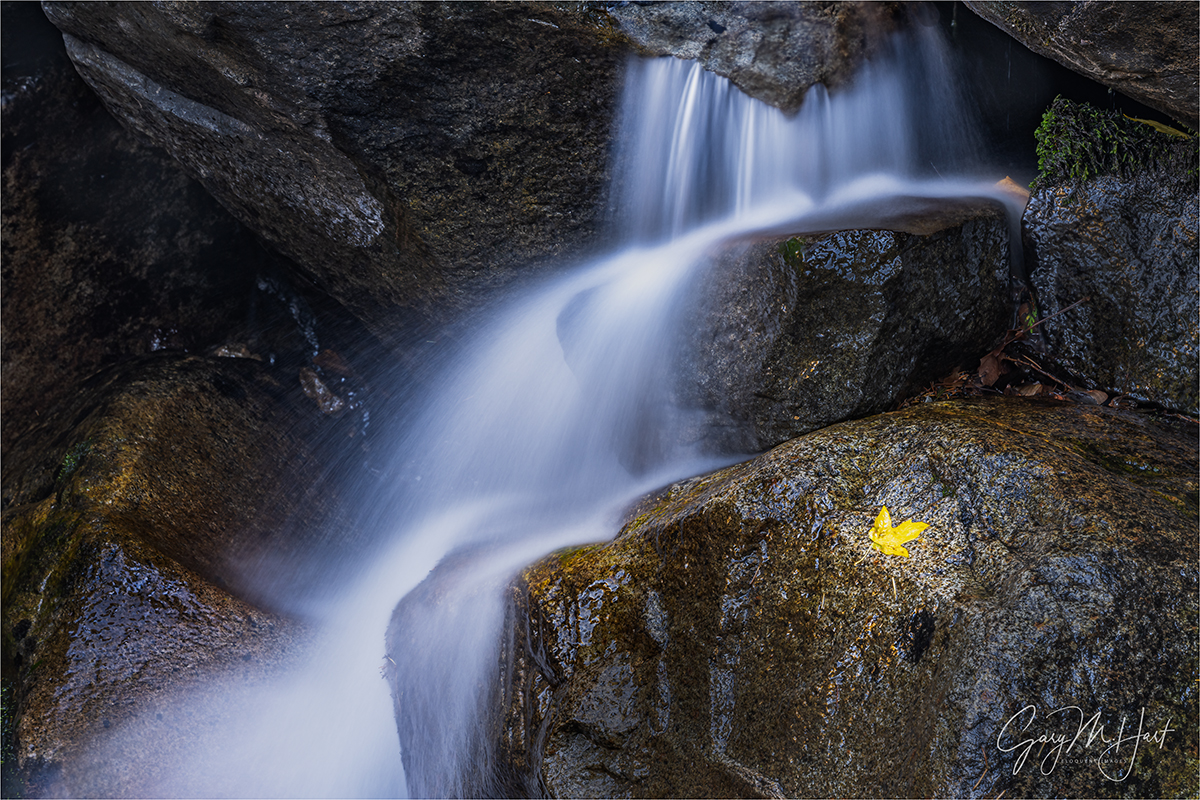
Autumn On the Rocks, Bridalveil Creek, Yosemite
Sony α1
Sony 100-400 GM
3.2 seconds
f/16
ISO 200
This year marked my second autumn visit since the reopening, and everything still feels gloriously new to me. Arriving at Bridalveil Creek on the final morning of last week’s Yosemite Fall Color photo workshop, I started with a brief orientation, then guided the group along the main trail, pointing out the many photography opportunities here. I wrapped up the introduction by inviting anyone who doesn’t mind a little bush-whacking and rock scrambling to follow me to one more spot.
Off the beaten path and often jammed with fallen trees and branches, the scene here is a little different each time I visit. The amount of water in the creek varies, as does the number of leaves on the ground and in the pools. This year the water was nice, but the leaves hadn’t quite reached peak blanket status. But these annual variations are part of what I love about photographing here.
Autumn Leaf and Cascade, Bridalveil Creek, Yosemite
Sony α1
Sony 100-400 GM
8 seconds
f/16
ISO 100
Probably my favorite thing to do at Bridalveil Creek is to find a leaf or leaves swirling in a pool and capture their colorful spiral with a long exposure. But when I couldn’t find any candidates for swirling color on this visit, I went to Plan B and scanned the scene for a leaf I could isolate. Despite lots of beautiful yellow leaves overhead, I only found two candidates on the ground.
Usually I try to get within 10 feet of subjects like this, because the closer I am, the more even a small amount of repositioning affects my foreground/background relationships. But closer access to these leaves was blocked by water, rocks, and downed branches (plus I didn’t want to risk getting in someone else’s frame), so I put away my 24-105 lens in favor of my 100-400, and went to work from an open vantage point about 30 feet back.
As I worked this scene, I couldn’t help remembering that every time I share an autumn image from Bridalveil Creek in Yosemite, I need to brace for the questions: some version of, “Did you place that leaf there?” Usually the tone is friendly curiosity, but sometimes it includes an undercurrent of suspicion bordering on accusation. While these questions are an inevitable part of being a nature photographer, I suspect that I get more than my share because I aggressively seek naturally occurring subjects to isolate and emphasize—and Bridalveil Creek in autumn has them in spades. But regardless of the questioner’s tone, my answer is always a cheerful, unapologetic, and honest, “No.”
I digress
We all know photographers who have no qualms about arranging their scenes to suit their personal aesthetics. The rights and wrongs of that are an endless debate I won’t wade into, other than to say that I have no problem when photographers arrange their subjects openly, without intent to deceive. But photography has to make you happy, and I create my photographic happiness by discovering and revealing Nature, not manufacturing it. I don’t like arranging scenes because I have no illusions that I can improve Nature’s order, and am confident that there’s enough naturally occurring beauty to keep me occupied for the rest of my life.
Order vs. chaos
Nature is inherently ordered. In fact, in the grand scheme, “Nature” and “order” are synonyms. But humans go to such lengths to control, contain, and manage the natural world, we’ve created a label for our failure to control nature: chaos. Despite its negative connotation, what humans perceive as “chaos” is actually just a manifestation of the Universe’s inexorable push toward natural order.
Let’s Take a Trip…
For example, imagine that all humans leave Earth for a scenic tour of the Milky Way. While we’re gone, no lawns are mowed, no buildings maintained, no fires extinguished, no floods controlled, no Starbucks built. Let’s say we return to Earth in 100 years*. While the state of things would no doubt be perceived as chaotic, the reality is that our planet would in fact be closer to its natural state. And the longer we’re away, the more human-imposed “order” would be replaced by natural order.
* Since this is my fantasy, I’ve chartered a spaceship that accommodates all of humankind and travels at 90 percent of the speed of light. While Earth has indeed aged 100 years during our holiday, we travelers return only a year older. (Dubious? Don’t take my word for it, ask Albert Einstein.)
What’s it all about?
Instead of manufacturing false order, I prefer organizing my scenes around naturally occurring relationships in a way that makes the image about something—in other words, finding the natural order and interpreting (translating) it in a way that resonates with humans. To distill this natural order from perceived chaos, nature photographers have a couple of compositional tools in our creative toolbox.
With a wide lens and careful positioning and framing, we can guide viewers’ eye with relationships that start in the close foreground and extend to the distant background, connecting elements to create virtual lines that guide the viewers through the frame. I think most photographers are biased toward these wide landscape images because the wider frame is closer to the way we see the scene with our eyes. But going wide also risks introducing unwanted elements that clutter the frame and pull the viewers’ eyes off their prescribed visual path.
Enter the telephoto lens, an underused landscape tool by most (but not all) photographers. A telephoto lens lets us be more surgical in our subject choice by simplifying the scene to its most essential elements that emphasizes our scene’s most prominent feature or features, and eliminates peripheral distractions. Nevertheless, despite the telephoto’s effectiveness, I often catch myself automatically defaulting to my wide lenses. But I’ve learned that those times when I’m struggling to find a shot, the easiest way to reset my creative instincts in the field is to simply view the scene through a telephoto lens, just to see what might be lost in the visual discord of the wide scene.
Still not convinced? In addition to providing a fresh perspective, telephoto lenses offer undeniable, tangible advantages in landscape photography:
- Bigger subject: Bigger isn’t always better, but there’s often no more effective way to emphasize your subject than to magnify it in your frame.
- Isolate: By zooming closer, you can banish distractions and unwanted objects to the world outside the frame, distilling the scene to its most essential elements.
- Highlight the less obvious: Sometimes a scene’s compelling, but more subtle, qualities are overwhelmed by the cacophony of dramatic qualities that drew you in the first place. By all means, shoot the grand drama that drew you in the first place, but take the time to discover the smaller stuff that’s there as well.
- Selective focus: The longer your focal length, the shallower your depth of field. One of my favorite ways to emphasize a subject that might otherwise be overlooked is to render it as the only sharp object surrounded by a sea of soft color and shape.
If telephoto vision doesn’t come naturally to you in the field, try training your eye in the comfort of your own home by opening any wide angle image in Photoshop (or your photo editor of choice), setting the crop tool to 2/3 aspect ratio (to match what you see in your viewfinder), and see how many new compositions you can find. (I’m not suggesting that you shoot everything wide and crop later—this crop tool suggestion is simply a method to train your eye.) But whether you do it in the field, or later in Photoshop, once your eye gets used to seeing in telephoto, you’ll find virtually every scene you photograph has telephoto possibilities you never imagined existed.
Meanwhile, back at Bridalveil Creek…
On this morning, I shot these leaves—one, the other, and both—horizontal and vertical, from wide to tight (horizontal version shared above). I even experimented with a variety of shutter speeds, but it was so dark back here in the early morning shadow beneath towering granite, darkened further by a canopy of leaves, and with a polarizer essential to mitigate the glare on the wet rocks and leaves, that any reasonable ISO didn’t allow a shutter speed that made a noticeable difference in the water’s blur—the water was moving so fast, 1 second and 10 seconds were virtually identical. So I just went with whatever shutter speed I needed to get the exposure I wanted (the fact that I ended up shooting this frame at ISO 200 instead of ISO 100 was just small oversight, left over from earlier shutter speed experiments).
My starting position was more-or-less at eye level with the cascade, putting the leaves more edge-on. Though they were clearly visible, but their classic maple leaf shape was somewhat obscured by the angle of view. So after exhausting all compositional variations, I scanned my surroundings for a higher vantage point and spotted a rock that would take a little effort to scale (nothing dangerous—mostly navigating a lot of downed trees and branches), but that might work if the view from there was unobstructed.
Turns out shifting those few feet was worth the effort, providing a much better angle that clearly revealed the leaves’ shape. I proceeded to run through another series of compositions similar to what I’d done at the first spot.
I’ve learned to wait until the workshop’s final day to take my groups to Bridalveil Creek. The photography here isn’t as obvious as the rest of Yosemite, so as excited as I am to share it, it takes a while for everyone to refamiliarize themselves with their cameras and warm up their creative muscles. This group was no exception, but when we gathered at the cars after the shoot, I heard the same “I could have stayed here all day!” responses I always get at Bridalveil Creek. Me too!
Join me in Yosemite
Workshop Schedule || Purchase Prints || Instagram
Isolate and Conquer
Click any image to scroll through the gallery LARGE


")


No Sky? No Problem…
Posted on October 10, 2024

Autumn Symmetry, North Lake, Eastern Sierra
Sony a7R V
Sony 24-105 f/4 G
ISO 100
f/16
13 seconds
Anyone who has been in one of my photo workshops will confirm that I’m kind of obsessed with skies. Not just the good skies, but the bad ones too. While the sky can add a lot to an image, it can detract just as much. Viewing images online and in my workshop image reviews, it seems that many people pay outsize attention to the landscape, while ignoring the sky. But since all the components of an image need to work together, the way you handle the sky is just as important as the way you handle the landscape that you’re most likely there to photograph.
From rainbows, to dramatic clouds, to vivid sunrises and sunsets, great skies are easy, regardless of the landscape. But what do you do when the sky is bland and boring? The rule of thumb I’ve always followed and taught is that amount of sky you put in an image should be based on the relative appeal of the sky versus the landscape: determine which has the most visual appeal and by how much, then allocate your frame’s sky/landscape real estate percentage accordingly. I’m not suggesting that you whip out a calculator and do actual math in the field, but you get the idea.
Every autumn I visit North Lake, east of Bishop in the Eastern Sierra, hoping to catch the peak fall color there. Prepping for this post, I started reviewing my North Lake images from the 20 or so years that I’ve been visiting, and was immediately struck by the variety of the images taken from more or less the same location (somewhere along a 50-foot stretch of shoreline). The variety is both in the compositions and the conditions, but the compositions are largely determined by those conditions.
The annual variables at North Lake include the state of the fall color in the aspen across the lake (early, late, peak), the reflection (from serene mirror to windy chop), the level of the lake (and the rocks that are visible), the clouds and color in the sky, and the crowds (how much freedom is there for me and my workshop group to set up where we want).
Here’s a handful of North Lake images captured over the years. Without plunging too deep into the weeds, it’s pretty clear to me how the conditions on each day influenced my composition and exposure decisions.


Autumn Symmetry, North Lake, Eastern Sierra
The morning I captured the image I share today was impacted by a combination of scene variables, some positive, others negative. On the positive side, the color was as good as good as it can get there, and the reflection was really nice all morning. On the negative side, despite arriving an hour before sunrise, there were already a number of cars in the parking lot, which I knew would mean my group and I would be settling for whatever spaces were available, as well as limited ability explore (giving up a nice spot to search for something better risks finding nothing, while losing the nice spot you just left). And the sky sucked. (If you know me at all, you know that means there were no clouds.)
Rather than take the easy path up the road directly to the lakeshore (no more than 100 yards from the parking lot), I guided my group into the woods and along the creek to the lake—no farther, but the trail was a little muddy and slightly overgrown in spots. My rationale was that, since the most popular spots to set up were likely taken, this route would let them see that there are other very nice options that most visitors never make it to.
At the lake I found enough room for several in my group to set up in the “popular” area with the foreground rocks, and guided the rest just a few feet farther to a somewhat sheltered mini-cove on the other side of a large boulder. Just because the other spot is more popular doesn’t mean it’s better—this second spot, being more sheltered, means it’s more likely to have a reflection, even when the rest of the lake is shuffled by a breeze, and the foreground tall (and photogenic) grass aligns nicely with the peaks (the Autumn Morning, North Lake, Eastern Sierra image in the gallery above was taken from this spot).
Once everyone in my group was set up and happy, I squeezed into a remaining opening at the small reflective cove and went to work. In the fading twilight, I started to work out a plan, quickly deciding that this morning I would not take a single picture that includes the sky. This isn’t the approach I’d recommend for first-time North Lake visitors because excluding all of the sky also means excluding the beautiful peaks surrounding the lake. But I have so many images of the peaks here, many with much nicer skies, and didn’t really feel like I needed any more.
So I had a blast all morning playing with a variety of compositions that completely ignored the sky, ending up with about 2 dozen images to choose from when I got home. Below are the Lightroom thumbnails from that morning. (You can see that while I didn’t include the sky or peaks, more than half of the morning’s captures did include their reflections)

Not only do the Lightroom thumbnails show my compositional options this morning, they also reveal a little of my process. In general, my first capture is a “proof of concept,” and if I like what I see I start making refinements until I’m satisfied. And even though some of these thumbnails look identical, I can assure you that each one is at least a slight adjustment of the one preceding it.
I chose the composition I share today because I love the symmetry, the strong diagonals, and the way it emphasizes my favorite features of this beautiful little lake—but nothing else.
I return to the Eastern Sierra and North Lake next fall
Workshop Schedule || Purchase Prints || Instagram
No Sky, No Problem…


, California")


Every. Single. Thing.
Posted on August 23, 2024

Sunset Reflection, North Lake, Eastern Sierra (2008)
Canon EOS-1Ds Mark III
Canon 17-40 f/4 L
10 seconds
F/11
ISO 200
A few days ago, while browsing old images looking for something else, I came upon this one from a solitary sunset visit to North Lake above Bishop almost 16 years ago. It’s a great reminder to appreciate my past efforts, and to not forget that, even though some images from my distant photography past evoke a “What was I thinking?” face palm, I really did have an idea of what I was doing—even if my execution wasn’t always perfect.
One of the earliest lessons I learned on this path to where I am as a photographer today, a lesson I work hard to impart on my workshop students, is the photographer’s responsibility for each square inch (and pixel) in the frame. Not just the beautiful elements, but everything else as well. Every. Single. Thing.
It’s always heartening to see the genesis of that approach in my older images. Rather than just framing and clicking the obvious, I can see signs that I took the time and effort to assemble the best possible image. That assembly process might start weeks or months before I arrive (planning for a moonrise, fall color, the Milky Way, and so on), or it could simply be a matter of making the best of whatever situation I’m presented when I arrive.
Either way, once it’s time to take out the camera and get to work, before clicking the shutter I try to make a point of surveying the scene to identify its most compelling elements. Once I’m comfortable with the possibilities, I position myself to create the ideal relationships between the various elements, then frame the scene to eliminate distractions, and finally, choose the exposure variables that achieve the motion, depth, and light that create the effect I want. And while my execution still isn’t always perfect (and will always have room for improvement), I think this image in particular illustrates my assembly process.
I’ve been visiting North Lake in autumn for nearly 20 years, both on my own and in my workshops. Most of these visits come at sunrise, but this time, by myself in Bishop with an evening between workshops, I decided to explore some of my favorite spots near the top of Bishop Creek Canyon. I pulled into North Lake and was surprised to find it completely devoid of photographers—a refreshing difference from the customary autumn sunrise photographer crowds that usually outnumber the mosquitos.
Early enough to anticipate the sunset conditions and plan my composition, I was especially excited by the western sky above the peaks, which was smeared with broken clouds that just might (fingers crossed) color up when the sun’s last rays slipped through. Without the swarm of photographers I was accustomed to here, I took full advantage of the freedom to roam the lakeshore in search of a composition that would do the (potential) sunset justice. Rather than simply settle for the standard version of this inherently beautiful scene that might be further enhanced by a nice sunset, I wanted a composition that assembled the best of the scene’s various features—colorful sunset sky, serrated peaks, golden aspen, crisp reflection, small granite boulders—into coherent relationships that allowed everything to work together that might be a little different.

Autumn Reflection, North Lake, Eastern Sierra
I eventually rock-hopped to this mini granite archipelago near the lake’s outlet and found what I was looking for. Since I’d always gone horizontal at North Lake to feature the arc of peaks framing the aspen-lined lake, this time I decided to emphasize the foreground rocks and reflection with a vertical composition. (I’ve since had great success with vertical frames at North Lake, but this is the one that really opened my eyes to the vertical possibilities here—see the image on the right from two years later.)
First I positioned myself so the line of small granite rocks formed a diagonal along the bottom half of the frame, enhancing the scene’s illusion of depth. Next, I lowered my camera (on a tripod, of course) to minimize the empty patch of lake between the rocks and reflection.
As much as I like my images to have uncluttered borders, in nature it’s often impossible to avoid cutting something off, or to prevent a small piece of an object outside the frame from jutting in (like a rock or branch). In this case, from my chosen location, including the foreground rocks I considered essential meant cutting off other rocks. When I run into these situations where a clean border is impossible, I at least need to make my border choice very deliberate. In this case, I took care to include all of the rocks at the bottom, but chose to cut the rocks on the left boldly, right down the middle, so they don’t look like an afterthought (or a never-thought).
As much as I liked the mountain, aspen, and sunset parts of the reflection, I found the reflection of the sky above the colorful clouds pretty dull. So I dialed my polarizer just enough to erase the bland part and reveal the (more interesting) submerged rocks near the lakeshore, taking care not to lose the best part of the reflection.
Of course, including the nearby rocks added another layer of complication: ensuring that everything, from the foreground rocks to the distant mountains, was sharp. Because every image has only one perfectly sharp plane of focus, in a scene like this, finding the right focus point and f-stop is essential.
Of the various techniques photographers apply to ensure proper focus, Hyperfocal focusing is the most reliable. Hyperfocal focusing determines the combination of focal length, f-stop, sensor size, and focus point that ensures the ideal position and depth of the frame’s zone of “acceptable” sharpness. Since identifying the precise hyperfocal point (the point of maximum depth of field) requires plugging variables into a chart (the old fashioned way) or smartphone app (the smart way), many photographers foolishly decide it’s not worth the effort. But, like most things that start out difficult, regularly applying hyperfocal focus technique soon reveals its underlying simplicity. (I rarely have to check my app anymore, usually relying instead on experience-based seat-of-the-pants hyperfocal focusing.)
Today, with my mirrorless cameras, I am able to precisely position my focus point using a magnified viewfinder view, and I completely trust my camera’s autofocus. But because the evening of this image was back in my DSLR days, when I never completely trusted autofocus when the margin for error was small, I know I manually focused it.
So where did I focus? Well, even though I no longer remember, I’d bet money that it was on first small rock beyond the trio of rocks at the bottom. I think that because, 1) that just seems like where I’d instinctively focus, and 2) my hyperfocal app tells me that the hyperfocal distance for this image’s settings (thank you EXIF data) was a little less than 3 feet, and that rock was about 3 feet away. Since close scrutiny at 100 percent confirms that the image is sharp from front to back, I’m pretty confident that’s where I focused.
The final piece of the puzzle was exposure. At the time I was shooting with a dynamic range limited (compared to my Sony Alpha cameras) Canon 1DSIII, so I’m pretty sure I used a 3-stop soft graduated neutral density filter to subdue the bright sky. (FYI, I no longer carry a GND.) This always requires a little extra work in Photoshop because I hate, hate, hate the GND transition’s darkening effect on the landscape immediately beneath the sky, which always requires a little dodging and burning to eliminate.
There really was a lot going on in this scene, and I’m pretty pleased that I was able to make everything work together. Of course that doesn’t always happen, but I find the more I’m able to consider every single thing in a scene, the happier I am with my results.
Workshop Schedule || Purchase Prints || Instagram
Image Building
Click any image to scroll through the gallery LARGE


, Yosemite")


A Peek Behind the Curtain
Posted on October 24, 2023

Aspen and Ferns, Bishop Creek Canyon, Eastern Sierra
Sony α1
Sony 16-35 f/2.8 GM
ISO 400
f/16
.8 seconds
A particular highlight of my annual Eastern Sierra photo workshop is our sunrise shoot at North Lake. Made famous as the default desktop image for macOS High Sierra, North Lake is a small lake in the shadow of snow-capped Eastern Sierra peaks, near the top of Bishop Creek Canyon a little west of Bishop. It’s encircled by aspen, and reflections in its sheltered bowl are quite common. More than once my groups have been fortunate enough to enjoy a light dusting of snow along the lakeshore.

Autumn Morning, North Lake, Eastern Sierra
Depending on the conditions, we’ll stay at North Lake for at least an hour—often longer. But the photography isn’t over when we do finally leave, because just down the mountain from the lake are some of my favorite Sierra fall color spots. In the two miles between North Lake and Lake Sabrina (Pro Tip: it’s pronounced with a long “i,” like China) at the top of the canyon, we can choose between mountain vistas, dense aspen groves, views of aspen lined Bishop Creek, and several small reflective ponds also accented by aspen.
The conditions determine our stops. When it’s cloudy (low contrast light), we can shoot anywhere for hours; when the sky is clear, the best photography is done before the sun arrives, forcing me to be a little more selective to get the most of our limited time.
This year, with few clouds and morning light rapidly descending the mountainsides, after North Lake I took my group to the deep shade at the canyon’s bottom, stopping first to photograph the gold and (a few) red aspen framing Bishop Creek, then moving a half-mile or so upstream for reflections in a couple of pools formed by wide spots in the creek. There’s so much to photograph at both of these locations that the group always scatters quickly—when that happens, I know we’ll enjoy a wonderful variety of images at the next workshop image review.
Always on the lookout for something new, familiar locations like Bishop Creek kick-in my natural urge to explore. But when I lead a workshop, I’m well aware that no one pays their hard earned money only to spend their days (and nights) following the leader to places he’s never been. So, despite the obvious beauty here, I’m usually content to simply step back and take it all in.
Nevertheless, I try not to let that inhibit my explorer’s mindset. As I walk about checking on my workshop students, or simply while taking in the surroundings, I often find myself silently asking, “I wonder what’s over there.” Though circumstances don’t usually allow me to actually find out on that visit, I mentally file the spot away for a time when no one depends on me. But every once in a while an opportunity to explore surprises me in the moment.
I knew the sun this morning would reach us at around 9:00 a.m., so around 8:30 I started making my way around to everyone to let them know that we had about 30 more quality minutes before we’ll head back down the mountain for breakfast. The creek here parallels the road, with all the standard photo spots between the road and the creek. While waiting for people to wrap up after I made my rounds, I thought I might have just enough time to find out what’s on the other side of the creek and crossed the bridge, where I found a barely discernible path into the woods.
This was just a quick reconnoissance mission, so my camera bag remained in the car. At first the path was so overgrown that in spots I had trouble following it, but after about 50 yards it opened into a sublime fern garden, walled by aspen and sprinkled with golden leaves. I knew instantly it was too small and fragile to bring a group to, but I also knew I had to photograph it. So I raced back to my car, grabbed my camera bag and tripod, and was back in business in just a few minutes.
I only had about 5 minutes to photograph, but that was enough to drop low, compose wide, meter and focus, and capture a half-dozen or so horizontal and vertical frames. The treetops were already getting washed out by the advancing sun, so I emphasized the foreground ferns with all my compositions, cutting off the sunlit parts of the aspen—an effect that creates the illusion of infinite depth in this relatively compact space.
When I first arrived back here, the dense forest on all sides made me feel completely isolated. But as I worked my scene, I became aware of people in my group laughing and chatting as they worked their own scenes, and realized that I was only a few feet from the creek. That got me thinking about all the intimate beauty underlying the larger scenes that first draw our attention. In this natural garden this morning, it felt as if I’d peeked behind a curtain and discovered an entirely new world.
This is a reminder to me that even the most in-your-face beauty is comprised of easily overlooked subtleties, and that no matter how beautiful the first thing you see in a scene, there’s always more there. The best photography doesn’t show us the world we already know, it pulls back a curtain to expand our understanding of the unseen world.
Workshop Schedule || Purchase Prints || Instagram
Off the Beaten Path
Click any image to scroll through the gallery LARGE


")


Nature’s Gifts: Reflections
Posted on January 2, 2023

Autumn on Ice, El Capitan Reflection, Yosemite
Sony α1
Sony 16 – 35 f/2.8 GM
1/4 second
F/18
ISO 100
Sometimes Nature delivers us something that’s so beautiful, it just has to be a gift. When we think of Nature’s gifts, it’s often in terms of locations, like Yosemite or Grand Canyon (gifts indeed!). But today I’m thinking about Nature’s transient beauty: the perfect arc and vivid colors of a rainbow, a brilliant crimson sunrise or sunset, or an aurora dancing among the stars (I could go on)—beauty that can simultaneously surprise and wow us.
Underrated on Nature’s list of gifts are reflections. Doubling the scene, reflections signal tranquility. And like a metaphor that engages the brain in ways different than we’re accustomed, a reflection is an indirect representation that can be more powerful than its literal double. Rather than allowing us to process the scene directly, a reflection challenges us to mentally reassemble its reverse world, and in the process perhaps see the scene a little differently.
Reflections can feel like a fortuitous gift that we just stumbled upon. But given that reflections are entirely beholden to the laws of physics, they’re far more predictable than many of the natural phenomena we photograph. Taking a little time to understand the nature of reflections and how they’re revealed by a camera enables photographers to anticipate their appearance and craft their relationship to the surrounding landscape in an image.
Without getting too far into the physics of light, it’s important to understand that every object we see (and photograph) that doesn’t generate its own light, comes to us courtesy of reflected light. In other words, what we call a reflection is in fact re-reflected light (reflected first from the object itself, then by the water).
For example, when sunlight strikes El Capitan in Yosemite, some of the sun’s photons bounce back into our eyes, and there it is. But other photons head off in different directions—some to be captured by different sets of eyes, while others land on the surface of the Merced River far below. A few of these photons penetrate the water, illuminating leaves and rocks on the submerged riverbed, while others carom off the water at the same angle at which they struck—only in the other direction, much the way a pool ball ricochets off the pool table’s cushion. When our eyes are in the path of these bounced photons, we see a reflection.
The recipe for a mirror reflection
Water reflections come in many forms, from a mirror-sharp inverted mountain peak glistening atop a still pool, to an abstract shuffle of color and texture on an undulating lake. Both have their place in creative photography.

Autumn Reflection, El Capitan and Three Brothers, Yosemite
The ideal recipe for a mirror reflection is pretty simple: still water, a sunlit subject that’s much brighter than the water’s surface (the greater the contrast the better), and a view angle that matches the angle at which the sunlight struck the water’s surface. And while a sunlit subject and shaded surface aren’t essential, the more photons striking the reflected subject, and the fewer non-reflected photons (ambient light) striking the reflective surface, the greater the contrast that helps the reflection stand out.
El Capitan Autumn Leaves, Yosemite: With El Capitan getting direct sunlight and the slow moving Merced River still shaded, I had the sharp reflection I hoped for. With just a little bit of searching, I positioned myself to include nearby floating autumn leaves.
Playing the angles
Just because you don’t see a reflection in the still water in front of you, doesn’t mean there’s no reflection—it just means you’re viewing from the wrong angle.
Understanding that reflected photons leave the water’s surface at the same angle at which they arrive—imagine the way a tennis player anticipates the ball’s bounce to get in position—allows us to position ourselves to photograph the reflection we want. For example, if the angle from your subject to the water is 40 degrees, its reflection will bounce off the water at 40 degrees in the other direction.

Sunset Palette, Half Dome from Sentinel Dome, Yosemite
To locate the reflection, set your camera aside and move up/down, backward/forward, and left/right until you see find it. Then bring your camera back in and position it exactly where your eyes were when you saw the reflection.
Half Dome from Sentinel Dome, Yosemite: One summer evening I found myself atop Sentinel Dome shortly after an intense rain shower had turned indentations in the granite into small, reflective pools. Seeing the potential for a spectacular sunset above Half Dome, I wanted to include the colorful clouds reflected in the pools. At eye-level the pools reflected nothing but empty sky, so I dropped my tripod almost to granite level until my lens found the angle that intercepted the red clouds just above Half Dome bouncing off the still water.
When the water’s in motion
As spectacular as a crisp, still water mirror reflection is, it’s easy to overlook the visual potential of a reflection that’s not crisp, and to forget your camera’s ability to render a soft or abstract reflection much better than your eyes view it.

Before the Sun, South Tufa, Mono Lake
While a crisp reflection can dominate an image, a splash of reflected color or shape can beautifully accent a striking primary subject. And a reflection that’s lost to the continuously varying angles of rippled or choppy water, magically appears as a soft outline when a long exposure smooths the water’s surface into a gauzy haze.
South Tufa, Mono Lake: In this sunrise image, all the ingredients were in place for a special reflection. Just as the color arrived, a light breeze stirred the lake’s surface with gentle undulations. I used a 6-stop neutral density filter to enable a multi-second exposure that completely smoothed the lake’s surface. While not a perfect mirror, the resulting reflection has a very pleasing soft, gauzy look.

Autumn Reflection, El Capitan, Yosemite
Where to focus
An often misunderstood aspect of reflection photography is where to focus. Though counterintuitive to some, the focus point of a reflection is the reflection’s subject, not the surface it reflects on. This isn’t a big deal when the focus point of everything of visual significance is infinity, but it’s a very big deal when you want both your distant subject’s reflection and the nearby rocks or leaves on or in the water surface to be sharp.
Photographing a distant subject reflecting in a pool of leaves requires the same hyperfocal depth of field approach you’d use for any other close-to-distant image: small aperture and a focus point slightly beyond the closest thing that needs to be sharp.
El Capitan Reflection, Yosemite: Photographing autumn leaves atop El Capitan’s reflection required impossible depth of field to capture sharpness throughout. Even though the leaves and reflection were just a few feet in front of me, focusing for a sharp reflection would have softened the leaves. To increase my depth of field, I stopped down to f/18 and focused toward the back of the closest group of leaves, then magnified the image on my LCD to verify that all of the leaves were sharp. Though El Capitan’s reflection is slightly soft, a soft reflection is almost always more forgivable than a soft foreground.
Polarizer

Reflection on the Rocks, Lake Wanaka, New Zealand
Put simply, a polarizer cuts reflections. Most photographers use a polarizer to darken the sky, and while that can be a nice effect, the polarizer’s value is far greater than that. More than to darken the sky, polarizers remove subtle reflective sheen that washes out color on foliage and rocks.
An underappreciated polarizer use is to erase a reflection to reveal submerged rocks, leaves, and texture. After photographing a reflection with no polarizer or polarization minimized (maximum reflection), rotate the polarizer to minimize the reflection (maximum polarization) and capture submerged features hidden by the reflection. You might be surprised by how different the two images are, and how much you like both versions.
Lake Wanaka, New Zealand: But a polarizer isn’t an all or nothing tool. When photographing the solitary willow tree in Lake Wanaka, I carefully watched the reflection in my viewfinder while rotating my polarizer, stopping when I reached a polarization midpoint that included some reflection, while still revealing the mosaic of stones just beneath the lake’s surface.
Rainbows
Rainbows are a very special kind of reflection that happens when light is refracted (separated into its colorful wavelengths) upon entering airborne water droplets. This refracted light reflects off the back of the droplet to create a rainbow.
Because the laws of physics apply to all reflections, we know that a rainbow would actually form a full, 42 degree circle if it didn’t encounter the horizon. The center of this circle is at the anti-solar point—the point exactly opposite the sun (with your back to the sun, imagine a line from the sun through the back of your head and exiting between your eyes). That means that your shadow will always point at the rainbow’s apex. And the lower the sun, the higher the apex will be. Read more about rainbows.

Rainbow Bridge, Colorado River, Grand Canyon
Double Rainbow, Colorado River, Grand Canyon: Understanding rainbow physics allowed me to anticipate a rainbow despite a black cloud blocking the sun and drenching everyone in my raft trip group. When I saw that the sun was about to pop out of the cloud and into a large patch of blue sky, I rallied my group and pointed to where the rainbow would appear. A few minutes later their skepticism turned to ecstasy when we all started capturing images of a double rainbow bridging the Grand Canyon.
Outside the box
Reflections also provide wonderful creative opportunities. An often overlooked opportunity is the potential found in reflections that aren’t mirror-like. And, in addition to the more conventional reflection composition that’s split somewhere near the middle to give more or less equal frame real estate to the subject and its reflection, some of the most creative reflection images concentrate entirely, or almost entirely, on the reflection.

Autumn on Ice, El Capitan Reflection, Yosemite
I found this El Capitan reflection at Cathedral Beach on the final afternoon of last month’s Yosemite Winter Moon photo workshop. After capturing a crisp, top-to-bottom El Capitan reflection, I repositioned myself to juxtapose much of El Capitan against the faceted veneer of ice topping the river. An added bonus of water still enough for ice to form was that it allowed drifting, recently fallen autumn leaves to settle and accumulate on the river-bottom here.
Finding the best spot combine the reflection, ice, and leaves in a single frame, I dropped low enough to get a sharp reflection El Capitan’s nose in the still, iceless water close to the shore. To ensure sharpness in the ice and the reflection (as well as the distant trees and El Capitan), I stopped down to f/18 and focused midway into the ice.
Almost all of the foreground was shaded, but with bright, direct sunlight brightening the clouds and El Capitan, this scene’s dynamic range was a real factor. But my reflection-centric composition eliminated the clouds brightest granite, making the exposure much easier. Finally, I tried multiple polarizer positions until I found the one with the best combination of reflection and submerged leaves.

Sunset Mirror, Yosemit
I was so focused on the other visual elements in this scene, I didn’t fully appreciate the bare trees across the river. But when I started processing the image and viewed it on my large monitor, I was pleased by how much they add to the wintry feel of this image.
Double your pleasure
Whether it’s a shimmering mirror, a gauzy haze of color and shape, or a colorful rainbow, reflections are a gift from Nature—camera or not. By doubling the beauty surrounding us, reflections have the power to elevate ordinary to beautiful, and beautiful to extraordinary.
For photographers, reflections provide boundless creative opportunities. When exploring outdoors with a camera, some reflections seem to jump out and grab us by the eyeballs, while others require a little more work. Either way, when properly conceived and executed, a reflection image possesses a visual synergy, conveying beauty that more than doubles the scene’s two halves.
Workshop Schedule || Purchase Prints || Instagram
El Capitan Reflections
Click any image to scroll through the gallery LARGE


, Yosemite")


Near, Middle, Far
Posted on December 5, 2022

El Capitan and Floating Autumn Leaves, Yosemite
Sony α1
Sony 16-35 f/2.8 GM
1/2 second
F/11
ISO 100
I’m in Yosemite for a workshop so my blogging time is significantly curtailed, but let’s see what happens…
Photography is the futile attempt to render a three dimensional world in a two dimensional medium. It’s “futile” because including actual depth in a photograph is literally impossible. But impossible doesn’t mean hopeless. One of the simplest things photographers can do to elevate their images is think about their scene in three dimensions, specifically how to create the illusion of depth by composing elements at multiple distances from the camera.
Many photographers miss opportunities by simply settling for the beautiful scene before them instead of looking for ways to make it even better. A more productive approach is to start with the beautiful aspect of the scene you want to emphasize (brilliant sunset, backlit flower, towering peak, vivid rainbow, plunging waterfall, whatever), then aggressively seek an object or objects nearer or farther to complement it. Of course that’s sometimes easier said than done, but this near/middle/far mindset should be present for every capture.
Thinking foreground and background is a great start, but merely having objects at varying distances isn’t always enough—you also need to be aware of how those objects guide your viewer’s eye through the frame. We hear a lot of photographers talk about using “leading lines” to move the eye, but a line doesn’t need to be a literal (visible) line to move the eye, because viewers will subconsciously connect objects to create virtual lines.
To help me achieve virtual lines that move the eye, I think in terms of “visual weight”: a quality of an object that tugs the eye like gravity, subconsciously pulling the viewer’s gaze in its direction. These qualities include, among other things: mass, shape, brightness, contrast, color, texture, and sometimes just position in the frame. A single one of these qualities can give an object visual weight, but combining then can be even more effective.
Additionally, an object’s emotional power can boost its visual weight. For example, a small moon can pull the eye more than a larger bright cloud, and Half Dome has more visual weight than a random rock occupying the same amount of frame real estate.
With my primary subject and complementary (eye moving) objects identified, I still need to consider the linear connection between these visual components. I like diagonal relationships because of the visual tension created by moving the eye along multiple planes. While creating these virtual diagonals requires careful positioning, it’s surprising how many photographers just remain planted with their tripod as if it has grown roots—either they don’t see the benefit of repositioning, or don’t think moving is worth the effort.
Whatever the reason, it’s important for photographers to understand the power of shifting position to control foreground and background relationships: move left and your foreground shifts right relative to the background; move right and the foreground shifts left relative to the background. Either way, the closer the foreground is relative to the background, the more dramatic the shift. And contrary to what you might believe, it’s impossible to change foreground/background perspective with focal length—to change perspective, you must change position: forward/backward, left/right, up/down.
An often overlooked shift that can be quite powerful is up/down. Often I’m able to un-merge objects at different distances by simply raising my tripod or climbing atop a nearby rock. Dropping low will emphasize the closest elements, and when my frame has a large and boring empty space (such as a field of weeds or dirt) between the foreground and background, I drop lower to shrink that gap.
It’s taken me a while to figure out the best way to convey these concepts to my photo workshop students. In most workshops, I find that many of the students haven’t picked up their cameras in weeks or months (or years!), so I’ve learned give them time to get back in their creative zone before laying all this stuff on them.
For example, in my Yosemite workshops I usually start with the classic shots that probably drew them to the park in the first place, places like Tunnel View and Valley View, where there are obvious compositions that lead to easy success. At the first image review I give a little talk on composition and moving the eye (among other things), then everyone shares images and I offer my feedback.
By the second day, armed with that foundation and a little Day 1 success, they’re usually ready to challenge their creativity and attack the less heralded spots whose beauty is more subtle. This growth is obvious as soon as the Day 2 image review. I’m frequently blown away by how quickly they’ve refined their inherent creative vision well enough to see beyond the obvious and find compositions that are both beautiful and unique.
One autumn favorite creative spot is the section of the Merced River from the Pohono Bridge upstream to Fern Spring, and even a little beyond. Fern Spring alone, with its stair-step cascades and a small reflecting pool that’s covered with color each fall, has enough to occupy a creative photographer for hours. And just across the road is a trail that skirts the river and traverses a forest filled with colorful maple and dogwood trees. The entire area is chock-full of creative opportunities that include whitewater, still water reflections, and of course (lots of) fall color.
In last month’s Fall Color and Reflections workshop, once I was satisfied that everyone was comfortable with their cameras and starting to trust their creative instincts, I took them to Fern Spring. Once there, I gave them the lay of the land and encouraged them to explore. Early in the workshop my groups tend to stick close to me, but this afternoon I was encouraged to see everyone instantly scatter. That’s always a good sign that they’re starting to get in the zone—even though it means I need to chase each one down to make sure they’re doing okay.
By the time I’d finished my rounds and confirmed that each person had things under control (and fearing that my presence might actually be a distraction), I was left with about 20 minutes to do a little shooting of my own. I quickly grabbed my camera and beelined upstream to a spot that I can’t take a group to because there’s no room for more than one person, no trail to get there, and it’s frighteningly easy to fall in the river. (I’ve had a couple of minor mishaps here that required changing shoes and socks, and maybe spending a couple of hours in pants wet to my calf, but was always grateful it wasn’t worse).
Rather than a standard fall color location, this is a fallen color spot that accumulates leaves that have drifted downstream from elsewhere to float among the rocks. Each year, the quality of the floating color varies from none to lots—not enough water and the leaves don’t make it into the rocks; too much water and the leaves just wash right by to locations downstream.
I was happy to confirm that this was indeed a good year for the floating color. Being in a hurry, I could have very easily snapped off a couple of frames from where I stood and called it good. But often the difference between an image that’s merely a decently executed rendering of a beautiful scene, and an image that stands out for the (often missed) aspects of the natural world it reveals, is the time it takes to identify and connect the scene’s visual relationships. So I took just a little more time to align the elements.
In this case that meant positioning myself so the foreground rocks and leaves aligned with the middle-ground rocks and reflection, which aligned with cloud-shrouded El Capitan in the background. Words cannot express how awkward this position was, requiring a grand total of 5 splayed legs—3 tripod and 2 human. But still it wasn’t quite right—until I dropped my tripod down to about a foot above the water to make the leaves more prominent.
After setting my exposure, I focused on the third small foreground rock, then dialed my polarizer to reduce the reflection on the leaves while retaining the upstream reflection. Click.
Near, Middle, Far
Click any image to scroll through the gallery LARGE


Secure Your Borders
Posted on November 28, 2022

Autumn Leaves on the Rocks, Valley View Reflection, Yosemite
Sony a7R IV
Sony 24-105 G
1/40 second
F/16
ISO 100
It’s easy to be overwhelmed at the first sight of a location you’ve longed to visit for years. And since by the time you make it there you’ve likely seen so many others’ images of the scene, it’s understandable that your perception of how the scene should be photographed might be fixed. But is that really the best way to photograph it?
Valley View in Yosemite is one of those hyper-familiar scenes. El Capitan, Bridalveil Fall, and Cathedral Rocks pretty much slap you in the face the instant you land at Valley View, making it easy to miss all the other great stuff here. This month’s workshop group visited Valley View twice, with each visit in completely different conditions, which got me thinking about about the number of ways there are to photograph most scenes, and how it’s easy to miss opportunities if you simply concentrate on the obvious. Most scenes, familiar or not, require scrutiny to determine where the best images are—on every visit.

Sunrise Reflection, El Capitan, Yosemite
On our first visit, Bridalveil Fall was just a trickle lost in deep shadow, so I focused my attention on El Capitan, opting for a vertical frame to emphasize El Cap, the beautiful clouds overhead, and the reflection. When we returned a couple of days later, Bridalveil had been recharged by a recent rain, the soft light was more even throughout the scene, and patches of fallen leaves and pine needles now floated atop the reflection. All this called for a completely different approach.
On this return visit, since I thought there was (just barely) enough water in Bridalveil to justify its inclusion, I went with a horizontal composition. It would have been easy to frame up El Capitan, Bridalveil, and Cathedral Rocks, throw in a little reflection and call it good. But (as my workshop students will confirm) I obsess about clean borders because I think they’re the easiest place for distractions to hide.
So before every click, I do a little “border patrol,” a simple reminder to deal with small distractions on my frame’s perimeter that can have a disproportionately large impact on the entire image. (I’d love to say that I coined the term in this context, but I think I got it from fellow photographer and friend Brenda Tharp—not sure where Brenda picked it up.)
To understand the importance of securing your borders, it’s important to understand that our goal as photographers is to create an image that not only invites viewers to enter, but also persuades them to stay. And the surest way to keep viewers in your image is to help them forget the world outside the frame. Lots of factors go into crafting an inviting, persuasive image—things like compositional balance, visual motion, and relationships are all essential (and topics for another day), but nothing reminds a viewer of the world outside the frame more than an object jutting in or cut off at the edge.
When an object juts in on the edge of a frame, it often feels like part of a different scene is photobombing the image. Likewise, when an object is cut off on the edge of the frame, it can feel like part of the scene is missing. Either way, it’s a subconscious and often jarring reminder of the world beyond the frame. Not only does this “rule” apply to obvious terrestrial objects like rocks and branches, it applies equally to clouds.
And there are other potential problems on the edge of an image. Simply having something with lots of visual weight—an object with enough bulk, brightness, contrast, or anything else that pulls the eye—on the edge of the frame can throw off the balance and compete with the primary subject for the viewer’s attention.
Of course it’s often (usually?) impossible to avoid cutting something off on the edge of the frame, so the next best thing is to cut it boldly rather than to simply trim it. I find that when I do this, it feels intentional and less like a mistake that I simply missed. And often, these strongly cut border objects serve as framing elements that hold the eye in the frame.
To avoid these distractions, I remind myself of “border patrol” and slowly run my eyes around the perimeter of the frame. Sometimes border patrol is easy—a simple scene with just a small handful of objects to organize, all conveniently grouped toward the center, usually requires minimal border management. But more often than not we’re dealing with complex scenes containing multiple objects scattered throughout and beyond the frame. Even when you can’t avoid cutting things off, border patrol makes those choices conscious instead of random, which is almost aways better.
As nice as the Valley View reflection was on this visit, it was sharing space with a disorganized mess of rocks, driftwood, and leaves. Organizing it all into something coherent was impossible, but I at least wanted to have prominent color in my foreground and take care to avoid objects on the edge of my frame that would pull viewers’ eyes away from the scene.
Unfortunately, as I used to tell my kids all the time (they’re grown and no longer listen to me), you can’t always have what you want. In this case, including the best foreground color also meant including an unsightly jumble of wood, rock, and pine needles in the lower right corner. But after trying a lot of different things, I decided this was the best solution—especially since I managed to find a position and focal length that gave me completely clean borders everywhere else in my frame.
I very consciously included enough of the mass in the lower right that it became something of a boundary for that corner of the image (not great, but the best solution possible). I also was very careful to keep an eye on the ever-changing clouds. The light on El Capitan that broke through just as I had my composition worked out felt like a small gift.
Workshop Schedule || Purchase Prints || Instagram
Valley View Variety


