Eloquent Images by Gary Hart
Insight, information, and inspiration for the inquisitive nature photographer
Going Out a Winner
Posted on January 17, 2026
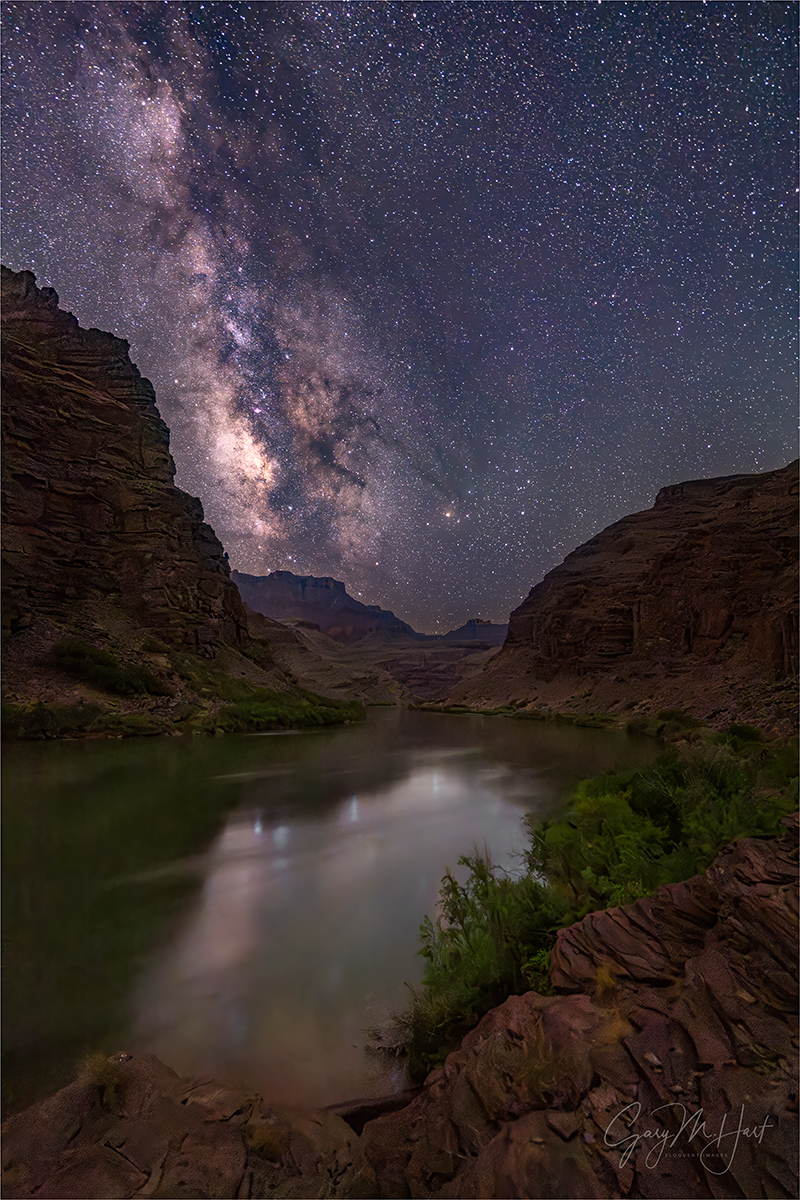
Milky Way Reflection, Colorado River, Grand Canyon
Sony α1
Sony 14mm f/1.8 GM
ISO 6400
f/1.8
20 seconds
There was nothing easy about this picture. Milky Way photography in general is a challenge, but trying it at the bottom of Grand Canyon is especially harrowing. In addition to the standard Milky Way photography difficulties, like insufficient light essential for composition and focus, any kind of night photography at the bottom of a mile-deep hole adds another level of dark.
In this extreme darkness, some locations are worse than others, and navigating to this one in particular was difficult enough to put it on the fringe of my safety comfort zone. Not only did getting here require a longer than usual walk on uneven and sometimes trailless (is that a word?) terrain, the last section was along a series of narrow ledges where a single misstep might result in a sudden plunge into the Colorado River. Oh, and as if all that wasn’t enough to test me, on the entire walk out here this night, I couldn’t push down the thought that the name of this particular camp is Rattlesnake.
But I was especially motivated to make this shoot work, because…
I knew before the trip started that this, my tenth Grand Canyon raft trip, would be my last one. Rafting Grand Canyon had been a bucket-list item for as long as I could remember, but when I scheduled my first trip way back in 2014, I had no plan to continue once it was it off my list. But, for many reasons, that initial experience so far exceeded expectations, I vowed to continue doing it until people stopped showing up. Fast forward nine more trips: turns out, I’m the person who will stop showing up…
Let me explain. The trip still fills, but not nearly as quickly as it did those first few years, when I already had a waiting list for the next year before the current year’s trip even pushed off. And with costs rising faster than I’ve been able increase the price (see slowing enrollment reference in the previous sentence), and understanding that I’m on the financial hook for a full trip whether or not it fills, somehow my Grand Canyon raft trip had become the most stress-inducing offering on my schedule. So, while I still love the whole rafting experience as much as ever, when I decided to pare a few workshops from that schedule, it seemed like ten (!) Grand Canyon raft trips was a nice round number to go out on.
But I will miss it. Between the sights, the rapids, the guides, and the fantastic people I got to share it all with, it’s pretty difficult to single out one thing I’ll miss most about rafting Grand Canyon. But hold a gun to my head, and I’d have to say it will be the night sky filled with more stars than I’ve ever seen, and so dark the Milky Way actually casts a shadow.
As desperately as I craved a good Milky Way experience (and when I say Milky Way, I refer specifically to our galactic core) on this farewell trip, I always go in knowing that, for many reasons, Milky Way success is far from a sure thing. Even though it’s always a priority, before this one, I’d had trips that had two nice Milky Way shoots, one nice Milky way shoot, and zero nice Milky Way shoots.
First obstacle is that, despite Grand Canyon’s typically clear skies, clouds do happen—I had two trips with so many clouds we never even saw the Milky Way. But even when the sky is clear every night, we still need a little luck to even see the galactic center because, from most campsites, the Colorado River’s general east/west orientation through the canyon puts views of the southern horizon (where the Milky Way hovers in May) behind the looming south wall. It helps that over the years I’ve been able to identify a handful of campsites that are either on the north/south trending Marble Canyon section of the canyon (where we spend our first two nights), or (more rarely) on a south-facing bend in the river. But they’re few and far between.
Since all Colorado River campsites in Grand Canyon are first-come, first-served, my trips can never count on getting one with a Milky Way view. And the Colorado River is unforgivingly one-way—if your first choice campsite is taken, there’s no way to return to that wide open second choice campsite you passed two miles back. This fact sometimes forces us to settle for whatever campsite is available. And with a schedule to maintain, even coming upon an empty ideally oriented campsite is of no value if we’re floating past it at 11 a.m. because we don’t have enough wiggle room in our schedule to lose a half day of rafting.
With all this in mind, at the start of each trip I powwow with the guides to explain (emphasize) my Milky Way and other photography priorities (for example, if it’s sunny, there are several key locations I only want to photograph in the full shade of early morning or late afternoon). We come up with the framework of a plan that by Day-2 is usually out the window, or at least is significantly renegotiated, as things invariably don’t go exactly as planned. And each plan change factors in downstream Milky Way possibilities.
The first thing I do after arriving at a new camp is check its Milky Way opportunities—specifically, I identify south and whether it’s behind a canyon wall (bad), or between the two walls (good). But even an open southern exposure isn’t enough—I know of at least one campsite with a great view of the southern sky, but it’s so overgrown along the river that all we get for a foreground is a bunch of scruffy shrubs. And my groups have also had several campsites where the only place to park the boats is smack in the middle of the only open view of the southern sky. So all the tumblers need to click into place for the Milky Way to work at the bottom of Grand Canyon.
If I determine that tonight’s campsite does have a good view of the Milky Way, at some point (usually at dinner) I give group the night’s Milky Way plan: where it will appear, when it will appear, and the best place to photograph it. I also give a basic Milky Way photography primer (focus, composition, and exposure tips), lecture them about the damage flashlights will do to everyone’s shots (especially red lights!), then make myself available for the inevitable, “Which lens…?,” “How do I get my camera to do…?” questions. By bedtime, most people who hope to photograph the Milky Way are ready (-ish). And of course they know where I’ll be set up if they have problems (but they’ll need to come me, because it’s too dark to safely move around to everyone).
All of my Grand Canyon night shoots are no-host: I tell people where I’ll be and roughly when I’ll be there. In May the earliest the Milky Way rises into view is around 1:30, but to avoid disturbing people who value their sleep more than I do, I never set an alarm because that might disturb those nearby who would rather sleep. Fortunately, I have no problem waking myself up at a specific time, give or take 15 minutes.
There are six nights on this trip. The way the trip usually unfolds, our best chances for the Milky Way are the first two nights, and (if we’re very lucky) the fourth night. On our first night of this trip, we ended up at a spot beneath a wall that blocked the lower half of the Milky Way, but the few of us went for it and did okay—but I knew we could do much better.
Not wanting to hang all our hopes on getting the very nice but difficult to secure campsite on night four, I felt very motivated to make the second night work. But as the afternoon wore on and we continued to encounter good campsites that were already taken, we just floated on. And there comes a point where you just have to take whatever is available so we can start the business of setting up camp and making dinner before it gets too dark. Which is why the guides were actually relieved as we floated up to Rattlesnake camp and found it open, Milky Way be damned. The first thing I did when we landed was pull out my phone and check the compass to find south, and as feared, the S-needle pointed right at a towering wall. Oh well…
But after setting up my campsite, I got my (iPhone) compass out and went exploring. My eye was on a bend in the river a few hundred yards downstream, and I wondered if it might bend far enough to the south to provide a view to the southern sky, and whether it was even possible to get down that far.
As I moved downstream, the route along the river got rockier, eventually turning into a series of sandstone ledges with a steep drop straight to the water. Each time it looked like I couldn’t go any farther downstream, I found a I found a route that got me a little farther. I was at least a quarter mile downstream before reaching a spot where I could go no farther without climbing. (A quarter mile doesn’t sound very far, but in total darkness and without a trail, it feels like forever.) Looking downstream, I saw that this vantage point still didn’t face due south as I’d hoped, but it did provide a clear view southwest. Hmmm—not ideal, but… maybe?
Checking (and re-checking) my astronomy app, I guessed (crossed my fingers) that we might have about a 45-minute window from the time the Milky Way rotated out from behind the canyon wall, until the sky started to brighten enough that we’d start losing essential contrast. And the longer I took in the entire view, the more I liked the river scene we’d be able to put with the Milky Way. If it worked.
Walking back, I took special note of the route, identifying distinctive rocks and shrubs I might be able to use as landmarks in the dark. At camp, I told my group what I’d found, and that the window of opportunity is very small (even the slightest miscalculation on my part could make a difference). I also warned the that the route out there, while only slightly treacherous in daylight, would be exponentially more-so in virtually total darkness. I also told them I’d be going for it. I finished by encouraging anyone even considering going out there in the dark to scout it and make a route plan now.
Before crawling into my sleeping bag, I got my camera and lens combo set up on my tripod and stood it next to my cot. The last thing I did before closing my eyes was set my mental alarm clock for 3 a.m.
I woke up a little before 3:00, grabbed my tripod, and made my way out. Because other people might be either shooting or sleeping, I try not to use any kind of flashlight or headlamp when walking around at night, but using only my cell phone screen to illuminate my next step, I didn’t really have much trouble finding the way, one step (as far as I could see) at time until I was there.
I was surprised and pleased to see how many people were already out there—on this trip I have a lot of non-photographers who join photographer friends and loved-ones, but I’d guess close to a third of the group was there already, and a few more joined shortly after I arrived. With no light, I poked around on the sandstone until my eyes to completely adjusted, and eventually edged my way out to the farthest ledge. Then I went to work.
I did my usual vertical (first) and horizontal composition mix, trying different ISO and shutter speed settings to give myself more processing options. I also moved around a little, eventually photographing from three different positions within about a 30-foot radius. From my first frame to my last was only 25 minutes, but by the time I’d finished, I knew I’d had a Milky Way success I so wanted on my final trip.


Channeling the Donner Party
Posted on July 18, 2024

Star Spangled Night, Milky Way and Tasman Lake, New Zealand
Sony a7R V
Sony 14mm f/1.8 GM
ISO 4000
f/1.8
20 seconds
Landscape photographers know suffering. With no control over the weather and light, we’re often forced to sacrifice comfort, sometimes even safety, in pursuit of our subjects. Cold, exhaustion, sleep deprivation, hunger—it all goes with the territory. But in the long run the successes, though never guaranteed, far outweigh the sacrifices.
So, when my wife and I scaled the short but steep trail (336 stairs—I counted) to the Tasman Lake overlook in New Zealand earlier this month, we knew it would be cold, and found out quickly that the route was treacherously icy as well. But we persevered and were rewarded with a lake view beneath the southern night sky that was almost beyond comprehension for our Northern Hemisphere brains.
Did I mention the cold? When I’m taking pictures, though I’m very much aware of the temperature, no matter how extreme, it never bothers me. For anyone with me who isn’t shooting? Not so much. But Sonya braved the frigid temps for 30 minutes—long enough to appreciate the majesty of the moment, and for me to get some nice pictures. Mission accomplished.
One of the things about planning a photo shoot in difficult conditions is anticipation and planning—not just for the shoot itself, but for all the other factors supporting it. In addition to the knowledge that the Milky Way would indeed be shining above the lake, and the moon wouldn’t be present to wash out the essential darkness, we also anticipated the possibility of an icy trail and carried a pair of Yaktrax for improved footing, made sure our lights were in working order, and had all the appropriate cold weather gear. And knowing that afternoon that we’d be driving into Aoraki / Mt. Cook National Park and possibly staying well past dark, I had the foresight (patting myself on the back) to check into our hotel in Twizel and make arrangements for dinner before embarking on our adventure.
Calling Twizel a sleepy town would be an understatement. Because our hotel locks the registration area and sends the staff home at 8:00 p.m., and most restaurants in town also close their doors at 8:00, at hotel check-in I inquired about a place in town to eat after 8:00. The woman at the front desk sent us to (raved about, in fact) a restaurant nearby. But not wanting to take her word that it would be open after 8:00, we drove over to talk to someone at the restaurant in person. When I explained to Carol, the nice lady who greeted us at the restaurant, that I wasn’t sure what time we’d be there, she said she’d just put us down for between 8:00 and 9:00. Great!
We were already getting hungry by the time we drove into the park and started our hike, but sucked it up like good photographers (well one of us at least—the other just sucked it up like a good human with a crazy partner). After our successful ascent and stay at the top, our prime emphasis on the descent was not falling on our butts, but rattling around the back of our minds was our extreme cold and hunger, and (especially) the relief waiting for us back in Twizel.
Back in town we beelined to the restaurant. Having checked the menu in advance, our mouths already watered in anticipation. It was still relatively full, but everyone was in the bar area watching the All Blacks vs. England rugby game (rugby is a religion in New Zealand, and the All Blacks are the deity of choice). There was no sign of Carol, any hostess or server, so I approached the bar and told the bartender we have a dinner reservation. He just stared at me like I’d asked where I could park my camel, finally saying with an implicit duh, “We stopped serving dinner at 8:00.” Dropping Carol’s name was met with a blank stare and a shrug. When I asked where else we might find dinner after 8:00 p.m., he just chuckled and said, “This is Twizel.”
By now it was after 8:45 and very clear that pleading with the bartender would be a waste of time, so we zipped over to town centre hoping to find something open. The only place with any sign of life was the local pub, so we parked and rushed in. Everyone here was watching the rugby game too, and try as we might, we couldn’t get enough of anyone’s attention to ask about dinner. Fortunately (or so it seemed), about then the game ended (All Blacks 16 — England 15) and the rugby zombies snapped out of their trances.
At least this time when we asked about dinner we got a little sympathy, but still no dinner. Walking back out into the cold and suddenly desperate, we remembered a gas station as we entered town—maybe we could at least find snacks there? Then we noticed a liquor store next door to the pub, a potential snack oasis in a frozen desert? Not so much. As we approached the entrance, a woman came out the front door and told us they’d just closed.
Turns out the gas station was fully automated, with no minimart, unlike pretty much every gas station in the US. So we limped back to the hotel, hoping maybe to find vending machines that would sustain us until breakfast. But with the lobby area locked tight, we had to enter through a side door that only provided access to the rooms, but none of the hotel’s other (meager) amenities.
By then we were so hungry we’d temporarily forgotten how cold we were. That is, until we turned the key in our door and walked into what surely must be a cryogenic chamber with beds. We were already accustomed to the unheated hotel hallways with temperatures that rival the temps outside (you can see your breath in a New Zealand hotel hallway in winter), but this was an entirely new level of cold. Before doing anything else, I went searching for the heater and finally found mounted to the wall a box with vents and a couple of knobs, about the size of a toaster. Surely this couldn’t be the heater?
It was in fact the heater. A heater, it turns out, that also doubles as a white noise machine. Genius! So we cranked it, keeping our outdoor clothes on while unpacking and rummaging for scraps of food in our luggage. Eventually Sonya struck pay dirt, excavating two pieces of hard candy from the bottom of her purse—dinner!
By 10:00 p.m. it had become pretty clear that the heater, despite achieving impressive decibel levels, was never going to generate enough warmth to make the room comfortable, and decided our best defense would be bed. While this did nothing for the hunger, perhaps sleep would mitigate our discomfort.
It’s amazing what being awake in a dark room does to the mind. Freezing cold, starving (okay, perhaps a bit of hyperbole but you get the idea), my thoughts kept drifting to the Donner Party. I discovered new empathy in their plight, but only the knowledge that Sonya is mostly vegetarian and doesn’t eat red meat allowed me to eventually drift off to sleep with both eyes closed.
Somehow, we survived the night.
(I should add that this is the only bad hotel experience I’ve ever had in New Zealand. Despite the chilly hallways, and bafflingly flaccid bacon, I truly love the hotels there.)
A few words about this image
In my prior blog post I shared the details of this night above Tasman Lake. But before checking out, I’d like to add a thought or two.
Most of my Milky Way shoots skew heavily to a vertical orientation that maximizes the amount of Milky Way in my frame. Between the wall of peaks stretching northward, and the Magellanic Clouds high in the southern sky, if ever a scene were to break me of this habit, it’s this view of Tasman Lake.

New Zealand Night, Milky Way Over Tasman Lake
So this night I made a conscious effort to emphasize horizontal orientation, and the image I shared last week reflects that choice. But I’ve learned to never leave a beautiful scene, night or day, without giving myself both horizontal and vertical options.
Sometimes as soon as I reorient and put my eye to the viewfinder I’ll see something I missed; other times, it’s not until further scrutiny with the benefit of my large monitor at home, that I’m surprised to find I actually prefer the less obvious orientation.
So, despite my plan to emphasize horizontal frames this evening, I made sure I didn’t leave without some verticals as well. In this case, since I’ve photographed here before, I didn’t find anything especially surprising. But I did try something new, entirely ignoring the lakeshore and small pool on the rocks directly beneath me, including only enough lake to feature a couple of icebergs. This minimal foreground allowed the maximum Milky Way. (Which, at 14mm, turned out to be quite a bit of Milky Way.)
And as I’ve said before, the color of the lake in this image is real, though at night there isn’t enough light to see it. This ability to reveal realities lost to human vision is probably my favorite thing about photography.
Join Don Smith and me for next year’s New Zealand adventure
Workshop Schedule || Purchase Prints || Instagram
The Joy of Suffering
Click any image to scroll through the gallery LARGE


New Zealand After Dark
Posted on June 19, 2024

Dark Night, Milky Way and Tasman Lake, New Zealand
Sony a7S II
Sony 12 – 24 f/4 G
ISO 10,000
f/4
30 seconds
This week I have New Zealand on my mind. In preparation for the New Zealand Winter photo workshop that begins next week, I started going through unprocessed images from prior New Zealand visits. I was actually looking for something else when I stumbled upon this Milky Way image from the 2019 trip, when Don Smith and I guided a group of Sony influencers around the South Island. I’d already processed a virtually identical composition of this scene back then, but since my Milky Way processing has evolved (improved), I decided to give it another shot.
Day or night, I love this Tasman Lake scene in particular because it so beautifully captures what I love most about New Zealand. We only do this workshop in winter, which of course leads to the inevitable question: “Why?” The simple answer is that the modest sprinkling of tourists, consistently interesting skies, and snowy peaks I love so much, are only possible in winter. I could go on and on with my answer, but since a picture is worth a thousand words, I’ll just save you some time and give you six-thousand words worth of examples. (You’re welcome.)


But even once I convince skeptics that winter in New Zealand is in fact quite beautiful, I’m usually hit with a follow-up: “But isn’t it cold?” Sure it’s cold, but by most people’s expectations of winter, New Zealand’s South Island is actually quite mild—with average highs in the 40s and 50s, and lows in the 30s, it’s similar to winter in Northern California and Oregon. I would venture that there’s not a single person reading this who doesn’t already have in their closet enough winter warmth to ensure cozy comfort in a New Zealand winter. Also like Northern California and Oregon, in winter New Zealand’s South Island gets rain and fog in the lowlands, and snow in the mountains, conditions I find so much better for photography (and for just plain being outside) than the sweltering blank-sky California summers I left back home.
All that said, for me the strongest argument for winter in New Zealand is Southern Hemisphere’s night sky. Inherently pristine air and minimal light pollution makes New Zealand is an astrophotographer’s paradise any season. But winter is when the Milky Way’s brilliant core shines in the east after sunset, already much higher above the horizon than my Northern Hemisphere eyes are accustomed to. The galactic core remains visible all night, ascending further and slowly rotating westward, before finally fading on the other side of the sky in the pre-sunrise twilight. That means more than 12 hours of quality Milky Way time, and the ability to place it above landscapes facing east, north, or west, by simply choosing the time of night you photograph it. And joining the celestial show are the Large and Small Magellanic Clouds—satellite galaxies of our Milky Way, only visible in the Southern Hemisphere.
Benefiting from our years of experience on the South Island, Don and I have identified many very nice locations for photographing the Milky Way, but our two favorites feature the galactic core above glacial lakes that are bounded by snowy peaks. One of these is on the shore Lake Wakatipu near Queenstown; the other is a vista above Tasman Lake in Mt. Cook / Aoraki National Park. This week’s image, from the 2019 trip, is of the Tasman Lake scene.
From the very first time my eyes feasted on it, I marveled at what a spectacular place the Tasman Lake view would be to photograph the Milky Way. In 2019, Don and I were especially pleased to be guiding this group of young photographers who were as excited about photographing the Milky Way as we were, so this shoot was in our plan since before the workshop started.
The sky this evening was crystal clear, but as the sky darkened, I found myself still down at the foot of the lake (just out of the frame on the far right), where I’d photographed sunset with most of the group. The majority decided to stay put for the Milky Way shoot, and while I couldn’t deny that this spot would likely be no less spectacular, I couldn’t pass the opportunity at the elevated lake view that had been on my radar for so long. I also thought the Milky Way would align better with the most prominent peaks from this vantage point. So I scrambled back up the boulders to the trail and race-walked more than a mile, then scaled more than 300 stairs in near darkness, to get in position.
I expected to find the few who weren’t down at the lakeside sunset spot (this group always scattered) would already be up here, but I arrived to find the view empty. While I was happy to eventually have the company of a couple of others, the utter solitude I enjoyed for the first 30 minutes felt downright spiritual.
Going with my dedicated night camera, the Sony a7S II, I started with my default night lens at the time, the Sony 24mm f/1.4. But the scene was so expansive, I quickly switched to my Sony 16-35 f/2.8 GM for a wider view. While that did the job for a while, it wasn’t long before I found myself wanting an even bigger view, so I reached for my Sony 12-24 f/4 G lens. Because light capture is the single most important factor in a Milky Way image, in general I find f/4 too slow. (Today I’d use my 14mm f/1.8 or 12-24 f/2.8, but back then those lenses were still at least a year away.) But really wanting the widest possible view, I rationalized that since the a7S II can handle 10,000 ISO without any problem, and the star motion of a 30-second exposure at 12mm would be minimal, and just went for it. Mitigating the f/4 exposure problems was the fact that the best parts of the scene’s foreground, the snow and water, were highly reflective, while the dark rock wasn’t really essential to the scene.
The result as processed in 2019, while noisier than ideal, was still usable. But as time passes, I’ve become less and less thrilled with many of my old Milky Way processing choices—that image was no exception. Since I’ve been pretty thrilled with the results reprocessing old Milky Way images with Lightroom’s latest noise reduction tool, I thought this might be a great time to reprocess this old scene to see if I could do it better.


For no reason in particular, I chose different image to process, but the compositions are nearly identical. As expected, the new Lightroom noise reduction did a much better job minimizing the inevitable noise that comes at 10,000 ISO, so I was already ahead of the game. The only other major processing improvement I made was the color of the sky, which, as my night sky processing evolves, I’m making much less blue.
Because no one knows what color the night sky supposed to be when given the amount of exposure necessary bring out foreground detail, I’ve always believed that the color of the sky in a Milky Way image is the photographer’s creative choice. I mean, scientists might be able to tell you what color it should be (there’s a very strong case for green), but to me the bottom line is image credibility (and green just won’t do it).
Whatever night sky color I’ve ended up with has entirely a function of the color temperature I choose when I process my raw file in Lightroom—no artificially changing the hue, saturation, or in any other way plugging in some artificial color. Since I do think the foreground (non-sky) of a night image looks more night-like (I don’t want a night image that looks like daylight with stars) with the bluish tint I get when the color temperature is cooled to somewhere in the 3000-4000 degrees range (photographers will know what I’m talking about—non-photographers will just need to take my word), for years I cooled the entire image that way—hence the blue night skies. But Lightroom now makes it super easy to process the sky and foreground separately and seamlessly, so I no longer cool my night skies nearly as much as before (or at all). Now my night skies tend to be much closer to black, trending almost imperceptibly to the purple side of blue (avoiding the cyan side).
Oh, and the color of Tasman Lake you see in this image is real, I swear—the color of the South Island’s glacial lakes is another reason to love this country, but that’s a story for another day.
Workshop Schedule || Purchase Prints || Instagram
This year’s New Zealand workshop is full, but Don and I will do it again next year.
New Zealand After Dark


A Dose of Perspective
Posted on December 6, 2023

Celestial Reflection, Milky Way Over the Colorado River, Grand Canyon
Sony a7SIII
Sony 20mm f/1.8 G
ISO 12800
f/1.8
30 seconds
Nothing in my life delivers a more potent dose of perspective than viewing the world from the bottom of the Grand Canyon. Days are spent at the mercy of the Colorado River, alternately drifting and hurtling beneath mile-high rock layers that reveal more than a billion years of Earth story. And when the sun goes down, the ceiling transforms into a cosmological light show, each stellar pinpoint representing a different instant in our galaxy’s past.
I’ve done this raft trip eight times now—long enough to know that when I stop doing it, the night sky is what I’ll miss most. To ensure the darkest skies (and the most stars), each trip is timed around the lunar minimum when the moon’s only appearance is a thin crescent is shortly before sunrise or after sunset. For most of my rafters, these are the darkest skies they’ll ever see—so dark that the Milky Way actually casts a faint shadow.
While cloudless nights down here always deliver a seemingly impossible display of stars, viewing the glowing core of our Milky Way galaxy is never assured. In the Northern Hemisphere, even when the galactic core reaches its highest point, it’s still relatively low in the southern sky. So, given the Grand Canyon’s general east/west orientation (high walls north and south), the best Milky Way views are usually blocked by the canyon’s towering walls. But these trips spend the first two nights in the north/south-trending Marble Canyon stretch of Grand Canyon, where we can enjoy open views of the north and south sky. And even after the canyon’s westward bend just downstream from the Little Colorado River confluence, a few fortuitous twists in the river open more nice southern views.
Campsites along the Colorado River are all first-come, first-served—if you set your sights on a Milky Way spot and arrive to find it occupied, there’s no option but to continue downstream. Over the years my (incomparable) guides and I have become pretty adept at identifying and (equally important) securing the best sites for Milky Way views—if the weather cooperates, we always score one or (usually) more quality Milky Way shoots.
One more Grand Canyon Milky Way obstacle I should mention is that even in the most favorable locations, the galactic core doesn’t rotate into the slot between the canyon walls until around 1:00 or 2:00 in the morning. Often rafters go to bed with every intention of rising to photograph it, but when the time comes to rise and shoot, their resolve has burrowed somewhere deep in the cozy folds of their sleeping bags. The best antidote for this is willpower, bolstered by bedtime preparation. To assist my rafters, I prescribe at the very least:
- Pick your campsite strategically, with the Milky Way in mind. (The first thing I do when we land is let everyone know where the Milky Way will appear.) That means either setting up your cot or tent with a good view of the southern sky, or at a place with easy access (in pitch darkness) to your desired shooting spot.
- Before going to bed, identify your composition, set up your camera, lens, and tripod, set your exposure (a relative constant that I’m able to help with), and focus at infinity.
- Have your camera ready atop the tripod and beside your cot (or outside your tent) when you go to bed. Some people just wake and shoot from their campsite (sometimes not even leaving their cot), but I usually prefer walking down to the river for the best possible foreground.
- Better still, if it can be done without risk of someone stumbling over it in the dark, leave the camera composed and focused at your predetermined shooting spot. But if this spot happens to be beside the river, check with the guides because the river level fluctuates on a known schedule (based on releases from Glen Canyon Dam timed for peak flow during peak electricity demand, and distance downstream).
I’ve learned that it isn’t practical to plan a group shoot for the wee hours of the morning, so I let people know when I plan to be up and where I’ll be, then let them decide whether to join me, choose their own time or place, or just stay in bed.
Regardless of the night’s Milky Way plan, I always forego the available but optional tent in favor of the unrivaled celestial ceiling. At home I’m a read-until-the-book-drops-to-my-chest guy, but down here I just lie flat on my back with my eyes locked heavenward, scanning for meteors, constellations, and satellites until my eyelids fail me. Here’s a sample of the mind-boggling thoughts that crowd my mind as I gaze:
- The light from every single pinpoint up there was created at a different time, and took many, sometimes thousands of, years to reach us—I really am peering back into the past.
- That streaking meteor was no larger than a pea and had probably been drifting around the solar system for millions, or billions, of years.
- Many of these stars host planets capable of hosting life.
- Our Milky Way galaxy is home to 10 times as many stars as there are people on Earth.
- For each star in the Milky Way, there are at least 20, and possibly as many as 200, galaxies in the Universe—many with trillions of stars.
Mind sufficiently boggled, I’ll eventually drift off to sleep (resistance is futile), but am fortunate that I don’t usually need to set an alarm to wake up—at bedtime I just tell myself what time I want to be up and trust my body’s clock. Then I psych myself into getting up by thinking I’m just going to fire off a dozen or so frames and then go back to bed. Of course I usually end up staying out much longer—always when there are others up and needing help, but often just because once I’m awake, the sky is just too beautiful to go back to sleep.
Rising for the galactic core’s arrival gives a good two or three hours of quality Milky Way time before the sky starts to brighten noticeably in the camera, sometime around 4:00 a.m. (the eyes don’t see the brightening for another half hour or so). I use all that dark time to work on a variety of compositions and exposure settings, sometimes moving around, but often staying put and just letting the Milky Way do the moving across the scene, from one side of the canyon to the other.
Since the “star” of the Grand Canyon night images is the sky, and vertical orientation gives me more of the vertically oriented Milky Way framed by the canyon’s vertical walls, my initial compositions are usually vertical. But the longer I do this, the more I’ve tried to lean into horizontal compositions as well, giving the canyon walls billing equal to the Milky Way.
Today I’m sharing a newly processed image from my 2021 raft trip—you can read the story of this night, and see a vertical version of the scene, here. This spot has become one of my favorite campsites because of the way, when the flow is just right, the water here spreads and pools at an extreme bend in the river. The reflection this night was spectacular, probably the best I’ve ever seen here, and (needless to say) I got very little sleep.
FYI
This image (like all of my images) is a single click (no compositing of multiple frames) with no artificial light added (no light painting or any other light besides stars and skylight). I was using my 20mm f/1.8 lens, which was wide enough, but I sure wish I’d have had the 14mm f/1.8 that was on order but didn’t arrive on time.
I had to skip the 2023 Grand Canyon raft trip, but am excited to be returning in May of 2024—and I just scheduled my 2025 trip.
Milky Way Favorites (one click—no blending)
Click any image to scroll through the gallery LARGE


That Time Elon Musk Photobombed My Workshop…
Posted on August 15, 2023
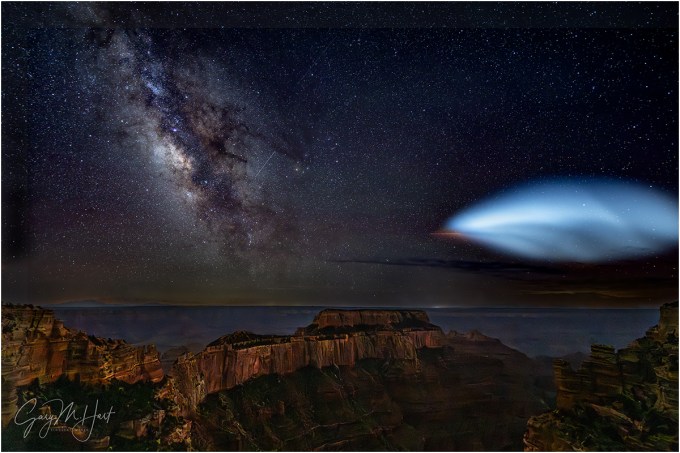
Milky Way and SpaceX Falcon 9, Wotan’s Throne, Grand Canyon
Sony a7R V
Sony 14mm f/1.8 GM
ISO 4000
f/1.8
25 seconds
Last week’s Grand Canyon Milky Way shoot almost didn’t happen, but by the time all was said and done, we ended up with far more than we’d bargained for.
My Grand Canyon monsoon workshops are ostensibly about photographing all of Grand Canyon’s unrivaled beauty, but ask anyone who signs up and they’ll tell you their number one goal is lightning. About 70 percent of my monsoon groups have what I consider lightning success: everyone in the group gets at least one nice lightning image. Of course that also means in 30 percent of my groups, not everyone gets lightning—I can prepare them, monitor the activity, and put us in the locations that maximizes our chances, if the lightning isn’t happening, there’s not much I can do. On the other hand, the clouds that bring lightning often wipe out the night sky, so the (generous) consolation prize for the clear-sky groups is the opportunity to photograph the Milky Way in the dark Grand Canyon sky.
After spending the first two days of this year’s second Grand Canyon workshop beneath wall-to-wall blue skies, all of us were excited about photographing the Milky Way on that second night. Though I was a little concerned about the wind during the Cape Royal sunset shoot, it wasn’t until walking over to my nearby Milky Way location in the darkening twilight (for a less obstructed view and better angle to our foreground subject, Wotan’s Throne), that I really started to fear our Milky Way shoot might not happen. I’d hoped that the more sheltered location would help, but the wind there was just as intense, blowing so hard that I wasn’t sure we’d be able to keep our cameras stable throughout the long exposures a Milky Way shoot requires.
Not only that, the views this spot offers are very exposed, with no railings above a precipitous vertical drop (there’s also room back from the edge for all who aren’t comfortable with heights, so no one is forced to stand on the edge). That meant, given the wind gusting to 40 MPH, in addition to camera stability concerns, I was more than a little concerned about someone straying too close to the edge and getting knocked off balance by a sudden gust. Yikes.
After pondering all this, I decided that we’d hang out a safe distance from the edge at least long enough for the darkening sky to reveal the Milky Way. Best case, the wind would die enough for us to photograph; worst case, we’d at least get to see the Milky Way, always a treat. (Okay, the real worst case would be someone stumbling over the cliff in the dark, but there was really no need for anyone to vacate their safe vantage point once we were established.)
As we waited, I realized that the gusty wind often slowed long enough that we might be able to time our captures between gusts and decided we may as well give the Milky Way a shot—when darkness was complete, we were open for business. With each person’s camera safely affixed to their tripod, Curt (the photographer assisting me) and I moved around to ensure that all had achieved reasonable focus, the right exposure settings, and a good composition. Thanks to our optional practice shoot at Grand Canyon Lodge (where the South Rim lights make for less than ideal Milky Way conditions) the prior night, the group got up to speed quickly.
With exposures in the 10 to 30 second range (double that if long exposure noise reduction is turned on), we had lots of time while waiting for each exposure to complete to simply appreciate skies darker than any of us get at home—for some, darker than they’d ever seen.
It truly is a joy to watch the stars pop out in a darkening sky. There’s Spica in Virgo, Arcturus in Bootes, Antares in Scorpius, plus a host of less prominent stars. Splitting the dark like sugar spilled in ink was our Milky Way galaxy’s luminous core. Two or three times a meteor flashed through the scene, perhaps a stray Perseid streaking from behind us, but most likely just a random piece of space dust.
But wait a minute… What’s that? As I mentally checked through all the familiar skymarks (I just made-up that word), something new caught my eye. Expanding in the southwest sky was a large diaphanous disk. We all saw it at about the same time, which told me that it had just appeared. My first thought, which I uttered out loud only half joking, was, “I hope it’s one of ours.”
Living in California my entire life means I’ve seen a few rocket launches—none that looked exactly like this, but similar enough that I was pretty confident that’s what we were seeing. I did a quick Google search and the first thing that popped up was a SpaceX Falcon 9 Starlink mission launching from Vandenberg Air Force Base on California’s Central Coast, nearly 500 miles away, at 8:57 that night. I checked my watch: 9:04 p.m.—mystery solved.
SpaceX was founded in 2002 by Elon Musk to further his dreams of space dominance. Propelled by reusable Falcon and (soon) Starship rockets, SpaceX crafts deliver both human and electronic payloads to space. Today the human payloads are primarily mega-rich tourists, but the eventual goal is to put humans on the Moon, Mars, and perhaps beyond.
A more practical current SpaceX implementation is the Starlink satellite system that blankets Earth and is capable of providing Internet service anywhere on the planet. I’ve used Starlink at a location where I’d previously had no Internet (the Grand Canyon North Rim, actually) and was absolutely blown away by the speed and reliability—not as fast as home, but certainly fast enough for reasonable use (I didn’t stream any movies, but I did stream shorter videos without problem). On the other hand, this year we tried Starlink on the North Rim and didn’t have a clear enough view through the trees to get a reliable signal—sometimes it worked, but mostly it didn’t.
Which is why SpaceX is still adding satellites. As of August 2023 4,500 Starlink satellites orbit roughly 200 – 350 miles above Earth’s surface. The launch we witnessed last Monday added another 15, with the ultimate goal being as many as 42,000!
I found a video of the launch and learned that 7 1/2 minutes after liftoff, a few seconds before I captured this image, the rocket propelling the satellites toward orbit was 175 miles above Earth’s surface, traveling over 10,000 MPH. But the the Falcon 9 rocket achieves this altitude and speed by using two stages—when the first one has exhausted its fuel, it steps aside and defers to stage two. After doing a little research I’m pretty sure what we witnessed was the beginning of the stage-1 rocket’s return to Earth—the second stage and its satellite payload were out of sight.
Five minutes earlier (2 1/2 minutes into the flight), it’s job done, stage 1 had shut down and separated from the moneymaking section of the rocket, turning control of the payload delivery to stage 2. At that point the rocket was about 50 miles above Earth, traveling about 4,700 MPH. As stage 2 took over, accelerating its payload of satellites even further heavenward, it rapidly outpaced the jettisoned first stage.
With nothing propelling stage 1 forward, Earth’s gravity became the only force acting on it, causing immediate deceleration. But with so much momentum and virtually no atmosphere to slow it further, the depleted stage 1 continued climbing for about 2 1/2 more minutes.
Without further intervention, stage 1 would have plummeted far out in the Pacific. But SpaceX wants to reuse it, so about 7 1/2 minutes into the flight, when it was about 42 miles above the ocean and traveling more than 4,800 MPH, stage one threw on the brakes with a 20-second entry burn timed to deliver it into the waiting “arms” (landing pad) of a SpaceX ship positioned in the east Pacific, west of Baja California. Bullseye (watch the video and be amazed).
I believe the glowing cloud my group and I witnessed was the exhaust from this entry burn, illuminated by the sun. The red streak is the rocket burn itself.
The opportunity to view this phenomenon is relatively rare. Because the exhaust cloud has no inherent luminance, it’s visible only when illuminated by sunlight. That means Earth-bound viewers must be beneath dark skies, and the exhaust plume must be high enough to still have a direct line of sight to the sun—in other words, night below, daylight above. Too far east and the plume would get no sunlight; too far west and it wouldn’t have been visible to anyone beneath a night sky. This convergence requires a twilight launch, cloudless skies, and a viewing position within a relatively small terrestrial zone just into the dark side of night’s advancing shadow.
I virtually never photograph anything manmade, but this was too cool to lose to silly personal rules. At this point, still completely ignorant of all I detailed above, I quickly adjusted my composition to include more of the glowing exhaust plume without losing the Milky Way and Wotan’s Throne. I just stuck with the exposure values I’d already been using. I got exactly one frame before the rocket and its cloud faded noticeably—I just hoped the image was sharp.
I come from the generation where space flight was celebrated, a time when the world stopped to watch every launch, splashdown, and space milestone. Teachers would wheel televisions into classrooms so we could all view together, and I still have vivid memories of watching Neil Armstrong’s first steps on the moon. But as amazing as this SpaceX launch was to view and photograph, and no matter how beneficial this technology is, I can’t help being more than a little concerned about what all this hardware in space is doing to our once pristine night sky.
When I was a kid gazing up at the night sky, spotting a satellite was a rare and thrilling event. But in this 25-second exposure I count at least 9 satellites of varying degrees of brightness—what’s our night sky experience going to be like when Starlink’s count reaches its 42,000 goal, and SpaceX’s inevitable competitors try to match them?
And if scientific exploration is important to you, consider that satellites have become the bane of optical astronomers’ existence. SpaceX has started applying a less reflective surface to its Starlink satellites, reducing their visibility by about 50% (better than nothing but still not great), but also increasing their surface temperatures, making them more problematic for infrared astronomy.
I don’t really have a solution for this conundrum, I just hope that moderation is applied to these technological advances, and that factors beyond the bottom line are considered as we dig deeper into space.
(And I still love this image.)
Join me at the Grand Canyon
To Infinity and Beyond
Click any image to scroll through the gallery LARGE


Smart Luck
Posted on July 30, 2023

Milky Way and the Southern Alps, Mt. Cook / Aoraki National Park, New Zealand
Sony a7R V
Sony 14mm f/1.8 GM
ISO 12800
f/1.8
10 seconds
Once upon a time I posted a rainbow image on Facebook and someone commented that getting a shot like that is simply dumb luck. After having a good chuckle, I actually felt a little sad for the commenter. Since we all tend to make choices that validate our version of reality, imagine going through life with that philosophy.
No one can deny that photography has a significant luck component, but each of us chooses our relationship with the fickle whims of chance—I prefer to look for smart luck. Smart luck embraces Louis Pasteur’s conviction that chance favors the prepared mind. Ansel Adams was quite fond of repeating Pasteur’s quote, and later Galen Rowell as well as many other photographers have jumped on board. So while many may indeed feel lucky to have witnessed special moments in Nature, let’s not lose sight of our opportunities to create our own “luck.” Smart luck.
Some examples

Double Rainbow, Tunnel View, Yosemite
As nature photographers, we must acknowledge the tremendous role chance plays in the conditions that rule the scenes we photograph, then do our best to maximize our odds for witnessing whatever special something Mother Nature might toss in our direction. A rainbow over the Safeway parking lot or the sewage treatment plant is still beautiful, but a rainbow above Yosemite Valley can ascend to a lifelong memory (not to mention a beautiful photograph).
I’ll never forget the time, while driving to Yosemite to meet new clients to plan the next day’s tour over dinner, I saw conditions that told me a rainbow was possible. When I met the clients at the cafeteria, I “suggested” (pleaded?) that we forget dinner and take a shot at a rainbow instead. Despite no guarantee of success, we raced our empty stomachs across Yosemite Valley, scaled some rocks behind Tunnel View, and sat in a downpour for about twenty minutes. Our reward? A double rainbow arcing across Yosemite Valley. Were we lucky? Absolutely. But it was no fluke that my clients and I were the only “lucky” ones out there that evening.

Captive Crescent, El Capitan and Half Dome, Yosemite
Before sunrise on a chilly May morning in 2011, my workshop group and I had the good fortune photograph a crescent moon splitting El Capitan and Half Dome before sunrise. Was this luck? I’ll give you one guess.
I suppose we were lucky that our alarms went off, and that the clouds stayed away that morning. But I knew at least a year in advance that a crescent moon would be rising at this less heralded Yosemite vista on this very morning, scheduled my spring workshop to include the date, then spent hours obsessively making sure I hadn’t made any mistakes.

Rainbow Bridge, Colorado River, Grand Canyon
I’d love to say that I sensed the potential for a rainbow over the Grand Canyon when I scheduled my 2016 Grand Canyon raft trip, then hustled my group down the river for three days to be in this very position to witness the moment. Sadly, I’m not quite that prescient. On the other hand, I did anticipate the potential for a rainbow at least an hour earlier, scouted our campsite to determine the best locations to photograph it, then called the rainbow’s arrival far enough in advance that everyone was able to grab their gear and be set up before its arrival.
Anticipating these special moments in nature doesn’t require any real gifts—just a basic understanding of the natural phenomena you’d like to photograph, and a little effort to match your anticipated natural event (a rainbow, a moonrise, the Milky Way, or whatever) with your location of choice.
But to decide that photographing nature’s most special moments is mostly about luck is to pretty much limit your rainbows to the Safeways and sewage treatment plants of your everyday world. I’ve lost track of the number of times I’ve prepared for a special moment in nature, changed plans, lost sleep, driven many miles, skipped meals, and suffered in miserable conditions, all with nothing to show for my sacrifice. But just one success like a rainbow above Yosemite Valley or the Grand Canyon is more than enough compensation for a thousand miserable failures. And here’s another secret: no matter how miserable I am getting to and waiting for my goal event, whether it happens or not, I absolutely love the anticipation, the just sitting out there marinating in the thought that it might happen.
About this image

Milky Way and the Southern Alps, Mt. Cook / Aoraki National Park, New Zealand
Don Smith and I didn’t choose New Zealand in June by accident. And it was no fluke that we were at this spot beneath the Southern Alps on a moonless night. June is when the Milky Way’s core rises highest in the night sky, and we knew exactly where to be when it came out this night. Well, we thought we knew exactly where to be…
Our New Zealand workshop group had had such a great Milky Way experience on the workshop’s first night, everyone wanted to do it again. But this year’s trip encounter more fog than we ever have, which brought us some nice daytime conditions but wasn’t particularly conducive to night photography. We finally got another chance on the workshop’s penultimate night, when the sky cleared at one of my favorite places for night photography. After a nice sunset shoot, we went to dinner (at a spectacular buffet) while waiting for the sky to darken, then headed back out.
But when we arrived at our predetermined location, a bridge over the Hooker River, we discovered that workers doing grading (I assume) on the riverbank just upstream had left a spotlight on outside their little shed, perhaps by mistake, or maybe to discourage thieves. Whatever the reason, it was so bright that it washed out the bottom half of everyone’s frame. No problem—we were familiar enough with the location that we were able to drive up the road a mile or so until we found a nice view where the light wasn’t a factor.
This far into the workshop everyone was fairly comfortable with their cameras, but the utter darkness out there added another layer of complication. Spreading out along the shoulder, we had to take care not to bump into tripods and each other, but once everyone established their positions and started finding compositions that worked, there wasn’t really any need to move around. At that point the job for Don and I is mostly to be a resource—help people with their compositions and focus (mostly just checking to ensure that it’s okay)—and just stay out of the way.
Since most of my compositions at the prior Milky Way shoot had been vertical, this night I opted for horizontal frames that included more mountains. With nothing special in the immediate foreground, I minimized it in my frame. I further deemphasized (darkened) the foreground with a faster shutter speed that had the added benefit of reducing star motion.
After we’d been out their for a while and I was pretty sure everyone had been successful, I pointed out the Large and Small Magellanic Clouds, satellite galaxies of our Milky Way that aren’t visible in the Northern Hemisphere. They’re not in this frame—they’d be quite a bit to the right of the Milky Way with a very wide lens—but I’ve seen several images from others in the group that included them. Altogether a very special evening.
Join Don and Me in New Zealand Next June
More Smart Luck


, Yosemite")


Greetings from Down Under
Posted on June 19, 2023
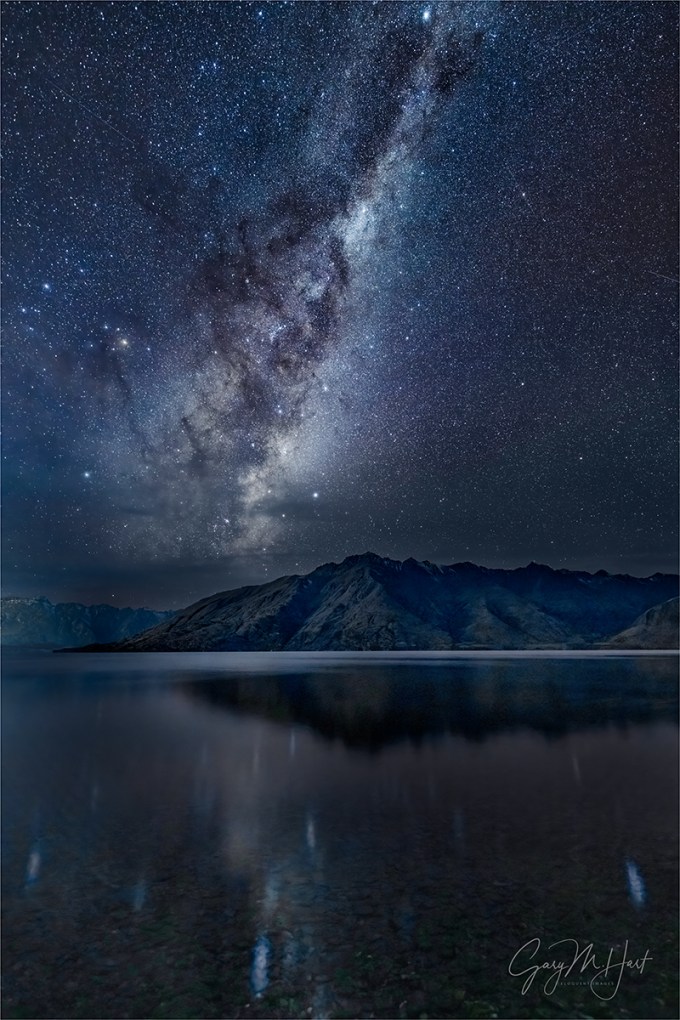
Milky Way Reflection, Lake Wakatipu, New Zealand
Sony a7R V
Sony 14mm f/1.8 GM
ISO 6400
f/1.8
15 seconds
It’s hard enough sticking to my (self-imposed) weekly blog schedule when I’m home and just doing the daily stuff necessary to keep my business running. But for the last week Don Smith and I have been cavorting about the New Zealand countryside with a dozen awestruck photographers. So I’ve dusted off a still relevant blog post from 4 years ago, updated it, and added a brand new image (from this trip) and description.
What’s my problem?
I share a lot of Milky Way images (and when I say Milky Way, I’m referring to the brilliant core of our home galaxy). But then it seems does everyone else. And when I look at some of the other visually dazzling Milky Way images posted online, I realize I’m working at something of a disadvantage—not because of deficient equipment (not even close), a physical or mental handicap (though as the years spin by…), or even because I think the world is unfair (maybe it is, but it’s been pretty good to me). No, my disadvantage is solely the result of self-imposed “rules” that prevent me from photographing anything that can’t be captured with a single click.
Single-click shooting means no focus stacking, no HDR, no blending separately captured foreground and sky. In other words, if I can’t get what I want in one frame, I don’t get it. It’s not that I think there’s anything wrong with combining images—image blending is a tremendous tool that allows digital photographers to transcend the limitations of film photography. And it’s not because blending is “too technical” for me—having spent 20 years working in the tech industry, I know my way around a computer and have actually played a fair amount with blending images (it’s not rocket science). No, I don’t blend images simply because, as beautiful as they might be, I get no personal satisfaction from results that feel artificial to me. And if photography doesn’t make you happy, what’s the point?
Every time I bring this up, someone gets defensive, feeling like I’m saying that there’s something wrong with blending images. There isn’t!* I enjoy viewing the work of photographers who blend images to elevate their art. So if you blend and enjoy it, please go forth and blend to your heart’s content (and keep those defensive comments to yourself). This is about me, and what makes me happy.
*As long as it’s not used to deceive.
Milky Way capture
I’m frequently asked about my processing for Milky Way images, and I’ve always been a little reluctant to share a lot because I’m not an expert, I don’t blend, and my Milky Way workflow is always a work in process. Nevertheless, I’m asked enough that I’ve decided it might nevertheless help for me to share my overall processing mindset and approach. (Plus, it might help others to understand why my images aren’t as “stunning” as the images of those who blend.)
In many ways I still consider myself a film shooter, albeit with an upgrade to a digital camera. Processing, though not my favorite part of photography, is an essential digital windfall that enables me to extract results from the photons I capture, results that were never possible with film (especially for those of us who shot only color film/transparencies). Like most digital photographers, I couldn’t succeed without processing—the alternative is to let the camera or computer make processing decisions, and that’s control I don’t want to relinquish. And given the challenges of minimal light photography, processing is doubly important for Milky Way images.
Given that I don’t blend images (for Milky Way photography that’s usually one exposure for the foreground and another for the sky), I start with a raw file that needs help. A lot of help. I like foreground detail in my night images, which requires me to compromise with a less than ideal f-stop, shutter speed, and (especially) ISO to gather enough light. And even with these compromises, the image straight from the camera is still far darker and noisier than ideal.
The right gear
First, even with all the skill and processing software you can muster, if you’re going to photograph the Milky Way with one click, you need to have the camera and lens to do it. On a moonless night light capture is king, which means using a camera able to return relatively clean results at extreme ISOs (up to 12,800) with a very fast, wide lens—24mm and f/2.8 is okay, but wider and faster is better.
For years my Milky Way body has been some version of the Sony a7S series (a7S, a7S II, a7S III)—most recently the Sony a7S III (a truly remarkable low light camera), while my night lens has been one of the following: Sony 24mm f/1.4 GM, Sony 20mm f/1.8 G, or Sony 14mm f/1.8 GM. But an equipment change may be afoot—details below.
Exposure compromise
My processing choices depend a lot on my exposure choices, which as I said earlier, are all compromises. For example, with my 14mm at f/1.8 wide open, I can usually keep the ISO in the 3200 to 6400, and my shutter speed to 15 seconds—quality compromises for sure (high ISO means high noise, longer shutter speeds mean star motion), but the results are certainly acceptable. It might help to know that when I photograph the Milky Way, I usually give each composition a variety of exposure settings and choice the best one later, when I can see the images on my computer.
It starts with noise reduction
For all of my images, my standard noise processing is Topaz DeNoise AI Photoshop plugin. I used to run my Milky Way images through DxO PhotoLab 2, but later versions of DeNoise have been so good that I now skip the DXO step.
In Topaz I magnify the view to 100% (and sometimes 200%) and play with the Noise Reduction and Recover Detail sliders until I’m confident I’ve found the combination that maximizes noise reduction without muddying the detail. I’ve had the most success with the Low Light, Standard, and Severe Noise panels (in that order), but your results may vary so experiment with all the options to find the panels that work for you.
The method behind my madness
Processing is where things start to get more vague because my approach is less an explicit series of steps than it is searching for the best way to achieve the results I want, steps that can vary a lot from image to image. Sometimes I can achieve most of what I want in Lightroom, other times I lean more heavily on Photoshop—usually it’s a fairly even balance of the two.
Given my hit-and-miss approach, it’s probably most important to explain what makes a successful Milky Way image. Here’s what I’m going for:
- Minimal noise: Asked and answered (Topaz DeNoise AI)
- The right sky color: As far as I’m concerned, the color of the sky in a Milky Way image the photographer’s creative choice because at night the human eye doesn’t capture enough light to discern color. If you look at my recent Milky Way images, you’ll see that I tend to avoid a blue/cyan sky in favor of something more blue/purple. It just feels more night-like to me. But that’s just my opinion and I empower you to go with whatever color makes you happy (more on that below). And lately I’ve been skewing away from blue and toward black with just a hint of blue—and no cyan.
- Foreground detail: The amount varies with the foreground, and how much light I can give it without too much noise.
- Uniform sky tone and hue (as much as possible): I don’t like a huge difference between the sky near the horizon and up toward the top of the frame
- The stars should pop: I want the sky to be fairly dark, but the stars to stand out.
- No part of the Milky Way should be blown out: While I want the stars bright, I don’t want them too bright.
- And the final result still needs to look like night (even though it will be brighter than the human eye sees).
I make extensive use of Lightroom and Photoshop’s History panels. There’s no single best way to do anything in Lightroom and Photoshop, so I make a lot of what-if?, trial-and-error adjustments that I only keep if I’m satisfied. So you’re not going to get specific steps from me as much as you’ll get things to try and accept/reject. The other thing I want to emphasize is to magnify the image to 100% (1:1) when you’re trying to decide whether or not to accept an adjustment.
I always play with the Highlights/Whites/Shadows/Blacks sliders—lots of up/down trial-and-error adjustments to find the right balance (gotta love that History panel). The Lightroom Clarity and Texture sliders will make the stars pop (and sometimes the foreground), but be especially gentle with these to avoid exaggerating the noise and making the stars look crispy). And Dehaze will add contrast to the sky that really enhances the Milky Way, but it also might darken parts of the scene too much. As with Clarity and Texture, Dehaze moderation is key.
I use lots of techniques to get the color I want—often just one or two adjustments are enough, and sometimes it requires a lot of adjustments. In Lightroom, I play with Color Temperature and Tint. That usually means cooling the temperature to somewhere in the 3000-4000 range, and nudging the Tint slider slightly to the right—less cyan, more red (which creates a blue with hints of purple). When those things don’t do the job, I’ll play with Lightroom’s HSL sliders. And now that Lightroom’s masking capability makes separating sky and foreground a snap, I usually process each independently of the other.
To tweak the color in Photoshop, I usually select the area I want to adjust, Feather it fairly loosely (large Feather Radius), and create a Color Balance and/or Saturation layer, doing lots of trial-and-error moves with each. And when using Saturation, I almost always work on specific colors, adjusting some combination of Hue, Saturation, and Lightness until I’m satisfied. Also, I find that some of the other adjustments I make in Lightroom and Photoshop tend to pump up the color too much, so I usually desaturate the sky a fair amount in Photoshop.
To make the Milky Way more prominent, a few passes with the Dodge brush set to Highlights can do wonders by brightening the stars without affecting the sky. But don’t overdo it—I prefer multiple passes at low Opacity (less than 20).
Probably the trickiest thing to contend with is a different hue near the horizon than I get in the rest of the sky. I can usually mitigate this somewhat with a feather selection and a Color Balance or Saturation layer, described above. And sometimes, if I’m really brave, I’ll select the offending area, Feather it, use the Eyedropper tool to pick the color I want, and the Paint Bucket tool to apply the color to the selected area. I usually get better results with Tolerance set fairly high (>50) and Opacity fairly low (<30). If you do this, don’t expect it to work every time, and always examine the results at 100% because it can introduce some pretty nasty blotchiness that doesn’t jump right out at you on first glance at lower magnification.
With most of my images, the last thing I do before saving is sharpen. But since night images are rarely about fine detail, and sharpening exacerbates noise and creates crispy-looking stars, I usually don’t sharpen my Milky Way images.
These tips are not intended to be the final word on Milky Way processing—I just wanted to give you some insight into my approach, both my goals and the steps I take to achieve them. I’ve been using Photoshop for a long time, but don’t consider myself a Photoshop expert, not even close. There may be (probably are) better ways to do many of these things. But I’ve always been a simple-first photographer: Do things the simplest possible way until you find some way that’s better, or until you encounter something you just can’t do without upping the complexity. And if you take nothing else away from this, I hope you at least feel empowered to experiment until you achieve results that make you happy.
About this image

Milky Way Reflection, Lake Wakatipu, New Zealand
New Zealand is hands down my favorite place to photograph the Milky Way. Better even than my previous favorite, the ultra-dark Colorado River at the bottom of the Grand Canyon, because: 1) the skies in New Zealand are almost as dark as the bottom of the Grand Canyon 2) the New Zealand air is usually cleaner (less dust and pollution) 3) New Zealand’s winter matches the Milky Way core’s prime months, so in June (when we do our workshop) the galactic center is photographable from about 7 p.m. until 7 a.m. 4) the Milky Way is higher in the sky down here.
Milky Way photography is a priority in the New Zealand workshop—not just for the people who sign up, but for Don and me as well. But since it’s winter, we often battle clouds, so the Milky Way on any given night is never a sure thing. To maximize our chances, over the years we’ve been doing this workshop Don and I have identified a handful of prime Milky Way locations at various points along the workshop’s 10-day journey.
A Milky Way location needs a good view of the sky in the direction of the Milky Way (in the first hours after sunset, that would be southeast), a compelling foreground, and minimal light pollution. It took us a couple of years, but we finally found a nice Milky Way spot on beautiful (and large) Lake Wakatipu near Queenstown. Since the workshop begins and ends in Queenstown, this spot allows us to check off the Milky Way box at the start of the trip (fingers crossed), and also gives us one last resort shot at it at the end of the trip.
This year we lucked out with clear skies on our very first night. So after a nice sunset farther up the lake toward Glenorchy, we drove back toward town and pulled into “our” spot. After waiting about 30 minutes for the sky to darken, we went to work. At first Don and I concentrated on getting everyone up to speed with Milky Way photography, but eventually we were able to get to work on a few images of our own.
On this New Zealand trip I’d decided to try my Sony a7R V at night—but because I’ve never tried this camera at night, to hedge my bets I also packed the trusty a7S III. The lens I chose for this trip was my Sony 14mm f/1.8 GM—almost as fast as the 24mm f/1.4, the Milky Way’s elevation in the New Zealand sky makes opting for the extra width of the 14mm a no brainer.
I started with the a7S III, but after a half dozen or so images switched to the a7R V. I haven’t looked at the a7S III images yet, but I have to say that I’m blown away by the results I got with my a7R V. Blown away enough that my days of packing a body just for night photography might very well be over. To get an image as clean as this one with 61 megapixel everyday camera truly is a (cliché warning) game changer.
I’ve photographed here several times before, each in slightly different conditions. This year the fact that there wasn’t as much snow on the peaks as previous years was more than compensated by the still, reflective lake surface.
We still have three more workshop nights, and I have cautious hopes for our planned Milky Way shoot at Tasman Lake in Mt. Cook / Aoraki National Park in a couple of nights. But if the clouds take us down, there’s no stress because we already have a great Milky Way shoot in the bank. Add that to our very special day cruising on Doubtful Sound, yesterday’s excellent Wanaka Tree shoot, and today’s spectacular Fox Glacier helicopter ride and hike, not to mention lots of fun with a bunch of great people, and I’m already declaring this trip an unforgettable success.
A Milky Way Gallery
Click any image to scroll through the gallery LARGE


")


Near and Far, Now and Then
Posted on September 25, 2022
 Glow, Milky Way Above Kilauea, Hawaii
Sony a7SIII
Sony 14mm f/1.8 GM
ISO 6400
f/1.8
15 seconds
So what’s happening here? (I thought you’d never ask.)
The orange glow at the bottom of this frame is light from 1,800° F lava bubbling in Halemaʻumaʻu Crater atop Hawaii’s Kilauea, the world’s most active volcano. It’s also a beautiful example of the final act of our planet’s auto-recycling process.
Propelled by the mantle’s inexorable convection engine, Earth’s tectonic plates endlessly jostle about, sometimes sliding past each other, often colliding. When the lighter of the colliding plates is pushed upward, mountains form. While this is happening, the denser plate is forced downward, beneath the uplifting plate, a process called subduction. As the downward force persists, the subjected crust continues downward into the mantle, where intense heat melts the rock until it’s absorbed into the mantle.
Around the globe subduction is constantly, albeit very slowly (on the human scale), adding new material to the mantle. To make room for this new material, magma somewhere else is forced out at weak points in Earth’s crust and volcanoes are born. Sometimes these volcanoes push up above the land in front of the subducting plate—that’s what’s happening in the Cascade Range of the the Pacific Northwest.
A hot spot can also form in the middle of a tectonic plate. For the last 40 million years the Pacific Plate has drifted slowly northwest above a hot spot, leaving a string of 80 or so volcanoes in its wake. Most of these have since eroded away, or never made it to the surface at all. The Hawaiian Islands as the youngest in this island chain, haven’t had time to erode into their eventual oblivion. The Big Island of Hawaii is the youngest of the islands, and the only one still volcanically active, though it’s believed that Maui isn’t completely finished.
Another island, Kamaehuakanaloa Seamount, is building up south of Hawaii and should make its appearance sometime in the next 100,000 years (could be much sooner). But until that happens, we get to enjoy Kilauea—and eventually (inevitably) Mauna Loa (last eruption, 1984), Hualalai (last eruption, 1801), and maybe even Kohala (last eruption, 120,000 years ago) and Mauna Kea (last eruption 4 million years ago) could come back to life.
The vertical white band above the crater represents world building on an entirely different scale. You no doubt recognize it as light cast by billions of stars at the center of our Milky Way galaxy. So dense and distant are the stars in the Milky Way’s core, their individual points are lost to the surrounding glow. The dark patches partially obscuring the Milky Way core’s glow are large swaths of interstellar gas and dust, the leftovers of stellar explosions—and the stuff of future stars. Completing the scene are pinpoint stars in our own neighborhood of the Milky Way, stars close enough that we see them as discrete points of light that humans imagine into mythical shapes: the constellations.
The Milky Way galaxy is home to every single star we see when we look up at night, and 300 billion (-ish) more we can’t see—that’s nearly 50 stars for every man, woman, and child on Earth in our galaxy alone. And recent estimates put the total number of galaxies in the Universe at 2 trillion—a number too large to comprehend.
Our Sun, the central cog in the Solar System, is an insignificant outpost in the Milky Way suburbs. It resides in a spiral arm, a little more than halfway between the urban congestion at the galaxy’s core and the empty wilderness of open space.
Everything we see is made possible by light—light created by the object itself (like the stars and lava), or created elsewhere and reflected (like the planets, or Halemaʻumaʻu’s walls). Light travels incredibly fast, fast enough that it can span even the two most distant points on Earth faster than humans can perceive, fast enough that we consider its arrival from any terrestrial origin instantaneous. But distances in space are so great that we don’t measure them in terrestrial units of distance like miles or kilometers. Instead, we measure interstellar distance by the time it takes a photon of light to travel between two objects: one light-year is the distance light travels in one year—nearly 5.9 trillion miles.
The ramifications of cosmic distances are mind-bending. While the caldera’s proximity makes its glow about as “right now” as anything in our Universe can be—for all intents and purposes, the caldera and its viewers are sharing the same instant in time. On the other hand, the light from the stars above the caldera is tens, hundreds, or thousands of years old—it’s new to me, but to the stars it’s old history.
Imagine Proxima d, a planet orbiting Proxima Centauri, a mere four light-years distant and the star closest to our solar system. If we had a telescope with enough resolving power to see all the way down to Proxima d’s surface, we’d be watching what was happening there four years ago. Likewise, if someone on Proxima d today (2022) were peering at us, they’d be viewing a pre-Covid world and learn that Dunkin’ Donuts was dropping “Donuts” from their name (how did I miss that?). Halemaʻumaʻu Crater, which paused its activity in August 2018, would be black. (Anything you regret doing in the last 4 years? Take heart in the knowledge that everywhere in the Universe outside our Solar System, it hasn’t happened yet.)
So what’s the point of all this mind bending? Perspective, I guess. To me, the best landscape images don’t just tip the “that’s beautiful” scale, they also activate deeper insights into our relationship with the natural world. And few things do that better for me than combining, in one frame, light that’s 25,000 years old with light caused by the formation of Earth’s newest rock.
About this image

Glow, Milky Way Above Kilauea, Hawaii
In 2018, after years of reliable activity, Halemaʻumaʻu Crater went out in a blaze of glory. This renewed vigor included fountaining lava, daily earthquakes, and the complete collapse of the crater as I’d known it.
Even more impactful, lava draining from the summit flowed into the Pacific to create nearly 900 acres of brand new land, on the way overrunning nearly 14 square miles of land and destroying more than 500 homes. The spectacle ended in August, one month before that year’s Big Island workshop.
Kilauea’s current eruption started in September 2021, just two weeks after that year’s workshop ended. Between sporadic eruptions and Covid, I haven’t been able to enjoy one of my favorite sights, the Milky Way above an active Kilauea, since 2017. Needless to say, in the weeks leading up to this year’s trip I kept my fingers crossed that Kilauea would keep going. It didn’t disappoint.
Given the caldera’s collapse and the new eruption, I knew things on Kilauea were completely different from any previous visit. So on my first evening back on the Big Island (I always fly in 3 days before the workshop to check all my locations), I made the 40 minute drive up from Hilo to get my eyes on it.
At the vista that once housed the now closed Jagger Volcano Museum, and that used to be the primary place to view the eruption, I started chatting with a photographer who was set up with a long telephoto, waiting for the full moon to rise. It turned out that she volunteers at Hawaii Volcanoes National Park and does a lot of photography for the park. She very generously provided me with great information that saved me a lot of scouting time, including the best places to view the new eruption, and how to avoid the crowds I’d heard so much about.
Based on her input, after sunset I parked at the Kilauea Visitor Center and took a 1/2 mile walk along the Crater Rim Trail to the point where my new friend had promised the lava would be visible. I chose this spot over the closer view that most people seemed to prefer for a couple of reasons: fewer people (and easier parking), it would be an easier walk for my group (you can only go as far, or as fast, as the slowest person), and (especially) because I thought it would align better with the Milky Way.
To say that I was thrilled with the new view would be an understatement. Though clouds obscured the Milky Way that evening, I was pretty confident the alignment would be fine—not the perfect alignment I got from the spot I’d always used before, but definitely close enough that it would be no problem getting the eruption and Milky Way in the same frame.
The thing that excited me most was that I could actually see the lava. In my 12 years visiting Kilauea, I’ve only been able to see lava at the summit once (check the gallery below)—in the other visits we could clearly see the lava’s beautiful orange glow, but the lava lake was too low to be visible from the rim. But now not only was the lava visible, the perspective was close enough to actually see it bubbling and splattering on the lake’s surface. I hadn’t brought my camera, but I took a quick snap with my iPhone, then walked back to the car in the dark, pretty stoked by what I’d be able to share with my group.
I returned to the volcano the next night to check out more locations, especially interested in my old viewing spot. I was pleasantly surprised to find that I could still see the glow at least as well as I could with the earlier eruption, and that it still aligned perfectly with the Milky Way.
I took my workshop group up to Kilauea on our second night—since it’s a real highlight, I like to do the volcano early in the workshop so we can come back if clouds shut us out. After a few other stops waiting for darkness, we started the short (and easy) hike out to the new lava viewing sight shortly after sunset.
Fog hovering over the caldera obscured the sky at the vista, but no one cared because for most (all?), it was the first time they’d seen lava. Without stars, this was a total telephoto shot—since everyone in the group was shooting mirrorless, we could all magnify our viewfinder and get an up-close, live look at the bubbling lava. It appeared to be bursting from a vent near the caldera wall, like a massive waterfall springing from a mountainside. In addition to the constant rolling and popping on the lake’s surface, every minute or so we could see a much bigger explosion that sent lava careening about the crater—pretty cool for all of us.
I spent most of my time working with people in the group and didn’t photograph too much. Eventually I did manage a few telephoto frames and was pretty happy with how things were going in general—not so much for my images, but mostly because everyone seemed as excited as I’d hoped they’d be.
About the time I was thinking of heading over to my other spot, the fog suddenly thinned and the Milky Way appeared. Everyone immediately switched to wide angle lenses and started working on completely different images. For the next 20 minutes or so we alternated between clicking and waiting as the fog came and went. Again I spent much of that time working with my group, but I managed to get in a few Milky Way frames, including this one.
I’ve got my Milky Way exposure down, and focus for this image was actually easier than most Milky Way scenes because of the brightness in the caldera. Since the Milky Way requires an exposure too long to freeze most motion, all detail in the lava was lost, but I still think it’s pretty cool to know what that glow really is. (Full disclosure: I used Photoshop’s Content Aware Fill tool to fill in a tiny blown-out white patch where the hottest lava was too bright for my night exposure.) The biggest problem I had to deal with is the guy standing next to me (not in my group), who insisted on using a red light (great for telescope or naked eye view, but absolutely the worst light source for night photography). So I had to time my clicks for the times he turned it off, then hope he kept if off until my exposure complete.
Eventually the clouds thickened and showed no sign of leaving. Since everyone was pretty happy with what they had, we packed up and headed back. But it turns out we weren’t done, because by the time we made it backto the cars, the stars were back out—so I took everyone over to my other view. There was no fog at this spot and the Milky Way remained out the entire time we were there. We had another great shoot, despite a crazy wind that hadn’t bothered us at all at our first spot. But that’s a story for another day…
Near and Far
Click any image to scroll through the gallery LARGE


Looking Up Down Under
Posted on July 17, 2022

Milky Way and Small Magellanic Cloud, Lake Wakatipu, New Zealand
Sony a7SIII
Sony 14mm f/1.8 GM
ISO 1600
f/1.8
20 seconds

James Webb Space Telescope’s First Deep Field image
Are you as thrilled as I am by the mesmerizing images we’re seeing from the James Webb Space Telescope? There’s nothing like a heaping dose of perspective to remind humans of our insignificance in the grand scheme things, and these images deliver perspective in spades.
I think my favorite Webb image is the view deep into a seemingly tiny black region of sky that reveals thousands of galaxies. How tiny? According to the NASA website, “This slice of the vast universe covers a patch of sky approximately the size of a grain of sand held at arm’s length by someone on the ground.”) The light from these galaxies traveled as far as 13.1 billion years to reach us, which means we’re getting a view of our nascent Universe as it was less than a billion years after the Big Bang.
I get another dose of perspective, albeit on a much smaller scale, each time I visit the Southern Hemisphere. After a lifetime living north of the equator, I pretty much take for granted the Northern Hemisphere night sky. When I’m outside after dark, I reflexively look up and locate the Big Dipper. Using the Dipper’s pointer stars, my eyes slide to Polaris (the North Star) to locate north, then slowly scan the surrounding sky for other familiar features: bright stars Arcturus and Spica, constellations Cassiopeia and Corona Borealis, among many. If it’s dark enough, I try to pick out the Little Dipper and the Andromeda Galaxy.
Looking up at night in the Southern Hemisphere is downright disorienting. Most of the stars and constellations are completely unfamiliar (but no less beautiful), and those that are familiar (like Orion), appear “upside down.” (There’s no true up and down in space because up/down, left/right is always relative to the viewer’s frame of reference.) The Milky Way down here is reversed, and I’ll never forget the first time I watched a Southern Hemisphere moonrise and realized that it moved left (north) as it rose—duh.
A personal Southern Hemisphere highlight is the opportunity to see the Large and Small Magellanic Clouds. Like the first (only) time I saw the Taj Mahal and Stonehenge, my first view of the Magellanic Clouds was like spotting a celebrity I’d heard about my entire life but never imagined I’d see in person.
The Magellanic Clouds are satellite galaxies of our Milky Way. The Large Magellanic Cloud is about 160 light years from Earth and estimated to contain 30 billion or so stars; the Small Magellanic Cloud is about 200 light years distant and weighs in at around 3 billion stars. It also appears the the SMC orbits the LMC, making it a satellite of a satellite.
In a dark Southern Hemisphere sky, both Magellanic Clouds appear as smudges of light, faint but clearly visible. The diameter of the LMC is about 5 degrees, while the SMC spans less than 2 degrees (for reference, the Sun and Moon are each about 1/2 degree across when viewed from Earth). None of Magellanic Clouds’ individual stars are bright enough to be resolved with the human eye.
About this image
In an earlier post I detailed the night I photographed the Milky Way over Cecil Peak and Lake Wakatipu. It was the first night of the New Zealand winter photo workshop Don Smith and I do each year, and we were pretty pleased that the conditions cooperated so nicely.
We came straight here from our sunset shoot, then waited for the sky to darken enough for the Milky Way to appear. Toward the end of the shoot, once everyone was locked in and feeling good about their results, I started to look for ways to do something a little different and my eyes landed on the Magellanic Clouds. But there were a couple of problems: first, there’s a lot of sky between them and the Milky Way, which was still going to be my primary subject; second, they were both above a blob of large shrubs (or small trees) on the lakeshore.
It’s times like this that I especially love the wide field of view of my Sony 14 f/1.8 GM lens. This lens is always great in New Zealand because the Milky Way’s core here is so high in the sky, the wide field of view enables me to get lots of Milky Way and foreground. This evening I found that by going horizontal at 14mm, I could in fact get the Milky Way and Small Magellanic Cloud in my frame without crowding either too close to the border.
But now the ugly shrubs were in my frame too. The solution for that problem was simply to walk about 50 yards up the lake. Engaging the Bright Monitoring feature on my Sony a7SIII (Sony shooters need to look up this underused feature that’s fantastic for night photography—mine’s assigned to a custom button on all of my bodies), I saw in my viewfinder that the shrubs were no longer a problem.
I only shot here for about 5 minutes, but by the time I made it back to the group, the group was ready to head back to the hotel for dinner—always a good sign that everyone was happy with their results.
Here’s my Photo Tips article on Milky Way photography
New Zealand Photo Workshops
Looking Up
Click an image for a closer look, and to view a slide show.


")


")


Thank You, Dad
Posted on June 19, 2022

Dark Night, Milky Way Above the Colorado River, Grand Canyon
Sony a7SIII
Sony 14mm f/1.8 GM
ISO 6400
f/1.8
20 seconds
Last night I completed a 30-hour odyssey that started in Sacramento, included stops in San Francisco, Fiji, and Aukland, before finally reaching its merciful conclusion in Queenstown, New Zealand (one car, one taxi, one bus, three airplanes, and lots of airport walking throughout). So forgive me if I’m not in shape (or in the mood) for writing a new blog. Instead, in honor of Father’s Day, I’m sharing this blog post from a couple of years ago honoring my father. I did, however, muster the energy to write few paragraphs about this image taken on the first night of last month’s Grand Canyon raft trip, which I have added at the bottom of this post, just above the gallery.
Had we not lost him 18 years ago, my dad would be turning 92 next month. He was a such a vibrant, healthy person, both mentally and physically, that I have no doubt he’d still be going strong if Alzheimer’s hadn’t taken him. I have always been grateful for Dad’s love, gentle discipline, wisdom, advice, and laughs (can’t forget the laughs), but it takes being a parent to fully appreciate our own parents’ love, and their influence on the adults we become.
Dad was a United Methodist minister who literally practiced what he preached. Just one example: In 1965, when Martin Luther King issued a plea for clergy to join him on his voting rights march to Montgomery, Dad borrowed money and flew across the country to join Dr. King in Selma, Alabama (where he was on national TV getting arrested with hundreds of other marchers).
His was an inclusive, Jesus-centric theology that honored all religions and people. He’d do things like open his pulpit to the local rabbi on Sunday morning, then reciprocate the following Saturday with a sermon of his own at the synagogue. Dad welcomed everyone into his churches, and became an outspoken advocate for LGBT rights long before it reached the mainstream. He frequently provided odd-jobs around the church to people who were down on their luck, and I lost track of the number of homeless people, including families with young children, we housed while they tried to get back on their feet.
In addition to the values he instilled, so many of the things that define my personality are directly attributable to my dad’s influence. My positive spirit, sense of humor, and love for sports were absolutely modeled by Dad. And when asked how I became a photographer, the instant answer has always been that my dad was a serious amateur photographer whose 80-hour work week offered too little time to pursue his passion, so he made up for lost time on our summer family vacations. So frequent were our photo stops, I grew up believing that a camera was just a standard outdoor accessory.
But I think his influence on my photography goes deeper than that. More than simply modeling camera use, Dad instilled in me his appreciation of nature’s beauty, and his longing for its soothing qualities. I realize now, because I see it in myself, that it’s not simply photography that dad loved, he was motivated by an insatiable desire to record and share the people and places he loved.
On a minister’s budget, our family summer vacations were, without exception, camping trips—always tent-camping, though in the later years we splurged on a used, very basic tent trailer (no kitchen, bathroom, or any of the other luxuries available in today’s tent trailers). These vacations usually took advantage of the mountain scenery within a few hours of our California home (we were just as close to the ocean, but our vacations were almost always in the mountains), but a few times our family (Dad, Mom, my two younger brothers, and I) hit the road for a much longer camping trip. Some of my most significant childhood memories came on the full month we camped all the way across the United States and back, and a multi-week camping adventure into and around the Canadian Rockies.
Of our more frequently visited destinations, Yosemite was the clear favorite. Marveling at the Firefall from Camp Curry and Glacier Point, waiting in lawn chairs with hundreds of fellow tourists at the Yosemite garbage dump for the bears to arrive for their evening meal (really), rising in the dark for a Dad and Gary (only) fishing expedition to Tuolumne Meadows, family hikes up the Mist Trail to Vernal and Nevada Falls, are just a few of the memories that I realize in hindsight formed the bedrock of my Yosemite connection.

Here’s my dad’s Half Dome Rainbow, captured on a summer afternoon in the mid-sixties.
My favorite Dad photography story happened when I was about ten. It involves an electrical storm atop Sentinel Dome, and his desire to photograph a lightning bolt, a desire so great that it trumped common sense. As his ignorant but trusting assistant, to keep his camera dry I stretched high to extend an umbrella above Dad’s head. (In his defense, as Californians, the novelty of lightning obscured a full comprehension of its dangers.) We didn’t get the lightning, and more importantly, it didn’t get us. But that’s not the end of the story.
After risking our lives on Sentinel Dome, the family ended up at Glacier Point, just down the road. Dad had returned to tourist mode as we browsed the shop at Glacier Point Lodge, no doubt seeking souvenirs that would fit our meager budget. But when a vivid rainbow appeared out of nowhere to arc across the face of Half Dome, Dad was ready with his camera still draped around his neck. Watching Dad’s excitement, better than any souvenir, this felt as if God was giving him a much deserved, “I got your back.”
I love you, Dad.
About this image
Another life-long interest I can thank my dad for is my love for astronomy. Even though Dad’s interest in astronomy was little more than an enthusiastic marveling at the stars we saw on our summer camping trips, as soon as he sensed my attraction to the night sky, he went to work figuring out how to get me a telescope. Limited, as always, by his minister’s salary, he somehow negotiated with a fellow Kiwanis member and serious amateur photographer the gift of a no longer used 6-inch reflector telescope that was far better than anything I could have hoped for. (I was especially proud to discover this photographer’s name in the photo credit for a nebula image in one of my astronomy books.)
Today I trace my lifetime fascination with the night sky all the way back to this simple act of support from my father, a fascination that manifests today in a love for photographing the stars above my favorite landscapes. It’s why so many of my workshops attempt to account for the night photography opportunities, including my annual Grand Canyon raft trip, which I always schedule a moonless week in May.
Because in May a view of the brilliant core of the Milky Way requires a good view toward the southern horizon, and the Grand Canyon trends mostly east-west, and campsites are first-come, first-served, it’s not necessarily a sure thing. Other important factors are an open view of the river for a foreground, and raft parking upstream from our river view.
In the eight years I’ve done this trip, I’ve identified several target campsites, and on the first night of this year’s trip we found at a new camp that instantly became one of my favorites. The problem here was the only place to put the rafts was right in front of the view, so as soon as we had the rafts unloaded I went exploring and found a great little beach a couple of hundred yards downstream.
The problem was that getting here required a little boulder scrambling that was doable for most in broad daylight, but not an option in the utter darkness of a Grand Canyon night. But just past the boulder field I found a spot with enough room for campsites and a straight, easy walk down to the river. So I advised the group that anyone interested the best night photography should lug their gear up the hill and over the boulders now.
At least six others took my advice. Relying on my aging body’s inability to sleep through the night, I didn’t bother setting an alarm and woke up naturally (always the best way) around 2 a.m., just as the Milky Way’s core was slipping over the canyon wall. I found two or three already shooting away at the river, and during the hour or so I was down there we were joined by several others.
Most of us started at the most easily accessed spot right on the river, but after a while I moved a few dozen yards downstream to see what the view was like there. After negotiating a few boulders, I found myself on a flat sandstone platform just a couple of feet above the river, with what I thought was an even better view. I let everyone know my discovery and was soon joined by two or three more adventurous souls. A great start to a great trip.
One more thing
I’m sure my dad had no idea at the time the significance his simple act of support would have on the rest of my life. Just something that I hope all parents, or prospective parents, keep in mind.
Join me in the Grand Canyon
Night Sky


