Eloquent Images by Gary Hart
Insight, information, and inspiration for the inquisitive nature photographer
It’s All a Blur: Photographing Moving Water
Posted on March 9, 2018
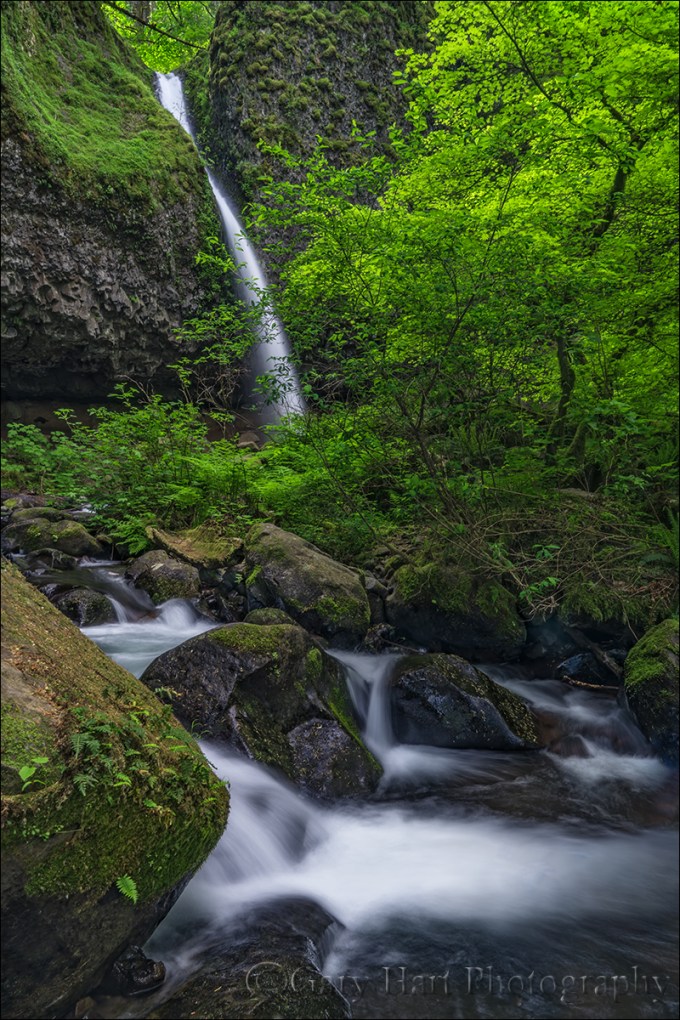
Downstream, Upper Horsetail Fall, Columbia River Gorge
Sony a7RII
Sony/Zeiss 24-70 f4
1 second
F/11
ISO 50
One of the questions I’m asked most is how to blur water. It’s really not that hard when you know how to control your exposure variables, and in fact if you’re photographing moving water in the right light, it’s easier to blur the water than it is to freeze it.
Here are the essential elements for blurred water:
- Sturdy tripod: The longer the shutter is open, the greater the blur effect; even with a stabilized lens and/or body, it’s pretty hard to hand-hold at a water-blurring shutter duration and avoid camera shake that blurs the rest of the scene.
- Camera with exposure control: Since motion blur is partially a function of shutter speed, you’ll need to be able to control your camera’s shutter speed. A mirrorless or DSLR camera will do the job for sure, but many of the more sophisticated point-and-shoot cameras will work as well.
- Whitewater: While it’s possible to smooth any moving water, the silky water effect most people want requires whitewater.
- Shade or overcast: Water in direct sunlight is so bright that, without a neutral density filter, a shutter duration long enough to blur it will completely and irrevocably overexpose it.
With these basic ingredients, and a little knowledge of exposure management, you’re ready to go. While motion blur requires the shutter remain open long enough for the water’s motion to blur, there’s no magic shutter speed that achieves this. The amount of blur will vary from a lot to none at all, depending on the following factors:
- Shutter speed: A digital sensor (or piece of film) records the position of everything in the scene throughout the duration of the exposure. If something moves while the shutter is open, it will blur—the more it moves, the more it blurs.
- The water’s speed: The faster the water moves while the shutter is open, the more of the frame it will span and the greater the blur. But it’s not just the water’s speed that determines the blur—other factors are…
- The water’s distance: It’s not actually the water’s speed that matters, it’s the distance across the frame that the water moves while the shutter is open. So the farther away the water is, for any given focal length, the less of the frame it will span (and the less blur you’ll see).
- Focal length: Increasing the focal length is the equivalent of moving closer. A longer focal length magnifies everything in the frame, including the distance across the frame the water travels while the shutter is open.
- The water’s direction of motion: Water moving across the frame will blur more than water moving away from or toward the camera.
Most of the above motion blur factors affect the composition too, so achieving motion blur without compromising the composition usually comes down to managing the shutter speed. Choosing a shady scene or overcast day is a good start, but here are a few other ways to keep the shutter open longer:
- Neutral density filter: An ND filter will darken the scene without changing anything else (such as the color cast)—typically by at least 3 stops, and usually more. I don’t often use an ND filter for whitewater because I only shoot water in shade or overcast and find I can achieve enough blur without it.
- Polarizer: A polarizer cuts light by 1 to 2 stops, but that’s secondary to the polarizer’s primary function, which is to reduce reflections. Whether it’s sheen on rocks and leaves, or light bouncing off darker water, reflections are everywhere, even in a shady or overcast scene. I never photograph moving water without a polarizer, and gladly accept its longer shutter speed side benefit.
- Low ISO: The lower the ISO, the less sensitive to light the sensor is, and the longer the shutter duration necessary to make up for that decreased sensitivity. Your camera probably has a native ISO of 100 (most likely) or 200—that’s the ISO that achieves the best image quality, and the ISO you should start at for your motion blur shots. Some digital cameras offer a lower, emulated ISO that, while not increasing the image quality (unlike film, where the lower the ISO or ASA, the better the image quality). Usually the ability to access this emulated ISO needs to be enabled in your camera’s menu system.
- Small aperture: Because I prefer basing my aperture choice on the depth of field I want, and by what will give me the sharpest results (less diffraction and most corner-to-corner sharpness), I usually go to my minimum ISO before choosing an aperture smaller than f/11 (remember, the bigger the f/ number, the smaller the aperture, so f/16 is smaller than f/11).
Armed with this knowledge, you’re ready to go. One important thing to keep in mind is that motion blur is never just blurred or not blurred. Rather, there are degrees of blur. That’s why, when possible, for any given scene I try different ISOs and f-stops, adjusting the shutter speed to compensate and vary the blur effect.
For example
In a region packed with waterfalls, Upper Horsetail Fall (sometimes called Ponytail Fall), is one of my favorites. After a short but steep hike from the road and (lower) Horsetail Fall, hikers round a bend for the first view of the source of the roar heard from several hundred yards down the trail. Most waterfall trails either cross the source river or creek upstream, above the fall, or down stream, below the fall. The Upper Horsetail Fall trail goes behind the fall.

Looking Out, Upper Horsetail Fall, Columbia River Gorge: The view from the trail under the ledge, behind Upper Horsetail Fall.
On this visit, before venturing behind the fall, I scrambled down the slope on the right and set up near creek level, in front of the whitewater and just downstream from the pool. After a little bit of visual exploration, I settled on the essence of my composition: the rushing water in the foreground, with the waterfall prominent in the background, balanced by the brilliant green of a freshly leafed-out tree. The compositional variations mostly centered around how much of the fern-infused rock on the left, and the angled tree trunk on the right, to include.
Another compositional choice to weigh was whether to allow the foreground rock to merge with the rock just behind it, in the center of the creek. Normally I try to avoid merging elements at different distances, but in this case the solution would have been to move a couple steps to the right, which would have put the fall more behind the tree. Since the waterfall is the scene’s most prominent element, I decided to maximize its presence.
The darkness of the surrounding forest was enhanced by a thick overcast, making motion blur virtually inevitable, so I just embraced it. Often the greatest difficultly with photographing motion blur surrounded by dense foliage is that a shutter open long enough to blur water is also open long enough to pick up wind motion in the leaves. On this morning I was fortunate to have virtually no breeze, and my 1-second exposure blurred the water and froze the leaves. Mission accomplished.
Columbia River Gorge Photo Workshops


