Eloquent Images by Gary Hart
Insight, information, and inspiration for the inquisitive nature photographer
Finding Focus in the Grand Canyon
Posted on May 12, 2019

Sky Reflection, Blacktail Canyon, Grand Canyon
I returned Friday from my annual Grand Canyon Raft Trip for Photographers and am playing catch-up on all aspects of my photography life. I’ve barely looked at the my raft trip images, but chose this one for a couple of reasons: first, because I think it perfectly conveys the intimate serenity that always catches me by surprise in this landscape known mostly for it’s broad vistas; and second, because it’s the only image I’ve processed so far.
This is Blacktail Canyon, one of hundreds (thousands?) of narrow slot canyons cutting into the Grand Canyon’s towering walls. Most of them we just float past, sometimes because of the physical challenges required to explore their depths, but usually because there just isn’t time to stop at every slot canyon. On my trips we pick our slots for their photo opportunities, and this year Blacktail Canyon was a particular highlight.
With tall, tightly spaced walls, Blacktail Canyon spends most of its daylight hours in full shade, ideal for photography on sunny days. It doesn’t always have water, but this year’s wet winter meant water in lots of places that don’t always get it. We found the little creek that splits the canyon carrying just enough water to create a series of reflective pools before disappearing into the stream bed, only to reappear farther downstream.
What first drew my eye to this scene was a tiny sapling sprouting from an overhanging ledge, but I soon realized that the tree would best serve me as a visuall element to hold the top of my frame rather than the primary subject. The most interesting thing, I decided, was the blue sky reflection like a jewel embedded in the creek bed.
To create this composition, I dropped my tripod to about a foot above the canyon floor and positioned myself so the lines connecting my primary focal points (the sky reflection, the pair of boulders, and the green tree) created a triangle. Fitting all this into the frame required a vertical orientation of my Sony a7RIII, using virtually the entire width of my Sony 16-35 f/2.8 G lens. Even at this wide focal length, the smooth pebbles at my feet were only about a foot away; getting both the nearby pebbles and glowing (from bounced sunlight) sandstone above the tree sharp, meant choosing my exposure settings and focus point very carefully. My hyperfocal app told me that at f/16, by focusing two feet away, I could achieve my sharpness goal. Watching the rapidly changing sky, I timed my click for the best blend of clouds and sky filling the reflection.
To better understand focus technique, below is an updated version of my Depth of Field article from my Photo Tips section
Finding Focus
What’s the point?
It seems like one of photography’s great mysteries is achieving proper focus: the camera settings, where to place the focus point, even the definition of sharpness are all sources of confusion. If you’re a tourist just grabbing snapshots, everything in your frame is likely at infinity and you can just put your camera in full auto mode and click away. But if you’re a photographic artist trying to capture something unique with your mirrorless or DSLR camera and doing your best to have important visual elements objects at different distances throughout your frame, you need to stop letting your camera decide your focus point and exposure settings.
Of course the first creative focus decision is whether you even want the entire frame sharp. While some of my favorite images use selective focus to emphasize one element and blur the rest of the scene, most (but not all) of what I’ll say here is about using hyperfocal techniques to maximize depth of field (DOF). I cover creative selective focus in much greater detail in another Photo Tip article: Creative Selective Focus.
Beware the “expert”
I’m afraid that there’s some bad, albeit well-intended, advice out there that yields just enough success to deceive people into thinking they’ve got focus nailed, a misperception that often doesn’t manifest until an important shot is lost. I’m referring to the myth that you should focus 1/3 of the way into the scene, or 1/3 of the way into the frame (two very different things, each with its own set of problems).
For beginners, or photographers whose scene doesn’t include subjects from near to far, the 1/3 technique may be a useful rule of thumb. But taking the 1/3 approach to focus requires that you understand DOF and the art of focusing well enough to know when 1/3 won’t work, and how to adjust your focus point and settings. And once you achieve that level of understanding, you may as well do it the right way from the start. Focus control becomes especially important in those scenes where missing the focus point by just a few feet or even inches can make or break and image.

Where to focus this? Of course 1/3 of the way into a scene that stretches for miles won’t work. And 1/3 of the way into a frame with a diagonal foreground won’t work either.
Back to the basics
Understanding a few basic focus truths will help you make focus decisions:
- A lens’s aperture is the opening that allows light to reach your sensor—the bigger this opening, the more light gets in, but also the smaller your DOF.
- Aperture is measured in f-stops, which is the lens’s focal length divided by the aperture’s diameter; the higher the f-number, the smaller the aperture and the greater the DOF. So f/8 is actually a bigger aperture (with less DOF) than f/11. This understanding becomes second nature, but if you’re just learning it’s helpful to think of f/stops this way: The higher the f-number, the greater the depth of field. Though they’re not exactly the same thing, photographers usually use f-stop and aperture interchangeably.
- Regardless of its current f-stop setting, a DSLR camera maximizes the light in its viewfinder by always showing you the scene at the lens’s widest aperture. All this extra light makes it easier to compose and focus, but unless your exposure is set for the widest aperture (which it shouldn’t be unless you have a very specific reason to limit your depth of field or maximize light), the image you capture will have more DOF than you see in the viewfinder. The consequence is that you usually can’t see how much of your scene is in focus when you compose. Most cameras have a DOF preview button that temporarily closes the lens down to the f-stop you have set—this shows the scene at its actual DOF, but also darkens the viewfinder considerably (depending on how small your aperture is), making it far more difficult to see the scene.
- For any focus point, there’s only one (infinitely thin) plane of perfect sharpness, regardless of the focal length and f-stop—everything in front of and behind the plane containing your focus point (and parallel to the sensor) will be some degree of less than maximum sharpness. As long as the zone of less than perfect sharpness isn’t perceptible, it’s considered “acceptably sharp.” When that zone becomes visible, that portion of the image is officially “soft.” Acceptable sharpness varies with the display size and viewing distance.
- The zone of acceptable sharpness extends a greater distance beyond the focus point than it does in front of the focus point. If you focus on that rock ten feet in front of you, rocks three feet in front of you may be out of focus, but a tree fifty feet away could be sharp. I’ll explain more about this later.
- While shorter focal lengths may appear to provide more depth of field, believe it or not, DOF doesn’t actually change with focal length. What does change is the size of everything in the image, so as your focal length increases, your apparent DOF decreases. So you really aren’t gaining more absolute DOF with a shorter focal length, the softness just won’t be as visible. When photographers talk about DOF, they’re virtually always talking about apparent DOF—the way the image looks. (That’s the DOF definition I use here too.)
- The closer your focus point, the narrower your DOF (range of front-to-back sharpness). If you focus your 24mm lens on a butterfly sunning on a poppy six inches from your lens, your DOF is so narrow that it’s possible parts of the poppy will be out of focus; if you focus the same lens on a tree 100 feet away, the mountains behind the tree are sharp too.

Moonset, Mt. Whitney and Whitney Arch, Alabama Hills, California
With subjects throughout my frame, from close foreground to distant background, it’s impossible to get everything perfectly sharp. Here in the Alabama Hills near Lone Pine, California, I stopped down to f/16 and focused at the at the most distant part of the arch. This ensured that all of the arch would be perfectly sharp, while keeping Mt. Whitney and the rest of the background “sharp enough.”
Defining sharpness
Depth of field discussions are complicated by the fact that “sharp” is a moving target that varies with display size and viewing distance. But it’s safe to say that all things equal, the larger your ultimate output and closer the intended viewing distance, the more detail your original capture should contain.
To capture detail a lens focuses light on the sensor’s photosites. Remember using a magnifying glass to focus sunlight and ignite a leaf when you were a kid? The smaller (more concentrated) the point of sunlight, the sooner the smoke appeared. In a camera, the finer (smaller) a lens focuses light on each photosite, the more detail the image will contain at that location. So when we focus we’re trying to make the light striking each photosite as concentrated as possible.
In photography we call that small circle of light your lens makes for each photosite its “circle of confusion.” The larger the CoC, the less concentrated the light and the more blurred the image will appear. Of course if the CoC is too small to be seen as soft, either because the print is too small or the viewer is too far away, it really doesn’t matter. In other words, areas of an image with a large CoC (relatively soft) can still appear sharp if small enough or viewed from far enough away. That’s why sharpness can never be an absolute term, and we talk instead about acceptable sharpness that’s based on print size and viewing distance. It’s actually possible for the same image to be sharp for one use, but too soft for another.
So how much detail do you need? The threshold for acceptable sharpness is pretty low for an image that just ends up on an iPhone or an 8×10 calendar on the kitchen wall, but if you want that image to fill the wall above the sofa, acceptable sharpness requires much more detail. And as your print size increases (and/or viewing distance decreases), the CoC that delivers acceptable sharpness shrinks correspondingly.
Many factors determine the a camera’s ability to record detail. Sensor resolution of course—the more resolution your sensor has, the more important it becomes that to have a lens that can take advantage of that extra resolution. And the more detail you want to capture with that high resolution sensor and tack-sharp lens, the more important your depth of field and focus point decisions become.
Hyperfocal focus
The foundation of a sound approach to maximizing sharpness for a given viewing distance and image size is hyperfocal focusing, an approach that uses viewing distance, f-stop, focal length, and focus point to ensure acceptable sharpness.
The hyperfocal point is the focus point that provides the maximum depth of field for a given combination of sensor size, f/stop, and focal length. Another way to express it is that the hyperfocal point is the closest you can focus and still be acceptably sharp to infinity. When focused at the hyperfocal point, your scene will be acceptably sharp from halfway between your lens and focus point all the way to infinity. For example, if the hyperfocal point for your sensor (full frame, APS-C, 4/3, or whatever), focal length, and f-stop combinition is twelve feet away, focusing there will give you acceptable sharpness from six feet (half of twelve) to infinity—focusing closer will soften the distant scene; focusing farther will keep you sharp to infinity but extend the area of foreground softness.
Because the hyperfocal variable (sensor size, focal length, f-stop) combinations are too numerous to memorize, we usually refer to an external aid. That used to be awkward printed tables with long columns and rows displayed in microscopic print, the more precise the data, the smaller the print. Fortunately, those have been replaced by smartphone apps with more precise information in a much more accessible and readable form. We plug in all the variables and out pops the hyperfocal point distance and other useful information
It usually goes something like this:
- Identify the composition
- Determine the closest thing that must be sharp (right now I’m assuming you want sharpness to infinity)
- Dig the smartphone from one of the 10,000 pockets it could be in
- Open the hyperfocal app and plug in the sensor size (usually previously set by you as the default), f-stop, and a focus distance
- Up pops the hyperfocal distance (and usually other info of varying value)
You’re not as sharp as you think
Since people’s eyes start to glaze over when CoC comes up, they tend to use the default returned by the smartphone app. But just because the app tells you you’ve nailed focus, don’t assume that your work is done. An often overlooked aspect of hyperfocal focusing is that app makes assumptions that aren’t necessarily right, and in fact are probably wrong.
The CoC your app uses to determine acceptable sharpness is a function of sensor size, display size, and viewing distance. But most app’s hyperfocal tables assume that you’re creating an 8×10 print that will be viewed from a foot away—maybe valid 40 years ago, but not in this day of mega-prints. The result is a CoC three times larger than the eye’s ability to resolve.
That doesn’t invalidate hyperfocal focusing, but if you use published hyperfocal data from an app or table, your images’ DOF might not be as ideal as you think it is for your use. If you can’t specify a smaller CoC in your app, I suggest that you stop-down a stop or so more than the app/table indicates. On the other hand, stopping down to increase sharpness is an effort of diminishing returns, because diffraction increases as the aperture shrinks and eventually will soften the entire image—I try not to go more than a stop smaller than my data suggests.
Keeping it simple
As helpful as a hyperfocal app can be, whipping out a smartphone for instant in-the-field access to data is not really conducive to the creative process. I’m a big advocate of keeping photography as simple as possible, so while I’m a hyperfocal focus advocate in spirit, I don’t usually use hyperfocal data in the field. Instead I apply hyperfocal principles in the field whenever I think the margin of error gives me sufficient wiggle room.
Though I don’t often use the specific hyperfocal data in the field, I find it helps a lot to refer to hyperfocal tables when I’m sitting around with nothing to do. So if I find myself standing in line at the DMV, or sitting in a theater waiting for a movie (I’m a great date), I open my iPhone hyperfocal app and plug in random values just to get a sense of the DOF for a given f-stop and focal length combination. I may not remember the exact numbers later, but enough of the information sinks in that I accumulate a general sense of the hyperfocal DOF/camera-setting relationships.
Finally, something to do
Unless I think I have very little DOF margin for error in my composition, I rarely open my hyperfocal app in the field. Instead, once my composition is worked out and have determined the closest object I want sharp—the closest object with visual interest (shape, color, texture), regardless of whether it’s a primary subject.
- If I want to be sharp to infinity and my closest foreground object (that needs to be sharp) is close enough to hit by tossing my hat, I need a fair amount of DOF. If my focal length is pretty wide, I might skip the hyperfocal app, stop down to f/16, and focus a little behind my foreground object. But if I’m at a fairly long focal length, or my closest object is within arm’s reach, I have very little margin for error and will almost certainly refer to my hyperfocal app.
- If I could hit my foreground object with a baseball and my focal length is 50mm (or so) or less, I’ll probably go with f/11 and just focus on my foreground object. But as my focal length increases, so does the likelihood that I’ll need to refer to my hyperfocal app.
- If it would take a gun to reach my closest object (picture a distant peak), I choose an f-stop between f/8 and f/11 and focus anywhere in the distance.
Of course these distances are very subjective and will vary with your focal length and composition (not to mention the strength of your pitching arm), but you get the idea. If you find yourself in a small margin for error focus situation without a hyperfocal app (or you just don’t want to take the time to use one), the single most important thing to remember is to focus behind your closest subject. Because you always have sharpness in front of your focus point, focusing on the closest subject gives you unnecessary near sharpness at the expense of distant sharpness. By focusing a little behind your closest subject, you’re increasing the depth of your distant sharpness while (if you’re careful) keeping your foreground subject within the zone of sharpness in front of the focus point.
And finally, foreground softness, no matter how slight, is almost always a greater distraction than slight background softness. So, if it’s impossible to get all of your frame sharp, it’s usually best to ensure that the foreground is sharp.
Some examples

A hat’s toss away: The closest pool was about 6 feet from my lens. I stopped down to f/20 (smaller than I generally like to go) and focused on the back of the pool on the left, about 10 feet away.

A baseball throw away: The little clump of wildflowers (lower right) was about 35 feet away and the trees started another 35 feet beyond that. With a focal length of 55mm, I dialed to f/11 and focused on the most distant foreground tree, getting everything from the flowers to Half Dome sharp.

Honey, fetch my rifle: With everything here at infinity I knew could focus on the trees or moon confident that the entire frame would be sharp. In this case I opted for f/8 to minimize diffraction but still in my lens’s sharpest f-stop range, and focused on the tree.
Why not just automatically set the aperture to f/22 and be done with it? I thought you’d never ask. Without delving too far into the physics of light and optics, let’s just say that there’s a not so little light-bending problem called “diffraction” that robs your images of sharpness as your aperture shrinks—the smaller the aperture, the greater the diffraction. Then why not choose f/2.8 when everything’s at infinity? Because lenses tend to lose sharpness at their aperture extremes, and are generally sharper in their mid-range f-stops. So while diffraction and lens softness don’t sway me from choosing the f-stop that gives the DOF I want, I try to never choose an aperture bigger or smaller than I need.
Now that we’ve let the composition determine our f-stop, it’s (finally) time to actually choose the focus point. Believe it or not, with this foundation of understanding we just established, focus becomes pretty simple. Whenever possible, I try to have elements throughout my frame, often starting near my feet and extending far into the distance. When that’s the case I stop down focus on an object slightly behind my closest subject (the more distant my closest subject, the farther behind it I can focus).
When I’m not sure, or if I don’t think I can get the entire scene sharp, I err on the side of closer focus to ensure that the foreground is sharp. Sometimes before shooting I check my DOF with the DOF preview button, allowing time for my eye to adjust to the limited light. And when maximum DOF is essential and I know my margin for error is small, I don’t hesitate to refer to the DOF app on my iPhone.
A great thing about digital capture is the instant validation of the LCD—when I’m not sure, or when getting it perfect is absolutely essential, after capture I pop my image up on the LCD, magnify it to maximum, check the point or points that must be sharp, and adjust if necessary. Using this immediate feedback to make instant corrections really speeds the learning process.
Sometimes less is more
The depth of field you choose is your creative choice, and no law says you must maximize it. Use your camera’s limited depth of field to minimize or eliminate distractions, create a blur of background color, or simply to guide your viewer’s eye. Focusing on a near subject while letting the background go soft clearly communicates the primary subject while retaining enough background detail to establish context. And an extremely narrow depth of field can turn distant flowers or sky into a colorful canvas for your subject.
 In this image of a dogwood blossom in the rain, I positioned my camera to align Bridalveil Fall with the dogwood and used an extension tube to focus extremely close. The narrow depth of field caused by focusing so close turned Bridalveil Fall into a background blur (I used f/18 to the fall a little more recognizable), allowing viewers to feast their eyes on the dogwood’s and raindrop’s exquisite detail.
 An extension tube on a macro lens at f/2.8 gave me depth of field measured in fractions of an inch. The gold color in the background is more poppies, but they’re far enough away that they blur into nothing but color. The extremely narrow depth of field also eliminated weeds and rocks that would have otherwise been a distraction.
There’s no substitute for experience
No two photographers do everything exactly alike. Determining the DOF a composition requires, the f-stop and focal length that achieves the desired DOF, and where to place the point of maximum focus, are all part of the creative process that should never be left up to the camera. The sooner you grasp the underlying principles of DOF and focus, the sooner you’ll feel comfortable taking control and conveying your own unique vision.
About this image

Floating Autumn Leaves, Valley View, Yosemite
Yosemite may not be New England, but it can still put on a pretty good fall color display. A few years ago I arrived at Valley View on the west side of Yosemite Valley just about the time the fall color was peaking. I found the Merced River filled with reflections of El Capitan and Cathedral Rocks, framed by an accumulation of recently fallen leaves still rich with vivid fall color.
To emphasize the colorful foreground, I dropped my tripod low and framed up a vertical composition. I knew my hyperfocal distance at 24mm and f/11 would be 5 or 6 feet, but with the scene ranging from the closest leaves at about 3 feet away out to El Capitan at infinity, I also knew I’d need to be careful with my focus choices. For a little more margin for error I stopped down to f/16, then focused on the nearest rocks which were a little less than 6 feet away. As I usually do when I don’t have a lot of focus wiggle room, I magnified the resulting image on my LCD and moved the view from the foreground to the background to verify front-to-back sharpness.
Workshop Schedule || Purchase Prints
Playing with Depth: A Gallery of Focus
Click an image for a closer look and slide show. Refresh the screen to reorder the display.


Taking Yosemite for Granite (sorry)
Posted on November 18, 2018
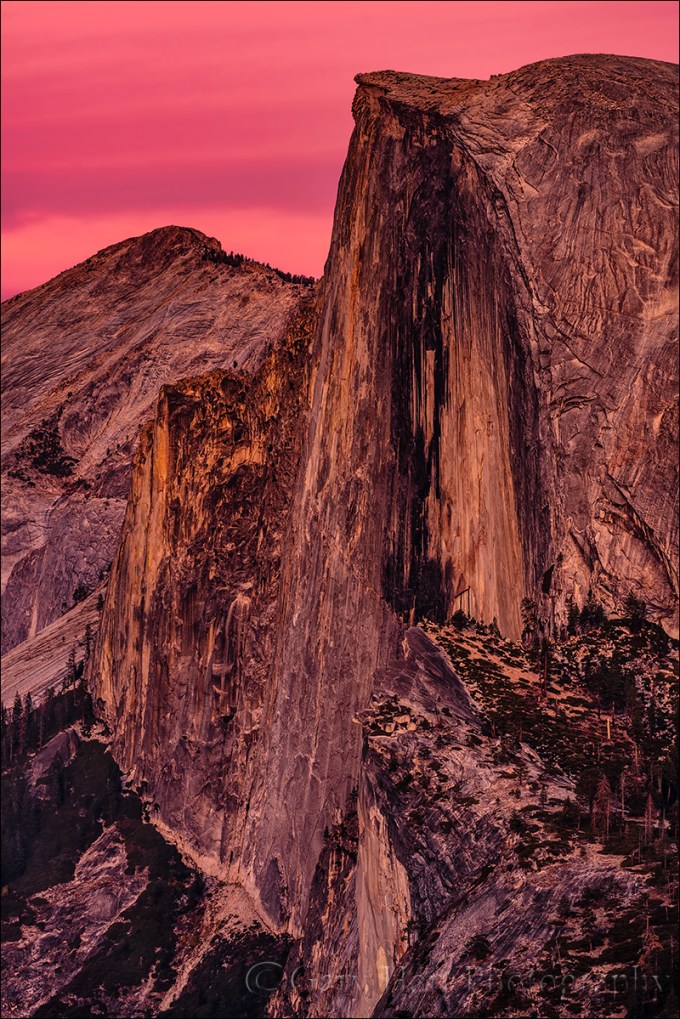
Face to Face, Half Dome from Glacier Point, Yosemite
Sony a7RIII
Sony 100-400 GM
ISO 100
f/11
1/6 second
Yosemite, like most of the Sierra Nevada, was carved from an intrusive igneous rock (subterranean magma that cooled without reaching the surface). This subterranean magma cooled slowly enough for its primary constituents, quartz and feldspar, plus mica and other minerals, to form crystals that fuse into an extremely hard matrix: granite. The granite waited patiently in the dark while overhead oceans advanced and receded, leaving thousands of feet of new sediment behind.
Beginning tens of millions of years ago, a slow-motion collision of tectonic plates uplifted the granite and its overlying sedimentary layers. As the ancient mountain range rose, erosion accelerated the demise of the sedimentary layers, eventually exposing the much harder granite. As the uplift continued, rivers moved faster, carving V-shaped river valleys that included the predecessor of what we now know as Yosemite Valley.
Then came the glaciers, an irresistible force meeting granite’s immovable object. Instead of breaking apart and collapsing as a lesser rock might, Yosemite’s granite stood tall as the glaciers cleared out the ancient Yosemite Valley, carving it into the U-shaped feature we know today—a flat floor bounded by vertical cliffs.
Granite’s hardness also affects the way it breaks up when exposed to the elements of weathering. Instead of crumbling under wind and rain like softer rock, or cleaving along aligned planes of weakness, granite retains its shape until fracturing along microscopic cracks caused by external stress such as pressure or weathering. These cracks allow water to seep into the rock. Of course you remember from high school science (right?) that unlike most substances, water expands when it freezes. This expansion pushes open the cracks, allowing even more water to seep in after the ice melts. This crack/seep/freeze/expand cycle continues until the rock fails, splitting along the expanded crack. In this process large chunks of granite are shed, often quite suddenly, while the remaining granite stands tall.
Granite’s unique qualities are on exquisite display in Yosemite Valley, where streams bursting with snowmelt tumble over shear granite walls, and granite monoliths tower 3,000 feet above the Merced River. Yosemite and Bridalveil Falls are Yosemite’s most recognized waterfalls, but look up on a spring day and you might count a dozen or more. The waterfalls dominate in spring, but Yosemite’s monoliths endure year-round, drawing visitors from around the world in every season. El Capitan, the largest chunk of granite in the world, is a climbers’ mecca, and few mountains have a more recognizable profile than Half Dome.
Half Dome is a bit of a misnomer, but one look at it the name is easy to visualize a rounded dome that lost a full half of its mass to a passing glacier. The reality is that Half Dome’s current shape is fairly close to the rock that was exposed by millions of years of erosion. While Yosemite’s glaciers filled most of Yosemite Valley, Half Dome was tall enough to protrude from the ice sheet and avoid direct contact. Half Dome’s shear face resulted from a single fracture that separated a large slice of granite to expose the flat granite face we all recognize.
After a nice day photographing fall color and reflections El Capitan’s shadow, we finished our day at Glacier Point for a face-to-face view Half Dome. The gray stratus blanket that had permitted a full day of sweet photography in diffuse the sunlight was about to become a liability for anyone longing for a colorful sunset.
Half Dome gets light all the way up to, and in fact even a couple of minutes beyond, the “official” (flat horizon) sunset. But because the view of Half Dome faces east, and the view to the west is obscured by terrain, there’s no way to know whether the horizon is clear in the direction of the setting sun. Even on cloudy days like this, my rule in Yosemite is to never give up on sunset until at least five minutes the after the official sunset time has passed. When a couple of people in the group started rumbling about heading back to the cars, I issued one of my favorite Yosemite proclamations to all within earshot: Never try to predict the conditions in five minutes based on the conditions now. I knew the odds were long for capturing anything more than darkening shades of gray fading to black, but without cameras they’d be zero.
I have no idea whether they truly believed me, or simply stayed put to humor me, but either way, I started to look pretty smart about five minutes before sunset when we spotted a faint glow on Half Dome. I held my breath as the sun slipped into a clear slot of unknown size on the horizon behind us to paint Half Dome with warm light. I hadn’t planned to shoot that evening, but as the light intensified I was glad I’d dragged my bag around anyway. As I quickly set up my tripod and extracted my camera, I urged everyone to keep shooting because there was no guarantee that this would last—just as I’ve witnessed many of these last minute miracles in Yosemite, I’ve also seen euphoria dashed in a heartbeat when the sun was suddenly snuffed right at the climactic moment (Horsetail Fall is notorious for this). But this evening the light held strong, warming to a golden crescendo, then fading to pink that intensified to a rich red that colored the sky from horizon to horizon.
The light tones of quartz and feldspar, plus its crystalline nature, make granite especially reflective. So while Yosemite isn’t especially known for its sunsets, when they do get red like this, granite’s inherent reflectivity causes the entire landscape to throb with a crimson glow. It’s one of my favorite phenomena in nature.
I ended up photographing the entire sunset with my Sony 100-400 GM lens on my Sony a7RIII. Not because I didn’t have a wealth of wide angle shots to choose from (I did!), but because I was working with my group and the telephoto compositions were simpler. Simpler in the sense that (for me at least) a wide shot requires a bit more strategic planning to first identify the frame’s foreground, middle-ground, and background elements, then position myself to give them a coherent relationship. A telephoto composition, on the other hand, has always felt more intuitive than strategic (though each generally requires elements of strategy and intuition), so I’m usually able to put my camera and telephoto to my eye, then move and zoom until something feels right.
With so many views at Glacier Point, the group had scattered a little before sunset, so I was only with about half of them for the good stuff at the end. Back at the cars I checked in with those who had gone elsewhere and found that while most had photographed it, a couple had watched the show from the parking lot. Sigh.
Yosemite Photo Workshops
Workshop Schedule || Purchase Prints
Half Dome Near and Far


It’s All a Blur: Photographing Moving Water
Posted on March 9, 2018
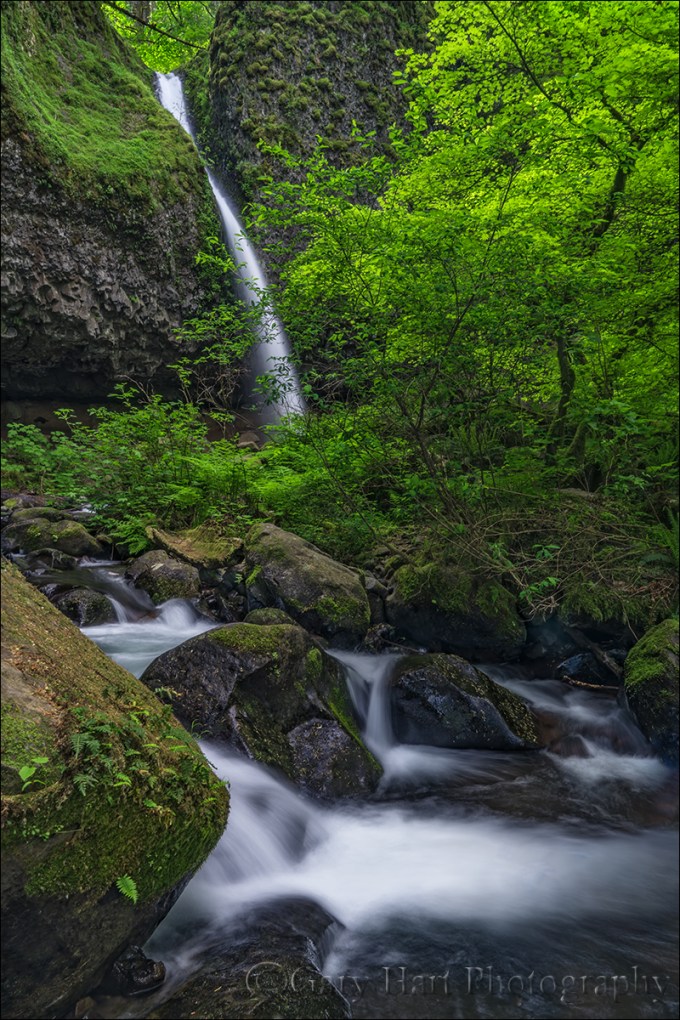
Downstream, Upper Horsetail Fall, Columbia River Gorge
Sony a7RII
Sony/Zeiss 24-70 f4
1 second
F/11
ISO 50
One of the questions I’m asked most is how to blur water. It’s really not that hard when you know how to control your exposure variables, and in fact if you’re photographing moving water in the right light, it’s easier to blur the water than it is to freeze it.
Here are the essential elements for blurred water:
- Sturdy tripod: The longer the shutter is open, the greater the blur effect; even with a stabilized lens and/or body, it’s pretty hard to hand-hold at a water-blurring shutter duration and avoid camera shake that blurs the rest of the scene.
- Camera with exposure control: Since motion blur is partially a function of shutter speed, you’ll need to be able to control your camera’s shutter speed. A mirrorless or DSLR camera will do the job for sure, but many of the more sophisticated point-and-shoot cameras will work as well.
- Whitewater: While it’s possible to smooth any moving water, the silky water effect most people want requires whitewater.
- Shade or overcast: Water in direct sunlight is so bright that, without a neutral density filter, a shutter duration long enough to blur it will completely and irrevocably overexpose it.
With these basic ingredients, and a little knowledge of exposure management, you’re ready to go. While motion blur requires the shutter remain open long enough for the water’s motion to blur, there’s no magic shutter speed that achieves this. The amount of blur will vary from a lot to none at all, depending on the following factors:
- Shutter speed: A digital sensor (or piece of film) records the position of everything in the scene throughout the duration of the exposure. If something moves while the shutter is open, it will blur—the more it moves, the more it blurs.
- The water’s speed: The faster the water moves while the shutter is open, the more of the frame it will span and the greater the blur. But it’s not just the water’s speed that determines the blur—other factors are…
- The water’s distance: It’s not actually the water’s speed that matters, it’s the distance across the frame that the water moves while the shutter is open. So the farther away the water is, for any given focal length, the less of the frame it will span (and the less blur you’ll see).
- Focal length: Increasing the focal length is the equivalent of moving closer. A longer focal length magnifies everything in the frame, including the distance across the frame the water travels while the shutter is open.
- The water’s direction of motion: Water moving across the frame will blur more than water moving away from or toward the camera.
Most of the above motion blur factors affect the composition too, so achieving motion blur without compromising the composition usually comes down to managing the shutter speed. Choosing a shady scene or overcast day is a good start, but here are a few other ways to keep the shutter open longer:
- Neutral density filter: An ND filter will darken the scene without changing anything else (such as the color cast)—typically by at least 3 stops, and usually more. I don’t often use an ND filter for whitewater because I only shoot water in shade or overcast and find I can achieve enough blur without it.
- Polarizer: A polarizer cuts light by 1 to 2 stops, but that’s secondary to the polarizer’s primary function, which is to reduce reflections. Whether it’s sheen on rocks and leaves, or light bouncing off darker water, reflections are everywhere, even in a shady or overcast scene. I never photograph moving water without a polarizer, and gladly accept its longer shutter speed side benefit.
- Low ISO: The lower the ISO, the less sensitive to light the sensor is, and the longer the shutter duration necessary to make up for that decreased sensitivity. Your camera probably has a native ISO of 100 (most likely) or 200—that’s the ISO that achieves the best image quality, and the ISO you should start at for your motion blur shots. Some digital cameras offer a lower, emulated ISO that, while not increasing the image quality (unlike film, where the lower the ISO or ASA, the better the image quality). Usually the ability to access this emulated ISO needs to be enabled in your camera’s menu system.
- Small aperture: Because I prefer basing my aperture choice on the depth of field I want, and by what will give me the sharpest results (less diffraction and most corner-to-corner sharpness), I usually go to my minimum ISO before choosing an aperture smaller than f/11 (remember, the bigger the f/ number, the smaller the aperture, so f/16 is smaller than f/11).
Armed with this knowledge, you’re ready to go. One important thing to keep in mind is that motion blur is never just blurred or not blurred. Rather, there are degrees of blur. That’s why, when possible, for any given scene I try different ISOs and f-stops, adjusting the shutter speed to compensate and vary the blur effect.
For example
In a region packed with waterfalls, Upper Horsetail Fall (sometimes called Ponytail Fall), is one of my favorites. After a short but steep hike from the road and (lower) Horsetail Fall, hikers round a bend for the first view of the source of the roar heard from several hundred yards down the trail. Most waterfall trails either cross the source river or creek upstream, above the fall, or down stream, below the fall. The Upper Horsetail Fall trail goes behind the fall.

Looking Out, Upper Horsetail Fall, Columbia River Gorge: The view from the trail under the ledge, behind Upper Horsetail Fall.
On this visit, before venturing behind the fall, I scrambled down the slope on the right and set up near creek level, in front of the whitewater and just downstream from the pool. After a little bit of visual exploration, I settled on the essence of my composition: the rushing water in the foreground, with the waterfall prominent in the background, balanced by the brilliant green of a freshly leafed-out tree. The compositional variations mostly centered around how much of the fern-infused rock on the left, and the angled tree trunk on the right, to include.
Another compositional choice to weigh was whether to allow the foreground rock to merge with the rock just behind it, in the center of the creek. Normally I try to avoid merging elements at different distances, but in this case the solution would have been to move a couple steps to the right, which would have put the fall more behind the tree. Since the waterfall is the scene’s most prominent element, I decided to maximize its presence.
The darkness of the surrounding forest was enhanced by a thick overcast, making motion blur virtually inevitable, so I just embraced it. Often the greatest difficultly with photographing motion blur surrounded by dense foliage is that a shutter open long enough to blur water is also open long enough to pick up wind motion in the leaves. On this morning I was fortunate to have virtually no breeze, and my 1-second exposure blurred the water and froze the leaves. Mission accomplished.
Columbia River Gorge Photo Workshops


