Eloquent Images by Gary Hart
Insight, information, and inspiration for the inquisitive nature photographer
In Defense of the Tripod
Posted on July 5, 2020

Spring Sunrise, Rowena Crest, Columbia River Gorge
Canon EOS-5D Mark III
Canon 70-200 f/4L
1/10 second
F/8
ISO 800
This is another 6-year-old “brand new” image, just excavated from the depths of my 2014 folder
Photography without compromise
If you think the main reason to use a tripod is to avoid camera-shake, you’re mistaken. In this day of phenomenal high ISO performance and stabilized bodies and lenses, acceptable hand-held sharpness is possible in the vast majority of images. But here’s a reality that’s tough to deny: The steadiest hand-held image will never be sharper than it would have been if it had been properly executed using a sturdy tripod. And that’s not even the best reason to use a tripod.
Each camera has an ideal ISO—the quality of any image that doesn’t use it is compromised, sometimes just slightly, other times a lot. So if hand-holding an images forces you out of your camera’s ideal f-stop to reduce camera shake, you’ve made an unnecessary compromise. “Photographer’s light” (such as sunrise, sunset, and stormy or cloudy weather) only compounds the problem. While most of these compromises can be more or less remedied in post-processing, and many may not show up at all on a fifteen-inch laptop screen or in an 8×10 print, most serious photographers like the option to print their images large—and nothing reveals flaws more than a large print.
Let’s imagine you just got a request for a 24×36 print of the pride of your portfolio—a (hand-held) Yosemite Valley moonrise telephoto, captured at ISO 800 (it looks great in your Flickr gallery)—for the reception area of your mother-in-law’s law firm (a real coup after that whole llama-farm investment fiasco). So what do you tell her when you go to hang it and she asks why it looks “so mushy,” and what’s with all that “sludge in the shadows”? Oops—looks like another Thanksgiving at the kids’ table.
Not only does every camera have an ideal ISO, every scene has an ideal f-stop. Anyone with a camera can snap the lateral (left/right, up/down) dimensions of a scene, but artistic photographers understand that the key to rendering our three-dimensional world in photography’s two-dimensional medium is creating the illusion of the missing dimension, depth, by composing elements throughout the frame, from near to far. Since depth of field is controlled by the f-stop, of all the exposure variables at a landscape photographer’s disposal, f-stop is the least negotiable. In a static scene (as most landscape images are), the tripod removes motion (camera shake) from the equation, allowing you to select the ideal f-stop at your camera’s best ISO.
But what about a scene that’s all on the same plane, where depth isn’t a factor? The f-stop still matters because every lens has a single f-stop that renders the sharpest result. For some lenses the sharpness difference between f-stops is small, for others it’s significant. But it’s always there. So even when DOF isn’t a consideration, I choose my lens’s sharpest f-stop, usually f/5.6-f/11. Some photographers put each lens through extensive testing to determine its sweet spot; I usually go with f/8 or f/11 unless I see clear evidence that a lens is sharper at a different f-stop. I also try to avoid f-stops smaller than f/11 unless the scene requires extra depth—not only do lenses tend to be less sharp at their extreme f-stops, at f-stops smaller than f/11, diffraction starts to rear its ugly head.
The bottom line: By removing camera shake from the equation, a tripod frees you to choose the best f-stop for your composition, without compromise.
An image is not a snap, it’s a process
Still not convinced? Consider also the control a tripod gives to your composition process. Managing the relationship of elements in the frame is usually the single most important compositional decision a photographer can make. Relationships are especially important when you’ve included the front-to-back objects so essential to enhancing the illusion of depth. Photographing on a tripod gives you the time to consider each element in your frame and its relationship to other elements and eliminate distractions, and the flexibility to evaluate and refine until everything’s perfect.
When setting up an image, I try to achieve a sense of visual balance throughout my frame. I think about the path for my viewers’ eyes to follow, and where I want them to pause or land. I consider the elements that will move or stop the eye, and potential distractions that might pull the eye away, and merged elements that rob the scene of depth. With these things in mind, I position myself and frame my composition, identifying the focus point and f-stop for the ideal depth of field. Having my composition frozen in place atop my tripod enables me to make these adjustments deliberately and methodically, and helps me ensure that one tweak here didn’t break something else over there.
After each click, I step back and study the image on the LCD, imagine it framed large and hanging on a wall. I scrutinize my composition for possible composition and depth of field improvements, and check the histogram for exposure problems. With a tripod I can do all this at my pace, taking as much time as necessary, knowing that when I’m ready to make adjustments, the image I just reviewed will be waiting right there in my viewfinder atop my tripod, exactly as I captured it, ready for me to enhance.
And finally
Other benefits of a tripod I’ve almost come to take for granted. For example, I sometimes use graduated neutral density filters but find the holders that screw onto the end of my lens awkward. With a tripod, it’s easy to position my GND and hold it with my fingers during exposure (I don’t even own a filter holder). During long exposures I’ll sometimes move the GND up and down slightly to disguise the transition—also easy on a tripod.
A tripod also makes it easy to use a polarizer to reduce color-robbing glare, something I can do on virtually every daylight shot because unless something in my scene is moving, the two stops of light I lose to a polarizer are irrelevant when I’m on a tripod.
And advanced digital techniques such as image stitching (for panoramas or high resolution capture), HDR (high dynamic range blending of multiple images for exposure management), or focus blending to increase depth of field are all easier on a tripod. As is old-fashioned mirror lock-up to reduce mirror-slap induced vibration. And live-view focusing, the best way to ensure precise focus, is a snap on a tripod (and pretty much impossible hand-held).
For example

Spring Sunrise, Rowena Crest, Columbia River Gorge
There was a lot going on in this scene. I had wildflowers everywhere, the Columbia River, clouds, a freeway, railroad tracks, power lines, and lots of other photographers and wildflower peepers. Organizing all this into a coherent image, including the good stuff and eliminating the distractions, required no small measure of planning and execution.
I’d been wandering the hillsides of the Tom McCall Preserve on the Rowena Crest in the Columbia River Gorge for about an hour, playing with compositions and identifying potential subjects. I could see the potential for a colorful sunrise and wanted to be ready when (if) it happened. I wanted a foreground subject to anchor my frame, and needed to eliminate the freeway, tracks, wires, and people, and finally landed on this spot about 15 minutes before sunrise.
Rather than wait for the color to arrive, I started working on my composition immediately, choosing a height about two feet above the ground—any higher and the power lines would come into view; any lower and the flowers and near cliff (on the left) would merge with the opposite bank. To compress the foreground/background distance, I moved back a little and chose my 70-200 lens, putting the bottom of the frame a few inches below the yellow balsam root to frame the flowers with a little green, and taking care not to cut off any of the large, ear-shaped leaves.
The clouds weren’t very interesting, but I knew that if they colored up they’d add an important layer to my frame, so I made sure to include a strong stripe of clouds across the top of my frame. I liked the nearby sprinkling of lupine and other wildflowers, so I went wide enough to include a few without diluting my primary clump of wildflowers.
The final step was to determine depth of field and focus. To make the flowers’ sharpness stand out even more, I slightly softened the background by dialing to f/8 and choosing a focus point closer than the hyperfocal distance.
Each of these framing decisions were part of an iterative process that took more than a dozen clicks before everything was just as I wanted it. Because I was working on a tripod, I was able to click a frame, evaluate all of the variables, and make small refinements. The tripod also gave me the luxury of straightening to unkink my back between clicks. When I was sure everything was right, I stood and waited (fingers crossed) for the color. When the sky did finally color-up, an intermittent breeze came with it, forcing me to compromise my ISO (ISO 800) to freeze the flowers’ movement. But because I was on a tripod, I was able to stand and watch the scene confident in the knowledge that my composition was fixed, and click my remote release whenever there was a lull.
Workshop Schedule || Purchase Prints


It’s All a Blur: Photographing Moving Water
Posted on March 9, 2018
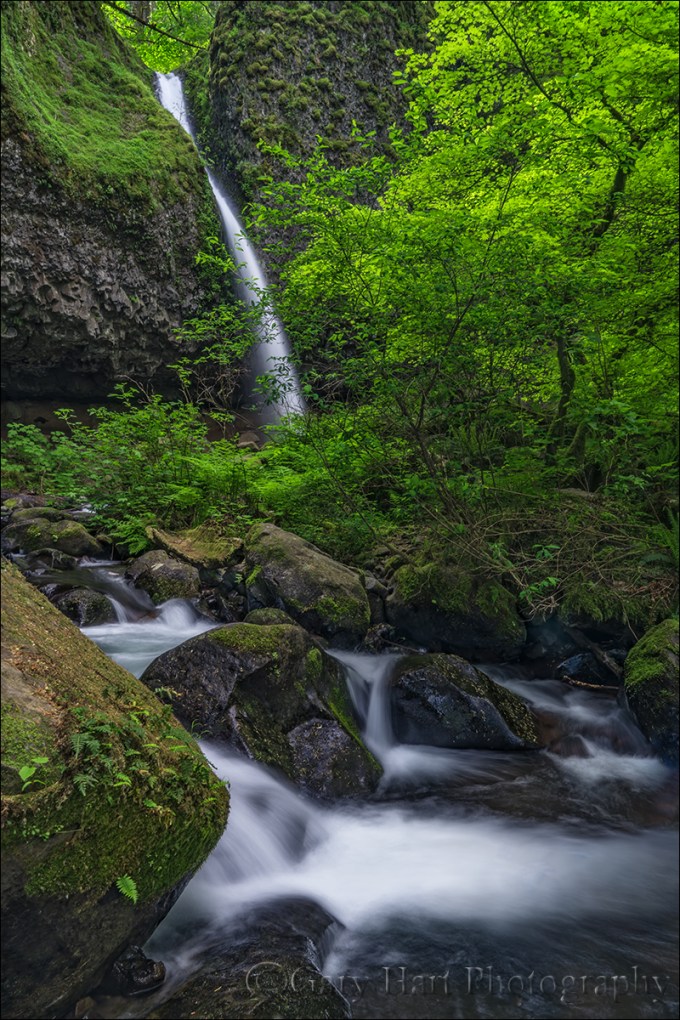
Downstream, Upper Horsetail Fall, Columbia River Gorge
Sony a7RII
Sony/Zeiss 24-70 f4
1 second
F/11
ISO 50
One of the questions I’m asked most is how to blur water. It’s really not that hard when you know how to control your exposure variables, and in fact if you’re photographing moving water in the right light, it’s easier to blur the water than it is to freeze it.
Here are the essential elements for blurred water:
- Sturdy tripod: The longer the shutter is open, the greater the blur effect; even with a stabilized lens and/or body, it’s pretty hard to hand-hold at a water-blurring shutter duration and avoid camera shake that blurs the rest of the scene.
- Camera with exposure control: Since motion blur is partially a function of shutter speed, you’ll need to be able to control your camera’s shutter speed. A mirrorless or DSLR camera will do the job for sure, but many of the more sophisticated point-and-shoot cameras will work as well.
- Whitewater: While it’s possible to smooth any moving water, the silky water effect most people want requires whitewater.
- Shade or overcast: Water in direct sunlight is so bright that, without a neutral density filter, a shutter duration long enough to blur it will completely and irrevocably overexpose it.
With these basic ingredients, and a little knowledge of exposure management, you’re ready to go. While motion blur requires the shutter remain open long enough for the water’s motion to blur, there’s no magic shutter speed that achieves this. The amount of blur will vary from a lot to none at all, depending on the following factors:
- Shutter speed: A digital sensor (or piece of film) records the position of everything in the scene throughout the duration of the exposure. If something moves while the shutter is open, it will blur—the more it moves, the more it blurs.
- The water’s speed: The faster the water moves while the shutter is open, the more of the frame it will span and the greater the blur. But it’s not just the water’s speed that determines the blur—other factors are…
- The water’s distance: It’s not actually the water’s speed that matters, it’s the distance across the frame that the water moves while the shutter is open. So the farther away the water is, for any given focal length, the less of the frame it will span (and the less blur you’ll see).
- Focal length: Increasing the focal length is the equivalent of moving closer. A longer focal length magnifies everything in the frame, including the distance across the frame the water travels while the shutter is open.
- The water’s direction of motion: Water moving across the frame will blur more than water moving away from or toward the camera.
Most of the above motion blur factors affect the composition too, so achieving motion blur without compromising the composition usually comes down to managing the shutter speed. Choosing a shady scene or overcast day is a good start, but here are a few other ways to keep the shutter open longer:
- Neutral density filter: An ND filter will darken the scene without changing anything else (such as the color cast)—typically by at least 3 stops, and usually more. I don’t often use an ND filter for whitewater because I only shoot water in shade or overcast and find I can achieve enough blur without it.
- Polarizer: A polarizer cuts light by 1 to 2 stops, but that’s secondary to the polarizer’s primary function, which is to reduce reflections. Whether it’s sheen on rocks and leaves, or light bouncing off darker water, reflections are everywhere, even in a shady or overcast scene. I never photograph moving water without a polarizer, and gladly accept its longer shutter speed side benefit.
- Low ISO: The lower the ISO, the less sensitive to light the sensor is, and the longer the shutter duration necessary to make up for that decreased sensitivity. Your camera probably has a native ISO of 100 (most likely) or 200—that’s the ISO that achieves the best image quality, and the ISO you should start at for your motion blur shots. Some digital cameras offer a lower, emulated ISO that, while not increasing the image quality (unlike film, where the lower the ISO or ASA, the better the image quality). Usually the ability to access this emulated ISO needs to be enabled in your camera’s menu system.
- Small aperture: Because I prefer basing my aperture choice on the depth of field I want, and by what will give me the sharpest results (less diffraction and most corner-to-corner sharpness), I usually go to my minimum ISO before choosing an aperture smaller than f/11 (remember, the bigger the f/ number, the smaller the aperture, so f/16 is smaller than f/11).
Armed with this knowledge, you’re ready to go. One important thing to keep in mind is that motion blur is never just blurred or not blurred. Rather, there are degrees of blur. That’s why, when possible, for any given scene I try different ISOs and f-stops, adjusting the shutter speed to compensate and vary the blur effect.
For example
In a region packed with waterfalls, Upper Horsetail Fall (sometimes called Ponytail Fall), is one of my favorites. After a short but steep hike from the road and (lower) Horsetail Fall, hikers round a bend for the first view of the source of the roar heard from several hundred yards down the trail. Most waterfall trails either cross the source river or creek upstream, above the fall, or down stream, below the fall. The Upper Horsetail Fall trail goes behind the fall.

Looking Out, Upper Horsetail Fall, Columbia River Gorge: The view from the trail under the ledge, behind Upper Horsetail Fall.
On this visit, before venturing behind the fall, I scrambled down the slope on the right and set up near creek level, in front of the whitewater and just downstream from the pool. After a little bit of visual exploration, I settled on the essence of my composition: the rushing water in the foreground, with the waterfall prominent in the background, balanced by the brilliant green of a freshly leafed-out tree. The compositional variations mostly centered around how much of the fern-infused rock on the left, and the angled tree trunk on the right, to include.
Another compositional choice to weigh was whether to allow the foreground rock to merge with the rock just behind it, in the center of the creek. Normally I try to avoid merging elements at different distances, but in this case the solution would have been to move a couple steps to the right, which would have put the fall more behind the tree. Since the waterfall is the scene’s most prominent element, I decided to maximize its presence.
The darkness of the surrounding forest was enhanced by a thick overcast, making motion blur virtually inevitable, so I just embraced it. Often the greatest difficultly with photographing motion blur surrounded by dense foliage is that a shutter open long enough to blur water is also open long enough to pick up wind motion in the leaves. On this morning I was fortunate to have virtually no breeze, and my 1-second exposure blurred the water and froze the leaves. Mission accomplished.
Columbia River Gorge Photo Workshops


Putting the Gorge in Gorgeous
Posted on March 2, 2018

Sunset Calm, Trout Lake and Mount Adams, Washington
Sony a7R
Sony/Zeiss 24-70 f4
1.3 seconds
F/11
ISO 100
I recently spent some time going through and processing a bunch of Columbia River Gorge images, from many years of visits, I haven’t had time to get to until now. This is the first of several I’ll be posting over the coming weeks.
The first time I visited the Columbia River Gorge, I couldn’t believe I’d lived my entire life without visiting here. For a landscape photographer, the Columbia River Gorge area has everything: lush forests, thundering waterfalls, majestic volcanoes, sparkling streams, and glassy lakes. It’s almost unfair that this year-round beauty is enhanced by the vivid colors of spring wildflowers and autumn foliage.
The Columbia River cuts a wide channel through lava flows that ended around 10 million years ago, leaving a layer of basalt that’s more than a mile thick. Basalt’s hardness is responsible for the gorge’s proliferation of waterfalls. Rather than eroding into gently sloping terrain as softer rock does, the basalt cliffs carved by the Columbia River maintain their verticality, creating resilient platforms that launch the numerous rivers and creeks that drain this saturated region. The result is waterfalls, lots and lots of waterfalls: Tall waterfalls, short waterfalls, wide waterfalls, skinny waterfalls, single waterfalls, multiple waterfalls, plummeting waterfalls, cascading waterfalls….
But it would be a mistake to assume that the Columbia River Gorge experience is all about waterfalls. Bookended by majestic volcanoes, the area surrounding the Gorge is a pastiche of rivers, streams, and lakes that are beautiful subjects by themselves, and as wonderful foreground material for whatever mountain happens to be in view.
On the Oregon (south) side of the Columbia River, Mount Hood towers over the picturesque orchards of the Hood River Valley. Across the river is Washington and its seemingly endless evergreen forests that unfold in the shadows of Mount Hood and Mount St. Helens.
Trout Lake is about a half hour north of the river on the Washington side. Technically not part of the Columbia River Gorge, Trout Lake is nevertheless part of the broader Columbia River Gorge experience. And while I wouldn’t call Trout Lake hidden, or particularly unknown, it’s far enough off the beaten path to avoid trampling by ogling tourists.
Filling with sediments that started their journey on or near Mount Adams, Trout Lake is on its way to becoming a meadow. Its relative shallowness makes it less likely to be disturbed by waves that spoil reflections reflections. While a reflection like the one in this image is far from a sure thing, neither is it a rare occurrence. They’re more common here in the calm air around sunrise, but as this picture illustrates, I’ve found reflections on Trout Lake at sunset too.
Filtered by thin clouds, the light this afternoon had been rather subdued—nice, but unspectacular. Sunset was similarly forgettable. But as I started to pack up, a whisper of pink in the previously bland clouds above Mount Adams gave me pause. Hmmm. Often this kind of color is just there to mess with me (you know what I’m talking about), but I paused to watch the color intensify, until finally I could no longer resist.
Without a lot of foreground options, and not much time to go hunting, I simply centered Mount Adams in the top third of the frame and used a solitary protruding rock to create a diagonal with a cinder cone to Mount Adams’ right. While perhaps not my most creative composition, the mountain, color, and reflection make this one of those moments in nature when it’s best for the photographer to get out of the way and just let the scene speak for itself.
Columbia River Gorge Photo Workshops
Workshop Schedule || Purchase Prints
Celebrating the Columbia River Gorge


The cat’s out of the bag…
Posted on May 19, 2017
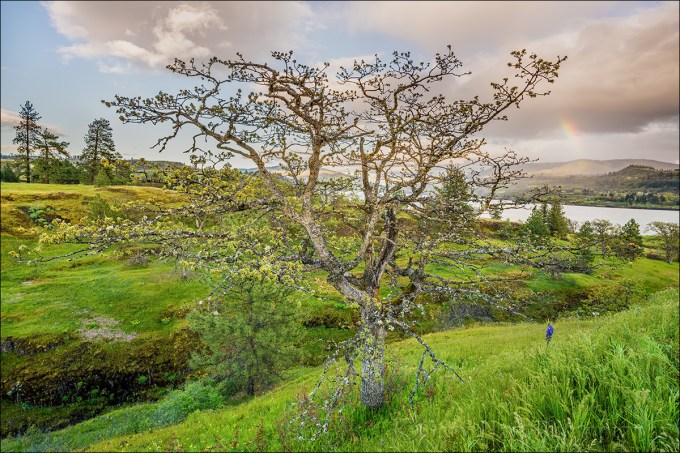
Spring Rainbow, Catherine Creek Trail, Columbia River Gorge
Sony a7R II
Sony 16-35 f2.8 GM
18mm
1/125 second
F/11
ISO 400
For about three weeks I’ve had to bite my tongue about two new Sony lenses I got to try out a few weeks ago. But yesterday Sony announced their brand new 16-35 f2.8 GM and 12-24 f4 G lenses and I’m free to share.
I spent most of this week just outside of Santa Barbara, California with a hundred or so Sony Artisan and Creative Collective photographers at Sony’s Kando Summit. This event was revelatory in many ways: Not only did I get to commune with fellow Sony Artisan’s who had previously been just names on e-mails and pictures on Facebook, I also learned that the future of photography is in the very capable hands of the Collective members—such an impressive group of creative, intelligent young adults.
For most of the Summit the hardware show-stealer was the brand new Sony a9—each of us got our own a9 to play with (but not to keep) for the duration of the event, along with many great photo opportunities (models, sets, and demonstrations) provided to us by Sony. Without going into a lot of detail, I predict that time will prove that the Sony a9 is an actual photography game changer and not just another “next great camera” cliché.
But the availability of the a9 wasn’t a surprise; the surprise (to almost everyone else) was the announcement of the new 16-35 and 12-24 lenses, and their instant availability (again only to borrow). Since I’d already had nearly a week of quality time with them, I passed on this opportunity, but had to jump aside to avoid being trampled by a stampede of photographers intent on getting their hands on these two new lenses.
Don Smith and I were just wrapping up our back-to-back Columbia River Gorge workshops when Sony asked us if we could stay a couple of extra days to try out their two new (super-secret) lenses. They overnighted them to us, and since we had them for a week, Don and I decided we had time to try them for a couple of extra days at our favorite locations closer to home. For me that was Yosemite (Don went to Big Sur). Since I knew I wanted the 12-24 in Yosemite, I took the 16-35 for our two extra days in the CRG.
First Impressions: 16-35 f2.8 GM
The first thing that struck me about this lens was its compactness. As a landscape shooter always on a tripod, I value compactness over speed in a lens, but this one gives me both. Of course it’s not as compact as my Sony/Zeiss 16-35 f4, but it’s noticeably more compact than my Canon 16-35 f2.8 was. I was also pleased with its smoothness of operation and speed of focus—this lens is definitely a joy to use.
Of course compactness and ease of use mean nothing if a lens isn’t sharp, and I can tell you with certainty that this lens is as sharp as we’ve come to expect Sony’s GM lenses to be—that is, ridiculously sharp from corner to corner and throughout the aperture range. I haven’t really taken the time to do a/b tests against any other lenses (I leave the pixel-peeping to others), but I did magnify many images to 100% (on my 27-inch iMac Retina 5K monitor) and can’t imagine that I have any lenses sharper than this one (including primes).
First Impressions: 12-24 f4 G
Even more than with the 16-35, the 12-24 blew me away with its compactness. I’ve handled the Nikon 14-24 f2.8 many times, and actually used Canon’s 11-24 f4, and as sharp as those lenses are, the first thing I remember about those lenses is their heft—they’re beasts, and just too heavy to carry in my bag for regular use. Not so with the Sony 12-24: This lens is 1/3 the weight of Canon’s 11-24—in fact it’s noticeably lighter than the Canon 24-105, and not much heavier than the Canon 17-40. Wow.
Like the 16-35, this lens just felt good on my camera and in my hand. The operation was smooth, and focus was fast and easy. Having rarely shot with a lens this wide, I found myself frequently surprised by how much more I could get in my frame at 12mm than I can at 16mm—suddenly things not possible with a single click before were very doable. With so many views of very large and close subjects (such as El Capitan and Half Dome), this lens was made for Yosemite. And I did an actual double-take at the top of the trail to lower Yosemite Fall when I realized I could get the entire fall and a sunstar (with the sun behind my right shoulder) in one frame (see the gallery below).
Sharpness? Again, I didn’t do any pixel peeping beyond magnifying my images to 100%, but they looked every bit as sharp as the Canon 11-24 images that blew me away when I used it a year ago. I will own this lens the first day it’s available.
About this image
On the first evening with our new toys, Don and I went to Catherine Creek on the Washington side of the Columbia River Gorge. At the trailhead Don headed off in one direction and I went in the other, eventually ending up at this tree that I remembered from previous visits.
With the wind blowing like crazy, probably 25-35 MPH, this lens was perfect for the wide scenes that deemphasize motion. To further ensure against any motion blur I bumped my ISO to 400 and went to work. I started by balancing the tree with a small waterfall that was down the hillside to my left, but when a surprise rainbow fragment popped out above the Columbia River I quickly shifted position. My exposure variables were already set, so all I had to do was compose, focus, and shoot. Good thing, because the rainbow faded quickly and I only had time for a handful of images before it was gone completely.
Listen to Don and I discuss the new lenses on the Alpha Universe Podcast
Sony 16-35 f2.8 GM and Sony 12-24 f4 G Sample Images
Click an image for a closer look and slide show. Refresh the window to reorder the display.

, Catherine Creek Trail, Columbia River Gorge")


The limitations of human vision
Posted on June 21, 2016
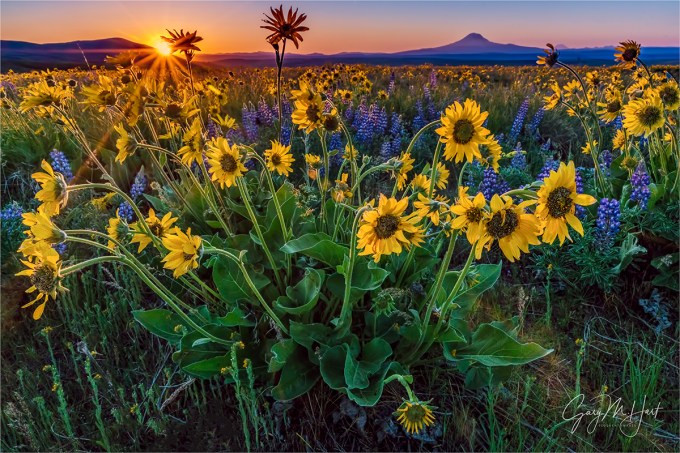
Wildflowers and Sunstar, Mt. Adams, Columbia River Gorge
Sony a7R II
Sony/Zeiss 16-35 f4
1/125 second
F/20
ISO 800
Read the story of my “discovery” of this location
Visual “Truth” is more relative than real
“Is that the way it really looked?” What photographer hasn’t heard that question by skeptical viewers? For years I used to feel slightly defensive when answering, as if my honesty was in question. Now I simply try to educate the skeptic.
Without getting too philosophical, it’s important to understand that, like the camera’s, the human view of the universe is both limited and interpreted. In other words, there’s no such thing as absolute visual truth. Instead, we (you, me, and our cameras) each have our own view of the world that’s based on many factors, some we can control, others we can’t. When you look through a viewfinder, the more you turn off your visual biases and understand your camera’s, the more successful your photography will be.
Limited vision
Complaining about the camera’s limitations—its dynamic range, low-light sensitivity, distorted perspectives—is a popular pastime among photographers who feel obligated to reproduce the world as “it really looks.” But before wasting too much time lamenting your camera’s limitations, pause to consider that what you and I see is incredibly limited as well. And while the camera can’t do some things our eyes can, it can do other things our eyes can’t.
Every square inch of the Universe is continuously bathed in an infinite range of electromagnetic frequencies. We humans, and our cameras, are completely oblivious to the vast majority of this radiation. For example, X-ray machines “see” waves in the one nanometer (one billionth of a meter) range, far too small for our eyes to register; TVs and radios “see” waves that are measured in centimeters—much too long for our eyes; we humans (and our cameras) can only see electromagnetic waves that fall between (about) 400 and 750 nanometers.
Knowledge of these “missing” wavelengths enables astronomers to peer into space using tools designed to see objects at wave lengths invisible to us, doctors to harness X-rays to view bones hidden beneath opaque skin, and military and law enforcement to see in the dark by detecting infrared radiation (heat). In other words, in the grand scheme of things, there’s no single absolute visual standard—it’s all relative to your frame of reference.
Recording more or less the same visible spectrum our eyes do, the camera is sometimes mistakenly assumed to duplicate human vision. But the camera has its own view of the world. For starters, it’s missing an entire dimension. And not only does it not record depth, a still camera only returns a frozen snap of a single instant. And we all know about our camera’s limited dynamic range and depth of field. Yet despite these differences, photographers often go to great lengths to force their camera to record what their eyes see. Not only is this impossible, it ignores camera’s potential to see things in ways we don’t.
About this image
Several things about this Columbia River Gorge wildflower image are different from what my eyes saw. First, this scene was a little brighter to my eyes than what I captured—I chose to slightly underexpose the majority of the scene to avoid completely overexposing the extremely bright sun and sky, and to keep the color from washing out. Another benefit of underexposure in this case is the way the nearly black shadows enhance the scene’s rich color.
(In the simplest possible terms) a sunstar is caused when sunlight’s path is disturbed as it passes by the intersection of a lens’s aperture blades—the smaller the aperture, the greater the angle of the intersection, and the more distinct the sunstar. (In this case, the scene’s extreme depth of field required a small aperture anyway.) The sunstar was a perfect counterweight on the left side of my frame for the visual weight of Mt. Adams on the right. And finally, going with an extremely wide focal length exaggerated the size of the flowers that were just inches away, and significantly diminished the size of the distant Mt. Adams.
What is real?
Is this image real? While I couldn’t see the sunstar with my unaided eyes, this image is a very accurate rendering of my camera’s reality. Understanding how my camera’s vision differs from mine, and how to leverage that difference by controlling the available focal length, exposure, and compositional options enabled me to capture a perspective that surpassed my limited vision to transcend human reality. Pretty cool.
Workshop Schedule || Purchase Prints || Instagram
Not what my eyes saw


Playing the Hand You’re Dealt
Posted on April 27, 2015

Spring Sunrise, Memaloose Overlook, Columbia River Gorge, Oregon
Sony a7R
Sony/Zeiss 24-70
1/13 second
F/11
ISO 400
In family Hearts games when I was a kid, I loved to “shoot the moon” (tremendous reward for success, extreme cost for failure). But simply wanting to shoot the moon wasn’t enough to make it happen, and I didn’t really start winning until I learned to separate my desires from the reality of the moment—I know now to evaluate my cards when they’re dealt, set a strategy, then adjust my strategy as the game unfolds. It’s that way for most card games, and it’s that way with photography.
So much of successful nature photography is about flexibility, an ability to anticipate conditions, establish a plan, then adjust that plan when things don’t play out as expected. That’s why, given nature’s fickle tendencies, I’m never comfortable photographing any location without backup options. I was reminded of this during my recent 10-day, two photo workshop trip to the Columbia River Gorge with Don Smith, where rapidly changing Pacific Northwest weather makes flexibility the name of the game.
The Columbia River Gorge offers a full deck of photo opportunities that include numerous waterfalls in the gorge’s steep tributary canyons, mirror reflections of Mt. Hood and Mt. Adams in small lakes south and north of the gorge, and spring wildflowers blanketing the eastern gorge’s more exposed slopes. Of course merely showing up at a spot and expecting great captures isn’t sufficient: Waterfalls are dramatic subjects the camera struggles to capture in brilliant, midday sunlight; towering volcanos are the first subjects disappear when it rains; and I can photograph wildflowers all day—as long as there’s no wind.
During our workshops, Don and I had to shuffle our groups’ photo locations and timing around snow, rain, and clear skies, temperatures that reached the 80s and dropped into the 20s, and winds that ranged from calm to 40 MPH. Our plan for clear skies was to head to the volcanos; if we were dealt clouds and rain, we would use the diffuse light (subdued dynamic range) to concentrate on the gorge’s waterfalls. And rain or shine, the wildflowers were ideally positioned for sunrise and sunset if the wind cooperated.
Somehow we managed to pull it all off, our trip culminating with a sunrise jackpot on the final morning of the second workshop. The plan that morning was a vast, exposed, wildflower-smothered hillside on the southwest end of the gorge. I’d been monitoring the weather obsessively throughout the trip, and with the morning’s forecast calling for clear skies and calm wind, Don and I were looking forward showing the group these wildflowers backlit by the rising sun’s warm rays.
Despite our optimism for the morning’s shoot, as the group gathered in the dark, a chilly breeze gave me pause. The breeze stiffened on the drive to our planned location, and rather than cling to our original vision and attempt to photograph dancing wildflowers in low light, I started considering options.
Don and I had done extensive scouting in the area on multiple prior visits, and had arrived two days before these workshops for more scouting and to get a handle on conditions. My mind immediately jumped to a sheltered location just a short distance from our planned spot. This location had wildflowers too, but instead of being all about the wildflowers, we’d have lots scenes with rocks and trees above the Columbia River, allowing the clumps of balsam root, lupine, and paintbrush to serve as accents. This location’s advantages were that its primary subjects (rocks, trees, river) would be less affected by wind, and its wildflowers would be a little more sheltered.
The group ended up with an absolutely wonderful shoot that made Don and I look like geniuses. The morning started with a pink sky that reflected beautifully in the river, and ended with an orange ball of sun floating low above the horizon. There were more than enough wildflowers go around, and wind was much less of a problem than it would have been on a more exposed hillside.
Honestly, there was nothing genius about what Don and I did that morning. It should be standard operating procedure for any photographer to base location and timing plans on the expected conditions, but to be familiar enough with the area to have options if the conditions don’t materialize as expected. Additionally, no photographer should get so locked in to a plan, regardless of its potential, that he or she fails to see that it might not work out. (Because what good are options if you don’t use them?)
No shoot is a guaranteed success—sometimes nature’s cards just don’t fall right. But the more options you have, the more you read and respond to conditions, the more winners you’ll come home with.
Workshop Schedule || Purchase Prints || Instagram
A Spring Gallery
Click any image to scroll through the gallery LARGE


Uncharted territory
Posted on November 19, 2012

Fall Color, Elowah Fall, Columbia River Gorge, Oregon
Canon EOS-5D Mark III
28 mm
1/3 second
F/16
ISO 400
A few months ago I accepted an invitation to speak to the Cascade Camera Club in Bend, Oregon. With my fall workshops behind me, I decided to take the opportunity to spend a few days exploring the Columbia River Gorge, a place long on my “must see” list. I wasn’t disappointed.
Undeterred by steady rain throughout most of my visit, I found more photo opportunities than I had time to photograph. I’d only been there a couple of hours before it become clear that I’d be coming back, which caused me to change my strategy a bit. Rather than try to squeeze as many photographs as possible into my three days there, I decided to make my priority reconnaissance that would help me be more efficient on future trips.
My emphasis was on waterfalls, something the Gorge has an ample selection of. I was also pleased to find vestiges of fall color, well past prime, but quite nice nevertheless. Though I spent most of my time familiarizing myself with the area, identifying locations and the best conditions for photographing them, I still managed to find plenty of photographs.
The first waterfall I visited was Elowah Fall (about a one mile hike in a steady rain), where I was rewarded with a plethora of yellow leaves (some of which were still falling as I shot) accenting a tumbling cascade just downstream from the fall. Rather than follow the trail all the way to the bridge at the base of the fall, I scrambled about 75 feet down to McCord Creek for a perspective that would allow me to feature the leaves and cascades up close, with Elowah Fall in the background.
When the hill turned out to be a little steeper than I’d anticipated, and the footing a bit slipperier, I had visions of myself reprising Michael Douglas and Kathleen Turner’s wild ride through the Columbian jungle in “Romancing the Stone.“ But I made it to the bottom unscathed (Galen Rowell I’m not), and proceeded to work this scene to within an inch of its life. I don’t think I moved more than fifteen feet from this spot for the hour or more I was there, starting atop a rock directly above the creek and eventually working myself down closer and closer, until I finally ended up standing in the water.
Composing this was mostly a matter of organizing the leaves, rocks, and water into something coherent. By going wide and vertical, I chose to make the leaves the prime focus point, using the creek to guide your eye to the fall itself. F16 ensured depth throughout the frame, while ISO 400 gave me a 1/3 second shutter speed in the limited light, slow enough to blur the water, but fast enough that the water maintained some character. My polarizer was turned to minimize reflections, allowing the color to come through the significant sheen on the wet leaves, rock, and moss, and on the surface of the dark water.

