Eloquent Images by Gary Hart
Insight, information, and inspiration for the inquisitive nature photographer
It’s in the bag
Posted on July 22, 2011

Probably the question I am most asked is some variation on, “What lens should I use?” While I’m happy to answer questions, this one always makes me cringe because the implicit question is, “Which lenses can I leave behind?”
What many photographers fail to realize is that the “proper” lens is determined by the photographer, not by the scene. While there’s often a general consensus on the primary composition at a location, that pretty much just means the first composition everyone sees. But those are just the compositions I want to avoid, and you should too if your goal is to capture something unique (as I suggest it should be).
One of the things I emphasize in my photo workshops and lectures is the role of sacrifice in landscape photography. I’m not talking about risking your life, but I am talking about a willingness to experience a little discomfort and inconvenience to get a unique shot. That means venturing out in miserable weather, rising well before the sun, and (gulp) skipping dinner. And yes, it even means lugging a little heavier camera bag than you might prefer.
I pretty much carry everything with me when I shoot, regardless of the burden or inconvenience, because experience has taught me that best way to guarantee I’ll need a lens is to not pack it. On the other hand, I realize some people have physical limitations that sometimes requires equipment compromise, and many photographers aren’t as hardcore as I am (some are more hardcore). But the lens you choose is part of the creative process that defines you as a photographer; it’s a personal decision that I’m happy to assist, but reluctant to dictate.
So the next time you find yourself wondering what lenses to leave out, rather than asking someone else to make the lens choice for you, try researching and asking questions that will help you understand the location better, then pack your bag with that information in mind. Don’t get me wrong: I’m totally fine being asked for help deciding which lenses to leave behind, I just think the ultimate decision should be based on your creative instincts.
The above image is from a backpack trip in the Twenty Lakes Basin, just north and east of Yosemite. In addition to a backpack filled with food and gear, I also carried my 1DS body, my three primary lenses, and a tripod. I was a little cranky about shlepping all this gear up and down 11,000+ foot mountain passes, but not nearly as cranky as I’d have been if I hadn’t been able to make the compositional decisions I’m accustomed to. For this shot I rose before sunrise and trekked to this spot on an unnamed lake I’d scouted the previous afternoon. My original plan was to try some telephoto shots of the first light on North Peak, but when I saw the skimming light of the day’s first rays illuminating this patch of wildflowers, I quickly switched to a wide angle lens and dropped low to to fill the foreground with wildflowers.
Whenever I consider leaving something behind, I remember moments like this. I’m not suggesting that you lug Hermione’s purse to every shoot; just try to remember that the images will last far longer than the discomfort.
Bracketing in the digital age
Posted on April 23, 2011

Poppy With a View, Point Reyes National Seashore, California
Canon EOS 10D
1/90 second
F8
ISO 100
24 mm
Remember the uneasy days of film, when we never knew whether we had exposed a scene properly until the film was processed? As insurance we’d bracket our exposures, starting with the exposure we believed to be right, then hedge our bets by capturing the same composition at lighter and darker exposure values. Today digital capture gives us instant exposure confirmation, yet the practice of exposure bracketing persists among inexperienced photographers.
Film shooters carefully budget their shutter clicks because they pay for film and processing by the exposure; digital photographers paid for their exposures when they purchased their camera. In other words, while every film click costs you money, every digital click increases the return on your investment. This means that using a digital camera, you can shoot to your heart’s content with little to no added cost, a great opportunity get the most out of your significant hardware investment and grow as a photographer. These “free” captures may also explain the persistence of exposure bracketing by so many digital photographers who think nothing of tripling the number of shutter clicks. But unless you plan to blend images later, exposure bracketing is a waste of time, shutter-cycles (the shutter is often the first thing to wear out on digital SLRs), and storage. Instead, trust your histogram and spend your extra shutter clicks on a more productive approach: composition bracketing.
Composition bracketing is “working” a scene by capturing composition and camera-setting variations to be decided upon later, when you review your images on a large screen. If you shoot your scenes both horizontally and vertically, you already composition bracket. But don’t stop there: Before looking for something else to shoot, shoot the current scene wider and tighter, move around to change the foreground or background, experiment with depth of field and motion blur, and so on.
For example, a few years ago I spent a couple of days photographing wildflowers in Point Reyes. Visualizing a solitary poppy with the coastline soft in the background, I was pleased to find this fearless subject clinging to Chimney Rock’s precipitous west slope. From my vantage point above the poppy, the background was a mix of dirt and weeds, but dropping down to poppy-level instantly juxtaposed it against the ocean. A blue ocean was better than dirt and weeds, but I wanted coastline so I rotated (with one eye on the cliff) until the poppy was framed by the curving shore. To fill the frame with the poppy and achieve the narrow depth of field I sought, I added an extension tube to my wide (24-70) lens.

Here I am refining my composition for this poppy. I ended up dropping lower and closer before bringing in my tripod. (The slope was as steep as it looks here.)
Dropping low enough to place the entire poppy against the surf put me too low for the tripod I was carrying. But since nailing the focus point is particularly essential these shallow depth of field images, I don’t even consider hand-holding close focus shots. In this case I placed my tripod on its side and carefully rested the lens on one of the legs, using my bunched jacket to cushion against vibration and my remote release to click without disturbing the precarious equilibrium. As you might imagine, because this was in the days before live-view, composing was an exercise in contortion and patience.
Exposure was easy, a fact confirmed by my histogram. But after going to all this trouble to set up my shot, I wasn’t about to fire off a single frame and move on. So I bracketed my compositions, timing several exposures for different background wave action, a surprisingly significant frame-to-frame change. And even though I believed minimal DOF was best, I knew that my postage stamp sized LCD wouldn’t tell me if I’d achieved the best DOF. So I followed my initial wide-open shot with several frames at a variety of smaller f-stops (and a correspondingly slower shutter speeds). Good thing, because the background in the original f4 exposure was far too soft–the frame I ended up choosing was at f8. While the exposure was identical for each frame, I attribute my satisfaction with this image to the choices due to my calculated composition bracketing.
Is it spring yet?
Posted on March 6, 2011

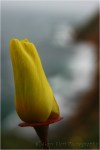
Poppy Lantern, Merced River Canyon, California
Canon EOS-1Ds Mark II
1/50 second
F/4
ISO 200
100 mm
March 3, 2011
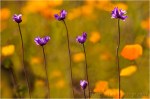
With all the recent snow posts, it’s kind of hard to believe that spring has arrived in California. We’re still getting rain here in the Central Valley (and snow in the Sierra), but Northern California skies are more blue than gray, and colorful blossoms are popping up everywhere. While the soon-to-be-ubiquitous foothill poppies haven’t quite kicked in, I know by the end of the month my camera and I will be enjoying leisurely drives through the Gold Country to photograph my favorite wildflower. My foothill drives have become quite a treat for me, not just for the photography, but for the opportunity to meander quiet country roads with the window down and baseball on the radio.
On these drives I often find entire hillsides blanketed with poppies beneath billowing cumulus pillows. Sometimes a spring shower sprinkles the blossoms, closed tight against the weather, with glistening water jewels. When I’m fortunate enough to find the sun diffused by a veneer of translucent clouds, I like to sprawl in the dirt for a bugs-eye view of the tissue-thin, backlit petals that light up as if they have their own internal light source like colorful little lanterns.
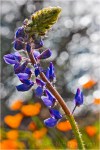
I found the poppy in this image at one of my favorite spots near the Merced River west of Yosemite. An extension tube on my 100mm macro lens enabled me to get close enough to smooth the background lupine into a blur of purple. I chose this tight composition of just the base of the closest backlit poppy for the way it emphasized the glowing lantern effect I love so much. Believe it or not, the color was so vivid that I actually had to desaturate it a bit in Photoshop.
-

- Poppy Lanterns, Merced River Canyon
-

- Sparkling Poppies, Merced River Canyon
-

- Poppy Hillside, Sierra Foothills
-
- Poppy and Surf, Point Reyes National Seashore
-

- Poppies, Hite Cove Trail, Merced River Canyon
-
- Lupine and Poppies, California Gold Country
-

- Champagne Glass Poppies, Merced River Canyon, California
-
- Intimate Poppy, Point Reyes National Seashore
-
- Wildflower Collage, Sierra Foothills, California
-
- Poppy and Surf, Point Reyes National Seashore
-
- Sparkling Poppies, Merced River Canyon
-
- Lupine and Poppies, California Gold Country
-
- Poppy Hillside, Sierra Foothills
-
- Poppy Lanterns, Merced River Canyon
-
- Intimate Poppy, Point Reyes National Seashore
-
- Wildflower Collage, Sierra Foothills, California
-
- Champagne Glass Poppies, Merced River Canyon, California
-
- Poppies, Hite Cove Trail, Merced River Canyon

