Eloquent Images by Gary Hart
Insight, information, and inspiration for the inquisitive nature photographer
Leveraging Light
Posted on April 11, 2023

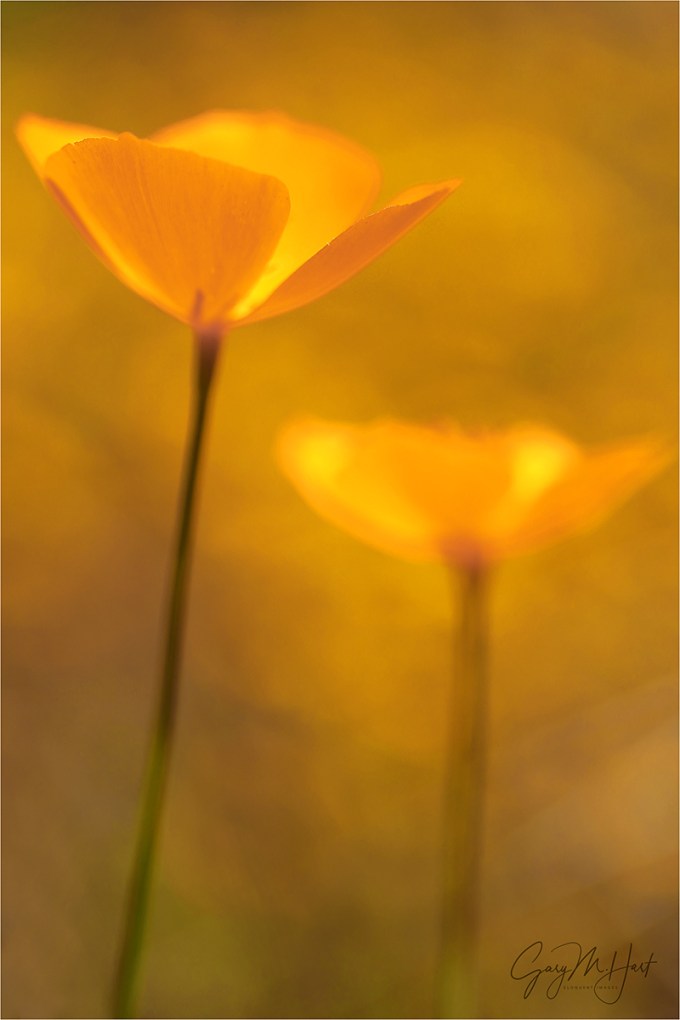
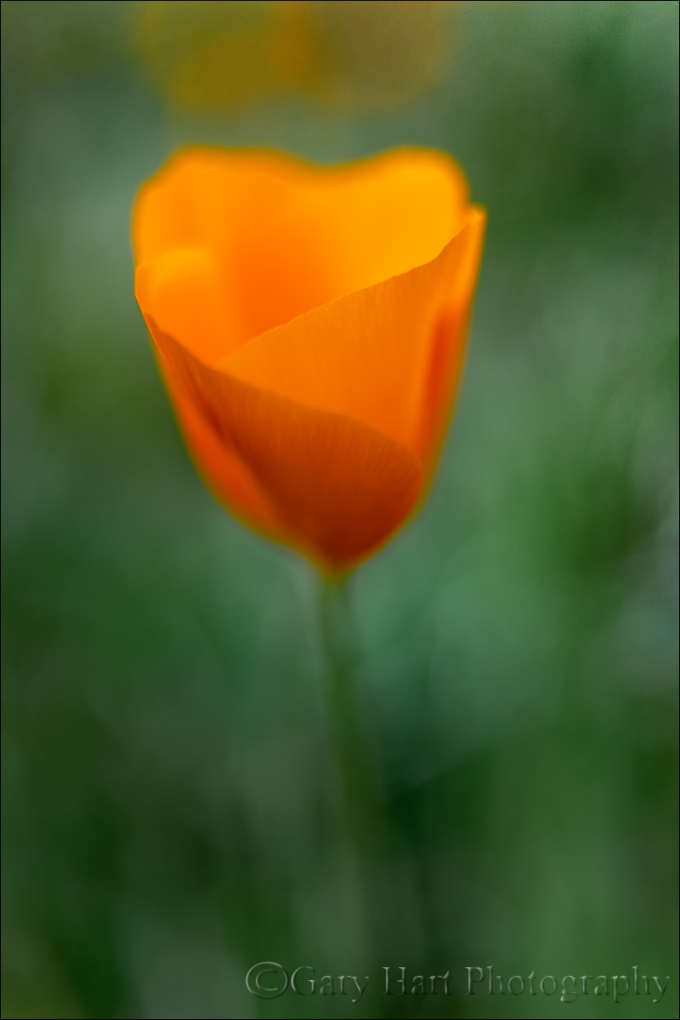
Glow, California Golden Poppy, Merced River Canyon
Sony a7R V
Sony 100-400 GM
2 extension tubes (26mm total)
ISO 100
f/5.6
1/400 second
In last week’s post I wrote about the importance of distilling a scene to its essence. I suggested that the best way to achieve this is to eliminate all but the scene’s most essential elements, and emphasized using precise cropping to banish unwanted objects to the world outside the frame. And while it could be argued that this careful cropping might be the most essential part of the scene-distilling process (or at least the foundation upon which to build), it’s often not enough.
Many (most?) scenes, even after the most surgical cropping, can remain filled with distractions that dilute the image’s impact. Areas of brightness, distinctive but irrelevant features, and objects cut off or intruding at the sides of the frame are just a few examples of visual elements that can distract the eye and confuse viewers looking for clues about the image’s purpose.
But take heart, all is not lost for photographers able to jettison the urge to “reproduce the world just the way I saw it.” The truth is, reproducing the world as we see it is literally impossible, and the sooner you come to terms with that truth, the better off you’ll be.
Setting aside our own reality to leverage our camera’s reality starts with understanding that “reality” is in fact a moving target defined by the medium interpreting it. Humans’ definition of “real” is founded on the three-dimensional, 360 degree, continuous-motion, multi-sense input delivered to our eye/brain collaboration. A camera, on the other hand, captures a two-dimensional, static, mono-sensory version of our very dynamic world.
But before lamenting your camera’s limitations, pause to consider that, in the grand scheme of perpetual electromagnetic energy that surrounds us, what you and I see is an tiny fraction of the infinite continuum of electromagnetic wavelengths continuously (and ubiquitously) careening about the Universe.
For example, X-ray machines peer into the world of electromagnetic waves in the one nanometer (one billionth of a meter); TVs and radios “see” waves that are measured in centimeters; humans, on the other hand, see only the waves in a very narrow band between (about) 400 and 750 nanometers. Understanding all allows doctors to expose subcutaneous secrets, astronomers to explore our galaxy and beyond, and the military and law enforcement to view “invisible” (to us) infrared signatures that reveal people and objects in complete darkness. In other words, there’s no single absolute visual standard—it’s all relative to the frame of reference.
The photographer’s job is to embrace his or her camera’s unique frame of reference, and to understand the power they possess to convey aspects of the world missed by the human experience. That “instant” a still photo is limited to can actually be stretched with a long exposure that compresses a potentially infinite number of instants to reveal, in a single frame, patterns of motion and flow. And the information a camera can’t see gives photographers incredible power to hide or minimize distractions, to control the world inside their frame, and to emphasize select elements over other elements.
All this might explain why I’ve always considered myself a film photographer with a digital camera. That doesn’t mean I don’t appreciate and use the incredible processing power digital photography brings, but it does mean that the images I process are limited to the photons captured in a single click. I just find no joy in adding information through focus or exposure blending of multiple images. Rather, I prefer leaning into my camera’s visual shortcomings by subtracting the aspects of the scene that don’t serve the image. (There’s nothing wrong with honest image blending, it just doesn’t give me joy.)
The image I share today, a brand new one from last week’s Yosemite Moonbow and Wildflowers photo workshop, got me thinking about the importance of subtracting distractions, and the power of my camera’s relatively narrow (compared to human vision) dynamic range to emphasize the most important qualities my subject. I’ve always loved the way sunlit poppies seem to radiate from within, as if illuminated by their own internal light source, and am always looking for ways to highlight it.
Based on my observations last month (normally a reliable start to the poppy season in Northern California), and the persistence of California’s incredibly chilly spring (by our standards), I wasn’t even sure I’d have a chance do any poppy photography this year. But scouting my poppy spots near Yosemite for last week’s workshop, I was thrilled to see that the poppies were just starting to erupt. They were still quite small, and rather thinly distributed, but were already plentiful enough to photograph. I reasoned (hoped) that a few days of sun might really kick them into gear, so I planned the workshop wildflower shoot for our final afternoon. It turns out I’d reasoned right, and a few days of sunlight was indeed exactly what the doctor ordered.
I found this solitary poppy jutting from a rocky wall in the Merced River Canyon, about 10 miles west of Yosemite Valley. I was especially drawn to the flower’s warm glow, but no matter how I framed it, the rest of the scene was ugly rock, brown dirt, and scraggly weeds.
I’d armed myself this afternoon with my Sony a7R V camera and Sony 100-400 GM lens; to focus closer, I’d also added two extension tubes totaling 26mm. Though it was only mid-afternoon, with the sun well into its daily descent, the shadows were already stretching deep into nearby nooks and crannies.
After studying the scene, I lowered my tripod and positioned my camera beneath the flower for the best view of its backlit, glowing petals. Instead of trying to make the scene look the way I saw it, I took advantage of my camera’s “limited” dynamic range and underexposed enough to blacken the superfluous background detail. The result is this simple image (which required very little processing, BTW) that, while nothing like what my eyes saw, contains only the elements of the scene I was interested in: the glowing poppy and its softly lit stem on a canvas of black shadow.
Workshop Schedule || Purchase Prints || Instagram
Leveraging Light


")


")


Spring is a State of Mind
Posted on March 20, 2023
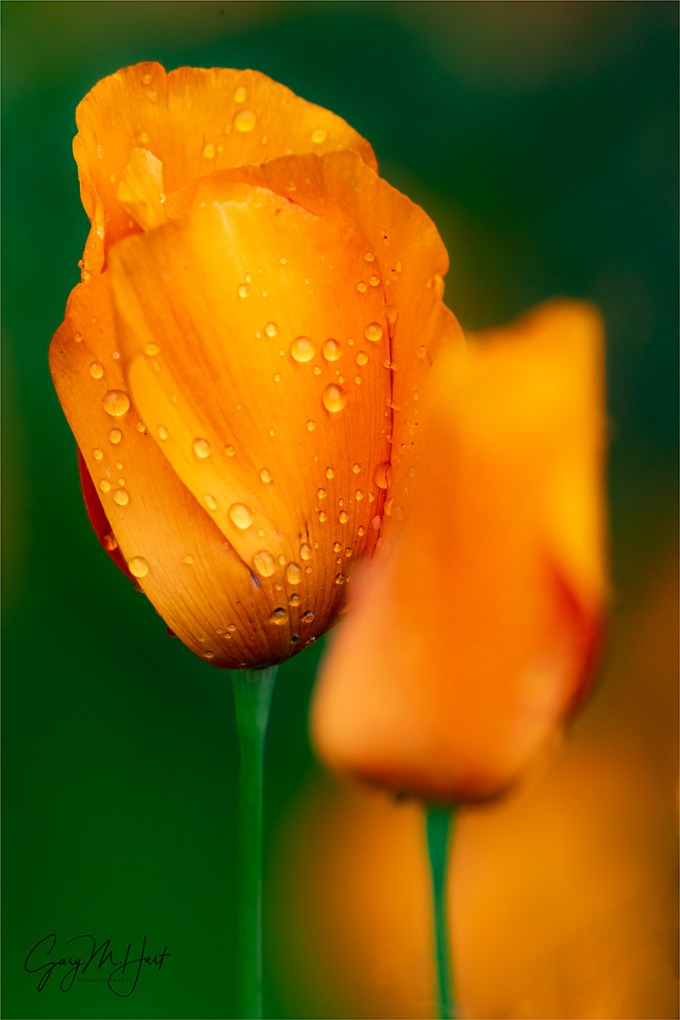
Rainy Day Poppy, Sierra Foothills, California
Sony a7R III
Sony 100-400 GM
Sony 2X Teleconverter + extension tubes
ISO 1600
f/11
1/125 second
According to the calendar, today is the first day of spring—so…, Happy Spring! On the other hand, here in Northern California Mother Nature is delivering very mixed signals. A few trees are blooming, and every few days the sun pops out long enough to forgo a jacket or sweater—but the rain still seems to be coming several times a week, which means (lots of) snow is still falling in the mountains. And the temperatures remain chilly enough that I’ve only dared a short-sleeve shirt once, and my shorts and sandals are still buried in the closet.
Attempting to jumpstart spring, on Saturday my wife and I took advantage of a brief break between storms to drive up into the foothills to check out some of my favorite poppy spots. Usually by mid-March I’ve made this foothills trip several times and am deep into processing the year’s poppy bounty. But on Saturday’s drive we didn’t see a single poppy. Not. One. Poppy. While I was a little disappointed, I certainly wasn’t surprised.
Despite the wildflower shutout, it was a nice drive, and with definite hints of spring. We saw some blue sky, lots of water in the creeks, and hills covered with that happy emerald green that’s only possible in spring (Californians know what I’m talking about).

Poppy Hillside, Highway 49, California Gold Country
Our first stop was the site of what remains one of my favorite, and most successful, poppy images. We found the hillside blanketed with peak green, but no poppies. We stayed long enough for me to pull up the picture on my phone and try to figure out where I’d stood for this shot. The fence persists in a similar state of skewed dilapidation, and as my eyes followed its line I mentally relived scaling the deceptively steep hillside. So steep, in fact, that I jettisoned gear to make it up the steepest spot.
A short distance down the hill from this spot is a road that has been the source of many of my favorite poppy images. Sadly, when we got there we found it gated with a “Road Closed” sign, an all too common site this year. This was the final nail in this year’s poppy photography coffin.
But I wasn’t going to go down easy because all this nostalgia really got my poppy juices flowing. So, with no new poppy images to work on, the next day I decided to dig into the archives and try to uncover some I’d missed in previous years. Since I often don’t have time to process everything from any given shoot, I was hopeful that I wouldn’t need to look too long. Starting with a search of processed poppy images, I quickly identified a rainy day shoot from a few years ago that had potential for untapped opportunities.
It actually rained lightly the entire time I was out there, but some of my favorite photography has happened in the rain. And even though poppies don’t usually open when it rains, I found the raindrops more than enough compensation. And with rain gear in my car for just these situations, I stayed warm and dry. My camera? Not so much. I tried working with an umbrella, but after a few minutes realized I was one arm short and just decided to test the water resistance of my Sony a7RIII. I’m happy to say that it passed with flying colors.
A couple of years ago I wrote an article for “Outdoor Photographer” magazine on what I call creative selective focus. (You can read my blog version of this article here.) In it I write about using minimal depth of field to emphasize very select aspects of a scene, and letting the surrounding scene retreat to a complimentary blur.
If you read the article, you know the 3 primary factors for minimizing depth of field: large aperture (small f-number), long focal length, and close focus point. While I could have used my Sony 90mm f/2.8 macro, for close focus photography I really like the compositional flexibility of a zoom lens, so this afternoon I went with my Sony 100-400 GM lens. To increase my focal length (and shrink my depth of field) further, I added my 2X teleconverter (which, I might add, handled the rain perfectly as well). And to focus even closer, I added 26mm of extension. My original plan was try a few lens/extension-tube/teleconverter configurations (including my macro), but I was having so much fun that I ended up shooting with this setup the entire time.
There’s no free lunch in photography—the downside of adding a teleconverter and extension tubes is significantly reduced light. A 2x teleconverter cuts two stops of light, which means my 100-400 that’s normally wide upon f/5.6 at 400mm, wide open becomes f/11. To compensate for light lost to the smaller aperture, added extension, and a cloudy sky, I shot everything this afternoon at either ISO 1600 or ISO 3200 (grateful that there was no wind).
One of the cool things about this kind of photography is how different the world looks through the viewfinder. I love putting my eye to my camera, moving the lens around, and changing focus slowly to see what snaps into view. In this case I was looking for poppies to isolate from their surroundings, as well as nearby features (like other poppies) that I could soften enough to complement my primary subject without competing. Sometimes I had a general idea of a subject before looking through my camera, other times I’d just explore with my eye to my viewfinder until something stopped me.
Because depth of field shrinks not only with focal length, but also with focus distance, every frame I clicked this afternoon had a paper-thin range of sharpness. With such a shallow depth of field, none of these images would have been possible without a tripod. With my composition set on my tripod, I’d pick a focus point (usually, but not always, a prominent raindrop), focus in my viewfinder until I was pretty certain it was sharp, then magnify the focus point in my viewfinder to confirm and tweak the focus.
I finally called it quits when the rain picked up and the approaching twilight forced too much shutter speed compromise.
Workshop Schedule || Purchase Prints || Instagram
My Favorite Poppies


Telephoto Landscapes
Posted on April 11, 2021

California Spring, Oak and Poppies, Sierra Foothills
Sony a7RIV
Sony 200-600 G
ISO 400
f/9
1/4 second
Over the years I’ve spent a lot of time photographing with my good friend and fellow Sony Artisan Don Smith. Both in workshops and on our personal trips, we’ll head out into the scene or meet back later at the car, and more often than not I’ll have a wide angle lens on my camera, while Don will have a telephoto. Each of us would usually end up with images that pleased us, and I think Don would agree that neither of us could say whose images were “better”—they were just different. But those observations have made me conscious of my wide angle bias, and helped remind me that I may in fact be missing a telephoto opportunity.
What’s it all about?
I’ve always felt strongly that an image needs to be about something, and the photographer’s job is to make it clear to viewers what that something is. I usually accomplish that with my wide lenses by positioning strong elements throughout my frame in a way that creates virtual connecting lines that guide my viewers’ eyes. The problem is, the wider the focal length, the greater the chance of introducing unwanted elements that pull my viewers’ eyes off their prescribed path.
The cure for this problem is often to simplify the scene by going tighter with a telephoto. That doesn’t necessarily mean forgoing the wide version; rather, it can just be a matter of also trying the scene through a telephoto to see what else might be there. If that doesn’t come naturally to you in the field, you might be able to teach yourself how many telephoto shots you left in the field (and to train your eyes in the process) by opening any wide angle image in Photoshop (or your photo editor of choice), setting the crop tool to 2/3 aspect ratio (to match what you see in your viewfinder), and see how many new compositions you can find.
Practicing what I preach
Over the years I’ve gotten better about using my telephoto, but I’d be lying if I said it’s usually the first thing I reach for when I work a landscape. My standard workflow in the field (not conscious, just the way I seem to work naturally) is to start wide and go tighter as I become more familiar with the scene. But last week I got a great reminder of the value of a telephoto as I was driving home from real nice poppy shoot in the foothills near Jackson, California. It was just a few minutes after sunset and my mind was already on dinner when I rounded a bend and saw an oak-studded hillside completely blanketed with poppies.

Poppy Hillside, Highway 49, California Gold Country
I was very familiar with this hillside because it’s the site of one of my oldest, and favorite images, captured in spring of 2005 (read the story). A 24×36 print of this 2005 scene graces the wall in my living room above my fireplace. The one thing I’ll never forget about photographing it is how much steeper this hill is than it appears in the image—so steep, in fact, that when I decided to scale it to get a better vantage point, I jettisoned my tripod so I could have two hands free to hold on and pull myself up. While it wasn’t quite mountain climbing, it was steep enough that I’d have rolled all the way to the bottom had I fallen (much like this).
But this time there was no time to ascend the hill because the scene was rapidly darkening (and the photographer is rapidly aging). The conditions weren’t quite as good as back then either: there were no clouds and the sky was completely colorless. But still, it was just so pretty…
I made the split-second decision to brake and pull over. Safely on the shoulder, I quickly hopped out, grabbed my tripod and Sony a7RIV, and surveyed the scene. I wanted to feature one striking oak that stood alone about 2/3 of the way up the hill, and tried to determine the best way to do it. The fence from my old image was not too far off to the right of the tree, but I now try to avoid manmade objects in my scenes—in fact, the 2005 image is the only image in my current portfolio I can think of with anything manmade. Other nearby concerns were a couple of kind of scraggly trees that definitely didn’t merit inclusion, a few brown patches, and several unsightly rocks. And the sky added absolutely nothing.
It was clear that the best way to highlight the oak and poppies was to eliminate all the surrounding distractions with a long telephoto. Given the distance, perhaps 350 yards, I went straight to my Sony 200-600 G lens. For this image I used 500mm, which completely eliminated all the problems. The light was dimming fast, and a slight breeze stirred the poppies, so I bumped my ISO to 400, focused. I ended up taking 18 frames, some a little wider, some a little tighter, but all more than 400mm. Most of my frames were horizontal, but I finished with a couple of verticals just to cover my bases. Then I packed up and headed to dinner.
Workshop Schedule || Purchase Prints || Instagram
Telephoto Landscapes
Click an image for a closer look, and to view a slide show.


")


, California")


It’s All a Blur
Posted on March 28, 2021
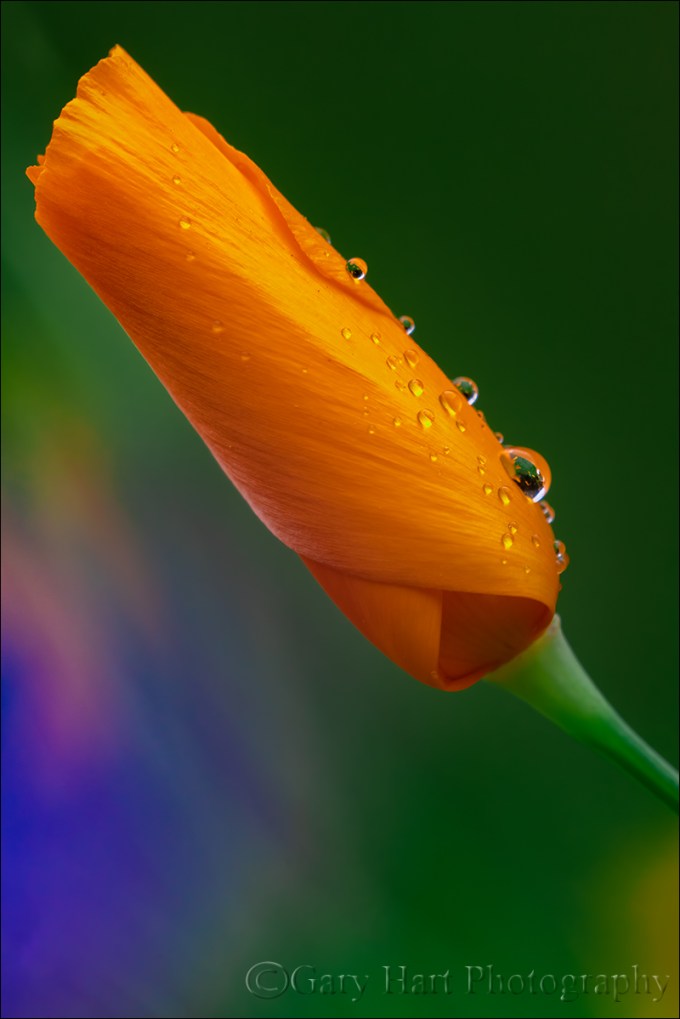
Champagne Glass Poppies, Merced River Canyon, California
Canon 10D
Canon 100mm f2.8 macro
f/2.8
Kenko 20mm extension tube
ISO 100
1/1000 second
This has always been one of my favorite images. It’s also one of the oldest images in my digital portfolio. I photographed it 17 years ago (!) with my very first DSLR, a Canon 10D. Despite the 10D’s postage-stamp-size LCD, being able to instantly view and refine my images led to an epiphany that permanently altered the way I photograph: Even though photography is a two-dimensional medium, the ability to visualize and manage its missing dimension—depth—separates artistic photography from snapshots.
I’m sharing this image today because yesterday afternoon I returned to the location of its capture, a hidden hillside in the Merced River Canyon, just west of Yosemite Valley. It was the last day of my Yosemite Moonbow and Wildflowers workshop, and while there wasn’t enough water to create the explosion of mist a March moonbow requires, the wildflowers were out in force. Rather than pull out my camera and try to reprise this old favorite, I was content to stand by, take in the beauty, and watch my group happily work this now familiar scene. Between occasional iPhone clicks, I mentally returned to that afternoon 17 years ago, and to the lessons I learned that day.


Getting an entire scene, front to back, in sharp focus is important, but fueled by digital photography’s instant feedback, I grew to appreciate the power of shallow depth of field. On shoots like this I’d take a picture, evaluate my result, and notice the way an out-of-focus background smoothes potential distractions into blurs of color and shape. With that realization, I started challenging myself to see how far I could take background blur.
While working on this pair of poppies, my eyes could sharply resolve every background detail, from colorful wildflowers to scraggly weeds, but I found that much detail distracting in an image. Simply blurring the background helped, but I wanted more blur, as well as a background that complemented the closest two poppies that were to be my scene’s focal point.
Circling the poppies, I positioned camera downhill and as close to the ground as possible, which enabled me to shoot uphill, toward the most densely populated part of the poppy covered hillside. To achieve maximum blur, I added an extension tube to my macro lens, set my f-stop to f/2.8 (wide open), and moved my lens to within a few inches of the closest poppy. When the image on my LCD after the first click revealed the hillside blurred into a golden fog, I knew I was on to something.
But I wasn’t done. Nailing the focus point, always important, is even more essential in macro photography. Sometimes the focus point is a difficult choice, but in this case it was pretty clear that the leading edge of the front poppy was where focus needed to be.
With my camera flat on the ground and the lens resting on a beanbag (homemade, from a Ziploc and dried lentils), focus was easier said than done. Had I been doing this today, with my Sony a7RIV, I could have tilted my live-view LCD upward, magnified the front poppy’s leading edge, and focused without getting dirty. But with my ancient Canon I had to do it the “old fashioned” way, sprawling on the ground and contorting to get my eye to the viewfinder. Fortunately, a calm wind gave me the time to get the focus right.
Not only is this one of my personal favorite images, it’s also one of my most popular. And even though the resolution on my 10D was only 6 megapixels, I’ve sold prints of this image up to 24×36. But sprawled in the weeds that afternoon, I had no idea was creating something that would still be important to me 17 years later. Where has the time gone? …
Here’s my Photo Tips article explaining my selective focus technique
It’s All a Blur
Click an image for a closer look, and to view a slide show.


In Defense of the Tripod
Posted on July 5, 2020

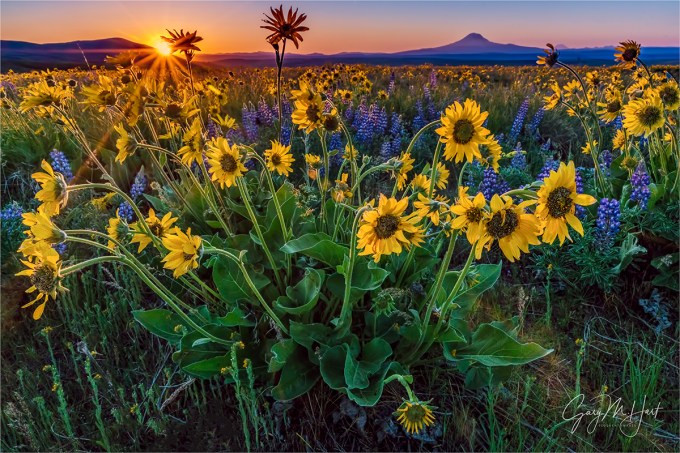
Spring Sunrise, Rowena Crest, Columbia River Gorge
Canon EOS-5D Mark III
Canon 70-200 f/4L
1/10 second
F/8
ISO 800
This is another 6-year-old “brand new” image, just excavated from the depths of my 2014 folder
Photography without compromise
If you think the main reason to use a tripod is to avoid camera-shake, you’re mistaken. In this day of phenomenal high ISO performance and stabilized bodies and lenses, acceptable hand-held sharpness is possible in the vast majority of images. But here’s a reality that’s tough to deny: The steadiest hand-held image will never be sharper than it would have been if it had been properly executed using a sturdy tripod. And that’s not even the best reason to use a tripod.
Each camera has an ideal ISO—the quality of any image that doesn’t use it is compromised, sometimes just slightly, other times a lot. So if hand-holding an images forces you out of your camera’s ideal f-stop to reduce camera shake, you’ve made an unnecessary compromise. “Photographer’s light” (such as sunrise, sunset, and stormy or cloudy weather) only compounds the problem. While most of these compromises can be more or less remedied in post-processing, and many may not show up at all on a fifteen-inch laptop screen or in an 8×10 print, most serious photographers like the option to print their images large—and nothing reveals flaws more than a large print.
Let’s imagine you just got a request for a 24×36 print of the pride of your portfolio—a (hand-held) Yosemite Valley moonrise telephoto, captured at ISO 800 (it looks great in your Flickr gallery)—for the reception area of your mother-in-law’s law firm (a real coup after that whole llama-farm investment fiasco). So what do you tell her when you go to hang it and she asks why it looks “so mushy,” and what’s with all that “sludge in the shadows”? Oops—looks like another Thanksgiving at the kids’ table.
Not only does every camera have an ideal ISO, every scene has an ideal f-stop. Anyone with a camera can snap the lateral (left/right, up/down) dimensions of a scene, but artistic photographers understand that the key to rendering our three-dimensional world in photography’s two-dimensional medium is creating the illusion of the missing dimension, depth, by composing elements throughout the frame, from near to far. Since depth of field is controlled by the f-stop, of all the exposure variables at a landscape photographer’s disposal, f-stop is the least negotiable. In a static scene (as most landscape images are), the tripod removes motion (camera shake) from the equation, allowing you to select the ideal f-stop at your camera’s best ISO.
But what about a scene that’s all on the same plane, where depth isn’t a factor? The f-stop still matters because every lens has a single f-stop that renders the sharpest result. For some lenses the sharpness difference between f-stops is small, for others it’s significant. But it’s always there. So even when DOF isn’t a consideration, I choose my lens’s sharpest f-stop, usually f/5.6-f/11. Some photographers put each lens through extensive testing to determine its sweet spot; I usually go with f/8 or f/11 unless I see clear evidence that a lens is sharper at a different f-stop. I also try to avoid f-stops smaller than f/11 unless the scene requires extra depth—not only do lenses tend to be less sharp at their extreme f-stops, at f-stops smaller than f/11, diffraction starts to rear its ugly head.
The bottom line: By removing camera shake from the equation, a tripod frees you to choose the best f-stop for your composition, without compromise.
An image is not a snap, it’s a process
Still not convinced? Consider also the control a tripod gives to your composition process. Managing the relationship of elements in the frame is usually the single most important compositional decision a photographer can make. Relationships are especially important when you’ve included the front-to-back objects so essential to enhancing the illusion of depth. Photographing on a tripod gives you the time to consider each element in your frame and its relationship to other elements and eliminate distractions, and the flexibility to evaluate and refine until everything’s perfect.
When setting up an image, I try to achieve a sense of visual balance throughout my frame. I think about the path for my viewers’ eyes to follow, and where I want them to pause or land. I consider the elements that will move or stop the eye, and potential distractions that might pull the eye away, and merged elements that rob the scene of depth. With these things in mind, I position myself and frame my composition, identifying the focus point and f-stop for the ideal depth of field. Having my composition frozen in place atop my tripod enables me to make these adjustments deliberately and methodically, and helps me ensure that one tweak here didn’t break something else over there.
After each click, I step back and study the image on the LCD, imagine it framed large and hanging on a wall. I scrutinize my composition for possible composition and depth of field improvements, and check the histogram for exposure problems. With a tripod I can do all this at my pace, taking as much time as necessary, knowing that when I’m ready to make adjustments, the image I just reviewed will be waiting right there in my viewfinder atop my tripod, exactly as I captured it, ready for me to enhance.
And finally
Other benefits of a tripod I’ve almost come to take for granted. For example, I sometimes use graduated neutral density filters but find the holders that screw onto the end of my lens awkward. With a tripod, it’s easy to position my GND and hold it with my fingers during exposure (I don’t even own a filter holder). During long exposures I’ll sometimes move the GND up and down slightly to disguise the transition—also easy on a tripod.
A tripod also makes it easy to use a polarizer to reduce color-robbing glare, something I can do on virtually every daylight shot because unless something in my scene is moving, the two stops of light I lose to a polarizer are irrelevant when I’m on a tripod.
And advanced digital techniques such as image stitching (for panoramas or high resolution capture), HDR (high dynamic range blending of multiple images for exposure management), or focus blending to increase depth of field are all easier on a tripod. As is old-fashioned mirror lock-up to reduce mirror-slap induced vibration. And live-view focusing, the best way to ensure precise focus, is a snap on a tripod (and pretty much impossible hand-held).
For example

Spring Sunrise, Rowena Crest, Columbia River Gorge
There was a lot going on in this scene. I had wildflowers everywhere, the Columbia River, clouds, a freeway, railroad tracks, power lines, and lots of other photographers and wildflower peepers. Organizing all this into a coherent image, including the good stuff and eliminating the distractions, required no small measure of planning and execution.
I’d been wandering the hillsides of the Tom McCall Preserve on the Rowena Crest in the Columbia River Gorge for about an hour, playing with compositions and identifying potential subjects. I could see the potential for a colorful sunrise and wanted to be ready when (if) it happened. I wanted a foreground subject to anchor my frame, and needed to eliminate the freeway, tracks, wires, and people, and finally landed on this spot about 15 minutes before sunrise.
Rather than wait for the color to arrive, I started working on my composition immediately, choosing a height about two feet above the ground—any higher and the power lines would come into view; any lower and the flowers and near cliff (on the left) would merge with the opposite bank. To compress the foreground/background distance, I moved back a little and chose my 70-200 lens, putting the bottom of the frame a few inches below the yellow balsam root to frame the flowers with a little green, and taking care not to cut off any of the large, ear-shaped leaves.
The clouds weren’t very interesting, but I knew that if they colored up they’d add an important layer to my frame, so I made sure to include a strong stripe of clouds across the top of my frame. I liked the nearby sprinkling of lupine and other wildflowers, so I went wide enough to include a few without diluting my primary clump of wildflowers.
The final step was to determine depth of field and focus. To make the flowers’ sharpness stand out even more, I slightly softened the background by dialing to f/8 and choosing a focus point closer than the hyperfocal distance.
Each of these framing decisions were part of an iterative process that took more than a dozen clicks before everything was just as I wanted it. Because I was working on a tripod, I was able to click a frame, evaluate all of the variables, and make small refinements. The tripod also gave me the luxury of straightening to unkink my back between clicks. When I was sure everything was right, I stood and waited (fingers crossed) for the color. When the sky did finally color-up, an intermittent breeze came with it, forcing me to compromise my ISO (ISO 800) to freeze the flowers’ movement. But because I was on a tripod, I was able to stand and watch the scene confident in the knowledge that my composition was fixed, and click my remote release whenever there was a lull.
Workshop Schedule || Purchase Prints


Natural Order
Posted on April 14, 2019
Raindrops on Poppy, Sierra Foothills, California
I’m often asked if I placed a leaf, moved a rock, or “Photoshopped” a moon into an image. Usually the tone is friendly curiosity, but sometimes it’s tinged with hints of suspicion that can border on accusation. While these questions are an inevitable part of being a photographer today, I suspect that I get more than my share because I aggressively seek out naturally occurring subjects to isolate and emphasize in my frame. But regardless of the questioner’s tone, my answer is always a cheerful and unapologetic, “No.”
We all know photographers who have no qualms about staging their scenes to suit their personal aesthetics. The rights and wrongs of that are an ongoing debate I won’t get into, other than to say that I have no problem when photographers arrange their scenes openly, with no intent to deceive. But photography must be a source of pleasure, and my own photographic pleasure derives from discovering and revealing nature, not manufacturing it. I don’t like arranging scenes because I have no illusions that I can improve nature’s order, and am confident that there’s enough naturally occurring beauty to keep me occupied for the rest of my life.
Order vs. chaos
As far as I’m concerned, nature is inherently ordered. In fact, in the grand scheme, “nature” and “order” are synonyms. But humans go to such lengths to control, contain, and manage the natural world that we’ve created a label for our failure to control nature: Chaos. Despite its negative connotation, what humans perceive as “chaos” is actually just a manifestation of the universe’s inexorable push toward natural order.
Let’s take a trip
Imagine all humans leave Earth for a scenic tour of the Milky Way. While we’re gone, no lawns are mowed, no buildings maintained, no fires extinguished, no floods controlled, no Starbucks built. Let’s say we return in 100 Earth years*. While the state of things would no doubt be perceived as chaotic, the reality is that our planet would in fact be closer to its natural state. And the longer we’re away, the more human-imposed “order” would be replaced by natural order.
* Since this is my fantasy, I’ve chartered a spaceship that accommodates all of humankind and travels at 90 percent of the speed of light. While Earth has indeed aged 100 years during our holiday, we travelers return only a year older. (Dubious? Don’t take my word for it, ask Albert Einstein.)
What does all this have to do with raindrops on a poppy?
Read the story of this saturated shoot in my All Wet blog post
Venturing outdoors with a camera and the mindset that nature is inherently ordered makes me feel like a treasure hunter—I know the treasure is there, I just have to find it. Patterns and relationships hidden by human interference and the din of 360 degree multi-sensory input, further obscured by human bias, snap into coherence when I find the right perspective.
Finding water droplets to photograph can be as simple as picking a subject and squirting it with a spray bottle of water or (better still) glycerin. But what fun is that? If I’d have been staging this, I probably would have insisted on an open poppy, maybe with more and bigger drops. But that’s not what Nature gave me this soggy afternoon. So I photographed this raindrop festooned poppy (and many others) the old fashioned way—within minutes I was as wet as the poppy, and (to quote the immortal Cosmo Kramer) lovin’ every minute of it.
Finding Natural Order
Click an image for a closer look and to view slide show.


All Wet
Posted on April 5, 2019
Raindrops on Poppy, Sierra Foothills
Last Monday seemed like the perfect day for a poppy shoot in the foothills. I had the afternoon wide open—with the California media buzzing about this year’s “superbloom,” plus a forecast promising ideal conditions (calm wind and thin clouds), I couldn’t help dreaming about my own images of poppy-saturated fields. What could possibly go wrong?
Getting on the road proved a little more problematic than anticipated, but by 2 p.m. I was on my way, encouraged forward by an occasional poppy beside the freeway. Adding to my optimism, the aforementioned clouds were just right: thick enough to diffuse the sunlight, but not so dark that they’d close the sun-loving poppies. I exited the freeway as soon as possible, opting to drive the 2-lane roads that follow the hills’ natural contours. While my preferred my route isn’t the most direct, it is the most scenic, winding me through oak-studded hills deeply greened by this year’s copious winter rain. Though this drive takes a little more than an hour, the time passes quickly with so much pastoral beauty filling my windshield.
I knew the poppies in Northern California were starting late due to our relatively late winter, but was fairly confident I’d allowed enough time for the golden hillsides to kick in. In a good spring, poppies dot the entire route, but by the time I was southbound on scenic Highway 49, I started realizing I hadn’t seen any poppies since leaving Sacramento. Soon I was pretty resigned to the fact that this year’s superbloom was limited Southern California, and wondered if I’d find any poppies at all. Then it started to rain.

Yosemite in a Raindrop, Valley View, Yosemite
As easy as it would have been easy to cut my losses and turn around, I simply changed my expectations. With fresh memories of a brief but rewarding raindrop experience in Yosemite, I realized I didn’t need to find entire hillsides covered with poppies, that even a single poppy could be nice. So, rather than zipping along Highway 49 at 50 MPH (-ish) looking for golden slopes, I started exploring some of the quieter tributary roads and quickly realized that there were a sprinkling of poppies out.
I ended up spending two hours photographing a small patch of poppies I found on a dead-end road near Jackson. It rained the entire time, but with rain gear in my car for just these situations, I stayed warm and dry. My camera? Not so much. I tried working with an umbrella, but after a few minutes realized I was one arm short and just decided to test the water resistance of my Sony a7RIII. I’m happy to say that it passed with flying colors, as did the Sony 100-400 GM.
In the two weeks since I shot those raindrops in Yosemite, I’ve been plotting how to get even closer. On the Yosemite shoot I added extension tubes to my 100-400; this afternoon I returned to the extension tubes, but added my 2X teleconverter (which, I might add, handled the rain perfectly as well). I thought I’d try a few lens/extension-tube/teleconverter configurations, but I was having so much fun that I ended up shooting this way the entire time.
On a rainy day, light is already limited. But adding a teleconverter and extension tubes compounds the light problem. Because f/stop is a ratio with focal length as the numerator and lens opening as the denominator, adding a teleconverter and extension increases the focal length, resulting in less light reaching the sensor. A 2x teleconverter cuts two stops of light, which means my 100-400 that’s normally wide upon f/5.6 at 400mm becomes f/11 at (the teleconverted) 800mm (400mm x 2). And adding extension tubes also extends the lens’s effective focal length, further reducing the light reaching the sensor. To compensate for all this missing light, I shot everything this afternoon at either ISO 1600 or ISO 3200.
One of the cool things about this kind of photography is how different the world looks through the viewfinder. I love putting my eye to the viewfinder, moving the lens around, and changing focus slowly to see what snaps into view. In this case I was looking for a poppy to isolate from its nearby surroundings, but that also has something nearby (usually another flower) that I could soften enough to complement without competing. Sometimes I had a general idea of a subject before looking through my camera, other times I’d just explore with my lens until something stopped me.
Because depth of field shrinks not only with focal length, but also with focus distance, every frame I clicked this afternoon had a paper-thin range of sharpness. With such a shallow depth of field, none of these images would have been possible without a tripod. With my composition set, I’d pick a focus point (usually, but not always, a prominent raindrop), focus in my viewfinder until I was “certain” it was sharp, then instantly debunk my that “certainty” by magnifying the image in my viewfinder. This little exercise quickly taught me that with such a small margin for error, the best I could reliably achieve without magnifying the view was almost sharp enough, making pre-click magnification an essential part of my focus workflow (instead of just a cursory focus-check).
Each time I do this kind of photography I learn something. In this case it was how far away I could be and still fill my frame with a poppy. All of the images I captured this afternoon were from four to six feet away.
I wrapped up when the sky darkened further and the rain started coming down pretty hard. I couldn’t believe I’d been out there two hours, and spent most of the drive strategizing new ideas for the next time.
Getting the Drop on Nature
Click an image for a closer look and to view slide show.


Macro in Spirit
Posted on March 31, 2019
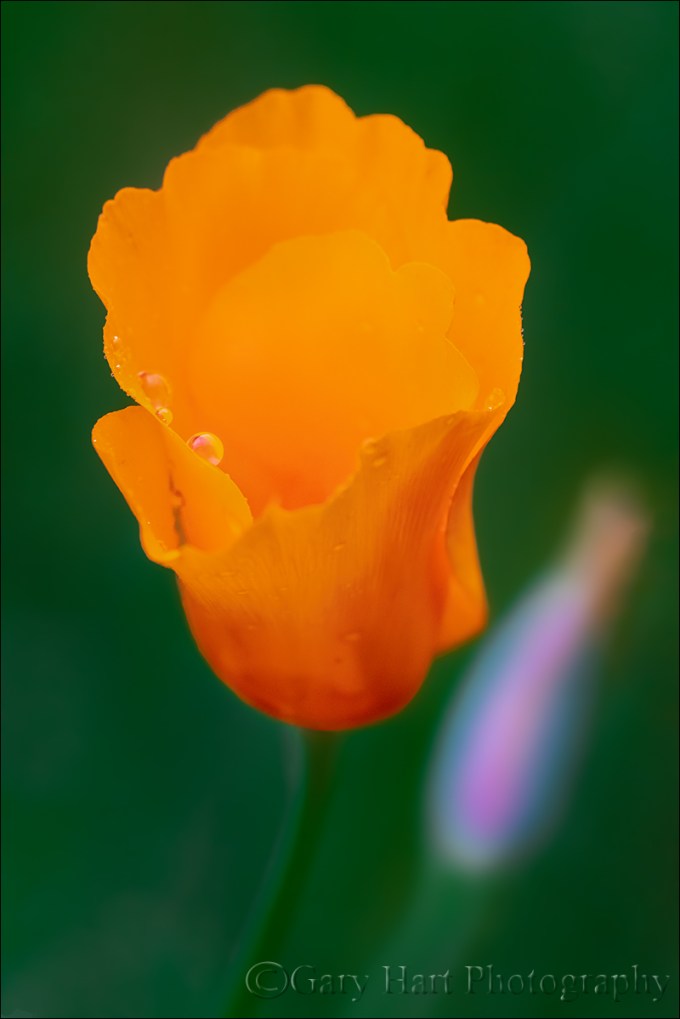
New Poppy, Merced River Canyon, California
It’s poppy season in California, and this is turning out to be a banner year. I’ve already enjoyed one nice poppy shoot, but things are just getting started in Northern California so I hope there are more to come.
When I photograph poppies, I don’t always use my macro lens. Even though my objective is similar to what I’d accomplish with a macro lens—a close view that excludes or blurs surrounding distractions—I often like to experiment with the creative flexibility other lenses provide. This also means that many of my so-called macro images technically aren’t macro at all.
What is macro photography?
The generally accepted definition of a macro image is an image in which the subject is at least as large on the sensor as it is in reality. When we photograph an expansive landscape with a full frame camera, we’re cramming the entire scene onto a 24mm x 36mm (864 mm2) rectangle (“cropped” sensors have even less real estate to work with, while medium format sensors have more). But imagine your landscape includes a single flower, and you want to get a closer look. As you zoom your lens tighter on the flower, or position yourself closer, the amount of the scene you capture shrinks, while everything remaining in the frame expands. Pretty soon the flower occupies most of the frame. Your image doesn’t achieve macro status until the still visible area of the flower spans 864 mm2 or larger.
It’s important to note that many camera manufactures will label a lens’s (or a point-and-shoot camera’s) closest focus point “macro” when all they really mean is just plain “close focus.” Getting closer will make the flower bigger, but unless you can focus close enough to reach that 1:1 threshold, it’s not a true macro.
So, by the generally accepted definition, this close image of a recently sprouted poppy doesn’t qualify as “macro.” But in my mind it’s macro in spirit because I use an intimate perspective with a single point of focus, in this case to emphasize the poppy’s translucent petals and graceful curves. My goal in these pseudo-macro images is make viewers look closer than they normally would, and (I hope) to help viewers see the poppy as more than a pretty gold flower.
To achieve that for this image, I tried something a little different. Shooting this afternoon with my Sony a7RIII, I started with my Sony 100-400 lens to allow a little working distance from the various poppies I targeted, then switched to my Sony 90mm macro to move closer to my subjects. When I wanted to get closer still, I brought out my extension tubes and switched back and forth between these two lenses. But the more time I spent out there, the closer I wanted to get.
Sprawling on the ground to work on this tiny new poppy, for something different I decided to try my 24-105 lens. At 24mm I was able to focus very close, but even wide open I had too much depth of field to properly blur the background, so I did what many say you’re not supposed to do: use extension tubes with a wide angle lens. With this arrangement the focus tolerance was microscopic, but when the poppy finally did snap into focus, my lens was so close they nearly touched.
I’m a tripod evangelist because in my approach to every scene, from macro to landscape, an image is not simply a click, it’s an incremental process: compose, expose, click, evaluate, refine, repeat until satisfied. Refining and repeating a standard landscape without a tripod is difficult enough; with macro and its minuscule tolerances, working without a tripod becomes nearly impossible.
For an image like this one, the tripod provides and another, less heralded advantage. This tiny flower was just a few inches above the ground, forcing me to sprawl in the weeds and awkwardly contort my body to avoid smashing the surrounding poppies. Holding this position as I refined my composition and waited for the breeze to pause was just plain uncomfortable, so every minute or two I had to stand to stretch and rest my cramped and fatigued muscles and joints. But each time I was ready to return to my subject, the composition I’d left was waiting patiently, right there in my viewfinder.
Because of the breeze, I bumped my ISO to 1600, which my a7RIII handles without even breathing hard. Freezing the poppy’s motion at 1/1000 of a second wasn’t hard, but because every time the wind moved the poppy, the focus point changed, I had to wait for the wind to die long enough for the poppy to return to the equilibrium position I’d focused on. The orange blobs you see in the background are more poppies, less than 8 inches away.
Read more about my approach to photographing wildflowers
Workshop Schedule || Purchase Prints
My Favorite Flower


The limitations of human vision
Posted on June 21, 2016
Wildflowers and Sunstar, Mt. Adams, Columbia River Gorge
Sony a7R II
Sony/Zeiss 16-35 f4
1/125 second
F/20
ISO 800
Read the story of my “discovery” of this location
Visual “Truth” is more relative than real
“Is that the way it really looked?” What photographer hasn’t heard that question by skeptical viewers? For years I used to feel slightly defensive when answering, as if my honesty was in question. Now I simply try to educate the skeptic.
Without getting too philosophical, it’s important to understand that, like the camera’s, the human view of the universe is both limited and interpreted. In other words, there’s no such thing as absolute visual truth. Instead, we (you, me, and our cameras) each have our own view of the world that’s based on many factors, some we can control, others we can’t. When you look through a viewfinder, the more you turn off your visual biases and understand your camera’s, the more successful your photography will be.
Limited vision
Complaining about the camera’s limitations—its dynamic range, low-light sensitivity, distorted perspectives—is a popular pastime among photographers who feel obligated to reproduce the world as “it really looks.” But before wasting too much time lamenting your camera’s limitations, pause to consider that what you and I see is incredibly limited as well. And while the camera can’t do some things our eyes can, it can do other things our eyes can’t.
Every square inch of the Universe is continuously bathed in an infinite range of electromagnetic frequencies. We humans, and our cameras, are completely oblivious to the vast majority of this radiation. For example, X-ray machines “see” waves in the one nanometer (one billionth of a meter) range, far too small for our eyes to register; TVs and radios “see” waves that are measured in centimeters—much too long for our eyes; we humans (and our cameras) can only see electromagnetic waves that fall between (about) 400 and 750 nanometers.
Knowledge of these “missing” wavelengths enables astronomers to peer into space using tools designed to see objects at wave lengths invisible to us, doctors to harness X-rays to view bones hidden beneath opaque skin, and military and law enforcement to see in the dark by detecting infrared radiation (heat). In other words, in the grand scheme of things, there’s no single absolute visual standard—it’s all relative to your frame of reference.
Recording more or less the same visible spectrum our eyes do, the camera is sometimes mistakenly assumed to duplicate human vision. But the camera has its own view of the world. For starters, it’s missing an entire dimension. And not only does it not record depth, a still camera only returns a frozen snap of a single instant. And we all know about our camera’s limited dynamic range and depth of field. Yet despite these differences, photographers often go to great lengths to force their camera to record what their eyes see. Not only is this impossible, it ignores camera’s potential to see things in ways we don’t.
About this image
Several things about this Columbia River Gorge wildflower image are different from what my eyes saw. First, this scene was a little brighter to my eyes than what I captured—I chose to slightly underexpose the majority of the scene to avoid completely overexposing the extremely bright sun and sky, and to keep the color from washing out. Another benefit of underexposure in this case is the way the nearly black shadows enhance the scene’s rich color.
(In the simplest possible terms) a sunstar is caused when sunlight’s path is disturbed as it passes by the intersection of a lens’s aperture blades—the smaller the aperture, the greater the angle of the intersection, and the more distinct the sunstar. (In this case, the scene’s extreme depth of field required a small aperture anyway.) The sunstar was a perfect counterweight on the left side of my frame for the visual weight of Mt. Adams on the right. And finally, going with an extremely wide focal length exaggerated the size of the flowers that were just inches away, and significantly diminished the size of the distant Mt. Adams.
What is real?
Is this image real? While I couldn’t see the sunstar with my unaided eyes, this image is a very accurate rendering of my camera’s reality. Understanding how my camera’s vision differs from mine, and how to leverage that difference by controlling the available focal length, exposure, and compositional options enabled me to capture a perspective that surpassed my limited vision to transcend human reality. Pretty cool.
Workshop Schedule || Purchase Prints || Instagram
Not what my eyes saw


Secret locations (and why they should stay that way)
Posted on June 9, 2016
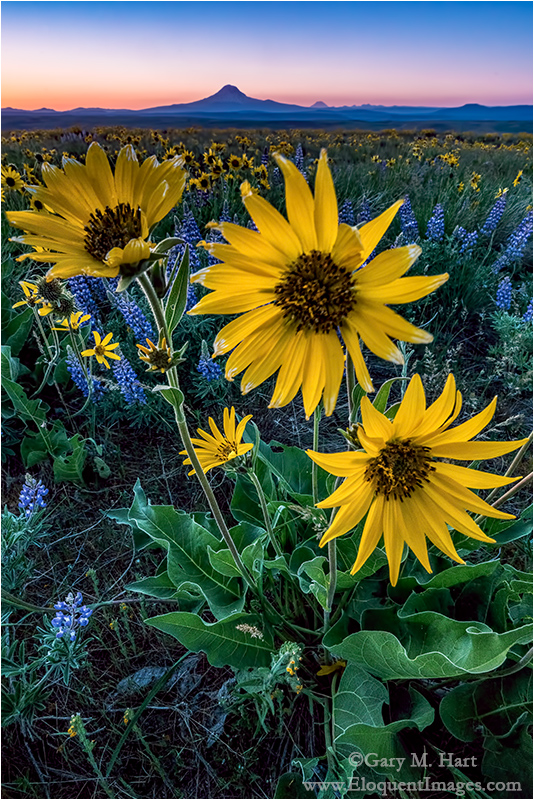
Wildflowers and Mt. Adams, Columbia River Gorge
Sony a7R II
Sony/Zeiss 16-35 f4
1/25 second
F/18
ISO 3200
As a professional photographer with a pretty large social media following, I get a lot of questions from complete strangers. What camera (or lens, or tripod, or whatever) should I buy? What were your settings for this picture? Did you use a filter? What’s the best time to photograph such-and-such a location? Because I don’t believe there should be secrets in photography, I do my best to answer these questions as quickly and completely as my time permits (though it seems that the time I have to answer questions decreases at about the rate the volume of questions increases).
Among the most frequently asked questions is, “Where did you take this picture, and how do I get there?” But, despite my “no secrets” policy, I’m no longer as free with location information as I once was. I can cite (at least) three reasons, none of which is a desire to prevent others from duplicating my shot (the best photography requires far more than location knowledge anyway).
First
I’m disappointed by the laziness of many photographers who simply want to duplicate an image they’ve admired. (No, I don’t think that simply asking for a location automatically makes you lazy, and in fact have been known to ask for location details when something about a spot interests me—but identifying a location should be the photographer’s starting point, not the goal.) I’ve seen enough duplicate images to know that I don’t want to perpetuate the epidemic.
Second
Sadly, the quickest way to ruin a location is to invite photographers. It seems that as soon as the word is out about a new spot, it becomes impossible to visit in peace, and even worse, to enjoy it without having to face the damage done by photographers who preceded you. You’d think that people who photograph nature would take better care of it, but that doesn’t appear to be the case, at least not for everyone.
It’s unfortunate that the actions of a few can ruin things for everyone, but these disrespectful few are far more visible than the respectful majority. The more photographers try to squeeze into spaces too small to accommodate them, spilling into fragile areas, crowding out tourists with just as much right to be there (“Hey, you’re in my shot!”), the more fences and rules are installed to keep us out.
And finally
I’d love to be wealthy enough to make myself available as a fount of photography information to all who ask. But because photography is my livelihood, I have to balance the time I spend against the income it generates.
When people pay me for a photo workshop, not only do I like to guide them to all the locations they’ve seen in the pictures, I also like to be able to give them perspectives a little off the beaten path and less heavily photographed. For that reason (and the fact that I just plain enjoy doing it), I spend a lot of time researching: Scouring maps, studying books, and googling before I visit for sure, but more importantly, polling locals and exploring independently (Hmmm, this road looks interesting…) once I arrive. This takes time, sometimes a lot of time.
About this image
I bring all this up because the image today was captured at a location that Don Smith and I “discovered” (it’s not as if we’re Lewis and Clark, but you get the point) while scouting before this year’s Columbia River Gorge workshops (back-to-back, collaborative workshops organized by Don and me). Despite our familiarity with any location, Don and I always allow time to explore for more spots on every visit. Which is how we found ourselves bouncing along dirt roads and traipsing up and down remote hillsides on both sides of the gorge earlier this spring.
When we found this spot, Don and I immediately agreed on two points: 1) We have to take the workshop groups here 2) Too many photographers would destroy this place. And since the surest way to invite a trampling horde of photographers is to share directions to a location, I won’t do that. But here’s a tip: some of my favorite photo spots have been found while searching for other spots.
So, after cautioning our groups to treat each destination with care, we did take them to this new spot. The first group had to contend with 30 MPH winds—we made those shots work by bumping our ISOs and concentrating more on views wide and distant enough to minimize motion blur. The second group landed here in a gentle breeze that ranged from slight to nonexistent, allowing us to get up close and personal with the flowers.
The image I’m sharing today came right at the end of the second group’s visit. The sun had been down for about ten minutes, but because the light was so nice, and the color seemed to linger in the sky above Mt. Adams, I just couldn’t bring myself to leave. With my lens just inches from the flowers, even at 16mm and f18, complete front-to-back sharpness was impossible. Forced to choose between foreground or background sharpness, I opted to make the trio of yellow balsam root in my foreground sharp, and let the background go a little soft. By this time it was dark enough that I bumped my ISO to 3200 to ensure a shutter speed fast enough to avoid motion blur.
Off the beaten path (20 feet to 20 miles from the crowd)


