Eloquent Images by Gary Hart
Insight, information, and inspiration for the inquisitive nature photographer
In Defense of the Tripod
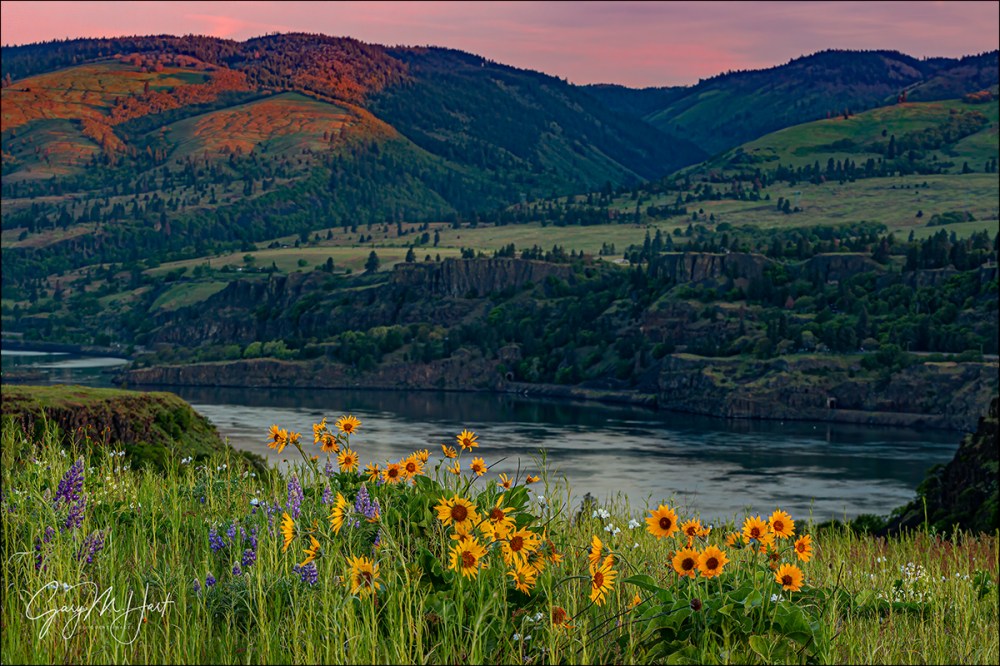
Spring Sunrise, Rowena Crest, Columbia River Gorge
Canon EOS-5D Mark III
Canon 70-200 f/4L
1/10 second
F/8
ISO 800
This is another 6-year-old “brand new” image, just excavated from the depths of my 2014 folder
Photography without compromise
If you think the main reason to use a tripod is to avoid camera-shake, you’re mistaken. In this day of phenomenal high ISO performance and stabilized bodies and lenses, acceptable hand-held sharpness is possible in the vast majority of images. But here’s a reality that’s tough to deny: The steadiest hand-held image will never be sharper than it would have been if it had been properly executed using a sturdy tripod. And that’s not even the best reason to use a tripod.
Each camera has an ideal ISO—the quality of any image that doesn’t use it is compromised, sometimes just slightly, other times a lot. So if hand-holding an images forces you out of your camera’s ideal f-stop to reduce camera shake, you’ve made an unnecessary compromise. “Photographer’s light” (such as sunrise, sunset, and stormy or cloudy weather) only compounds the problem. While most of these compromises can be more or less remedied in post-processing, and many may not show up at all on a fifteen-inch laptop screen or in an 8×10 print, most serious photographers like the option to print their images large—and nothing reveals flaws more than a large print.
Let’s imagine you just got a request for a 24×36 print of the pride of your portfolio—a (hand-held) Yosemite Valley moonrise telephoto, captured at ISO 800 (it looks great in your Flickr gallery)—for the reception area of your mother-in-law’s law firm (a real coup after that whole llama-farm investment fiasco). So what do you tell her when you go to hang it and she asks why it looks “so mushy,” and what’s with all that “sludge in the shadows”? Oops—looks like another Thanksgiving at the kids’ table.
Not only does every camera have an ideal ISO, every scene has an ideal f-stop. Anyone with a camera can snap the lateral (left/right, up/down) dimensions of a scene, but artistic photographers understand that the key to rendering our three-dimensional world in photography’s two-dimensional medium is creating the illusion of the missing dimension, depth, by composing elements throughout the frame, from near to far. Since depth of field is controlled by the f-stop, of all the exposure variables at a landscape photographer’s disposal, f-stop is the least negotiable. In a static scene (as most landscape images are), the tripod removes motion (camera shake) from the equation, allowing you to select the ideal f-stop at your camera’s best ISO.
But what about a scene that’s all on the same plane, where depth isn’t a factor? The f-stop still matters because every lens has a single f-stop that renders the sharpest result. For some lenses the sharpness difference between f-stops is small, for others it’s significant. But it’s always there. So even when DOF isn’t a consideration, I choose my lens’s sharpest f-stop, usually f/5.6-f/11. Some photographers put each lens through extensive testing to determine its sweet spot; I usually go with f/8 or f/11 unless I see clear evidence that a lens is sharper at a different f-stop. I also try to avoid f-stops smaller than f/11 unless the scene requires extra depth—not only do lenses tend to be less sharp at their extreme f-stops, at f-stops smaller than f/11, diffraction starts to rear its ugly head.
The bottom line: By removing camera shake from the equation, a tripod frees you to choose the best f-stop for your composition, without compromise.
An image is not a snap, it’s a process
Still not convinced? Consider also the control a tripod gives to your composition process. Managing the relationship of elements in the frame is usually the single most important compositional decision a photographer can make. Relationships are especially important when you’ve included the front-to-back objects so essential to enhancing the illusion of depth. Photographing on a tripod gives you the time to consider each element in your frame and its relationship to other elements and eliminate distractions, and the flexibility to evaluate and refine until everything’s perfect.
When setting up an image, I try to achieve a sense of visual balance throughout my frame. I think about the path for my viewers’ eyes to follow, and where I want them to pause or land. I consider the elements that will move or stop the eye, and potential distractions that might pull the eye away, and merged elements that rob the scene of depth. With these things in mind, I position myself and frame my composition, identifying the focus point and f-stop for the ideal depth of field. Having my composition frozen in place atop my tripod enables me to make these adjustments deliberately and methodically, and helps me ensure that one tweak here didn’t break something else over there.
After each click, I step back and study the image on the LCD, imagine it framed large and hanging on a wall. I scrutinize my composition for possible composition and depth of field improvements, and check the histogram for exposure problems. With a tripod I can do all this at my pace, taking as much time as necessary, knowing that when I’m ready to make adjustments, the image I just reviewed will be waiting right there in my viewfinder atop my tripod, exactly as I captured it, ready for me to enhance.
And finally
Other benefits of a tripod I’ve almost come to take for granted. For example, I sometimes use graduated neutral density filters but find the holders that screw onto the end of my lens awkward. With a tripod, it’s easy to position my GND and hold it with my fingers during exposure (I don’t even own a filter holder). During long exposures I’ll sometimes move the GND up and down slightly to disguise the transition—also easy on a tripod.
A tripod also makes it easy to use a polarizer to reduce color-robbing glare, something I can do on virtually every daylight shot because unless something in my scene is moving, the two stops of light I lose to a polarizer are irrelevant when I’m on a tripod.
And advanced digital techniques such as image stitching (for panoramas or high resolution capture), HDR (high dynamic range blending of multiple images for exposure management), or focus blending to increase depth of field are all easier on a tripod. As is old-fashioned mirror lock-up to reduce mirror-slap induced vibration. And live-view focusing, the best way to ensure precise focus, is a snap on a tripod (and pretty much impossible hand-held).
For example

Spring Sunrise, Rowena Crest, Columbia River Gorge
There was a lot going on in this scene. I had wildflowers everywhere, the Columbia River, clouds, a freeway, railroad tracks, power lines, and lots of other photographers and wildflower peepers. Organizing all this into a coherent image, including the good stuff and eliminating the distractions, required no small measure of planning and execution.
I’d been wandering the hillsides of the Tom McCall Preserve on the Rowena Crest in the Columbia River Gorge for about an hour, playing with compositions and identifying potential subjects. I could see the potential for a colorful sunrise and wanted to be ready when (if) it happened. I wanted a foreground subject to anchor my frame, and needed to eliminate the freeway, tracks, wires, and people, and finally landed on this spot about 15 minutes before sunrise.
Rather than wait for the color to arrive, I started working on my composition immediately, choosing a height about two feet above the ground—any higher and the power lines would come into view; any lower and the flowers and near cliff (on the left) would merge with the opposite bank. To compress the foreground/background distance, I moved back a little and chose my 70-200 lens, putting the bottom of the frame a few inches below the yellow balsam root to frame the flowers with a little green, and taking care not to cut off any of the large, ear-shaped leaves.
The clouds weren’t very interesting, but I knew that if they colored up they’d add an important layer to my frame, so I made sure to include a strong stripe of clouds across the top of my frame. I liked the nearby sprinkling of lupine and other wildflowers, so I went wide enough to include a few without diluting my primary clump of wildflowers.
The final step was to determine depth of field and focus. To make the flowers’ sharpness stand out even more, I slightly softened the background by dialing to f/8 and choosing a focus point closer than the hyperfocal distance.
Each of these framing decisions were part of an iterative process that took more than a dozen clicks before everything was just as I wanted it. Because I was working on a tripod, I was able to click a frame, evaluate all of the variables, and make small refinements. The tripod also gave me the luxury of straightening to unkink my back between clicks. When I was sure everything was right, I stood and waited (fingers crossed) for the color. When the sky did finally color-up, an intermittent breeze came with it, forcing me to compromise my ISO (ISO 800) to freeze the flowers’ movement. But because I was on a tripod, I was able to stand and watch the scene confident in the knowledge that my composition was fixed, and click my remote release whenever there was a lull.
Workshop Schedule || Purchase Prints


Well said!
Thanks, Larry!