Lightning Safety (for Photographers)
Posted on September 15, 2025

Lightning and Sun, Amistad, New Mexico
Sony a7R V
Sony 24-105 G
1/4 second
F/18
ISO 50
If you’re reading this post and hope to stay completely safe from lightning, just stop right here and simply go indoors at the first flash, and stay there until 30 minutes after the last flash. (You’re welcome.) But if you would like to assume the risks of photographing lightning while staying as safe as possible, read on….
It’s a personal calculation
I share a lot of lightning pictures. Which of course means I spend a fair amount of time outside, in and around electrical storms. In fact, if I didn’t usually have to travel so far to so much as see lightning, I’d absolutely be out there chasing it a lot more than I do. But based on my many lightning images, it occurs to me that some might believe I’m risk taker (I’m not), or that I’m just plain foolish (perhaps, but not where lightning is concerned). Believe it or not, there is method to this madness.
I was already thinking about dedicating a post to lightning safety when I recently read an article on that very topic from the June 2024 “Outside Online” magazine. While there wasn’t a lot of new info there, that article did underscore for me how much most people have wrong about lightning safety, and how that ignorance puts them at risk. Given that sharing lightning images as much as I do might be construed as tacit encouragement to go out and do this inherently unsafe thing, I think the time for my safe (-ish) lightning photography post is now.
I want to start by acknowledging that photographing lightning is dangerous, no matter how careful you are. But life is continual series of calculated risks that start when we get out of bed in the morning, and continue until we turn off the light at night. (And have you ever considered that even after you’re “safely” tucked away with the lights out, a meteor could be speeding toward your bed? If only you’d have been outside photographing lightning, you’d have escaped perfectly unharmed.)
Whether it’s driving a car, sharing our lives on social media, taking a jog around the neighborhood, managing finances online, or free-soloing El Capitan, there is some degree of risk in virtually every decision we make. Yet we go ahead and expose ourselves to these potential dangers anyway, when we believe the benefits outweigh the risks.
As a nature photographer with a significant and lifelong attraction to Nature’s astonishing power in many forms, my personal risk/reward calculation deems the thrill of witnessing and photographing lightning worth the inherent risks. But that doesn’t mean I blindly rush outside at the first thunder crack—if anything, my desire to experience as much lightning as possible is a great motivator to become as familiar with lightning safety as I possibly can be.
Safety first
The 2000 (or so) people killed worldwide by lightning each year had one thing in common with you and me: they didn’t believe they’d be struck by lightning when they started whatever it was they were doing when they died. The key takeaway here is, don’t get cocky.
The foundational elements of lightning safety are:
- Preparation: If we knew in advance exactly where the next lightning bolt would strike, the risk of getting struck would be almost zero. Of course that’s not possible, but you can at least give yourself an advantage by learning as much about thunderstorms and lightning as possible, and by relying on lightning experts who know far more than you do.
- Weather forecasts are your friend. Find a reliable source very familiar with the area you want to photograph lightning, and monitor the forecast constantly. For me, that’s the National Weather Service, who has forecast offices throughout the US that are staffed with genuine weather experts, and in fact provides most of the data the other forecasters rely on.
- Thunderstorms have personalities, and while you should always assume they’ll behave unpredictably, they do have “tells” that can hint at their behavior for anyone who understands the how, where, and why of thunderstorm development. Learn to recognize the stages of thunderstorm development and their various components (inflow, outflow, updrafts, downdrafts, anvil tops, wall clouds, hail zones, etc.) that reveal important things like the storm’s direction of motion, intensity, and where its lightning is most likely.
- Awareness: Never get so caught up in the spectacle of an electrical display that you lose track of everything happening elsewhere. And it’s more than just your eyes you need to rely on—lightning safety is very much a multi-sensory effort. For example:
- A wind increase or direction change often signals an approaching storm.
- The sound of thunder is usually an indication that the storm is too close. You generally don’t hear thunder that’s more than 8 miles away (at 5 seconds per mile, thunder from lightning 8 miles away would arrive in 40 seconds), yet lightning can easily strike 10 miles or more from its prior strike. Though I’m not usually close enough to hear my lightning’s thunder, when I am, my vigilance goes on overdrive.
- Hair on your head, arms, or legs standing up is a sign of grave danger, indicating a nearby strike is imminent. This is the time to run, not get one more shot.
- Similarly, the smell we normally associate with burning electronics is another indicator of the electrically charged (ionized) atmosphere that immediately precedes a strike.
- Escape plan: Before setting up to photograph lightning, always have an escape plan—a safe place immediately (within seconds) accessible if lightning surprises you.
- The best escape plan is to never let the lightning get close enough that you need to escape in the first place. That’s why I prefer photographing lightning at distances great enough that I can’t hear the thunder, using my moderate to long telephoto lenses (24-105 and 100-400) and a Lightning Trigger (www.LightningTrigger.com) that senses daylight lightning more than 50 miles away—not too uncommon at Grand Canyon, where I’ve done the majority of my lightning photography. (And any time you find yourself reaching for an extreme wide lens, such as a 12-24 or 16-35, just assume the lightning is too close.)
- But for those times I might need to escape, before setting up I want to know exactly where my safe shelter is and how long it will take me to reach it. For me, that shelter is almost always my car, and I don’t like it to be more than a 30-second sprint from where I’m photographing (yes, I realize sometimes even 30 seconds isn’t fast enough—see risk calculation reference above).
Of course, since an electrical storm always has a first lightning bolt, all the vigilance in the world won’t save you if you’re just plain unlucky enough to catch one before you have a chance to retreat. But if you’ve done your preparation, use all of your senses to remain hyper-aware of the conditions in all directions, you’ve greatly improved the odds that lightning won’t surprise you. And when you do see, hear, smell, or feel anything that causes you to think the lightning risk is increasing, it’s always better to retreat to your pre-determined shelter (building or car) too soon than too late.
Under fire
With those common sense basics out of the way, let’s get to what I think is the greatest risk facing lightning photographers: General ignorance of lightning safety in the field that causes them to feel safer than they actually are while photographing it. There’s just a lot of misinformation out there.
The safest place to be in an electrical storm is in a fully enclosed structure that has plumbing and/or wiring that will channel a lightning strike around the perimeter and into the ground and away from occupants. Contrary to what many believe, shelter from rain does not equal shelter from lightning. You are not safe in an open structure (such as a covered patio, bus stop, shed, etc.), beneath a tree or overhanging rock, or in a cave. In other words, if you find yourself outside with no fully enclosed structure to retreat to, you’re kind of screwed.
But if your goal is to photograph lightning, you’ll no doubt want to be outside, with a bit more mobility than a solid building provides. Fortunately, lacking an enclosed building (with plumbing and/or wiring), the next best shelter is a hard-top, metal vehicle with the windows closed. Though fiberglass bodies don’t work, modern composite car bodies usually contain enough metal to safely channel the lightning.
Lightning myth buster: A car’s lightning safety is courtesy of its metal frame and has nothing to do with its rubber tires. You’d be just as safe sitting in a vehicle that’s perched on 4 bare rims as you would be in a vehicle atop massive truck tires.
So the combination of safety and mobility makes my car an integral component of my lightning-photography safety protocol. When I chase lightning, I make sure the vehicles are within a few seconds sprint from wherever I (and my group) are set up. And I never set off into the wilderness any time there’s even a slight chance of electrical activity—regardless of how clear the sky is now, or how great the potential photography.
The last resort
If you follow the guidelines I’ve outlined above, you should be able to avoid most lightning dangers. But most is not all. Maybe you wandered a little far from shelter and got caught off guard because the storm acted completely unpredictably, or (more likely) you got so caught up in the spectacle that you missed a warning sign or strayed too far from shelter. Now you’re exposed and fear that the next bolt could target you.
If you do ever find yourself caught outside in an electrical storm with no available shelter, shame on you. But I get it—on the Grand Canyon North Rim, my groups take the 1/2 mile walk to Cape Royal, where we have indeed photographed lightning. Being 1/2 mile from safe shelter is outside my standard lightning comfort zone, but the visibility here is distant enough that we can (and have) photographed lightning 50 miles away, and I’m extremely quick to pull the trigger on our retreat with even the slightest indication that nearby lightning might be possible.
If you do find yourself exposed to lightning without safe shelter, here’s some knowledge that will improve your chances:
- Lightning is quite lazy and always follows the path of least resistance, so you should avoid proximity to conductors like metal, water, power poles, cell towers, and trees (which contain lots of water). While these things don’t actually attract lightning, they do provide the easiest path for lightning to follow—unless you get too close, in which case you may become the path of least resistance.
- Whether you use an aluminum or carbon fiber tripod makes no difference.
- Sadly, the human body is mostly water, making it an excellent conductor. Your job is to minimize the chance that you will be the lightning’s conductor of choice.
- Avoid high ground.
- Avoid exposed areas.
- Stay at least fifteen feet from other people, to minimize collateral damage.
- Do not lie down. Lying down to reduce your height might slightly improve your chances of a direct hit, but it also greatly increases your surface area that’s in contact with the ground, thereby greatly increasing the chances a nearby strike will use your (waterlogged) body to discharge itself.
- If you’re surrounded by trees, position yourself near shorter trees, as far from the trunks as possible
- Rubber soled shoes provide no lightning protection. And despite assertions to the contrary, neither does a foam sleep pad.
- The “lightning position”—crouching on the balls of your feet, with your feet together and your hands covering your ears—is of very little value. Some consider it the solution of last resort, but many lightning safety experts now believe you’d be much better off spending the time you’d be in the lightning position running to a safer location.
- Safety is relative, so sometimes the best you can do when there is no safe location, is to find a safer location:
- Head to lower ground—basically, just run downhill, and keep going until you can’t get any lower (but avoid standing beneath or even getting too close to elevated ridges).
- Stand in a grouping of uniform height, shorter trees.
At the risk of repeating myself…
If you’re risk averse, just stay inside. But if you find beauty in Nature’s power, few natural phenomena provide a better opportunity to experience that power than lightning. And while lightning isn’t as predictable as a moonrise, not only is lightning’s unpredictability a big part of what makes it special, lightning isn’t as unpredictable as those who don’t understand it believe. If you learn the science, remain vigilant, and always respect the risks, photographing lightning can be one of the most thrilling things you do with your camera.
About this image
Today’s image is one of many from what became one of the most memorable photo days of my life (from my June 2025 storm chasing workshop). To read about the shoot that produced this image and several others, click here.
Here’s the bounty from the storm chasing afternoon that produced today’s image (June 7, 2025)
-

- Sunset Supercell Lightning, Amistad, New Mexico
-

- Lightning and Thunderhead, Eastern New Mexico
-

- Double Rainbow and Lightning, Amistad, New Mexico (vertical crop)
-

- Lightning at Sunset, Eastern New Mexico
-
- Lightning and Road, Amistad, New Mexico
-

- Down the Middle, Rainbow and Lightning Near Amistad, New Mexico
-
- Lightning and Sun, Amistad, New Mexico
-

- Alien Spaceship, Amistad, New Mexico
Read my Photo Tips article on photographing lightning: Lightning
And here are my lightning-centric photo workshops:
Grand Canyon Monsoon
Storm Chasing
Lots of Lightning
Click any image to scroll through the gallery LARGE


A Different Kind of Thrilling
Posted on September 6, 2025

Quiet Dawn, Aoraki and Lake Pukaki, New Zealand
Sony a7R V
Sony 24-105 G
30 second
F/18
ISO 50
Chasing tornadoes is undeniably thrilling, but photographers don’t live by thrills alone. Or maybe a better way to put that would be, thrills don’t necessarily need to set your heart racing. Because after nearly 2 weeks chasing supercells and their (thrilling) progeny, I was only home for a couple of days before jetting off to New Zealand for a completely different kind of thrills. Instead of action-packed targets like lightning, tornadoes, and the supercells themselves, our New Zealand thrills skew more toward soothing.
On any photo trip, whether it’s a workshop or personal, I like to balance the essential popular photo spots with a variety of less known, personal-discovery sites. For our New Zealand workshops, over the years Don Smith and I have assembled a nice variety of these spots to mix in with the Wanaka willows, Doubtful Sounds, and Tasman Lakes that justifiably attract the beauty-loving masses.
In New Zealand, and elsewhere, Don and I have learned that popularity doesn’t necessarily mean superiority, and some of our off the beaten path photo spots can be at least as beautiful as their more popular counterparts. With the added bonus of complete solitude.
When we scout workshop locations, we always get our eyes on the popular spots for a better understanding of things like light, foreground options, light, and so on. But we spend much more time poking around the perimeter of these known locations, venturing off-road (or at least off main and paved roads), studying maps, querying locals, and simply exploring the terrain for potential vantage points that are easily overlooked. (This doesn’t make us special—most good photographers take a similar approach.)
Which is how we came across this sweet location on the shore of Lake Pukaki in New Zealand. Many years ago, Don and I were just driving along the lakeshore, scouting possible photo locations in the Aoraki/Cook area. And while this spot is off the main highway, I’d hardly label it “hidden.” But we’ve never seen another photographer there. When we first saw it, we instantly realized that it checked every box on our list that day: mountains, lake, and foreground features (plus access that won’t kill anyone in the group).
From the get-go, Don and I made this a regular workshop sunrise location. And over the years we’ve learned that, like many spots, it’s a little different with each visit: the lake level goes up and down (and with it the rocks that are visible), the snow line on the surrounding peaks changes, amount of churn on the water varies, and of course the sky is always doing something different. Not only that, making our way from the van to the water in the pre-sunrise dark, it’s easy to end up a couple hundred feet one direction or the other from where we were the previous year. But one thing remains unchanged: we’re always alone.


One of the most important features of this spot is the prominence of Aoraki (Mt. Cook). At over 12,000 feet, it’s New Zealand’s highest peak. Sometimes clouds obscure its summit, but this year’s group got to watch Aoraki’s striking outline slowly materialize against the brightening sky.
With the group settled in and happily clicking away, I set about searching for this year’s foreground rocks. One of the things that makes this such a great location is the shallowness of the water near the shore here, which allows a few rocks to jut above the surface, with many more clearly visible just below the surface. For my foreground, I always look for the protruding rocks, but also stay very aware of the surrounding submerged rocks. This year, with Aoraki so visible, I hunted until I found a V-shaped collection of nearby rocks that complemented the distant peak.
Because the lake was fairly choppy, I decided on a long exposure to smooth the water, which provided the added bonus of better revealing the submerged rocks. We were still about 20 minutes out from sunrise, so achieving a 30-second exposure without a neutral density filter was a simple matter of dropping to ISO 50 and stopping down to f/18. To compose, I positioned myself so the nearby rocks framed Aoraki. Then I dropped my tripod a little to shrink the gap between the rocks and the peak, but didn’t drop as low as I might otherwise have because the lake’s glacial turquoise is such a beautiful feature itself.
One unsung perk of these pre-sunrise long exposures is the waiting. Nothing is more soothing, and dare I say thrilling, than simply standing and basking in morning’s quiet calm while my camera collects the faint light. Sublime.
Join Don and Me in New Zealand
Workshop Schedule || Purchase Prints || Instagram
Roads Less Traveled
Click any image to scroll through the gallery LARGE


, California")


That’s a Wrap
Posted on August 30, 2025

Lightning and Abandoned House, Eastern Colorado
Sony a7R V
Sony 24-105 G
1 second
F/13
ISO 100
Photographing blue-sky California as much as I do, it seems that I spend much of my life strategizing, hoping, praying, and sometimes even begging (whatever it takes) for a quality sky to complement the Golden State’s spectacular scenery. So the irony wasn’t lost on me when my June storm chasing group spent nearly two weeks under absolutely jaw dropping skies, strategizing, hoping, praying and begging for quality foreground to complement whatever sky we were chasing.
Fortunately, our Midwest skies were so consistently spectacular that we didn’t need much foreground. Hay bales? Sure. Oil drilling rig? Absolutely. Barn? Jackpot! Empty field? Good enough.
As the trip wound down, we’d reached the point where we’d photographed so many spectacular sights, we started to feel like hoping for more would be greedy. But that didn’t keep us from still trying.
On our final full day of chasing, we found ourselves in eastern Colorado, pursuing several active thunderstorms. While the forecast didn’t look good for supercell development (and the associated tornados), these cells certainly buzzed with electricity. For our first stop that afternoon, we found vantage point overlooking verdant, rolling hills dotted with distant farms. Not exactly Yosemite, but fine for lightning and dramatic clouds. Most of the lightning was several miles away—far enough that we didn’t hear thunder—but my Lightning Trigger did a very good job catching each bolt. Even though I was pretty sure I wasn’t getting anything I’d use, that didn’t stop me from feeling thrilled each time.
When the primary activity at this location receded and shifted away from the best foreground views, we loaded into the vans and race to get back out front of the storm. Within a few minutes we were back in position, but at first saw no foreground worth stopping for. Then someone noticed a farmhouse in the distance, and as we approached we saw that wasn’t merely a farmhouse, it was long-abandoned and wonderfully weathered.
We screeched to a stop and piled out and were met instantly by what felt like hurricane force winds. When a bolt flashed in the general direction of the house, it was instantly clear that we were much closer to the action than we had been at the previous location. Since the house as at least 1/4 off the road, with no discernible path out to it, I figured we’d just shoot it from the road and move on. But boy, it would sure be nice to get closer and use a wider lens to include more of that spectacular sky…
About the time I had that thought, Jeremy (my workshop co-leader) bolted across the field in the direction the house, and instantly at least half the group, myself included, followed. I kept waiting for Chris, our trip leader and lead storm chaser, to call us back, but honestly, I’m not sure we’d have heard him anyway in all that wind. So we just kept going.
Without a road, we had to maneuver around holes, culverts, and a variety of aggressive plants. My biggest concern was the thorns, of which there was an abundance. Let me just say that Texans like to brag about how everything is bigger in Texas, and while I’m not sure that’s a universal truth, it sure applies to their thorns. Earlier in the trip, after navigating a similar field, something started stabbing the bottom of my foot with each step, and figured a sharp object had worked its way into my shoe. But when I realized it only hurt when I had my shoes on, I removed my shoe, turned it over, and discovered a thorn had completely pierced the sole. But anyway…

Lightning and Abandoned House, Eastern Colorado (my final frame of the trip)
We made it to about 100 yards from the house, setting up in a line so no one was in anyone else’s way. We all had the same goal: a lightning bolt in the general direction of the house. The lightning was firing across a fairly wide area, and some of it was pretty shrouded by rain. Every once in a while we got a bright bolt somewhere in the scene, or a faint one aligned with the house, but nothing that was both bright and perfectly aligned. The other problem was that crazy wind—not only did it require us all to hold on tight to our tripods, it was also a clue that we were perilously close to the storm’s RFD (rear flank downdraft), and all the hail and lightning that came with it. And the wind was intensifying—not a good sign.
About the time we started getting splatted with large but (so far) relatively infrequent raindrops, someone noticed that Chris was frantically waving us back to the vans. I knew the smart thing to do was to retreat without hesitation, but I delayed just a little bit—just long enough for, bang! My attention had been on the evacuating photographers, so I only caught the bolt out of the corner of my eye, but Chuck, the other person foolish enough to still be out there confirmed that it was indeed bright bolt, and right behind the house. When a second bolt hit seconds later, we just grabbed our tripods and raced back to the vans. That bolt turned out to be the final frame of one of the most unforgettable trips of my life.
Join me on my next storm chasing adventure
Workshop Schedule || Purchase Prints || Instagram
My Storm Chasing Bounty (So Far)
Click any image to scroll through the gallery LARGE


Days of Lightning Passed
Posted on August 23, 2025
So. Here I am, back from my Grand Canyon monsoon workshop, isolated at home with Covid. I usually return from these workshops, hit the ground running, and find myself longing for more time to process all my new lightning images. Ironic that the one time circumstances force me to slow down and lay low, providing tons of time to process my new lighting bounty, I have no new bounty to process. Alas, though this year’s was indeed a fantastic workshop with many beautiful sunrises and sunsets, we got no lightning. (During the workshop—those who stayed through the day following our wrap-up sunrise shoot got a nice lighting show.)
Instead of feeling sorry for myself, I decided to go through images of past lightning that I never had time to process. I’m feeling better, but this week, rather than write a conventional blog, I’m just going to share three of my (hundreds of) previously unprocessed Grand Canyon lightning images, and the links to blog posts about those shoots.

Distant Lightning, Lipan Point, Grand Canyon South Rim
Sony a7RIV
Sony 24-105 G
1/4 second
F/8
ISO 200
The thing that stands out about this 2021 afternoon was the thunderhead that we could see in the distance for the entire 40 minute drive out to Lipan Point. I was afraid it would be spent by the time we got there, but this was a show that just didn’t want to end: What Would Michael Scott Do?

Inside Job, Inner Gorge Lightning, Grand Canyon North Rim
Sony a7RIV
Sony 24-105 G
1/4 second
F/8
ISO 250
Two days before capturing the preceding lightning image, the same 2021 monsoon group enjoyed a spectacular electrical display from the view decks adjacent to Grand Canyon Lodge (RIP) on the North Rim: Frozen in Time.

Incoming, Oza Butte Lightning Strike, Grand Canyon North Rim
Sony a7RIII
Sony 24-105 f/4 G
Breakthrough neutral polarizer
Lightning Trigger LT-IV
1/4 second
F/11
ISO 100
This lightning bolt landed just a mile away from my 2019 group’s perch on the Grand Canyon Lodge view decks. With safety just a few feet away, and shielded by lightning rods, many of us stayed out to enjoy the show. But less than five minutes later, we were all chased inside by an even closer strike: I Just Have to Share This.
Join me at the Grand Canyon next year
Workshop Schedule || Purchase Prints || Instagram
More Lightning
Click any image to scroll through the gallery LARGE


The Show Must Go On
Posted on August 13, 2025

Ablaze, Desert View Sunset, Grand Canyon
Sony a7R V
Sony 100-400 GM
Sony 1.4x Teleconverter
ISO 100
f/9
1/1600 second
Greetings from Grand Canyon.
A big part of nature photography is anticipation and planning. And with planning comes expectations. Sadly, expectations often don’t live up to reality, so another big part of nature photography is how you handle the situations when expectations aren’t met.
To those people who preempt disappointment by simply avoiding expectations (after all, if you don’t have expectations, you can’t be disappointed) I say, what fun is that? Despite the risk of disappointment, I truly enjoy getting excited about upcoming trips—then just do my best to make the most of whatever situation has dashed my expectations.
When planning my workshops, I try to remember that it’s not just my own expectations on the line—big promises also means the potential for big disappointment. And few things ramp up expectations, both my own and my workshop students’, more than the possibility of photographing lightning at the Grand Canyon. Of course with or without lightning, Grand Canyon is special. But let’s be honest—the only reason I schedule this workshop in Grand Canyon’s most crowded month is because that’s the best time for lightning. And despite all the inherent beauty here, lightning is the prime reason most of my workshop students sign up. The number two reason? Probably the opportunity to visit the North Rim.
This year, the first threat to everyone’s expectations came in July, when Grand Canyon Lodge on the North Rim burned, forcing the closure of that side of the park. Though the North Rim doesn’t have the views to match the South Rim, I’ve always believed the rest of the North Rim experience exceeds the South Rim: fewer people, evergreen forest setting, and rustic Grand Canyon Lodge. Additionally, the North Rim has been the site of some of my groups’ most spectacular lightning successes. But rather than cancel the workshop because we lost our two North Rim nights, I just switched those lost nights to the South Rim, where I believed (crossed my fingers) that the overall experience could be just as good, only different: expectations reset.
Smoke can create havoc at Grand Canyon, but at the time the fire changed my plans, I fully expected that it would be extinguished when my workshop came around (a month later). I also consoled myself with the belief that the chances for lightning this year would be no different than any other year (extremely good). In other words, expectations were back on the rise.
But, as the workshop drew near, the fire actually exploded from fewer than 10,000 acres to its current 145,000 acres (and climbing), with the containment percentages barely budging each day (it’s currently only 44% contained). Worse still, as August approached, it started to become clear that this was not a good monsoon year in Northern Arizona. Expectations cratered.
The workshop’s first day dawned with no hope for lightning, and a canyon filled with smoke—not a great combo. But by this time, we were in “the show must go on” mode, and I was grateful to have a group that was happy to stay as positive as I was. At the orientation I laid out the scenario, and gave them a rundown of all the ways we could make the best of it. I reminded them that some of my favorite Grand Canyon images were only possible because the smoke subdued a brilliant sun, and I’ve seen the forecast turn from clear to thunderstorms with very little warning.


Making it out to the east-side views on our first shoot, we found the skies cloudless, and a fair amount of smoke. But the smoke could have been much worse, and was thin enough to permit at least a decent view into the nearby portions of the canyon, with outlines of the canyon’s internal ridges receding down the canyon to the west. Not the iconic red rock grandeur people expect at Grand Canyon, but quite photogenic for anyone with a telephoto lens and reasonable understanding of exposure.
The view that evening enabled me to reemphasize the point I’d made in the orientation: this would likely be a sunset where the sun, receding ridges, and a telephoto lens would take the day. Even with the smoke, careful exposure would be required to capture (in a single frame) enough canyon detail for silhouettes, without blowing out the sun.
That’s exactly the approach I took for this Desert View sunset image from that first evening. I started by setting up my 100-400 with a 1.4 teleconverter for the biggest sun possible, then composed a few sample frames while the sun was about 15 minutes from the horizon. This gave me enough time to anticipate the spot on the distant canyon rim where the sun would disappear, and to play with the possible compositions, finally arriving at this one at a little less than 500mm. Then I waited.
I held my breath a few minutes later when the sun disappeared into a layer of clouds, exhaling only when it reappeared shortly thereafter. As it dropped to within a sun’s-diameter of the horizon, I started clicking, keeping a close eye on my camera’s histogram and highlight alerts (“zebras”), while pushing the exposure to as bright as I could make it without losing color in the sun. To hedge my bets, I varied my exposure up and down by a couple of stops, my standard practice any time the sun is in my frame. (This allows me to use my large monitor at home to select the image with the best highlights/shadows balance.)
Honestly, the resulting images looked like crap on my LCD: the sun appeared too bright, while the canyon was virtually black. But I know my camera well enough to know that both highlights and shadows were within the recoverable range. Not only that, underexposing everything but the sun turned the clouds a fiery orange-red.
Processing this image was actually a piece of cake: I just pulled Lightroom’s Highlights slider all the way to the left, the Shadows slider all the way to the right, then adjusted the Exposure slider upward until everything felt right. Believe it or not, as soon as I finished those three moves, the sun and clouds looked pretty much like this (no special masking, blending, or color adjustment required)—I actually chose to desaturate the color a bit in Photoshop to make everything look more credible. Besides some moderate noise reduction in the darkest areas of the frame, this image required very little more than that. (Amazing how much simpler processing is when you nail the exposure.)
We’re now on workshop Day 3, and it turns out that initial shoot was our smokiest. Though we haven’t seen many clouds (yet), and have had lots of smoke in the distance, the canyon itself, as well as the sky above, has been sufficiently smoke-free to permit very clear views all the way down to the river, and brilliant sunstars (which require the brightest possible sun) at each sunrise/sunset shoot after that first one.
I’ve also found myself even more thrilled than I expected to be to have much more time on the South Rim—not only do we have two more days here, we also didn’t lose most of one day to the drive to the North Rim. That’s allowed me to take group to a few favorite locations that I’ve never had time to share with groups before. And I’ve been doing this so long, I’ve found very effective workarounds to the daunting South Rim crowds.
And as if to reward everyone’s positive spirit, now the National Weather Service has dangled hints of thunderstorms for tomorrow, and completely dropped the hints in favor of downright promises for the day following (fingers crossed). So things are definitely looking up.
Having lost the North Rim for the foreseeable future, I wasn’t sure I was going to continue this workshop. But after this week’s experience, even without the normal amount of lightning, all systems are go for next year.
Workshop Schedule || Purchase Prints || Instagram
More Monsoon Magic


Bracketing, My Way
Posted on August 7, 2025

Tumble, Marion Falls, Milford Road, New Zealand
Sony a7R V
Sony 24-105 f/4 G
ISO 800
f/14
1/10 second
Bracketing then and now
Remember the uneasy days of film, when we never knew whether we had exposed a scene properly until the film returned from the lab? So as insurance, we’d bracket our exposures, starting with the exposure we believed to be right, then hedge our bets by capturing the same composition at lighter and darker exposure values. Today, digital capture gives us much greater dynamic range, as well as instant exposure confirmation (histogram), rendering this kind of exposure bracketing mostly unnecessary.
Another kind of bracketing, that has become quite popular in our (relatively) new digital world, is clicking multiple frames to process into a single image that uses only the best part of each. While I’m irrationally opposed to any kind of multi-image composites in my own photography (not that there’s anything wrong with it), popular applications in the general photography community uses this form of bracketing to solve exposure, depth of field, and star trails problems, to name a few.
Given that I’m a histogram evangelist, using a camera system with arguably best dynamic range possible, combined with my personal aversion to composites, it might be easy to conclude that I never bracket. Quite the contrary, in fact: I bracket the heck out my images.
For example
In this year’s New Zealand workshop, for the first time ever, not only did Don Smith and I get to take our group to Milford Sound, we had a full day to savor not just the sound itself, but all the delights of the Milford Sound road as well. In prior workshops, we’ve always spent two nights in Te Anau, which allows us to spend a full day cruising Doubtful Sound. Departing Te Anau the following morning. we’ve always headed up the Milford Sound road only far as Mirror Lakes for our sunrise shoot, before doubling back past Te Anau and straight to Wanaka. Then we’re off to Fox Glacier the next day. But this year, a rock slide forced us to drop our two days at Fox Glacier, so we pivoted back to Te Anau for two more nights. This gave as a day for Milford Sound, which turned out so successful, we decided to make it a permanent part of the workshop.
From Te Anau, the drive all the way to Milford Sound (the end of the road) is less than 2 hours—without stops. But with stops, we had no problem turning this route into a full day’s journey. Among the many waterfalls, lakes, and snow-capped peaks we enjoyed that day, the highlight for me was our short but sweet hike up to Marion Falls.
The fact that Marion Falls is really more a series of violent cascades than it is a vertical waterfall doesn’t make it any less beautiful or dramatic than your conventional, Yosemite-style plunging waterfall. (New Zealand has plenty of those too.) Immediately after crossing the stream on a swinging bridge, you find yourself on a lush trail. The verdant surroundings, filled with the roar of still unseen rushing water, gives you a pretty good inkling that something beautiful is in store.
This was the first time Don and I had taken a group to Marion Falls, but I was there with my wife last July. On that visit we were with a group completely devoid of photography priorities, so it had been a relatively quick stop just to stretch our legs and get our eyes on the falls. Period. On this visit, I was excited not only to have more time, but also by the heavy overcast that provided shadowless light that was ideal for flowing water.
As soon as I saw a gap in the foliage with a view of the entire “fall,” I scrambled through the opening and down onto a flat (-ish) rock directly above the torrent. I wanted my composition to emphasize the rich green framing the stream: ferns on my side, mossy boulders on the opposite side. But with that goal in mind, I had to balance my desire to get out as far as possible for the most unobstructed view of the stream, with the knowledge that any slip, stumble, or broken foothold would most likely require a recovery, not a rescue, some unknown (an not insignificant) distance downstream.
To unburden myself of my heavy and awkward camera bag, I set it down in the bushes just off the trail, grabbing only my tripod, camera, and 24-105 lens. Camera and lens mounted, I metered before attempting a composition, grateful for the flat, unchanging light the allowed me to expose once and then forget about it. Next, I carefully planted my tripod a little farther out than I was comfortable planting myself—as far out as I could get it while still being able reach my camera’s controls—and used its articulating LCD to compose (because I couldn’t get my eye to the viewfinder).
Once I had my exposure and composition set, I was ready to start bracketing. For me, bracketing can take many forms: sometimes it’s a varying framing of the same scene; sometimes it’s a variety of depths of field for a range of background softness options (not for focus stacking); sometimes it’s different motion effects; and sometimes it’s a combination of some or all of the above. In this case, I simply wanted to vary my shutter speed to alter the motion blur in the water.
Since my shutter speed would determine the amount of blur, and my aperture needed to be small to ensure front-to-back sharpness, I adjusted my ISO, with a corresponding shutter speed adjustment to keep the light the same. In other words, when I wanted a faster shutter speed, I increased my ISO, and decreased it for a slower shutter speed. The result was a range of motion effects with exactly the same amount of light..
With water moving this fast, even a 1/8 second shutter change creates a noticeable difference in the motion blur. For this composition, I ended up with a dozen or so frames with varying amounts of motion blur, finally (with the help of the 38-inch monitor in the comfort of my office) choosing this one that used 1/10 second (one the faster shutter speeds). I chose 1/10 second because it provided enough blur to convey the water’s speed, while still retaining the character and detail of each feature. I found that shutter speeds faster than 1/10 started showing an unappealing scratchiness in the water, while going much longer than 1/10 second started smoothing some of the best water into a detail-less, frothy white. Because this water was flowing so fast, I saw very little difference between shutter speeds of 1 second or longer.
This kind of bracketing isn’t really a revolutionary approach to photography—many photographers use it in one form or another. But in my photo workshop image review sessions, I often find myself surprised by the number of photographers who leave potentially great shots on the table because they simply click a pretty scene once, then move on. Whether it’s depth of field, framing, motion, or any of a number of other possible scene variables, don’t forget that there is almost always more than one way to capture the scene. All you need to do is slow down, and challenge yourself to find it.
Join Don Smith and Me in New Zealand
Workshop Schedule || Purchase Prints || Instagram
Motion Bracketed


, California")


Storm Chasing Diary: Saving the Best For Last
Posted on July 27, 2025

Sunset Supercell Lightning, Amistad, New Mexico
Sony a7R V
Sony 24-105 f/4 G
ISO 50
f/18
1/4 second
I’ve really enjoyed sharing my storm chasing images and experiences with everyone here on my blog, but need to end this “Storm Chasing Diary” series so I can return to some the unprocessed images from other recent trips. So the “last” referred to in the title is the series, not the images, which will keep coming as time permits.
“Best” is a very subjective term. I can’t even decide for sure that this image is the best one I captured this day, but I’m going with it because at the very least, it was the most thrilling.
After finishing with the storm cell I wrote about in my previous blog—the one with the double rainbow split by a lightning bolt, I looked around, wondering where everyone had gone. A minute ago we were all-in on the rainbow, but now I was alone. No, they weren’t playing a trick on me, they were lined up on the road about 100 feet away, aiming their cameras the other direction, toward a storm that had organized into a massive supercell while I was off chasing rainbows.
Surveying that scene, I said aloud and to no one in particular, “Well, this looks interesting,” then ambled off to join them. Surely I wouldn’t be able to top what I’d just captured, so on the way I stopped to share my excitement over capturing a double rainbow with a lightning bolt with our trip leader, Chris Gullikson. As I prepared to pull up the image on the back of my camera, a lightning bolt like none I’d ever seen froze me. This electric monster stretched from the base of the new supercell’s anvil—a thunderstorm’s cap, where the convection ceases and the clouds spread horizontally—all the way to the ground, instantly infusing me with deeper understanding of why everyone was so focused on this new storm. (Not to mention a renewed sense of urgency.)
This lightning was on a completely different scale from the ones I’d just been photographing—certainly in intensity, but even more impressive (and unprecedented in my personal history) was its length. The storm’s anvil topped out over 50,000 feet above the ground, and though the anvil’s top wasn’t visible from down on the ground, the bolt I’d just seen must have spanned several vertical vertical miles before stabbing the ground only about a mile away.
I quickened my pace (okay, sprinted), found a slot in the group’s already established firing line, and hastily set up. Since my Lightning Trigger was already attached and ready to go, all I need to do was compose and re-meter. To this point, most of my supercell images had used a 12-24 or 16-35 lens—wide enough to include the entire structure. But both were back in the van and I didn’t want to take my eyes off the storm to go fetch them if I didn’t need to. So I twisted my 24-105 all the way out to 24mm, and found it was just wide enough to include all of the most important components of the scene: the wall cloud, the rain curtain and sun, plus a little of the road. Though the cell was moving pretty rapidly from right to left, I reasoned I could stick with the 24-105 as long as I monitored my composition and adjusted for the motion every minute or two. Then I crossed my fingers, hoping that my composition would reach high enough to include all of whatever lightning I saw.
With everything ready for the next lightning strike, I took the time to appreciate the view. Of course every supercell is spectacularly beautiful, but this one was made even more special by its proximity to the sun, which etched its glowing disk in the dense rain curtain, and infused the backlit the clouds with a rich, golden hue. Surely, I thought, adding a lightning bolt like the one I just saw to something already so beautiful would be too much to ask for.
Apparently not. While I’ve seen many storms dispense more lightning than this one, the emphasis here was clearly on quality over quantity. In the 30 or so minutes I photographed it, I captured 6 bolts of similar brilliance and length to that first one. The one I’m sharing here was not only the evening’s strongest, eliciting the most ooohs and ahhhs from the group, it was also the most perfectly positioned, making it an easy to choice to be the first to process. I eventually went back and processed a couple of others as vertical frames, partly to add variety, and partly because they were just too beautiful to let languish on a hard drive.
If you’d have told me before the storm chasing workshop that we’d have one day where we saw multiple tornadoes, but that our best day would be a day with zero tornadoes, I wouldn’t have believed you. But if someone held a gun to my head and told me to pick one “best” day of the storm chasing trip, I’d have to say (before disarming them and rendering them unconscious, of course) this day would be the one.
June 7, 2025, Near Amistad, New Mexico (processed so far)


It’s days like this one, as well as our nearly as memorable tornado day, that remind me why I am a nature photographer. The unpredictability of the natural world, combined with its absolute insistence on doing exactly what it wants to do, can make photographing it an extremely frustrating endeavor. But then we get rewards like this.
One other thing this whole storm chasing experience did for me was reinforce my message to people who tell me how lucky I am to live in California, where I have so much world class beauty right at my doorstep. And while I can’t disagree (or complain!), I remind them that California skies are generally quite boring. The atmospheric sights I witnessed were every bit as spectacular as any more permanent terrestrial feature I’ve witnessed. Which is why I’m jealous of anyone who lives somewhere that serves up skies like this from time-to-time. Fortunately, until I return, I have the bounty I collected on this trip, both processed and yet-to-be processed, to keep me happy. So while this may be the last of my “Storm Chasing Diary” series, it absolutely won’t be the end of new images from this trip.
I’m also excited to say that this experience so greatly exceeded my expectations in so many ways (far beyond the photography itself, believe it or not), that I’ve decided to continue doing (this thing that was supposed to be a one-off) on into the future. In fact, Jeremy Woodhouse and I have already scheduled a storm chasing workshop for next summer, and are in the planning stages for another one in 2027.
Join me on another storm chasing adventure next summer
The Joy of Lightning
Click any image to scroll through the gallery LARGE


Storm Chasing Diary: Lucky Strike
Posted on July 20, 2025

Down the Middle, Lightning and Double Rainbow Near Amistad, New Mexico
Sony a7R V
Sony 24-105 f/4 G
ISO 50
f/18
1/8 second
How does one capture an image of a brilliant lightning bolt splitting the inverted prisms of a double rainbow? (No, not with AI or a composite—that’s cheating.) If you said luck, you’d be right—well, at least half right. But, right or not, there’s no surer way to elicit a defensive response from a nature photographer than to blurt some version of, “You were so lucky!”
Nevertheless, the inherent unpredictability of the natural world makes nature photographers’ relationship with luck pretty tight. We need luck.
On the other hand, a big part of the enigma we call “luck” is in fact not random (and therefore not truly luck). Whether it’s a colorful sunrise, vivid rainbow, or explosive lightning bolt, every photographer longs for “lucky” events that make a scene more special—but to turn those events into great photography, we still have to get ourselves out there at just the right time and place, equip ourselves with the right tools, and creatively apply our craft and vision.
My good friend and frequent workshop partner, pro photographer Don Smith, has labeled me the, “luckiest person in the world.” And I’m afraid I must plead guilty as charged—not to just being lucky in both my personal and photography lives, but lucky also with simple things, such as parking spots that always seem to appear just as I pull into a crowded lot, and potential traffic tickets that somehow dissolve into benign warnings.
The parking space thing I can’t really explain, but I imagine my traffic ticket good fortune is shaped at least partially by simple politeness and silent respect—I just do what the officer says, and never argue, make excuses, or attempt to charm. (And lest you think I make a habit of getting pulled over, it hasn’t happened in at least 10 years, I swear.) Regarding my photography luck, I will acknowledge that there’s quite possibly some mysterious parking space magic to my good fortune, but I also pride myself on doing everything possible to be present and prepared when the photography “luck” happens.
But I also need experiences like a double-rainbow lightning bolt to remind me that denying the role of luck in photography is to suppress the joy that accompanies Nature’s surprises. If I were to pretend that capturing an image like a lightning bolt splitting a double rainbow makes me special, I would surely damage (and dishonor) the sense of awe that draws me to nature photography in the first place.
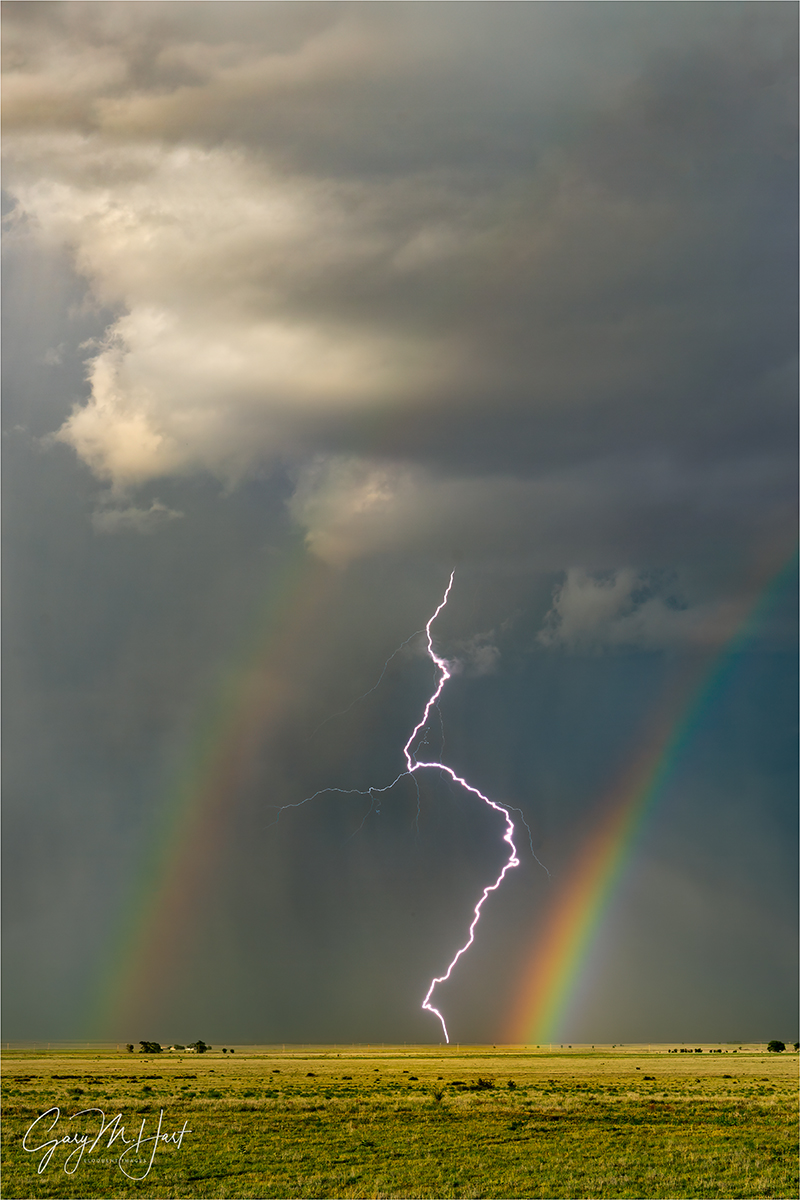
Double Rainbow and Lightning, Amistad, New Mexico :: Here’s a vertical crop of the same frame. This was my original plan for this image, but I decided I like the sunlit rain in the horizontal version, I decided to feature it instead.
This image? Yes, I was definitely anticipating a rainbow, because we were surrounded by, and at times in the midst of, light to moderate rain, while the sun played peek-a-boo with broken clouds in the west. So when shafts of sunlight started pouring through those openings, I instantly turned my attention in the direction a rainbow would form. And the lightning was no big surprise either, because it had been all around us all afternoon, firing up in one direction for a while, eventually diminishing and starting up in another direction. Sometimes these lightning displays would overlap, forcing us to choose which one to target—do I go for the activity producing the most lightning, or roll the dice for the best composition?
My decision that evening wasn’t difficult. The lightning was much more active in the northwest, but there wasn’t really a lot happening composition-wise over there. So when the rainbow popped up behind me, I turned my camera (with Lightning Trigger already fully engaged) in that direction, and crossed my fingers. At the very least, I’d have a rainbow—and if I was lucky, maybe even pair it with a lightning bolt.
Because the sparse lightning in the general direction of the rainbow hadn’t really settled in to one specific area, I composed fairly wide, grateful for a 61 megapixel sensor that would enable me to crop tighter in processing once I had a frame with a lightning bolt somewhere. Fairly confident I’d already bagged a couple of strikes, I congratulated myself for my decision to target the rainbow as I watched the color start fading from the top down. Still, I told myself, the bottom part as intense as ever, maybe more…
And then this happened. The bolt was so unexpected, short-lived, and perfectly placed, that I almost didn’t trust what I’d just seen. So I broke my own cardinal rule of lightning photography: I turned off my Lightning Trigger to check the most recent frame. (Speaking of luck, every photographer knows that the surest way to make a much anticipated event happen is to put away, turn off, or in any other way disable, essential equipment in the middle of a shoot.) But I couldn’t help myself, and was rewarded by confirmation that I had indeed captured a lightning bolt splitting a double rainbow. In fact, what I saw on my LCD was even better than I could have dared to hope: a brilliant, serpentine streak that couldn’t have been more perfectly placed had I hand-drawn it (or, gulp, resorted to AI).
So where does this capture fall on the luck/skill continuum? I don’t know—maybe somewhere in the middle? I’ll take credit for being there (well, at least for scheduling a Midwest storm chasing trip—we were at this specific location because I also had the good sense to trust an expert), for having the right gear, for connecting my Lightning Trigger, and for the decision to point my camera in the direction of the rainbow. But none of that changes the fact that, when this bolt struck, I felt like I’d won the lottery. And I wouldn’t have it any other way.
Join me on another storm chasing adventure next summer
Workshop Schedule || Purchase Prints || Instagram
Making My Own Luck
Click any image to scroll through the gallery LARGE


And that’s the way it goes with nature photography. Most of the best images are some combination of luck and skill.
Gone, But Not Forgotten
Posted on July 14, 2025
Grand Canyon Lodge, North Rim (1928 – 2025)


The images I share in this post were all captured on the North Rim of Grand Canyon, a place I’ve visited and photographed more times than I can count. And while Grand Canyon Lodge is no more, the North Rim will recover, thrive, and ultimately outlast us all.
Yesterday I woke to the devastating news that Grand Canyon Lodge on the canyon’s North Rim had been destroyed by a wildfire. I’d been monitoring last week’s evacuation of the North Rim, but since that evacuation was for a fire burning more than 50 miles away and threatening to close the only exit, my first reaction was denial—surely someone misinterpreted those earlier evacuation reports. But it soon became clear that the loss was real.
Unfortunately, with a workshop scheduled on the North Rim in less than a month, my grief was preempted by the need to save my workshop. That took 24 hours, but I was ultimately able to replace my lost North Rim nights with two more nights on the South Rim, so now I’m back to dealing with this sense of great loss.
As news of the fire trickled in, and I was able to view maps of its destruction, the scope of the disaster became clear: gone are the cabins my workshop groups and I have stayed in every (non-pandemic) summer since 2013; gone is the historic, beautiful main lodge building, with its exquisite 2-story picture-window views into the canyon that served as the backdrop for my “office” (where I wrote many a blog); gone is my favorite National Park Service restaurant, which shared those same views; gone is (much of) the beautiful evergreen and aspen forest that makes the North Rim experience feel so special; gone are the Visitor Center and funky little shops that always seem to convince me I need another Grand Canyon T-shirt or hat; gone is the “deli” that somehow always seemed to be out of my first choice, yet each time was somehow forgivable, thanks to its friendly, mostly international, staff; gone are the two outside view decks where I’ve captured more lightning than any other location. And so much more.
I fully acknowledge that for views alone, the South Rim has it over the North Rim. But the views on the North Rim quite spectacular in their own right, and since they don’t duplicate the South Rim’s, to fully appreciate the Grand Canyon expansive magnificence, you really need to visit both rims. For me, it’s the entire North Rim experience that distinguishes it, and makes the North Rim the favorite of the two rims for the majority of my workshop students.
I do love the South Rim views, but unfairly resent sharing them with so many others. So the North Rim is where I recharge from, or mentally prepare for, the South Rim and its teeming tourists. On the North Rim, it’s actually possible to visit any of its vistas and be the only person there—not every time, or even most times, but frequently enough to feel hopeful each time I arrive. And, while the only compelling reason to be outside on the South Rim requires a view of the canyon, on the North Rim, with its open meadows sprinkled with wildflowers and bounded by forests of pine and aspen, anywhere outside feels special.
Of course Grand Canyon Lodge is not the entire North Rim, but it is the hub of the experience there. At least when I completed my final Grand Canyon raft trip this May, I had full knowledge going in that this would be my last time, enabling me to say a proper goodbye. To one minute be excited about returning in just a month, and the next minute know it could be a very long time before I return, and that when I do return, the North Rim won’t be the place I grew to love so much, is something I’ll struggle with for a while.
I know I’m just one of many feeling a loss today. For a little perspective, losing some buildings, and access to the North Rim for a year or two, can’t compare to the tragedy of human loss following the Texas floods. But both events are a reminder that Mother Nature is in always in charge, and humans are just borrowing space. Wildfires are an essential natural process from which Grand Canyon will ultimately benefit. While we all may be feeling a profound sense of personal loss right now, Grand Canyon will endure as grandly as ever.
Workshop Schedule || Purchase Prints || Instagram
The Grand Canyon North Rim Experience


Storm Chasing Diary: More Tornadoes
Posted on July 10, 2025

Wedge Tornado, Morton, Texas
Sony a7R V
Sony 24-105 f/4 G
ISO 200
f/16
1/40 second
A month ago I shared an image of my very first tornado. As exciting as that experience was, it turns out that was only the beginning….
When a large supercell reaches maturity, the urgency among storm chasers seems to ratchet up exponentially. So one indelible lesson from my first storm chasing experience is that there’s no time to bask in your success, no matter how spectacular, because there’s potentially something at least as good down the road—and we’re on Mother Nature’s schedule.
While chasing supercells is incredible for many reasons, it seems everyone’s number one storm chasing goal is a tornado. But as thoroughly monitored, measured, and studied (and chased!) as tornadoes are, there’s still a lot to be learned about the how, when, and why of their formation. Why does one storm kick out multiple tornadoes, while the next similarly dynamic storm produces none? And why do some tornadoes form and disappear in seconds, while others grow to be a mile or more wide and stay on the ground for hours? Though the answers to these questions and more will undoubtably save lives, they remain frustratingly elusive. Fortunately, despite the lack of life-saving perfect insight, the general mechanism behind tornado formation is understood well enough to already be making a difference.
The action kicks off when daytime heating sends warm, moist air rising into increasingly colder, denser air. Since air cools as it rises, and cool air can’t hold as much moisture as warmer air, condensation occurs and we get clouds. Condensation releases energy that warms the air. The atmosphere is said to be unstable when the heat created by condensation is sufficient to keep the air rising. Lacking instability, the convection driving updrafts shuts off, but as long as the air is unstable, the updraft will persist. Of course what goes up, must come down—eventually the rising air is wrung of its moisture, allowing it to cool enough to descend, and a downdraft is born.
Still, while every thunderstorm forms through some version of this process, most don’t turn into tornado breeding supercells. For that, other atmospheric tumblers must click into place.
Most tornadoes are born in supercells—storms powered by a very powerful rotating updraft called a mesocyclone. A mesocyclone forms when a storm’s updraft encounters wind shear: different wind speed and/or wind direction at different heights in the atmosphere impart a spin to the rising air. Shear-induced spin actually starts horizontally, like rolling logs, but is soon tilted toward vertical by the overpowering updraft. When the vertical column of rising, spinning air reaches the ground, a tornado is born.
On the afternoon we saw our tornadoes, when the first one disappeared and its storm started shifting east, our group quickly loaded back into the vans and raced to get back ahead of it. The goal isn’t to be directly in a cell’s path, it’s (usually) to position ourselves adjacent to and in front of its path, so we can watch the action move across our field of vision.
Storm chasers generally avoid urban areas because traffic, stop signs, and stoplights can be very difficult to navigate, and buildings and trees obstruct views. While chasing tends to be easier in the wide open countryside, the downside there is fewer roads—even if we know exactly where we want to be, that knowledge does little good if there’s no road to take us there. And because many roads in these rural areas are unpaved they could quickly be rendered a completely impassable swamp by a downpour—you definitely don’t want to be spinning your tires in the mud with a large tornado or grapefruit-size hail bearing down on you.
We lucked out this evening. We got our supercell, and roads we found were paved and seemed to be laid out specifically to get us in the right place to continue our pursuit. But we quickly found that we weren’t the only ones appreciating the roads that evening, and as we approached our next target vantage point, we found both shoulders teeming with a veritable fleet of chase vehicles.
This diverse assortment included ordinary street vehicles (think generic rental cars), large passenger vans filled with chase groups like ours, trucks with massive tires, and clearly single-purpose storm-chasing beaters that appeared to sport their hail-inflicted wounds with pride. Some vehicles were outfitted with external cameras, weather stations, or satellite dishes (or all of the above). Of all the cars chasing that evening, I think the highlight for me was Reed Timmer’s heavily armored Dominator. (This is the storm chasing equivalent of a celebrity sighting—if you ever watched “Storm Chasers” on Netflix, you know what I’m talking about.)

Whirl, Tornado Near Morton, Texas
Navigating this stretch, it was impossible to drive more than a few car lengths without having to swerve or brake for a pedestrian bolting across the road. Rather than seek the perfect parking spot, we grabbed the first open spaces we found and raced on foot to a fence separating the road from a recently plowed field. Even though we were outside the most intense storm activity, the wind here was still quite strong, and the clouds overhead seemed poised to open up. Of course all this activity only added to the thrill of the moment.
Soon our trip leader Chris directed our attention across the field and a little west (left), maybe 1/2 mile away, to the tornado precursor we hope for our: a descending, rotating wall cloud. While promising, this isn’t a sure thing, but it wasn’t long before the first funnel dropped. We all watched, and held our breath, as the tornado approached, then appeared to pass just behind, a small farm. Over the next few minutes, a couple more tornadoes spun up and vanished in fairly short order.
Then our attention turned to an expanding wall of brown dust directly across the field. At first there was so much dust, it was difficult to tell exactly what was going on there, but it certainly looked promising. It wasn’t long before everything clearly organized into a very large wedge tornado that was on a different scale from what we’d seen so far, with the inflow feeding it clearly defined by the dust it sucked up.
I only managed a half-dozen or so frames before the wind picked up and approaching hail chased us away; shortly thereafter, the road network failed us and we lost track of the tornado. But given its size and organization, we weren’t surprised to learn later was that this tornado was on the ground for nearly 30 minutes, traveled over 10 miles, and eventually expanded to at least a mile wide. According to some (unverified) reports, it was up to 2.2 miles wide, which would make it the largest tornado ever recorded in Texas. The National Weather Service rated it as an EF2, with winds around 125 MPH. Fortunately, whatever its size, the tornado kept to wide open farmland, which limited its damage to a few downed trees and power poles.
I do it again in 2026
Workshop Schedule || Purchase Prints || Instagram
The Joy of Storm Chasing
Click any image to scroll through the gallery LARGE


