Eloquent Images by Gary Hart
Insight, information, and inspiration for the inquisitive nature photographer
Practicing what I preach
Posted on October 10, 2016
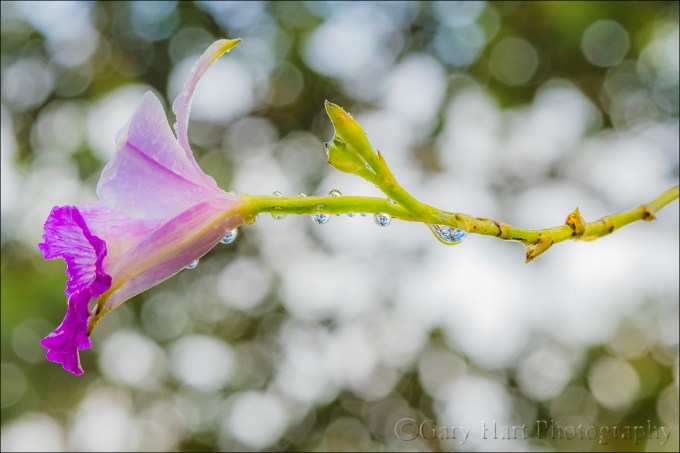
Raindrops on Orchid, Lava Tree State Park, Hawaii
Sony a7R II
Sony FE 90mm f2.8 Macro
1/30 second
F/11
ISO 800
The morning (last week) I started this post I was photographing South Tufa at Mono Lake in 26 degree temperatures. It’s hard to believe that less than three weeks earlier I was wearing a tank top, shorts, and flip-flops while photographing orchids in Hawaii. And later today I’m off to Moab, Utah.
I’d taken my Hawaii workshop group to Lava Tree State Park, long a personal favorite spot for its quiet beauty and intimate scenes. A recent heavy downpour had soaked the ground and left virtually every square inch of foliage glistening with raindrops. Recognizing an opportunity for some extreme close-focus photography, I immediately loaded my macro and extension tubes into my bag and herded my group onto the loop trail that circumnavigates the park.
In the shade just off the trail at the back of the park, a solitary, raindrop-laden orchid caught my eye—exactly what I look for when close-focus photography is my goal. Unfortunately, even with my tripod extended to its maximum height (6 inches above my head), the flower was a few inches too high to photograph at what I considered a good angle. No matter how I tried, I couldn’t find a position that allowed me to emphasize the orchid and its raindrops without blowing out the brilliant sky in the background. Tugging at the back of my brain as I stalked my subject was that frequently uttered photographic mantra, “Never blow the highlights.” But rather than give up, I stood back and considered my options.
Photographic rules are usually based on sound, proven reasoning that guides the neophyte to competent, appealing images. And while I’ll acknowledge that a broken photographic rule can indeed ruin an image, I’ve also spent my entire photographic career espousing the creative merits of breaking rules. If true artistic achievement means doing something new, and there’s already a rule for something, doesn’t that mean it’s been done? In other words, genuine creativity requires breaking the very rules that are supposed to lead to good images.
So what was my problem? Among the most ubiquitous and absolute pieces of photograph dogma is, “Never blow your highlights!” And for the most part I agree that blown highlights ruin an image—in fact I’ve spent a lot of time writing about how to deal with difficult light, and it’s all been based on the premise that we need to save the highlights at all costs. Over the years I’ve written and spoken about exposure techniques, graduated neutral density filters, HDR blending, and silhouettes to save the highlights.
In this case, after exhausting my conventional solutions, it would have been far easier to move on to a different orchid. But I liked this orchid, with its rich color and shimmering raindrops, and the more time I spent with it, the more I liked it. So what if I make it okay to blow the highlights? What if instead of trying to subdue them, I made the highlights a feature of my scene?
Suddenly unshackled, an entirely new world of possibilities opened for me. I eyed the background and realized that turning the bright sky white, I’d have a striking contrast for the properly exposed orchid. Furthermore, the sky breaking through the canopy overhead would be softened by a paper-thin depth of field—if I could find the right aperture, the effect could be quite appealing.
To focus as close as possible, I added a 15mm extension tube to my macro and worked on identifying the angle of view and front/back relationships, eventually refining my the composition in small increments until all felt right. To mitigate a very slight breeze, I set my ISO to 800 and metered on the flower, ignoring the violently flashing highlights. The final piece of the puzzle was determining the f/stop that would give me the best effect. Rather than trust the result on my LCD, I ran the range of f/stops from f/2.8 to f/16, increasing my shutter speed to keep the exposure uniform. Regardless of the f/stop, with my lens more or less parallel to the orchid’s stem, I had a fairly large area of sharpness that included all of the raindrops, most the flower, and much of the stem.
I know this scene won’t garner as much attention as a vivid sunrise or dramatic lightning strike, but really like this image. So I guess the moral here is if you find yourself bound by rules, aggressively seek the unconventional. If a “rule” applies, go ahead and follow the rule for a shot or two, then challenge yourself to break it. You may end up with more failures than successes (but of course nobody needs to know that), but I’ll bet your successes will turn out to be among your favorite images.
Workshop Schedule || Purchase Prints || Instagram
Playing with light
(Creative use of the camera’s “limited” dynamic range)


I love you, goodbye…
Posted on November 18, 2015

Fire and Mist, Halemaumau Crater, Kilauea, Hawaii
Sony a7S
Sony/Zeiss 16-35 f4
10 seconds
F/4
ISO 3200
Last week I said goodbye to my Sony a7S. More than any camera I’ve owned, this is the camera that overcame photography’s physical boundaries that most frustrated me.
I’ve been interested in astronomy since I was ten, ten years longer than I’ve a been photographer. But until recently I’ve been thwarted in my attempts to fully convey the majesty of the night sky above a grand landscape.
What was missing was light. Or more accurately, the camera’s ability to capture light. Light is what enables cameras to “see,” and while there’s still a little light after the sun goes down, cameras struggle mightily to find a usable amount.
When faced with limited light, photographers’ solutions are limited, and each solution is a compromise. In no particular order, we can increase:
- Shutter speed: We can increase the time the light strikes the sensor. While we can usually keep our shutter open for as long as the battery lasts, the longer it’s open, the more motion we capture.
- Aperture (a ratio measure in f-stops): Larger apertures (the f-stop number shrinks as the aperture opens) allow more light, with a loss of depth of field. While the DOF loss is usually insignificant in most night photography scenes (because all subjects are usually at infinity), the laws of optics limit the size of of a lens’s aperture.
- ISO: We can increase the sensor’s sensitivity to light by increasing the ISO, but not without significant image quality degradation (noise).
Most night photography attempts bump into the limits of each solution before complete success is achieved. For me, the first barrier is usually the f-stop, which is soon maxed. With my f-stop maxed, I’m left with a dance between ISO and shutter speed as I attempt to balance acceptable amounts of motion and noise.
So why not just add more light? Duh. But, while adding light solves some problems, it introduces others. Anything bright enough to illuminate a large landscape (sunlight or moonlight) washes out the stars, and artificial local light (such as light painting or a flash) violates my own natural-light-only objective. Another option some resort to is image blending (one frame for the foreground, one for the sky), but that too violates my personal single-frame-only goal.
My first shot at the night photography conundrum came about ten years ago, when I started doing moonlight photography. I immediately found that the reflected sunlight cast by a full moon beautifully illuminated my landscapes, while preserving enough celestial darkness that the brighter, most recognizable constellations still shined through. But walking outside on a clear, moonless night far from city lights was all the reminder I needed that my favorite qualities of the night sky—the Milky Way and the the seemingly infinite quantity of stars—remained beyond my photographic reach.
To photograph a moonless sky brimming with stars, my next step was star trail photography—long exposures that accumulated enough light to reveal my terrestrial subjects at manageable ISO (not too much noise). Star trails have the added benefit of stretching stellar pinpoints into concentric arcs of light that beautifully depict Earth’s rotation.
While both enjoyable and beautiful, moonlight and star trail photography were not completely satisfying. But the laws of physics dictated that lenses weren’t going to get any faster, and Earth wasn’t going to rotate any slower, so the solution would need to be in sensor efficiency.
Unfortunately, camera manufactures remained resolute in their belief that megapixels sold cameras. So as sensor technology evolved, and photographers saw slow but steady high ISO improvement, we were force-fed a mind-boggling increase in megapixel count.
But cramming more megapixels onto a 35mm sensor requires: 1) smaller photosites that are less efficient at capturing light, and 2) more tightly packed photosites that increase (noise inducing) heat.
The megapixel race changed overnight when Sony, in a risky, game-changing move, decided to offer a high-end, full-frame camera with “only” a 12 megapixel sensor. What were they thinking!?
Acknowledging what serious photographers have known for years, that 12 megapixels is enough for most uses (just 12 years ago, pros paid $8,000 for a Canon 1Ds with only 11 megapixels), Sony bucked the megapixel trend to embrace the benefits of fewer, larger, less densely packed photosites. The result was a light-sucking monster that can see in the dark: the Sony a7S.
Since purchasing my a7S less than a year ago, I’m able to photograph the dark night sky above the landscapes I love. Additionally, I found that its fast shutter lag (since matched by the a7R II) made the a7S ideal for lightning photography. It was love at first click.
And now it’s gone. Last month Sony released the a7S II, and given my satisfaction with the upgrade from the a7R to the a7R II, it was only a matter of time before I upgraded to the a7S II. I’m happy to say that I found a good home for my a7S and in fact may even get to visit it in future workshops.
I haven’t had a chance to use the a7S II, but I assure you it won’t be long, and you’ll be the first to know.
About this image
The image at the top of this post was captured in September (2015) during my Hawaii Big Island Volcanos and Waterfalls photo workshop. Each time I visit here I hold my breath until I see what the sky is doing. I’ve encountered everything from completely cloudless to pea soup fog. I’ve come to hope for a mix of clouds and sky—enough sky for the Milky Way to shine through clearly, but enough clouds to reflect the orange light of the churning volcano.
On this evening we got a combination I hadn’t seen before—clear sky overhead, a few low clouds, and a heavy mist hanging in the caldera. Not only did the mist frame the scene with a translucent orange glow, it subdued the volcano’s fire enough for me to use a long exposure to bring out the Milky Way without blowing my highlights.
We’ll do it again in my next Hawaii Volcanos and Waterfalls workshop
An a7S homage
Click an image for a closer look, and a slide show. Refresh the screen to reorder the display.


The camera’s vision: Light
Posted on August 2, 2015
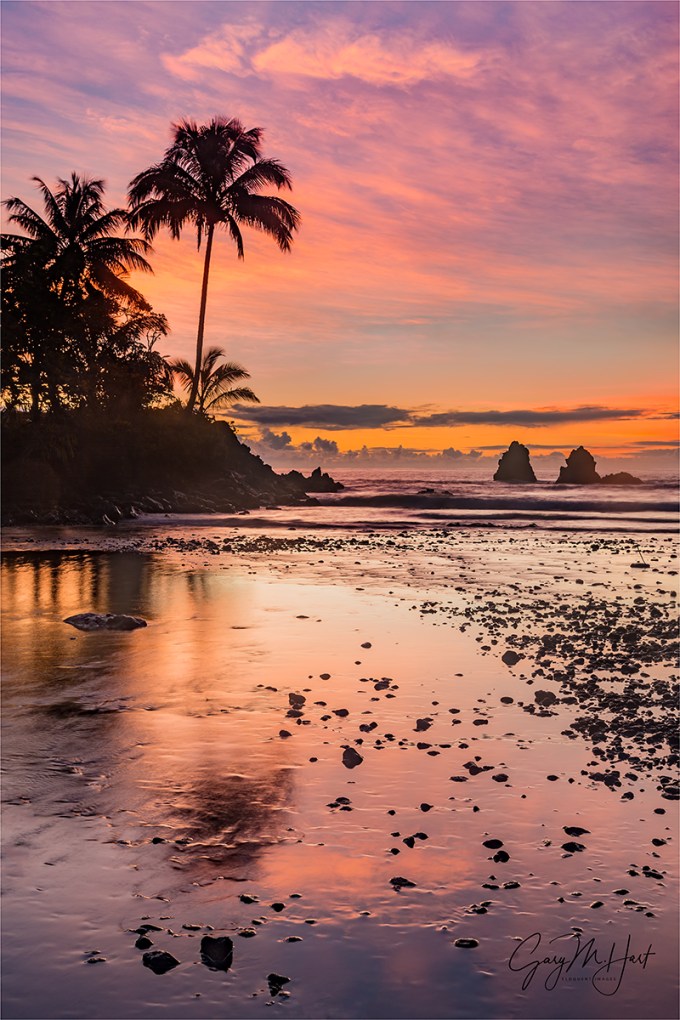
Tropical Sunrise, Hawaii Big Island
Canon EOS-5D Mark III
32 mm
1 second
F/11
ISO 200
Something I teach, write, and lecture on frequently (ad naseum?) is the photographer’s obligation to understand, not fight, the camera’s vision. Some people get this; others, not so much.
So here I go again…
Visual “Truth” is relative
Without getting too philosophical, it’s important to understand that, like your camera, your view of the universe is both limited and interpreted. In other words, there is no absolute visual truth. Instead, we (you, me, our cameras) each have a unique vision of the world that’s based on the way we receive it. Our definition of “real” is biased toward the three-dimensional, 360 degree, continuous-motion way our eye/brain system processes our universe, but it’s wrong to contend that the camera’s perspective is any less real than yours or mine.
The visible spectrum
Before lamenting your camera’s limitations, pause to consider that, in the grand scheme of perpetual electromagnetic energy surrounding us, what you and I see is incredibly limited as well. The visible (to the human eye) portion of the electromagnetic spectrum is an insignificant fraction of the infinite continuum of electromagnetic wavelengths permeating the Universe. For example, X-ray machines peer into the world of electromagnetic waves in the one nanometer (one billionth of a meter); TVs and radios “see” waves that are measured in centimeters; humans, on the other hand, see only waves in the very narrow band between (about) 400 and 750 nanometers.
With tools that target specific wavelengths, doctors reveal subcutaneous secrets, astronomers explore our galaxy and beyond, law enforcement and the military use “invisible” (to us) infrared radiation (heat) to see people and objects in complete darkness. In other words, in the grand scheme of things, there’s no single absolute visual standard—it’s all relative to your frame of reference.
The camera has its own frame of reference. While it’s sensitive to more or less the same visible spectrum our eyes see, the camera is oblivious to an entire dimension (depth). Not only that (since we’re not talking about movies here), a camera only returns a snap of a single instant. But a camera has advantages—its narrow perspective (compared to the human experience) allows photographers to hide distractions outside the frame, and that “instant” reflected in a photo can actually be an accumulation of infinite number of instants.
Despite these differences, photographers often go to great lengths attempting to force their cameras to record the world the way their eyes see it—not necessarily bad, but extremely limiting. Not only is duplicating human vision with a camera impossible, doing so sacrifices the camera’s ability to reveal things the eye/brain misses.
Interpreted vision
Every photograph must be processed (interpreted) in some way before it can be viewed. The processing can happen in a lab (remember those days?), the camera, and/or in a computer. But human visual input is also interpreted before we perceive it. Visual processing happens in the brain, which adjusts for things like color temperature, perspective, motion, and so on.
Of course human vision is a lot more complex than that, and while the eye/brain relationship might not be a perfect analog for the camera/computer paradigm, suffice to say, whether you’re looking at Yosemite in a digital print, on a computer screen, or through your own two eyes, the scene has been interpreted. And with interpretation comes bias.
Leveraging limitations
In many ways, the eye’s ability to capture light exceeds that of even the best cameras, effortlessly pulling detail out of deep shadows and bright highlights. But savvy photographers know how to use their cameras’ limited dynamic range to hide distractions, emphasize the scene’s most important elements, and reveal washed out color.
In the image above, captured on the Big Island of Hawaii last September, I used my camera’s (relatively) narrow dynamic range to simplify a sunrise to its essential color and shape. I could have blended multiple exposures to bring the detail in this scene closer to what my eyes saw, but it wasn’t the scene’s detail that moved me. Instead, underexposing the shadows minimized detail in the trees and rocks and allowed me to reveal color that had been washed out by the rising sun. I was able to simplify an originally complex scene to the elements that I found most compelling: the very tropical outline of swaying palms, the

Brilliant Poppy, American River Parkway, Sacramento
tenacious strength of rugged sea stacks, and the vivid color of a Hawaii sunrise, all mirrored in an abstract foreground reflection.
Instead, using my camera’s “limited” dynamic range, I blackened the superfluous detail that would have distracted from the qualities of the scene that I most wanted to convey.
In the poppy image on the right, the scene’s dynamic range was again impossible to capture with a camera—everything you see as white was blue sky or brilliant sunlight to my eyes. I chose to properly expose the poppy and let the sky blow out. The result was this beautifully backlit poppy isolated against a white background that was nothing like my view of the scene—but it was exactly what my camera saw.
Open your mind
So the next time you feel like labeling “real” or “not real,” or insisting that your camera do things it’s not very good at (just to satisfy your own perception of reality), remember that real is relative and far broader than your narrow perspective.
A few words about this image
I get to Onomea Bay each time I’m on the Big Island, and each time this scene is a little different. In recent years the stream feeding the bay has been low, and the tide has been out, so I haven’t been able to capture reflections like this. But on this visit in 2014 I got the reflection I wanted and a colorful sky to boot. Because this scene is more about the shapes of the palm tree and nearby rocks, I was able to save the sunrise color by turning them into silhouettes.
Workshop Schedule || Purchase Prints
Stuff my camera saw that I didn’t
(Or saw far differently)
Click an image for a closer look, and a slide show. Refresh the screen to reorder the display.


Sunrise on the rocks
Posted on September 21, 2011

Dawn, Puna Coast, Hawaii
Canon EOS 5D Mark III
10 seconds
17-40L
ISO 100
F11
I “discovered” this unnamed beach while scouting locations for my Hawaii workshops. It wasn’t on any maps or in any guidebooks, it was just there, tucked into a narrow strip separating the churning Pacific from lush Kapono-Kalapana Road. Through the trees the beach looked promising, so I pulled into a wide spot and explored more closely. A pair of children’s shorts draping a branch near the road, and a warning sign nailed to a tree, were indications that this not a secret location. I feared the sign would threaten severe consequences to anyone who dared trespass, but it simply said, “Private property: No camping or fires. Please enjoy.” So I did.
I’ve probably photographed this beach a dozen times since then. The hanging children’s clothing is always different: shoes, shirts, a swimsuit, but the sign stays the same. For the last few days, on each visit to locations I scouted before the workshop, I’ve scoured the rocks for a lens cap that disappeared somewhere early in my visit to the island. While I have no real hope of finding my lens cap, it’s a great reminder to look more closely at the beauty right at my feet. In Hawaii it’s easy to get distracted by the turquoise surf and billowing clouds, but it’s the jewel-like pools, pillow-shaped rocks, and emerald green moss within arm’s reach that make me feel like beautiful images are possible here any time, regardless of conditions.
This morning’s workshop sunrise was maybe my sixth time here in the last two weeks. The sky was nice but not spectacular, so I decided to emphasize the basalt pillows and quiet pools. I put on my widest lens (17-40) and dialed it out to 19mm to exaggerate the exquisite foreground. The pre-sunrise sky reflected nicely in the pools, but wasn’t yet sufficient to illuminate the black lava. To bring out the character in the nearby rocks, I used a two-stop graduated neutral density filter that held back the much brighter sky enough to expose the foreground detail. Because it was still too dark for a shutter speed that would freeze the violent waves, I opted to blur them into a gauzy mist that (I hoped) would create an ethereal mood. The result was a ten second exposure at f11 and ISO 100.
As we pulled away, an older gentleman hurried across the road to flag me down. I feared we’d inadvertently disturbed his peace, but he was simply wanted to express his admiration for our enjoying the beach so early. He gestured to a home mostly hidden behind dense foliage and said this was indeed “his” beach (technically no beach in Hawaii can be private) and that he was glad we enjoyed it. Then he reached into his pocket and handed me a small black disk, “I found this a few days ago.” I took my lens cap and thanked him for his generosity.
A Big Island Gallery


")


