Eloquent Images by Gary Hart
Insight, information, and inspiration for the inquisitive nature photographer
A Different Kind of Thrilling
Posted on September 6, 2025

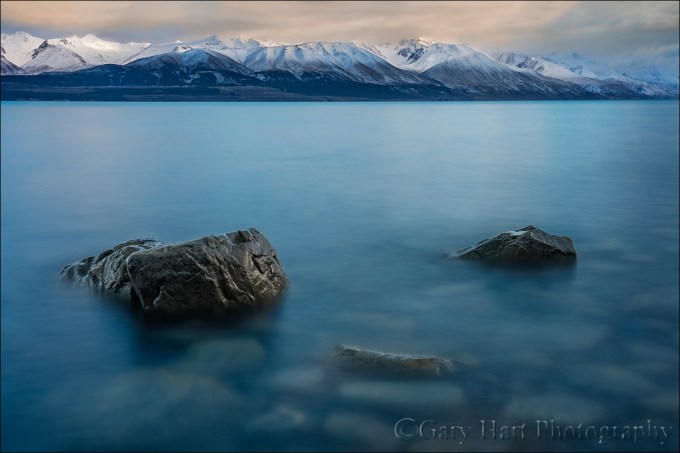
Quiet Dawn, Aoraki and Lake Pukaki, New Zealand
Sony a7R V
Sony 24-105 G
30 second
F/18
ISO 50
Chasing tornadoes is undeniably thrilling, but photographers don’t live by thrills alone. Or maybe a better way to put that would be, thrills don’t necessarily need to set your heart racing. Because after nearly 2 weeks chasing supercells and their (thrilling) progeny, I was only home for a couple of days before jetting off to New Zealand for a completely different kind of thrills. Instead of action-packed targets like lightning, tornadoes, and the supercells themselves, our New Zealand thrills skew more toward soothing.
On any photo trip, whether it’s a workshop or personal, I like to balance the essential popular photo spots with a variety of less known, personal-discovery sites. For our New Zealand workshops, over the years Don Smith and I have assembled a nice variety of these spots to mix in with the Wanaka willows, Doubtful Sounds, and Tasman Lakes that justifiably attract the beauty-loving masses.
In New Zealand, and elsewhere, Don and I have learned that popularity doesn’t necessarily mean superiority, and some of our off the beaten path photo spots can be at least as beautiful as their more popular counterparts. With the added bonus of complete solitude.
When we scout workshop locations, we always get our eyes on the popular spots for a better understanding of things like light, foreground options, light, and so on. But we spend much more time poking around the perimeter of these known locations, venturing off-road (or at least off main and paved roads), studying maps, querying locals, and simply exploring the terrain for potential vantage points that are easily overlooked. (This doesn’t make us special—most good photographers take a similar approach.)
Which is how we came across this sweet location on the shore of Lake Pukaki in New Zealand. Many years ago, Don and I were just driving along the lakeshore, scouting possible photo locations in the Aoraki/Cook area. And while this spot is off the main highway, I’d hardly label it “hidden.” But we’ve never seen another photographer there. When we first saw it, we instantly realized that it checked every box on our list that day: mountains, lake, and foreground features (plus access that won’t kill anyone in the group).
From the get-go, Don and I made this a regular workshop sunrise location. And over the years we’ve learned that, like many spots, it’s a little different with each visit: the lake level goes up and down (and with it the rocks that are visible), the snow line on the surrounding peaks changes, amount of churn on the water varies, and of course the sky is always doing something different. Not only that, making our way from the van to the water in the pre-sunrise dark, it’s easy to end up a couple hundred feet one direction or the other from where we were the previous year. But one thing remains unchanged: we’re always alone.


One of the most important features of this spot is the prominence of Aoraki (Mt. Cook). At over 12,000 feet, it’s New Zealand’s highest peak. Sometimes clouds obscure its summit, but this year’s group got to watch Aoraki’s striking outline slowly materialize against the brightening sky.
With the group settled in and happily clicking away, I set about searching for this year’s foreground rocks. One of the things that makes this such a great location is the shallowness of the water near the shore here, which allows a few rocks to jut above the surface, with many more clearly visible just below the surface. For my foreground, I always look for the protruding rocks, but also stay very aware of the surrounding submerged rocks. This year, with Aoraki so visible, I hunted until I found a V-shaped collection of nearby rocks that complemented the distant peak.
Because the lake was fairly choppy, I decided on a long exposure to smooth the water, which provided the added bonus of better revealing the submerged rocks. We were still about 20 minutes out from sunrise, so achieving a 30-second exposure without a neutral density filter was a simple matter of dropping to ISO 50 and stopping down to f/18. To compose, I positioned myself so the nearby rocks framed Aoraki. Then I dropped my tripod a little to shrink the gap between the rocks and the peak, but didn’t drop as low as I might otherwise have because the lake’s glacial turquoise is such a beautiful feature itself.
One unsung perk of these pre-sunrise long exposures is the waiting. Nothing is more soothing, and dare I say thrilling, than simply standing and basking in morning’s quiet calm while my camera collects the faint light. Sublime.
Join Don and Me in New Zealand
Workshop Schedule || Purchase Prints || Instagram
Roads Less Traveled
Click any image to scroll through the gallery LARGE


, California")


New Zealand Rocks
Posted on July 22, 2024

New Zealand Rocks, Lake Pukaki
Sony α1
Sony 16-35 GM
13 second2
F/18
ISO 50
(Yes it does.)
This New Zealand winter morning dawned damp and gray, with a layer of low clouds hindering the light and obscuring the peaks. Not awful for photography, but far from the spectacular color and light photographers hope for. My workshop partner Don Smith was battling a nasty (non-Covid) virus, so I was solo with the group on the morning we visited an obscure beach on the south shore of Lake Pukaki. It wasn’t lost on me that last year I was the one who had to miss this Lake Pukaki sunrise shoot with some kind of food poisoning. I don’t know what it is about this spot, but I’m pretty sure that in all our years of doing New Zealand workshops, these are the only two times Don or I have had to call in sick to a shoot.
Our destination was a beach we’d found many years ago—we like it not only for the foreground rocks and view of snowy peaks across the lake, but also for the pristine water that is often calm enough for glassy reflections. Another appeal is that it’s one of our discoveries—not that we’re the only ones who visit here, but despite its obvious appeal, this spot hasn’t yet made anyone’s list of New Zealand’s must-photograph destinations.
Don and I always try to offer our workshop groups a mix of photo locations, from popular to unknown. We certainly need to take our groups to all the beautiful New Zealand scenes that inspired them to travel around the world in the first place (I’m looking at you, Wanaka Tree), but we want to balance those by providing opportunities to capture New Zealand scenes that feel more uniquely their own.
Driving out in the dark this morning, I remembered our visit here a couple of years ago, when we almost couldn’t find this unmarked location because (it turned out) a few landmark trees had been removed. And since I’d missed last year’s visit here, I was afraid I wouldn’t remember how to get there, but our driver Steve was pretty confident he knew where to go, and we did indeed find it without trouble.
Pulling up in the faint light of the approaching sunrise, I could see nearby shrubs swaying in a strong breeze, dashing my hope for a reflection that might compensate for the flat sky. After giving the group a brief orientation, I guided them down to the lake and encouraged everyone to take advantage of the plentiful boulders—both the few protruding from the water, and the many clearly visible just beneath the surface.
There’s no trail from the parking area to the lake—you just have to pick your way across dry lakebed covered with more boulders. Usually this walk is just a few yards from the unpaved road where we park, but with the lake lower than usual, the lakeshore was more than 100 yards away—still not far, but definitely farther than I’d seen before. As this realization sank in, I could also see that the lower water had exposed even more rocks than usual—a small bonus.
Having arrived at the water more than a half hour before sunrise, darkness still ruled. As everyone extracted gear and set up tripods, it seemed like a good time to remind them that they are under no obligation to expose their images as dark as their eyes see the scene, and that this is a perfect opportunity to soften the churn atop the lake with long exposures. Some in the group immediately chose their own foreground rock or rocks and went straight to work, while I spent a little time going over hyperfocal focus techniques with a few people concerned about front-to-back sharpness.
Most photographers understand that stopping down (small aperture) increases depth of field, and that the wider the focal length, the greater the depth of field as well. By far the trickiest factor in maximizing front-to-back sharpness is choosing the correct focus point—focus too far, and nearby subjects will be soft; focus too close, and distant subjects will be soft.
Some photographers use seat of the pants hacks that are (slightly) better than nothing, such as focusing 1/3 of the way into the frame or 1/3 of the way into the scene (these aren’t the same thing), but they provide a false sense of focus-security while too often being wrong. The most reliable way to maximize depth of field is to use a hyperfocal app or table (remember those?) that identifies the hyperfocal point: the closest you can focus and still be sharp all the way out to infinity. But that’s not always convenient.
Lacking a hyperfocal app (or, more likely, too lazy to pull my phone out and check it), I usually start with a rough (experience based) idea of what the hyperfocal distance is for my chosen focal length and f-stop. (The more you check your hyperfocal app and apply its results, the more accurate your rough ideas will be.) Armed with that knowledge, I determine the closest thing that must be sharp (CTTMBS). If it’s clearly farther away than my estimated hyperfocal distance, my focus point doesn’t really matter (as long as it’s farther than the CTTMBS) and I just focus on the most convenient distant object.
When I think my CTTMBS is fairly close to my hyperfocal distance, but I still feel like there’s a comfortable amount of wiggle room, I just pick a spot behind CTTMBS and focus there. (Because focusing on the CTTMBS gives me worthless sharpness in front of it, at the cost of essential distant sharpness.) At that point the decision becomes, how far behind? I usually find something about 50% beyond my CTTMBS. In other words, if the CTTMBS is 10 feet away, I’ll focus about 15 feet distant; if it’s 4 feet away, I’ll pick a spot about 6 feet away.
Any time I’m not 100 percent confident with my focus point choice, I magnify the image preview in my (mirrorless) viewfinder (if you’re shooting with a DSLR, you’ll need to use the preview on your LCD, but I find that less than ideal for critical sharpness decisions), checking both my CTTMBS and a distant object.
When I’m not comfortable guessing the focus point, or when my review reveals an area of the image isn’t sharp, I suck it up and check my hyperfocal app. (And it’s possible that the CTTMBS is so close, I just can’t get there from here and the only way to achieve front-to-back sharpness is focus stacking—something my one-click paradigm doesn’t allow me to do, but there’s absolutely nothing wrong with it if you choose to focus stack.)
I was comfortable with my seat of the pants approach this morning. I started by identifying a group of exposed and submerged rocks that made a strong foreground for the lake and distant mountains, then positioned myself to emphasize a coherent and balanced pattern in the rocks’ relationships to one another.
By the time I was ready to start shooting, it was still dark enough to do multi-second exposures without a neutral density filter. I spent a lot of time with this group of rocks and my 16-35 lens, gradually moving closer and dropping lower as I became more familiar with the scene. Closer and wider allowed me to fill the foreground with the rocks; lower reduced the amount of open lake in the middle of my frame. When I felt like I’d exhausted the possibilities, I moved on to other nearby rock relationships.
As we all worked, the sky that had looked completely socked in when we started, began opening up, first revealing the peaks, and soon thereafter coloring the clouds with warm sunlight. With this, what had been a nice but unspectacular morning of photography took a more dramatic turn, and I rushed back to my original rock grouping that remained my favorite foreground subject.
Armed with prior knowledge, I went straight to the version of the composition I liked best on my initial pass. I dropped my camera (on my tripod, of course) down to about 18 inches above the water, and moved it to about 3 feet from the closest rock (tripod in about 4 inches of water). This close, the focal length that filled the frame left/right with rocks was around 24mm, which I knew at f/16 would give me a hyperfocal distance of around 4 feet. To increase my margin for error, I stopped down to f/18, then focused at the front of the second-closest rock (right of the nearest rock).
By this time the sky was bright enough that the only way to achieve a shutter speed long enough to smooth the choppy water was to replace my regular polarizer with my Breakthrough Filters 6-Stop Dark polarizer. This, combined with f/18 and ISO 50, enabled a more than adequate 13-second exposure—that, it turned out, also picked up slight motion blur in the clouds.
If you’ve made it this far (kudos to you), before leaving (and after checking out my gallery, of course), take the time to study this image and appreciate the color and clarity of the water. If you thought this was unique to Lake Pukaki, you’d be wrong—in this workshop our groups get to enjoy many large New Zealand South Island glacial lakes—Lake Wakatipu, Lake Te Anau, Lake Wanaka and its sister, Lake Hawea, Tasman Lake, Lake Tekapo, and Lake Pukaki—and they’re all some version of the color and clarity you see here.
Don and I return to New Zealand next year
Front to Back
Click any image to scroll through the gallery LARGE


Anchor Management
Posted on August 5, 2018
Dawn on the Rocks, Lake Pukaki, New Zealand
Sony a7R III
Sony 24-105 f/4 G
15 seconds
F/18
ISO 50
Virtually every scene I approach with a camera is beautiful, but a beautiful scene is rarely enough for a great image. Human experience of the world differs greatly from what the camera captures—the photographer’s job is to understand and use those differences.
I’ve always felt that viewers of an image are more comfortable exploring the frame—and therefore tend to linger longer with the image—when they have a starting and return place. So the first thing I do when trying to turn a beautiful scene into a beautiful picture is create that place by finding something to anchor my frame. Sometimes this anchor is an object that’s beautiful in its own right (such as a reflection, a flower, or the moon), but often it’s just a grounding element that aligns with the scene’s more striking features.
When I approached this scene on the shore of Lake Pukaki in New Zealand, I was struck first by the rich glacial turquoise water (I’ve seen a few lakes with similar color, but none that were nearly as big as Lake Pukaki), and second by the snowcapped peaks lining the distant shore. And in the pre-sunrise gloaming I could see that the sky was very nice too—maybe not spectacular, but with lots of character in the clouds plus the potential for soft, warm light when the sun finally arrived. Given all the scene had going for it, I probably could have raised my camera and composed something decent from any spot with a view of the lake, but a scene like this deserves something more than decent.
So before advancing any further, I performed my standard scan for something to anchor my frame, a visual element to surround with the scene’s inherent beauty. I was instantly drawn to an area of the beach where a few rocks protruded from the lake and quickly made my way down to the water. At the shore, in addition to the rocks that drew me I found a striking mosaic of rocks submerged beneath the clear water. A bonus for sure, but as beautiful as these submerged rocks were, as I tried to get all the visual pieces to fit together I quickly realized that they introduced a layer of complication as well.
For the next 10 or 15 minutes I wandered the lakeshore experimenting with compositions that used a variety of foreground rock combinations, but couldn’t really find anything that thrilled me. I’d click a frame or two, evaluate the result, but just couldn’t seem to organize all the foreground rocks with the mountains and sky to form something coherent.
But this wasn’t the time to become discouraged. I knew something was here and continued experimenting, hoping to find it before the light changed. As the sky brightened, I settled on the trio of rocks you see in this image. They aligned nicely with the mountains, better than anything else I’d found so far. But they were also orbited by a disorganized arrangement of satellite rocks that competed with the simple foreground I sought. I moved closer, extending my tripod as far into the water as I could, then dropped low and composed a fairly tight frame.
Eliminating the superfluous rocks made my foreground all about the rock trio, and with a few tweaks (preliminary frames followed by adjustments) arrived at the composition you see here. At this point the rocks were just a few feet from my camera, making depth of field a concern. Assisted by my hyperfocal app, I stopped down to f/18 and focused at the back of the farthest rock, taking only a couple of frames before I was confident my hyperfocal distance was dialed in.
The final piece of the puzzle was dealing with the chop in the water. Sometimes water motion can be a feature and I try to find a middle ground that softens it while retaining a bit of shape or texture. In this case I wanted simplicity, and felt that anything that wasn’t mountains, rocks, or color would be a distraction. The solution was to smooth the water as much as possible with a 15-second shutter speed.
There’s nothing inherently special about the rocks I used to anchor this image. The scene’s true beauty lies in the water and mountains, but if I’d have settled for an image that was just water and mountains, there would have been nowhere for your eye to land. Adding a simple foreground element to anchor my frame serves as a visual launching pad from which you’re free to explore the rest of this beautiful scene.
Join Don Smith and Me in New Zealand
Visual Anchors
Click an image for a closer look and slide show. Refresh the window to reorder the display.


