Eloquent Images by Gary Hart
Insight, information, and inspiration for the inquisitive nature photographer
Pictures, pictures everywhere
Posted on May 3, 2013

Single Dogwood, Pohono Bridge, Yosemite
Canon EOS 5D Mark III
1/40 second
F/9.0
ISO 400
400 mm
I’m always telling my workshop students that there are pictures everywhere, that we’re only limited by our ability to see them. How many shots have we just walked by because we were so focused on the larger world, or because we were simply distracted by life? But sometimes I need to be reminded to listen to my own words.
Last week in Yosemite I gave my group a couple of hours to explore the dogwood blooming above and beside the Merced River near the Pohono Bridge. After a brief orientation, I told everyone to be back at the cars by 5:00, then set them free. A few minutes before 5:00 I was back at my car waiting for the others to return; as I started to pack up my gear I noticed a single dogwood suspended no more than fifteen feet from the road. The breeze had eased somewhat, and I already had my 100-400 lens on my camera, so I figured, what the heck.
I started by setting up my composition, positioning myself so the branch moved diagonally from one corner of the frame to the other, and zooming as close as possible to eliminate peripheral distractions and soften background distractions. I placed the bloom in one of the rule-of-thirds “hot-spots,” and raised my tripod to allow a downward view into the flower’s still intact central cluster (older dogwood blooms tend to look raggedy at their center, but this one was still nice). I spot-metered on the bright flower, setting my exposure to one stop over a middle tone—the flower was actually a little brighter than this, so slightly underexposing like this set the bright flower against a nice dark background. With everything else in place I live-view focused on the central cluster.
I started with f5.6 (the lens’s widest aperture at that focal length), but quickly realized that focused as close as I was, the background was still nicely blurred at smaller apertures. So for the next five minutes or so I kept my composition but dialed in different apertures in (mostly) one stop increments. This is one of the things I love most about photographing with a tripod, this ability refine an earlier shot without having to reconstruct the composition each time. In this case I just counted f-stop/shutter dial clicks without even looking through my view finder before snapping the next frame: 3 clicks (one stop) less f-stop light + 3 clicks more shutter speed light. When I got concerned about the breeze, I replaced my shutter speed adjustment with an ISO adjustment. As I worked the rest of the group started to tickle in and I was able to share my process with those who were interested (I love the large LCDs and live-view for training).
When I got my images on my big screen at home I had a dozen or so versions of the same composition to select between, each with a different f-stop, shutter, ISO combination (but all with the same exposure). I selected this one because it’s sharp (a few images suffered from slight wind blur), and it has the best combination of foreground DOF and background blur. (The soft circles in the background are distant flowers and backlit leaves.)
Based on “Likes” and comments, these intimate scenes are rarely as popular as the vivid, dramatic landscapes, but in many ways the make me happier because they’re an opportunity to rally my creative and logical instincts toward an image that’s uniquely mine. And it’s these little scenes that make me wonder how many images I’ve left behind simply because I was too lazy to set up my camera, was focused elsewhere, or simply just in a hurry to move on.
Spring in Yosemite
Posted on April 30, 2013

Dogwood Branch, Pohono Bridge, Yosemite
Canon EOS 5D Mark III
1/200 second
F/5.0
ISO 400
150 mm
People ask all the time for my favorite season in Yosemite, and I really can’t give them an answer that doesn’t sound like a press conference by a waffling politician—there are things I love about each season in Yosemite, so asking me to choose is like asking me to pick a favorite child.
But what I can do is tell you what I like about each season, and I’ve always felt that spring in Yosemite is the most consistently photographable—it doesn’t really matter what the conditions are, I can always find something to photograph. In my workshop last week we had lots and lots of blue sky, nice for tourists but usually death to photographers, but we didn’t skip a beat.
Spring is when Yosemite’s waterfalls peak, and Yosemite Valley starts to green up. Many of the meadows are home to ephemeral pools that reflect Yosemite’s iconic monoliths, soaring cliffs, and plunging waterfalls. And with all the water in the falls, spring sunshine means rainbow opportunities from many spots if you know when to be there.
Maybe my favorite spring sunshine treat is the dogwood, which is great in full sun—just put the sunlit blooms against a dark background, expose for the flower, and go to town. And the translucence of backlit dogwood give them a luminosity that appears to originate from within. Either way you shoot it, front or back, dogwood in full sunlight allows shutter speeds that can largely mitigate frequent spring breezes.
My general approach to photographing dogwood is to start with a bloom, group of blooms, or entire branch, that I can isolate from surrounding distractions. Once I identify a likely candidate, I maneuver myself until I can get the subject against a complementary background—other dogwood, water, shaded (dark) evergreens. I usually opt for a shallow depth of field to eliminate or smooth distractions.
This branch of dogwood blooms was just one of many waving above the Merced River at the Pohono Bridge. I was able to isolate it against another similarly festooned branch in the background, and used a fairly large aperture to soften the background branch just enough to keep it recognizable (without making it a distraction). Exposing for the sunlit blooms darkened the Merced River in the distant background, allowing the brighter dogwood to stand out even more.
The biggest problem I had working this image was the gusting breeze, which blew quite strongly most of the time, often waving the branch completely out of my frame. But I found that by setting up my composition (on a tripod!) and exercising a little patience, the wind would eventually subside for a few seconds, allowing me to fire off a couple frames, sometimes even with enough time for quick adjustments in between.
All I want for Christmas….
Posted on April 27, 2013

Lunar Rainbow, Lower Yosemite Fall, Yosemite
Canon EOS 5D Mark III
15 seconds
F/4.0
ISO 800
26 mm
I returned late last night (well, early this morning) from my 2013 Yosemite Moonbow and Wildflowers photo workshop will lots of great new images and two fewer teeth. True story. The images I can verify; the teeth you’ll need to take my word for. Read on.
Chapter One: In the big inning
Twenty years ago I lost my two front teeth in a freak umpiring accident. Snapped off at the gum line, if you must know. (Nobody ever fouls a pitch straight back in slow pitch softball. Or so I believed.)
The visiting team was rallying in the last inning, with the tying run on second and their portly first baseman waving his bat in the box. The pitcher arced the ball homeward and with an awkward swing that somehow defied reality as defined by Newton, the batter sent the ball spinning toward my face like a yo-yo returning on a string—the picture of that stitched globe obscuring my view the instant before impacting my mouth is permanently etched in my memory. And with impact, Newton returned, imposing his second law with painful suddenness: Force equals mass times acceleration. I never did find out how the game ended.
Two emergency root canals the next morning were followed by a summer filled with trips to the dentist (I should have demanded my own parking space). By September I sported two gleaming crowns, affixed to the surviving tooth stubs (a process that involved embedded metal posts and “permanent” glue), a near perfect match that returned my smile to its original splendor.
Chapter Two: Be true to your teeth (or they’ll be false to you)
Apparently “permanent” means something different in the world of dental adhesives, because over the years (and despite my obsessive commitment to not testing them) my crowns have spontaneously detached several times: Once in the middle of a ten mile run, another time on Christmas day while snowed-in at my brother-in-law’s house in Colorado and fifteen hundred miles from my dentist. Each time I managed to avoid swallowing them, then had to endure much abuse (at the hands of the people who are supposed to love me most) until I could get back to the dentist for an application of the latest space-age cement guaranteed not to fail. Sigh.
Given the history, my biggest fear has always been that my crowns would lose purchase during a workshop (try saying ISO and shutter speed without your two front teeth), but since it only seems to happen once every three-to-five years, I felt fairly safe. I mean, what are the odds?
Chapter Three: Murphy is alive and well and living in Yosemite
After three-and-a-half days photographing waterfall rainbows, a rising full moon, a moonbow (lunar rainbow), and lots of dogwood with a group really nice (and fun!) photographers, my Yosemite spring workshop wrapped up Thursday night with a sunset shoot at one of my favorite Merced River spots. Half Dome, glowing with the warmth of the setting sun, reflected in the river as photographers contentedly crafted their own Yosemite masterpieces. What could go wrong?
I was helping one of the photographers add motion blur to his Half Dome reflection when my two front teeth (they’re connected) dropped without warning from the ceiling of my mouth. To avoid all the complications from the teeth slipping out the backdoor and down my throat, I reflexively dipped my head forward and opened my mouth, snatching them from the air before they could fall into the river. My workshop student was more than a little confused by my sudden theatrics until I flashed my toothless smile and explained that I’d just “Lotht my crownth.” I tried to deflect the inevitable (good natured) derision by telling the rest of the group that their workshop-mate slugged me for not answering his questions quickly enough, but they knew better.
Fortunately the teeth’s failure coincided with the end of the workshop, and I comforted myself with the knowledge that in the bottom of my suitcase was a tube of Polident I’d been carrying for years to mitigate (the very unlikely event of) just this calamity. After saying toothless goodbyes to the group I decided that, with nothing more than a four hour drive, requiring no more human interaction than one or two drive-thru passes, I’d wait until I was home with a mirror and clean, fully lit bathroom to temporarily reinsert my teeth. Then first thing in the morning I’d call the dentist to schedule the few minutes it would take him to “permanently” reattach my crowns. With that plan, I tenderly folded the teeth into a clean napkin from my glovebox, where they’d stay until I made it to the dentist the next morning. And that’s exactly how it would have happened….
Chapter Four: It gets worse
I pulled into the garage a little after midnight, grateful that the teeth hadn’t failed until the end of the workshop and pleased with myself for somehow not frightening the friendly barista who delivered my mocha through her sliding window. I grabbed my phone and wallet from the center console and reached for the napkin containing my teeth, which should have been right there in the cup holder. Hmmm.
A frantic search ensued, starting with all the logical places (beneath the seat) and becoming progressively more desperate (glove box, ash tray, back seat). Before dismantling the spare tire compartment I mentally reconstructed my trip home and flashed to the gas stop in Livingston (one of many generic, brightly lit exits with an assortment of gas stations and fast food selections dotting Highway 99 in the Central Valley). Slowly memories of a quick housecleaning while waiting for my gas to pump materialized—into the convenient garbage can went my Starbucks cup, fast food wrappers, a few stray napki…. Oh. Oops.
So what should have been a fifteen minute ride in the dentist’s chair turned into a two hour marathon involving Novocain, drills, goopy molds, and six hundred of my dollars while the dentist fashioned temporary crowns that will keep me from looking like I ended up on the wrong end of a pool cue until he can craft the “final solution.” In the meantime I’m instructed not to use my front teeth for anything but smiling—”Not even to tear bread,” he warned as I walked out the door. (Which I’m pretty sure means that while they’re in there, I can charge all ice cream purchases to my HSA card.)
Oh, and my dentist a$$ure$ me that ver$ion-two of my crown$ really will be permanent.
* * * *
About this image
About the only thing this image has to do with my teeth is I still had them when I took it. That and the fact that it was captured during the workshop that terminated in their demise. It’s a “moonbow,” a lunar rainbow caused by the light of a full moon. Witnesses see a shimmering silver band, but moonlight isn’t strong enough to reveal color to the naked eye. A camera, on the other hand, can accumulate light, making the scene in the image much brighter than being there.
While beautiful to photograph, the Yosemite Falls moonbow is no secret. The exposure is a piece of cake compared to the rest of the experience, which includes hundreds of photographers and point-and-shoot gawkers jostling in the dark, blowing mist. But despite the difficulties, the tailgate atmosphere at the bridge beneath lower Yosemite Fall is generally festive. Some photographers get a bit testy when a gawker (ignorantly) fires a flash, but generally a good time is had by all and those who want a picture (and are properly equipped and have some idea of what they’re doing) succeed.
The night before this I took my group out for a moonlight shoot without the moonbow (and the crowds) to get everyone comfortable with moonlight photography before braving the mayhem at the lower fall. Unfortunately, on our moonbow night unexpected clouds obscured the moon for most of window when the moon would be low enough for the moonbow. Nevertheless, the moonbow made several brief appearances (each time eliciting cheers) and most of the group got something, many that included a few moonlit clouds to enhance the sky. I spent most of my time working with the group (not the easiest thing to distinguish a dozen specific individuals from a couple of hundred strangers bundled in the dark against the elements) so this was the only moonbow I got that night.
Join me as I try to reprise this shot in my upcoming Yosemite Moonbow and Wildflowers photo workshop.
Yosemite After Dark
Click an image for a closer look, and a slide show. Refresh the screen to reorder the display.


A background check we can all agree on
Posted on April 20, 2013

Evolution, Gold Country Poppies, Sierra Foothills
Canon EOS 5D Mark III
1/400 second
F/2.8
ISO 800
100 mm
* * * *
Distractions
We photographers often concentrate our attention so closely on our primary subject that we’re oblivious to the subject’s surroundings, forgetting that everything in our frame potentially competes for attention with our subject. Eye-pulling distractions frequently skulk about the frame’s edges, but for most photographers a more insidious problems is the stuff lurking in the background.
Regardless of the problem, careful attention to the entire frame can turn these potential problems into advantages. For example, sometimes merely tightening the composition will eliminate offending elements. For objects not so easily eliminated, we can position the camera and orient the image so potential distractions actually frame the subject and hold the eye in place. Or we can create virtual lines that connect secondary and tertiary elements in a way that guides the eye to our subject.
Background check
But what about a busy background that creates visual noise throughout the frame? In large scenes repositioning can usually rearrange the foreground/background relationship enough to eliminate the problem. But in macro scenes the foreground and background are usually so closely tied that repositioning has little effect, or completely changes the view of the macro subject.
My favorite solution in these images is to soften my background, sometimes only enough to reduce the background’s visual weight, other times blurring it beyond the point of recognition. Take a look at all of my macro and close-focus images—virtually all use a narrow depth of field with very careful attention to what’s behind my subject, no matter how blurred.
For example
Photographing recently in the Sierra foothills, I was drawn to a trio of poppies in varying stages of evolution, from tight bud to partially open mature bloom (poppies open for sun and calm air, and close for shade/overcast and wind). I particularly wanted to capture the sensual curves of the unfurling poppy, but weeds and rocks in the background were both harsh and disorganized. Depth of field sufficient to allow sharpness along the poppy’s stamen from tip to base would have also sharpened the background enough that it would surely compete with the poppy. Instead, I chose to minimize my depth of field and emphasize only the outer fringe of the main poppy’s delicate petals.
The depth of an image’s range of sharpness varies with the closeness of the focus point and the size of the aperture: the closer the focus point (achieved by moving physically closer and/or by zooming tighter) and the larger the aperture, the thinner the plane of sharpness. In this case I minimized the distance of my focus point by moving close with my 100mm macro; to get even closer, I added a 36mm extension tube. Focusing this close at my lens’s widest aperture, f2.8, gave me a razor thin plane of sharpness with virtually no margin for error.
In images with a thin range of focus, the point of focus (that will hold all of the image’s visual weight) is the difference between success and failure. Here even the slightest twist of the lens’s focus ring brought radically different planes of the poppy into sharp focus (I can’t even imagine attempting something like this without a tripod). To ensure essential precision, after framing my composition I switched into live-view mode and magnified the inner petal’s outer edge, then waited for the pauses in the breeze before clicking.
To hedge my bets, I bracketed for depth of field, clicking several more frames at apertures progressively smaller, in one stop increments. As I suspected, the sleight increase in the region of poppy-sharpness wasn’t enough to justify the detail added to the background and what you see here is my original f2.8 frame. I love the way the individual weeds and rocks so clear to my eye blur into a homogenized canvas of soft color and texture, a perfect background that elevates my poppies to prominence—a potential fatal flaw turned into an essential feature. (BTW, despite the slight breeze I probably could have gotten by with ISO 400 and 1/200 here, but my 5DIII is so good at ISO 800, rather than constantly having to remember to adjust the ISO as my aperture and the light changed, I just went ahead and did most of this shoot at 800—sometimes simple is better than perfect.)
Closer than the eye can see
Posted on April 15, 2013

Intimate Poppy, Point Reyes National Seashore
Canon EOS 10D
1/125 second
F/2.8
ISO 100
100 mm
* * * *
Photography’s gift isn’t its ability to show the world we already know, photography’s gift is its ability to reveal a world we haven’t imagined.
I found this poppy on a visit to Point Reyes about nine years ago, just one of thousands sprinkled among a collage of swaying wildflowers. Before this day I’d aborted any attempt to photograph poppies that hadn’t yet opened to the sun, but with the fog showing no sign of lifting, I dropped to my knees for a closer look at this poppy furled tightly against the morning chill. Despite all the visual activity to distract my eyes, my camera distilled the scene’s kaleidoscope of color a single poppy’s buttery swirl.
With an extension tube and 100mm macro lens, my camera provided a far more intimate view than my eyes were capable of. Setting my aperture wide open, I focused on the poppy’s outer edge and blurred the rest of the poppy to liquid gold. The resulting image was nothing like what I saw on my hike that morning, but because my camera’s reality is no less valid than my own, I now know poppies just a little better than I did before this image.
Juggling Cats on Maui
Posted on April 10, 2013

Facing West, Molokai from West Maui, Hawaii
Canon EOS 5D Mark III
3 seconds
f/16
ISO 100
Canon 17-40 f/4 L
20 mm
Coordinating all of the rapidly changing exposure and composition variables sometimes feels like juggling cats (thankfully without the bloodshed). The difficulty is compounded by the unfortunate need to simultaneously process input from two sides of the brain (creative and logical) that don’t often play well together.
For me an image usually starts with a feeling or connection, not just the scene’s now, but also for its what-might-be. Using that seed, a general idea for a composition emerges. Next, I evaluate the scene’s exposure, depth, and motion variables, and how to best manage them with my camera’s aperture, shutter, and ISO settings. Usually compromises are required, as one need usually contradicts another (see “cat juggling,” above). And finally, when I think everything’s in place, I return to my creative instincts and allow my intuitive side to actually click the shutter—that is, it has to feel right. Often this is a multi-click process requiring multiple frames, with analysis and refinement in between, each frame informing the next until I’m satisfied.
Below is a summary of my mental process as I tried to turn this beautiful Maui sunset into a photograph. Its genesis came long before the final click (and the beautiful color that made this moment special).
- Hmmm—beautiful scene, with real potential for sunset color -> Wander around a bit in search of a foreground to go with the Pacific sunset.
- Love these pools—would love to balance them with the setting sun and Molokai in the distance -> If I stand here, this long pool creates a nice diagonal pointing toward Molokai, and connecting the background pool on the left with the sun creates a corresponding (balancing) diagonal in the other direction.
- Don’t want to cut Molokai off -> Definitely need the 17-40.
- But if I go too far right with my composition, I crowd the sun and cut off part of the reflective pool on the left -> Go super-wide with the 17-40.
- Don’t want to go all the way out to 17mm and risk losing sharpness at the corners -> 20mm will work.
- Yeah, I think I can do something with this composition -> Set up the tripod.
- Lots of dynamic range here -> Time for the Singh-Ray graduated neutral density filters. Three soft? Horizon still too bright. Two hard? Maybe. Three reverse? Even better. Will deal with disguising the GND transition in Photoshop.
- Need to be sharp from front to back -> Small aperture, but not so small that diffraction or softness (lenses tend to be less sharp at their extreme apertures) is a problem. Hmmm, at this wide focal length (20mm) my hyperfocal app says f11 will give me “acceptable” sharpness. To increase my margin for error I stop down to f16 because I know from experience, at f16 on my camera, diffraction and lens softness will be tolerable.
- But there’s only one plane of perfect sharpness, so even at f16, I need to make sure the perfectly sharp plane is in my foreground -> Live-view focus on the small rock jutting diagonally near the front of the large pool at my feet.
- Great sunset color reflecting in the background pool -> With my polarizer, dial reflections up. But…
- Love the green translucence of the foreground pool -> Dial reflections down.
- Sigh -> Find middle point with the polarizer.
- My GND darkens the clouds on the right too much -> Will need to dodge in Photoshop, but dodging could expose noise—make sure ISO is 100 despite the fading light.
- Without direct sunlight, these black rocks are sure dark -> Push exposure (increase shutter speed because aperture and ISO are already decided) as far to the right (in the histogram) as possible.
- The timing of the waves completely changes the image -> Monitor the waves’ break and action; time exposures for the desired effect.
- At 3.2 seconds the motion blur in the waves creates a nice, dynamic texture, but be careful that the waves don’t overrun the foreground pool -> Wait for a large wave to break on the farthest rocks, pause for a second, then click. (If my shutter speed had been too long for the desired wave effect, I’d have bumped my ISO and dealt with the noise in processing.)
- The setting sun is a ticking clock leaving only a small window when everything comes together -> Expose too soon and the sun blows out and the color fades; expose too late and the sun is gone (tick, tick, tick…).
- Click, review, adjust, repeat until satisfied (or time’s up).
- Move on to another scene and start over.
Join me in a future Hawaii photo workshop
A Hawaii gallery
Click an image for a closer look, and a slide show. Refresh your screen to reorder the display.


Getting the shaft at Antelope Canyon
Posted on April 5, 2013

Heavenly Beam, Upper Antelope Canyon
Canon EOS-1Ds Mark III
30 mm
4 seconds
F/16
ISO 200
How to photograph Antelope Canyon
Not long ago I wandered into a Peter Lik gallery and did a double-take at a floor-to-ceiling print of “my” Upper Antelope Canyon image. You’ve probably seen a million versions of the shot:

Peter Lik’s Antelope Canyon image
I have no idea whether mine came before or after Lik’s, but it’s safe to say that there were many before both of us, and many since (the day I took mine, there were at least a hundred other photographers fighting for the same shot). I do, however, get a kick out of comparing the two. While Lik and I clearly made different processing choices, his has a lot more footprints (I guess Lik wasn’t the first one to witness this phenomenon), and mine’s a somewhat tighter crop, there’s nothing inherently creative about either. Despite the scene’s undeniable beauty, the ubiquity of this composition dilutes its significance. Nevertheless, one look makes it clear why Upper Antelope Canyon has become a mecca for landscape photographers.
Two canyons
Upper and Lower Antelope Canyons, just outside Page, Arizona, are the most visited of many narrow “slot” canyons carved into hard American Southwest sandstone by years of drought/downpour cycles.. Lower Antelope Canyon is narrower, steeper, and less crowded than its upper cousin. While it lacks the drama of Upper Antelope’s shafting sunlight beams, I think its quieter environment is more conducive to creative photography. Upper Antelope Canyon is known for the narrow shafts of sunlight that seem to originate from heaven. And with the sunlight beams come people, hundreds and hundreds of people each day—tourists and photographers crammed together into this twisting, narrow 1/8 mile corridor.

Focused Beam, Upper Antelope Canyon, Arizona
I’ve heard it said that the only guaranteed shaft you’ll get at Upper Antelope Canyon is from the Navajos who oversee it, charging exorbitant fees to anyone willing to pay and with no regard for their experience. But I don’t think that’s a fair assessment. First, you can hardly fault the Navajos for profiting on this wonder (have you ever been to Disneyland in July?). And while the experience can be something of a shock to the unprepared, (despite appearances to the contrary) the number of visitors in the canyon at any given time is in fact limited, and the guides do an excellent job of managing the throngs while helping photographers get their shots.
For many photographers, the Upper Antelope Canyon shot is the light shaft in the second room. Like Horsetail Fall in February, Mesa Arch at sunrise, and the salmon snacking grizzly at Katmai, it’s a true bucket-list shot. The fact that the world doesn’t really need any more of this particular image doesn’t seem to be a deterrent. So if it’s your first visit to Upper Antelope Canyon, by all means go for the cliché shot (as Peter Lik and I did), but make it your starting point, not your goal.
The Antelope Canyon circus
The popular Upper Antelope Canyon sunlight shaft image is ubiquitous because each sunny day from mid-March through mid-September (months the sun climbs high enough to reach the canyon floor), hundreds of photographers line up for their opportunity to capture it. And when I say line up, I mean that literally—most days they assemble two-deep, ten or so photographers kneeling in the dust behind their tripods in front of another rank of photographers who stand over their shoulders, like Civil War soldiers executing the volley-fire tactic. These photographers even have commanders, Navajo guides, to bark their “Shoot!” orders. Also like soldiers the photographers keep coming in waves—when one group finishes, they’re herded along so the next can line up.
To the unprepared, Upper Antelope Canyon is an incredibly stressful experience, nothing like the cathedral-like solitude implied by the images (though the footprints are a clue). I’ve seen photographers actually retreat from the canyon because they couldn’t handle the urgent pace, constant jostling, and frantic shouting. But after a half-dozen or so Upper Antelope Canyon experiences, I’m finally starting to feel at ease in this incredibly stressful environment, an environment made even more stressful to photographers by the extreme dynamic range, ubiquitous dust, and a seemingly infinite number of composition decisions.
How do you define success?
Success in Upper Antelope Canyon starts with reasonable expectations going in. My Upper Antelope strategy starts by narrowing my goals: There may be many things on my list, but it’s a huge mistake to think I’ll be able to effectively handle more than one or two on a single visit. On my first visit to Upper Antelope Canyon I had no expectations or plan—I was merely satisfied to escape with my life and a handful of cliché (albeit beautiful) shots. On subsequent visits I settled down enough to seek images that were more uniquely mine.
Regardless of my location, there are a few cornerstone objectives for all of my images. For example, I don’t want any sign of human activity, so at Antelope Canyon I avoid footprints, the obviously staged scenes (like the tumbleweed on the ledge that has been there for as long as I’ve been visiting), and people in my images. Another of my “things” is that I never shoot HDR or otherwise blend multiple images. But these are just me—you, on the other hand, may like the story told by footprints, the serenity of an Antelope Canyon still life, the ability to blend a sliver of blue sky into the top of your image, or the sense of scale people provide. Whatever matters most in your photography, make sure (before entering the canyon) that you know how you’ll accomplish it, because when the crazy starts, you’ll need to triage your choices.
While getting something absolutely unique in such a heavily photographed location is pretty tough, success increases as you slow down—not just physically slow down (you probably won’t have a choice), but mentally as well. It helps me slow down when I identify one general theme to concentrate on, such as one (or more) of the many ephemeral, less known shafts bouncing around near the ceiling; tight shots that feature compelling aspects of a larger scene; wide shots that reveal an entire room; or rock/light shapes and relationships. Of course if something else jumps out at me I’ll give it a shot, but I try to maintain my focus on my narrow goal for the duration of my visit.
And finally, come to terms with the reality that success doesn’t mean getting everything you set out for, and prioritize your objectives accordingly: For example, if not getting a light shaft will mean a month of sleepless nights and kicking the dog when you get home, prepare to enter the canyon at the front of your group and to be aggressive (but please, once you get a few good images, move to the back and let others have their chance). Honestly, the happiest Upper Antelope photographers are those who enter with no life-or-death objectives and are able to simply roll with the conditions, because even the best plans can disintegrate in the mayhem.
Have a plan
Rolling with the conditions in Upper Antelope Canyon doesn’t mean that you shouldn’t be prepared. The world speeds up when sunlight shafts in Upper Antelope; the more you have ready before you start, the more productive you’ll be. So without further ado, here are my suggestions for getting the most out of your experience in Upper Antelope Canyon:
- The ceiling-to-floor shafts only happen in spring and summer: If your happiness depends on photographing light shafts in Upper Antelope Canyon, you’re setting yourself up for disappointment if you just show up and assume they’ll be there. The lower the sun, the higher on the wall the sunlight terminates, so you’ll only get the sunlight shafts midday, from (roughly) mid-March through mid-September, when the sun is high enough in the sky that it can reach all the way to the floor without first running into a wall. And of course the shafts require direct sunlight, so cloudy days won’t work.
- It’s not all about the shafts: Believe it or not, some of the best images in Upper Antelope Canyon don’t require light shafts, so don’t let their absence ruin your day.
- Pay the extra money for the photo tour: A photo tour will put you with like-minded visitors who understand that a flash causes more problems than it solves, it’s not okay to walk in front of someone with a camera or to bump a tripod, and (usually) that they need to get out of the way as soon as they get their shot. And your guide will (should) know the timing of the beams down to the minute and do what he/she can to get you there at the right time. Not only that, photo groups get an extra hour (for a total of two hours) in the canyon. While this extra hour comes after the shafts have left, it also comes when the canyon is much (!) less crowded—this extra hour will be your best time for undisturbed, creative photography.
- Dress for the canyon, not the weather in Page: It’s cool in the canyon, but not cold—during the day it’s generally 10-20 degrees cooler than the outside temperature. Before getting on the truck that will take you out there, ask the guide what he/she wears in the canyon. I’ve sometimes brought a sweater and waited until I see the earlier groups’ guides leaving the canyon before deciding whether to wear it or leave it on the truck.
- Invest in a can of compressed air: Stop by the Walmart in Page and pick up a can of compressed air for later. If you’re with a group, one can should be sufficient.
- Gear up for the ride: The twenty-minute ride to Antelope Canyon is a definite E-ticket. You’ll be crammed so tightly into a van or open-air truck that may exit with the imprint of your neighbor’s belt loops on your hip. Depending on your driver (who will also be your guide), at various points on the journey, first through the streets of Page and later on the soft dust of Antelope Wash, you may feel that your life is in jeopardy as your chariot careens around corners and seems constantly on the verge of tipping.
- Wear a hat: At the canyon dust will be in the air even if it’s not windy, and if it is windy, dust will spill onto your head—I have learned not to go in the canyon without a hat.
- Bring a tripod: It’s dark in the canyon, so if you’re a serious photographer, don’t even think about photographing there without a tripod.
- Pick one lens and stick with it: Antelope Canyon is incredibly dusty—changing lenses in there pretty much guarantees dust in your camera. A zoom lens is best, but whether you go with an ultra-wide or a moderate to long telephoto zoom, there will be plenty of shots to keep any lens busy. A wide lens is best if you want the ceiling-to-floor sunlight shaft shots, but the wider you compose, the harder it will be to keep your frame free of people and the unrecoverable brightness in the rafters. My Upper Antelope lens of choice is usually my 24-105—it’s wide enough to cover an entire room and long enough to frame portions of a scene (with the crowds it’s just too hard to keep people out of the frame with my 17-40). I’ve also been happy shooting Upper Antelope with my 70-200, a great lens for isolating the canyon’s graceful curves and for composing out people.
- Leave the camera bag at the hotel: The lighter you can travel, the faster you’ll be able to respond, and the easier time you’ll have getting through tight spaces. Also, if you’re wearing a backpack, not only will you be constantly bumped, you’ll be constantly be bumping others and scraping the walls.
- Cover your camera with a plastic bag when you’re not shooting: A used grocery bag or a garbage bag (not used, please) from your hotel room is totally fine.
- Wear something with pockets (the larger/looser the better): In cool months a sweater or light jacket is great. In the warmer months, you’ll have to get by with your pants or shirt pockets. In my pockets carry a blower or small can of compressed air to clean dust from my lens and camera. I also stuff my lens cap and the bag covering my camera in a pocket while I shoot.
- Pre-set your exposure variables: To keep things simple, I usually set my aperture and ISO before entering the canyon and don’t touch them unless absolutely necessary—almost all exposure adjustments are to shutter speed only. Since you’ll probably want lots of depth of field, apertures f11 and smaller are usually best. And because when the shafts are beaming in Upper Antelope speed is essential and long exposures are the rule, I’m usually at 400 ISO (sometimes even 800). At ISO 100 and f16 it’s easy to find scenes that require a 20-second exposure—bumping to 400 gives you time for three 5-second exposures with quick adjustments in between. I spot meter in manual mode, but matrix/evaluative metering in aperture priority is probably easiest for anyone not real comfortable with managing exposure.
- Monitor your histogram (and turn on blinking highlights): Get in the habit of checking for exposure problems and adjust if necessary before recomposing (remember, you’re on a tripod—right?). Blown highlights are almost always worse than black shadows. If you have the base of the shaft, where it hits the floor, in your frame, there’s a good chance it will be hopelessly blown—as much as I hate blown highlights, I’ve learned to live with this.
- Don’t forget your RGB histogram: The standard luminosity histogram is better than nothing, but the color in Antelope Canyon skews drastically to the red channel. What your luminosity histogram doesn’t tell you is a that an apparently properly exposed frame may in fact include a blown red channel. If you’re shooting raw and the overexposure isn’t too extreme you can probably recover the blown channel, but the last thing you want is to realize too late that you lost some of the canyon’s fabulous color.
- Don’t automatically assume autofocus is making the right choices: Given the canyon’s tight confines, even with a small aperture, unless you’re extremely wide you may find it difficult to achieve front-to-back sharpness. Make sure your focus point falls on or slightly behind the most important part of your composition. Autofocus can do this if you’re careful, but with all the nooks, crannies, curves, intersections, and front-to-back elements for autofocus to lock onto, you need to monitor the focus point closely. I’m almost always in manual focus mode in Upper Antelope, and think live-view focus is a God-send.
- The best compositions are often above everyone’s head: You’ll be doing a lot of waiting, but that doesn’t mean you can’t be shooting. Because my Antelope Canyon visits are with Don Smith’s Northern Arizona workshop, I’m pretty much always at the rear (Don’s and my shots are always lowest priority), which means when the shafts are present I usually don’t get to shoot anything that’s not toward the top of the canyon. On the other hand, my favorite Antelope Canyon images have come from looking up.
- There’s more to Upper Antelope than light shafts: Much like photographing sand dunes, in Antelope Canyon you’re shooting curves, lines, and contrast. The more you can train your eye to see a scene the way your camera will see it (limited dynamic range and constrained view), the more productive your visit will be.
- Consider visiting Lower Antelope Canyon: Lower Antelope, while similar in many ways, is quite different to photograph. It’s narrower, steeper (requiring steep metal stairs in places), and much less crowded. While you won’t find many (or any) light shafts there, you will find lots of creative opportunities. You’ll also be able to stay longer and move more comfortably at your own pace.
- Tip your guide: I have no idea where the proceeds of the Antelope Canyon gold mine end up, but it’s safe to say it isn’t with the guides. If you think your guide did a good job, don’t be shy about expressing your appreciation with a $5 or $10 (or more) gratuity.
- Clean up your gear: Camera, lenses, tripod will be coated with dust when you’re done, so this is where you’ll really appreciate that compressed air you picked up before you left. The sooner and more thoroughly you clean your gear, the less you’ll experience that disconcerting crunching whenever you twist the focus ring or extend a tripod leg.
Examples

Sunlight Shaft, Upper Antelope Canyon, Arizona
I got this version of the “classic” shaft while hanging back waiting for everyone in our group to get their classic shot. While waiting I had tons of time to play with compositions (this is a horizontal variation of the image at the top of the frame), manage my exposure, and ensure the correct focus point without feeling rushed.
Because the shafts show best when there’s dust in the air, the canyon guides carry scoops for flinging dust into the light’s path. While working this scene I was able to figure out the sweet spot between exposing too soon after the dust was tossed, when the shaft was too bright (completely blown out), and too late, when the shaft faded past the point of dramatic effect. This insight served me quite well on subsequent shafts when I only had time for one or two frames.

Glow, Upper Antelope Canyon, Arizona
Here’s another composition I found overhead while waiting behind the group. Again, with lots of idle time, I started wide in the direction of this glow originating around the bend, studying each frame on my LCD and incrementally tightening and balancing my composition. Once I had my composition I was able to scrutinize my results to ensure exposure and focus were right.
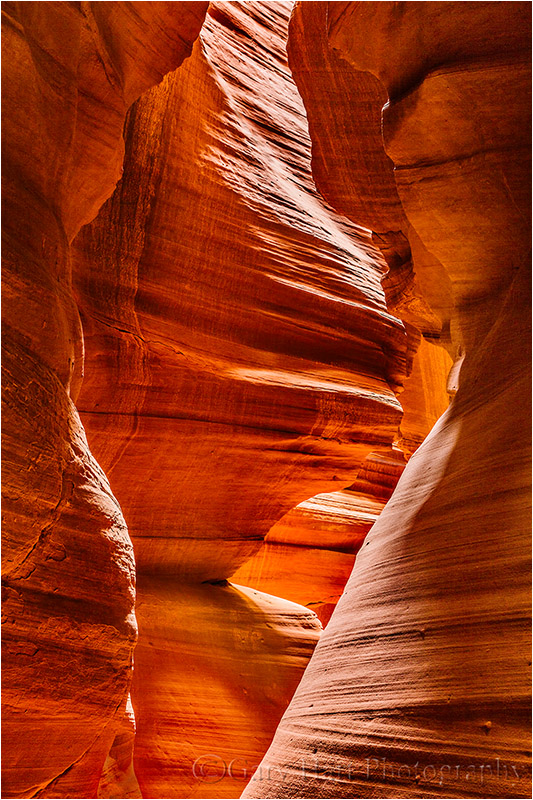
Rock Face, Upper Antelope Canyon, Arizona
Like a summer afternoon reclined beneath a cumulus sky, quiet time in Upper Antelope Canyon allows the creative brain cells to connect curves, lines, and relationships into recognizable shapes. Your guide will probably point some of these out to you, but you can find them on your own too. I “discovered” (I’m pretty sure this face is sometimes pointed out by the guides too, but I was alone and found it on my own) this human profile (see it on the right?) in the second hour of our group’s photo tour, when we were on our own to wander in peace. While the canyon is far from empty, it is no longer crowded and the vibration is far more relaxed.
I stayed with this scene for about fifteen minutes, working around others who occasionally strolled through. Not wanting to inconvenience anyone by making them wait, but stubbornly refusing to move on until I knew I had what I wanted, I dropped my ISO to 100 and my f-stop to 16. The resulting 20-second exposure enabled me to usher people through quickly without any sign of them in my frame. A couple of times people lingered slightly, creating a cool ghost effect—this isn’t something I wanted, but it might be fun to try if you like that sort of thing.
Enjoy!
What you get from Antelope Canyon is ultimately up to you and the attitude you bring. Enter with reasonable expectations, slow your mind, look up a lot, and whatever you do, don’t forget to occasionally disconnect from your photographic needs long enough to appreciate the unique beauty of this genuine natural wonder.
An Antelope Canyon Gallery


March madness
Posted on April 2, 2013

Comet PanSTARRS and the Grand Canyon by Moonlight, Yavapai Point
* * * *
Scheduling most workshops at least a year in advance, it’s easy to forget that distant dates will eventually become current dates. And so as 2013 approached I started looking somewhat askance at my spring schedule. Hmmm…, only four days at home from March 7 to March 29—what in the world had I been thinking? Ten days circling Maui and ten days bouncing between Phoenix, the Grand Canyon, Page, and Sedona seemed like such a good idea at the time, but now that I was actually going to have to pack my suitcase and hit the road (as much as I looked forward to each destination), I seriously wondered if I’d made a mistake. Well, with March 2013 now in my rearview mirror, I’m happy to not only did I survive, I thrived. A little worn around the edges perhaps, but nevertheless quite happy with an unforgettable month of photography and friendship.
Helping me survive March was my good friend and fellow pro photographer Don Smith—Don assisted my Maui workshop, I assisted his Northern Arizona workshop, and we shared the Spring Training experience with Don’s son Aaron. Truth be told, Don and I have far more fun on the road than two grown men should have—we returned from these adventures with a fresh trove of stories that included a beer glass accident resulting in a free dinner for our entire table (thanks, Don), and a car stuck in the mud on a remote dirt road we (I) had no business attempting.
Another March treat that can’t be overstated is the opportunity leading workshops provides to make new photographer friends and reconnect with old ones. Spending hours driving to and from locations, sharing meals, and waiting in the dark for the sun or stars is a great way to get to know people—I never fail to marvel at photography’s ability to bond people with such diverse professions, cultures, interests, and values.
For those of you who haven’t been paying attention, here’s a review of some of the great sights I was blessed with in March (in no particular order):
* * *

Comet PanSTARRS and New Moon, Haleakala, Maui
Regular readers know that I’m a lifelong comet enthusiast, so a major March highlight for me was the opportunity to photograph Comet PanSTARRS from atop Haleakala, the location of the PanSTARRS telescope that discovered the comet. I’m always surprised when people don’t realize how incredibly beautiful (and photogenic!) a comet is, but I’m pretty sure I made a few comet converts this year.
* * *

Sky on Fire, Hopi Point, Grand Canyon
The Grand Canyon delivered colorful sunrises and sunsets each day, and the extreme cold (remember, I’d just returned from Maui) was a reasonable price for avoiding the flat blue skies that frequently make the Grand Canyon so difficult to photograph.
* * *

Bamboo Sky, Maui, Hawaii
As someone who loves seeing things I’ve never seen, the exotic beauty of Maui’s bamboo forest was a particular thrill.
* * *
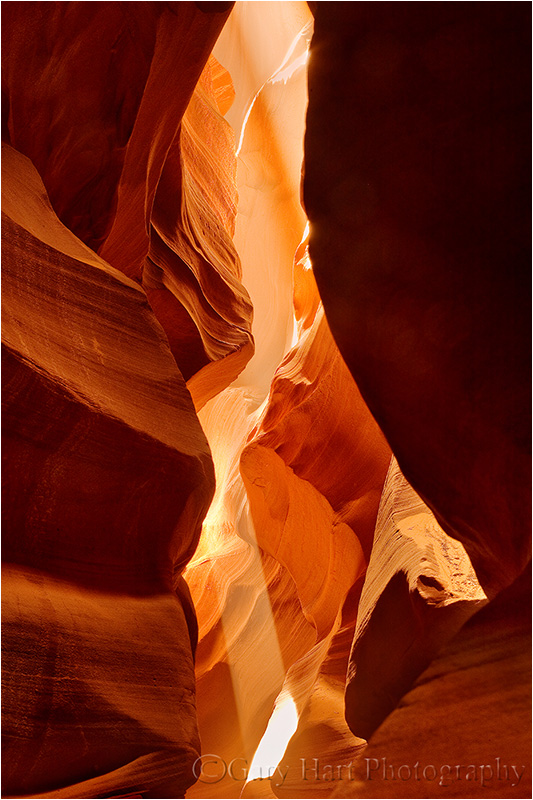
Heavenly Beam, Upper Antelope Canyon, Arizona
At Upper Antelope Canyon, not only did our workshop group get the much coveted beams of light, the timing of our tour somehow managed to avoid the crowds at the beam locations. (I’ve photographed there enough to know that this was a total fluke that couldn’t have been planned.)
* * *

Waterfall and Pool, Road to Hana, Maui
I’ll never tire of the Road to Hana, with a surprise at every turn and a seemingly infinite supply of waterfalls. My goal with each visit is to find something new—this time I scrambled and rock-hopped up a narrow canyon to find a 100 foot waterfall plunging into a translucent turquoise pool.
* * *

Lava Pool, West Maui, Hawaii
After nearly marooning on a muddy, remote dirt road on West Maui, on our final night Don and I returned to find out whether the spot was worth the trouble—it was.
* * *
Comet PanSTARRS and the Grand Canyon by Moonlight, Yavapai Point
* * *

Giants/Angels at Tempe Diablo Stadium, March 24, 2013 (click to enlarge)
Somehow in the midst of all this photography Don and I managed to indulge my baseball passion by tacking a four day Arizona Spring Training visit to the Northern Arizona photo trip. The weather couldn’t have been better (unless you don’t like 80 degrees and blue skies) and we got a healthy dose of our (World Champion!) San Francisco Giants. I’ve made this pilgrimage about fifteen times (I’ve lost the exact count) in the last twenty-five years and it never fails to disappoint.
* * *
And that was my March, a month that could have battered me but instead reminded me how fortunate I am to do what I do. Bring on April!
In my right mind at the Grand Canyon
Posted on March 30, 2013
Sky on Fire, Hopi Point, Grand Canyon
Canon EOS-5D Mark III
1 second
F/16.0
ISO 400
20 mm
Photographing the Grand Canyon isn’t easy (I’ve said this before)
The Grand Canyon is a very difficult place to photograph. Or more accurately, the Grand Canyon is a very difficult place to photograph well. More than any place I photograph, the Grand Canyon incites right/left (creative/logical) battles that can kill an image.
Despite (and likely because of) the Grand Canyon’s sweeping grandeur, you can’t expect to simply walk up to the rim and find a shot that does the scene justice. The view at the rim puts your emotional, creative brain on overload, and you instantly forget that the Grand Canyon’s depth and breadth, the very things that make it so breathtaking in person, are completely lost to the camera’s two-dimensional, confined perspective.
Overcoming these losses starts with understanding your camera’s vision and refining your ability to recognize and organize your scene’s compositional elements (subject, color, depth, light, visual flow), and how to manage them with your camera’s variables (f-stop, shutter speed, ISO, focal length). With that in place, you’re ready to formulate an actual plan for approaching the scene you plan to photograph. But keep in mind that plans can be a creative straightjacket (especially in a dynamic, unpredictable location like the Grand Canyon)—you also need the flexibility to overcome disappointment and quickly shift to Plan B when Plan A doesn’t materialize. For me, implementing all this means arriving early and spending every non-shooting moment familiarizing myself with my surroundings, the light, and the conditions in the sky.
Once my plan is in place, I put my left brain to bed and wake my right brain. Ultimately, despite all the analysis and planning that goes into setting up a shot, I try to click the shutter with my heart—does it feel right?
Putting it all together
My “plan” for this evening at the Grand Canyon’s Hopi Point was to photograph a full moon rising in the east, above the canyon, an image I’ve long sought. When clouds hugging the eastern horizon thickened I could have stubbornly stuck to my guns and hoped the moon would somehow find its way through. On the other hand, I knew if the moon didn’t show and something nice started in the west (where the sky looked more promising), I’d have to scramble to the other side and hope to quickly find a composition that did the moment justice. Always conscious to avoid reactive photography, I jettisoned the east-facing moonrise plan and headed over to re-familiarize myself with Hopi Point’s west side (but that didn’t keep me from sneaking back around for an occasional peek to the east).
The Grand Canyon is great for this kind of anticipatory photography because the unobstructed view of the horizon from the rim allows provides good insight into what’s in store. Once I switched views, I spent the rest of my pre-shooting time walking Hopi Point’s western rim, identifying trees, shrubs, and rocks that could anchor my frame and balance the distant ridges, river, sun, and clouds.
The moon that evening was in fact a no-show (until it was far too late to photograph), but the view to the west rewarded me with about forty-five minutes of productive, continuously improving photography as the sun slipped in and out of gaps in the clouds before finally dropping to and below the horizon. The highlight came couple of minutes after sunset, when a fan of thin clouds spewing from the sun’s exit point started throbbing with crimson, creating a flame-like effect.
But I wasn’t satisfied with a nice sky above the beautiful canyon (nor should you be)—I needed relationships between my foreground and background. After spending most of my shooting time emphasizing the canyon’s vast lateral expanse with wide, horizontal compositions anchored by a distinctive tree, I wanted a vertical composition that would turn the emphasis to the canyon’s depth beneath the flaming sky. Continuing with my horizontal frame would have been too wide to capture the sky’s impact. But because I’d spent so much time exploring earlier, I went right to this spot where a small (albeit unassuming) shrub jutted from the textured rim rock.
Given the extreme depth of field my composition required, I opted for f16, live-view focusing on the rock just behind the shrub. A gusty breeze forced me to bump my ISO to 400 and time my shutter click to coincide with the wind’s intermittent lulls. My 3-stop reverse graduated neutral density filter reduced the significant dynamic range to a very manageable level that allowed me to capture the entire range of light in a single frame (my personal rule). (Later I smoothed the barely visible GND transition with a few dodge/burn brush strokes in Photoshop.)
Photographing in my right mind
Once I’ve identified a scene’s compositional elements and exposure variables, I turn off my left (logical) brain and engage my right (creative) brain. (This is no longer conscious, nor is it genius—it’s pretty much just the product of years of repetition.) I composed the scene in my viewfinder (still haven’t embraced the live-view composition thing), moving up/down, forward/backward, left/right, and zooming in and out until everything felt balanced. While I’d love to claim that I was conscious of the virtual diagonals connecting the flaming sky and flame-shaped shrub, and the shimmering sliver of the Colorado River and nearby vein of light colored rock, I really wasn’t. But neither do I believe relationships like this are accidental—I’ve done this long enough to know that compositional relationships happen organically when I free my mind from distractions that force me to think when I should be creating.
Epilogue
It’s interesting to compare this image with one I created from within a few feet of this location a few years ago. While each contains many of the same elements, the conditions were vastly different, and so were my objectives, and ultimately, my compositional choices.

Sunset, Hopi Point, Grand Canyon
Grand Canyon Photo Workshops
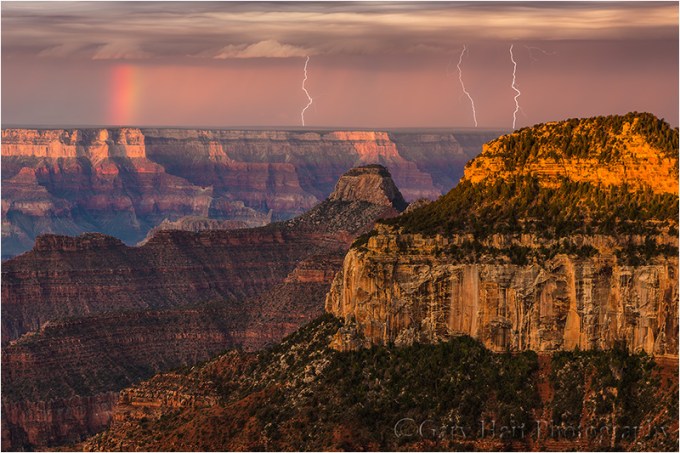
Three Strikes, Bright Angel Point, North Rim, Grand Canyon National Park
A Grand Canyon Gallery
Click an image for a closer look, and a slide show. Refresh the screen to reorder the display.


Reliving the dream: Comet PanSTARRS above the Grand Canyon
Posted on March 25, 2013

Comet PanSTARRS and the Grand Canyon by Moonlight, Yavapai Point
* * * *
A couple of weeks ago I wrote about fulfilling my Comet PanSTARRS dreams from atop Haleakala (the location of PanSTARRS’ discovery) on Maui. After nearly a year of anticipation, being able to photograph this beautiful comet paired with a new moon had left me sated. And anyway, with the comet fading fast, I had no illusions that I’d be able to top what I already had. But less than two weeks removed from Maui, finding myself in Arizona to assist Don Smith’s Northern Arizona workshop (Don assisted me in Maui) and still seeing nice PanSTARRS images online, I decided to check PanSTARRS’ location relative to the Grand Canyon (where the workshop kicks off). And guess what…. Not only did it look like we could align PanSTARRS with the Grand Canyon, the 93% waxing gibbous moon would be perfectly positioned to illuminate the canyon, normally a bottomless black pit at night.
I should mention that Don and I preceded our Northern Arizona trip with a few days watching Spring Training baseball (go Giants!) in Phoenix, a much needed respite separating a grueling week on Maui from an equally grueling trip to the Grand Canyon, Page (Antelope Canyon, Horseshoe Bend), and Sedona. (I know, I know, if our life gets any tougher U2 will probably be doing a benefit concert for us, but Don and I are just givers.)
Our original plan had been to catch the Giants and Angels in Tempe on Sunday afternoon, then take a leisurely drive to our hotel near the South Rim that night. But when I told Don about the opportunity to reprise our Maui PanSTARRS shoot, he was all for it. We bolted the Giants’ game in the seventh inning and rolled into the parking lot at Yavapai Point (by my calculation the only easily accessible, ideally aligned location) about 30 minutes after sunset.
We found the rim gloriously empty (and shockingly cold after Maui and Phoenix). The western horizon still held traces of warmth from the just finished day, but moonlight had already started spilling into the canyon. By the time we were set up and ready to shoot the sky had darkened enough that it was about dark enough to shoot. After a couple of test shots to get the exposure right and locate PanSTARRS (it’s too faint now to be seen with the naked eye), we got down to business. The comet was clearly visible as a white smudge on my LCD screen, even more visible than I expected it to be, making framing it in the composition easy. I just kept clicking, trying many horizontal and vertical variations as I could, until the comet finally faded into the orange haze.
Tonight we’ll take the group out and try again….

