Eloquent Images by Gary Hart
Insight, information, and inspiration for the inquisitive nature photographer
An Old Friend Returns
Posted on May 22, 2026
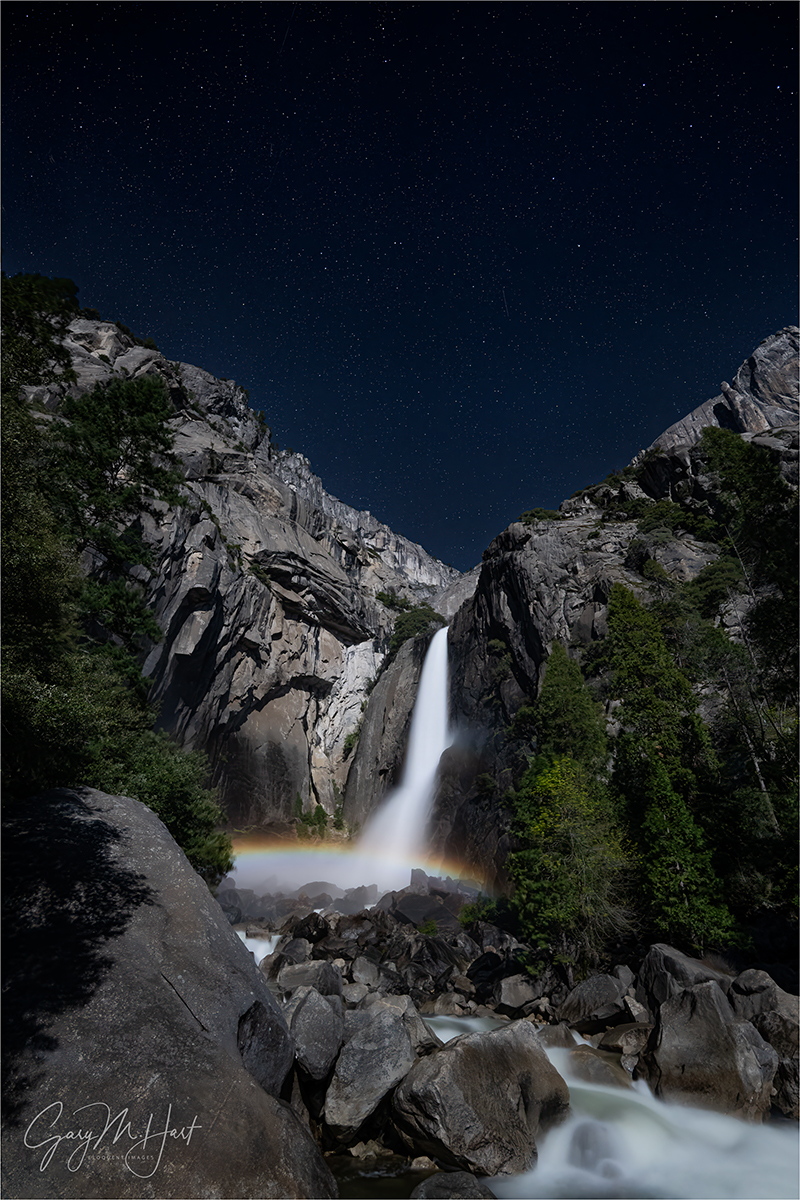
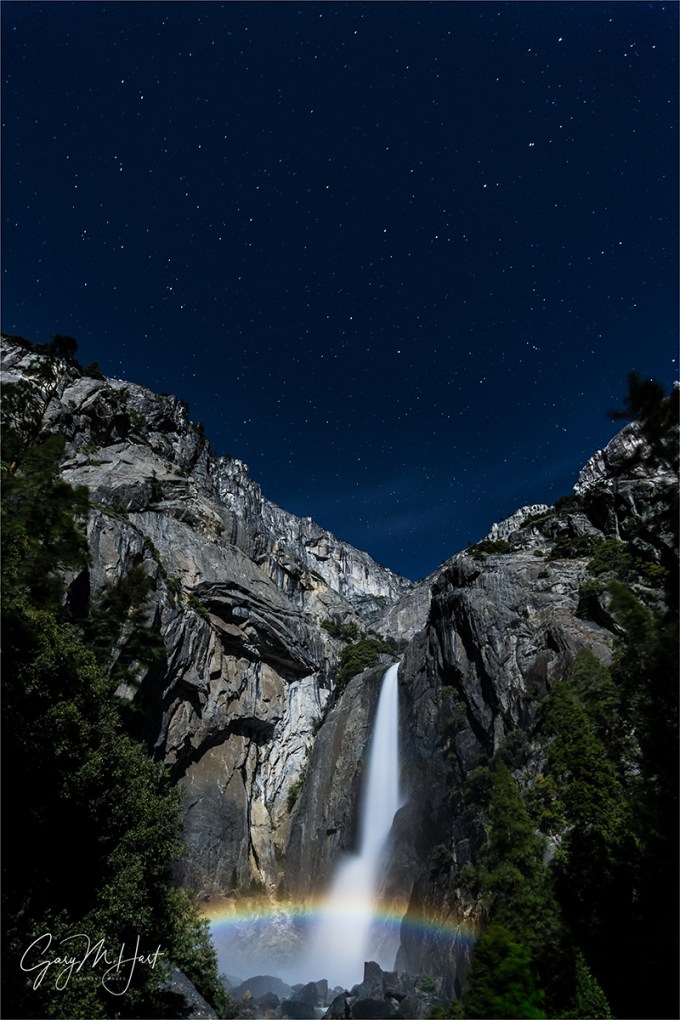
Moonlight Prism, Lower Yosemite Fall Moonbow, Yosemite
Sony α1
Sony 14mm f/1.8 GM
ISO 1600
f/1.8
4 seconds
Has anyone noticed that Yosemite becomes a completely different park with each season? I feel quite fortunate to live close enough that I’m able to enjoy each Yosemite season, and to offer Yosemite workshops in three of four seasons. (Actually, you can probably infer that I live close enough to offer workshops in all four seasons, but I leave summer to the tourists.)
Each Yosemite season offers its own distinguishing qualities. In autumn, though the falls are nearly dry (Bridalveil still trickles), red and gold leaves fill the trees, carpet the ground, and reflect gloriously in the low and slow Merced River. Winter is when the waterfalls return to life, and also the best time to find Yosemite draped in powdery white—but since snow is never guaranteed, I always schedule a workshop around the natural firefall light on Horsetail Fall (while still crossing my fingers for snow). Spring is the Yosemite of postcards and calendars, when waterfalls peak, dogwood blooms abound, low-lying meadows host (reflective) vernal pools, and rainbows color the waterfalls.
Each of these Yosemite workshops has a potential bonus lunar event that I try to include when it corresponds with the season’s primary distinguishing quality. Many autumns and winters I can align a rising full moon with Half Dome at sunset, and spring is when the light of a full moon paints a rainbow at the base of Lower Yosemite Fall.
For years I scheduled two workshops around this moonbow, but finally decided that the window for the absolute best moonbow experience is open only during a four week span from early April into early May. Though a moonbow also happens with the full moon from late March and into June, in late March and early April the moonbow appears in the mist billowing too far left of the fall; later in May and into June, the crowds swarming Yosemite Valley make an unpleasant experience for everyone.
Despite the remarkably predictable moon/landscape geometry that creates a moonbow, its appearance is never certain. Clouds are the biggest nemesis, but low water can also diminish the experience. Coming into this year, limiting my moonbow workshops to a single full moon in that four-week window, combined with factors beyond my control (in addition to clouds, you can add a sudden park closure and global pandemic), has meant that my previous successful moonbow sighting was in 2019. And for a while, it appeared 2026 would continue that streak of futility.
There was a time when I didn’t believe it possible for Yosemite’s spring runoff to be so low that the moonbow would essentially be erased. But as California’s wet season progressed and the Sierra Nevada range found itself on the way to an historically poor snowpack year, I couldn’t help flashing back to 2015. That’s the year PBS Newshour arranged for a film crew to follow me and my Yosemite spring workshop group as we photographed Yosemite’s spring splendor, with a particular emphasis on the moonbow. But 2015 also happened to be the year an unprecedented drought shrunk Yosemite’s normally booming spring waterfalls to mere trickles. Rather than cancel the Newshour segment and keep the film crew home, they adroitly pivoted to a piece on California’s drought and its impact on Yosemite. Check it out. (FYI, I haven’t aged a bit since then.)
Would history repeat this year? As April approached, the answer appeared to be yes. Then a series of unseasonably cold storms arrived, filling our rivers and bolstering the Sierra snowpack just in the nick of time. A couple of days before the workshop (scheduled for the last four days of April), another storm landed, further recharging the falls and even lingering through the workshop’s first couple of days—just enough rain and clouds to provide excellent photography, but not enough to wash us out. Suddenly, my concern wasn’t that there would be enough water, it was whether the clouds would depart in time for my planned Wednesday night moonbow shoot.
Even with all this last-minute moisture, spring 2026 was not especially wet in Yosemite. Though still flowing beautifully, all the falls were noticeably on the low side of average for this time of year (peak runoff is usually around May 1). Nevertheless, there was more than enough water exploding on the rocks beneath the falls to form the billowing mist Yosemite’s signature waterfall rainbows require.
Throughout the workshop my group enjoyed an assortment of daylight rainbows, from various vantage points (I have the timing down to the minute for each location, creating the illusion that I’m much smart than I am), but it was the moonbow everyone was crossing their fingers for. I had one person in the group who had already taken this workshop twice, each time with the expressed desire to photograph the moonbow. With Kent was returning for a third attempt, the pressure was on and I was pretty committed to making it happen for him if at all possible.
Since the moonlight timing and angle would be best on Wednesday, the workshop’s penultimate night, I tried to get everyone up to speed on moonlight and moonbow photography during that afternoon’s training session. The evening’s sunset shoot featured the full moon rising over Bridalveil Fall, photographed from an elevated turnout on Big Oak Flat Road. As soon as we finished there, I zipped the group back down to the Yosemite Valley Lodge parking lot, where we grabbed our gear and made the short walk, in the gathering dark, up to the bridge at the base of Lower Yosemite Fall.
The below average flow in the fall meant that this year’s moonbow wouldn’t be as big, or last as long, as it does in the wettest years. That’s because less water means a smaller cloud of mist for the bow to form in, not only shrinking the moonbow’s breadth, but also terminating the show sooner, as the rising moon shifts the necessary 42 degree rainbow angle downward and eventually out of the mist. (Rainbows drop as the sun or moon rises—read more about the geometry of rainbows on my blog) But this year’s moonbow was plenty big enough to thrill everyone, providing about 40 minutes of quality photography between the time the sky was dark enough for the moonbow to appear, and when it dropped out of the mist.
Even with less water than usual, the moonbow was obvious to the unaided eye as a shimmering silver band. And the rainbow colors were clearly visible in our mirrorless viewfinders or live-view LCD screens, even before a picture was captured.
The diminished flow in Yosemite Fall had one major advantage: at no point did we feel like we were photographing in a rainstorm. Every once in a while we’d get sprinkled with a small amount of mist, but I’ve photographed the moonbow from here when everyone had to don rain gear, and even a single 5-second exposure—that started with a dry lens—would finish with the front lens element completely misted over. When it gets like this, the only way to do it is with an umbrella in one hand and a towel in the other.
There were quite a few people the bridge this evening, but I’ve seen far more here. We’d become a little scattered on the walk up to the fall, so it took me a little while in the darkness to ensure everyone in my group had found a suitable spot to set up. Once I was confident my group was positioned satisfactorily, I tried to get around to everyone to make sure they were doing okay.
Exposure for the moonbow is pretty easy, and I’d given them settings to use before we started. Composition is a little tougher given the limited light, but I’d very strongly encouraged everyone to put their lens at its widest focal length and leave it there—this simplifies things, and today’s digital cameras have more than enough resolution to allow ample cropping later.
Not only does shooting wide streamline composition in the dark, it simplifies the most challenging aspect of night photography: focus. Since changing focal length requires refocusing, and finding focus in the dark is not easy, once you’ve achieved sharpness you don’t want to do it again. Most of my time this evening was spent moving around between the members of my group, helping them get focused, or checking their focus to make sure it was good. I started with Kent, but eventually made it around to nearly everyone (and even helped one or two people who weren’t in my group).
Eventually I found a few minutes for some frames of my own, squeezing in between a member of my group and another person who was okay with me and my tripod up in his space (I checked). I take both horizontal and vertical versions of virtually every scene I photograph, but I always photograph the moonbow vertically because I just haven’t found a horizontal composition that pleases me. For starters, I want to include as much sky as possible, and I think Yosemite Creek churning through granite boulders is a far more interesting than the trees on the left and right. This evening, I used my 14mm prime lens, enabling me to include a lot of starry sky above the fall (including 5/7 of the Big Dipper), while still getting plenty of moonlit creek and granite beneath it.
You can tell that I captured this toward the of the moonbow window by how low the moonbow is. When we arrived, it hovered above the visible mist, just below the top of the lower section (where the fall starts to spread). So even though my moonbow is not quite as broad as the earlier ones, it is brighter, thanks to all that water.
I should probably add a few words about my exposure. I started doing moonlight photography about 20 years ago, and established my full moonlight exposure values very early on. Back then, then ISO 400 was about as high as I could go without noticeable noise; since my fastest lens at the beginning of my digital years was f/4, so my exposure settings were usually in the ballpark of ISO 400, f/4, 30 seconds.
The problem with 30 seconds is you get a little star movement—not a deal-breaker, but enough to be visible if you look closely. So as sensor technology improved, and I acquired faster lenses, my ISOs went up and my shutter speeds dropped, while my exposure values (amount of light captured) remained constant. For this one, I used f/1.8, ISO 1600, and 5 seconds.
With limited time, and even more limited ability to move around, I still managed to get a handful of frames this night. But that was fine because my photography is never the priority in a workshop (and I certainly don’t lack for moonbow images from past years). Even though this year’s version may not be my best moonbow shot ever, I’m still pretty pleased with my results.
In the image review the next day, I invited everyone to share a moonbow image in addition to their review image—it was wonderful to see that everyone had a success! That includes Kent, who had to leave the workshop early, but who reported to me that his moonbow image is beautiful and he’ll no longer need to repeat the course.
Workshop Schedule || Purchase Prints || Instagram
Yosemite Falls, Day and Night


Where in the World is Gary?
Posted on March 23, 2026
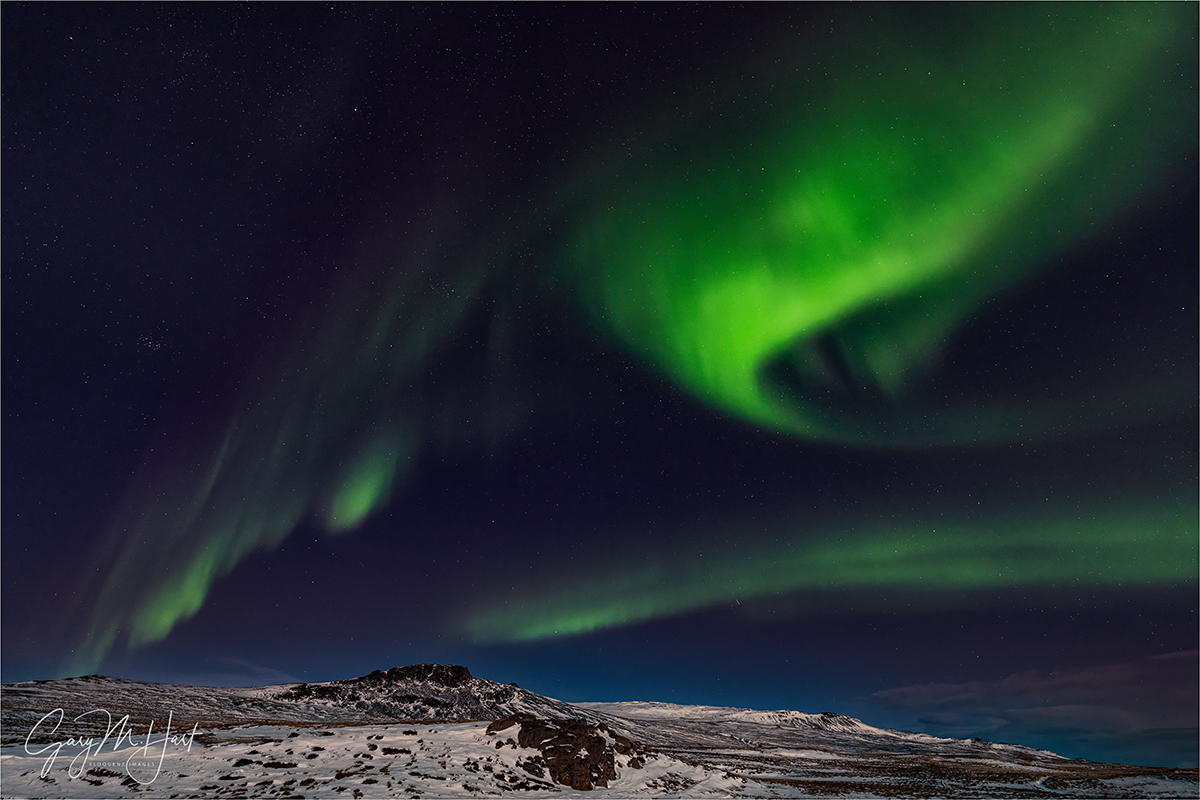
Winter Night, Aurora Over Vatnsnes Peninsula, Iceland
Sony α1
Sony 12-24 GM
3.2 seconds
F/2.8
ISO 3200
You may (or may not) have noticed that my “weekly” blog posts have slowed somewhat in the last month or two. I haven’t gone anywhere—or more precisely, I’m still going the same places and doing the same things I always have, I’m just prioritizing my time differently. After 15 years of stressing, staying up late, missing meals, and in many other ways pushing myself too hard to meet that once-a-week blog goal, I simply decided not to let myself be ruled by arbitrary, self-imposed commitments (I’m a slow learner). I still love writing this blog and have no plans to quit—I’m just going to adjust my time management a bit to emphasize other priorities, especially when my travel schedule starts to take its toll. But anyway…
So exactly where in the world have I been in the last two months? I thought you’d never ask. At the end of January and into early February, I was in Death Valley and the Alabama Hills for my (final) Death Valley workshop; a couple of weeks later I was off to (snowy!) Yosemite for my Horsetail Fall workshop. A storm that dropped record snowfall meant no Horsetail Fall, but seeing Yosemite smothered in white was more than sufficient compensation. A week after that, I jetted off to (snowy and icy) Iceland for Don Smith’s and my annual aurora workshop. Don and I have been doing this trip for many years now, but this year we mixed things up a bit by following a more northerly itinerary. I was home from Iceland for less than 36 hours before making a 13-hour drive to Phoenix for my annual MLB Spring Training trip (go Giants!). Phoenix had record-shattering (for March) highs in the 90s—going from multiple layers of wool and down to shorts, tank tops, and flip-flops was probably the most extreme weather whiplash I’ve ever experienced. And though my Spring Training trip isn’t for photography, I did pack my camera bag because on my drive home I added a day so I could detour through Death Valley to check out the super-bloom (nice, but nothing like the one I witnessed in 2005). I made it home to Sacramento (where our highs are only in the 80s) last Wednesday night, and am looking forward to a 5-week break from the travel.
Thanks to all this recent travel, the only thing in my life accumulating faster than unprocessed images seems to be the dull but essential tasks associated with running a business. Sigh. But I had to process something, so today I’m sharing a northern lights image from the first of two beautiful aurora shows this year’s group enjoyed. The aurora forecast for this night wasn’t great, but the sky was clear (-ish), so despite the late hour, temps in the low 20s (upper teens?), and no specific location in mind, we piled into our spacious Sprinter van decided to go aurora hunting. Why? Because that’s what photographers do.
We were in northern Iceland’s inherently remote Vatnsnes Peninsula, but somehow found an even more remote road and just drove until we liked the view. How remote? We were out there more than two hours and didn’t see a single other car. (I’m pretty sure our guide knew where we were, but no on else had a clue.)
For the first hour or so we had enough green glow to get the aurora newbies excited, but nothing exciting enough to make this grizzled aurora veteran take his camera out. Had I been by myself I might have clicked a frame or two, but I was content to spend my time making sure everyone was ready in the event the activity ramped up. It actually worked out nicely to have a dedicated practice session to get everyone up to speed with the challenges of night photography.
Not long after we told the group we’d give it another 20 or so minutes, a rising, nearly full moon poked through clouds behind us and bathed the snow and rock in moonlight. That was nice, but couple of minutes after the moon’s appearance, almost like magic a green shaft materialized on the northeast horizon and within seconds stretched above our heads to touch the opposite horizon—the real show was on. Soon we were all oooo-ing and ahhhh-ing, spinning around and trying to monitor the ever-changing overhead display—one minute the best show would be in the northeast, the next it would be due west. For the first-timers the priority was the best aurora, regardless of the foreground; those of us with prior aurora successes could afford to be more selective about our foregrounds. Though nothing on the ground out here was spectacular, I liked the view across the road, facing more west and northwest. Wanting to avoid including any road in my frame, I walked to the other side and framed up a small moonlit mountain.
My go-to night photography lens in my 14mm f/1.8—so imagine my surprise after arriving in Iceland to discover that its slot in my camera bag was empty—oh yeah, I took it out right before my Yosemite workshop because we wouldn’t be doing any night photography, then never thought about it again. Oops. If this had been a Milky Way shoot, where every photon counts, I’d have been pretty bummed (understatement). But for a good aurora display, especially one above a moonlight-augmented landscape, f/2.8 is plenty fast. And even though I don’t use my 12-24 f/2.8 a lot, when I do need it I really need it (especially in Yosemite), so it’s a fulltime resident of my camera bag. Which is how I ended up shooting this entire scene at 12mm and f/2.8. It didn’t take long to realize that I appreciated being able to include a little more sky much more than I missed that 1.3 stops of light.
This aurora show was memorable less for its spectacular nature—it was very nice, but didn’t compare to many other northern lights shows Don and I have shared with prior workshop groups—than it was for the fact that it enabled Don and me to breathe a collective sigh of relief, knowing that everyone in our group got to see and photograph the prime reason they signed up for an Iceland winter photo workshop: a legitimate northern lights display.
The next day we traveled to another region farther east, trying for the aurora again that night at a location with a much better foreground. That night we saw a little bit of green, but by then everyone had seen firsthand that it could be much better. What Don and I hadn’t told them after our first aurora success was how much better it could. But before we were done, they learned that for themselves. But that’s a story for a different blog post…
Workshop Schedule || Purchase Prints || Instagram
Celestial Wonders
Click any image to scroll through the gallery LARGE


")


")

, Yosemite")


")


")


Natural Light Painting
Posted on October 16, 2022

Mono Moonlight, South Tufa, Mono Lake
Sony 𝛂1
Sony 16-35 f/2.8 GM
20 seconds
F/8
ISO 3200
Once upon a time, moonlight was the only kind of night photography I did. As lifelong astronomy enthusiast, I’ve always been mesmerized by all the stars that come out when the moon is down, but film and the earliest digital cameras were just not capable of adequately capturing the world after dark without help from multiple exposures or artificial light (dealbreakers for me).
While waiting for digital technology to catch up with my Milky Way aspirations, I watched other photographers achieve beautiful results using night photography techniques that didn’t appeal to me: Light painting (long exposures with foreground subjects illuminated by artificial light), and blue-hour blends (one image captured with the foreground illuminated by twilight “blue hour” sky, blended with a second image of the stars from later total darkness at the same location).
Longing for something different than moonlight, while staying true to my one-click natural light objective, I added star trails to my night sky toolbox. Start trails allowed me to keep my shutter open long enough to reveal the landscape beneath a moonless, star-fill sky—albeit with star streaks that bore no resemblance to the pinpoint stars I was so fond of gazing at. Another perk star trail photography was the opportunity to kick back beneath a star-filled ceiling while waiting for my exposure to complete.
When digital sensors finally improved enough to enable usable starlight (moonless) images, I was all-in. Armed with my newly acquired Sony a7S camera (and subsequent versions) and super-fast and wide prime lenses, I aggressively pursued images of the Milky Way’s brilliant core above my favorite landscapes.
So thrilling was this Milky Way revelation, I all but dropped moonlight photography. In fact, moonlight and Milky Way photography are mutually exclusive because when the moon is full, the Milky Way is lost in the moon’s glow. So by 2015, the only moonlight photography I was doing came during my annual spring moonbow workshops in Yosemite, where bright moonlight is required for the lunar rainbow’s appearance.
As much as possible I time my trips, both personal and workshops, for moonless nights to maximize the Milky Way photography opportunities. One exception is my annual autumn visit to the Eastern Sierra, which is always timed for early October to coincide with the best fall color while letting the moon phase fall where it may.


When the moon cooperates, the dark skies east of the Sierra are ideal for Milky Way photography
This year’s Eastern Sierra visit was joined by a waxing gibbous moon that was well on its way to full (the day after my scheduled return home). Yet despite the nearly full moon, I longed for a night shoot. So on my first night in Lee Vining I decided to revisit (non-moonbow) moonlight photography for the first time in seven years and drove out to Mono Lake’s South Tufa after dinner. (Shout-out to the Whoa Nellie Deli.)
With my very first click, memories of how enjoyable moonlight photography is came rushing back: Composition and (especially) focus are orders of magnitude easier than with Milky Way photography; there’s no worry about getting lost or tripping over something (or someone); and even with the sky washed out by moonlight, the camera captures many times more stars than my eyes see. None of these insights were actually new, but they still felt like revelations because I’d been doing nothing but dark sky photography for so long.
This might be a good time to mention that for anyone interested getting into night photography, I strongly encourage starting with moonlight. Unlike Milky Way photography, you don’t need fancy gear—just a decent tripod, any mirrorless or DSLR body, full frame or cropped, made in the last 20 years (pretty much since the first digital cameras) will work, and an f/4 lens is plenty fast enough. Read my Photo Tips article on moonlight photography for more detailed instruction on moonlight photography.
One thing that made this Mono Lake night especially nice was the disappearance of the light breeze that had chopped up the reflection at sunset a couple of hours earlier. The lake wasn’t quite mirror-like, but the surface had settled to gentle undulations that smoothed completely in my multi-second exposures, revealing a gauzy reflection that stood out beautifully in each image. And the 82% moon, while not quite full, was more than bright enough to illuminate the water and limestone tufa towers better than any light painting could have.
I started with images of just water and Mono Lake’s iconic “shipwreck” tufa feature beneath the stars, but soon went exploring for a more interesting foreground. When I found the scene in this image, I oriented my Sony 𝛂1 vertically to maximize the sky, and widened my Sony 16-35 f/2.8 GM lens to 16mm to include more foreground than I usually do in a night image.
In almost all of my night images I simply focus on the stars, but this foreground started about 5 feet away and had so much interesting (important) detail, I stopped down to f/8 and focused about 6 feet from my camera to ensure front-to-back sharpness. Using my 𝛂1’s Bright Monitoring feature (I highly recommend to Sony mirrorless shooters who do night photography that they assign it to a custom button), I was able to manually focus through my viewfinder.
To compensate for the light lost to the smaller aperture and less than completely full moon, I bumped my ISO to 3200 and exposed for 20 seconds—less than ideal, but the 𝛂1 handles ISO 3200 easily, and at 16mm there’s not much visible star movement in a 20 second exposure, so I wasn’t worried.
I was only out here for about an hour, but it was such a joyful experience, and I’m so pleased with my results, that I know there’s a lot more moonlight photography in my future.
More Moonlight
Click any image to scroll through the gallery LARGE


Breathtaking Comet NEOWISE
Posted on July 12, 2020

Comet NEOWISE and Venus, Half Dome from Glacier Point, Yosemite
Sony a7RIV
Sony 24-105 G
10 seconds
F/5.6
ISO 3200
When I was ten, my best friend Rob and I spent most of our daylight hours preparing for our spy careers—crafting and exchanging coded messages, surreptitiously monitoring classmates, and identifying “secret passages” that would allow us to navigate our neighborhood without being observed. But after dark our attention turned skyward. That’s when we’d set up my telescope (a castoff generously gifted by an astronomer friend of my dad) on Rob’s front lawn to scan the heavens in the hope that we might discover something: a supernova, comet, black hole, UFO—it didn’t really matter.
Our celestial discoveries, while not Earth-changing, were personally significant. Through that telescope we saw Jupiter’s moons, Saturn’s rings, and the changing phases of Venus. We also learned to appreciate the vastness of the universe with the insight that, despite their immense size, stars never appeared larger than a pinpoint, no matter how much magnification we threw at them.

Here I am with the fifth grade science project that started it all. (This is only half of the creative team—somewhere there’s a picture that includes Rob.)
To better understand what we saw, Rob and I turned to astronomy books. Pictures of planets, galaxies, and nebula amazed us, but we were particularly drawn to the comets: Arend-Roland, Ikeya–Seki, and of course the patriarch of comets, Halley’s Comet (which wouldn’t return until 1986, an impossible wait that might as well have been infinity). With their brilliant comas and sweeping tails, it was difficult to imagine that anything that beautiful could be real. When the opportunity came to do a project to enter in our school’s Science Fair, comets were an easy choice. And while we didn’t set the world on fire with our project presentation, Rob and I were awarded a yellow ribbon, good enough to land us a spot in the San Joaquin County Fair.
The next milestone in my comet obsession occurred a few years later, after my family had moved to Berkeley and baseball had taken over my life. One chilly winter morning my dad woke me and urged me outside to view what I now know was Comet Bennett. Mesmerized, my smoldering comet fascination flamed instantly, expanding to include all things celestial, and stayed with me through high school (when I wasn’t playing baseball).
I can trace my decision to enter college with an astronomy major all the way back to my early interest in the night sky in general, and comets in particular. I stuck with the astronomy major for several semesters, until the (unavoidable) quantification of magnificent concepts sapped the joy from me.
Though I went on to pursue other interests, my affinity for astronomy hadn’t been dashed, and comets in particular remained special. Of course with affection comes disappointment: In 1973 Comet Kohoutek broke my heart, a failure that somewhat prepared me for Halley’s anticlimax in 1986. By the time Halley’s arrived, word had come down that it was poorly positioned for its typical display (“the worst viewing conditions in 2,000 years”), that it would be barely visible this time around (but just wait until 2061!). Nevertheless, venturing far from the city lights one moonless January night, I found great pleasure locating (with much effort) Halley’s faint smudge in Aquarius.
After many years with no naked-eye comets of note, 1996 arrived with the promise of two great comets. While cautiously optimistic, Kohoutek’s scars prevented me from getting sucked in by the media frenzy. So imagine my excitement when, in early 1996, Comet Hyakutake briefly approached the brightness of Saturn, with a tail stretching more than twenty degrees (forty times the apparent width of a full moon). But as beautiful as it was, Hyakutake proved to be a mere warm-up for Comet Hale-Bopp, which became visible to the naked eye in mid-1996 and remained visible until December 1997—an unprecedented eighteen months. By spring of 1997 Hale-Bopp had become brighter than Sirius (the brightest star in the sky), its tail approaching 50 degrees. I was in comet heaven.
Things quieted considerably comet-wise after Hale-Bopp. Then, in 2007, Comet McNaught caught everyone off-guard, intensifying unexpectedly to briefly outshine Sirius, trailing a thirty-five degree, fan-shaped tail. But because of its proximity to the sun, Comet McNaught had a very small window of visibility in the Northern Hemisphere and was easily lost in the bright twilight—it didn’t become anywhere near the media event Hale-Bopp did. I only learned about it on the last day it would be easily visible in the Northern Hemisphere. With little time to prepare, I grabbed my camera and headed to the foothills east of Sacramento, where I managed to capture a few faint images and barely pick the comet out of the twilight with my unaided eyes. McNaught saved its best show for the Southern Hemisphere, where it became one of the most beautiful comets ever to grace our skies (google Comet McNaught and you’ll see what I mean).
After several years of comet crickets, in 2013 we were promised two spectacular comets, PanSTARRS and ISON. A fortuitous convergence of circumstances allowed me to photograph PanSTARRS from the summit of Haleakala on Maui—just 3 degrees from a setting crescent moon, it was invisible to my eye, but beautiful to my camera. Comet ISON on the other hand, heralded as the most promising comet since Hale-Bopp, pulled an Icarus and and disintegrated after flying too close to the sun.


Since 2013 Earth has been in a naked-eye comet slump. Every once in a while one will tease us, then fizzle. In fact, 2020 has already seen two promising comets flop: Comets Atlas and Swan. So when Comet NEOWISE was discovered in March of this year, no one got too excited. But by June I started hearing rumblings that NEOWISE might just sneak into the the naked-eye realm. Then we all held our breath while it passed behind the sun on July 2.
Shortly after NEOWISE’s perihelion, astronomers confirmed that it had survived, and images started popping up online. The first reports were that NEOWISE was around magnitude 2 (about as bright as Polaris, the North Star) and showing up nicely in binoculars and photos. Unfortunately, NEOWISE was so close to the horizon that it was washed-out to the naked eye by the pre-sunrise twilight glow.
Based on my experience with PanSTARRS, a comet I’d captured wonderfully when I couldn’t see it in the twilight glow, I started making plans to photograph Comet NEOWISE. But I needed to find a vantage point with a good view of the northeast horizon, not real easy in Sacramento, where we’re in the shadow of the Sierra just east of town. After doing a little plotting, I decided my best bet would be to break my stay-away-from-Yosemite-in-summer vow and try it from Glacier Point. Glacier Point is elevated enough to offer a pretty clear view of the northeast horizon, and from there Half Dome and the comet would align well enough to easily include both in my frame.
While Yosemite is currently under COVID restrictions that require reservations (sold out weeks in advance) to enter, I have a CUA (Commercial Use Authorization that allows me to guide photo workshops) that gives me access to the park if I follow certain guidelines. So, after checking with my NPS Yosemite CUA contact to make sure all my permit boxes were checked, my brother Jay and I drove to the park on Thursday afternoon, got a room just outside the park, and went to bed early.
The alarm went off at 2:45 the next morning, and by 2:55 we were on the road to Glacier Point. After narrowly averting one self-inflicted catastrophe (in the absolute darkness, I missed a turn I’ve been taking for more than 40 years), by 4:00 we were less than a mile from Glacier Point and approaching Washburn Point, the first view of Half Dome on Glacier Point Road. Unable to resist the urge to peek (but with no expectation of success), I quickly glanced in that direction and instantly saw through my windshield Comet NEOWISE hanging above Mt. Watkins, directly opposite Tenaya Canyon from Half Dome. I knew there’d be a chance NEOWISE would be naked-eye visible, but I never dreamed it would be this bright.
Everything after that is a blur (except my images, thankfully). Jay and I rushed out to the railed vista at the far end of Glacier Point and were thrilled to find it completely empty. We found Half Dome beautifully bookended by Comet NEOWISE on the left, and brilliant Venus on the right. I set up two tripods, one for my Sony a7RIV and 24-105 G lens, and one for my Sony a7RIII and Sony 100-400 GM lens. Shut out of all the locations I love to photograph by COVID-19, I hadn’t taken a serious picture since March, so I composed and focused carefully to avoid screwing something up. The image I share here is one of the first of the morning, taken with my a7RIV and 24-105.
By 4:30 or so (about 80 minutes before sunrise) the horizon was starting to brighten, but the comet stayed very prominent and photogenic until at about 4:50 (about an hour before sunrise). When we wrapped up at around 5:00, NEOWISE was nearly washed out to the unaided eye; while our cameras were still picking it up, we knew that the best part of the show was over.
It’s these experiences that so clearly define for me the reason I’m a photographer. Because I’ve always felt that photography, more than anything else, needs to make the photographer happy (however he or she defines happiness), many years ago I promised myself that I’d only photograph what I want to photograph, that I’d never take a picture just because I thought it would earn me money or acclaim. My own photographic happiness comes from nature because I grew up outdoors (okay, not literally, but outdoors is where my best memories have been made) and have always been drawn to the natural world—not merely its sights, but the natural processes and forces that, completely independent of human intervention and influence, shape our physical world.
I think that explains why, rather than settle for pretty scenes, I try to capture the interaction of dynamic natural processes with those scenes. The moon and stars, the northern lights, sunrise and sunset color, weather events like rainbows and lightning—all of these phenomena absolutely fascinate me, and the images I capture are just a small part of my relationship with them. I can’t imagine photographing something that doesn’t move me enough to understand it as thoroughly as I can, and enjoy learning about my subjects as much as I enjoy photographing them.
The converse of that need to know my subjects is a need to photograph those things that drive me to understand them. Most of the subjects that draw me are relatively easy to capture with basic preparation, some effort, and a little patience. But the relative rarity of a few phenomena make photographing them a challenge. This is especially true of certain astronomical events. I’m thinking specifically about the total solar eclipse that I finally managed to photograph in 2017, and the northern lights, which finally found my sensor last year. But comets have proven even more elusive, and while I’ve seen a few in my life, and even photographed a couple, I’ve never had what I’d label an “epic” comet experience that allowed me to combine a beautiful comet with a worthy foreground. Until this week. And I’m one happy dude.
Comet Class
Comets in General
I want to tell you how to photograph Comet NEOWISE, but first I’m going to impose my personal paradigm and explain comets.
A comet is a ball of ice and dust a few miles across (more or less), typically orbiting the sun in an eccentric elliptical orbit: Imagine a circle stretched way out of shape by grabbing one end and pulling–that’s what a comet’s orbit looks like. Looking down on the entire orbit, you’d see the sun tucked just inside one extreme end of the ellipse. (Actually, some comets’ orbits are parabolic, which means they pass by once and then move on to ultimately exit our solar system.)
The farther a comet is from the sun the slower it moves, so a comet spends the vast majority of its life in the frozen extremities of the solar system. Some periodic comets take thousands or millions of years to complete a single orbit; others complete their trip in just a few years.
As a comet approaches the sun, stuff starts happening. It accelerates in response to the sun’s increased gravitational pull (but just like the planets, the moon, or the hour hand on a clock, a comet will never move so fast that we’re able to visually discern its motion). And more significantly, increasing solar heat starts melting the comet’s frozen nucleus. Initially this just-released material expands to create a mini-atmosphere surrounding the nucleus; at this point the comet looks like a fuzzy ball when viewed from Earth. As the heat increases, some of the shedding material is set free and dragged away by the solar wind (charged particles) to form a tail that glows with reflected sunlight (a comet doesn’t emit its own light) and always points away from the sun. The composition and amount of material freed by the sun, combined with the comet’s proximity to Earth, determines the brilliance of the display we see. While a comet’s tail gives the impression to some that it’s visibly moving across the sky, a comet is actually about as stationary against the stellar background as the moon and planets—it will remain in one place relative to the stars all night, then appear in a slightly different place the next night.
With millions of comets in our Solar System, it would be natural to wonder why they’re not regular visitors to our night sky. Actually, they are, though most comets are so small, and/or have made so many passes by the sun, that their nucleus has been stripped of reflective material and they just don’t have enough material left to put on much of a show. And many comets don’t get close enough to the sun to be profoundly affected by its heat, or close enough to Earth to stand out.
Most of the periodic comets that are already well known to astronomers have lost so much of their material that they’re too faint to be seen without a telescope. One notable exception is Halley’s Comet, perhaps the most famous comet of all. Halley’s Comet returns every 75 years or so and usually puts on a memorable display. Unfortunately, Halley’s last visit, in 1986, was kind of a dud; not because it didn’t perform, but because it passed so far from Earth that we didn’t have a good view of its performance on that pass.
Comet NEOWISE in particular (and some tips for photographing it)
Comet NEOWISE is a periodic comet with an elliptical orbit that will send it back our way in about 6700+ years. On it’s current iteration, NEOWISE zipped by the sun on July 2 and is on its way back out to the nether reaches of our solar system. The good news is that NEOWISE survived the most dangerous part of its visit, its encounter with the sun. The bad news is that NEOWISE’s intrinsic brightness decreases as it moves away from the sun. But if all goes well, we’ll be able to see it without a telescope, camera, or binoculars for at least a few more weeks. And it doesn’t hurt that until perigee on July 22, NEOWISE is still moving closer to Earth.
Because a comet’s tail always points away from the sun, and NEOWISE is now moving away from the sun, it’s actually following its tail. If you track the comet’s position each night, you’ll see that it rises in the northeast sky before sunrise, which makes it a Northern Hemisphere object (the Southern Hemisphere has gotten the best 21st century comets, so it’s definitely our turn). Each morning NEOWISE will rise a little earlier, placing it farther from the advancing daylight than the prior day, so even if its intrinsic brightness is waning, it should stand out better because it’s in a darker part of the sky. And as a bonus, the moon is waning, so until the new moon on July 21, there will be no moonlight to compete with NEOWISE.
Until now, Comet NEOWISE has been an exclusively early morning object, but that’s about to change as it climbs a little higher each day. Starting tonight (July 12), you might be able to see it shortly after sunset near the northwest horizon, and each night thereafter it will be a little higher in the northwest sky. Your best chance to view Comet NEOWISE in the evening is to find an open view of the northwest sky, far from city lights.
Photographing Comet NEOWISE will require some night photography skill. Since the moon is waning, you won’t have the benefit of moonlight that I had when I photographed the comet in Yosemite on the morning of July 10, when the moon was about 75% full. This won’t be a huge problem if you just want to photograph NEOWISE against the stars, but if you want to include some landscape with it, your best bet may be to stick to silhouettes, or stack multiple exposures, one for the comet and one or more for the foreground.
To photograph it against the starry sky, I recommend a long telephoto to fill the frame as much as possible. If you want to include some landscape, go as wide as necessary, but don’t forget that the wider you go, the smaller the comet becomes. Whatever method you use to focus (even if you autofocus on the comet itself), I strongly recommend that you verify your focus each time you change your focal length. If you choose the multi-exposure blend approach, please, please, please, whatever you do, don’t blend a telephoto NEOWISE image with a wide angle image of the landscape (because I’ll know and will judge you for it).
Camera or not, I strongly encourage you to make an effort to see this rare and beautiful object, because you just don’t know when the next opportunity will arise—it could be next month, or it might not happen again in your lifetime.
Workshop Schedule || Purchase Prints
Gifts From Heaven


Moonlight Magic
Posted on May 12, 2020
Moonbow and Big Dipper, Lower Yosemite Fall, Yosemite
Canon EOS-1Ds Mark III
22 mm
30 seconds
F/4
ISO 800
Rainbows demystified
A rainbow forms when sunlight strikes airborne water droplets and is separated into its component spectral colors by characteristics of the water. The separated light is reflected back to our eyes when it strikes the backside of the droplets: Voila—a rainbow!
There’s nothing random about a rainbow—despite their seemingly random advent and location in the sky, rainbows follow very specific rules of nature. Draw an imaginary line from the sun, through the back of your head and exiting between your eyes—when there are airborne water droplets to catch that light, a will rainbow form a full circle at 42 degrees surrounding that line (this won’t be on the test). Normally, because the horizon (almost always) gets in the way, we see no more than half of the rainbow’s circle (otherwise it might be called a “raincircle”). The lower the sun is, the more of the rainbow’s circle we see and the higher in the sky the rainbow extends; when the sun is higher than 42 degrees (assuming a flat horizon), we don’t see the rainbow at all unless we’re at a vantage point that allows us to look down (for example, looking into the Grand Canyon from the rim).
Read more about rainbows on my Photo Tips Rainbows Demystified page.
Moonbows
Moonlight is nothing more than reflected sunlight—like all reflections, moonlight is a dimmer version its source (the sun). So it stands to reason that moonlight would cause a less bright rainbow under the same conditions that sunlight causes a rainbow. So why have so few people heard of lunar rainbows (a.k.a., moonbows)? I thought you’d never ask.
Color vision isn’t nearly as important to human survival in the wild as our ability to see shapes, so we evolved to bias shape over color in low-light conditions. In other words, colorful moonbows have been there all along, we just haven’t be able to see them because they’re not bright enough. But cameras, with their ability to dial up sensitivity to light (high ISO) and accumulate light (long exposures), “see” much better in low light than you and I do.
While it’s entirely possible for a moonbow to form when moonlight strikes rain, the vast majority of moonbow photographs are waterfall-based. I suspect that’s because waterfall moonbows are so predictable—unlike a sunlight rainbow, which doesn’t require any special photo gear (a smartphone snap will do it), capturing a lunar rainbow requires at the very least enough foresight to carry a tripod, and enough knowledge to know where to look.
Nevertheless, even though we can’t see a moonbow’s color with the unaided eye, it’s not completely invisible. In fact, even without color, there’s nothing at all subtle about a bright moonbow—it may not jump out at you the way a sunlight rainbow does, but if you know where to look, you can’t miss a moonbow’s shimmering silvery band arcing across the water source.
Yosemite Falls moonbow
Despite frequent claims to the contrary, moonbows can be seen on many, many waterfalls. Among the more heralded moonbow waterfalls are Victoria Falls in Africa, Cumberland Fall in Kentucky, and (of course) Yosemite Falls in Yosemite National Park.
Yosemite Falls is separated into three connected components: Upper Yosemite Fall plummets about 1400 feet from the north rim of Yosemite Valley; the middle section is a series of cascades dropping more than 600 feet to connect the upper and lower falls; Lower Yosemite Fall drops over 300 feet to the valley floor. While there are many locations from which to photograph the moonbow on Upper Yosemite Fall, the most popular spot to photograph it is from the bridge at the base of Lower Yosemite Fall.
The Lower Yosemite Fall moonbow is not a secret. Arrive at the bridge shortly after sunset on a full moon night in April, May, and (often, if the fall is still going strong) June, and you’ll find yourself in an atmosphere of tailgate-party-like reverie. By all means come with your camera, tripod, and rain gear, but don’t get so caught up in the photography that you fail to appreciate the majesty of this natural wonder.
Following a typical winter, in spring the mist and wind (the fall generates its own wind) on and near the bridge will drench revelers and cameras alike. After a particularly wet winter, the airborne water and long exposures can completely obscure your lens’s view during the necessarily long exposures. And if the wet conditions aren’t enough, if you can find a suitable vantage point, expect to find yourself constantly jostled by a densely packed contingent of photographers and gawkers stumbling about in limited light. Oh yeah, and then there are the frequent flashes and flashlights that will inevitably intrude upon your long exposures. But despite all these challenges, I’ve done this long enough to know that success is very possible if you know what you’re doing.
If, knowing all that, you still have visions of a moonbow image, it’s best to come prepared:
- A tripod and digital SLR camera are must (a film camera will work too, but it adds complications I won’t get into here)
- Wear head-to-toe rain gear so you can concentrate on keeping your camera dry
- Bring a chamois or towel—you’ll be using it frequently
- An umbrella can help keep water off your lens during a long exposure
- Practice moonlight photography (you’ll find my how-to of moonlight photography, including exposure settings and focus techniques, in the link) before you get there—trust me when I say that you don’t want to be learning how to photograph by moonlight while you’re trying to capture a moonbow in a mosh pit.
- Don’t have time to practice before your visit? Stop at the top of the Lower Yosemite Falls trail, where you can see the entire fall from top-to-bottom, and practice there—you won’t see a moonbow (the angle is wrong), but the conditions are much easier, and these might just turn out to be your favorite images of the night.
About this image
I’d taken my May workshop group to Glacier Point on this night, so we didn’t arrive at Yosemite Falls until nearly an hour after the moonbow started. This late arrival was intentional because California’s severe drought has severely curtailed the mist at the base of the lower fall. In a normal year the mist rises so high that the moonbow starts when the moon is quite low (remember, the lower the sun or moon, the higher the bow); this year, I knew that the best moonbow wouldn’t appear until the moon rose and the bow dropped into the heaviest mist. Not only that, the later it gets, the few people there are to deal with.
I’d given the group a talk on moonlight photography that afternoon, but we stopped at the top of the trail to practice for about 20 minutes, using the exquisite, tree-framed view of the entire fall. When everyone had had success, we took the short walk up to the bridge and got to work.
We found conditions that night were remarkably manageable—by the time we arrived at the bridge, at around 9:45, the crowd had thinned, and our dry winter meant virtually no mist on the bridge to contend with. I started with couple of frames to get more precise exposure values to share with the group (moonlight exposures can vary by a stop or so, based on the fullness of the moon, its size that month, and atmospheric conditions), then spent most of my time assisting and negotiating locations for my group to shoot (basically, wedging my tripod into an opening then inviting someone in the group to take my spot).
This image is one of my early test exposures—I went just wide enough to include the Big Dipper (just because it’s a test doesn’t mean I’ll ignore my composition). In wetter years I’ve captured move vivid double moonbows and complete arcs that stretch all the way across the frame, but I kind of like the simplicity of this image, and the fact that I was able to include the Big Dipper, which appears to be pouring in the the fall.
Chase the Moonbow With Me in April
Workshop Schedule || Purchase Prints || Instagram
Moonlight Magic


A Milky Way Success Story (Phew)
Posted on June 23, 2019

Moonlight and Milky Way, Lake Wakatipu, New Zealand
Sony a7SII
Sony 16-35 f/2.8 GM
30 seconds
F/2.8
ISO 8000
Several people in this month’s New Zealand workshop had stated pretty emphatically that the Milky Way was a prime reason for attending—one guy even said his wife had told him not to come home without a Milky Way picture (we think she was joking). So no pressure. I reassured everyone in the orientation that I had multiple Milky Way shoots planned, but as the workshop’s nights ticked off, each Milky Way plan was doused—first by clouds, later by moonlight. And with the moon brightening and closer in the sky to the Milky Way each night, the we’d about run out of time.
I’d known all along that a waxing moon meant that our best Milky Way chances would come in the first half of the workshop. And I’d decided long before the workshop started that our final night would be especially problematic for the Milky Way not just because of the moon, but because of our location. But desperate times call for desperate measures, so with just a couple of days to go, I decided to recheck my calculations for about the millionth time (maybe a slight exaggeration, but you get the point). The two nights in Twizel were out of the question—the moon would be pretty much in the Milky Way. But our last night, in Queenstown…. Hmmm, maybe, just maybe, we’d have a 30-45 minute window between sunset and moonrise when the sky might be dark enough for the Milky Way to shine.
But the moon wasn’t the only obstacle. The forecast called for “high clouds,” a frustratingly vague forecast. And even if the sky darkened enough and the clouds cleared, we were in Queenstown, where I’d long ago decided that city lights and the orientation of Lake Wakatipu made finding Milky Way vantage point with a dark enough sky (no light pollution) and a nice enough foreground (lake and mountains) impossible. The moonlight and clouds risk were irrelevant if I couldn’t find a Milky Way location. But I had to give it a shot. Zooming in on the map, my eyes landed on one small tiny of lakeshore with enough of a twist that might work, though I’d never photographed there or even considered its Milky Way potential. But that was enough for me to circle the date and location and tell the group that we were going to give the Milky Way one more shot. All that was left to do was monitor the forecast and wait.
Wanting to be certain (and to avoid hunting blindly in the dark), on the way to our final sunset shoot I asked the driver to swing by my potential spot. I was relieved to confirm that the angle was good, and that there was an open, easily accessible stretch of beach. Yay. Down the road at our sunset location I just watched the clouds and hoped. The sky seemed clear enough there, but looked a little less promising back in the direction of my Milky Way location.
Arriving in twilight I hopped out of the van and checked the twilight sky—In addition to the promised high clouds, an accumulation of thicker clouds sat on the horizon more or less where the brightest part of the galactic center would be. And there were indeed a few high clouds, but Jupiter’s appearance was a relief because I knew Jupiter was on the leading edge of the Milky Way that night. Waiting for darkness, I prepared the group and just tried to stay positive. Every few minutes I’d return to my camera and fire a test frame to see if the sky was dark enough and look for any hint of moonlight.
You can’t imagine my excitement the first time my LCD displayed the faint glow of the Milky Way angling above 6000 foot Cecil Peak—we were in business. As the sky darkened, the Milky Way unfurled overhead in all its Southern Hemisphere glory, flanked by Jupiter and thousands of other stars in completely unfamiliar arrangements.
I started with my dedicated night photography setup, my Sony a7SII body and Sony 24 f/1.4 GM lens, trying a variety of horizontal and vertical compositions. After about 15 minutes I switched to my Sony 16-35 f/2.8 GM, sacrificing two stops of light for a wider field of view (more Milky Way). I liked the extra sky and stuck with that lens for the rest of the shoot.
After about 30 minutes of happy shooting we started to detect a brightening that signaled the moon’s approach behind The Remarkables (my hands-down favorite mountain range name). But rather than being a show stopper, the moonlight added a diaphanous sheen to the previously dark clouds and we kept going. As we wound down, the entire group was giddy with excitement, and I was giddy with relief. Just as we were started to pack up, I detected the faint reflection of Cecil Peak on the lake’s surface and adjusted my composition to include it.
To say that this night exceeded my expectations would be an understatement. In fact, my expectations almost dashed the entire shoot. It was a good a reminder not to get too locked in to preconceived notions. Had I stuck with my original belief that our final night in Queenstown wouldn’t work, I’d never have found a great Milky Way location—and one of the best shoots of an already great workshop would never have happened.
My tutorial on photographing the Milky Way
A Gallery of Stars
Click an image for a closer look and to view a slide show.


Yosemite Spring
Posted on April 21, 2019

Moonbow, Lower Yosemite Fall, Yosemite
Sony a7RIII
Sony 12-24 f/4 G
10 seconds
F/4
ISO 1600
There are many (many!) beautiful sights in Yosemite, but when most people think about Yosemite, they think about waterfalls and granite. The granite is forever (virtually), but Yosemite’s waterfalls come and go with the season: exploding from the granite walls in spring, most of Yosemite’s waterfalls are bone dry by summer’s end. And some years are better than others—three springs ago, Bridalveil and Yosemite Falls were barely a trickle, too dry to photograph (unprecedented in my lifetime). The next spring the deafening roar of waterfalls was back, echoing throughout Yosemite Valley.
Moonbow, April 18, 2019
I just returned from my annual Yosemite Moonbow and Dogwood photo workshop on Friday night (technically, it was early Saturday morning). The dogwood are just starting to pop, but the waterfalls are going strong, with enough snow in the high Sierra bank to keep them roaring through summer.
My group photographed more waterfall rainbows than I could count, on both Bridalveil and Yosemite Falls, but the highlight was Thursday night’s lunar rainbow (moonbow) shoot on the bridge beneath Lower Yosemite Fall. Nothing compares to the first time seeing a moonbow. A shimmering silver arc, a moonbow is clearly visible to the naked eye—proper exposure in a camera reveals the moonbow’s vivid color.
A “practice” moonlight shoot the previous night helped prepare everyone for the difficulties of photographing in the dark. And while my group came prepared for moonlight photography, the crowds and mist make things difficult even for the seasoned veteran. The crowds weren’t too bad this year, but while lots of water in the fall means a better moonbow, it also means a wetter photographer.
I feared that the thin cloud cover that had delivered a spectacular sunset just as the full moon rose just an hour or so earlier, would douse the moonlight necessary for a moonbow, but that turned out to be a non-factor. One problem was contrails, more than I’ve ever seen. Some chose to leave the sky (or most of the sky) out of their frame; I opted to include the sky, then carefully execute a contrailecotmy in Photoshop.
Because most of my time on the bridge is spent assisting the group, I only got to click a handful of frames. I started on the (drier) paved open area before the bridge, but after working with a workshop participant on the bridge, I decided the view there was worth getting wet.
I went wider with this year’s images than previous years, using my Sony 12-24 G lens on my Sony a7RIII camera. I focused on the moon, then turned around and set up my composition. Concerned about too much water on my front lens element, I bumped my ISO to 1600 to keep my shutter speed at 10 seconds or faster. When I was ready to click, I wiped down the front of my lens with a towel that I lifted just as my shutter clicked.
Yosemite April 2019 Images
(processed so far)
Shameless plug
I just scheduled my 2020 Yosemite Spring photo workshops, April 5-8 and May 4-7. Both are timed for the full moon to maximize our moonbow chances. And of course it’s not all about waterfalls and rainbows—this year’s spring workshops included some spectacular clearing storms, beautiful moonrises, and brilliant poppies. In addition to great photography, you’ll improve your photo skills with daily training and image reviews. You’ll also have lots of fun.
Yosemite Spring
Click an image for a closer look and to view slide show.


Sony 24mm f/1.4 GM Lens: First thoughts
Posted on September 20, 2018

Moonlight, Sierra Foothills, California
Sony a7R III
Sony 24 f/1.4 GM
10 seconds
F/1.4
ISO 1600
Today Sony announced the lens I’ve been waiting for: the Sony 24, f/1.4 GM. I got a sneak preview of this lens on Maui last week, and again once I got home home. Hurricane Olivia, my workshop (no one was supposed to see me using the lens), and food poisoning significantly limited my use of it, but I did get to play with it enough to share a few thoughts.
Night photography is all about capturing light, the more the better. We bump our ISO as high as the image quality permits, dial in our lens’s widest aperture, and open our shutter as long as we can without obvious star streaks, pushing each exposure variable as far as possible squeeze out every last photon. The shortcomings of each of these compromises is mitigated by an improvement in the others, which is why night photography with the fastest possible lens means I can get the same exposure with a little less star motion and/or noise. So f/1.4 is great, currently pretty much as good as it gets for a lens wide enough for night photography.
Of course fast and wide isn’t much good if the lens is lousy, or difficult to use. I haven’t used the 24 GM a lot, but I’ve used it enough to know that lousy and difficult won’t be a concern.
First Impression
My very first impression, and I suspect this will be everyone’s first impression, is how small this lens is. When I knew it was coming my way I started strategizing how I’d rearrange my bag to accommodate it, but it turns out all I needed to do was empty the slot with a couple of extension tubes and my 2X teleconverter. Contrast that with the Sigma 20mm f/1.4, which is an absolute beast of a lens, both in weight and volume, that could never just live in my bag. But I flew home with the Sony in my bag and was completely unaware of the extra weight. Well done, Sony!

Two Galaxies, West Maui
I only got one night to use the on Maui before I had to return to the real world, and my location options had been severely limited by the recent passage Tropical Storm Olivia (downgraded from a hurricane shortly before landfall), so I drove about half-hour from my condo in Napili to the ultra-dark skies on the northern-most tip of West Maui, where I stumbled in the dark down to the edge of a cliff above the Nakalele Blowhole and shot into a 30-MPH headwind. Not the most ideal conditions, but I made it work for my purposes.
The benefit of a fast lens like this is not just the amount of light it allows into an image, it starts with the simple ability to see enough to simply compose and focus. And as I expected, both composition and manual focus were a piece of cake with Sony 24 1.4. For the Maui night shoot I composed, then magnified the viewfinder of my Sony a7SII and twisted the focus ring until the stars were the finest possible points of light—it took all of about 3 seconds. After my first exposure I magnified the image to verify that it was indeed sharp, then didn’t worry about focus again.
The image on the right features the dimmest part of the Milky Way, opposite the brilliant galactic core we all love to photograph. As a bonus, I also captured M-31, the Andromeda Galaxy—its fuzzy glow in the upper right has traveled over 2 million lightyears and is the farthest we can see with the unaided eye.
About this image
I’d have liked to have done more starlight photography after getting home from Maui, but by the time I recovered enough from a most unwelcome bout of food poisoning that showed up the day I returned, the moon was too prominent in the night sky. Nevertheless, a couple of days ago I sucked it up and drove out to the foothills about an hour from my home and put the lens through its paces beneath a 70 percent gibbous moon.
With the moon high over my right shoulder I looked for scenes facing northeast, where the skies were the least polluted by city glow. I eventually settled on a nearby hillside dotted with oaks fortuitously punctuated by an organized formation of the only clouds in the sky. With so much moonlight present I went with the Sony a7RIII instead of the Sony a7SII. Shooting moonlight at f/1.4 enabled me to get away with a 10-second exposure at ISO 1600.
In the past I’ve usually auto-focused on the moon for my moonlight scenes, but for laughs this night I tried autofocusing on the trees and was shocked to hear my focus indicator beep. Wow, I’ve never been able to autofocus on anything by moonlight, even when the moon was completely full. Next I tried autofocusing on a random star and again heard the confirmation beep—another first. And finally I magnified the view and manually focused on the tree: 3-for-3. Admittedly, with the recent ability to do starlight photography (moonless nights), I don’t do as much moonlight photography as I once did, and I’ve never done it with an f/1.4 lens (because it really isn’t necessary). Nevertheless, I think night focus struggles will be a thing of the past with this lens.
Processing my night images, the first thing I checked was the stars in the corners. In many years of night photography I used three dedicated “night” lenses (lenses that I only use for night photography): Zeiss 28mm f/2, Rokinon 24mm f/1.4, and Sigma 20mm f/1.4. In quest of more light I’ve shot all of them wide open, but I’ve had to live with a fair amount of coma (comatic aberration). My first reaction is that is that this lens is cleaner wide open than any of them.
The bottom line
I haven’t had tons of time to spend with my images, but my first impression is that I’m blown away by this lens. I’ve grown to accept that if I want quality in a lens I need to accept bulk along with it. Apparently that’s not the case, because this lens gave me crazy sharp images wide open, yet felt not much larger than a baseball in my hand.
A Sony 24mm f/1.4 GM Samples
Yosemite Moonbow
Posted on April 6, 2018

Moonbow and Big Dipper, Lower Yosemite Fall, Yosemite
Canon EOS 1DS Mark III
Canon 17-40 f/4L
30 seconds
F/4
ISO 800
Even though your spellcheck says it doesn’t exist, I promise you that a moonbow is a very real thing indeed (and I have the pictures to prove it). Some argue that “lunar rainbow” is more the technically correct designation, but since that moniker just doesn’t convey the visual magic, I’m sticking with moonbow.
This won’t be on the test
Because a moonbow is a rainbow, all the natural laws governing a rainbow apply. But all the moonbow’s physics can be summarized to:
1) Your shadow always points toward the center of the moonbow (put your back to the moon and note the direction your shadow points)
2) The higher the moon, the lower the moonbow and the less of it you’ll see
3) When the moon is above 42 degrees (assuming flat terrain), the moonbow disappears below the horizon
Yosemite’s moonbow
Each spring, Sierra snowmelt surges into Yosemite Creek, racing downhill and plunging 2,500 feet in three mist-churning steps as Yosemite Falls. Shortly after sunset on spring full moon nights, light from the rising moon catches the mist, which separates and bends it into a shimmering arc. John Muir called this phenomenon a “mist bow,” but it’s more commonly known today as a moonbow.
While a bright moonbow is visible to the naked eye as a shimmering silver band, it isn’t bright enough for the human eye to register color. But thanks to camera’s ability to accumulate light, the moonbow’s vivid color shines in a photograph.
I just returned from the first of two moonbow workshops scheduled for this spring, but haven’t had time to process this year’s moonbow images. The above image was captured a few years ago near the bridge at the base of Lower Yosemite Fall. Not only was it crowded (the moonbow is no longer much of a secret), wind and mist made the necessary 20- to 30-second exposures an exercise in persistence. Not only was I able to capture the moonbow, as you can see, I now have photographic proof that the Big Dipper is the true source of Yosemite Falls.
A Moonbow Gallery
Click any image to scroll through the gallery LARGE


It’s only cold on the outside
Posted on November 22, 2017
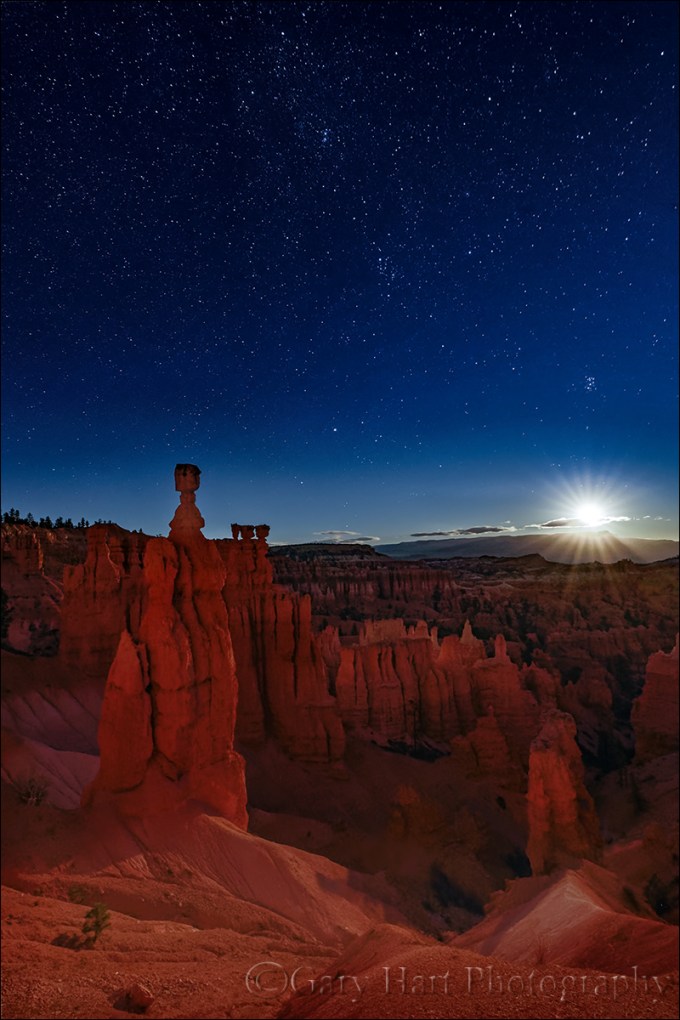
Moonstar, Thor’s Hammer, Bryce Canyon National Park, Utah
Sony a7R II
Sony 16-35 f/2.8 GM
30 seconds
F/8
ISO 3200
We all all have different hot/cold comfort thresholds, a temperature above or below which it’s just too hot or cold to feel human. Of course wind and moisture can move the needle a little bit, but let me just say that regardless of the other factors, after spending a few days in Bryce Canyon NP co-teaching a workshop with Don Smith, I’ve determined that the comfort threshold for my California bones is somewhere north of 20 degrees.
That Bryce is cold in November wasn’t really a revelation because couple of Novembers ago I experienced one of the coldest shoots of my life there, a sunrise at Rainbow Point (9,000 feet) where the temperature was 10F and the wind was a constant 35 MPH. Informed by that experience, I showed up this year with full body armor that included multiple layers of silk, wool, down, fleece, and pretty much every other insulation material known to humankind. This visit wasn’t nearly as cold as I experienced a couple of years ago, but layers or not, cold finds exposed skin like a hungry mosquito and virtually ever minute outdoors tested my comfort threshold.
But despite appearances to the contrary, I’m not complaining. Discomfort is part of being a nature photographer, and miserable conditions definitely keep the crowds at bay. These thoughts bring to mind a phenomenon I’ve been aware of my entire photography life: when the shooting is good, the conditions just don’t matter. I’m not saying that I’m not aware that it’s cold, or hot, or wet, I’m saying that good photography somehow turns off the part of my brain that registers discomfort.
On this year’s Bryce visit we had low temperatures in the teens and low twenties, with a little wind. We also had quite a few clouds, but on our last night, when the skies cleared and the stars appeared, Don and I took the group to Thor’s Hammer for a night shoot. With a 95% moon rising more than 90 minutes after sunset, we knew we’d have about an hour or so of quality dark sky photography. The air that night was wonderfully clear, but without the cloud’s insulation, the temperature plummeted as soon as the sun went down and we found ourselves shooting in the coldest temperatures of the trip—somewhere in the teens, I’m certain.
I was well bundled head-to-toe, but gloves and photography don’t mix, especially night photography when you need to locate and adjust all the camera’s controls by feel. So I spent most of the evening with my delicate digits exposed to the elements, full commando. Of course adjusting camera settings with finger-shaped ice cubes is only marginally better than the gloved alternative, but somehow I managed.
It didn’t hurt that the pristine air and remote, moonless darkness made for a dazzling sky. I positioned myself to align Thor’s Hammer with the faint, outward-facing part of the Milky Way in Cassiopeia, trying both vertical and horizontal compositions. Without moonlight, the faint-to-the-eye Milky Way seemed to leap from the blackness on my LCD. Especially exciting were my vertical frames, which revealed near the top the fuzzy disk of the Andromeda Galaxy, our sister galaxy, a mere two-and-a-half million light-years away.
I was having so much fun that I completely forgot how cold I was, and I think that goes for the rest of the group as well. About the time we thought we’d accomplished all there was to accomplish, the clouds on the eastern horizon came alive with the glow of the approaching moon. Everyone seemed to be having such a good time that Don and I decided we should stick around long enough to catch the first rays of moonlight on the red hoodoos.
Most of my full(-ish) moon photography takes place when there’s enough ambient daylight to capture both landscape and lunar detail in a single frame. But since daylight was long gone well before the moon arrived, my exposures that night had been all about maximizing the amount of light reaching my sensor to bring out the foreground. So when the moon showed up my original exposure became far too much and I needed a different plan. I had a couple of options: either find a composition that didn’t include the moon, or figure out a way include the moon in my frame without ruining the picture.
Since the moon was above the best part of the scene, I decided to try for a “moonstar” and repositioned myself to balance it with Thor’s Hammer. Letting the moonlight do the heavy lifting on the hoodoos, I was able to get all the foreground detail I needed, with enough light left over to enhance my moonstar by stopping down to f/8. When we were finished the walk up from Thor’s Hammer is short but steep, perfect for warming my frigid blood, but despited my frozen digits, I honestly have no memory of discomfort.
This was a truly exceptional experience I’ll never forget, a perfect memory to highlight on the eve of Thanksgiving here in America.
A Starry Night Gallery
Click an image for a closer look and slide show. Refresh the window to reorder the display.


