Eloquent Images by Gary Hart
Insight, information, and inspiration for the inquisitive nature photographer
That Time Elon Musk Photobombed My Workshop…
Posted on August 15, 2023
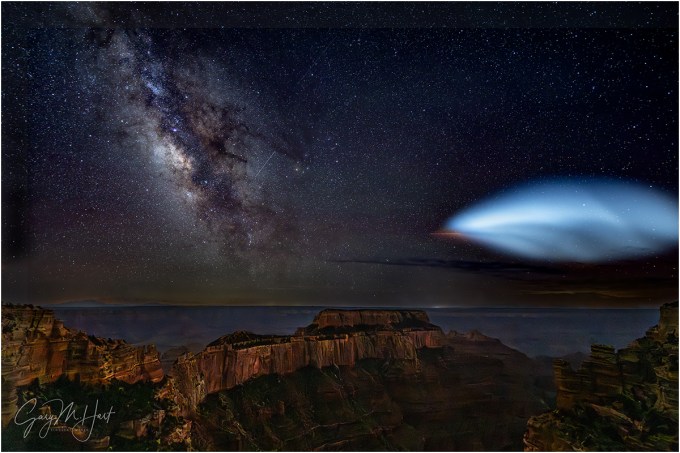
Milky Way and SpaceX Falcon 9, Wotan’s Throne, Grand Canyon
Sony a7R V
Sony 14mm f/1.8 GM
ISO 4000
f/1.8
25 seconds
Last week’s Grand Canyon Milky Way shoot almost didn’t happen, but by the time all was said and done, we ended up with far more than we’d bargained for.
My Grand Canyon monsoon workshops are ostensibly about photographing all of Grand Canyon’s unrivaled beauty, but ask anyone who signs up and they’ll tell you their number one goal is lightning. About 70 percent of my monsoon groups have what I consider lightning success: everyone in the group gets at least one nice lightning image. Of course that also means in 30 percent of my groups, not everyone gets lightning—I can prepare them, monitor the activity, and put us in the locations that maximizes our chances, if the lightning isn’t happening, there’s not much I can do. On the other hand, the clouds that bring lightning often wipe out the night sky, so the (generous) consolation prize for the clear-sky groups is the opportunity to photograph the Milky Way in the dark Grand Canyon sky.
After spending the first two days of this year’s second Grand Canyon workshop beneath wall-to-wall blue skies, all of us were excited about photographing the Milky Way on that second night. Though I was a little concerned about the wind during the Cape Royal sunset shoot, it wasn’t until walking over to my nearby Milky Way location in the darkening twilight (for a less obstructed view and better angle to our foreground subject, Wotan’s Throne), that I really started to fear our Milky Way shoot might not happen. I’d hoped that the more sheltered location would help, but the wind there was just as intense, blowing so hard that I wasn’t sure we’d be able to keep our cameras stable throughout the long exposures a Milky Way shoot requires.
Not only that, the views this spot offers are very exposed, with no railings above a precipitous vertical drop (there’s also room back from the edge for all who aren’t comfortable with heights, so no one is forced to stand on the edge). That meant, given the wind gusting to 40 MPH, in addition to camera stability concerns, I was more than a little concerned about someone straying too close to the edge and getting knocked off balance by a sudden gust. Yikes.
After pondering all this, I decided that we’d hang out a safe distance from the edge at least long enough for the darkening sky to reveal the Milky Way. Best case, the wind would die enough for us to photograph; worst case, we’d at least get to see the Milky Way, always a treat. (Okay, the real worst case would be someone stumbling over the cliff in the dark, but there was really no need for anyone to vacate their safe vantage point once we were established.)
As we waited, I realized that the gusty wind often slowed long enough that we might be able to time our captures between gusts and decided we may as well give the Milky Way a shot—when darkness was complete, we were open for business. With each person’s camera safely affixed to their tripod, Curt (the photographer assisting me) and I moved around to ensure that all had achieved reasonable focus, the right exposure settings, and a good composition. Thanks to our optional practice shoot at Grand Canyon Lodge (where the South Rim lights make for less than ideal Milky Way conditions) the prior night, the group got up to speed quickly.
With exposures in the 10 to 30 second range (double that if long exposure noise reduction is turned on), we had lots of time while waiting for each exposure to complete to simply appreciate skies darker than any of us get at home—for some, darker than they’d ever seen.
It truly is a joy to watch the stars pop out in a darkening sky. There’s Spica in Virgo, Arcturus in Bootes, Antares in Scorpius, plus a host of less prominent stars. Splitting the dark like sugar spilled in ink was our Milky Way galaxy’s luminous core. Two or three times a meteor flashed through the scene, perhaps a stray Perseid streaking from behind us, but most likely just a random piece of space dust.
But wait a minute… What’s that? As I mentally checked through all the familiar skymarks (I just made-up that word), something new caught my eye. Expanding in the southwest sky was a large diaphanous disk. We all saw it at about the same time, which told me that it had just appeared. My first thought, which I uttered out loud only half joking, was, “I hope it’s one of ours.”
Living in California my entire life means I’ve seen a few rocket launches—none that looked exactly like this, but similar enough that I was pretty confident that’s what we were seeing. I did a quick Google search and the first thing that popped up was a SpaceX Falcon 9 Starlink mission launching from Vandenberg Air Force Base on California’s Central Coast, nearly 500 miles away, at 8:57 that night. I checked my watch: 9:04 p.m.—mystery solved.
SpaceX was founded in 2002 by Elon Musk to further his dreams of space dominance. Propelled by reusable Falcon and (soon) Starship rockets, SpaceX crafts deliver both human and electronic payloads to space. Today the human payloads are primarily mega-rich tourists, but the eventual goal is to put humans on the Moon, Mars, and perhaps beyond.
A more practical current SpaceX implementation is the Starlink satellite system that blankets Earth and is capable of providing Internet service anywhere on the planet. I’ve used Starlink at a location where I’d previously had no Internet (the Grand Canyon North Rim, actually) and was absolutely blown away by the speed and reliability—not as fast as home, but certainly fast enough for reasonable use (I didn’t stream any movies, but I did stream shorter videos without problem). On the other hand, this year we tried Starlink on the North Rim and didn’t have a clear enough view through the trees to get a reliable signal—sometimes it worked, but mostly it didn’t.
Which is why SpaceX is still adding satellites. As of August 2023 4,500 Starlink satellites orbit roughly 200 – 350 miles above Earth’s surface. The launch we witnessed last Monday added another 15, with the ultimate goal being as many as 42,000!
I found a video of the launch and learned that 7 1/2 minutes after liftoff, a few seconds before I captured this image, the rocket propelling the satellites toward orbit was 175 miles above Earth’s surface, traveling over 10,000 MPH. But the the Falcon 9 rocket achieves this altitude and speed by using two stages—when the first one has exhausted its fuel, it steps aside and defers to stage two. After doing a little research I’m pretty sure what we witnessed was the beginning of the stage-1 rocket’s return to Earth—the second stage and its satellite payload were out of sight.
Five minutes earlier (2 1/2 minutes into the flight), it’s job done, stage 1 had shut down and separated from the moneymaking section of the rocket, turning control of the payload delivery to stage 2. At that point the rocket was about 50 miles above Earth, traveling about 4,700 MPH. As stage 2 took over, accelerating its payload of satellites even further heavenward, it rapidly outpaced the jettisoned first stage.
With nothing propelling stage 1 forward, Earth’s gravity became the only force acting on it, causing immediate deceleration. But with so much momentum and virtually no atmosphere to slow it further, the depleted stage 1 continued climbing for about 2 1/2 more minutes.
Without further intervention, stage 1 would have plummeted far out in the Pacific. But SpaceX wants to reuse it, so about 7 1/2 minutes into the flight, when it was about 42 miles above the ocean and traveling more than 4,800 MPH, stage one threw on the brakes with a 20-second entry burn timed to deliver it into the waiting “arms” (landing pad) of a SpaceX ship positioned in the east Pacific, west of Baja California. Bullseye (watch the video and be amazed).
I believe the glowing cloud my group and I witnessed was the exhaust from this entry burn, illuminated by the sun. The red streak is the rocket burn itself.
The opportunity to view this phenomenon is relatively rare. Because the exhaust cloud has no inherent luminance, it’s visible only when illuminated by sunlight. That means Earth-bound viewers must be beneath dark skies, and the exhaust plume must be high enough to still have a direct line of sight to the sun—in other words, night below, daylight above. Too far east and the plume would get no sunlight; too far west and it wouldn’t have been visible to anyone beneath a night sky. This convergence requires a twilight launch, cloudless skies, and a viewing position within a relatively small terrestrial zone just into the dark side of night’s advancing shadow.
I virtually never photograph anything manmade, but this was too cool to lose to silly personal rules. At this point, still completely ignorant of all I detailed above, I quickly adjusted my composition to include more of the glowing exhaust plume without losing the Milky Way and Wotan’s Throne. I just stuck with the exposure values I’d already been using. I got exactly one frame before the rocket and its cloud faded noticeably—I just hoped the image was sharp.
I come from the generation where space flight was celebrated, a time when the world stopped to watch every launch, splashdown, and space milestone. Teachers would wheel televisions into classrooms so we could all view together, and I still have vivid memories of watching Neil Armstrong’s first steps on the moon. But as amazing as this SpaceX launch was to view and photograph, and no matter how beneficial this technology is, I can’t help being more than a little concerned about what all this hardware in space is doing to our once pristine night sky.
When I was a kid gazing up at the night sky, spotting a satellite was a rare and thrilling event. But in this 25-second exposure I count at least 9 satellites of varying degrees of brightness—what’s our night sky experience going to be like when Starlink’s count reaches its 42,000 goal, and SpaceX’s inevitable competitors try to match them?
And if scientific exploration is important to you, consider that satellites have become the bane of optical astronomers’ existence. SpaceX has started applying a less reflective surface to its Starlink satellites, reducing their visibility by about 50% (better than nothing but still not great), but also increasing their surface temperatures, making them more problematic for infrared astronomy.
I don’t really have a solution for this conundrum, I just hope that moderation is applied to these technological advances, and that factors beyond the bottom line are considered as we dig deeper into space.
(And I still love this image.)
Join me at the Grand Canyon
To Infinity and Beyond
Click any image to scroll through the gallery LARGE


Grand Canyon: North vs. South
Posted on August 29, 2021

Last Light, Wotan’s Throne, Cape Royal, Grand Canyon
Sony a7RIV
Sony 12-24 f/2.8 GM
1/30 second
F/10
ISO 100
North vs. South
When people decide to cross the Grand Canyon off their bucket list, they usually look at a map and see that the South Rim is an easy one hour detour off Interstate 40, or just a little more than three (mostly interstate) hours from Sky Harbor Airport in Phoenix. The North Rim, on the other hand, is nearly five hours from the closest major airport, and isn’t really on the way to anywhere. Not only that, most of the Grand Canyon pictures we see came from the South Rim. Great views, minimal effort? The South Rim is the clear winner, right?
If you prefer experiencing your national parks in wham-bam-thank-you-ma’am visits to jaw dropping, expansive vistas, the South Rim is definitely for you. But here’s a little secret: If your outdoor tastes lean toward an actual relationship with nature, the North Rim is better, and it’s not even close.
I realize that “better” is subjective, and you’re welcome to disagree. But for each of the last 9 years (not including 2020), I’ve led at least two Grand Canyon photo workshops that split time evenly between the Grand Canyon’s North and South Rims—if the votes of hundreds workshop participants who spent equal time on both sides mean anything, the North Rim wins in a landslide.
So what gives?
For both workshop participants and myself, an oft-cited North Rim benefit is just plain peace and quiet. Its relative remoteness, limited accommodations and dining, combined with a dearth of luxury amenities that today’s travelers take for granted (like wifi and reliable cellular), work better than a border wall to keep the masses away. But these “hardships” are actually a feature for those of us who prefer communing with nature, rather than simply gawking at it.
Another bonus: As a photo workshop leader, it’s wonderful not having to stress over parking strategies for every shoot, or having to negotiate prime photography real estate with selfie-obsessed tourists (does a tripod possess some kind of cloaking magic that makes a photographer invisible to tourists?). When I’m with a group on the South Rim, I can’t wait to get over to the North Rim to recharge my psyche.
I do love the South Rim’s views—a lot—but I literally cannot think of a single thing on the South Rim that I’d consider scenic that isn’t a canyon view. On the other hand, the North Rim’s canyon views are surrounded by thousands of acres of dense evergreen forest that’s marbled with aspen, and green meadows sprinkled liberally with wildflowers. You could spend an entire North Rim visit surrounded by peaceful beauty without getting a single glimpse of the canyon. (And if you’re lucky, you might even enjoy a view of the bison herd that hangs out near the entrance station.)
And the North Rim’s views, while not as plentiful or expansive as those on the South Rim, are still world class. For lightning photography, there’s no better spot than Grand Canyon Lodge. Protected by an array of lightning rods, with the fully enclosed lodge Sun Room right there for immediate retreat, the Grand Canyon Lodge view faces south, across the canyon, in the direction from which most thunderstorms approach. Rather than chasing the lightning, we can just wait for it to come to us.
But for beautiful views, my two favorite North Rim vistas are Point Imperial and Cape Royal. At nearly 9000 feet above sea level, Point Imperial is the Grand Canyon’s highest scenic view point. It also provides the park’s best view of the Vermillion Cliffs and Grand Canyon’s Marble Canyon. And picturesque Mt. Hayden, a prominent spire that stands front and center against a host of ridges and towers that recede in the distance, makes a perfect visual anchor for Point Imperial scenes.
Cape Royal has the North Rim’s most expansive view, and is probably the best spot on the North Rim to photograph the setting sun. It also offers the closest view of Vishnu Temple, one of the Grand Canyon’s most recognized landmarks. But what really sets Cape Royal apart for me is that it is hands down the Grand Canyon’s best view of Wotan’s Throne, a massive sedimentary monolith rising nearly 3000 feet above the Colorado River.
Even though it stands out as a large, flat-top structure that’s clearly visible from most of the Grand Canyon’s South Rim vistas, when viewed from the South Rim Wotan’s Throne isn’t nearly as interesting as its neighbor, Vishnu Temple. Which probably explains why Wotan’s Throne doesn’t get the love I’ve always felt it deserves. But at Cape Royal, Wotan’s Throne looms just a mile away, and the close view from this side reveals it to be so much more than it appears to be from the South Rim.
About this image
Maybe the best thing about the Cape Royal Wotan’s Throne view is the way it seems positioned, as if by Devine hand, to catch the warm light of the setting sun. Which is exactly what I was thinking about when my third workshop group arrived for the final North Rim sunset shoot of this year’s trip.
The cloudy vestiges of the afternoon’s thunderstorms were scattered across the sky, broken by just a few blue patches. The clouds were beautiful, but what excited me most was the lack of clouds on the western horizon, which would (fingers crossed) provide a perfect path for the sun’s last rays to slip through to color the sky and canyon.
After making sure everyone else was settled, I set about trying to find something for myself. It was pretty clear that the scene both west and south was going to be spectacular at sunset, but I decided that finding a single composition in one direction and would allow me to park my tripod and move around and help people between shots.
I chose the view to the south, for the potential sunset light on Wotan’s Throne, over the view of the actual setting sun in the west. I was drawn to a dead tree precariously perched near a vertical drop of undetermined height (I wasn’t super motivated to find out), and worked hard to safely position myself to balance the tree between Vishnu Temple and Wotan’s Throne, and to get my camera high enough to prevent the tree from intersecting the horizon. While I ended up having to dig my shoes into a steep slope a few feet from the edge, I felt safe.
Being so close to the tree, I chose my Sony 12-24 GM lens. This would allow me to include lots of sky and canyon. Normally I try to avoid too much sky in my Grand Canyon images, but there was potential this night = for some very special color that would demand a lot of sky.
Waiting for the show to start, I just started composing and clicking to familiarize myself with all the composition possibilities. When the sun finally dropped beneath the clouds to light up Wotan’s Throne, I was ready. Many of my shots were wider, including Vishnu Temple and more sky, but for the few minutes the tree got beautiful light, I tightened my composition a little to better emphasize it.
Even though the tree was just a few feet away, I knew that at 20mm I could comfortably use f/10 (to avoid diffraction) if I focused just a little beyond the tree. Since there was nothing beyond the tree to focus on, I used one of the shrubs on the right that I estimated to be just a little farther away than the tree. Dynamic range was extreme, but well within the bounds of my Sony a7RIV. With my focal length, f-stop, and focus point set, I dialed my shutter speed with my eye on the histogram. Click.
This was probably the nicest sunset I’ve ever seen at Cape Royal. I have more colorful images from this evening, and many that include more clouds, and Vishnu Temple, but I chose this one because it’s the best example I’ve ever captured of the spectacular Wotan’s Throne sunset light I love so much.
Grand Canyon Workshops
Workshop Schedule || Purchase Prints || Instagram
A North Rim Gallery


Here comes the sun
Posted on September 12, 2016

Here Comes the Sun, Mather Point, Grand Canyon
Sony a7R II
Sony/Zeiss 16-35 f4
1/8 second
F/18
ISO 100
I rarely shoot at Mather Point because I’m usually working with workshop students struggling to corral the extreme dynamic range of a summer sunrise there. But on this morning a couple of weeks ago, about half the group had congregated at the rail in near the Mather Point amphitheater, allowing me to set up my tripod and occasionally visit my camera. When it became clear that the clouds were setting up for something special, I prepared my composition, set my f-stop to f/18 (in the sunstar zone), and ready my graduated neutral density filter in anticipation of the sun’s first rays peeking out from behind Wotan’s Throne.
Knowledge is power
As with many of my images, I can trace this image’s creation to long before the shutter clicked. That’s because, whenever possible, I avoid arriving at a location without knowing at the very least when and where the sun will appear or disappear. In this case I was familiar enough with the Mather Point in August to know that the sun would rise between Wotan’s Throne and Vishnu Temple. But I needed to be more precise than that.
We’re living in an era of ubiquitous information, carrying mini computers with the potential to make virtually everyone an instant astronomical genius. Though my own workflow for computing sun/moon arrival/departure information was established long before smartphones, it amazes me both how easy the internet and smartphones have made preparation, and how few photographers do it.
I got a little head start because I studied astronomy in college for a few semesters (long enough to learn that the essential math would would wring the marvel from my mind), enough to have good mental picture of the celestial rotations and revolutions that determine what we see overhead and when we see it.
While I’m just geeky enough to prefer plotting all this stuff manually, for most people I recommend starting with one of the excellent apps that automate most of the process. Of the two apps I recommend, PhotoPills and The Photographer’s Ephemeris, I prefer PhotoPills because it seems more complete, but they’re both excellent.
If you’ve tried either of these apps and found them too complicated, don’t be discouraged—neither is so intuitive that you should expect to simply pick it up and use it. But each is logical and well designed, and I promise that the more you use it, the easier it will become. In other words, practice!
Practice
As with most things in photography, it’s best not to be trying to learn to predict the timing and position of the sun or moon when the results matter. Rather, I suggest that you plot tonight’s sunset from the park down the street, or tomorrow’s sunrise from your backyard. Figure out where and when the sun will set or rise, be there to check your results, and then figure out why it didn’t happen exactly as expected. You’ll be surprised by how quickly your predictions improve after repeating this process a few times. Once you feel comfortable with your ability to anticipate a sun or moon rise or set from home, it’s time to take the show on the road—pick a spot you know fairly well and apply your new knowledge there.
Working it out on the fly
For me, celestial preparation from the comfort of my recliner is only half the job. It’s great when I know exactly where I’ll be and when I’ll be there, but the reality of nature photography isn’t quite so simple. On a first visit to a new location, I often end up places I never imagined I’d be—Hmmm, I wonder where that road goes…, or, Gee, I bet the view from the top of that hill would be great…—often with no connectivity.
On location with no connectivity, I need to be able to figure out the celestial details with only the resources at hand. The two iPhone apps I’ve come to rely on most are Focalware (I couldn’t live without this app) and MotionX-GPS.
- Focalware provides sun and moon rise/set times, the moon phase, and the altitude and azimuth of the sun and moon—all for any any time and date, and any location on earth. It uses my phone’s GPS to determine my current location, but doesn’t require cell or wifi connectivity.
- MotionX-GPS gives me topo maps and the ability to plot point-to-point linear distance as well as azimuth. While its maps do require connectivity to download, I can pre-download them to my phone so they’ll be available when I’m offline.
Using these two apps, plus my basic understanding of astronomical dynamics, I’m able to figure out everything necessary to plan a shoot. On this morning at Mather Point, I pulled out my iPhone and opened Focalware to determine the sunrise time and azimuth. I used the MotionX-GPS Measure tool to drop a pin at my current location, then stretch a line, at the angle of the sunrise azimuth, across the canyon until it intersected the horizon. That was all I needed—seeing that this sunrise line passed just to the right of Wotan’s Throne, I was able to set up the composition I wanted.
Workshop Schedule
A gallery of celestial timing


