Eloquent Images by Gary Hart
Insight, information, and inspiration for the inquisitive nature photographer
Photographing the Grand Canyon: It’s not as easy as it looks
Posted on March 29, 2011

Sunset, Hopi Point, Grand Canyon
Canon EOS-1Ds Mark III
1 second
F/18.0
ISO 100
28 mm
As a photographer weaned on the no less breathtaking but far more finite confines of Yosemite, transitioning to photographing the Grand Canyon shattered a long-established template for success. In Yosemite Valley I’m surrounded by looming walls as familiar as they are spectacular. Attempts to capture Yosemite’s grandeur generally involve isolating or combining specific subjects: El Capitan, Half Dome, Yosemite Falls, and so on.
But when photographing from the rim of the Grand Canyon, no single subject stands out. Rather, I’m instantly overwhelmed by both the vast expanse of the vista and the enormity of its scale. The problem is, as far as the camera is concerned, breadth and size are mutually exclusive: The wider I compose to include the vista, the more everything in the frame shrinks; the tighter I compose to convey the size of the canyon’s features, the more the vista shrinks. But perhaps the greatest hurdle is the Grand Canyon’s great distance, with dramatic red ridge after red dramatic ridge seeming to continue into infinity. This visual depth is completely lost in the camera’s two-dimensional vision.
While I’m not sure I’ve completely mastered the Grand Canyon, I feel like I’m finally getting the hang of it. The above sunset photographed from Hopi Point demonstrates the approach that seems to work best for me, which is to find something for the foreground that complements the background I’m trying to highlight. The Grand Canyon’s rim is rife with interesting trees and shrubs, but in this case I wanted to photograph the sun on the horizon, using the river to lead the eye through the frame. But I couldn’t find an appealing foreground subject. Since experience has shown me that something in the foreground anchors the viewer and is essential to the depth I want to convey, rather than forego any foreground subject at all, I settled for two pretty ordinary shrubs on the canyon’s rim. Because they’re not particularly compelling, I positioned the shrubs at the edge of the frame, allowing ample room for the eye to move easily along the more interesting rim and through the rest of the frame.
Another difficulty photographing the Grand Canyon is the extreme contrast between the bright sky and deeply shaded canyon at sunrise and sunset, a contrast the eye handles far more easily than a camera. The best light in Yosemite Valley comes at sunset, when the sun is at your back for most compositions that include El Capitan or Half Dome. But the Grand Canyon offers an unobstructed view of the horizon in all directions–as difficult as it is to photograph, it’s pretty hard to ignore the rising and setting sun. And the canyon’s precipitous sides put much of it in deep shadow when the sun is on the horizon.
For this sunset I’d arrived at Hopi Point about an hour early, allowing time to plan and set up my composition. When the sun reached the horizon I combined two- and three-stop graduated neutral density filters, which enabled a long enough exposure to bring out the canyon’s shadow detail while holding back color-robbing brightness in the sky. (The Grand Canyon is a great place for hard-transition or reverse GNDs because the linear horizon is a great place to hide the dark-to-light transition.) The sunburst was achieved by using a small aperture (f18) and timing my exposure just as a thin sliver of sun peaked beneath a cloud.
While I’m still not as productive at the Grand Canyon as I am in Yosemite (and other more familiar locations), I really do enjoy the challenge and am encouraged by the growing satisfaction I feel following each trip. My fingers are crossed that I was able continue this trend with the images from my latest visit. Stay tuned….
Conveying a three dimensional world in a two dimensional medium
Posted on March 23, 2011
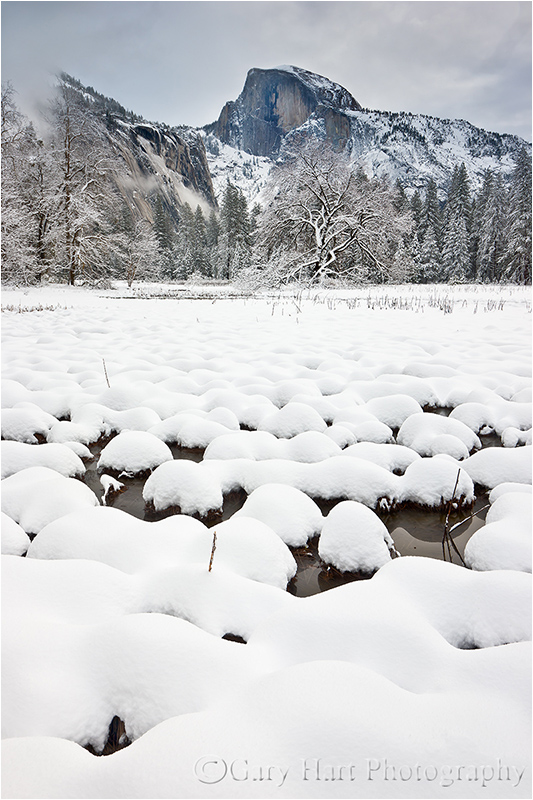
Fresh Snow, Cook’s Meadow and Half Dome, Yosemite
Canon EOS-1Ds Mark III
1/8 second
F/16.0
ISO 100
32 mm
With the (seemingly endless) upward spiral of digital resolution comes a fair amount of hand wringing over the future relevance of still photography as an art form. It’s currently possible to pan a scene with a digital video camera and pluck individual frames for web use. And what, the paranoid landscape photographer laments, will we do when everyone with a high-resolution digital SLR can walk up to a beautiful scene, snap a single wide frame, and in the comfort of their office (or recliner) crop many compelling smaller images for print?
Relax. Regardless of the number of usable frames in a video, or printable crops from a single still-camera click, images captured without consideration of the scene’s front-to-back dimension are still just flat, two-dimensional snapshots. The snapshot world has always been the domain of tourists who simply want to save a memory (not that there’s anything wrong with that), and is rarely a productive path for truly creative photographers.
The missing dimension
Many photographers do pretty well with a more literal interpretation of the world, but struggle understanding how their camera’s view of the world differs from theirs, and how to take advantage of those differences. Foremost among these differences is the missing depth dimension.
Rendering our three dimensional world in a two-dimensional medium requires a paradigm shift for photographers accustomed to capturing the world as it appears to their eyes. But while it’s impossible to create a true three-dimensional image with a standard camera, it is possible to create the illusion of depth.
Creating this illusion starts with of a couple of simple principles. First, never settle for your primary subject. When when your primary subject is in the background, force yourself to seek a complementary foreground. Conversely, when your subject is in the foreground, pay special attention to the background.
Your complementary subject doesn’t need to be compelling, it just needs to provide a brief stopping point on a different plane from your main subject, or a path for the eye to follow through the frame. Leading lines, like a fence, creek, or lakeshore, guide the eye through the frame. Or you can create virtual leading lines with a prominent rock, shrub, or tree that your viewers can subconsciously connect to the primary subject. In most cases, you’ll want your complementary object to connect diagonally to the primary subject.
But the illusion of depth can also happen without leading lines. Simply giving your subject a foreground or background with visual interest can be enough, such as the snowy meadow beneath Half Dome in the image here.
An easily overlooked flaw that can rob a scene of depth is merged visual elements on different front-to-back planes. For example, even though to your eye that distant rock is clearly behind the tree right in front of you, unless the two are completely separated horizontally (left/right, up/down), in the camera’s two-dimensional world they’ll appear at first glance to be a single object. Often the solution is as simple as moving left/right, forward/backward, or up/down.
About this image
Photographing Yosemite with fresh snow, it’s easy to get so caught up in your own reaction to the beauty that you forget the camera will “see” it differently. Rather than concentrate on Half Dome above Cook’s Meadow’s snow-etched elm, I paused to better understand what made this moment feel special. At my feet stretched the meadow, normally brown and tramped by visitors, transformed by a pristine marshmallow meringue of new snow.
Dropping to snow-level, I used a wide vertical composition that emphasized the foreground, allowing the undulating snow to carry the viewer’s eyes into the larger scene in the distance. The sky wasn’t particularly interesting, so I minimized its presence in the frame and gave as much real estate as possible to the snowy foreground. At f16 and 32mm, focusing on the edge of the nearest pool, about 7 feet into the frame, gave me sharpness from 3 1/2 feet to infinity.
Sunset, Hopi Point, Grand Canyon
Canon EOS-1Ds Mark III
4 seconds
F/18.0
ISO 100
28 mm
* * *
This image is all about the distant Grand Canyon and sunset. Nevertheless, I found a couple of unassuming shrubs for my foreground to create the illusion of depth. I took care to separate them far enough to allow the eye to flow easily into the canyon and beyond. And having the shrubs near the border also signals that they’re not significant subjects. My focus point was on the rim, just a little behind the right shrub.
Current photo workshop schedule
Images with depth
Click an image for a closer look, and a slide show. Refresh the screen to reorder the display.


Just another day at the office
Posted on March 11, 2011

Sunset, McWay Fall, Big Sur, California
Canon EOS-1Ds Mark III
Canon 17-40mm f/4L USM
3 2/3 seconds
F/11.0
ISO 400
As some readers know, fellow pro photographer Don Smith and I partner on many workshops, donating our time as co-leaders for each other’s trips. On a recent trip Don and I stood on a bluff at sunrise gazing at the Big Sur Coast (or was it sunset overlooking Yosemite Valley?) and reminded ourselves of all the people idling in traffic or confined in a cubicle, and how fortunate we are to do what we do for a living.
Not only do photo workshops allow me to see and photograph great stuff, they give me the opportunity to learn from the diverse perspectives of dedicated photographers from every hemisphere on Earth and virtually every state in America. My workshop participants have been, in no particular order, musicians, computer professionals, artists, physicians, writers, lawyers, corporate executives, electricians, accountants, bond traders, active and retired military, other professional photographers, real estate agents, clergy, a classical composer, a Hollywood graphic artist, and a Hooters girl (a very sweet young lady who would completely dash any preconceived impression of what that might mean). One workshop included a rocket scientist and a brain surgeon.
Sometimes the education I gain from this eclectic mix of professions, preferences, and personalities is simply an insight or point-of-view that helps me better understand or inform future workshop participants. And sometimes my education is a bit more, uh, “esoteric.” On the day I captured this image of McWay Fall in Big Sur, I got a little of both.
This was a couple of years ago, on the first day of Don’s spring Big Sur workshop. Driving to the workshop’s first shoot we hadn’t been on the road five minutes when it was discovered my backseat featured a sex therapist and a gynecologist. Uh-oh. While they seemed quite excited by their mutual interest, I was uncertain that the other passengers shared the doctors’ outspoken zeal for the subject and did my best to deflect the conversation into more benign territory. But the doctors were not to be deterred. We spent the duration of the drive listening to these experts compare notes in graphic and excruciatingly uncensored detail. Topics ranged from, uh, well let’s just say we covered everything from oysters to “When Harry Met Sally.” Much to my relief, and after fifty minutes without exhaling, I pulled into the parking area at Julia Pfeiffer Burns State Park with a car-full of laughing (and, it turns out, just a little better informed) passengers. Phew.
Amazingly, it turned out that the drive wasn’t even the most memorable part of the afternoon. That honor goes to the sunset, which I was fortunate enough to capture in today’s image. When we arrived at the view of McWay Fall, the sun was behind a cloud bank that painted land, sea, and sky matching gray. But successful photography is often not as much about what’s happening now as it is about what’s going to happen later. And few opportunities excite me more than watching the sun slip from the clouds just before it completes its dash for the horizon–exactly what was in store this evening.
Don and I rallied the troops and told them not to be deceived by the flat scene, to prepare for a sudden and dramatic change in the color and light when the sun popped from behind the clouds. We told everyone that the display wouldn’t last long and encouraged them to forego the current moment and search for a composition that would work when “the moment” happened. With about ten minutes to pick a spot, refine our compositions, and ready our cameras, I ended up working with about half the group at this location. Don stationed himself with the rest of the group a couple hundred feet up the trail.
After getting everyone situated, I opted for this wide shot that used the fall and sun to balance the frame. To reduce the contrast between the sky and foreground I stacked two graduated neutral density filters (totaling five stops); to get the starburst effect I stopped down to f18. Because everyone in my group was ready and comfortable enough with their camera, we were all able to capture our own version of this special moment.
I’m afraid Don wasn’t so fortunate. Most of his group was successful, but with little warning one of his people decided that this very moment was the absolute best time to learn the manual metering techniques Don and I had covered in our orientation. Despite suggestions from Don (and stronger “urgings” from her husband) to shoot the way she’s most comfortable now and defer the learning to later, she insisted that now is the time to crack the manual metering puzzle.
To Don’s credit, he passed his opportunity at this magic moment to work with her. So while Don didn’t get his shot (kind of the photographer’s equivalent of taking one for the team), we did come away with a great cautionary tale we now spin to all of our workshop participants: Practice, practice, practice, when everything’s static, but when the magic happens, always, always, always revert to what’s most comfortable.
All in all, a very educational (and productive!) day. I don’t remember the drive back up the coast that night, but given the sunset we’d witnessed I’m pretty sure the primary topic was photography. Over the course of the workshop our woman did in fact learn manual metering (as she has demonstrated in subsequent workshops), and Don will forever be able to tell people about “the one that got away.” I, on the other hand, learned how long I can hold my breath.
Workshop Schedule || Purchase Prints
A Seaside Gallery


Is it spring yet?
Posted on March 6, 2011

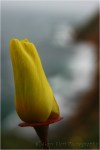
Poppy Lantern, Merced River Canyon, California
Canon EOS-1Ds Mark II
1/50 second
F/4
ISO 200
100 mm
March 3, 2011
With all the recent snow posts, it’s kind of hard to believe that spring has arrived in California. We’re still getting rain here in the Central Valley (and snow in the Sierra), but Northern California skies are more blue than gray, and colorful blossoms are popping up everywhere. While the soon-to-be-ubiquitous foothill poppies haven’t quite kicked in, I know by the end of the month my camera and I will be enjoying leisurely drives through the Gold Country to photograph my favorite wildflower. My foothill drives have become quite a treat for me, not just for the photography, but for the opportunity to meander quiet country roads with the window down and baseball on the radio.
On these drives I often find entire hillsides blanketed with poppies beneath billowing cumulus pillows. Sometimes a spring shower sprinkles the blossoms, closed tight against the weather, with glistening water jewels. When I’m fortunate enough to find the sun diffused by a veneer of translucent clouds, I like to sprawl in the dirt for a bugs-eye view of the tissue-thin, backlit petals that light up as if they have their own internal light source like colorful little lanterns.
I found the poppy in this image at one of my favorite spots near the Merced River west of Yosemite. An extension tube on my 100mm macro lens enabled me to get close enough to smooth the background lupine into a blur of purple. I chose this tight composition of just the base of the closest backlit poppy for the way it emphasized the glowing lantern effect I love so much. Believe it or not, the color was so vivid that I actually had to desaturate it a bit in Photoshop.
-

- Poppies, Hite Cove Trail, Merced River Canyon
-

- Poppy Hillside, Sierra Foothills
-
- Intimate Poppy, Point Reyes National Seashore
-
- Wildflower Collage, Sierra Foothills, California
-
- Lupine and Poppies, California Gold Country
-
- Poppy and Surf, Point Reyes National Seashore
-

- Champagne Glass Poppies, Merced River Canyon, California
-

- Poppy Lanterns, Merced River Canyon
-

- Sparkling Poppies, Merced River Canyon
-
- Intimate Poppy, Point Reyes National Seashore
-
- Sparkling Poppies, Merced River Canyon
-
- Lupine and Poppies, California Gold Country
-
- Poppies, Hite Cove Trail, Merced River Canyon
-
- Poppy and Surf, Point Reyes National Seashore
-
- Wildflower Collage, Sierra Foothills, California
-
- Poppy Lanterns, Merced River Canyon
-
- Champagne Glass Poppies, Merced River Canyon, California
-
- Poppy Hillside, Sierra Foothills

