Eloquent Images by Gary Hart
Insight, information, and inspiration for the inquisitive nature photographer
Just Another Day at the Office
Posted on April 18, 2021

Sunset, McWay Fall, Big Sur, California
Canon EOS-1Ds Mark III
Canon 17-40mm f/4L USM
.4 seconds
F/18
ISO 100
With vaccines taking hold and COVID restrictions easing, I’ve suddenly found myself in “be careful what you wish for mode.” I’m currently in Oregon with Don Smith, where we wrapped up our Oregon Coast workshop yesterday, and start our Columbia River Gorge workshop this afternoon. When this stretch is over, I’ll have done five workshops in five weeks. In addition to that, I had an unexpected (but welcome), time-critical project dumped in my lap that has occupied virtually all of workshop down-time. But rather than skip this week’s blog entirely, I’ve pulled one of my most popular from the archives (March, 2011), updated it slightly, and am sharing it today.
As some readers know, fellow pro photographer Don Smith and I partner on many workshops, donating our time as co-leaders for each other’s trips. On a recent trip Don and I stood on a bluff at sunrise gazing at the Big Sur Coast (or was it sunset overlooking Yosemite Valley?) and reminded ourselves of all the people idling in traffic or confined in a cubicle, and how fortunate we are to do what we do for a living.
Not only do photo workshops allow me to see and photograph great stuff, they give me the opportunity to learn from the diverse perspectives of dedicated photographers from every hemisphere on Earth and virtually every state in America. My workshop participants have been, in no particular order, musicians, computer professionals, artists, physicians, writers, lawyers, corporate executives, electricians, accountants, bond traders, active and retired military, other professional photographers, real estate agents, clergy, a classical composer, a Hollywood graphic artist, and a Hooters girl (a very sweet young lady who would completely dash any preconceived impression of what that might mean). One workshop included a rocket scientist and a brain surgeon.
Sometimes the education I gain from this eclectic mix of professions, preferences, and personalities is simply an insight or point-of-view that helps me better understand or inform future workshop participants. And sometimes my education is a bit more, uh, “esoteric.” On the day I captured this image of McWay Fall in Big Sur, I got a little of both.
This was a couple of years ago, on the first day of Don’s spring Big Sur workshop. Driving to the workshop’s first shoot we hadn’t been on the road five minutes when it was discovered my backseat featured a sex therapist and a gynecologist. Uh-oh. While they seemed quite excited by their mutual interest, I was uncertain that the other passengers shared the doctors’ outspoken zeal for the subject and did my best to deflect the conversation into more benign territory. But the doctors were not to be deterred. We spent the duration of the drive listening to these experts compare notes in graphic and excruciatingly uncensored detail. Topics ranged from, uh, well let’s just say we covered everything from oysters to “When Harry Met Sally.” Much to my relief, and after fifty minutes without exhaling, I pulled into the parking area at Julia Pfeiffer Burns State Park with a car-full of laughing (and, it turns out, just a little better informed) passengers. Phew.
Amazingly, it turned out that the drive wasn’t even the most memorable part of the afternoon. That honor goes to the sunset, which I was fortunate enough to capture in today’s image. When we arrived at the view of McWay Fall, the sun was behind a cloud bank that painted land, sea, and sky matching gray. But successful photography is often not as much about what’s happening now as it is about what’s going to happen later. And few opportunities excite me more than watching the sun slip from the clouds just before it completes its dash for the horizon–exactly what was in store this evening.
Don and I rallied the troops and told them not to be deceived by the flat scene, to prepare for a sudden and dramatic change in the color and light when the sun popped from behind the clouds. We told everyone that the display wouldn’t last long and encouraged them to forego the current moment and search for a composition that would work when “the moment” happened. With about ten minutes to pick a spot, refine our compositions, and ready our cameras, I ended up working with about half the group at this location. Don stationed himself with the rest of the group a couple hundred feet up the trail.
After getting everyone situated, I opted for this wide shot that used the fall and sun to balance the frame. To reduce the contrast between the sky and foreground I stacked two graduated neutral density filters (totaling five stops); to get the starburst effect I stopped down to f18. Because everyone in my group was ready and comfortable enough with their camera, we were all able to capture our own version of this special moment.
I’m afraid Don wasn’t so fortunate. Most of his group was successful, but with little warning one of his people decided that this very moment was the absolute best time to learn the manual metering techniques Don and I had covered in our orientation. Despite suggestions from Don (and stronger “urgings” from her husband) to shoot the way she’s most comfortable now and defer the learning to later, she insisted that now is the time to crack the manual metering puzzle.
To Don’s credit, he passed his opportunity at this magic moment to work with her. So while Don didn’t get his shot (kind of the photographer’s equivalent of taking one for the team), we did come away with a great cautionary tale we now spin to all of our workshop participants: Practice, practice, practice, when everything’s static, but when the magic happens, always, always, always revert to what’s most comfortable.
All in all, a very educational (and productive!) day. I don’t remember the drive back up the coast that night, but given the sunset we’d witnessed I’m pretty sure the primary topic was photography. Over the course of the workshop our woman did in fact learn manual metering (as she has demonstrated in subsequent workshops), and Don will forever be able to tell people about “the one that got away.” I, on the other hand, learned how long I can hold my breath.
Workshop Schedule || Purchase Prints || Instagram
A Seaside Gallery


Think Fast
Posted on June 21, 2020

Almost Heaven, Big Dipper Above the Clouds, Big Sur
Canon EOS-1Ds Mark III
Canon 24-105 f/4L
25 seconds
F/4
ISO 400
In virtually all aspects of my life, “think fast” is rarely my default response. Rather, given a choice, I prefer evaluation and analysis to instant reaction. This think-first mindset might also explain why my favorite sport is baseball (which many consider “too slow”), and why I prefer chess and Scrabble to video games (the last video game I played was Pong). So I guess it should be no surprise that, as a landscape photographer, my subjects don’t move. I’m much happier working a scene comfortable in the knowledge that when I’m finally ready, it will still be there.
But nature isn’t truly static, and sometimes I don’t have the luxury of analysis. A few years ago while helping Don Smith with his summer Big Sur workshop, we’d spent most of an afternoon and evening working in the fog (it was billed as a fog workshop). Driving home after a gray sunset, the fog showed no signs of clearing so Don and scrapped the group’s night shoot plans. But climbing toward Hurricane Point, the car suddenly broke through the fog and the world completely changed. We were above the clouds, whose undulating tops seemed to stretch to the horizon where a fading stripe of orange was the only evidence of the retreating day. In the darkening blue sky, the stars had just started to pop into view, with more seeming to appear with every passing second.
Change of plans: Screeching to a halt at the Hurricane Point vista, everyone piled out and raced to set up their gear. As much as I like to take my time when I arrive at a scene, something told me to hurry and once I got to the edge of the overlook and peered over, I saw why. The fog that looked so static and serene from a distance was in fact a roiling soup charging up the steep slope. With a few advance fragments of cloud scooting across my view, I frantically loaded my camera onto my tripod. To save time, I stuck with the lens that was already mounted on my body, pointed in the direction of the Big Dipper, and quickly focused on the stars. This was pre-mirrorless, so without the pre-capture histogram, I just guessed on the exposure. Fortunately my focus and exposure choices were right-on because this was the only shot I got before that foreground fog bank engulfed the world in clouds—score one for instant reaction.
The value of some images can transcend their aesthetic appeal—sometimes they offer lessons as well. For me, this is one of those images. In my workshops I see photographers who are deliberate like me, and others who are constantly in motion. What I’ve come to realize is, wherever we might naturally fall on the deliberate<->reactive continuum, it benefits our photography to sometimes shake things up and come at a scene from a different place than we usually do. I learned from this night’s experience, and others like it, to trust my instincts more. I know I’ll never not be one to take time to pause and consider a scene because that’s how I’m wired. But now when I arrive at a scene, I try to start with the more instinctive shot—even if that turns out not to be exactly the image I end up with, that alternate perspective often sends me down a completely different path than I’d have otherwise taken.
Workshop Schedule || Purchase Prints
In a Fog
Click an image for a closer look, and to view a slide show.


More thoughts on the Sony a7R
Posted on January 20, 2015

Rocks at Sunset, Garrapata Beach, Big Sur
Sony a7R
Sony/Zeiss 16-35
1/15 seconds
F/20
ISO 100
Read my original thoughts on the Sony a7R in my November 25 post, “New trick, old dog.“
It’s been about two months since I switched my primary camera from a Canon 5D Mark III to a Sony a7R. After a lifetime of seeing the “actual” world through my viewfinder, (for me at least) there has been some adjustment to trusting a digital facsimile of the world. I’m actually surprised by how long the adjustment is taking, but I’m getting there (and your results may vary). And this is really more my problem than the camera’s—I have no significant complaints with the camera’s interface or handling.
Another thing to prepare for is a lot more sensor dust. Unlike and SLR, which has a mirror and shutter to protect the sensor, a mirrorless sensor is pretty much exposed to the elements when the lens is removed. At the very least you’ll want to blow the sensor after each use, and do more aggressive cleaning very regularly.
On the positive side of the ledger, I appreciate the a7R’s extreme customizability. And I’m finding focus-peaking and (especially) the focus magnifier to be a godsend for my shooting style—I obsessively seek subjects from near to far in my frame, and am more than happy to forego the speed of autofocus for the precision of manual focus. As my trust in the a7R’s electronic focus aids grows, I find manual focusing so effortless that I never even attempt autofocus (nor do I miss using it).
But more important than interface and usability pluses and minuses, I continue to be blown away by the quality of the images I get from this camera. The a7R’s dynamic range is the stuff of dreams, and the sharpness and resolution continue to thrill me. I’m admittedly not a pixel-peeper, but I’ve not encountered any of the lens concerns some have reported online—my Sony/Zeiss 16-35, 24-70, and Sony 70-200 lenses are sharper than my Canon L glass. Period. I purchased the Metabones Canon-to-Sony adapter fully expecting to use my Canon lenses a lot, but so far have only used the Metabones once (it works fine).
I do have a concern about the sturdiness of the the a7R lens mount—all my lenses wobble too much where they connect to the body, and with minimal pressure can be removed without pressing the unlock button (some more easily than others). Conducting workshops gives me unique exposure to other cameras, and I can say that I’ve seen several a7Rs and they all exhibit this problem. But in a refreshing change of pace from my Canon experience, it appears that Sony has quickly (albeit tacitly) recognized the problem and improved the mount in its newer a7S and a7II bodies. While I’ve heard nothing about a lens mount recall of the first generation Sony a7 bodies (a recall that I feel would be justified), I won’t stress it too much because I found a simple and inexpensive solution: The Fotodiox TOUGH E-Mount completely fixed the problem on my a7R. I consider the Fotodiox mount a must for any Sony E-mount body the preceded the a7S. Installation is quite simple, but here’s a word to the wise: Before attempt the replacement, watch the video on the Fotodiox page; also note that you’ll need a Phillips #000 screwdriver (despite the picture on the website, one isn’t included with the mount).
And since we’re talking about things you might want to purchase, the a7R does not come with a battery charger. Instead, Sony gives you a USB cable that plugs into your camera and connects to the provided adapter (or any other USB adapter—I can plug their cable with my iPhone, Kindle charger, or computer). The problem with this is that the battery needs to be in the camera while you charge, making it impossible to charge a battery while you use the camera, not a great scenario for such a power-thirsty camera. You could spend another $50 or on Sony’s charger, or you could do what I did and buy a third-party charger. For about $27 on Amazon I got a Wasabi charger that includes two batteries (haven’t tested them, but at the very least they can be backups that hold me until I can get a primary battery charged), a car charger, and European adapter. I also ordered one more Sony battery as my primary backup (but I’m kind of obsessive about having backups).
And speaking of backups, perhaps the best indication of my level of commitment to the new Sony is that I just ordered a Sony a6000 (and the Fotodiox TOUGH E-mount). I can’t afford not to have a backup body, and the a6000 is a perfect complement to the a7R—in addition to its rave reviews, the a6000 is quite compact, is only around $700 (even cheaper if you shop around), takes all my EF mount lens, and with a 1.5 crop sensor, gives me extra focal length when I need it (in other words, it’s more than a backup). So it looks like I’m all-in with Sony. Stay tuned….
A few words about this image
The image at the top of today’s post is from my Big Sur visit early this month. I share it here because it’s a great example of why I’m so excited about the dynamic range of the a7R. Since I don’t blend images (just my personal style), I needed to capture this scene with one click. Even with the great dynamic range, I used a Singh-Ray 3-stop graduated neutral density filter to hold back the sky, had to pull the highlights down and shadows up the shadows a little in Lightroom, and do a little dodging and burning in Photoshop. But all things considered, this was a remarkably straightforward capture with the a7R (not much work to expose and process).
If you’re thinking about purchasing filters (like the graduated neutral density filter I used here), you can’t to better than Singh-Ray. For a 10 percent discount on the Singh-Ray site, use the discount code gary10.
A (growing) gallery of Sony a7R captures
Click an image for a closer look, and a slide show. Refresh your screen to reorder the display.


The twilight edge
Posted on January 16, 2015

Moonlight on the Water, Garrapata Beach, Big Sur
Sony a7R
Sony/Zeiss 16-35
6 seconds
F/11
ISO 100
I sometimes hear comments and questions that make me think people believe pro photographers have “secrets” that enable us to photograph things the amateur public can’t. Let me assure you that this is not true. What is true is that successful landscape photographers have an understanding of the natural world that helps us know where and when to look for our images, and we know that often the best pictures aren’t in the same place as the best view.
For example, it’s hard to deny the beauty of a sunrise or sunset. But it seems that most people are so mesmerized by the scene facing the sun that they miss exquisite beauty in the other direction. The next time you find yourself out photographing (or simply enjoying) a sunrise or sunset, do yourself a favor and check out the world behind you. Beneath clear skies you’ll see the earth’s shadow, often called the “twilight wedge,” overlaid by the pink “Belt of Venus.” I call the sky in this direction the “twilight edge,” not only because it’s found at the day’s leading or trailing edge, but also for the advantage it gives photographers who understand how easy this under-appreciated (and oft missed) perspective is to photograph.
Unlike the view toward the rising or setting sun, where cameras struggle to expose the full range of shaded subjects against a bright sky, the scene opposite the sun is bathed light that has been bent, scattered, colored, and subdued by its long trip through the atmosphere. While not as dramatic to the eye as an electric crimson sky or throbbing orange sun, a camera loves the long shadows and warm tones away from the sun.
But the great light doesn’t begin at sunrise, or end at sunset. When the sun is about ten degrees or closer to the horizon, the sky in the opposite direction is bright enough to fill the landscape with soft, shadowless light that makes photography a breeze. And while the scene may appear quite dark to the eye, a long exposure and/or slightly higher ISO (like 400 or 800) will reveal the world in a way that’s impossible in daylight. Case in point:

Before Sunrise, Mt. Whitney and the Alabama Hills, California
This is a 30 second exposure at ISO 400, captured about 30 minutes before sunrise on a windy Eastern Sierra winter morning, when the world was still dark enough to require a flashlight to maneuver.
Twilight components
Above the shadowless pre-sunrise/post-sunset landscape, when the sun is around six degrees or closer to the horizon (civil twilight), soft bands of color stacked like pastel pillows materialize. The blue-gray band earth’s shadow directly above the horizon earned its “twilight wedge” designation because you can sometimes see the earth’s curve in the shadow, giving it something of a wedge shape. At sunset, the gradual upward motion of the shadow gives the appearance of a wedge being driven into the darkening sky.
Above the earth’s shadow, but not quite high enough to receive the full complement of solar wavelengths, the atmosphere basks in the slightly brighter pink glow of scattered sunlight. In this region the shorter wavelengths have been dispersed, leaving only the longest, red wavelengths—the Belt of Venus. You’ll first see its pink stripe high in the pre-sunrise sky, descending and brightening as the sun rises, until the pink is finally overcome by the first rays of sunrise; after sunset the pink band starts low, climbing skyward and darkening, eventually blending into the oncoming night.
Alpenglow
A particularly striking sunrise/sunset phenomenon is the “alpenglow” that spreads atop mountaintops that rise so far above the surrounding terrain that they jut into the BoV, assuming its pink glow. My favorite place to photograph alpenglow is the Alabama Hills, 10,000 vertical feet below Mt. Whitney and the Sierra crest, but alpenglow paints peaks throughout the world.

Alpenglow, Mt. Whitney and the Alabama Hills, Eastern Sierra
From my vantage point the sun was still well below the horizon, but Mt. Whitney, 10,000 feet above me jutted into the scattered pink rays of the rising sun.
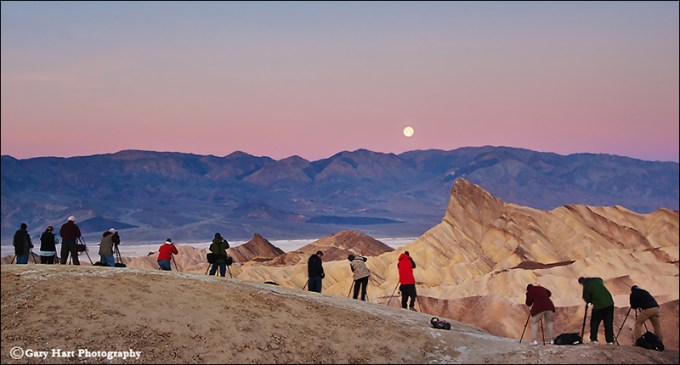
Moonrise, moonset
Quite conveniently, the earth shadow and Belt of Venus also happen to be where you’ll find a setting (at sunrise) and rising (at sunset) full moon. If you’ve been paying attention, you know that the full moon (more or less) rises in the east at sunset, and sets in the west at sunrise. Many of my favorite images use just such a moonrise or moonset to accent an empty but colorful sky.
The image at the top of this post is a recent attempt at a sunrise moonset. I was in Big Sur last week to help my good friend Don Smith with his Big Sur winter workshop. Don and I guided the group down to the beach much too early to photograph the moon, but the extra time allowed everyone to search for a suitable foreground.
With the tide quite high, many of the beach’s most photogenic rocks were partially or completely submerged, but we certainly weren’t lacking for subjects. Don helped half of the group work the rocks along the south part of the beach, while the other half followed me north. Just a couple of hundred yards up the beach we found a pair of boulders amidst the crashing surf. Taking care not to scar the pristine sand with footprints, we spent the rest of the sunrise moving around, framing the setting moon with these and a couple of other nearby boulders.
I clicked the frame here extremely early in the window of usable light, when the foreground was just bright enough that capturing usable detail didn’t require overexposing the moon (remember, if I can’t capture the entire scene with one click, I won’t shoot it). Vanquishing this extreme dynamic range was aided by the amazing sensor of my new Sony a7R (thank you very much), combined with my trusty Singh-Ray 3-stop hard graduated neutral density filter.
Even with those advantages, I still needed to massage the shadows up and highlights (the moon only) down in Lightroom and Photoshop. The advantage of photographing the scene this early was the ability to capture the moonlight reflected on the ocean, something I’d have lost if I’d waited for the foreground to brighten.
A Gallery of the View Opposite the Sun
Click an image for a closer look, and a slide show. Refresh your screen to reorder the display.


Photo Workshops
Learn more and photograph these scenes yourself in a photo workshop
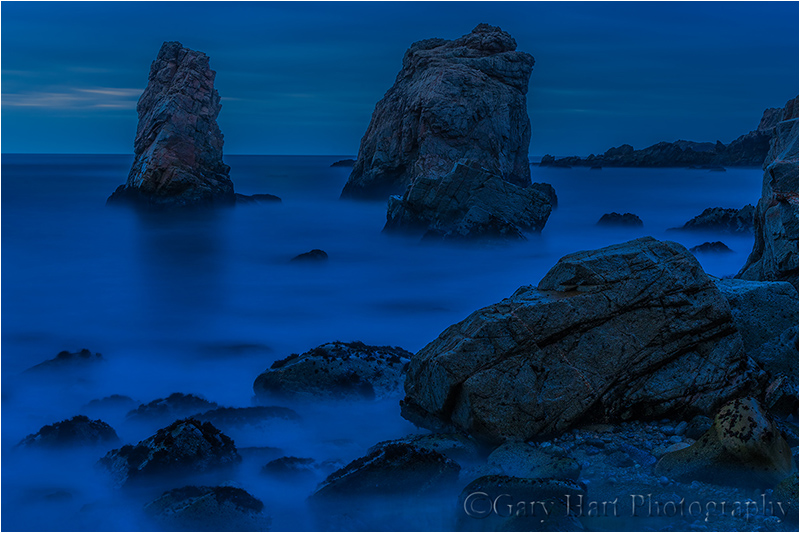
World in motion
Posted on January 9, 2015

Moon on the Rocks, Soberanes Point, Big Sur
Sony a7R
Sony/Zeiss 16-35
5 seconds
F/11
ISO 200
As a full-time landscape photographer, I often joke that I don’t photograph anything that moves—no wildlife, no pets, no portraits, no sports. And don’t even think about asking me to do your wedding. I’ve always been a deliberate shooter who likes to anticipate and prepare my frame with the confidence my shot will still be there when I’m ready—landscape photography suits me just fine (thank-you-very-much).
But as much as I appreciate the comfortable pace of a static landscape, the reality is that nature is in constant motion. Earth’s rotation spins the moon and stars across our night sky, and continuously changes the direction, intensity, and color of the sunlight that rules our day. Rivers cascade toward sea level, clouds scoot and change shape overhead, ocean waves curl and explode against sand and rock, then vanish and repeat. And even a moderate breeze can send the most firmly rooted plants into a dancing frenzy.
Photographing motion is frustrating because a single image can’t duplicate the human experience (not to mention the technical skill required to subdue it without compromising exposure and depth). But motion also presents a creative opportunity for the photographer who knows how to create a motion-implying illusion that conveys power, flow, pattern, and direction.
While a camera can’t do what the human eye/brain do, it can accumulate seconds, minutes, or hours of activity with one “look,” recording a scene’s complete history in a single image. Or, a camera can document an instant, an ephemeral splash of water or bolt of lightning that’s gone so fast it’s merely a memory by the time a viewer’s conscious mind processes it. This is powerful stuff—accumulating motion in a long frame reveals hidden patterns; freezing motion saves an instant for eternal scrutiny.
For example
-

- Fire on High, Kilauea and Milky Way, Hawaii
-
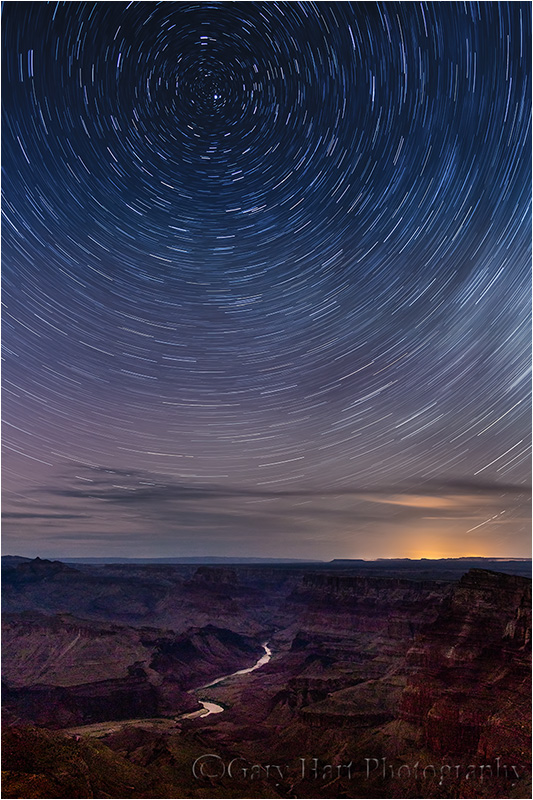
- Star Trails, Desert View, Grand Canyon
When I photograph the night sky, I have to decide how to handle the motion of the stars (insert obligatory, “It’s not the stars that are moving” comment here). Freezing celestial motion is a balancing act that combines a high ISO and large aperture with a shutter speed to maximize the amount of light captured, while concluding before discernable streaks form. My goal is to hold the stars in one spot long enough to reveal many too faint for the eye to register. Or, I can emphasize celestial motion by holding my shutter open for many minutes.
-

- Electric Night, Grand Canyon Lodge, North Rim, Grand Canyon
-
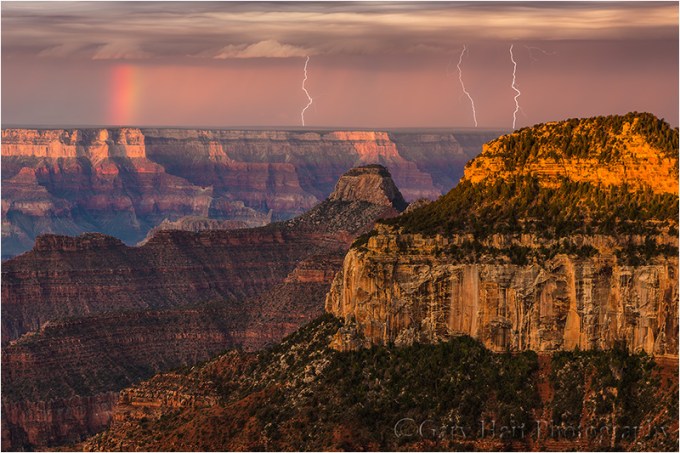
- Three Strikes, Bright Angel Point, Grand Canyon
Lightning comes and goes faster than human reflexes can respond. At night, a long exposure can be initiated when and where lighting might strike, recording any bolt that occurs during the exposure. But in daylight I need a lightning sensing device like a Lightning Trigger, that detects the lightning and fires the shutter faster than I can.
Moving water is probably the most frequently photographed example of motion in nature, with options that range from suspended water droplets to an ethereal gauze. I’m always amused when I hear someone say they don’t like blurred water images because they’re not “natural.”
Ignoring the fact that it’s usually impossible to achieve a shutter speed fast enough to freeze airborne water in the best (shade or overcast) light, I don’t find blurred water any less natural than a water drop suspended in midair (when was the last time you saw that). Blurred water isn’t unnatural, it’s different.
Which brings me to the image at the top of the frame, of the waves and rocks at Big Sur’s of Soberanes Point, and a (nearly) full moon dropping through the twilight on the distant horizon. I could have increased my aperture and ISO until my shutter speed stopped the motion of the waves, and timing the exposure just right, might have recorded an explosive collision of wave and rock—dramatic, but understating turbulence of the ocean/land interface. Instead, I opted for an exposure long enough to convey the action and extent of the agitated surf, but fast enough to hold the setting moon in place.
A gallery of motion in nature
Click an image for a closer look, and a slide show. Refresh your screen to reorder the display.


New trick, old dog
Posted on November 25, 2014
Nightfall, Big Sur Coast, California
Sony a7R
43 mm
4 minutes
F/16
ISO 200
Way back in 2008 when I got my first live-view camera, a Canon 1DS Mark III, I couldn’t understand what all the hubbub was about. I’d been looking through a viewfinder for thirty years and saw no reason to do things any differently. But when a 5D Mark III entered my life in early 2012, its improved live-view interface caused me to waver a bit—in particular the live-view focus capability, an on-screen level, a histogram that appeared before capture, and the ability to compose at odd angles without being tethered to the viewfinder. While I incorporated these capabilities into my workflow in the field when conditions dictated, for the most part I remained the same viewfinder shooter I’d always been.
Enter mirrorless
A few years ago, camera manufacturers, looking to replace point-and-shoot business rapidly succumbing to ubiquitous smartphones, realized that removing the mirror box from an SLR (single lens reflex: a mirror deflects the lens’s view up through the viewfinder, then flips the mirror up and out of the way of the sensor when the shutter fires) camera would allow them to put an SLR-size sensor in a much smaller body. These first mirrorless systems picked off many enthusiastic amateurs looking for better image quality than a smartphone or point-and-shoot without having to lug bulky gear. But the pros still considered mirrorless cameras fancy toys, or at best, a viable second camera.
Then, in late 2013, Sony released its full-frame, a7 mirrorless cameras and partnered with Zeiss for compatible lenses. Sony was the maker of the esteemed 36 MP Nikon D800 sensor (which they put in their mirrorless a7R body), and Zeiss has long been regarded one of the world’s finest lens makers. Suddenly, they had our attention.
Waffling….
While I was mildly intrigued by what Sony was doing, I remained committed to my Canon 5DIII. Given my significant investment in Canon glass, and confidence that Canon would be coming out with something better soon, I gave little serious thought to switching.
But, despite the consensus that Nikon and Sony cameras have surpassed Canon in image quality, we’ve reached the end of 2014 with nothing but cricket sounds coming from Canon’s corner of Tokyo. Contrasting those cricket sounds is the celebratory din from pros I respect who abandoned the Canon ship in favor of Sony, and are thrilled with Sony’s improved dynamic range, high ISO performance, and significantly higher resolution. Hmmm.
Budding relationship
Then my good friend Don Smith (and fellow long-time Canon shooter) made the Sony plunge, and I got to see the camera and its results up close on our trips to the Grand Tetons and Columbia River Gorge. Don couldn’t stop raving about the quality of the Sony image files, and I couldn’t get over the compactness of his camera bag.
So this month I did it. I pulled the trigger and went all-in on a Sony a7R and three lenses: a Sony 70-200 f4, and Sony/Zeiss 16-35 f4 and 24-70 f4 lenses. Hedging my bets, I also purchased the Metabones Mark IV adapter that enables me to use my Canon lenses on the a7R.
Was it love at first sight? Hardly. Like any new relationship, there are growing pains—in this case, it’s adjusting to a completely new way of shooting. I’ve always been a keep-it-simple, full control, totally manual (metering, focus) shooter—I just don’t want my camera making any decisions for me. Relying exclusively on an electronic viewfinder for composition, exposure, and focus is a paradigm shift that caught me off guard.
So the Sony and I are still negotiating certain aspects of our relationship. I will acknowledge that things like pre-capture focus-peaking (dots that highlight in-focus areas before I shoot) and exposure zebras (diagonal lines that appear where my image is over or under exposed) are potentially quite useful, but I still have trust issues—just because you tell me you’re sharp, doesn’t mean I have to believe you.
And I’ve always felt that spot metering was the way to go in manual exposure mode (it’s all I’ve ever used), but I’m coming to the conclusion that the way to go with the Sony is to let the meter see the entire scene and base my exposure settings on the pre-shot histogram. I wish it gave me the RGB histogram before the shot, but I’m willing to compromise for the sake of photographic harmony.
But there’s no denying the image quality, and for that alone, I’m quite confident that this relationship will last. Without doing a lot of pixel-peeping tests (I leave that stuff to other photographers while I’m out taking pictures), the dynamic range if the a7R just blows me away. I’m guessing that I get at least two more stops of dynamic range than I got with any of my Canon bodies, a game-changer for a landscape shooter.
This being such a new relationship, we haven’t spent a night together yet. And until we do, I’m not about to discard my Canon (does that make me a bad person?). I’m less concerned about the a7R’s night image quality than I am about my ability to compose and focus in low light using the electronic viewfinder. So stay tuned….
An evening out
While I haven’t done a full-on night shoot yet, I did stay out quite a bit past sunset on my first shoot. The image here is from that first date, a triple-date actually, to Soberanes Point in Big Sur with friends Don Smith and Mike Hall. While Don’s experience with his new a7R was the tipping point in my decision to switch, he was just a few weeks ahead of me, and we were both still trying to figure things out (and laughing about feeling like beginners).
When the sky darkened, the low-light shortcomings of the a7R’s electronic viewfinder became apparent, as feared. About 25 minutes after sunset (when I clicked this), I could still see enough with my 24-70 f4 to compose and focus, but just barely. Shortly thereafter I switched to my Canon-mount Zeiss f2 (with the Metabones adapter) and found the light gathering capability of the faster lens helped a lot. I’m guessing that until I get some fast Sony/Zeiss glass, I’ll be shooting night with my f2 and 2.8 Canon lenses and the Metabones adapter, but I’m less concerned than I was originally. Again, stay tuned….
Final thoughts
I’m slowly coming to terms with the electronic viewfinder and am pretty sure I’ll grow to like using it most of the time. Some of the a7R’s shortcomings—for example, the shutter is noisy, most things seem slightly more sluggish than I’m used to, and the autofocus doesn’t compare to my 5DIII (though some of the other Sony’s are much better, and I’m not a big autofocus person anyway)—are of little concern to me as a landscape shooter. And because it’s a battery hog, I carry four batteries (they’re small and light), though two is probably enough for a full day of heavy shooting, unless I’m adding a night shoot. And the user-manual feels more like an afterthought (I’m afraid this doesn’t make Sony unique), but there are plenty of resources available online, with more appearing every day.
In addition to the a7R’s improved dynamic range, which by itself is enough in my book to justify switching, I love the new weight of my camera bag. The body is much smaller than my 5DIII, the lenses are somewhat smaller (which also saves money on filters), the combination of which means I can use my smaller bag (F-Stop Guru) and lighter tripod (Gitzo 1531—if I had to do it now, I’d be buying the RRS TQC-14) and head (RRS BH-30) most of the time.
Having a smaller camera bag and tripod has air travel benefits as well—I won’t stress the airport check-in weigh-in as much (I pack my tripod and head in the suitcase), and won’t need to debate flight attendants who refuse to believe my larger camera bag (F-Stop Tilopa) will fit in the overhead compartment (it will, but there can be flight-long ramifications to proving a flight attendant wrong in front of a plane full of cranky travelers).
I think the a7R is best for a landscape shooter—I don’t think I’d make the a7R my primary camera if I had to photograph anything that moves. All pros and cons factored in, it may just be the best landscape camera. The strongest recommendation I can make to anyone making a change is to allow ample time to get up to speed with the new camera. This is more than just learning a new control interface and menu system—unless you’re already a fulltime live-view shooter, it’s an entirely new way of shooting. In other words, take it on a few dry runs before going out when every click counts.
As with any new relationship, there will be growing pains. But I think this one’s going to last.
Epilogue (January, 2015)
It’s been month and a half since I switched to the Sony a7R. And while I’m still getting comfortable with the full-time mirrorless paradigm, I have no significant complaints with the camera’s interface or handling (“It’s not you, it’s me”). The focus peaking is a godsend for a photographer like me, who obsessively seeks subjects from near to far in the frame. And I’m growing to appreciate the extreme customizability of the a7R’s buttons.
I do have a concern about the sturdiness of the the mount—all my lenses wobble a bit where they connect to the body, and with minimal pressure can be removed without pressing the unlock button (some more easily than others). I hope Sony makes fixing this a high priority, because while the body lenses are quite solid, this single flaw makes everything feel a little fragile.
But most important, I continue to be blown away by the quality of the images I get from this camera. The dynamic range is the stuff of dreams, and the sharpness and resolution continue to thrill me. I’ve grown to trust focus peaking, and find manual focusing so effortless that I never even attempt autofocus (nor do I miss using it). Perhaps the best indication of my level of commitment is that I just ordered a Sony a6000, giving my daughter my old Canon 5DIII. It looks like I’m all-in.
A (growing) Sony a7R gallery
Click an image for a closer look, and a slide show. Refresh your screen to reorder the display.


The “Oooh” and “Ahhh” of photography
Posted on July 6, 2012

Sunset, Point Lobos, Big Sur
Canon EOS-1Ds Mark III
81 mm
1/8 seconds
F/11
ISO 200
It’s a getaway weekend and you’re browsing a quiet photo gallery near the wharf. The photography is nice, but soon Vivaldi’s gentle strings mingling with the aroma of warm banana bread command most of your attention. Your brain starts bouncing between Thai or Italian for dinner, and you wonder whether you remembered to close the garage door—maybe your brother-in-law can swing by the house and check it on his way home from work…. Suddenly, just as you reach for your cell phone, your eyes stop, your brain exclaims, “Oooh…” as your eyes latch onto a Pacific sunset on the far wall, a solitary cypress clinging to the rocks above the surf. Instantly the cell phone is back in its holster and your hunger has vanished.
What just happened? Volumes have been dedicated to identifying the combination of composition, color, and light that “grabs” a viewer in just this way. But what then? Do you simply nod approval and return to your phone? Or do you cross the room, plant yourself before the the scene, and beckon your date? Maybe you’re even moved enough to check the price, to mentally banish to the attic the flower print above the sofa that has survived three moves, an earthquake, and come to think of it, you can’t even remember what kind of flower it is.
Art of any form appeals on two seemingly contradictory planes: it must stimulate enough to attract, yet soothe enough to sustain. These are art’s “oooh” and “ahhh” factors. You probably understand the “oooh!” that grabs your attention and draws you from afar, but once that initial jolt has faded, it’s the soothing “ahhh…” that holds you. We each have our own oooh and ahhh triggers. Some are touched by an intimate flower portrait, others find inspiration in a sweeping landscape; some seek connection to a familiar place, others long for vicarious exploration. Before reaching for your wallet, you need to know whether this is a scene that will uplift you each time you enter the room.
The way we enjoy art is just as personal as the art itself. I sometimes browse other photographers’ online galleries, but much prefer the intimacy of paging leisurely through a glossy, hardcover photography book. Art shows are fun, but a little frenetic; galleries can be nice, albeit somewhat pretentious. But nothing beats having a special print on my wall, though I see far more I’d like to own than I can afford to own. Nevertheless, I’ve purchased prints from other photographers. (And of course my walls at home bear many of my own prints.)
I’m very thankful that some people do decide that my prints are worthy of living with. But I can’t pretend to know what inspires your oooh’s and ahhh’s, nor can I let those thoughts influence my photographic choices. Before plunking down $600 dollars for that stunning sunset image (or the orange and black velvet matador that your date’s been eyeing), spend a little time with it. Does its virtual world transcend your literal world, even briefly? Do the emotions it generates rejuvenate or deplete your energy? My own, private answers to those questions determine the things I photograph and the way I photograph them. I think it’s also why photography will always be a source of pleasure for me.
A sand and surf gallery
Click an image for a closer look, and a slide show. Refresh your screen to reorder the display.


Digital photography the old fashioned way
Posted on January 29, 2012

Moonlight, Garrapata Beach, Big Sur
Canon EOS-1Ds Mark III
4 seconds
F/8
ISO 400
35 mm
Photoshop processing sometimes gets a bad rap. There’s nothing inherently pure about a jpeg file, and because a jpeg is processed by the camera, it’s actually less pure than a raw file. As a general rule, the less processing an image needs, the better, but sometimes raw capture followed by Lightroom/Photoshop processing is the only way to a successful image.
I’ve always considered myself a film shooter with a digital camera. But that doesn’t mean that I’m opposed to processing an image—in fact, processing is an essential part of every image. But just as Ansel Adams visualized the finished print long before he clicked the shutter, success today requires understanding before capture a scene’s potential, and the steps necessary to extract it later Lightroom/Photoshop.
For example
A couple of weeks ago, while co-leading Don Smith’s Big Sur photo workshop, our group had an early morning shoot that was equal parts difficult and glorious. The plan was a Garrapata Beach sunrise featuring the moon, one day past full, dropping into the Pacific at sunrise. But high tide and violent surf banished us to about 500 square feet of sheltered sand, and the cliffs above the beach (it’s bad for business when workshop participants get swept out to sea). Compounding the difficulty, the most striking aspect of the scene, a nearly full moon, was too bright for the rest of the scene. But despite the morning’s difficulties, I set to work trying to make an image because, well, that’s what photographers do.
As much as I wanted to be on the sand, aligning the moon with the the best foreground from down there would have made me a sitting duck for the waves. So I made my way along the cliff to an off-trail spot above a group of surf-swept rocks. It turns out the higher perspective was perfect for emphasizing the reflected moonlight that stretched all the way to the horizon.
With long exposures on a tripod, photographing the moonlight and beach wasn’t a problem. But adding the daylight-bright moon burning through the pre-dawn darkness made capturing the entire range of light in a single frame (a personal requirement) difficult, and perhaps impossible. Nevertheless, I spot-metered on the moon to determine the maximum exposure that would retain the ability to recover overexposed lunar detail later in the Lightroom raw processor. But even after maximizing the moon’s exposure, I didn’t have nearly enough light for the rest of the scene without first darkening the sky further using five stops of graduated neutral density (stacking my Singh-Ray three-stop reverse and two-stop hard GND filters). So far so good.
Satisfied that I could make the exposure work, but with very little margin for error, my next concern was finding a shutter speed that allowed enough light without risking motion blur in the moon. Because I needed sharpness throughout the frame, from the beach right below me all the way out to the moon, I couldn’t open all my aperture all the way. Whipping out my DOF app, I computed that focusing twenty feet away at f8 would give me sharpness from ten feet to infinity. Bumping to ISO 400 at f8 brought my shutter speed to four seconds, a value I was confident would freeze the moon enough. I clicked several frames to get a variety of wave effects, ultimately choosing this one for the implicit motion in foreground wave’s gentle arc.
In Lightroom, I cooled the light temperature slightly to restore the night-like feel. Using five GND stops at capture required significant Photoshop brightening of the sky to return it to a reasonable range. A few years ago this would have introduced far too much noise, but the latest noise reduction software (I use Topaz) is amazing. As expected, even after all my exposure and processing machinations, I still needed to process the raw file a second time to recover the highlights in the moon. Because the two versions were the same capture, combining them in Photoshop was a piece of cake.
A Gallery of Favorite Seascapes
Click an image for a closer look, and a slide show. Refresh your screen to reorder the display.


")


There’s no whining in photography
Posted on January 14, 2012

Moonset, Soberanes Point, Big Sur
Canon EOS-1Ds Mark III
10 seconds
F/16
ISO 50
28 mm
January 2012
I just wrapped up a long week that underscores the best and worst of my life as a landscape photographer. In the plus column I’ll put visits to Big Sur and Yosemite and the opportunity to spend quality time with a great bunch of photographers; in the negative column goes long days, dull weather, and lots of solo miles.
Sunday morning I left for Big Sur to co-lead Don Smith’s winter workshop, where we spent three-and-a-half days yo-yoing up and down one of the most beautiful coasts in the world. Wednesday night, after photographing sunset with the group at Point Lobos, I made the long trip home, arriving with barely enough time to repack my suitcase and gas-up before hitting the road for Yosemite Thursday afternoon. Following a sunrise to sunset day guiding two photographers from the Netherlands around Yosemite, I drove home late Friday.
But when a long week includes scenes like today’s image, you can see I have little to complain about. I’m extremely fortunate to live where I do, less than four hours drive from locations people travel around the world to visit: Yosemite, Big Sur, San Francisco, Point Reyes, Muir Woods, the Sonoma and Mendocino coasts, the Napa and Sonoma Wine Country, Mt. Shasta, Mt. Lassen, Lake Tahoe, and Mono Lake.
As has become California’s norm this winter, Big Sur delivered mild temperatures and cloudless skies. But, since poor conditions should never be an excuse for staying inside, here’s a little secret for dealing with bland skies: the best light for photography comes before the morning sun reaches the scene, and after the evening sun leaves. Without direct light, the entire landscape is bathed in even, contrast-smoothing light reflected from the sky, and the pastel hues of the Earth’s shadow colors the sky and paints the horizon. All you need to capture the magic is a decent camera (any digital SLR will do) and sturdy tripod.
I time all of my moonrise/moonset shoots for the small window when the moon is in this day-night transition zone—often, the more clear the sky, the better the twilight color on the horizon opposite the sun (and right where the full moon sets/rises). But adding a full moon in limited light like this can be tricky—the moon is daylight bright, while the rest of the scene is in deep shade. Some photographers blend multiple images to handle the extreme contrast; I prefer graduated neutral density filters. For example, to capture the above image of the moon setting into the Pacific at Big Sur’s Sobranes Point, I used a Singh-Ray three-stop reverse GND filter to subdue the moon and hold the sky’s color during an exposure that had to be long enough to reveal the foreground detail.
It was more night than day when Don and I got the group to Sobranes Point for our sunrise shoot. A white strike of moonlight reflected on the black Pacific, and nearby sea stacks, mere shapes in the dark, were under continuous assault from the violent surf. Following a brief orientation, everyone spread out along the cliffs—Don led some of the group southward along the cliffs; I guided the rest northward toward a not yet visible arch. When my eyes adjusted and the light came up, I wound my way along a narrow path that ended on a granite prominence jutting thirty feet or so above the ocean. While most of the waves crashed harmlessly beneath me, every few minutes a particularly large surge would strike at just the right angle, obliterating my view with spray that rose twenty feet above my head (see below). Had the generally prevailing onshore wind not been absent that morning, I’d have been thoroughly drenched. After the first wave explosion I was a bit uneasy about my location, but once I realized I was out of range I kind of enjoyed the ride.
All the visual activity makes this a tricky scene to photograph—I’ve shot here a number of times, but until now have never come away with anything that completely satisfies me here. With most of the action is on the right side of the frame, I’ve always found wide, horizontal compositions unbalanced. Going for a tighter vertical orientation to emphasize the strong coastline, I never find a left edge that doesn’t cut the sea stacks awkwardly. And horizontal or vertical, with a host of smaller rocks protruding from the nearby surf, I struggle placing the bottom of my frame. But adding the moon’s significant visual weight to the left of the frame gave me the horizontal balance I wanted, and hiding the protruding foreground rocks behind the weathered granite cliff gave a solid base for my composition.
When I finally found a composition that worked, I needed to find the focus point that would maximize the depth of field. A quick check of the hyperfocal app on my iPhone told me that f16 at 28mm would give me sharpness from 2 1/2 feet to infinity if I focused on the foreground granite about five feet away. To ensure correct focus, I used my camera’s live view and magnified my focus point 10x. There wasn’t enough light to even think about freezing the surf at a useable ISO, so I just went with a long exposure that smoothed the water.
When photographing waves, many photographers fail to account for the change from one frame to the next. So, knowing my composition was locked securely in place on my tripod, I stood back and monitored the waves closely, clicking about a dozen frames to capture a range of surf action, from placid to violent. This ten second exposure included a single moderate wave and several minor swells.
I was probably cold, damp, and sleepy, but I don’t remember. And it would have been easy to complain about the boring skies, or feel sorry for myself during my many lonely hours behind the wheel, but mornings like this one are exactly why I do this, and a perfect example of why there really is no whining in photography.

Finding your camera’s “truth”
Posted on December 17, 2011

Gossamer Twilight, Pfeiffer Beach, Big Sur
Something I teach, write, and lecture on frequently (ad naseum?) is the photographer’s obligation to understand, not fight, the camera’s vision. Some people seem to get this; others, not so much. So I’ve decided to try a slightly different tack.
Visual “Truth” is relative
Without getting too philosophical, it’s important to understand that, like your camera, your view of the universe is limited and interpreted. In other words, there is no absolute visual truth. Instead, we (you, me, and our cameras) each have our own view of the world that’s based on many factors–some we can control, others we can’t. When you look through a viewfinder, the more you turn off your visual biases and understand your camera’s, the more successful your photography will be.
Limited vision
Before lamenting your camera’s limitations, pause to consider that what you and I see is incredibly limited as well. The visible (to the human eye) portion of the electromagnetic spectrum is a minuscule part of the infinite continuum of electromagnetic radiation bombarding each of us, every instant of every day. For example, X-ray machines “see” waves in the one nanometer (one billionth of a meter) range; TVs and radios “see” waves that are measured in centimeters; humans, on the other hand, only see waves between (about) 400 and 750 nanometers.
Using this knowledge, astronomers peer into space with tools designed to see objects at wave lengths invisible to us. X-rays allow doctors to view bones hidden beneath opaque skin, and night vision technology uses “invisible” (to us) infrared radiation (heat) to see objects complete darkness. In other words, in the grand scheme of things, there’s no single absolute visual standard–it’s all relative to your frame of reference.
The camera has its own frame of reference. While it records more or less the same visible spectrum our eyes do, the camera is missing an entire dimension: depth. Not only that (since we’re not talking about movies here), a camera only returns a snap of a single instant. And we all know about limited dynamic range and depth of field.
Despite these differences, photographers often go to great lengths to force their camera to record what their eyes see. Not only is this impossible, it doesn’t take advantage of the camera’s ability to see things in ways we don’t.
Interpreted vision
Our visual input is interpreted before we perceive it, in much the same way a camera’s input is processed before it’s output (to a monitor, printer, or whatever). Visual processing happens in our brain, which makes adjustments for things like color temperature, perspective, motion, and so on.
Likewise, every photograph must be processed (interpreted) in some way before it can be viewed, either by the camera (if camera gives you a jpeg or tiff), or by the photographer, using Photoshop or some other processing software.
Visual synergy
In most ways, the eye’s ability to capture light exceeds that of even the best cameras. On the other hand, the camera does do a few things our eyes can’t do: In the image above, captured a year ago at Pfeiffer Beach on the Big Sur coast, I used my camera’s ability to accumulate light to reveal things that, while invisible to my eye, were still quite real.
According to the EXIF data (try getting your eye/brain to record that), the sun had set twenty minutes prior, but my camera was still able to see in the limited light. This twenty second exposure revealed more detail than my eye registered. In doing so it smoothed the surf into a gauzy mist, and captured reflected color lost in my visual darkness.
Another thing I really like about my camera’s take on this scene is the way it reveals the transition of light and color as the view moves away from the sun. Though the eye does register it, our brains, influenced by the subconscious misperception that a cloudless sky is a uniform sky, often overlook subtle differences like this. But capture it in an image and the transition is both striking and beautiful.
So what about the blurred water?
People who criticize blurred water images for being “false” because that’s not the way water is, completely miss the point (I won’t get into the whole cliché argument here, which has more validity). My question to them is, how would you choose to capture water? (It’s a trick question.) When they answer frozen sharp, I ask them how many times they’ve actually seen a wave or water droplet suspended in midair. (Checkmate.)
The point is, a still camera simply “sees” motion differently than we do. Rather than holding our images to an unattainable human standard, we should feel free to appreciate and convey our cameras’ unique perspective. In this Pfeiffer Beach scene, I like the way smoothing the water to an ethereal gauze more accurately conveys the inviting mystery of the sea.
What is real?
Is this image real? While it’s nothing like what I saw, it’s still a very accurate rendering of my camera’s reality. Understanding my camera’s vision enabled me to share a perspective that expands my limited vision and transcends human reality. Pretty cool.

