Eloquent Images by Gary Hart
Insight, information, and inspiration for the inquisitive nature photographer
Frozen in Time
Posted on September 26, 2021
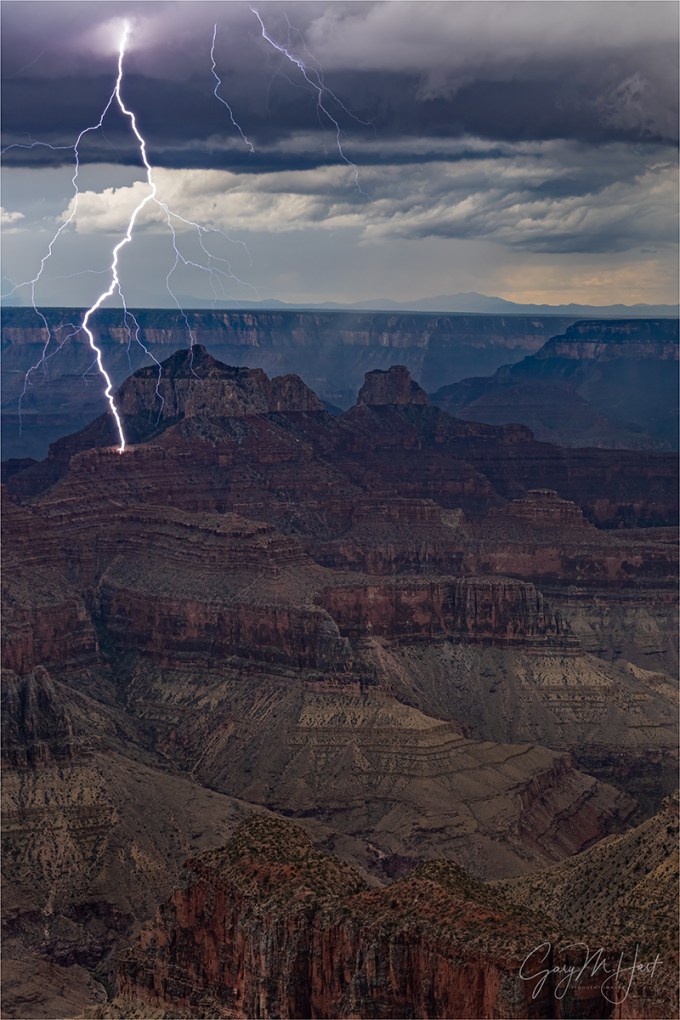
Lightning Strike, Brahma Temple, Grand Canyon
Sony a7RIV
Sony 24-105 G
1/4 second
F/8
ISO 250
I’ve always been intrigued by still photos’ ability to reveal aspects of the natural world that are missed by human vision. A couple of weeks ago I wrote about the camera’s ability to, through long exposures, blur motion and reveal unseen patterns in moving water. And last week I shared an image that used a long exposure to capture the Milky Way above crashing Hawaiian surf, a 20-second exposure that blurred that explosive wave action into a gauzy haze.
But I think my favorite still image motion effect is probably freezing a lightning bolt—an ephemeral phenomenon that comes and goes so quickly that it is already a memory before it even registers to my brain. The thrill of seeing a lightning strike always delivers a jolt of adrenalin, but it’s not until I can spend time with an image that froze it in time that I appreciate all that happens in a lightning bolt. Multiple prongs, meandering patterns, delicate filaments—each bolt seems to have a personality of its own.
For me, the holy grail of lightning captures is the splash of light that occurs at the primary bolt’s instant of contact with terra firma. Not only is getting the precise timing difficult, the strike also needs to be fairly close, and on a surface that’s angled to face my vantage point.
The lightning in this image checked those boxes, striking just a couple of miles away on the diagonal slope of Brahma Temple facing me. It was one of many lightning strikes captured on the second day of my first (of three) Grand Canyon monsoon workshops earlier this summer. On the day prior we’d had a nice lightning shoot just as the workshop started, but the storm that afternoon had moved parallel to the rim, staying near the South Rim, at least ten miles away.
This afternoon’s storm started in more or less the same area of the South Rim, but crossed the canyon, approaching less than two miles from where my group had set up on the view decks outside Grand Canyon Lodge. Protected beneath an array of lightning rods, and just a few feet from the safety of the fully enclosed lodge Sunroom, this spot is the location of some of my workshop groups’ closest lightning encounters. This afternoon was added to that list.
I usually prefer photographing lightning that’s across the rim, distant enough that we often don’t hear the thunder. At most locations, when the lightning gets as close as it got this afternoon, I’ve already rounded people up and herded them indoors or to the relative safety of the cars. But here I have (barely) enough cellular service to monitor the distance of each strike with my lightning app, and keep everyone apprised of its proximity, so they can make their own call on when to retreat.
Preparing to photograph lightning is a matter of setting up my tripod with my camera and Lightning Trigger, composing a frame that includes the area most likely to receive the next bolt, focusing and metering the scene, then standing back and waiting for the strike (not unlike fishing).
If everything is set up correctly, lightning photography a hands-off endeavor—when it senses lightning, my Lightning Trigger fires my camera’s shutter, then just waits patiently to do it again with the next lightning. So when this bolt hit, I wasn’t even with my camera—I was checking with others in my group. When it struck, it was the closest we’d seen so far. It was also farther to the left than any previous strike—so far, in fact, that I wasn’t even sure it was in my frame.
It wasn’t until I was processing my images that I found that I had indeed captured it. Not only that, this bolt struck close enough, on an exposed surface that was in perfect view for me to capture the precise point of contact in all of its glory. Unfortunately, it was on the far left side of my horizontal frame. This is when I appreciate having my Sony a7RIV, probably the best lightning camera made today. Not only do the Sony bodies have the fastest shutter lag (the time it take for the shutter to respond after receiving the instruction to fire), but 61 megapixels provides a crazy amount of latitude for cropping.
I usually like to get my crop right before capture, but I sometimes need to make an exception when photographing lightning, because I’m never sure where in the frame the lightning will land. In this case, having my lightning strike so close to the left side of a horizontal frame made the image feel very off-balance. To fix the problem, I simply turned it into a vertical composition, eliminating everything on the right 2/3 or the original composition. But with 61 megapixels to play with, the final product was still more than 25 megapixels—more than enough for pretty much all of my uses, including large prints.
Read my tutorial on photographing lightning
Frozen in Time
Click an image for a closer look, and to view a slide show.


Confessions of a Happy Photographer
Posted on September 19, 2021

Stairway to Heaven, Milky Way Over the Puna Coast, Hawaii
Sony a7SIII
Sony 14mm f/1.8 GM
ISO 6400
f/1.8
20 seconds
More than anything else, photography needs to make you happy. When photography was my hobby, that wasn’t really a problem—I photographed what I wanted, where I wanted, when I wanted, with no pressure to please anyone else. Pretty nice. But, as I mulled turning photography into my livelihood (nearly 20 years ago!), I couldn’t help thinking about the photographers who had become unhappy after turning their passion into their profession. Suddenly their choices were fueled not by their own creative juices, but rather by their need to pay the bills.
So one of the promises I made to myself when I decided to pursue photography as a career was that I’d only photograph what I want to photograph. Over the years that approach has evolved to cover more than just subject choices—it also applies to my overall approach to photography, from capture through processing, all the way to what I share and how I share it. So I think a more accurate way of expressing my personal key to photography happiness would be that I photograph to please no one but myself.
It’s personal
When you look at one of my images, you’re viewing a subject that resonates with me personally (while I don’t think every photographer can say that, I also don’t think this makes me unique). That personal connection is why most of my images feature some version of the natural processes that have always fascinated me, camera or not: weather and its many manifestations (such as clouds, rainbows, lightning, and snow), geology (like mountains, volcanism, and the other natural processes of landscape building), and of course all things celestial. Communicating that connection is also why I virtually never share an image without writing something about it and/or the natural processes at play.
This need for connection to my subjects also influences my personal photography rules—not the same “rules” that guide and constrain aspiring photographers, but my own rules for what and how I photograph. Rules like natural light only (no light painting, flash, or any other artificial light), and no arranging of subjects in my scene, and so on.
One and done
A big personal rule for me is one-click capture. Though I never really felt much nostalgia for the color transparencies I shot for over 25 years, I’m still driven by a film photographer’s mindset. That doesn’t mean I don’t process my images, or that I don’t appreciate the power of digital processing to convey my subjects at their very best. But I do (among other things) like knowing that each image represents the photons that struck my sensor in the span of a single shutter click. In other words, I am a one-click photographer who gets no pleasure from merging, blending, combining multiple images into a single image.
Preemptive disclaimer
It seems that every time I try to explain these personal motivations and guiding principles, I get a few defensive responses from people who believe I’m saying that everyone should follow my rules, or that I’m somehow superior to photographers who don’t do things the way I do them. Nope. I’m simply saying that my images need to please me and no one else, and hope your own images, however they’re achieved, make you just as happy as mine make me.
Which brings me to…
I’m thinking about all this because today I’m sharing a Milky Way image from my recently concluded Hawaii Big Island photo workshop. And nothing underscores the difference between my own (dinosaur?) approach than today’s computer-enabled (and beautiful) astro images.
For most of my photography life, I was frustrated by the camera’s low light limitations. In my pre-digital days, using my medium of choice (color slides) to photograph the Milky Way above a landscape was just a dream. And my first digital cameras, while perhaps better than slides in darkness, were still not up to the night photography task.
But over the last fifteen or so years, I watched technology improve to the point that one-shot, night-landscape photography became possible—and it keeps getting better. In my first digital attempts, I found that while I could capture the Milky Way, there was not enough light for the camera to pull in discernible landscape detail to go with it. Instead, in those early digital days I settled for moonlight night images—no Milky Way, but plenty of stars above a beautifully moonlit scene.
As I became hooked on moonlight photography, I watched other photographers start having Milky Way success by blending two (and sometimes more) images—one for the Milky Way, and another much longer exposure for the landscape. I actually tried this approach myself, had enough success to appreciate the technique, but soon realized that I derived absolutely no pleasure from these manufactured images and stopped doing it without ever sharing a blended creation with another soul.
My first real Milky Way success came at Kilauea, about ten years ago. Here the orange glow from the churning lava lake provided enough light to illuminate the surrounding caldera, and sometimes even painting the clouds with its volcanic glow. I was hooked.
The next major Milky Way milestone came when I switched to Sony and started using the Sony a7S. Suddenly, not only could I include lots of foreground detail in my one-click Milky Way images, I could see the scene in my viewfinder well enough to compose and focus quickly, without guessing.
And while my night cameras been evolving—from the a7S, then the Sony a7SII, and now the a7SIII—Sony has slipped the final piece of the night photography jigsaw into place with a great selection of fast, wide, and sharp lenses that seem made for the Milky Way.
Waxing nostalgic
For many years I looked forward to my Hawaii workshop more than any other workshop, in no small part because of the opportunity to return to Kilauea, the location of my first Milky Way success and still one of my very favorite Milky Way locations. Then, in August 2018, the Kilauea eruption went out in a blaze of glory—suddenly, I had to scramble for Milky Way locations on the Big Island.
With many locations lost to the recent eruption, in September 2018 I took my group to the Mauna Kea summit, nearly 14,000 above the Pacific. We had a great shoot among the array of telescopes at the summit, but the only thing more brutal than the wind and cold at the top was drive up there. My rental car started losing power and flashing an engine warning light, and a couple of other drivers were (understandably) less than thrilled about violating their rental car agreements. We also had to send a couple of people back down the mountain when they started feeling altitude sickness. (I’d still recommend the experience to anyone—it’s just not something I’m comfortable doing with a group.)
In 2019 scouted the Puna Coast for a good spot, but found much of the access still limited by the 2018 lava flow. I finally settled for section of brand new lava above the ocean, but clouds and moisture-thickened air hindered visibility, and the moonless darkness made it very difficult to safely get close enough to include much crashing surf. The Milky Way made enough of an appearance that were were able to photograph it, but the overall experience was less than ideal.
Given all the obstacles Mother Nature had thrown at me—not just locations and access lost to lava flows, but recent hurricane and flood damage to other locations too—I decided to take 2020 off from Hawaii. (Turns out I’d have had to cancel anyway.) But I missed Hawaii and realized, eruption and Milky Way or not, it’s a pretty great place to photograph. So the Big Island went back on my schedule in 2021.
Despite the aborted eruption and the prior night location difficulties, I was determined to give the Milky Way another shot in 2021. Thinking it might be easier to photograph away from the coast, I found a nice elevated view on Chain of Craters Road in Hawaii Volcanoes National Park. It was about three miles from the coast, but had a great view of the ocean and recent lava flows, and a few striking trees for the foreground.
I gave the group some Milky Way training on our second afternoon, then drove out to the chosen spot after that evening’s sunset shoot. While the view was indeed magnificent, the wind was so strong that we couldn’t even consider setting up tripods. But since we were there anyway, I kept everyone out long enough for everyone to see the Milky Way emerge from the darkness. While that was more of a consolation prize for people with their hearts set on Milky Way images, it was pretty cool, especially for the folks who have never really seen the Milky Way’s core in a truly dark sky.
Some groups are more excited than others about the chance to photograph the Milky Way, and I could tell that this group was pretty disappointed that our shoot didn’t work out. So I decided to give it one more shot, on the workshop’s final night—no guarantees, but we’d at least go down trying.
Since our final sunset would be on the Puna Coast, I decided that we’d just find a spot out there for the Milky Way. A check of the map confirmed that the galactic core would align nicely with the rocky coast from MacKenzie Point, my planned sunset spot, we just stayed put there and waited for the Milky Way to come to us.
The downside of this location is that it’s rather precariously perched above quite violent surf. But since we were already out there for sunset, I knew everyone would be able to get situated and set up for the Milky Way early enough to avoid moving around much (or at all) in the dark.
The biggest unknown in this plan was the clouds that always seem to lurk along the Puna Coast. But after a day of sky mostly obscured by clouds, a little opening appeared in the south around sunset, and I crossed my fingers. We ended enjoying the most colorful sunset/sunrise of the workshop, then crossed our fingers that the sky would remain open until darkness was complete.
For this shoot I used my Sony a7SIII and Sony 14 f/1.8 GM exclusively. Usually my Milky Way compositions favor the sky over the foreground. But here, long exposures of the waves exploding against jagged volcanic rock created ethereal motion blur that nicely complimented the Milky Way, so I wanted to include as much surf as sky. Not only did I want more foreground than usual, the lower the latitude, the higher in the sky the Milky Way’s core is—having such a wide lens allowed me to include lots of surf and sky.
I only managed to capture seven frames while I “bounced” (tiptoed gingerly) in near total darkness, hyper-conscious of the consequences of a misstep, between people to provide assistance. The southern sky was virtually clear in my first two captures, but each subsequent click revealed an ominous cloud bank encroaching on our sky. Knowing how quickly the rain can strike in Hawaii, and wanting to avoid anything that might cause people to move suddenly in the dark, I called the shoot after about 30 minutes. This is my final image of the night.
Since this was the workshop’s last night and there were no more image reviews, I can’t say that everyone finished that shoot with a great Milky Way image. But I do know that everyone did at least capture the Milky Way, and gained enough insight to do it better the next time. I also know that everyone was happy with the entire experience—which is really what it’s all about.
Learn more about Milky Way photography
Join Me In Hawaii
Workshop Schedule || Purchase Prints || Instagram
Milky Way One Click Wonders
Click an image for a closer look, and to view a slide show.


")


Return to Paradise
Posted on September 12, 2021
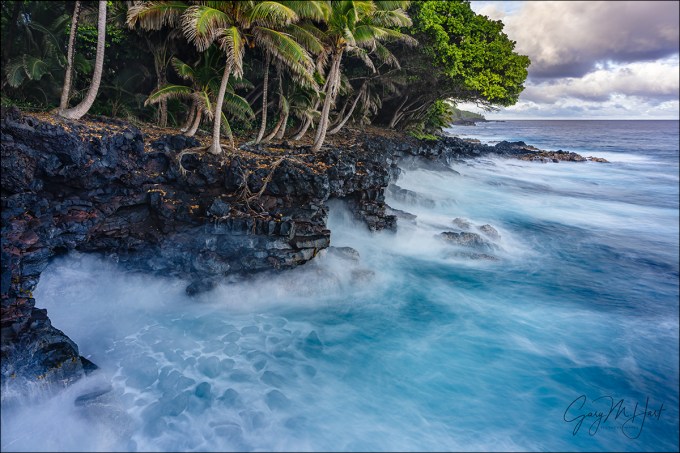
Surf on the Rocks, Puna Coast, Hawaii
Sony a7RIV
Sony 16-35 f/2.8 GM
4 seconds
F/11
ISO 50
I’m still working my way through my Grand Canyon images, but because life goes on, I “had to” spend the last week leading a workshop on my favorite Hawaiian island, Hawaii. (It’s a tough job, but…)
Until last year, I’ve spent a week each year since 2010 on Hawaii’s Big Island. And while I’d love to blame COVID for the missed year, it just so happened that I’d decided to take a break from Hawaii way back in 2019, well before COVID was even a twinkle in some Asian pangolin’s eye.
Just to be clear, it wasn’t that I’d fallen out of love with the Big Island. It was more that in recent years, on each Hawaii trip I had to work around wind, flood, or lava damage that closed or altered some of my locations. (That’s just the way things go for a volcanic island in the middle of an ocean.)
After dealing with those problems, the final straw came in August of 2018, with the cessation of Kilauea’s eruption, and I decided to remove the Hawaii workshop from my schedule. But during that one-year Hawaii hiatus, I realized that I’d come to believe that the eruption, and especially photographing the Milky Way over the eruption, was the main reason for my Hawaii workshop. It took missing a year to realize how much I missed everything else on the Big Island.
I scheduled my 2021 Hawaii Big Island workshop more than a year ago, never thinking at the time that we’d still be dealing with a global pandemic. Nevertheless, people signed up, and I can say now that we were able to pull it off without any trouble—not from COVID, or Mother Nature. The Hawaii COVID protocols are strict but reasonable, and more seriously enforced than I’ve observed on the Mainland, which actually helped everyone feel safer. And all my locations were open, albeit with a few detours around freshly poured lava (from 2018).
I’ve spent quality time on each of the primary Hawaiian islands except Oahu, and while I love them all, I’m especially drawn to the Big Island. When most people think of Hawaii, they think of palm trees, ukuleles, luaus, and sandy beaches. That’s not my Hawaii: I can get my palm tree fix in California, have never been to a luau, don’t really care for Hawaiian music (sorry), and generally prefer the mountains to the beach. But I love clouds, waterfalls, rainbows, lush (and colorful!) foliage, and all things volcanic—all prominent features that the Big Island, especially the Hilo side, has in spades.
My favorite scenery in Hawaii is probably the Puna Coast, a stretch of rugged volcanic coastline south of Hilo. Immediately downhill from Kilauea, one of the world’s most active volcanoes, virtually none of the Puna real estate is older than 200 years—some of it is much younger.
Every square inch of Hawaii is a lava flow, a fact that’s never more obvious than along the Puna Coast, where the basalt is so young that it has had little time to weather and erode. Paralleling the coast on Highway 130, the relative age of the land at any given location is obvious if you know what to look for. The youngest lava is exposed for the world to examine, empty black plains of jagged aa (pronounced ah-ah) and ropey pahoehoe (pronounce every vowel: puh-ho-e-ho-e) that achieved their distinguishing characteristics not by virtue of different chemical compositions (they’re identical), but by their temperature at the time they cooled and hardened.
Side note: I used to struggle remembering which lava was which until I realized that “Ah! Ah!” is the sound I’d make if I were to walk on aa barefoot. (Aa is also an essential Scrabble word, BTW.)
With humidity off the charts, and rain a virtual daily event, it doesn’t take long for foliage to establish a foothold in Puna’s fresh lava. And the more the lava ages, the more it’s smothered with green—overwhelmed by trees and shrubs that advance at a somewhat slower, but seeming just as relentless, pace as lava.
On every visit to Hawaii, I make at least one drive down Highway 130 all the way to the end (and back), stopping randomly (and frequently) to walk out to the ocean in search of fresh views to photograph. At each stop I find some version of rugged cliffs, tide pools, or an occasional black sand beach under constant attack by water that seems to fluctuate between blue-green and green-blue, depending on the water’s depth and the cloud cover overhead.
A few years ago I found the view in this image while exploring one of the densest stretches of foliage (oldest lava) on the entire coast. Somehow this spot has managed to dodge Pele’s fire long enough for a tree tunnel to canopy the road, and for the surrounding trees to become so crowded that they appear ready to leap into the Pacific.
Another feature I love at this spot is the large chunks of lava shed by the nearby cliff, then rounded by collisions with the pounding surf and their boulder brothers. The waves here are especially violent, sometimes leaping higher than the surrounding 20-foot cliffs, that with each wave you can hear the rocks knock together.
All this persistent, violent surf makes managing the explosive wave motion an essential part of photographing here.
I digress
A still image can’t display actual motion, but it can convey the illusion of motion. While nothing like our own experience of a world in motion, a well framed and exposed still image can freeze the extreme chaos of a single instant, or accumulate a series of instants into a blur that conveys a pattern of motion. A still image’s rendering of motion can establish the scene’s mood and stimulate the viewer’s imagination into a greater sense of being there.
Combining creative vision and technical skill, a photographer chooses where on the freeze-blur continuum an image falls: The sudden drama of a wave caught mid-crash, or the soothing calm of soft surf. Or perhaps someplace in the midrange of the motion continuum, stopping the waves enough that discrete elements stand out, but not so much that a sense of flow is lost.
One question I’m quite frequently asked is, “How do I blur water?” And while there’s no magic formula, no shutter speed threshold beyond which all water blurs, blurring water isn’t that hard (as long as you use a tripod). In fact, when you photograph in the full shade or cloudy sky conditions I prefer, it’s usually more difficult to freeze moving water than it is to blur it.
The amount of water motion blur you get depends on several variables:
- The water’s speed—the faster the water, and (especially) the more whitewater (green water, no matter how fast it’s moving, doesn’t usually display a lot of motion blur), the greater the blur
- Your focal length—the longer the focal length, the greater the blur
- Your distance from the water—the closer the water, the greater the blur
- And of course, the shutter speed—the longer your shutter is open, the greater the blur
Of these variables, it’s shutter speed that gets the most attention because focal length and subject distance are compositional considerations, and we usually don’t start thinking about blurring the water until after we have our composition.
Since motion blur increases with the duration your shutter is open, blurring water means reducing the non-shutter light reaching your sensor. Here are the tools at your disposal:
- Reduce the ISO: The lower the ISO, the less sensitive to light the sensor is, requiring a longer shutter speed to achiever proper exposure.
- Smaller aperture (larger f-stop value): The aperture is the opening that allows light to enter, so it makes sense that the smaller the opening, the less light will enter for any given length of time, also requiring a longer shutter speed to compensate.
- Polarizing filter: In addition to reducing reflections, a polarizer will subtract 1 to 2 stops of light (depending on its orientation). When using a polarizer you need to be vigilant about orienting it each time you recompose (especially if you change your camera’s horizontal/vertical orientation), and monitoring its effect on the rest of your scene.
- Neutral density filter: A neutral density filter is, as its name implies, both neutral and dense. Neutral in that it doesn’t alter the color of your image; dense in that it cuts the amount of light reaching your sensor. While a dark enough ND filter might allow you to blur water on even the brightest of days, it does nothing for the other problems inherent to midday, full sunlight shooting. ND filters come in variable and fixed-stop versions—the flexibility of variable NDs (the ability to dial the amount of light up and down) means living with the vignetting they add to my wide angle images.
- Tripod: Don’t even think about any kind of subject blur without a sturdy tripod. For help selecting the right tripod, read the Tripod Selection article in my Photo Tips section.
Back to Puna
There’s only one obvious composition at this spot, but it’s such nice composition that I’ve added this spot to my Hawaii workshop “don’t miss” list. This year, that shoot came on the workshop’s final afternoon, on our way to the day’s sunset location.
The best vantage point here is atop a small prominence that juts into the surf; it offers just enough room for a group of a dozen or so photographers to set up tripods and capture their version of the scene without anyone feeling crowded (or, more importantly, without plummeting into the churn below).
With the group safely engaged, I pulled out my Sony a7RIV and 16-35 GM lens and set about photographing this scene using a variety of shutter speeds. I started with fast shutter speeds that froze the waves mid-crash, then added my Breakthrough Dark CPL (a 6-stop neutral density filter that is also a circular polarizer) to blur the water to a gauzy haze. But I quickly realized that getting the blur effect I wanted wasn’t quite as simple as attaching a neutral density filter and going for the longest possible shutter speed.
I love the rounded boulders in the foreground, but found that when I went with a really long shutter speed, the boulders disappeared beneath the accumulated foam of multiple waves. Because the sun was low, and the scene was further darkened by clouds, I figured I could still get decent blur without the neutral density filter, and replaced it with a standard Breakthrough polarizer.
After a little bit of playing, I found that a properly timed four-second exposure gave me the blur effect I was looking for, without obliterating the boulders. Of course each wave is different, both in size and angle of attack, so once I found the shutter speed that worked, I captured at least a dozen frames, picking the one I liked best when I could view my images on a bigger screen.
This day ended with a nice sunset a couple of miles up the road, followed by an even nicer Milky Way shoot. But that’s a story for a different day.
Just scheduled: 2022 Hawaii Big Island Waterfalls and Volcanos
Workshop Schedule || Purchase Prints || Instagram
It’s All a Blur
Click an image for a closer look, and to view a slide show


, California")


Grand Canyon: The South Rim Strikes Back
Posted on September 5, 2021
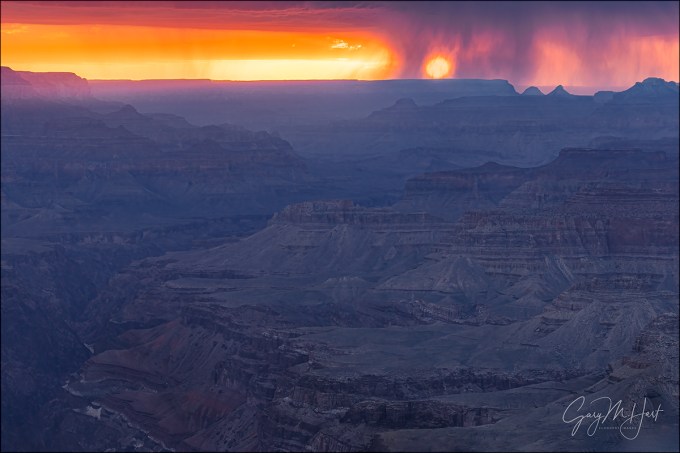
Veiled Sunset, Lipan Point, Grand Canyon
Sony a7RIV
Sony 24-105 G
1/2 second
F/8
ISO 50
Last week I expressed some pretty strong feelings for why I prefer the North Rim of the Grand Canyon to the South Rim. And while I’m not about to issue a retraction, let me just say that the relative merits of the canyon’s two sides are somewhat more nuanced. You might even say that last week’s post was authored by Gary Hart, Human Being. This week’s rebuttal will come from Gary Hart, Photographer.
Like so many arguments, the fulcrum of the Grand Canyon North/South debate is not actually the debate’s subjects, rather, it’s the definition of the argument. In this case, the difference really comes down to how you want to define “best.” If best refers to the overall experience of one rim over another—the “best” I argued for last week—then the North Rim’s simple serenity, alpine setting, and visual variety make it the clear winner. But if best only considers the actual vistas from which beautiful images can be made, then I’m afraid the nod goes to the South Rim and its supply of vast, open views of the world’s most magnificent canyon.
Many of the South Rim vistas offer at least 100 degrees of unobstructed canyon view, and some provide more than 180 degrees. (That’s pretty crazy when you consider that the horizontal field of view of my widest lens, the Sony 12-24 f/2.8 GM, is only around 112 degrees.) This sheer expansiveness is what makes Hopi Point a personal South Rim favorite, along with the three east-most vistas: Lipan Point, Navajo Point, and Desert View.
Hopi Point juts into the canyon farther north than any of the other South Rim vistas, giving it the broadest (easily accessible) canyon views possible from the rim. From here you can look at least 20 miles down-canyon; and up-canyon you can see all the way past Wotan’s Throne and Vishnu Temple to almost as far as the Little Colorado River confluence, more than 20 miles away. There’s even a nice downstream view of the Colorado River that’s responsible for all this beauty.
The three eastern vistas provide the only views upstream, past the Little Colorado River confluence, into the Grand Canyon’s north/south, Marble Canyon section. In this direction you’ll also find the best view of the Colorado River on the rim. Downstream the view is more than 40 miles of red ridges and towering monoliths. From Lipan Point there’s even a peek into the canyon’s Inner Gorge (well known to rafters as home to the Grand Canyon’s most thrilling rapids).
On the other hand, this abundance doesn’t come without its costs. A photographer’s job is to take all this jaw-dropping beauty and consolidate it into a coherent image, no small feat. I learned that the hard way on my very first morning trying to photograph the Grand Canyon, when I was gifted fresh snow on the South Rim, yet couldn’t manage to squeeze one usable image out of my camera (let’s blame the camera).
Fortunately, over the years, familiarity has made me more comfortable photographing the South Rim. I find myself particularly drawn to scenes that allow me to combine the Grand Canyon’s inherent beauty with ephemeral weather phenomena like snow, clouds, rainbows, and lightning. I’ve even learned to read the conditions enough to make calculated guesses at where the best opportunities will manifest. If you look at the gallery at the bottom of this post, you’ll see the product of many of those opportunities—some more calculated than others.
The images I share today came from the third (and final) of last month’s back-to-back-to-back Grand Canyon Monsoon photo workshops. We’d started the day with a sunrise shoot on the North Rim, then packed up and started the 4-hour drive to our hotel on the South Rim. As I mentioned in last week’s post, this is such a nice drive, I usually give everyone ample time for a leisurely trip to make a few stops and enjoy the scenery. But lightning was in the forecast for this afternoon, and since we’d been shut out on our two North Rim days, I arranged for us all to meet up again at Desert View, the first South Rim stop after reentering the park. You’ll need to read the aforementioned post for the details of that shoot, but needless to say, by the time we finished that rather lengthy lightning shoot and reconvened at our hotel, everyone was dragging a little.
When I announced that we’d be heading back out for sunset in an hour or so, the response was less than enthusiastic. The enthusiasm was further dampened by the horizon-to-horizon gray clouds that threatened rain and suggested a complete sunset washout was possible. I countered with the my mantra that the best photography often comes during the worst times to be outside, and while I couldn’t promise great images if they went, I could promise no images if they stayed at the hotel.
Everything in my workshops is optional, but my speech managed to convince all but four to join me (who else just flashed to John Belushi in “Animal House”? (language warning)). Including Curt and me, we ended up with seven hardy souls at Lipan Point (six, plus one hardy soul who stayed out there all afternoon).
Sometimes Mother Nature rewards effort and sacrifice. Almost immediately upon arrival, we started seeing lightning firing over the canyon, about 30 miles distant (this is where the Lightning Trigger’s range is appreciated). But the real story this evening was the sun dropping into the rain curtain that was still delivering intermittent lightning.
The sight was so spectacular, I didn’t even mind that no lightning happened in the few minutes the sun was visible. At one point, one of the women in the group uttered almost to herself, “This is the most incredible sunset I’ve ever seen.” I couldn’t argue.
(The toughest thing about this whole shoot was trying not to gush too much the next day in front of those who stayed at the hotel.)
Here’s a slightly wider version from a little earlier in the show
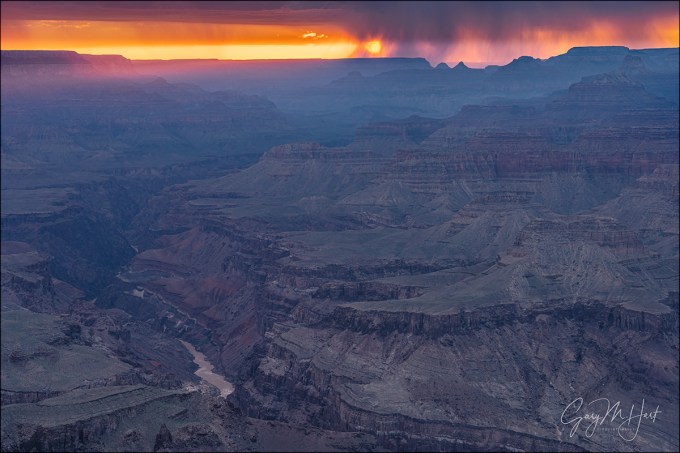
Grand Sunset, Lipan Point, Grand Canyon
Sony a7RIV
Sony 24-105 G
1/3 second
F/8
ISO 50
Grand Canyon Workshops
Workshop Schedule || Purchase Prints || Instagram
A South Rim Gallery


